1
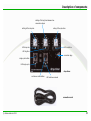
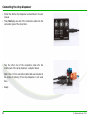
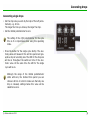
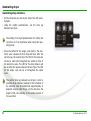
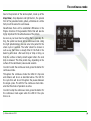
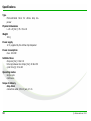
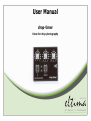
User Manual
drop-timer
timer for drop photography
Vers: 1.0.0
Description of components
Description of components
setting of the lag time between two
consecutive drops
setting of the drop size
seting of the cycle time
LED cycle time
LED drop size
LED lag time
connection plug
single cycle button
LED single cycle
drop-timer
continuous mode button
LED continuous mode
connection cord
© eltima electronic 2013
3
Content
Content
Description of components.................................................3
Content..............................................................................4
Introduction.......................................................................5
Intended purpose..................................................................5
Symbols...............................................................................5
Maintenance and storage........................................................5
Connecting the drop dispenser...........................................6
Generating drops...............................................................7
Generating single drops.........................................................7
Generating drop collisions......................................................8
The continuous mode.........................................................9
Technische Daten.............................................................10
Directions for disposal.....................................................11
4
© eltima electronic 2013
Introduction
Introduction
Dear customer,
Intended purpose
thank you for purchasing our timer for drop photography
drop timer. It shall be a reliable tool for you that is both
handy and easy to operate.
This drop timer was solely designed for the control of the
eltima drop dispenser article no. 50049. Please do only
use it for this purpose!
Please do not hesitate to contact us if you should miss
anything or have further improvement proposals. Only like
this the product will be able to develop to fully meet your
requirements.
Symbols
Please read this manual carefully before using the timer. It
is supposed to get you acquainted with operating the system and all its functions. Afterwards you will be able to
use all the advantages which drop-timer offers.
Symbol for tips concerning the handling of the
device.
Important advice concerning the function of the
device.
Important advice to prevent damage of the timer or
connected devices.
Maintenance and storage
• The drop timer is not waterproof and therefore neither
suitable for use in rain nor under water. Please contact
the manufacturer immediately in case it should get wet.
Water drops can be wiped off with a dry cloth.
• Do not drop it or expose it to severe blows.
• Do not try to make alterations yourself.
© eltima electronic 2013
5
Connecting the drop dispenser
Connecting the drop dispenser
• Install the eltima drop dispenser as described in its user
manual.
• Then, first plug one end of the connection cable into the
connection jack of the drop timer.
• Plug the other end of the connection cable into the
middle jack of the drop dispenser´s adapter board.
Note: The 2.5 mm connection cable that was included in
the scope of delivery of the drop dispenser is not used
here.
• Ready
6
© eltima electronic 2013
Generating drops
Generating drops
Generating single drops
• Set the drop size you wish by the help of the left potentiometer, e.g. 40 ms.
The longer the time you choose, the larger the drop.
• Set the middle potentiometer to zero.
The setting of the right potentiometer for the cycle
time is of no importance when using this operating
mode.
• Press the button for the single cycle shortly. The electronic valve will release for the set time period and generate a drop of according size. The LED for the drop size
will be on throughout the switch-on time of the electronic valve. At the same time the LED for the single
cycle will be on.
Although the range of the middle potentiometer
starts with zero, the shortest time period you can
choose is 60 ms. In order to make sure that only one
drop is released, settings below this value will be
classified as zero.
© eltima electronic 2013
7
Generating drops
Generating drop collisions
• Set the drop size you wish by the help of the left potentiometer.
• Using the middle potentiometer, set the time lag
between two drops.
The setting of the right potentiometer for setting the
cycle time is of no importance when using this operating mode.
• Press the button for the single cycle shortly. The electronic valve releases the first drop and then, after the
set time lag, the second drop. The LED for the drop size
will be on each time throughout the switch-on time of
the electronic valve. The LED for the drop distance will
be on within the pause between the two drops. The LED
for the single cycle will be on throughout the whole
cycle.
The perfect time lag between two drops in order to
generate drop collisions (leading to the formation of
an umbrella) must be determined experimentally. It
depends, among other things, on the drop size, the
height of fall, the viscosity or the surface tension of
the used fluid.
8
© eltima electronic 2013
The continuous mode
The continuous mode
Due to the precision of the whole system, made up of the
drop timer, drop dispenser and light barrier, the general
form of the generated crests, pillars, umbrellas etc. will be
fairly much the same for each release.
Nevertheless there will be substantial differences in the
filigree structure of the generated forms that will also be
highly important for the attractiveness of the picture.
As soon as you have found a setting that is generally fitting, the system can be set into a continuous mode. Using
the right potentiometer, one can set a time period for the
whole cycle in seconds. The latter should be chosen in
such a way that there is enough time for the fluid in the
basin to calm down after each drop or drop on drop, so
that the surface is totally smooth again before the next
drop is released. This time period may, depending on the
surface of the catch basin, take several seconds.
In order to start the continuous mode, press the button for
continuous mode.
Throughout the continuous mode the LEDs for drop size
and distance will be on as described above. The LED for
the cycle time will be on throughout the pauses between
the single cycles. The LED for the continuous mode indicates that this mode of operation is active.
In order to stop the continuous mode, press the button for
the continuous mode again when the LED for the cycle
time is on.
© eltima electronic 2013
9
Specifications
Specifications
Type
Microcontrolled timer for eltima drop dispenser
Physical dimensions
L x B x H [mm]: 75 x 59 x 18
Weight
100 g
Power supply
12 V, supplied by the eltima drop dispenser
Power consumption
max. 100 mW
Settable times
drop size [ms]: 0 bis 110
time lag between two drops [ms]: 60 bis 150
cycle time [s]: 0 bis 48
Operating modes
single cycle
continuous
Scope of delivery
drop-timer
connection cable 3.5 mm jack, 2.5 m
10
© eltima electronic 2013
Directions for disposal
Directions for disposal
Old electric devices do not belong to domestic waste!
Electrical- and electronic devices must be
separated from domestic waste before disposal, according to policy 2002/96/EG and
national law. They have to be disposed at
government certified waste disposal sites.
This may be done by returning the old device where you
are buying a new one or by dispensing the waste at authorized collecting points for the recycling of electro- and
electronic devices.
Inappropriate handling of old electronic devices can be
harmful for health and environment. By means of appropriate disposal of electronic products you make an important contribution towards an effective use of natural
resources.
Do not dispose of batteries and accumulators in domestic waste!
As final consumer you are legally bound to return batteries
and accumulators. Return these to collection points that
are subject to public law or to places where batteries or
accumulators are sold. Here batteries and accumulators
can be returned for free.
© eltima electronic 2013
11
eltima electronic
Hans Gierlich
Staufenstraße 10
73230 Kirchheim unter Teck
Tel: 07021-863444
Fax: 07021-863444
Email: [email protected]
URL: http://www.eltima-electronic.de
12
© eltima electronic 2013