1
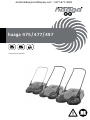
JanitorialEquipmentSupply.com 1-877-977-3339
haaga 475 / 477 / 497
• Operating instructions
Publisher's notice
Dear customer, thank you for purchasing
a quality product from Haaga. This product has been manufactured using modern
production processes with comprehensive
quality assurance measures.
These instructions will allow you to use
the sweeper safely and efficiently.
Before using the sweeper for the first
time, please carefully read the "Safety
instructions" chapter.
If you have any questions about your
sweeper, please ask your specialist dealer
or contact us directly at:
These instructions form part of the
sweeper and must be kept in the vicinity
of the sweeper at all times for reference
by the user.
These instructions must remain with the
sweeper if the machine is lent out or sold.
Haaga Kehrsysteme GmbH
Wielandstr. 24
D-73230 Kirchheim / Teck
Tel. +49 (0) 70 21 36 42
Fax. +49 (0) 70 21 7 43 25
[email protected]
www.haaga-gmbh.de
Illustrations in these instructions are provided for the purpose of general understanding and may differ from the actual
sweeper version.
Model designation:
haaga 475
haaga 477 / iSweep
haaga 497 / iSweep
Revision history
Version 1.0:
February 2015, Creation
Copyright
© 2015 Haaga Kehrsysteme GmbH
All rights reserved
22
English
1 About these instructions
1.1 Symbols used
Warning!
A warning informs you about possible
health risks or risks of fatal injury to
yourself and other persons that may
occur when handling or using the
sweeper.
CAUTION!
Indicates a possibly dangerous situation.
This can lead to damage to property or
the environment if not prevented.
NOTE
Highlights useful tips and recommendations as well as information for efficient
and trouble-free operation.
1.2 Technical further
development
We are continuously working on further development of all our products.
We therefore reserve the right to make
changes in the scope of delivery with
respect to form, technology and equipment.
No claims can therefore be derived from
information and illustrations contained in
these instructions.
1.3 Warranty
• The relevant national regulations apply
in each country. Excepted from this are
wearing parts such as sweeping lip,
angled wheels and running wheels.
• Please enclose a copy of the invoice in
the event of a warranty claim.
• Only genuine Haaga spare parts must
be used.
• No technical modifications must be
carried out on the sweeper.
• All claims under guarantee and warranty will be rendered void if the
machine is not operated properly.
1.4 Target group
These instructions are intended for the
person using this sweeper.
Prerequisites
• Persons who operate the sweeper must
be informed about the dangers related
to use of the machine.
• Persons who operate the sweeper must
be rested, healthy and in good physical
condition.
• Only pass on or loan the sweeper to
persons who are familiar with this
model and its handling – always provide the instructions with the machine.
• Persons who are using the sweeper for
the first time must have safe operation of the machine explained to them
by the salesperson or another qualified person before they operate the
sweeper.
• Children should be supervised to
ensure that they do not play with the
sweeper.
23
• Minors must not operate the sweeper –
except for juveniles over the age of 16
who are trained under supervision.
• This sweeper is not intended for use
by persons (including children) with
restricted physical, sensor or mental
capacity or persons who lack experience and/or knowledge, unless they
are supervised by a person responsible
for their safety or received instructions
from this person on how to use the
machine.
• Persons who are prohibited from strenuous physical activity for health reasons should ask a doctor for advice on
whether working with the sweeper is
possible.
• The sweeper must not be operated after
consumption of alcohol, medicines that
impair reaction times or drugs.
2 Safety instructions
Safety instructions prevent danger to life
and limb and also avoid damage to property or the environment due to improper
use of the sweeper.
The sweeper is intended for commercial
use, e.g. in hotels, schools, hospitals, factories, shops, offices and the equipment
hire trade.
For this reason, you must read these
instructions carefully and follow the
safety instructions contained in them
before using and working on the sweeper.
The sweeper is intended exclusively for
removal of road dirt, leaves, grass, paper
and similar debris.
The user of the sweeper is responsible for
injuries and damage that are caused due
to non-compliance with these instructions.
2.1 Intended use
This sweeper is designed in accordance
with the state of the art and recognised
safety regulations.
Nevertheless, use of the sweeper can lead
to dangers for the user or third parties or
damage to the sweeper and other material assets.
24
Sweeping snow with the sweeper is not
permitted.
Any other use will be deemed as improper
use. The manufacturer will not be liable
for damage caused as a result of this.
The user is solely liable for the associated
risks.
Claims of any kind due to damage caused
by improper use are excluded.
The following information must also be
observed when operating the sweeper:
• the safety instructions in these operating instructions.
• Always wear a dust protection mask in
dusty conditions.
• compliance with the operating, maintenance and storage conditions prescribed by the manufacturer.
• Wear sturdy gloves.
• compliance with accident prevention
regulations as well as country-specific
safety regulations, e.g. as issued by
employers' professional liability associations, social security authorities,
occupational health and safety bodies
and others.
• national and local regulations on
time restrictions for operation of
noise-emitting equipment.
The sweeper must not be used, for
example, for sweeping substances that
are hazardous to health, flammable or
glowing (e.g. cigarettes, matches), liquids,
explosive or hazardous dusts (Ex), acids or
solvents. The sweeper must not be used
in explosion-hazard areas or as a means
of transport.
2.2 Safety instructions for
operation / Maintaining
operating safety
The user must not wear open long hair,
tie, loose clothing or jewellery, including
rings.
Use the machine only in technically perfect condition for its intended purpose
and paying attention to safety and the
environment.
Have any faults that affect safety rectified immediately by a specialist dealer.
Observe all safety and danger instructions
on the sweeper.
The user must ensure the presence and
legibility of all warning and information
notices throughout the entire service life
of the sweeper.
Use only genuine spare parts and accessories that have been approved by the
manufacturer. These guarantee that the
machine can be operated safely and
without faults.
Do not carry out any modifications,
attachments or conversions on the
sweeper that could impair safety without
the approval of the manufacturer! The
manufacturer excludes all liability for
injuries or material damage caused by
use of attachments that have not been
approved.
There is a risk of injury, e.g. getting
caught up or pulled into the machine.
The maintenance work described in
these instructions must be carried out
completely and at the specified intervals
either by the user or at a specialist dealer.
Use personal protective equipment if necessary or required by regulations!
2.3 Instructions for transport
• Wear sturdy shoes with a high-grip,
anti-slip sole.
NOTE
• Do not carry the sweeper by the handle
of the waste bin.
25
English
• the chapter "Technical data" in these
instructions.
• In vehicles: Secure the sweeper to prevent it from tipping, slipping or being
damaged.
2.4 Instructions for work
preparation
Danger of injury
• The sweeper must be operated only in
operationally safe condition.
• Put the sweeper into operation only if
all the components are undamaged.
• Check the sweeper to ensure that it
is in operationally safe condition –
observe the corresponding chapters in
the instructions.
2.5 Instructions for operation
Danger of fire!
• Do not sweep up any burning or
glowing items, e.g. cigarettes, ash or
matches.
Risk of accident!
• Use the sweeper only for its intended
purpose.
• Do not climb on the sweeper or use it
as a means of transport.
• Do not operate the sweeper without
fitted waste bin.
• Never reach into the rotating brushes.
• Never reach into the running sweeper.
• When operating the sweeper, take into
account the local conditions and pay
attention to other persons, particu-
26
larly children, when working with the
machine.
• Take care in slippery, wet or snowy
conditions. There is a risk of slipping on
slopes or uneven ground.
• Make sure that the sweeper does not
collide with objects, e.g. shelves, scaffolding during operation – danger due
to objects tipping over or falling down.
• Take breaks in good time in order to
avoid fatigue and exhaustion.
• In the event of a blocked disc brush or
blocked fine dirt sweeping roller, interrupt work and clear the blockage. Wear
sturdy gloves in order to avoid cut injuries due to sharp objects.
• If the sweeper has been subject to
loads other than those that occur
during normal use (e.g. forces caused
by impacts or falling), always check
to ensure that it is still in operationally safe condition before continuing
work – also see "Instructions for work
preparation". Pay attention in particular to correct functioning of the safety
devices.
• Do not continue to use machines that
are no longer operationally safe. Consult a specialist dealer in case of doubt.
Danger of explosion!
Sparks can ignite dust or vapours in
explosion-hazard areas and cause explosions.
• Never operate the sweeper in areas
where there is an explosion hazard.
JanitorialEquipmentSupply.com 1-877-977-3339
Danger of injury!
• The sweeper is designed for operation
by one person only – do not allow any
other persons into the working area.
• Pushing against or over obstacles,
e.g. kerbs, can lead to damage to the
sweeper.
• If the cleaning performance deteriorates, check whether the waste bin is
full or if the disc brushes or fine dirt
sweeping roller are blocked or worn.
• Keep children, animals and spectators
away from the sweeper.
2.6 Information on fill level in
waste bin
• The user is responsible for accidents or
risks that occur with respect to other
persons or their property.
NOTE
CAUTION!
Damage to the sweeper due to improper
use.
• In the case of noticeable changes in
running behaviour (e.g. higher vibrations, sluggish movement), interrupt
work and rectify the causes of the
changed behaviour.
• Do not leave the sweeper in the rain.
NOTE
• When sweeping up leaves, improve the
capacity of the waste bin by briefly
placing the sweeper on the rear side of
the waste bin.
• Guide the push handle with both
hands.
• Push the sweeper forwards and adapt
the speed to the conditions.
• The sweeper can be pushed over small
bumps with a height of 2–3 cm by
pushing down slightly on the push
handle.
English
• Never operate the sweeper in the
vicinity of combustible fluids (vapours),
gases or dust.
• The waste bin is full if dirt is pushed
in front of the machine and no dirt is
swept up.
• In order to continue working for a short
time, lift the sweeper at the front to
move the dirt to the rear of the waste
bin. This makes it possible to make
better use of the waste bin capacity.
2.7 Instructions for cleaning
NOTE
• Cleaning ensures proper functioning
and a long service life for your sweeper.
• Accumulated dirt deposits and
wound-up threads etc. behind the
roller mounting can lead to sluggish
operation of the sweeper and impair
functioning.
Danger of injury!
• Wear sturdy gloves in order to avoid
cut injuries, e.g. due to glass shards,
metal or other sharp-edged materials.
27
CAUTION!
Damage to the sweeper due to improper
cleaning.
• Do not use grease removers for cleaning.
• Do not use aggressive detergents.
• Do not clean with compressed air.
• Do not spray-clean with water or
immerse in water.
• Clean plastic parts with a damp cloth.
2.8 Instructions at the end of
work
NOTE
• Empty the waste bin each time after
use.
Health risk!
• Empty the waste bin outdoors if possible in order to avoid production of
dust.
2.9 Instructions for storage
Risk of accident!
• Do not reach into the swivel area of
the push handle – parts of the body
may be trapped between the push
handle and housing if the push handle
falls over unintentionally.
• When storing the sweeper, position it
so that no persons are endangered.
• Secure the sweeper to prevent unauthorised access.
28
• Secure the sweeper to prevent it from
falling over and so that the push
handle cannot fold down in an uncontrolled manner.
NOTE
• Store the sweeper securely in a dry
room.
2.10 Instructions for
maintenance and repair
NOTE
• Carry out maintenance of the sweeper
regularly. Perform only the maintenance work described in the instructions.
• Have repairs carried out only by the
manufacturer's authorised dealers.
CAUTION!
Damage to the sweeper due to improper
maintenance.
• Repairs must be performed only by
authorised service centres or by specialists in this field who are familiar
with all relevant safety regulations.
2.11 Instructions for disposal
CAUTION!
• Incorrect handling of environmentally
hazardous materials, particularly incorrect disposal of replacement parts, can
cause considerable damage to the environment.
English
3 Design and function
Important components
1.
2.
3.
4.
5.
6.
7.
8.
9.
10.
11.
12.
13.
14.
15.
16.
17.
18.
19.
Push handle
Waste bin
Waste bin handle
Disc brush height adjustment
Carrying handle
Disc brush
Side guide roller (not 475)
Running wheel
Fine dirt sweeping roller
Holding-down device (not 475)
Dust filter (not 475)
10
Machine number (477/497)
Machine number (475)
7
Angled wheel
Sweeping lip
Sweeping plate
Clutch
Toothed sleeve
Gear protection (not 475)
14
17
1
3
13
4
8
5
6
6
14
12
15
13
18
19
2
11
16
9
9
29
4 Putting into operation
Fitting the push handle: 475
Danger of injury!
Danger of injury!
• Avoid injury due to push handle accidentally falling over.
1. Engage handle fittings (1) in frame by
knocking gently.
2. Turn handle fittings (1) so that they are
positioned vertically upwards.
3. Press locking springs (3) on push
handle (2).
4. Push the push handle (2) simultaneously into the two handle fittings (1).
5. Engage push handle in handle fittings
by knocking gently.
2
Fitting the push handle: 477 / 497
• Avoid injury due to push handle accidentally falling over.
NOTE
The push handle can be fitted in two different positions depending on the body
height of the user.
1. Turn handle fittings (1) so that they are
positioned vertically upwards.
2. Press locking springs (3) on push
handle (2).
3. Push the push handle (2) simultaneously into the two handle fittings (1).
4. Press the push handle into the handle
fittings until the locking springs
engage.
2
2
3
3
3
1
3
1
30
2
1
1
JanitorialEquipmentSupply.com 1-877-977-3339
English
5 Using the sweeper
5.1 Manual operation
1. Adjust to the required level (1):
1. Check the sweeper
(see Maintenance and care).
• Level 1 – 2: for all flat, hard surfaces
(e.g. asphalt, concrete, slabs…)
2. Adjust the sweeper
(see Adjusting the sweeper).
• Level 3 – 4: for damp leaves, sand,
uneven surfaces
(e.g. washed concrete slabs)
3. Guide the push handle with both
hands.
4. Push the sweeper forward at normal
walking pace.
5. Empty the waste bin as required
(see Emptying the waste bin).
• Level 5 – 8: for heavy soiling and very
uneven surfaces
2. To do this, turn the knob (2) anti-clockwise or clockwise to the desired position.
5.2 Adjusting the sweeper
Height adjustment
1
NOTE
2
• Do not press the disc brushes onto the
ground too firmly.
• An excessive contact pressure will not
achieve a better cleaning result but will
increase the wear.
• An excessive contact pressure will
increase the pushing resistance.
NOTE
The knob for height adjustment of the
disc brushes is located in the middle
of the front section. The height adjustment knob allows the height of the disc
brushes to be adjusted to the ground to
be swept.
Adjusting the brush
holding-down device: 477 / 497
NOTE
The brush holding-down device adjusts
the right disc brush to the edge areas to
be swept, e.g. walls or kerbs.
Excessive wear can occur in the event of
unsuitable adjustment at lower edges.
The holding-down device must not scrape
on the ground.
31
• Sweeping edges and corners:
Press the handle of the brush holding-down device down.
• Operation on surfaces: Pull the handle
of the brush holding-down device up.
1. Fold the push handle forwards so that
it is in flat position.
2. Pull the handle of the waste bin
upwards.
3. Remove the waste bin and empty.
4. Fit the empty waste bin on the
sweeper, making sure that the housing
edges are free of dirt.
5. Lock the waste bin handle.
5.3 Emptying the waste bin
Danger of injury!
• Wear sturdy gloves in order to avoid
cut injuries, e.g. due to glass shards,
metal or other sharp-edged materials.
Health risk!
• Empty the waste bin outdoors if possible in order to avoid production of
dust.
• Wear a dust protection mask in dusty
conditions.
NOTE
Empty the waste bin each time after use.
Empty the waste bin at regular intervals
in order to achieve optimum sweeping
performance.
32
5.4 Cleaning the sweeper
Danger of injury!
• Wear sturdy gloves in order to avoid
cut injuries, e.g. due to glass shards,
metal or other sharp-edged materials.
Damage to the sweeper due to improper
cleaning.
• Clean the sweeper to remove dust and
dirt.
• Do not use grease removers for cleaning.
• Do not use aggressive detergents.
• Do not clean with a high-pressure
cleaner.
• Cleaning interval after 8 hours of operation.
1. Clean the disc brushes, fine dirt sweeping roller (1) and drives with a wet
cloth.
2. Clean plastic parts with a damp cloth.
3. 477 / 497: clean the dust filter (3).
Recommendation: apply a thin coating
of Haaga genuine lubricant spray to the
brush drives.
• Protect bearings against moisture.
3
• Do not spray-clean with water or
immerse in water.
• Do not clean the disc brushes and fine
dirt sweeping roller with compressed
air. The hard air jet could damage the
bristles.
1
3
• Clean plastic parts with a damp cloth.
6 Transport
6.1 Carrying the sweeper
Danger of injury!
• Hold the sweeper so that falling over
or tipping down of the push handle
cannot cause injuries to the user or
other persons.
• Do not carry the sweeper by the handle
of the waste bin.
1. Fold the push handle (1) forwards so
that it is in flat position.
2. Grasp the sweeper at the carrying
handle (2).
3. Carry the sweeper so that the disc
brushes are facing away from the body
(3).
1
NOTE
Carry the sweeper by means of the carrying handle at the front.
Do not drop the sweeper.
33
English
CAUTION!
3
2
• Secure the sweeper with a suitable
lashing strap to prevent it from slipping.
1. Remove the push handle
(see Removing the push handle).
2. Position the sweeper in the vehicle.
6.2 Transporting the sweeper in
a vehicle
3. Secure the sweeper by means of a lashing strap.
CAUTION!
Damage to the sweeper due to improper
transport.
• Position the sweeper so that the bristles of the disc brushes are not kinked
or bent.
• Secure the sweeper to prevent it from
tipping, slipping or being damaged.
7 Putting out of operation and storage
7.1 Removing the push handle:
475
Danger of injury!
• Avoid injury due to push handle accidentally falling over.
NOTE
The push handle can be removed from the
sweeper to permit space-saving transport
in vehicles.
34
1. Swivel push handle upwards so that it
is vertical.
2. Press down the locking springs on the
inside using a screwdriver.
3. Pull out the push handle.
English
Removing the push handle:
477 / 497
7.2 Storing the sweeper
CAUTION!
Danger of injury!
• Avoid injury due to push handle accidentally falling over.
NOTE
The push handle can be removed from the
sweeper to permit space-saving transport
in vehicles.
1. Adjust so that the arrows (1) on the
housing are flush with the lugs on the
handle fittings.
2. Position yourself in front of the
sweeper inside the push handle.
3. Grasp both handle fittings with your
hands.
4. Carefully press both handle fittings
outwards.
5. Simultaneously pull the handle fittings
out of the two mounts on the sweeper.
Damage to the sweeper due to improper
storage.
• Position the sweeper so that the bristles are not kinked or bent.
• Secure the sweeper to prevent it from
tipping, slipping or being damaged.
• Do not store the sweeper outside or in
a damp place.
NOTE
• Empty the waste bin
(see Emptying the waste bin).
• When storing, ensure that the push
handle and sweeper are secured to prevent them from falling over.
• Space-saving storage:
Store the sweeper in a hanging position
(ensure sufficient load capacity of the
suspension)
• Clean the sweeper
(see Cleaning the sweeper).
1
35
8 Maintenance and care
CAUTION!
Damage to the sweeper due to improper
maintenance.
• Carry out maintenance of the sweeper
regularly.
• Perform only the maintenance work
and repairs described in the instructions.
• Have all other work performed by a
qualified specialist dealer.
• Use only genuine Haaga spare parts.
Otherwise there is a risk of accidents or
damage to the sweeper.
• In the event of queries related to this,
please consult a specialist dealer.
Check height adjustment of the disc
brushes and adjust to the ground to be
swept.
Check sweeping pressure adjustment –
adjust to the ground to be swept.
Clean handles – they must be clean and
dry and free of oil and dirt.
Check the sweeper for damage, and contact Service if necessary.
Check the height adjustment
(see Height adjustment).
8.1.2 After the end of work
477 / 497: clean the dust filter
(see Cleaning the dust filter).
8.1 Regular maintenance
Clean the sweeper (see Cleaning the
sweeper).
8.1.1 Before the start of work
8.1.3 Every 8 hours of operation
Check the condition of the sweeper.
Clean the brush drives
(see Cleaning the sweeper).
Check to ensure that the push handle is
securely attached to the sweeper.
Check condition of waste bin and ensure
that it is securely attached.
Check the disc brushes and fine dirt
sweeping roller for stuck parts and
embedded dirt – bristles must move
freely.
Check the disc brushes and fine dirt
sweeping roller for wound-up threads
and string – remove if necessary.
36
Recommendation: apply a thin coating
of Haaga genuine lubricant spray to the
brush drives (see Spraying the brush
drives with lubricant).
8.2 Cleaning the dust filter:
477 / 497
Danger of injury!
• Do not clean with compressed air.
1. Remove the waste bin.
3. Remove the foam insert from the filter
element.
4. Knock out the foam insert.
5. Clean the foam insert with water and
allow to dry.
6. Insert the cleaned foam insert in the
filter element.
7. Insert both filter elements in the
guides.
8. Fit the waste bin.
English
2. Pull both filter elements out of the
guides.
8.4 Spraying the brush drives
with lubricant
CAUTION!
• Damage to the sweeper due to
improper lubrication.
• Use only Haaga genuine lubricant
spray. Use of other oils or greases can
impair functioning of the brush drives.
1. Position the sweeper so that it is
vertical.
2. 475: apply a thin coating of Haaga
genuine lubricant spray to the gearing
of the brush drives (1).
3. 477 / 497: spray a sparing amount of
Haaga lubricant spray onto the brush
drives through the opening in the
housing (2).
4. Remove excess lubricant.
8.3 Eliminating blockage
Danger of injury!
• Wear sturdy gloves in order to avoid
cut injuries, e.g. due to glass shards,
metal or other sharp-edged materials.
• Recommendation: every 8 hours or
operation or as required.
• Haaga genuine lubricant spray is
available as an accessory
(article no. 923000).
1
2
1. Remove wound-up material (e.g.
threads, string…) from brushes and
axles.
2. Remove any jammed material (e.g.
stones, branches, …).
37
8.5 Straightening bristles
Danger of fire!
• Do not use naked flames or burners to
heat the bristles.
• Do not use a heat gun. The brushes
may melt due to the excessively hot air.
NOTE
Bent bristles can be straightened again
by heating with a hot-air blower.
Heat the bristles using a hot-air
blower (e.g. hair dryer). The bristles will
straighten themselves.
9 REACH
REACH is the European chemicals regulation for registration, evaluation, authorisation
and restriction of chemicals.
Information on compliance with the REACH regulation (EU) No. 1907/2006 can be
found at www.haaga-gmbh.de
10 Technical data
Technical data
Sweeping width approx. cm
Sweeping performance approx. m²/hour
Waste bin capacity (litres)
Weight in kg
38
haaga 475
75
2,900
50
11
haaga 477
77
3,000
50
15
haaga 497
97
3,600
50
16
English
JanitorialEquipmentSupply.com 1-877-977-3339
11 Troubleshooting
Problem
Cause
Sweeper dirty
Brushes blocked
Sweeper moves
sluggishly
or does not run
smoothly
Brushes are bent
Inadequate sweeping
performance
Brush drives dirty
• Height adjustment is set too
low
• Contact pressure of disc
brushes is too high
Disc brushes do not rotate
Improper storage
Sweeping lip is missing, loose
or heavily worn
Remedy
Clean the sweeper
(see Cleaning the sweeper)
Eliminate blockage
(see Eliminating blockages)
Clean the brush drives
(see Cleaning the sweeper)
Lubricate brush drives with lubricant spray
Adjust height
(see Height adjustment)
Contact Service
Straighten brushes
Replace sweeping lip
39