1
careSOFT
user manual
Introduction
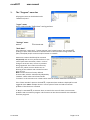
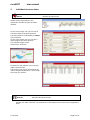
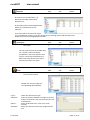
careSOFT comprises a main program with the name "careSOFT" and the careSOFT interface
programs, as shown here in the windows "NurseCall" client and "AscotelIP" client, for example.
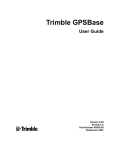
Structure tree
Information window
Logo field
The main careSOFT program
is split into three sections:
Structure tree:
Located at the top left. All main and substructure items are shown
here in line with the access rights of the current user.
Information window: The large window on the right. This shows the relevant information
for the individual structure items. The sorting can be changed by
double-clicking the relevant column name.
Logo field:
Located at the bottom left. The company logo is normally displayed
here. If this is not the case, this indicates that the connection
displayed in this field was temporarily interrupted. In this case,
double-click one of the displayed connections. The company logo
should then reappear.
21.09.2012
Page 1 of 12
careSOFT
1.
user manual
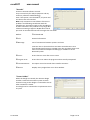
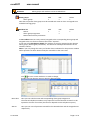
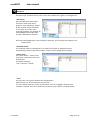
The "Program" menu bar
All program items can be blocked under
"Definitions/Users".
"Logon" menu
Users entered under "Definitions" can log on here.
"Settings" menu
Default:
all deselected.
"Basic data"
If the functions "create unit", "create criterion" and "create location" are activated ,
sending an alarm from NurseCall to careSoft results in the automatic storage of the unit
(floor/room/bed) and/or criterion and/or location in careSoft.
Automatic creation should only be activated
temporarily and not on a permanent basis. In the
case of permanent activation, there is a risk of
foreign or incorrect units, criteria or positions
being registered. This results in unnecessary
license use, which can even lead in turn to
blocking of the software with careSoft versions
prior to 2.6.x.
Note: all units feature a factory-defined
location code, which is automatically adopted by
careSOFT. These codes can be found under
"Positions" in the structure tree. These entries must be checked and deleted if necessary.
If the "Alarm window" option is checked , a separate alarm window is displayed for each
triggered alarm. Note: multiple alarms in a short space of time can lead to overview
problems if this feature is activated.
If "Beep" is activated , an acoustic alarm is issued. This occurs if there are connection
problems with an interface program. This function can also be activated for the individual
interface programs.
21.09.2012
Page 2 of 12
careSOFT
user manual
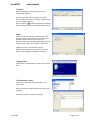
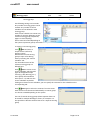
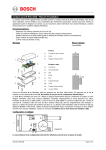
"Records"
These are internal software records.
They are used only for analysis purposes and any
necessary software troubleshooting.
Even if this option is not checked , all system and
unit alarms are still recorded.
Note: only activate the record feature if there are
problems and following consultation with the
manufacturer. Activation results in the recording of
all client interfaces. This produces a very large data
volume amounting to approx. 30,000 data records
per week. A record should not last for longer than one week.
Default:
all deselected
Info:
General information
Warnings:
Loss of connections between systems and units
Incorrect units or those that have not been entered that are sent
from the NurseCall system to careSOFT are also recorded. These units
must be checked and adapted accordingly in careSOFT or in the
NurseCall system.
Errors:
Errors that can occur after a user action.
Program error:
Errors that occur within the program and are usually unexpected.
Communications:
This option is used to record client interface activities.
Alarms:
Displays every single alarm as an alarm window.
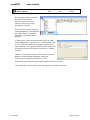
"Licence holder"
When the dongle is inserted, the relevant dongle
number is entered here and the system remains
licensed as long as the dongle is connected to the PC
when careSOFT is started.
The dongle can be connected to a replacement PC at
any time.
21.09.2012
Page 3 of 12
careSOFT
user manual
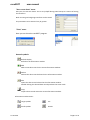
"Licenses"
When the dongle is inserted, all licenses are
entered and released.
For test purposes, system licenses can also be
entered without the use of a dongle. These licenses
are then valid for 30 days.
Click the "New"
symbol and select the relevant
license. Repeat this process for all desired licenses.
"Data"
"Delete all alarms" removes all alarms from the
database while "Delete all alarms from last year"
removes all alarms issued in the past year.
However, old alarms should only be deleted via the
relevant task as per the installation instructions.
"Register service" and "Remove service":
Detailed information on these functions can be
found in the careSOFT installation instructions.
"Program info"
Information on the software version can be found
here.
"Send message" menu
Here you can manually send messages to any
system unit.
Select the relevant system and unit and write your
message.
Then press "Send" to send the message.
21.09.2012
Page 4 of 12
careSOFT
user manual
"Start a test alarm" menu
Here you can start test alarms. This is very helpful during initial startup as a means of testing
the interfaces.
Both incoming and outgoing interfaces can be tested.
The parameters to be entered vary by system.
"Close" menu
Here you can close the careSOFT program.
General symbols:
Refresh display
Refreshes the information window
Add
Adds a new data record in the active information window.
Delete
Deletes the data record selected in the information window.
Edit
Opens the data record selected in the information window.
Double-clicking the desired data record produces the same result.
Copy
Copies a data record within the active information window.
Information window views:
21.09.2012
Large symbols
List
Small symbols
Details
Page 5 of 12
careSOFT
2.
user manual
Individual structure items
Alarms:
Displays all open alarms
Double-click an open alarm in the
information window to open the detail
window.
On the "Curr.pos(O)" tab, you can see an
overview image of the alarm position.
The exact position is indicated by a red dot
in the software.
On the "Curr.pos(D)" tab, you can see a
detail image of the alarm position.
The relevant images can be
saved under "Positions".
All alarms for the relevant unit are shown
under "Previous calls".
The same list can also be accessed via the
"Name assignment/Name list" menu under
the name of a resident.
Records:
Record of all software steps
All items set under "Records" are entered here. The analysis of the record can be exported to
Excel.
21.09.2012
Page 6 of 12
careSOFT
user manual
Residents:
Alarm groups and residents can be recorded here
Alarm groups:
Add
Edit
Delete
Alarm groups
x
x
x
Note that a separate alarm group must be created each time an alarm is assigned to an
individual nursing group.
Resident list:
Names
Alarm group assignment
Manual alarm history evaluation
Add
x
Edit
x
x
Delete
x
A new resident must be newly created, assigned to the corresponding alarm group and
assigned to the unit for the relevant room under "Systems".
In the case of the discharge or death of a resident, he must be assigned to the relevant
alarm group ("Discharged"/"Deceased"). This allows for subsequent evaluation of the
resident's alarms.
Note: if you only change the name, no further alarm evaluation for the previous resident
will be possible. His alarm data will only be accessible via the new name.
Click
to enter a new resident or to make a change,
double-click the relevant name to open the detail window.
Basic data:
Here you can edit the name and corresponding alarm group assignment.
The internal telephone number is only required if a communication channel is to be
opened in the case of an alarm (this function depends on the telephone system).
Alarms:
Here you can view all processes started for the selected alarm and the assigned units
respectively.
21.09.2012
Page 7 of 12
careSOFT
user manual
Positions:
Alarm zones:
Alarm zones
Add
x
Edit
x
Delete
x
Edit
x
Delete
x
Alarm zones can be defined here.
However, only one alarm zone should be defined due
to the significant amount of programming required.
A new alarm program must be created for each alarm
zone. E.g. all loops in building A are located in zone
building A
Creating a new alarm zone:
Press the
New button.
Name: name of the zone
Default: if only one zone exists.
If multiple zones are defined, the default zone must
be specified.
The default zone is used automatically if the zones are
not programmed correctly.
Positions:
-
Positions
Add
x
All IS75 loops are recorded here.
Note: the entry "Without position 0" must not be
deleted! It forms part of the system and is used for
units without localization function. If this entry is
deleted, reliable system operation can no longer be
assured.
To enter a position, click "New"
.
The "Position" window opens. In the "Number" field,
enter the same number as set in the IS75/76 unit via
dip switch.
In the "Name" field, enter the position of the loop,
e.g. "Main entrance".
The "Alarm zone" field can be used to define which
alarm zone the loop is located in. An image (photo or
floor plan) can be stored on the "Overview picture"
and "Detail picture" tabs.
The red dot can be set to the desired position via the
cursor. The overview and detail pictures are then
displayed in the case of an alarm.
21.09.2012
Page 8 of 12
careSOFT
user manual
Nursing groups:
-
Nursing groups
Add
Edit
Delete
x
x
x
The following settings can be made:
Any number of nursing groups can be
created. Any number of service
schedules can be defined in each
nursing group.
Each service schedule can contain any
number of receivers belonging to the
relevant nursing group (cell phones,
pagers or alarm displays).
Entries must be limited depending on
the system in question (partly restricted service).
To create a new nursing group,
click
New and enter a
unique name. Confirm by
pressing "Store".
Double-click the new nursing
group to open it for editing.
Start by selecting the "Service
schedule" tab.
The attendance times of the
relevant nursing group are
defined here.
Click
New to create a new
service schedule, which should
again be assigned a unique
name (e.g. 24h, Morning, etc…)
Then specify the attendance
times (from – to) and save the
service schedule. By doubleclicking the relevant service schedule, you can specify the receivers for this schedule on the
corresponding tab.
Click
New again to select the receivers from the menu.
Each receiver must be entered individually! A receiver group
can also be created depending on the system.
The use of several nursing groups allows separate alarms to
be issued for multiple buildings or floors, for example. It is
also possible to allocate technical alarms to a separate nursing
group.
21.09.2012
Page 9 of 12
careSOFT
user manual
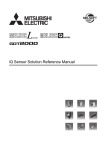
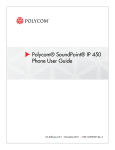
Alarm program:
Alarm program
Add
Edit
x
Delete
Alarm programs define how each
criterion is to be handled.
E.g. in the case of a call with
criterion 7 (help call), nursing
group green is alerted.
In the case of a call with criterion 3
(acknowledgement), "Acknowledge
all resident alarms" is displayed,
followed by "All resident alarms
deleted".
To edit an entry, select the desired alarm type, e.g. "Help",
"Acknowledgement", "Technical" etc…, and then click "Step
1". The information window then displays how this alarm
type is handled. To change this, double-click the entry in the
information window. The window "Command – 1" appears,
as shown.
"Number": the program number of the relevant command.
Numbers can be assigned individually, though we
recommend that sequential numbering is used.
"Command": here you define what happens with the alarm in this step.
"Nursing group": here you define which nursing group is alerted in this step.
21.09.2012
Page 10 of 12
careSOFT
user manual
Systems:
Systems
Add
x
Edit
x
Delete
x
All systems are recorded here, e.g.:
NurseCall, AscotelIP, Spectralink,
Quancom etc.
All possible systems are predefined here.
Delete any systems that are not
required.
If you still need to record a new system
(e.g. two identical systems), copy the settings for the existing system and allocate them a
unique name and an unassigned port number.
Unit types:
Unit types
Add
x
Edit
x
Delete
x
Add
x
Edit
x
x
Delete
x
The unit types contain all possible units
for a system. These are already
predefined. If you have created a new
system, contact the manufacturer to
define the exact data for the criteria
(functions) of these unit types.
Units:
-
Units
Link units with names
Double-click a unit to open the
corresponding detail window.
"Type":
"Number":
"Name":
"Resident":
21.09.2012
Select the relevant unit type.
Enter the relevant hardware number of the unit,
which is contained in the user manual of the unit
manufacturer.
Enter the desired name, such as the room
number.
Select the relevant name to be assigned to this
unit.
Page 11 of 12
careSOFT
user manual
Definitions
The alarm type, escalation levels, alarm status and careSOFT user rights are managed here.
"Alarm type"
Here you define the alarm types
that can be used in the alarm
program. "Max. age (days)" should
be set as shown in the screenshot
on the right. As a result, when
restarting careSOFT, for example, all
acknowledged alarms older than
one day are deleted or archived.
Since the acknowledgement is also entered for help calls, the incoming call recognition can
still be traced.
"Escalation levels"
The escalation levels are defined here. For each level created, an additional entry is
automatically created in the alarm program. These must be configured accordingly.
"Alarm status"
The "Alarm status", "Status" level,
and "Color" of the alarm status are
defined here.
The default setting is:
"Call" "Presence" "Closed"
"User"
The users that can log into careSOFT are managed here.
Authorizations can be set separately for each user.
If a user is defined without a name and password, this user is logged in directly when
careSOFT is started. This can be used to ensure that the open alarms are always visible.
21.09.2012
Page 12 of 12