1
SimFlex™ Client Simulator – User Manual
Index
Index ........................................................................................................................................................ 1
1
2
Introduction ..................................................................................................................................... 5
1.1
What is SimFlex CS?................................................................................................................. 5
1.2
Benefits.................................................................................................................................... 5
1.3
Applications ............................................................................................................................. 5
1.4
Key Features ............................................................................................................................ 6
1.5
Test Sessions............................................................................................................................ 6
1.6
Test Suite ................................................................................................................................. 6
1.7
Script Edition ........................................................................................................................... 6
1.8
Logging .................................................................................................................................... 6
1.9
Basic skill requirements ........................................................................................................... 7
1.9.1
IEC 61850 standard, tissues and UCA testing. ................................................................. 7
1.9.2
Python/Programming ...................................................................................................... 7
SimFlex CS overview ........................................................................................................................ 8
2.1
Details in the main screen ....................................................................................................... 8
2.2
Configuring the SimFlex CS settings ........................................................................................ 8
2.3
Detailed information of Settings dialog, General tab ............................................................. 9
2.4
Detailed information of Settings dialog, Devices tab ............................................................ 10
2.5
Detailed information of Settings dialog, Globals tab ............................................................ 11
2.5.1
Program settings ........................................................................................................... 12
2.5.2
Global test suite settings ............................................................................................... 12
2.5.3
Settings for test cases in Conformance Block 1 ............................................................ 13
2.5.4
Settings for test cases in Conformance Block 2 ............................................................ 13
2.5.5
Settings for test cases in Conformance Block 2+........................................................... 13
2.5.6
Settings for test cases in Conformance Block 3 ............................................................ 14
2.5.7
Settings for test cases in Conformance Block 5 & 6 ...................................................... 14
© 2011-2014 GridClone B.V.
SimFlex™ Client Simulator – User Manual
2.5.8
Settings for test cases in Conformance Block 5 ............................................................ 15
2.5.9
Settings for test cases in Conformance Block 6 ............................................................ 15
2.5.10
Settings for test cases in Conformance Block 9 ............................................................ 15
2.5.11
Common Settings for test cases in Conformance Blocks 12 ......................................... 15
2.5.12
Settings for test cases in Conformance Block 12a......................................................... 15
2.5.13
Settings for test cases in Conformance Block 12b ........................................................ 16
2.5.14
Settings for test cases in Conformance Block 12c ......................................................... 16
2.5.15
Settings for test cases in Conformance Block 12d ........................................................ 16
2.5.16
Settings for test cases in Conformance Block 13 .......................................................... 16
2.5.17
Settings for test cases in Conformance Block 14 .......................................................... 16
2.6
3
4
5
Detailed information of Settings dialog, NIC tab................................................................... 17
Use case: Starting and stopping SimFlex CS .................................................................................. 17
3.1
Verify a connection with a DUT ............................................................................................. 17
3.2
Start SimFlex CS ..................................................................................................................... 18
3.3
Configure the right network adapter in SimFlex CS .............................................................. 18
3.4
Select, Edit or Add a DUT to SimFlex CS ................................................................................ 18
3.5
Build the data model ............................................................................................................. 19
Use case: Run a single test ............................................................................................................ 19
4.1
Open a test suite ................................................................................................................... 19
4.2
Test suite tree panel and script tabs ..................................................................................... 21
4.3
Select and run test scripts ..................................................................................................... 22
4.4
Evaluate test results .............................................................................................................. 24
4.5
Open and examine a log file .................................................................................................. 26
4.6
Open and examine a capture file .......................................................................................... 26
4.7
Save and close a test suite..................................................................................................... 27
Use case: Run a session ................................................................................................................. 29
5.1
Create a test session.............................................................................................................. 29
© 2011-2014 GridClone B.V.
SimFlex™ Client Simulator – User Manual
6
5.2
Open a test session................................................................................................................ 31
5.3
Run tests in ‘non-recording’ mode ........................................................................................ 33
5.4
Run tests in ‘recording’ mode ............................................................................................... 33
5.5
Save and close test sessions .................................................................................................. 34
5.6
Modify and copy test sessions .............................................................................................. 35
5.7
Use the issues tab .................................................................................................................. 37
Advanced use ................................................................................................................................ 38
6.1
6.1.1
Columns in the Global Settings Tab ............................................................................... 39
6.1.2
Global variable format ................................................................................................... 39
6.2
More on Scripts ..................................................................................................................... 40
6.2.1
IEC 61850 and UCA test procedures.............................................................................. 41
6.2.2
Script structure and language ....................................................................................... 42
6.2.3
Function calls ................................................................................................................. 42
6.3
How to use the data model ................................................................................................... 43
6.3.1
Tree hierarchy ............................................................................................................... 44
6.3.2
How to read the values in the DUT data model (MMSData values) ............................. 44
6.3.3
MMSData type and length information: ....................................................................... 45
6.4
7
Global settings. ...................................................................................................................... 38
More on configuration files ................................................................................................... 46
6.4.1
Log file customization .................................................................................................... 46
6.4.2
Test Lab information ..................................................................................................... 49
6.4.3
Vendor information ....................................................................................................... 49
Frequently Asked Questions (FAQ) ............................................................................................... 50
7.1
General .................................................................................................................................. 50
7.1.1
How to install the SimFlex™ Client Simulator?.............................................................. 50
7.1.2
How can I check if my device is available on the network? .......................................... 50
7.1.3
The Client Simulator does not start or complains about the license ............................ 50
© 2011-2014 GridClone B.V.
SimFlex™ Client Simulator – User Manual
8
Additional Information .................................................................................................................. 51
8.1
File name conventions........................................................................................................... 51
8.2
Used abbreviations ................................................................................................................ 51
8.3
Referenced documents ......................................................................................................... 52
8.4
Referenced tools ................................................................................................................... 52
8.5
Version History ...................................................................................................................... 52
© 2011-2014 GridClone B.V.
SimFlex™ Client Simulator – User Manual
1
Introduction
1.1
What is SimFlex CS?
The SimFlex IEC 61850 Client Simulator is a simulator for the testing of IEC 61850 based servers
(IEDs). This software tool is designed for performing IEC 61850 tests including Conformance Tests.
The main features of the Client Simulator include:
•
Script based for flexibility and expansion of the test system
•
Graphical User Interface
•
Automatic execution of scripts
•
Report & Storage of test results
The SimFlex IEC 61850 Client Simulator is an easy to use tool with advanced capabilities that enables
utilities, manufacturers, system integrators and conformance test laboratories to automatically test
IEC 61850 based server devices.
The SimFlex IEC 61850 Client simulator comes with an extensive test suite that implements the IEC
61850 test cases that can be individually selected and executed. The SimFlexTM IEC 61850 Client
Simulator enables users to create new and combine existing test cases to perform complex test
scenarios. The simulator is easy to use and its intuitive user interface enables to quickly perform
tests.
This makes the SimFlex IEC 61850 Client Simulator an excellent software solution for the electrical
power industry.
1.2
Benefits
The main benefits of using the SimFlex Client Simulator are:
•
Fast and flexible automated testing of system and IED behaviour
•
Verification of IEC 61850 implementations
•
Easy setup of a conformance test laboratory
•
Generation and capturing of standard network traffic that can be stored in files
1.3
Applications
The SimFlex Client Simulator has a wide range of applications.
•
•
•
•
•
•
IEC 61850 conformance testing
Functional testing of IEDs and systems
IED product development
GOOSE publishing
Network traffic generation
Preparation for UCA© International Users Group based IED certification
© 2011-2014 GridClone B.V.
SimFlex™ Client Simulator – User Manual
1.4
Key Features
The SimFlex Client Simulator is designed to be a versatile simulator for IEC 61850 devices and
systems. Key features of the SimFlex Client Simulator include:
•
•
•
•
•
•
•
Performs the test cases from the UCA© International Users Group detailed test procedures,
based on IEC61850-10
Through a flexible interface any test case can be designed and executed
Logging of test progress and test results in human-readable text format
Network traffic is captured in PCAP format that can be read by other tools such as Wireshark
Advanced GOOSE engine enables for publishing GOOSE messages, including faulty ones for
negative testing
Enhanced test case editor with syntax highlighting
Visual representation of and interaction with server’s data models
The SimFlexTM IEC 61850 Client Simulator provides a flexible user interface for IEC 61850 testing.
Many of the features of the program are available through an intuitive tool bar.
1.5
Test Sessions
Testing of IEDs and systems requires that test results can be stored orderly. Especially for IEC 61850
Conformance Test Laboratories it is important that test information and results are kept together
and stored safely. The SimFlex Client Simulator provides Test Sessions that enable the user to create
a specific environment for the device or system under test where all necessary information and test
results are stored. This makes it possible to organize the results and easily analyze test results at a
later stage.
1.6
Test Suite
The core of the simulator is an engine that executes predefined and user defined test definitions.
These definitions are located in groups that, together, form a test suite. The test suite is represented
as a hierarchical tree.
The test suite view offers functionality to add, rename and delete groups and test scripts. Each group
and test script can be enabled separately, which makes it possible to execute any combination of
groups and test scripts.
To facilitate its use the SimFlex Client Simulator comes with a complete test suite that implements
the UCA© International Users Group detailed test procedures for server devices.
1.7
Script Edition
The SimFlex Client Simulator has a built-in editor for creating the test definitions to be executed. The
interface provides many of the defined services in IEC 61850-7-2 to be called from within the test
sequence. The response from the called services can be checked and the flow of the test scripts can
be logged in the Logging View. With a simple command the user can start and stop network
capturing and store the captured communication in a PCAP file format. It is also possible to define
and show message boxes when user-input is required in the script.
1.8
Logging
In this view the user can follow the execution of the scripts. Log messages from the test sequence as
well as messages from the test engine are shown.
© 2011-2014 GridClone B.V.
SimFlex™ Client Simulator – User Manual
The SimFlex Client Simulator automatically shows the response and retuned values of called IEC
61850 services. This makes it very easy for the user to monitor test execution.
1.9
Basic skill requirements
There are some main things that the user must be familiarized beforehand, in order to use this
program.
1.9.1 IEC 61850 standard, tissues and UCA testing.
The user/tester of this application must have at least basic level understanding of IEC 61850
standards.
This is important because the tester will use it to test the device, diagnose and analyse the result.
The user must be correctly identify that each of the network communication between the
server/device and the client is exactly the way it should, given the scope within the IEC 61850
standards.
1.9.2 Python/Programming
The user/tester at least must understand how to do basic programming. It will be better if the
user/tester is already familiar with Python programming. The SimFlex Client Simulator uses Python as
the programming language for the test cases because it is a high level programming language, easily
understandable and configurable.
© 2011-2014 GridClone B.V.
SimFlex™ Client Simulator – User Manual
2
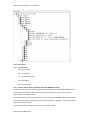
SimFlex CS overview
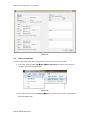
2.1
Details in the main screen
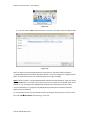
The main windows has different parts: the menu bar (1), the toolbar (2), the test suite panel (3), the
script panel (4), the device panel (5) and the log/issues panel (6).
Figure 2.01
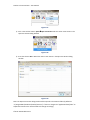
2.2
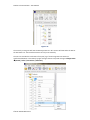
Configuring the SimFlex CS settings
In order to configure the setting:
1) In the menu bar click in Edit Settings
© 2011-2014 GridClone B.V.
SimFlex™ Client Simulator – User Manual
Figure 2.02
2) In the toolbar, hover above the icon that will says "show settings" and click the icon.
Figure 2.03
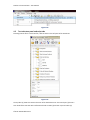
There will a new window shows up. The window consists of four tabs.
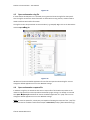
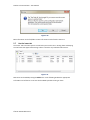
2.3
Detailed information of Settings dialog, General tab
In the Settings dialog, General tab, you can specify program specific settings. The following figure
shows the settings that can be configured in the General tab.
© 2011-2014 GridClone B.V.
SimFlex™ Client Simulator – User Manual
Figure 2.04
Capture interface
Select the Network Interface Card that will capture the
network traffic during the execution of test cases
Application base directory
Select the directory that will be the base for the storage of all
program related and created files. This includes amongst
others the network capture files, the log files, the defined
DUTs and all session related files.
Test-Bench name
Specify the name of the test bench. The test bench is the
system on which the SimFlex™ Client Simulator has been
installed on.
Show test result summary
Select Yes when a summary of the tests needs to be shown
on the screen after a test run.
Always overwrite session file
Select Yes when the session file can be overwritten. This
setting is only applicable when running test cases during a
session.
2.4
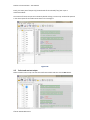
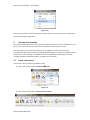
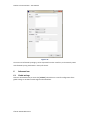
Detailed information of Settings dialog, Devices tab
In the Settings dialog, Devices tab, you can define the Devices Under test (DUTs). On the left side of
the dialog a list of defined DUT is shown. Selecting a DUT shows the settings in the Details part of the
dialog. You can add new devices by pressing the [ + Add ] button and remove devices by pressing the
[ - Remove ] button. In the Details part of the dialog you can specify the Device name, Vendor Name
and the IP address of the DUT. You can also enter text to describe the version of the DUT (e.g. the
© 2011-2014 GridClone B.V.
SimFlex™ Client Simulator – User Manual
HW version, the SW version and the firmware version of the DUT). This text field is free-format. In
the Comments field you can enter any information you may find important for the DUT.
The [ Advanced ] button will reveal fields that might be important during the association of the
SimFlex™ Client Simulator with the DUT. By default the pre-configured values will do for most DUTs.
Please refer to the PICS document of the manufacturer of the DUT for information regarding the
settings. Changing these settings might cause the SimFlex™ Client Simulator not being able to
properly connect to a DUT.
The following figure shows the settings that can be configured in the Devices tab.
Figure 2.05
2.5
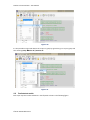
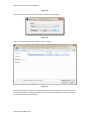
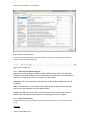
Detailed information of Settings dialog, Globals tab
The SimFlex™ Client Simulator is a generic IEC 61850 Client capable of running test scripts (test cases)
against many IEDs. The test scripts are defined in such a way that they should not need alteration
when executed. Therefore the SimFlex™ Client Simulator needs input from the test engineer that can
to be defined in the Global tab. Most of the settings to be defined will come from the manufacturer’s
PICS and PIXIT documents.
NOTE: In most cases the DUT (Device Under Test) will support a subset of the conformance blocks as
defined in the UCA© detailed test procedures for server devices. In that case only the settings for the
applicable conformance blocks (CBs) need to be specified.
The settings are grouped per conformance block. The settings that belong to a specific conformance
block can be identified by the Description. The description of each setting starts with a tag that
identifies the conformance block the setting belongs to. E.g., settings that belong to conformance
© 2011-2014 GridClone B.V.
SimFlex™ Client Simulator – User Manual
block 1 (Basic Exchange) start with “CB01”, settings that belong to conformance block 2+ (Data Set
Definition) start with “CB02+”, etc.
The following figure shows part the settings that can be configured in the Globals tab.
Figure 2.06
2.5.1 Program settings
The first three variables in the settings are informative and shall not be changed.
GROUP
# Program
settings
NAME
SuiteVersion
IP1
IP2
DEFAULT VALUE
"3.0.130117.1359"
"192.168.0.1"
"192.168.0.2"
DESCRIPTION
GLOB-Suite version as "Major.Minor.Date.Time"
GLOB-First IP number
GLOB-Second IP number
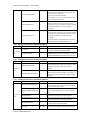
2.5.2 Global test suite settings
The global test suite settings are not bound to test scripts in specific conformance block. They are
used in test scripts throughout the whole test suite and need to be configured when applicable. The
settings can be recognized by the “GLOB” prefix in the description column.
GROUP
Global test
suite settings
NAME
VALUE
DESCRIPTION
MinimumPDUSize
1000
GLOB-The smallest PDU size in bytes that the DUT
supports (see PIXIT, e.g. 1000 bytes).
IntegrityPeriod
+0
DynamicDataSetSupported
F
© 2011-2014 GridClone B.V.
GLOB-This is the default integrity period for report
control blocks (time in ms e.g. +0). The value needs to
be pre-fixed by a ‘+’ sign.
GLOB-Specify if the DUT supports the creation of
dynamic data sets (T/F).
SimFlex™ Client Simulator – User Manual
2.5.3
""
StValObjectReference1
""
StValObjectReference2
""
Settings for test cases in Conformance Block 1
GROUP
Variables for
CB 1
2.5.4
DynamicDataSetReference
NAME
VALUE
MaxClients
5
WritableEnumerate
""
DESCRIPTION
CB01-Specify the maximum number of client
connections that the DUT accepts (see PIXIT)
CB01- Specify the object reference of a writable
ENUMERATED data attribute. Leave empty (“”) when no
writable ENUMERATED data attribute exists in the DUT.
Settings for test cases in Conformance Block 2
GROUP
NAME
VALUE
WritableDataSetReference
""
NonWritableDataSetReference
""
Variables for
CB 2
2.5.5
GLOB-Define the full object reference of a dataset name
that will be created dynamically in case the creation of
dynamic data sets is supported.
Format:<LD>/<LN>$<data set name>
Leave empty (“”) in case the creation of dynamic data
sets is not supported by the DUT.
GLOB-Specify the object reference of a status value
(stVal) that changes when an equipment simulator
changes value. E.g. if the equipment simulator simulates
the position of a breaker, this value will change
accordingly.
GLOB- Specify the object reference of a second status
value (stVal) that changes when an equipment simulator
changes value. E.g. if the equipment simulator simulates
the position of a breaker, this value will change
accordingly.
This object reference shall be different from the object
reference specified in StValObjectReference1.
DESCRIPTION
CB02-Specify the object reference of an existing data set
with writable data set members. Leave empty (“”) when
the DUT does not have a data set with writable
members.
CB02- Specify the object reference of an existing data
set with read-only data set members. Leave empty (“”)
when the DUT does not have a data set with read-only
members.
Settings for test cases in Conformance Block 2+
GROUP
Variables for
CB 2+
NAME
VALUE
NonPersistentDataSetReferenc
e
""
NonDeletableDataSetReference
""
MaxNrOfDataSets
0
MaxNrOfNonPersistentDataSet
s
0
MaxNrOfDatasetItems
0
ExcludeFC
{"BR","RP","
GO","CO"}
© 2011-2014 GridClone B.V.
DESCRIPTION
CB02+-Specify the object reference of a Non-Persistent
data set that will be dynamically created. Leave empty
(“”) for automatic name creation.
CB02+-Specify a pre-configured (SCL), non-deletable
data set that is not referenced in any report control
block
CB02+-Specify the maximum number of Persistent
Datasets as defined by the manufacturer (PIXIT)
CB02+-Specify the maximum number of Non-Persistent
Datasets as defined by the manufacturer (PIXIT)
CB02+-Specify the maximum number of Dataset Items
as defined by the manufacturer (PIXIT)
CB02+-Specify a list of Functional Constraints that shall
not be used in the lookup of data set elements (object
SimFlex™ Client Simulator – User Manual
references) for the creation of a dynamic data set.
2.5.6
Settings for test cases in Conformance Block 3
GROUP
Variables for
CB 3
2.5.7
NAME
VALUE
SVVolatility
T
DESCRIPTION
CB03-Specify whether or not substitution values are
stored in volatile memory, (true=volatile)
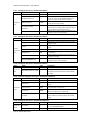
Settings for test cases in Conformance Block 5 & 6
GROUP
Variables for
common
report test
cases (CB 5
and CB6)
Trigger
Options bitcomponents
Optional
Fields bitcomponents
NAME
VALUE
ConfigurableDatSet
Dyn
ConfigurableRptID
Dyn
ConfigurableOptFields
Dyn
ConfigurableBufTime
Dyn
ConfigurableTrgOps
Dyn
ConfigurableIntgPd
Dyn
data_change
1
quality_change
1
data_update
integrity
1
1
general_interrogation
1
sequence_number
1
report_time_stamp
1
reason_for_inclusion
1
data_set_name
1
data_reference
1
conf_revision
1
AnalogueObjectReference1
""
AnalogueObjectReference2
""
PredefinedDataSet
""
PredefinedDataSetWithFCD
""
© 2011-2014 GridClone B.V.
DESCRIPTION
CB05/6-ReportSettings: The DatSet attribute in the RCB
is Fix, Conf or Dyn
CB05/6-ReportSettings: The RptID attribute in the RCB is
Fix, Conf or Dyn
CB05/6-ReportSettings: The OptFlds attribute in the RCB
is Fix, Conf or Dyn
CB05/6-ReportSettings: The BufTm attribute in the RCB
is Fix, Conf or Dyn
CB05/6-ReportSettings: The TrgOps attribute in the RCB
is Fix, Conf or Dyn
CB05/6-ReportSettings: The IntgPd attribute in the RCB
is Fix, Conf or Dyn
CB05/6-TrgOps: The DUT supports data-change (1=yes)
CB05/6-TrgOps: The DUT supports quality-change
(1=yes)
CB05/6-TrgOps: The DUT supports data-update (1=yes)
CB05/6-TrgOps: The DUT supports integrity (1=yes)
CB05/6-TrgOps: The DUT supports
general_interrogation (1=yes)
CB05/6-OptFlds: The DUT supports optional field:
sequence-number (1=yes)
CB05/6-OptFlds: The DUT supports optional field:
report-time-stamp (1=yes)
CB05/6-OptFlds: The DUT supports optional field:
reason-for-inclusion (1=yes)
CB05/6-OptFlds: The DUT supports optional field: dataset-name (1=yes)
CB05/6-OptFlds: The DUT supports optional field: datareference (1=yes)
CB05/6-OptFlds: The DUT supports optional field:
conf_revision (1=yes)
CB05/6-Specify the object reference of the first
analogue value that can be changed using an
EQUIPMENT SIMULATOR.
CB05/6-Specify the object reference of the second
analogue value that can be changed using an
EQUIPMENT SIMULATOR.
CB05/6-Specify the object reference to a predefined
data set (SCL), preferably with status attributes and
analogue attributes that can be changed using an
EQUIPMENT SIMULATOR. The data set elements shall be
FCDAs (=data attributes), if available with stVal, q and t.
CB05/6-Specify the object reference to a predefined
data set with FCDs (=data objects), with status values
that can be changed using an EQUIPMENT SIMULATOR.
SimFlex™ Client Simulator – User Manual
2.5.8
Settings for test cases in Conformance Block 5
GROUP
Variables for
CB 5
2.5.9
NAME
URCBReference
VALUE
""
LargeDataSetReference
""
BufferTimeNormal
+10000
AnalogueDataChangeSubstitutes
F
PreAssignedURCBReference
""
DESCRIPTION
CB05-Specify the object reference to a URCB
CB05-Specify the object reference of a large data set
that will be used for testing SEGMENTATION. Leave
empty in case dynamic data sets are supported.
CB05: The default value for BufTm in milliseconds (only
change this value when needed)
CB05: Specify if a second analogue data change
substitutes the first analogue data change when BufTm
> 0 (check PIXIT for implemented behavior)
CB05-Specify the object reference to a URCB that is preassigned to another client through SCL.
Settings for test cases in Conformance Block 6
GROUP
# Global
Variables for
CB 6
NAME
BRCBReference
VALUE
""
buffer_overflow
1
entryID
1
Tissue453
F
IntegrityPeriod
1000
AppMaxReports
1000
PreAssignedBRCBReference
""
DESCRIPTION
CB06-Specify the object reference to a BRCB
CB06-OptFlds: The DUT supports optional field: bufferoverflow (1=yes)
CB06-OptFlds: The DUT supports optional field: entryID
(1=yes)
CB06-DUT implements Tissue #453 (T=yes), see PIXIT.
CB06-Specify a valid integrity period (> 0). Time shall be
in milliseconds.
CB06-Specify the approximate number of Reports can
be buffered (See PIXIT).
CB06- Specify the object reference to a BRCB that is preassigned to another client through SCL.
2.5.10 Settings for test cases in Conformance Block 9
GROUP
Variables for
CB 9
NAME
GoCBReference
VALUE
""
ExpectedResultIsSuccess_GopN
1
T
DESCRIPTION
CB09-Specify the object reference to a GoCB.
CB09-Specify the expected behavior of the device: ‘T’ if
the GoCB can be enabled/disabled via SetGoCBValues
(see PIXIT).
2.5.11 Common Settings for test cases in Conformance Blocks 12
GROUP
Variables for
CB 12
NAME
ValidOrCat
VALUE
3
InvalidOrCat
0
OperateTimeout
10000
sboTimeout
300000
Tissue246
F
DESCRIPTION
CB12-Specify a SUPPORTED orCat value for the DUT.
CB12-Specify an UNSUPPORTED orCat value for the DUT
(E.g. 0).
CB12-Specify the Operate timeout of the DUT as defined
in the PIXIT (time in milliseconds)
CB12-Specify the SBO timeout value of the DUT as
defined in the PIXIT (time in milliseconds)
CB12-The DUT sends response- with LastApplError for
DOns and SBOns (check PIXIT regarding Tissue #246),
(T=yes)
2.5.12 Settings for test cases in Conformance Block 12a
GROUP
NAME
VALUE
Variables for
CB 12a
DonsObject
""
ExpectedResultIsSuccess_CtlN3a T
© 2011-2014 GridClone B.V.
DESCRIPTION
CB12a-Specify the object reference of a DOns object,
e.g. "LD_CTRL/LLN0$CO$LEDRs"
CB12a-Specify if the DUT response is SUCCESS when
SimFlex™ Client Simulator – User Manual
ExpectedResultIsSuccess_CtlN8a T
operating with the actual status (see PIXIT),
(T=SUCCESS)
CB12a-Specify if the DUT response is SUCCESS when
operating twice within 5 milliseconds (see PIXIT),
(T=SUCCESS)
2.5.13 Settings for test cases in Conformance Block 12b
GROUP
Variables for
CB 12b
NAME
VALUE
SBOnsObject
""
ExpectedResultIsSuccess_CtlN3b T
DESCRIPTION
CB12b-Specify the object reference of an SBOns object,
e.g. "LD_CTRL/CSWI1$CO$Pos"
CB12b-Specify if the DUT response is SUCCESS when
operating with the actual status (see PIXIT),
(T=SUCCESS)
2.5.14 Settings for test cases in Conformance Block 12c
GROUP
Variables for
CB 12c
NAME
VALUE
DOesObject
""
ExpectedResultIsSuccess_CtlN3c T
ExpectedResultIsSuccess_CtlN8c T
DESCRIPTION
CB12c-Specify the object reference of a DOes object,
e.g. "LD_CTRL/LLN0$CO$LEDRs"
CB12c-Specify if the DUT response is SUCCESS when
operating with the actual status (see PIXIT),
(T=SUCCESS)
CB12c-Specify if the DUT response is SUCCESS when
operating twice within 5 milliseconds (see PIXIT),
(T=SUCCESS)
2.5.15 Settings for test cases in Conformance Block 12d
GROUP
Variables for
CB 12d
NAME
VALUE
SBOesObject
""
SBOesObjects
{"","","",""}
ExpectedResultIsSuccess_CtlN3d T
DESCRIPTION
CB12d-Specify the object reference of an SBOes object,
e.g. "LD_CTRL/CSWI1$CO$Pos"
CB12d-Specify a list of object references to SBOes
objects, e.g. {"LD_CTRL/CSWI1$CO$Pos",
"LD_CTRL/CSWI2$CO$Pos"}
CB12d-Specify if the DUT response is SUCCESS when
operating with the actual status (see PIXIT),
(T=SUCCESS)
2.5.16 Settings for test cases in Conformance Block 13
GROUP
NAME
VALUE
EventDrivenUTCTime
""
TimeQuality
0
SyncLosingPeriod
0
Variables for
CB 13
DESCRIPTION
CB13-Specify an object reference to a UTC timestamp
(e.g., data attribute ‘t’) that changes when the data
object that the time stamp belongs to (e.g. data object
‘Pos’) is triggered by an event created by the
EQUIPMENT SIMULATOR (E.g.
"LD_CTRL/CSWI1$ST$Pos$t")
CB13-Specify the Time Quality of the device as specified
in PIXIT (E.g. ‘10’ specifies 2^-10, which corresponds to
approximately 1 millisecond accuracy).
CB13-Specify the period the device will lose time
synchronisation with the time server as specified in
PIXIT (time in milliseconds).
2.5.17 Settings for test cases in Conformance Block 14
GROUP
Variables for
NAME
ExpectedResultIsSuccess_Ft4
© 2011-2014 GridClone B.V.
VALUE
T
DESCRIPTION
CB14-Specify the behavior of the device when 2 clients
SimFlex™ Client Simulator – User Manual
CB 14
LargeFileReference
2.6
try to retrieve a file (GetFile) simultaneously (see PIXIT).
‘T’ means SUCCESS, ‘F’ means ‘file busy’.
CB14-Specify the path to a large file, the bigger the file
the more likely the test (Ft4) will be successful. Leave it
empty for automatic file selection.
""
Detailed information of Settings dialog, NIC tab
In the NIC tab of the Settings window, the user must select the NIC interfaces for both clients, and
one of the IP addresses that are available for each Network Interface Card (NIC) interface. The best
configuration is when the PC has two independent Network Interface Cards, each with a different IP
address. If you PC only has one NIC, please select that NIC for both Client 1 and Client 2, but select
different IP addresses for both clients (both in the same IP address range as the DUT). If your PC only
has one NIC and you see only one IP address in the drop-down list, please check you Windows OS
manual on how to specify a second IP address on the same NIC.
Note that the NIC addresses must be in the same sub-network as the DUT.
Figure 2.07
3
Use case: Starting and stopping SimFlex CS
3.1
Verify a connection with a DUT
Make sure that both IED and the PC that is running the SimFlex CS are connected to the same
network and that they are in the same IP address range.
Example:
© 2011-2014 GridClone B.V.
SimFlex™ Client Simulator – User Manual
IED
IP address = 192.168.0.100, mask = 255.255.255.0
SimFlex Client Simulator
IP address = 192.168.0.90, mask 255.255.255.0
Choose the right interface that connects the client (PC used to run SimFlex CS) and the server/device.
NOTE: Please check your Windows OS manual on how to change adapt the IP address and network
mask.
3.2
Start SimFlex CS
Open the SimFlex Client Simulator as you would normally open any Windows application. You may
find a link under the Start menu in the GridClone folder.
Another way to start the program is to double-click the SimFlex Client Simulator icon on the desktop
(available when this option has selected during the installation of the software).
3.3
Configure the right network adapter in SimFlex CS
Please check chapter 2.6 Detailed information of Settings dialog, NIC tab for more information on
how to configure the network interface cards in the SimFlex™ Client Simulator.
3.4
Select, Edit or Add a DUT to SimFlex CS
Use the menu item Devices to Edit, Add or Select new devices.
Figure 3.01
You may also use the button Devices.
© 2011-2014 GridClone B.V.
SimFlex™ Client Simulator – User Manual
Figure 3.02
3.5
Build the data model
Hover in the icon "Double click to start creation of data model". The user can choose between build
normal Data Model or Data Model with additional Read/Write information, which will be more useful
but take longer time to be generated.
Figure 3.03
4
Use case: Run a single test
This section explains what a test suite is, how to load a test suite into SimFlex CS, how to run one or
more tests and how to evaluate the results of the run tests.
First of all, what is a test suite? A test suite is a compilation of several test scripts grouped together in
one file. The extension of test suite files is “.suite”. In addition to the test scripts, a test suite also
contains the global variables and some metadata. Internally it is a XML file but it is not intended to be
edited by the end user, instead the SimFlex CS should be used for any editing of a test suite.
4.1
Open a test suite
In order to load a test suite from the SimFlex CS the user has several options:
1) Click in the menu bar under: File Open Open Test Suite, then select a test suite in the
Open Test Suite dialog window.
Figure 4.01
2) Click in the tool bar button: Open Open Test Suite, then select a test suite in the Open Test
Suite dialog window.
© 2011-2014 GridClone B.V.
SimFlex™ Client Simulator – User Manual
Figure 4.02
3) Press the shortcut CTRL + O and then select a test suite in the Open Test Suite dialog window.
Figure 4.03
Note: The Open Test Suite dialog window will be opened in the Testsuites folder (by default in
“C:\ProgramData\GridClone\SimFlex\TestLab\TestSuites”). If the user changes the “Application base
folder” as explained in Section 2 the TestSuites folder will change accordingly.
NOTE: Initially the folder “C:\ProgramData\GridClone\SimFlex\TestLab\TestSuites” might not contain
the IEC 61850 Edition 1 test suite. In that case the test suite is located in the installation folder of the
SimFlex CS, e.g. “C:\Program Files (x86)\GridClone\SimFlex Client Simulator\Testsuites” (32bit
version of Windows) or “C:\Program Files (x86)\GridClone\SimFlex Client Simulator\Testsuites”
(64bits version of Windows).
It is also possible to load a recently opened test suite selecting the wanted test suite from the menu
bar under: File Open Recent and selecting a “.suite” file.
© 2011-2014 GridClone B.V.
SimFlex™ Client Simulator – User Manual
Figure 4.04
4.2
Test suite tree panel and script tabs
Providing that the file is a valid suite file, it will be shown in the left panel of the SimFlex CS.
Figure 4.05
The top label (1) shows the name and version of the loaded test suite. The central part (2) shows a
tree model of the test suite with conformance blocks as nodes (3) and test scripts as leaves (4).
© 2011-2014 GridClone B.V.
SimFlex™ Client Simulator – User Manual
Finally, the lower part of the panel (5) shows details of the selected (if any) test script or
conformance block.
The content of the test scripts can be shown by double clicking in a test script. A tab will be opened
in the central panel of the SimFlex CS as shown in the next figure:
Figure 4.06
4.3
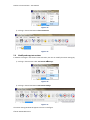
Select and run test scripts
Select at least one test script in at least one conformance block and then click the Run button.
© 2011-2014 GridClone B.V.
SimFlex™ Client Simulator – User Manual
Figure 4.07
If more than one test script is selected in the active conformance block and/or more than one
conformance block is selected with active scripts in it, all of the active scripts will be run sequentially
from the top.
The user might stop the tests pressing the Stop button that is located next to the Run button. The
current running test will be aborted and none of the remaining tests will be run.
Figure 4.08
While a test is running, some log messages will be shown in the Log panel. This panel shows useful
information of every step in the script and it is invaluable to know why a test is failing.
Figure 4.09
It is possible to select and deselect all scripts in the suite by right-clicking anywhere in the suite and
selecting Suite Select All | Deselect All.
© 2011-2014 GridClone B.V.
SimFlex™ Client Simulator – User Manual
Figure 4.10
It is also possible to select and deselect all scripts in a group by right-clicking in a script or group and
then selecting Group Select All | Deselect All.
Figure 4.11
4.4
Evaluate test results
Each script may have a status indication in the left panel as shown in the following figure:
© 2011-2014 GridClone B.V.
SimFlex™ Client Simulator – User Manual
Figure 4.12
The currently running test will have the Running status icon. All run tests will have either the Pass or
the Fail status icon. The Inconclusive status can only be set manually.
The user can override the result status of any test (e.g. if the test engineer sees some nonconformant behaviour in the device) by right clicking at the test script and clicking on Change Status
(Passed | Failed | Inconclusive | Unknown).
© 2011-2014 GridClone B.V.
SimFlex™ Client Simulator – User Manual
Figure 4.13
4.5
Open and examine a log file
If a test that has already been run is selected, the Log panel will show the log file for that specific
test. The log file contains the same information as shown while running the test, and also shows a
header and footer with useful information.
The log file can also be opened with an external editor (e.g. Notepad). Right click on the desired test
and then Open Log file.
Figure 4.14
Windows will choose the default application for text files and open the selected log file. You can
change the default application to use in the Windows settings.
4.6
Open and examine a capture file
In addition to log files, the SimFlex CS also stores a capture file of all the Ethernet packets in the
network. That capture file can be opened and examined by right clicking in an already run test and
then Open Capture file. Windows will choose the default application for “.pcap” files. You can
change the default application to use in the Windows settings.
NOTE: To view the capture file, a third-party tool capable of showing the contents of the “.pcap” file
format needs to be installed. A well-known example is Wireshark (see http://www.wireshark.org/).
© 2011-2014 GridClone B.V.
SimFlex™ Client Simulator – User Manual
Figure 4.15
4.7
Save and close a test suite
After modifying the selection of scripts, the Global Settings (as explained in Section 2) or the contents
of a script (as will be explained in Section 6) the user may want to save manually the test suite. In
order to do so there are two methods:
1) Click in the menu bar under: File Save Save Test Suite.
Figure 4.16
2) Click in the tool bar button: Save Save Test Suite.
© 2011-2014 GridClone B.V.
SimFlex™ Client Simulator – User Manual
Figure 4.17
3) Press the shortcut CTRL + S.
Additionally, test suites will be automatically saved in the following cases: before a test is run, before
the suite is closed (with a confirmation warning) and before the application is closed (with a
confirmation warning).
The user may want to save the test suite as a different file. To do so:
1) Click in the menu bar under: File Save Save Test Suite As...
Figure 4.18
2) Click in the tool bar button: Save Save Test Suite As...
Figure 4.19
The user can close a test suite manually by clicking in the menu bar under: File Close Test Suite.
© 2011-2014 GridClone B.V.
SimFlex™ Client Simulator – User Manual
Figure 4.20
Other actions that will close the test suite are: opening another test suite, opening or creating a test
session and closing the application.
5
Use case: Run a session
This section explains what a test session is, how to create or load a test session into SimFlex CS, how
to run one or more tests in a session and how to evaluate the results of the run tests.
First of all, what is a test session? A test session is a compilation of a test suite and session
information like DUT, test lab, vendor and settings grouped together in one file. The extension of test
session files is “.tsf”. Internally it is a XML file but it is not intended to be edited by the end user,
instead the SimFlex CS should be used for any editing of a test session.
5.1
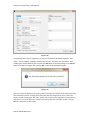
Create a test session
A test session can be created in two different ways:
1) Click in the menu bar under: Test Session Create.
Figure 5.01
2) Click in the tool bar button: Create a new test session.
© 2011-2014 GridClone B.V.
SimFlex™ Client Simulator – User Manual
Figure 5.02
The next step is to select a DUT for the session as shown in the next figure:
Figure 5.03
Also a test suite must be selected as shown in the next figure:
Figure 5.04
Finally, the user must fill in the session information in the session settings form. The several fields to
fill in will be explained in a following section. For now, the session name and test session number are
the only mandatory fields to be filled in.
© 2011-2014 GridClone B.V.
SimFlex™ Client Simulator – User Manual
Figure 5.05
5.2
Open a test session
In order to open a test session that was previously saved, the user has several options:
1) Click in the menu bar under: File Open Open Test Session, then select a test session in
the Open Test Session dialog window.
Figure 5.06
2) Click in the menu bar under: Test Session Open, then select a test session in the Open Test
Session dialog window.
© 2011-2014 GridClone B.V.
SimFlex™ Client Simulator – User Manual
Figure 5.07
3) Click in the tool bar button: Open Open Test Session and then select a test session in the
Open Test Session dialog window.
Figure 5.08
4) Press the shortcut ALT + O and then select a test session in the Open Test Session dialog
window.
Figure 5.09
Note: The Open Test Session dialog window will be opened in the Sessions folder (by default in
“C:\ProgramData\GridClone\SimFlex\Sessions”). If the user changes the “Application base folder” as
explained in Section 2 the Sessions folder will change accordingly.
© 2011-2014 GridClone B.V.
SimFlex™ Client Simulator – User Manual
It is also possible to load a recently opened test session selecting the wanted test session from the
menu bar under: File Open Recent and selecting a “.tsf” file.
Figure 5.10
5.3
Run tests in ‘non-recording’ mode
Tests can be run as explained in Section 4. One or more test scripts and conformance blocks can be
selected and run. The status icons will change accordingly and the log files and capture files can be
inspected as explained in Section 4.
Evaluating the test results and opening log and capture files can be accomplished as explained in
Section 4.
Running scripts in this mode is intended for fine-tuning or adjusting the settings of the DUT, suite
and/or session. After that, the test engineer may want to go on ‘record’ mode.
5.4
Run tests in ‘recording’ mode
The user can press the Record button to go on ‘recording’ mode. The Record button will be disabled
and a new Stop button will be enabled. To stop recording the session press the Stop button.
Figure 5.11
Another side effect of going into ‘recording’ mode is that all status icons of the scripts run in ‘nonrecording’ mode will be cleared. Some other scripts may be set to other statuses depending on
previous runs in ‘recording’ mode. In short, when a test is run in ‘recording’ mode its status, log file
and capture file information will be stored in the session file. Thus, that information can be retrieved
at any moment by the test engineer. Note that only the last run of the script will be stored, the user
must take care of not overwriting the results by re-running the test.
To run a test, like in the other cases, select the appropriate tests and press the Run button. A warning
window may appear before and after running the tests to confirm the overwriting of the test session
file. The first confirmation allows to overwrite any changes in the test suite and the second one
allows the overwriting of the test results.
© 2011-2014 GridClone B.V.
SimFlex™ Client Simulator – User Manual
Evaluating the test results and opening log and capture files can be accomplished as explained in
Section 4. If for any reason, the test engineer desires to overwrite a test status, it can be done as
explained in Section 4. This value will be stored in the session file and will be available in future runs
of the session.
5.5
Save and close test sessions
After modifying a session, it can be manually saved by three methods:
1) Click in the menu bar under: File Save Save Test Session.
Figure 5.12
2) Click in the tool bar button: Save Save Test Session.
Figure 5.13
3) Press the shortcut CTRL + ALT + S.
Additionally, test sessions will be automatically saved (with a confirmation warning) in the following
cases: before and after a test is run, before the session is closed and before the application is closed.
The user can close a test session manually by:
1) Clicking in the menu bar under: Test Session Close.
© 2011-2014 GridClone B.V.
SimFlex™ Client Simulator – User Manual
Figure 5.14
2) Clicking in the tool bar button: Close Test Session.
Figure 5.15
5.6
Modify and copy test sessions
In addition to changes in the session’s tests and results, the user can modify the session settings by:
1) Clicking in the menu bar under: Test Session Settings.
Figure 5.16
2) Clicking in the tool bar button: Test Session Settings.
Figure 5.17
The session settings window will appear as shown in next figure:
© 2011-2014 GridClone B.V.
SimFlex™ Client Simulator – User Manual
Figure 5.18
The following fields can be changed freely as they are only used as information containers: ‘Test
status’, ‘Test lab’ address, ‘Customer’ address, DUT ‘Version’, ‘Test setup’ and ‘Comments’. After
modifying any of these fields the user can press the ‘Ok’ button to store the settings or the ‘Cancel’
button to discard the changes. After pressing ‘Ok’ a confirmation window will appear.
Figure 5.19
Special care must be taken with the ‘Session name’ and ‘Test order number’ fields because these two
have side effects. Namely, changing the session name will also change the file name in which the
session is saved. Changing the ‘Test order number’ will prompt a warning window. Pressing ‘Yes’ will
copy the current session (with the exception of the test results) to a new folder location. Pressing
‘No’ will rename the current session.
© 2011-2014 GridClone B.V.
SimFlex™ Client Simulator – User Manual
Figure 5.20
More information on the file/folder structure of sessions can be found in Section 6.
5.7
Use the issues tab
The ‘Issues’ tab in the lower panel is a small utility to assist the user in writing down and keeping
track of issues that appear while testing a device. The tab is only enabled inside sessions.
Figure 5.21
New issues can be added pressing the Add button. In the following window the appropriate
information can be filled in. Issues can also be edited by double-clicking on them.
© 2011-2014 GridClone B.V.
SimFlex™ Client Simulator – User Manual
Figure 5.22
The issues can be filtered by category, can be imported from other issue files, can be manually saved
and refreshed by using the buttons in the top of the tab.
6
Advanced use
6.1
Global settings.
Section 2 described the way to access the [ Globals ] tab and that it is used for configuration of the
global settings or variables used through the Client Simulator.
© 2011-2014 GridClone B.V.
SimFlex™ Client Simulator – User Manual
Figure 1 Settings window, Globals tab
The tab has a small toolbar used (from left to right) for navigation, remove variable, add new
variable, refresh variable and get help.
Figure 2 Toolbar in Globals tab
6.1.1 Columns in the Global Settings Tab
Name: This column is listing the Global variable definition that is used in the testscripts.
Variables in the global settings can be invoked/used in the testscripts. Once assigned the
name can not change, also it the Locked flag is off. (See below)
Description: This Column describe briefly about the specific global variable and how it is
configured.
Value: This column has to has a value to the specific global variable and cannot be left
empty. Value type declaration will be explained below.
Locked: If this feature is ticked, all the columns are locked and the user cannot edit the
related rows. This will also prevent scripts from changing the value by accident.
6.1.2 Global variable format
This part describe the types available for the Global variable and how it is 'serialised' into a text
string.
BOOLEAN
© 2011-2014 GridClone B.V.
SimFlex™ Client Simulator – User Manual
BOOLEAN type is declared either with T or F.
=> T, F
(Note: The texts True and False will be converted to T and F.)
INTEGER
INTEGER type is explicitly declared with numerical int the column
=> 1234567890, -1234567890
(Note: Do not use the '+' sign, see UNSIGNED INTEGER.)
UNSIGNED INTEGER
UNSIGNED INTEGER type is explicitly declared with numerical int the column
=> +1234567890
(Note: The '+' sign forces it to be an unsigned integer.)
STRING
STRING type is declared with "".
=> "this is how it is declared."
(The double quotes are *not* optional and must be included.)
BITSTRING
BITSTRING type is declared as a list of zero's and ones within square brackets.
=> [010011...]
STRUCTURES AND LISTS
STRUCTURE and LIST types are declared as a comma-separated list of other types within curly
brackets.
=> {"first element",2,+3,{"nested","structure"}}
6.2
More on Scripts
Section 4 described how to run test scripts. A script can be opened by double-clicking on it.
© 2011-2014 GridClone B.V.
SimFlex™ Client Simulator – User Manual
Figure 3: Opening a test script
By default, test suites or sessions are opened in read-only mode. That is, the script can be examined
by the user but not modified. Do so by scrolling down and up like in a traditional text editor.
In order to modify the content of the script click on the [ Unlock ] button:
Figure 4: Unlock test script
After editing the script it is recommended to protect it against accidental modification by clicking on
the [ Lock ] button.
Figure 5: Lock test script
6.2.1 IEC 61850 and UCA test procedures
IEC 61850-10 defines the methods and abstract test cases for conformance testing of devices used in
substation automation systems. It also defines the metrics to be measured within devices according
to the requirements defined in IEC 61850-5. Part 10 of the IEC 61850 standard specifies the basic
types of tests required to label a device “IEC 61850 conformant” but it leaves details of the tests
open to interpretation.
© 2011-2014 GridClone B.V.
SimFlex™ Client Simulator – User Manual
The Utility Communications Architecture International Users’ Group (UCA IUG) formed a Testing
Committee to review the collective needs of device users and device providers for Conformance
testing. The Testing Committee’s mandate is to create a conformance test system compliant to all
parts of IEC 61850 which would meet the needs of users.
The testing committee has created three major documents as the core of the test system: IEC 61850
Conformance Testing:
•
The Accreditation Program. This document specifies what conditions an organization must
meet before it can claim to be a UCA IUG-recognized (accredited) IEC 61850 conformance
tester.
• Quality Assurance Procedures. This document specifies the rules users and conformance
testers must follow to ensure that interoperability issues discovered in real systems are
prevented by improved wording in future versions of the specification.
• Test Procedures. This document contains detailed step-by-step rules for conducting
conformance tests. These rules encode tests for not only normal operating conditions
(positive tests) but also as many error conditions (negative tests) as possible. These test
procedures reference the conformance testing specified in IEC 61850 Part 10.
The test suite provided with the SimFlex™ Client Simulator implements the test procedures described
in “Conformance Test Procedures for Server Devices with IEC 61850-8-1 interface. Revision 2.3”,
specifically in annex “A4. Mapping of ACSI models and services (IEC 61850-7-2 and applicable SCSM)”.
The SimFlex™ SCL Checker, on the other hand, implements the tests in annexes “A2. Configuration
file (IEC 61850-6) and “A3 Data model (IEC 61850-7-3 and IEC 61850-7-4)”.
6.2.2 Script structure and language
The SimFlex™ Client Simulator uses Python as the programming language for the test cases because it
is a high level programming language, easily understandable and configurable. The user must be
familiar with this language’s syntax in order to edit the scripts.
The scripts do not expose the whole Python language, they only use a small subset that can be learnt
in minutes by anyone with any previous experience with some kind of computer programming
(Matlab, Excel, etc). Many books and tutorial exist covering the basic Python syntax.
Once familiar with the syntax the structure of the scripts will be clear to the user. All of them start
with a (optional) declaration of global variables used in the script. Then some kind of initialization
follows. The test procedure begins after the BeginTest call. In the script body several function calls,
variable assignations, execution control blocks and loops are performed. Finally, the test procedure
ends with the EndTest call. At the bottom of the script a copy of the test procedure is included for the
user’s convenience. Note that the script body itself tries to follow this test procedure as closely as
possible.
6.2.3 Function calls
In addition to Python syntax and the use of global variables, the SimFlex™ Client Simulator exposes
an API to interact with the DUT. The API can be inspected in the online help by clicking in the menu
Help SimFlex CS Python API.
© 2011-2014 GridClone B.V.
SimFlex™ Client Simulator – User Manual
Figure 6 SimFlex CS Python API menu
A windows help file will be opened with the aforementioned API documentation:
Figure 7 SimFlex CS Python API Docs
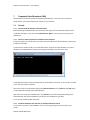
6.3
How to use the data model
Section 3 describes the procedure to build the DUT’s data model. After doing so, the data model will
be shown in the right panel as shown in the next figure:
© 2011-2014 GridClone B.V.
SimFlex™ Client Simulator – User Manual
Figure 8 Data model tree
6.3.1
Tree hierarchy
LD = Logical Device
LN = Logical Node
FC = Functional Constraint
DO = Data Object
DA = Data Attributes
6.3.2 How to read the values in the DUT data model (MMSData values)
All values from and to a DUT are communicated using the MMS protocol (ISO 9506), MMS for short,
as described in IEC 61850-6. Values shown in the DUT data model are restricted to the format
described within the MMS protocol.
The values displayed in the DUT data model do not only contain the MMSData type but also includes
some length information, a flag indicating if the value is ‘Readable’, ‘Writable’ or both and the actual
value retrieved from the DUT.
The normal format for an item with a value to is in the data model is:
© 2011-2014 GridClone B.V.
SimFlex™ Client Simulator – User Manual
Name, [MMSData type], Readable/Writable flag, value.
Example:
DUT_NAME [DUT IP address]
Data Model
LD name
FC ST
DO Mod
DA stVal, [INTEGER~8], R., value = 1
DA q, [BITSTRING~-13], R., value= [0000000000000]
DA t, [UTC_TIME], R., value = u23-11-2012_17:05:57.720
6.3.3 MMSData type and length information:
The length information with the MMSData type is according to IEC 61850, paragraph 8.1.1, table 14,
mapping of ACSI data types.
Most MMSData types with a fixed length (such as UTC_TIME) have no length information, with the
exception of BOOLEAN. INTEGER and UNSIGNED which have length information of one digit (8 for 8
bits, 16 for 16 bits etc.). String based types (such as VISIBLE_STRING) have length information that
can be negative indicating a Maximum length (the string may be shorter than the length but only if
the length information is negative.). And FLOATINGPOINT values have two length information values,
one to indicate the total length (in bits) and the second to indicate the length of the exponent (in
bits).
Readable/Writable:
At maximum two characters indicate the data attribute readable/writable information. The possible
characters are:
Character
Meaning
-
The Readable/Writable state is unknown.
.
The Readable/Writable state is untested.
R
The data attribute is Readable
W
The data attribute is Writable
w
The data attribute should be writable but is not available at the moment for writing
to.
The most common combinations are:
© 2011-2014 GridClone B.V.
SimFlex™ Client Simulator – User Manual
Combination
Meaning
-
The data attribute Readable/Writable state is unknown.
.
The data attribute Readable/Writable state is untested.
R.
The data attribute is Readable but not tested for Writable.
R-
The data attribute is Readable but not Writable.
Rw
The data attribute is Readable and should be Writable but is not available for writing
at the moment.
RW
The data attribute is Readable and Writable.
6.4
More on configuration files
Several files can be edited to alter some of the behaviour of the Client Simulator.
6.4.1 Log file customization
As explained in Section 4, the log text generated for each test script is stored in disk. Depending if the
test is run in a session or not it is store under the ‘Aplication base directory’ folder in:
•
•
•
Session (not recording): ‘.\Sessions\%VENDOR%\%DEVICE%.%NR%\Pre-Test\’
Session (recording):
.\Sessions\%VENDOR%\%DEVICE%.%NR%\Test\’
No Session:
‘.\TestLab\TestBenches\%TESTBENCH%\Pre-Test\’
The log file has some headers and footers at the beginning and ending. This header and footers can
be customized by the user. Log file customization is done by modifying the
‘.\TestLab\LogHeaders.xml’ file.
© 2011-2014 GridClone B.V.
SimFlex™ Client Simulator – User Manual
Figure 9 LogHeaders.xml
Two kinds of XML elements can be added to this file: HEADER and FOOTER elements:
•
•
HEADER_ELEMENTs are used in log files generated by test scripts. They are displayed before
the logging itself in the order found in this file.
FOOTER_ELEMENTs are used in log files generated by test scripts. They are displayed after
anything else in the order found in this file.
Each element can be of either one of three different types: MAIN, CS and SCL.
•
•
•
MAIN types are used as a titles for program log files. They are displayed before anything else
in the order found in this file.
CS types are used as a headers for script log files in the SimFlex™Client Simulator. They are
displayed before anything else in the order found in this file.
SCL types are used as a headers for script log files in the SimFlex™ SCL Checker. They are
displayed before anything else in the order found in this file.
Variables in the form of %VAR% can be used inside the element inner text. Two kind of variables can
be used: default variables defined in the SimFlex™ tool and environment variables defined by the
user or the OS.
Note 1: Environment variables will be checked before the default SimFlex™variables, thus
environment variables override the default values. Take this into account when creating new
environment variables.
Note 2: Some default variables are not applicable at some points, e.g. session information is only
available while running a session. When this is the case they will be translated as "NOT-APPLICABLE".
Note 3: If a variable, other than the default SimFlex™variables, is used and it is not defined as an
environment variable, it will be translated as "UNDEFINED".
Note 4: The variable %TSCRIPT_STATUS% may have different values in a title/header and in a footer.
The former will be the status of the script *before* running the script (i.e. the former status of the
script), whereas the later will be the status of the script after running it.
This is a list of the default SimFlex™variables available:
%FILENAME%
%DATE%
%TIME%
%TOOL_NAME%
%TOOL_VERSION%
%TESTER%
%TESTBENCH%
© 2011-2014 GridClone B.V.
SimFlex™ Client Simulator – User Manual
%TSUITE_NAME%
%TSUITE_VERSION%
%TSCRIPT_NAME%
%TSCRIPT_VERSION%
%TSCRIPT_STATUS%
%DEVICE_NAME%
%DEVICE_VENDOR%
%DEVICE_VERSION%
%DEVICE_COMMENTS%
%DEVICE_IPADDRESS%
%SESSION_NAME%
%SESSION_ORDERNR%
%SESSION_SETUP%
%SESSION_VERSION%
%SESSION_COMMENTS%
%TESTLAB_COMPANY%
%TESTLAB_STREET%
%TESTLAB_HOUSENUMBER
%TESTLAB_POSTALCODE%
%TESTLAB_CITY%
%TESTLAB_COUNTRY%
%TESTLAB_CTWORKPLACE%
%CUSTOMER_COMPANY%
%CUSTOMER_STREET%
%CUSTOMER_HOUSENUMBER%
%CUSTOMER_POSTALCODE%
%CUSTOMER_CITY%
© 2011-2014 GridClone B.V.
SimFlex™ Client Simulator – User Manual
%CUSTOMER_COUNTRY%
%CUSTOMER_CTWORKPLACE%
6.4.2 Test Lab information
Every time a test session is created the Test Lab information must be entered. The default Test Lab
information can be modified by opening and editing an xml file under the ‘Aplication base directory’
folder in ‘.\TestLab\TestLab.xml’
Figure 10 TestLab.xml
Introduce the company’s details under the Company, Street, HouseNumber, PostalCode, City, Country
and ConfTestingWorkplace attributes.
Every new session created will include the modified information by default.
6.4.3 Vendor information
As with the Test Lab information, every time a test session is created the Vendor information must
be entered. Once a vendor has been introduced in the sessions folder (by creating the first session
for a device from that vendor) an xml file will be created under the ‘Aplication base directory’ folder
in .\Sessions\%VENDOR%\Vendor.xml’.
Figure 11 Vendor.xml
Introduce the vendor’s details under the Company, Street, HouseNumber, PostalCode, City, Country
and ConfTestingWorkplace attributes.
Every new session created for one of that vendor’s devices will include the modified information by
default.
© 2011-2014 GridClone B.V.
SimFlex™ Client Simulator – User Manual
7
Frequently Asked Questions (FAQ)
Some questions do reoccur and become frequently asked (that is, more than once). Check this
section before you contact GridClone for support on your question.
7.1
General
7.1.1 How to install the SimFlex™ Client Simulator?
Read the Getting started document that comes with the program for a detailed description of the
installation procedure. If you do not have administrator rights on your PC, please contact your IT
department.
7.1.2 How can I check if my device is available on the network?
See that your DUT is turned on and connected to the same LAN as your Client Simulator. Find out the
IP address of the DUT.
A simple test to check if the DUT is connected and within range of the Client Simulator is to open a
Windows Command Window (cmd.exe) and typing the following instruction at the caret:
The IP address behind the ping command shall be the IP address of the DUT. In case the DUT is visible
it will react with positive responds.
Next, be sure that you selected the appropriate network interface in the [ General ] and [ NIC ] tabs
in the Configuration Dialog of the Client Simulator.
After that be sure that you created a DUT in the [ Devices ] tab in the Configuration Dialog of the
Client Simulator. Check if the IP address is the same as the IP address of your DUT.
Try to retrieve the date model of the DUT.
7.1.3 The Client Simulator does not start or complains about the license
In the system tray check if the CodeMeter service is running (clicking on the small system-tray
arrow).
© 2011-2014 GridClone B.V.
SimFlex™ Client Simulator – User Manual
If the CodeMeter is not visible, it could be that it is not running, or that the service *is* running, but
the CodeMeter program is not visible.
a) In the first case: re-install the Client Simulator and make sure the WIBU software installs
correctly.
b) In the second case: press Windows Start button and locate the CodeMeter installation. Then
start the “CodeMeter Control Center” manually.
Once the CodeMeter Control Center is started, open it (from the system tray) and check that there is
a license shown in the left part of the dialog. Make sure you have inserted the USB license key in one
of the available USB ports!
In case you are running a trial version of the SimFlex™ Client Simulator:
If there is no license shown, select File
Import License from the menu and locate the “*.lic”
file in the Client Simulator folder (In the folder where you installed the program, e.g.
C:\Program Files\GridClone\...). Note that the CodeMeter Control Center might have a filter
like “*.WibuCmRaU”. Change it to “*.*” or “*.lic” to make the license file visible.
Once the license file has been selected and opened it should be visible in the CodeMeter
Control Center.
To be sure the license is activated: stop and start the CodeMeter Control Center service by
pressing Process
Stop CodeMeter Service and then Process
Start CodeMeter Service.
Finally re-start the Client Simulator. If the problem persists please contact GridClone for support.
8
Additional Information
In this section you will find information on additional topics.
8.1
File name conventions
Any *.txt file is a test result file and has the same content as the log frame.
Any *.log file is an error log file for errors related to the program and not to the test.
Ass1-2013-01-27_09.01.02-CS.txt is the test result of test case Ass1 generated by the Client
Simulator on January 27th, 2013 at 09:01 (local time).
2013-01-07_09.28.43-SimFlexError.log is an error log for the same run. This file is located in the
“Application base directory”.
8.2
Used abbreviations
DUT
Device Under Test.
IEC
The International Electotechnical Commission, managing international standards. See:
http://www.iec.ch/
IEC 61850
The IEC 61850:2003 standard.
© 2011-2014 GridClone B.V.
SimFlex™ Client Simulator – User Manual
IED
Intelligent Electronic Device
UCA
The UCA® International Users Group. See: http://www.ucaiug.org
8.3
Referenced documents
IEC 61850
IEC 61850:2003
MMS
ISO 9506:2003 (as used by IEC 61850-8)
Getting started.pdf
8.4
Referenced tools
WinPcap
For capturing network traffic, see: http://www.winpcap.org/
WireShark
For analysing network traffic, see: http://www.wireshark.org/
8.5
Version History
Version
Date
By
Subject
1.0
January 1, 2013
EM
Initial version
1.1
February 27, 2013
EM
Extended chapter 3, added chapter 6, 7 and 8
© 2011-2014 GridClone B.V.