1
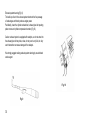
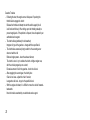
CLASSIC
OWNER’S NAME
ADDRESS
PHONE/E-MAIL
MODEL/TIP
VIN NO.
DATE OF DELIVERY
DEALER’S NAME
DEALER’S ADDRESS
All claims made within the warranty period should be submitted to an authorized
service workshop, along with the warranty itself.
THE DEALER’S STAMP
AND SIGNITURE
CLASSIC
WARRANTY TABLE
KM
months
1.000
2
3.000
6
10.000
12
15.000
18
DATE
DATE
DATE
DATE
SERVICE
SERVICE
SERVICE
SERVICE
20.000
24
DATE
SERVICE
RECORD OF RECOMENDED SERVICE INSPECTIONS (The cost of service inspection will be borne by the customer)
TOMOS
USER’S MANUAL
CLASSIC
1
CONTENTS
Warnings
3
Riding Safety Tips
3
Technical Specification
4-5
Technical Description
6-8
Vehicle operation
Fuel
Engine Starting
Riding
Engine Running-In
9
9
9
11
11
Maintenance
Maintenance Operations
Lubricants
Gearbox Oil change
12
12
12
12
Cleaning
Fuel System Cleaning
Exhaust System Cleaning
Vehicle Cleaning
13
13
14
15
2
Checks and Adjustments
Engine Oil Level Check
Bowden Adjustment
Transmission Chain Adjustment
Bolt and Nut Tightness
Maintenance Schedule
15
15
15
16
16
17
Troubleshooting
Fuel System Troubles
Ignition System Troubles
Troubles Causing Reduced Engine Power
Gearbox Troubles
18
18
18
18
19
Tomos warranty conditions
20
WARNINGS
RIDING SAFETY TIPS
Prior to operating the vehicle, carefully read this User’s Manual in order
to get acquainted with its operational characteristics and safe and
proper operation.
1.Fuel is extremely flammable and explosive; therefore it requires
special handling precautions:
- Stop the engine prior to refilling the tank;
- Fill the tank outdoors; never approach the tank with a lit cigarette,
open flame or sparks; and
- Thoroughly wipe off any spilled fuel
2. The engine should not be run in an enclosed space or nearby
entrances to lower-level areas (cellars etc.). Engine exhaust gases are
toxic and denser than normal atmospheric air.
3. When starting or running the engine, never touch the ignition coil,
high voltage cable, ignition spark plug cap or other parts of the
electrical system.
4. The vehicle is equipped with a catalysts exhaust system causing high
temperatures. When the engine is running and for some time after
it has stopped do not touch its hot parts: the cylinder, the cylinder
head, exhaust silencer. Do not touch the brake components too.
5. When the engine is running beware of the engine’s rotating parts.
No modification of the vehicle, stripping-off any parts or installing
non-original spare parts is permitted. The vehicle owner is specifically
warned that any modification to the exhaust system can only result in
the vehicle’s deteriorated operation, without any positive effects on
engine performance and causes higher air pollution.
Riding a two wheeler is simple, yet it requires some skills and
experience which can only be accumulated progressively. Prior to each
ride, observe the following rules:
1. Check the proper functioning of all vehicle assemblies.
2. When riding, wear light-colored, preferably light-reflective clothes;
ride with your lights on; avoid riding in other drivers “blind spots” to
prevent danger of other drivers “overlooking” you.
3. Abide by all traffic regulations; above all, adjust your riding speed to
the road conditions and your skill level.
4. Do not hand the vehicle over to any inexperience riders.
5. Prior to changing lanes, always check that this can be done safely,
and signal your intention in time Be careful when riding through road
crossings or passing other vehicles (including parked vehicles)..
6. Always ride with your helmet on, be properly dressed and wear
boots.
7. Pay due the attention to what is going on in front of you and behind
you (rear mirror) and try to anticipate events
8. The braking affects the loading on each wheel: the front braking
increases; whereas braking with the rear brake only increases the
braking distance while also reducing vehicle stability; hence use the
rear brake with caution.
3
TECHNICAL SPECIFICATIONS
Model
Classic
Variants
A34B – 45km/h
A34C – 30km/h
A34D – 25km/h
A34E – 20km/h
Engine
Type
Displacement
Cylinder bore diameter
Piston stroke
VARIANT A34B:
Compression ratio
Engine power
Torque
Maximum speed
Fuel consumption
single-cylinder, two-stroke
air-cooled
49 cm3
38 mm
43 mm
10 : 1
1,7 kW at 4800 min-1
3,6 Nm at 3500 min-1
45 km/h
1,8/100km
Starter
4
VARIANT A34C:
Compression ratio
Engine power
Torque
Maximum speed
Fuel consumption
6:1
1,0 kW at 3500 min-1
3,1 Nm at 2500 min-1
30 km/h
2,2/100km
VARIANT A34D:
Compression ratio
Engine power
Torque
Maximum speed
Fuel consumption
6:1
1,0 kW at 3500 min-1
3,1 Nm at 2500 min-1
25 km/h
2,5/100km
VARIANT A34E:
Compression ratio
Engine power
Torque
Maximum speed
Fuel consumption
6:1
1,0 kW at 3500 min-1
3,1 Nm at 2500 min-1
20 km/h
2,8/100km
Kick-starter or pedals
Fuel
Tank capacity
Engine oil reservoir
4 l (incl.0,5 l reserve)
1l
Suspension
Front forks travel
Rear shock absorber travel
70 mm
35 mm
Wheels
Front tire dimensions
Rear tire dimensions
Front tire inflation pressure
Rear tire inflation pressure
2 ¼ -16
2 ¼ -16
2,2 bar
2,2 bar
Electrical
system
Magneto
Spark advance
Spark plug-A24B
Spark plug-A24C, A24D,
A24E
Spark plug electrode clear.
Headlight
Tail light
Stop light
Speedometer illumination
Oil level signal light
12V 80W
preset
Bosna F75, BOSCH-W7AC
Dimensions
And weights
Wheelbase
1.080 mm
Total length of vehicle
1.640 mm
Vehicle mass (empty fuel tank) 60 +3 kg
Maximum permitted total weight 160 kg
Bosna F75, Champion-L86
0,8 mm
12V 25W
12V 5W
12V 15W
12V 2W
12V 1,5W
5
TECHNICAL DESCRIPTION
1. Fuel tank cap
2. Fuel petcock
3. Carburetor, choke
4. Kick starter lever or pedals
5. Prop stand
6. Rear brake lever
7. Front brake lever Electric start pushbutton (version)
8. Throttle lever
9. Horn switch
9a. STOP switch
10. Tool bag
11. Speedometer
12. Oil level signal light
13. Chain tension adjuster
6
14. Air filter
15. Engine oil reservoir, cap
16. Luggage carrier
17. Oil pump
18. Steering lock
11
6
Fig. 1
9
12
9a
8
7
Fig. 2
7
Fig. 3
Fig. 4
8
VEHICLE OPERATION
Fuel
EUROSUPER 95 and two-stroke engine oil.
Your vehicle is equipped with an oil pump, which adds a specified
amount of oil to the petrol (approx. 2%). Pour two-stroke oil into the
separate oil reservoir (15, Fig. 1) - approximately 1 liter.
CAUTION!
See the Warning sticker for the max. oil level near to the oil reservoir.
Use only high quality fully synthetic two-stroke oil.
CAUTION!
Prior to starting the engine for the first time, fill the fuel tank (1, Fig. 1)
with approx. 1 liter mixture of two-stroke oil and gasoline in the ratio of
1:50 (2%), then start the engine and let it run for at least 8 minutes in
order to allow the oil pump to fill the suction pipe.
Before this take off the oil pump cover (17, Fig. 1) and unscrew the bolt
on oil pump (A, Fig. 3) and wait till oil comes from reservoir. Tighten the
bolt.
Engine starting
Open the fuel cock (Fig. 5). Note: A – fuel supply shot, B – fuel supply
on, C - reserve.
If the engine is cold, press the cold start lever (B, Fig. 6).
Kick start version:
With the throttle fully closed, press the rear brake lever and press the
kick-starter lever (4, Fig. 1) – without opening the throttle.
If starting the engine when it is still warm, the throttle must be fully
opened.
Pedal version:
With the throttle fully closed, press the rear brake lever and press the
pedals (4, Fig. 1) backwards – without opening the throttle.
If starting the engine when it is still warm, the throttle must be fully
opened.
9
When using the choke, allow the engine to run for 10 to 20 seconds
without opening the throttle. The choke start lever disengages
automatically when the throttle is opened.
In the case the engine is hot do not use the choke lever.
Fig. 5
11
Riding
The speed is controlled by the throttle lever (8, Fig. 2).
Engaging the first or second gear is done by opening or closing the
throttle. Avoid switching too frequently between first and second
gears. In such situation you should instead reduce the throttle opening
and keep the vehicle in first gear. When descending a slope, shortly
open the throttle from time to time in order to improve lubrication and
headlight operation. The vehicle is shut down by closing the throttle
lever and switching the STOP button to the position off (9a, Fig. 4). Then
close the fuel cock (position A, Fig. 5)!
If the vehicle is to stay out of operation for a longer period (e.g. during
winter), draining of the fuel from the carburetor cup in the following way
is recommended: close the fuel cock and, by opening the throttle lever,
let the engine run out automatically.
Fig. 5
10
Engine Running-in
Do not run the engine at full throttle during the initial 100 km. Later
increase the engine loading progressively.
MAINTENANCE
Maintenance Operations
The vehicle is easy to maintain, yet maintenance is imperative for
perfect performance. Particularly important operations include regular
lubrication of individual assemblies, gearbox oil changes, cleaning
of parts affecting engine operation (spark plug, exhaust system,
fuel system) and checking of safety-related riding components (tire
pressure, operation of lights and brakes, tightness of bolts and nuts).
The maintenance table defines maintenance works in certain intervals in
km and months - consider whichever comes first - for the period up to
20.000 km or 24 months.
draining plug (3, Fig. 7) and pour approx. 300 cm3 of oil through the
refilling opening (1, Fig. 7), so that oil level reaches the control opening
(2, Fig. 7). Then, retighten the oil refilling and control opening plugs.
Lubricants
For the gearbox apply the automatic gearbox oil: ATF A or ATF F.
For lubrication of other vehicle components (see the maintenance
schedule), application of SAE 30 grade engine oil and LIS 2 grease is
recommended.
Gearbox Oil Change
Oil should be changed when the engine is still warm. Remove the right
side shield; release three threaded plugs (1, 2, 3, Fig. 7) on the right
side of the engine casing, and let the oil drain completely. Retighten oil
12
Fig. 7
CLEANING
Fuel System Cleaning (Fig. 8)
As regards the fuel system, periodic cleaning of the main jet, air filter
and fuel petcock filter is required. Do not use metal objects to clean the
main jet; clean it with an air jet.
Filter – sponge should be washed thoroughly in gasoline. After washing,
squeeze gasoline from the sponge (do not brush it) and dry the sponge
in a dry air jet.
Fig. 8
13
Exhaust system cleaning (Fig. 9)
The build up of soot in the exhaust system obstructs the free passage
of exhaust gas and thereby reduces engine power.
Periodically, clean the cylinder exhaust duct, exhaust pipe inlet opening,
piston crown and cylinder compression chamber (Fig.10).
Caution: exhaust system is equipped with catalysts, so do not enter into
the exhaust pipe with any tools, wires, do not pour in any fluid, etc. Any
such intervention can cause damage of the catalysts.
We strongly suggest making exhaust system cleaning by an authorized
service agent.
Fig. 10
Fig. 9
14
Vehicle cleaning
Vehicle exterior cleaning is also part of regular maintenance. After washing, wipe the vehicle dry. Protect painted surfaces with paint protection
agents. After cleaning, check the operation of the engine, the lights and
brakes.
CHECK AND ADJUSTMENTS
Engine Oil Level Check
Check regularly the oil level in the oil tank. Top up as required. Should
the warning light fail to extinguish after starting the engine, this means
the oil level is low and immediate topping up is required.
Caution:
Kick-starter and pedals version: the warning light lights few seconds
after starting the engine. If does not, the fault should be remedied.
Fig. 11
Bowden Adjustment
Bowden brakes are adjusted by means of the bolts on the wheels hubs.
The Bowden is properly set when the brake lever free travel is 10-15
mm and the sleeve – lever gap is approx. 3 mm (Fig. 11). After adjusting,
make sure the jam nut is retightened.
15
Transmission Chain Adjustment
The chain tension should be adjusted so that the chain yields 10 mm up
or down under pressure (Fig. 12). Adjust the chain tension by spinning
the chain tension adjuster (13, Fig. 1) on the rear wheel axle. After the
adjustment, retighten the nuts on the both side of axle that were party
released for the adjusting.
Fig. 12
16
Bolt and Nut Tightness
Periodically check and retighten as necessary the bolts and nuts of the
main vehicle components (wheels, handlebar, shock absorber, rear fork
axis, engine to frame bolts, gearbox oil drain plug).
MAINTENANCE SCHEDULE
Interval (km)
1.000
3.000
Interval (months)
Oil lubrication
1. Gearbox oil change
2. Bowdens (internal cables)
2
6
•
•
As necessary
•
3.
•
•
•
Chain
Greasing
4. Rear fork bearing bushes
5. Steering bearings
10.000,
15.000,
20.000
12, 18, 24
As necessary
•
Cleaning
6.
Spark plug
7.
Air filter (oiling)
8.
Cylinder head, piston head,
As necessary
•
•
Interval (km)
1.000
3.000
2
6
10.000,
15.000,
20.000
12, 18, 24
•
•
•
•
•
•
•
•
•
13. Brake operation check
and adj.
•
•
•
14. Steering bearing clearance
15. Wheel bearing clearance
16. Wheel track
•
•
•
•
•
•
•
•
•
Tire pressure
17. (front and rear 2,2 bar)
•
•
•
18. Chain tension
•
•
•
Interval (months)
Checks and adjustments
10. Gearbox oil level
11. Horn and lights
12.
Spark plug electrode
clearance
exhaust duct
17
•
9.
18
•
19.
Cylinder and exhaust pipe
Idle run and throttle
•
•
•
20. Bolt and nut tightness
•
•
•
•
•
TROUBLESHOOTING
Fuel System Troubles
Possible causes of the engine failing to start or stopping during a ride
Include, but are not limited to:
- Fuel is not supplied to the carburetor:
Check the fuel tank level and the position of the fuel cock.
- Clogged fuel strainers:
Blow the strainers clean.
- Clogged carburetor main jet:
Remove and blow clean.
- Improper use of the choke lever:
Use the lever in accordance with the engine start instructions.
- Low engine idle speed setting:
Using the adjustment bolt (A, Fig. 6), increase the engine speed
- Spark plug cap improperly mounted or short-circuiting to the
Ground mass:
Properly mount the cap on the spark plug or replace with a new cap.
- Ignition coil:
Have the trouble examined and remedied by an authorized service
agent.
Troubles Causing Reduced Engine Power
Possible causes of reduced engine power and reduced vehicle road
performance include:
- Inadequate spark plug or cylinder head tightness:
Tighten the spark plug or the cylinder head nuts.
- Clogged air cleaner on the carburetor:
Wash in gasoline, blow dry and oil lightly.
- Clogged exhaust system: clean.
Ignition System Troubles
Check the spark. Possible causes of the ignition spark plug failing to
produce a spark include:
- Wet spark or electrodes in a short circuit:
- Spark plug electrodes frequently in a short circuit:
Clean soot build-up from the cylinder head and piston head.
- Spark plug electrodes are worn out:
Adjust the electrode clearance according to the specifications, or
Replace the spark plug with a new one.
19
Gearbox Troubles
- Following the start, the engine runs at idle speed. If opening the
throttle fails to engage the clutch:
Release the throttle and attempt to start the vehicle again (the oil
is still cold and thicker). When riding, open the throttle gradually to
prevent engine jerks. If the problem is frequent, have it repaired by an
authorized service agent.
- The clutch slides (particularly in cold weather):
Improper oil type in the gearbox - change with the specified oil.
- The clutch takes excessively long to switch to the second gear or
does not switch at all:
Reduced engine power - clean the exhaust silencer;
The clutch is stuck - try to activate the clutch at higher engine revs,
with the vehicle propped up on a stand;
Excessive amount of oil in the gearbox - check the oil level.
- After engaging the second gear, the clutch jerks:
Chain is too loose - adjust the chain? tension;
Low gearbox oil level - top up to the specified level.
- With the engine shut down, it is difficult to move the vehicle forwardsbackwards:
Have the trouble examined by an authorized service agent.
20
TOMOS WARRANTY CONDITIONS
Tomos d. o. o., motoindustrija guarantees the buyer:
- That the product shall operate fault-free during the warranty period, provided that the
user follows the enclosed technical instructions;
- That the product has the required characteristics in terms of quality, as is defined in the
instructions;
- That it will settle any and all repair costs arising from a defect in the material or from an
error in assembly;
- That it will replace the product with a new one if, during the warranty period, the
authorized service workshop fails to address the problem in 45 days from the date of
notification;
- That the warranty period shall be extended for the entire duration of the repair period;
- That it will provide service and spare parts for at least 4 years after the date of purchase.
The warranty period shall cover 12 months from the date of sale. This
warranty shall not apply:
- In cases of defects caused by the owner, defects due to improper maintenance and
The
• TOMOS warranty shall not apply if proven that the defects have been caused by:
Improper motorcycle maintenance and disregarding the instructions provided in the
• TOMOS overhaul manual;
• Fitting parts on the motorcycle, or modifications or adaptations prohibited by TOMOS;
• Motorcycle repairs performed by a workshop not authorized by TOMOS;
Improper use of the motorcycle (for example: participation in races, overload, non-use of
• the motorcycle for extended periods of time);
In case the vehicle is damaged to the extent where its repairs or mending to a full work• ing order would amount to more than 15 % of the factory sale price.
Normal wear of parts.
20
The warranty does not cover parts with normal wear, such as: Tires, wiring, spark plugs,
graphics (stickers), fuel tank cap, lights, chains, brackets, brake pads, air and oil filters,
saddles and exhaust pipes (internal inspection); the same applies for the motorcycle
frame, piston holes, yellowing of chrome plating, damage due to improper adjustments,
bad oil/fuel mixture or low oil level, which is also not covered by this warranty.
Vehicle parts with limited warranty period (6 months)
- battery;
- footrests;
- stands.
This contract warranty does not cover the following expenses: costs of normal repair
works, oil, grease etc., emergency repair costs, motorcycle immobilization costs, and
costs of removal and damages of carried goods.
Warranty rights
The buyer can exercise their warranty rights on the basis of a duly filled in warranty certificate, verified by an authorized dealer and a confirmed coupon of a pre-delivery service by
an authorized service workshop.
WARNING: If it is found that a silencer or an air filter was used that is not an original part
of the motorcycle, or if the original parts were modified in any way in order to increase the
motorcycle noise level, the warranty is cancelled. In addition, the abovementioned adjustments that increase the noise level, power and speed of the motorcycle are under total
responsibility of the owner.
NOTE: In case of damage occurring in any of the neighboring countries, please present
the warranty claim to your dealer, together with the relevant invoices for any defective
parts.
*Depends on market
TOMOS