1
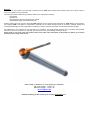
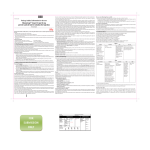
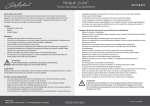
TUNE DC 15 Steckachse
15mm Steckachse für FOX, DT-Swiss & Rock Shox Federgabeln
Gebrauchsanleitung
Achtung! Bitte lesen Sie die gesamte Anleitung aufmerksam durch,
bevor Sie Ihre DC15 Steckachse in Gebrauch nehmen.
Stand:Dezember 2012
Wir gratulieren Ihnen zum Kauf Ihres Tune Produkts. Sie haben eine gute Wahl getroffen. Tune Produkte werden nach dem
höchsten Qualitätsstandard in Deutschland gefertigt. Dennoch ist es notwendig, dass Sie folgende Hinweise beachten und Ihr Tune
Produkt gemäß diesen Angaben pflegen. Bitte machen Sie eventuelle Mitbenutzer mit dieser Anleitung vertraut.
Technische Daten:
Material Achse: Aluminium 7075 CNC bearbeitet
Material Hebel: Karbon
Gewicht: ca. 43g
DC15 FX (für Fox Gabeln)
DC15 RS (für RockShox / Sram Gabeln) DC15 DT (für DT-Swiss Gabeln)
Gewinde: M14 x 1,5
Gewinde: M15 x 1,5
Achslänge: 136,5mm
Achslänge: 141mm
kompatibel mit folgenden Gabelmodellen:
-geeignet für alle QR15 Modelle
-Rock Shox Sektor R / RL / TK
-Revelation RL / RLT / RLT Ti / World Cup / XX /
XX World Cup
-Sid RLT / RLT Ti / World Cup / XX World Cup
-Niner RDO
Gewinde: M15 x 1,5
Achslänge: 131,5mm
-XMM 15mm Thru axle
-120 Twin Shot 15mm / tapered
-140 Twin Shot / tapered
-EXM 150 15mm / tapered
-EXC 150
nicht kompatibel mit folgenden Gabelmodellen:
- XMM 29 Thru Bolt 100/120
Diese Tabelle erhebt keinen Anspruch auf Vollständigkeit! Änderungen seitens der Gabelhersteller sind jederzeit möglich, wodurch
der DC15 nicht mehr kompatibel sein kann.
WARNUNG: Stellen Sie vor jeder Fahrt sicher, dass Ihre DC15 Steckachse wie in der Anleitung beschrieben fest
geschlossen bzw. fixiert ist. Durch eine fehlerhafte Montage kann es zu schweren oder tödlichen Verletzungen kommen.
Bitte beachten Sie die Gebrauchsanleitung des Gabelherstellers!
Einbau:
1.
Platzieren Sie das Vorderrad (ohne die DC 15 Steckachse) in den Ausfallenden des Tauchrohrs. Positionieren Sie die Bremsscheibe
zwischen den Bremsbelägen im Bremssattel, während Sie die Klemmflächen der Nabe gerade und fest in die Vertiefungen der
Ausfallenden einsetzen.
Tipp:
Zwischen den Ausfallenden der Gabel können sich Schmutz und Verunreinigungen ansammeln.
Überprüfen und reinigen Sie diesen Bereich daher stets, bevor Sie das Laufrad einbauen.
2.
Fetten Sie die Achse und das Gewinde Ihrer DC15 Steckachse. Führen Sie Ihre DC15 Steckachse in das Ausfallende der Gabel ein
und schieben Sie sie vollständig durch die Nabe, bis sie an das Gewinde auf der gegenüberliegenden Seite stößt.
3.
Drehen Sie Ihre DC15 Steckachse ca. 6 Umdrehungen in die Gabel ein, keinesfalls bis zum Anschlag! Danach den Hebel umlegen,
sodass Spannung aufgebaut wird.
Der Hebel sollte in der geschlossenen Position oben vor dem Tauchrohr stehen, damit er nicht im Fahrbetrieb beschädigt werden
kann und sich nicht selbstständig öffnet.
3.1 Ist die Hebelendstellung nicht optimal, so kann diese korrigiert werden. Hierfür die Achse wieder herausdrehen und die
Exzentereinheit des DC15 gegen den Federdruck in die Achse drücken und die Hebelausgangsstellung verändern.
Dies ist durch einrasten der Exzentereinheit in 60° Schritten möglich.
3.2 Versuchen Sie niemals mit Gewalt Ihr DC15 Steckachse weiterzudrehen, auch wenn keine Spannung aufgebaut
werden kann oder der DC15 sich nicht in das Gabelgewinde schrauben lässt. Dadurch kann der DC15 beschädigt
werden!
Garantie:
Ausgehend von dem Kaufdatum gewähren wir zwei Jahre Garantie auf unsere Produkte. Garantie-/ Gewährleistungsansprüche
können nur unter Vorlage einer Händlerrechnung (Kopie) geltend gemacht werden.
Die Garantie schließt Material- und Produktionsfehler ein, nicht aber Schäden welche durch:
- einsatzbedingten Verschleiß
- unsachgemäßen Einsatz
- Nichtbeachtung der Gebrauchshinweise
- nicht fachgerechter Reparatur und Wartung
auftreten. Garantieansprüche müssen direkt vor Ort geklärt werden und unterliegen dem Ermessen der Firma Tune U. Fahl.
Die Firma Tune U. Fahl haftet aus dieser Garantiezusage nicht auf Schadenersatz, insbesondere nicht für indirekte unfallbedingte
Schäden, mittelbare Schäden und Folgeschäden.
Eine Gewährleistung auf Farbkonstanz können wir nicht geben. Farbige Teile können bei Sonneneinstrahlung ausbleichen.
Die Zufriedenheit unserer Kunden liegt uns sehr am Herzen! Deshalb handhaben wir Probleme mit unseren Produkten auch
außerhalb des Gewährleistungsfrist meist sehr kulant. Wir sind bekannt für schnelle und herausragende Serviceleistungen.
Bitte senden Sie uns nur gereinigte Produkte ein und legen Sie bitte unser Kontaktformular sowie eine Rechnungskopie der
Sendung bei.
Tune U. Fahl, Im Mittelfeld 18, 79426 Buggingen
Tel. 07631 - 74 807 - 40
Fax. 07631 - 74 807 - 58
[email protected]
www.tune.de
Außerhalb Deutschlands bitte Ihren zuständigen Distributor kontaktieren!
TUNE DC 15 Through-Axle
15mm through axle for FOX, DT-Swiss & Rock Shox suspension forks
User manual
Attention! Please carefully read the entire user manual before using the quick release through axle.
Current as of May 2012
We congratulate you on the purchase of your new TUNE product. You have made a good choice. TUNE products are designed and manufactured in
Germany according to highest quality standards. Nevertheless, it is necessary to follow following advice and service the product according to this user
manual. Please make any other users familiarise themselves with this manual.
Technical specifications:
Material axle: aluminium 7075 CNC machined
Material lever: carbon
Weight: approx.. 43g
DC15 FX (for Fox forks)
DC15 RS (for RockShox / SRAM forks)
thread: M14 x 1,5
thread: M15 x 1,5
axle length: 136,5mm
axle length: 141mm
compatible with following fork models:
-suitable for all QR15 model forks -Rock Shox Sektor R / RL / TK
-Revelation RL / RLT / RLT Ti / World Cup / XX /
XX World Cup
-SID RLT / RLT Ti / World Cup / XX World Cup
-Niner RDO
The DC15 is not compatible with following fork models:
DC15 DT (for DT Swiss forks)
thread: M15 x 1,5
axle length: 131,5mm
-XMM 15mm Thru axle
-120 Twin Shot 15mm / tapered
-140 Twin Shot / tapered
-EXM 150 15mm / tapered
-EXC 150
- XMM 29 Thru Bolt 100/120
This list does not claim to be complete! Changes by the fork manufacturers are possible at any time in which case the DC15 may no
longer be compatible.
WARNING! Before every ride, ensure that the QR axle is assembled and properly closed/fastened as outlined in this
manual. An incorrect installation or adjustment can lead to serious or fatal injuries.
Please carefully read the owner’s manual of the respective fork manufacturer regarding changes to the fork.
Assembly:
1. Place the front wheel (without DC15 thru axle) in the drop-outs under your suspension fork’s lower legs. Position the brake rotor
between the brake pads while carefully inserting the front wheel hub parallel into the opening of the drop-outs.
Tipp:
Dirt and grit can accumulate between the drop outs. Always check and clean this area before inserting the
front wheel.
2.Grease the axle and thread of your DC15 thru axle. Insert the axle through the drop outs of your fork and insert fully until the axle’s
thread contacts the fork leg’s thread.
3.Insert the axle approx. 6 revolutions into the fork, but not all the way as far as it goes! Then, flip the lever to create some tension. In
the closed position, the lever should be pointing upwards and close to the forks lower leg, so that it cannot easily be damaged by
contact or open up by itself.
3.1 If the lever position is not optimal, it can be corrected. To do this, turn the axle out again, and change the position of the
lever, by pushing the lever against the spring until the position can be readjusted. This is felt by engaging every 60°.
3.2 Never try to turn the DC15 thru axle with a large force. Even if the required clamping force cannot be reached or the
thru axle does not seem to want to go into the drop outs, never apply a large amount of force. This can damage the
DC15!
Warranty:
We grant a two year warranty from the date of purchase on the TUNE DC15 QR thru axle. Warranty claims can only be made if a
copy of an original invoice is presented.
The warranty includes material and production defects, but not damages caused by:
normal wear
improper use
disregarding the service instructions/user manual
unprofessional repair and maintenance work
Warranty claims have to be sent in to the local TUNE distributor and are subject to the assessment of TUNE. Based on this warranty,
the company TUNE is not liable for compensation, especially not for indirect damage caused by accidents, collateral damage and
consequential damage. We cannot guarantee a consistency of colours. Coloured components can fade when exposed to sunlight.
The satisfaction of our customers is very important to us! Therefore, we usually handle problems with our products with goodwill,
even if the case is not covered by our warranty. We are known for our quick handling of warranty issues.
Please send us only clean parts and include a brief cover letter with a description of the problem or defect, your contact
information and a copy of the invoice.
Tune U. Fahl, Im Mittelfeld 18, 79426 Buggingen, GERMANY
Tel. 0049 (0)7631 - 74 807 - 40
Fax. 0049 (0)7631 - 74 807 - 58
[email protected]
www.tune.de
Outside Germany, please contact your country’s Distributor first!