1
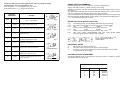
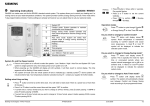
Part No: 8442 Iss.3. 08/99 Ampthill Road Bedford, MK42 9ER Tel: 01234 364621 Fax: 01234 219705 Email: [email protected] Website: www.danfoss-randall.co.uk Danfoss Randall Ltd. Features include: Simple change between GMT & BST 12 hour or 24 hour clock 2 on's/2 off's with manual over-rides Battery back-up While in OFF, AUTO or ALLDAY modes the plus one hour (+1HR) button can be used to switch from off to on for just one hour, or to extend an existing on period by one hour. The extra hour is cancelled by pressing the button again, pressing the MAN button, or when an on event is reached. While in AUTO or ALLDAY modes pressing the manual (MAN) button will switch an output which is on to off, and vice versa. This over-ride will last only until the next programmed switching event is reached, when the automatic programme will resume control, or until the button is pressed again. When the above over-rides are selected a bar appears in the display against the appropriate legend. MANUAL OVER-RIDES ( ) and Hot Water ( ). The operating modes available are: ON - The output is on constantly. OFF - The output is off constantly, unless +1HR is pressed. AUTO - The output switches on and off to the set programme. ALLDAY - The output switches on at Setting 1, then stays on until Setting 4. for Heating & Hot Water. CP10C -24 hour programmer with separate outputs USER INSTRUCTIONS Behind the flap are two SELECT buttons, one each for Central Heating SELECTING THE OPERATING MODE RESET Should the unit be disconnected from the mains a small battery symbol will blink on the left hand side of the display. After the second midnight, i.e. between 24 and 48 hours, the display will go blank and the unit will lose its settings. When mains power is restored it is recommended that the unit be reset by lowering the front flap and using a small non-metallic object, e.g. matchstick, press and release the recessed reset button (marked R/S). This installs the factory preset programme and sets the time to 12:00pm on Monday (MO). The outputs will be OFF, (see Fig. 1). Note that the colon between the hours and minutes is blinking. This means the unit is in RUN mode and will switch the Central Heating and Hot Water on and off in accordance with the programme. The colon only blinks in RUN mode. CHOICE OF 12 HR OR 24 HR CLOCK At any time during RUN mode the time displayed can be toggled between a 12 hour clock with am/pm indication or a 24 hour clock by pressing and holding both DAY and NEXT ON/OFF buttons for 1·5 seconds. 2) CHECKING/ADJUSTING PROGRAMMES: Pre-set programmes may be checked using the NEXT ON/OFF button to step through the four available settings, which can be changed if required using the + or - buttons. The display now shows SET OFF TIME, with OFF blinking. 3) RUN MODE: Having completed the programming, press PROG to go to the run mode. RUN MODE OPERATION: In RUN mode the unit will automatically switch the Central Heating and Hot Water on and off at the times set. However, useful over-rides are provided which enable the user to make temporary changes to the ON/OFF times without having to re-programme the unit. The facilities offered by the over-rides are detailed on the back cover. REVIEWING PROGRAMMES FROM THE RUN MODE: Press PROG twice, follow steps 2 & 3) above. G.M.T. / B.S.T. While in RUN mode the change from Greenwich Mean Time to British Summer Time and back is achieved by pressing and holding the + button to add one hour in the Spring, or the - button to put the clock back in the Autumn. After the first time this change has been made this feature will only allow the clock to be changed in the correct direction. Take care when making this change for the first time. If it is made in the wrong direction the unit will have to be reset and any user-settings re-entered. SETTING THE CLOCK & PROGRAMMES 1) Pressing PROG once enters SET TIME mode, see Fig. 2. While setting the time, pressing and releasing the + or - buttons will change the time by one minute; pressing and holding down + or - will change the time quickly in ten minute steps. (This also applies when adjusting the ON/OFF times). Use DAY button to set day. When the time and day are correct, press the PROG button once to start the clock and go to SET ON TIME mode. ERROR FREE PROGRAMMING. Sequence of button presses whilst adjusting time, day and programme settings. Read the section Error free programming first. Press and release + or - to change the time by one minute. Press and hold down + or - to change the time quickly. BUTTON SEQUENCE STEP 1 PRESS PROG ON/OFF times cannot be set out of sequence. The limits of adjustment are: Setting 1 (first ON) 12:00am to 11:59pm (normally in the morning). Settings 2 to 4 (first OFF to last OFF) anywhere between the previous Setting and 23 hours 59 minutes after Setting 1. The - button stops responding when the previous Setting is reached, but the + button continues to its limit, also changing any later Settings that would have been overlapped. While becoming familiar with the Setting Sequence the ON/OFF times may become grouped together. If this should happen use NEXT ON/OFF to select Setting 1, then check/alter each Setting in turn, using + or -, until the desired programme is entered. ACTION STARTING FROM RUN MODE, Fig. 1 - Colon blinking Fig. 1 NOTES ON TYPICAL DISPLAYS (See left) Fig. 1 Fig. 2 Fig. 3 Go to SET CLOCK mode. (Fig. 2) 2 DAY Select current day of week. (for display only) 3 + or - Adjust time of day. 4 PROG Start clock and display Central Heating and Hot Water ON/OFF times. (Fig.3) 5 + or - Adjust first event ON time. Fig. 2 Fig. 4 Fig. 5 Immediately following a manual RESET [RUN mode with colon blinking] SET TIME and DAY mode [colon steady, day, hours and minutes blink] SET FIRST EVENT ON [setting number and programming period shown, ON blinks] SET FIRST EVENT OFF [setting number and programming period shown, OFF blinks] SET LAST EVENT PROGRAMMED FOR OFF TIME AFTER [programming period when output will switch off blinks] TIME TIME MIDNIGHT Fig. 6 Typical CH ALLDAY, HW AUTO programme with HW +1 HOUR selected. Fig. 3 IMPORTANT NOTES 6 NEXT/ON/OFF Step forward to first event OFF time. 7 - Repeat steps 5 & 6 for second event ON/OFF times. (Figs. 3, 4 & 5) 8 PROG Complete programming and return to run mode, colon blinks. Fig. 4 A) B) C) Day of week is for display purposes only. The COPY button on CP10C has no function, please disregard. Should the unit be disconnected from the mains a small battery symbol will blink on the left hand side of the display. FACTORY PRE-SET PROGRAMME Fig. 5 The following ON/OFF times are programmed at the factory and are re-instated by pressing the recessed R/S button behind the flap. F acto ry P re-set P ro g rammes Se tti ng ON/OFF 1 2 3 4 ON OFF ON OFF Ti me 6:30AM 8:30AM 5:00PM 10:30PM