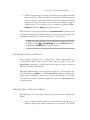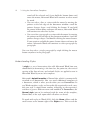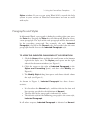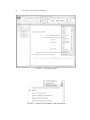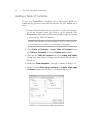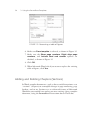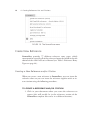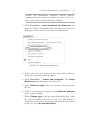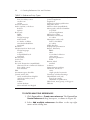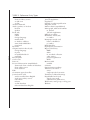
1
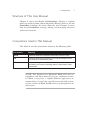
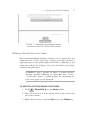
FormatEase VERSION 6.0 THE GUILFORD PRESS New York London 2007, 2012 Guilford Publications, Inc. Published by The Guilford Press A Division of Guilford Publications, Inc. 72 Spring Street, New York, NY 10012 www.guilford.com All rights reserved No part of this manual may be reproduced, translated, stored in a retrieval system, or transmitted, in any form or by any means, electronic, mechanical, photocopying, microfilming, recording, or otherwise, without written permission from the Publisher. Printed in the United States of America This manual is printed on acid-free paper. Last digit is print number: 9 8 7 6 5 4 3 2 1 This is a manual for the program FormatEase: Version 6.0 ISBN: 978-1-60623-603-1 FormatEase is a registered trademark of Guilford Publications, Inc. Throughout this manual the programs referred to are trademarks of their respective publishers and developers. Word 2007, Word 2010, Windows XP, Windows Vista, and Windows 7 are registered trademarks of Microsoft Corporation. Screen shots from Microsoft Word 2010 in this manual are reprinted by permission from the Microsoft Corporation. In this manual the uncapitalized word “windows” describes the appearance of part of the monitor’s screen and is not used as the trademark of or as a synonym for the program owned by Microsoft. FormatEase is an independently developed product that has not been endorsed by the American Psychological Association. FormatEase is not intended to function as a substitute for the Publication Manual of the American Psychological Association, 6th Edition, 2009 by the American Psychological Association. Cover image by Getty Images. LICENSE Notice to User/Purchaser: Do not install this program on your computer until you have read and agree to this agreement. Carefully read all the terms and conditions of this Agreement. By installing this program on your computer you agree to become bound by the terms and conditions of this Agreement as a complete and exclusive statement of your agreement with us. If you do not agree to the terms and conditions, promptly return this product to us, Guilford Publications (referred to below as Guilford), or to the distributor from whom you purchased it. If you have paid Guilford any monies, you will receive a full and immediate refund from Guilford. If you bought it from a distributor, you must make refund arrangements with it. 1. License: The enclosed computer program(s) and documentation, as well as upgrades, modified versions, and copies of the program (collectively referred to as “Software” or “Program”), are licensed, not sold, to you by Guilford for use under the terms of this License. 2. Terms of the License: a. You have the nonexclusive, nontransferable right to use the Software on a single computer (central processing unit). You may physically transfer the Software from one computer to another provided that the Software is used on only one computer at a time or by one user at a time. You may not electronically transfer the Software from one computer to another over a network. You may not install the software on a network server. If your needs are such, we will be happy to supply site licenses and group purchases. b. You may make one copy of the Software, solely for backup purposes. You must reproduce the copyright and other proprietary notices on the backup copy as they appear on the disk. c. You may not distribute copies of the Software or documentation to others. You may not rent or lease, sublicense, or lend copies of this Software or related documentation. d. You may transfer the Software and License to another party only if this party agrees to the terms and conditions of the Agreement and completes and returns a Registration Letter to Guilford. If you do transfer the Software, you must transfer all copies, whether in printed or machine-readable format, to the same party or destroy any copies of the Software or of its parts and modifications that are not transferred. e. You may modify the Software without the prior written consent of Guilford. If you do make modifications or translations, however, you may not distribute these modified versions without the prior written consent of Guilford. f. You may not translate, adapt, reverse-engineer, decompile, disassemble, or otherwise attempt to discover the source code of this Software. 3. Copyright: This Software and related documentation are copyrighted by and proprietary to Guilford. This Software is protected by the United States Copyright Law and international treaty provisions. Therefore you must treat it just as you would any other copyrighted, for example, a book. 4. Proprietary Rights: Guilford retains title and ownership of all copies of this Software, the media on which it is recorded, and related documentation. The nonexclusive License set forth in this Agreement is not a sale of the Software and related documentation or any copy. You agree to hold the Software and related documentation in trust and take all reasonable steps to prevent unauthorized disclosure. 5. No Other Rights: Except as stated in this Agreement, this Agreement does not grant you any rights to patents, copyrights, trade secrets, or trademarks (whether registered or unregistered) or any rights, franchises, or licenses in respect to the Software and related documentation. Guilford reserves all rights not expressly granted to you. 6. Uses: You have purchased a License for an unlimited number of uses of the Software. 7. Terms: This License Agreement is effective until terminated. You may terminate it by destroying the Software and documentation and all copies thereof. The License will also terminate if you fail to comply with any condition of this Agreement. You agree that upon such termination you will destroy all copies of the Software and documentation. 8. Limited Warranty: a. If you have purchased the Software from Guilford, then at any time during the 30-day period following the date you first receive it, you, at your sole option, may return to Guilford the total contents of the original package for a full refund (less shipping and handling charges, if any were applied to the original order). In addition, you must provide Guilford with a written description of what caused your dissatisfaction with the Software or documentation. If you exercise this option, you must destroy any duplicate copies of the contents of the Software or documentation before you request a refund. Unless Guilford has received the entire Software and documentation and written notice as described above within seven days after the end of the 30-day period, you will be assumed to have fully examined and accepted the Software and documentation and concluded that the Software and documentation are satisfactory to you in every respect. b. If you have purchased the License from an entity other than Guilford, your rights to return the Software (other than for defect, as provided below) will be determined by the agreement between you and the dealer. c. Guilford warrants to the original licensee that the disk on which the Software is recorded is free from defects in materials and workmanship under normal conditions, use, and service for a period of ninety (90) days from the date of delivery as evidenced by a copy of your purchase receipt. Guilford’s entire liability and your exclusive remedy shall be replacement of the disk that is returned to Guilford with a copy of your receipt, provided you have returned a registration card to Guilford within thirty (30) days of the date of purchase. If failure of the disk resulted from accident, abuse, or misapplication of the product, then Guilford shall have no responsibility to replace the disk under this limited warranty. d. GUILFORD DOES NOT AND CANNOT WARRANT THE PERFORMANCE OR RESULTS YOU MAY OBTAIN BY USING THIS SOFTWARE OR RELATED DOCUMENTATION, NOR DOES GUILFORD WARRANT THE PERFORMANCE OF ANY WORD-PROCESSING PROGRAM UTILIZED WITH IT. THE FOREGOING STATES THE SOLE AND EXCLUSIVE REMEDIES GUILFORD WILL PROVIDE FOR BREACH OF WARRANTY. YOU UNDERSTAND THAT, EXCEPT FOR THE FOREGOING 30DAY LIMITED WARRANTY, GUILFORD MAKES NO WARRANTIES, EXPRESSED OR IMPLIED, AS TO PERFORMANCE, NONINFRINGEMENT OF THIRD-PARTY RIGHTS, MERCHANTABILITY, OR FITNESS FOR ANY PARTICULAR PURPOSE. GUILFORD DOES NOT WARRANT, GUARANTEE, OR MAKE ANY REPRESENTATIONS REGARDING THE USE OF, OR THE RESULTS OF THE USE OF, THE SOFTWARE OR RELATED DOCUMENTATION IN TERMS OF CORRECTNESS, ACCURACY, RELIABILITY, CURRENTNESS, OR OTHERWISE. YOU RELY ON THE PROGRAM AND RESULTS SOLELY AT YOUR OWN RISK. e. NEITHER GUILFORD NOR ANYONE ELSE WHO HAS BEEN INVOLVED IN THE CREATION, PRODUCTION, OR DELIVERY OF THIS SOFTWARE SHALL BE LIABLE FOR ANY DIRECT, INCIDENTAL, OR CONSEQUENTIAL DAMAGES, SUCH AS BUT NOT LIMITED TO LOSS OF ANTICIPATED PROFITS OR BENEFITS OR SAVINGS, BUSINESS INTERRUPTION, LOSS OF INFORMATION, AND THE LIKE, ARISING OUT OF THE USE, RESULTS OF USE, OR INABILITY TO USE THIS SOFTWARE OR DOCUMENTATION, EVEN IF GUILFORD HAS BEEN ADVISED OF THE POSSIBILITY OF SUCH DAMAGES OR CLAIMS OR OF ANY CLAIM BY ANY OTHER PARTY. f. Some states do not allow the exclusion or limitation of liability for consequential or incidental damages, so the above limit may not apply to you. This warranty gives you specific legal rights and you may also have other rights, which vary from state to state. 9. Updates: Guilford is under no obligation to make any updates available to you. However, your completion and return of the Registration Letter will have the added benefit of putting you on Guilford’s list for notification of available updates. 10. Choice of Law: This Agreement is governed by the laws in force in the state of New York. This Agreement will not be governed by the United Nations Convention on Contracts for the International Sale of Goods, the application of which is expressly excluded. If any provision of this License is held by any court of competent jurisdiction to be contrary to law, that provision will be enforced to the maximum extent permissible and the remaining provisions of this License will remain in full force and effect. Exclusive jurisdiction over all disputes shall rest in the federal and state courts with jurisdiction over New York County, New York. 11. Export: You acknowledge that the laws and regulations of the United States restrict the export and re-export (as defined in Section 379.1, (b)–(c) of the Export Administration Regulations and any amendment thereto) of this Software and documentation. You agree that you will not export or re-export the Software and documentation in any form without the appropriate United States and foreign government approval. 12. U.S. Government Restricted Rights Legend: Use, duplication, reproduction, or disclosure by the Government is subject to restrictions in subdivision (c) (1) (ii) of the Rights in Technical Data and Computer Software clause at 48 C.F.R. 252.227-7013 and in subparagraphs (a) through (d) of the Commercial Software—Restricted Rights Clause at 48 C.F.R. 52.227-19 and the limitations set forth in Guilford’s standard commercial agreement for software. Unpublished rights are reserved under the copyright laws of the United States. If you are a government end-user, this License of the program conveys only “Restricted Rights” and its use, disclosure, and duplication are subject to Federal Acquisition Regulations, 52.227.7013. 13. Integration: You acknowledge that you have read this Agreement, understand it, and that by installing and opening the Software on any computer you agree to be bound by its terms and conditions. You further agree that it is the complete and exclusive statement of the agreement between Guilford and you, which supersedes any proposal or prior agreement, oral or written, and any other communications between Guilford and you relating to the subject matter of this Agreement. No variation of the terms of this Agreement or any different terms will be enforceable against Guilford unless Guilford gives its express consent, including an express waiver of the terms of this Agreement, in a writing signed by an officer of Guilford. 14. General: If you have any questions, please contact Guilford Publications at: [email protected]. Contents Figures and Tables xi 1. Introduction 1 The Basic Tasks 1 Replacing Template Text 2 Entering Reference Information 2 Structure of This User Manual 3 Conventions Used in This Manual 3 2. Installing FormatEase 5 Installing FormatEase in Windows 5 Installing FormatEase If You Have Used an Earlier Version 7 3. Using the FormatEase Templates 9 FormatEase Templates 10 Creating a Document 10 ¾¾To Create a New Formatease Document 10 Formatting in Microsoft Word 11 vii viii Contents Selecting Text in Microsoft Word 11 Understanding Styles 12 Paragraphs and Styles 13 ¾¾To View the Indented Paragraph Style Definition 13 An Important Note about Style Names 16 Shift + Enter 17 Applying a Style to a Paragraph 17 ¾¾To Apply a Style to a Paragraph in Word 2010 17 Changing a Style 18 ¾¾To Change the Interline Spacing for Block Quote 19 Changing the Font 20 ¾¾To Change the Font 20 Changing the Page Numbering 22 Using the Design Ribbon 22 ¾¾To Change the Pagination of Your Paper 22 ¾¾To Place the Page Number at the Bottom of the Page 24 ¾¾To Have No Page Number or Running Head on the First Page of Each Chapter 24 Running Heads 25 ¾¾To Change the Running Head 25 Adding Figures and Tables 26 ¾¾To Include a Figure That Is Stored in a File on Your Computer 26 ¾¾To Add a Caption to a Figure 27 Adding Tables 28 ¾¾To Add a Table 28 ¾¾To Add a Caption to a Table 29 Adding Cross-References 29 ¾¾To Add a Cross-Reference 30 Adding a Table of Contents 32 Adding a List of Figures or a List of Tables 33 ¾¾To Generate a List of Figures or a List of Tables 33 Adding and Deleting Chapters (Sections) 34 About Sections in a Document 35 Adding Chapters 35 ¾¾To Add a Chapter (Section) to Your Paper 36 Deleting a Section from Your Paper 37 ¾¾To Delete a Section From Your Paper 37 Using FormatEase Templates with Existing Documents 38 ¾¾To Format an Existing Document 38 Contents ix 4. Creating Reference Lists and Citations 39 Create New Reference 40 Creating a New Reference and/or Citation 40 ¾¾To Create a Reference and/or Citation 40 Reference Types 43 Additional Reference Help 43 Multiple-Entry Mode 43 ¾¾To Enter Multiple References 44 Creating Another References Section 45 ¾¾To Add Reference Entries in a Second Location 45 List/Copy/Edit References + Insert Citation 45 Copying a Reference from Another Document 46 ¾¾To Copy a Reference from Another FormatEase Document 47 Editing an Existing Reference 47 ¾¾To Edit a Reference without Changing the Citation 48 ¾¾To Edit a Reference and Create a New Citation 48 Editing Citations 49 Create a New Citation from an Existing Reference 50 ¾¾To Cite an Existing Reference 50 Create a New Reference Based on an Existing One 50 ¾¾To Use an Existing Reference for Creating a New One 50 Insert Bookmark for References 52 Captions Formatter 52 Sort References 52 APPENDIX A. Summary of FormatEase Styles 53 APPENDIX B. Formatting Terminology 55 APPENDIX C. Technical Support 57 Check Our Web Site 57 E-mail Us 57 Fax Us 58 Call Us 58 Figures and Tables FIGURE 1. The Styles panel 14 FIGURE 2. Opening the Modify Style dialog box 14 FIGURE 3. The Modify Style dialog box 15 FIGURE 4. The Styles panel, with Indented Paragraph selected 18 FIGURE 5. The Paragraph dialog box, changing interline spacing 19 FIGURE 6. Modify Style for the Normal style 21 FIGURE 7. The Font dialog box 21 FIGURE 8. Changing page numbering and running heads 22 FIGURE 9. The Running head dialog box 26 xi xii Figures and Tables FIGURE 10. The Caption dialog box 27 FIGURE 11. The Insert Table dialog box 28 FIGURE 12. The Cross-reference dialog box 30 FIGURE 13. Inserting a cross-reference to a figure 31 FIGURE 14. Generating a table of contents 32 FIGURE 15. Generating a table of figures 34 FIGURE 16. Paragraph marks and section breaks 36 FIGURE 17. Selecting the paragraph marker and the first two lines of the next chapter 37 FIGURE 18. The FormatEase menu 40 FIGURE 19. Select Insert bookmark 41 FIGURE 20. The Create Reference dialog box 42 FIGURE 21. The List/Copy/Edit References dialog box 46 FIGURE 22. The Edit reference dialog box 48 FIGURE 23. The Create new reference based on existing dialog box 51 TABLE 1. FormatEase Templates 10 TABLE 2. APA and FormatEase heading levels compared 16 TABLE 3. Reference Entry Types 44 1. Introduction FormatEase is an application that helps you create documents that meet the style guidelines of the 6th edition of the Publication Manual of the American Psychological Association. It does this in two main ways: • By providing you with Microsoft Word templates that contain styles that meet APA requirements • By automatically creating accurately formatted reference lists and in-text citations that meet APA requirements The Basic Tasks There are two basic tasks that FormatEase helps you with: 1 2 1. Introduction • Text formatting, in which you replace FormatEase’s already formatted template text with your own. • Entering reference information Replacing Template Text You get started writing your paper with FormatEase by creating a new document from one of FormatEase’s four templates. The document you have created contains placeholder text that is formatted according to the APA Publication Manual requirements. (The placeholder text you will eventually replace gives further tips on how to take advantage of the layout FormatEase provides.) Deleting FormatEase’s placeholder text and replacing it with your own in the right way results in a perfectly formatted paper! Entering Reference Information The other core feature of FormatEase is that it simplifies and guides you through creating and properly formatting references for your paper’s reference list, also enabling instant in-text citations. Though the reference list should be at the end of your paper, FormatEase lets you add references as you write, and it puts them at the end of your paper. The current edition of the APA Manual has detailed how to reference and cite 77 different types of publications, from journal articles to online sources. FormatEase’s reference functions tell you the pieces of information needed for each of those reference types, as well as the order, styling (such as capitalization), and punctuation required for each—thus saving you from having to page through the APA Manual every five minutes! 1. Introduction 3 Structure of This User Manual Chapter 2 covers installation of FormatEase. Chapter 3 explains what you need to know about Microsoft Word in order to use the FormatEase templates the most effectively. And Chapter 4 covers how to use FormatEase creating, editing, and managing references and in-text citations. Conventions Used in This Manual This Manual uses the conventions shown in the following table. Convention Meaning NOTE Presents additional important information about a topic TIP Presents additional information you may find helpful when you perform a command or step Bold Indicates dialog box sections and choices and items you click with your mouse, including menus, menu items, tabs, and buttons NOTE: This Manual uses Microsoft Word 2010 for its procedures and illustrations. If you use a different version of Word, it may have a slightly different appearance or nomenclature. A search on a specific term in the help system of your version of Word should clarify any discrepancies of that nature. 2. Installing FormatEase Installing FormatEase in Windows If you have a previous version of FormatEase on your computer, see the special note below before installing this one. Otherwise, follow these simple steps: 1. Insert the FormatEase CD-ROM into your CD-ROM drive. After a brief period, the FormatEase splash screen will come up. To start the installation, click on the Next button. If the installer screen does not come up, view your CD-ROM drive and click on setup.exe. 2. The installer will display the FormatEase license. Please read it (the text is also in the beginning of this manual), and if you agree, click on the radio button next to I accept the terms of this agreement then click on the Next button. 3. Next you get a warning about having installed FormatEase earlier. Please read it and click Next if you have not installed this version before. (If you have installed this version of 5 6 2. Installing FormatEase FormatEase, then remove it before you install it again. Find the option Add/Remove Programs from the Control Panel.) If you have an older version of FormatEase, you do not need to uninstall it, but see the section “Installing FormatEase if you have used an earlier version.” 4. You are now ready to install. Click Next and the files will be installed. 5. Open Microsoft® Word. There should be a new ribbon called Add-Ins showing as the rightmost or one of the rightmost ribbons. Click on the Add-Ins ribbon and you should see the FormatEase button. If you click on that button the FormatEase menu will show, which contains the special FormatEase functions. 6. Click on the File ribbon > New, and click on the My Templates button, which is one of the choices in the top panel. 7. The New dialog box will show, with a tabbed window. One of the tabs will say FormatEase. Click on the FormatEase tab and you will see four templates: APA Paper.dot Dissertation.dot Term Paper.dot Thesis.dot You can open one of these templates to start your paper, use a blank document, or any other templates. The FormatEase templates, however, have additional formatting options for headings and special sections for your paper. 2. Installing FormatEase 7 Installing FormatEase If You Have Used an Earlier Version You should remove your old templates after installing this new version. While the programs technically would work together, it may get confusing to have this newest version of FormatEase running at the same time as the old one. FormatEase opens when Word does, so if you use the old templates both versions would be running at the same time. You can tell them apart by the dates. Documents you created with a previous version of FormatEase will work with this new version. You will still get the old FormatEase menu on the top of your screen. Your system won’t crash if you use them both, but you won’t get all of the new useful features in this version. Unfortunately, the reference copying and editing and creating a new citation from an existing reference functions will not work on references created with an earlier version, only those created with this one. 3. Using the FormatEase Templates FormatEase lets you concentrate on writing your papers while it takes care of the formatting requirements for the elements of your papers, including: • The main body of your paper (paragraph indentation, spacing, and placement) • Title page, copyright page, acknowledgements page, abstract • Table of contents, list of figures, list of tables • Chapter titles and subtitles • Page margins, page numbering, and section headings • Level-1 to Level-5 headings FormatEase contains the four Microsoft Word document templates described in the following table. 9 10 3. Using the FormatEase Templates TABLE 1. FormatEase Templates Template Used For APA PAPER.dot Journal articles, book chapters, or other papers DISSERTATION.dot Dissertations, full books THESIS.dot Master’s theses TERM PAPER.dot Term papers FormatEase Templates The FormatEase templates contain all of the sections that make up a document, such as the title page, the main body of the paper, a reference page, and so on. The sections in a new document that you create with a FormatEase template are formatted according to the APA requirements and expand as you type new text. You can delete any sections from the template that you do not need in your paper. Creating a Document To Create a New FormatEase Document 1. In Microsoft Word, click File > New > My Templates. 2. Within the dialog box that opens, select the FormatEase tab, select the template that you want to use, and then click OK. A new document opens that is based on the FormatEase template you chose. 3. Click File > Save and then name and save the document. NOTE: It is a good idea to save your paper frequently and to save a copy to a backup disc or other removable media periodically. Keeping two or more copies is good practice. 3. Using the FormatEase Templates 11 4. Word’s Autorecovery settings also protect your work from loss due to crashing. (The Autorecovery settings are default settings and are designed to work whether the user understands their function or not; therefore, they cannot be disabled easily or inadverently.) The settings can be viewed by clicking File > Options and then Save from the left pane. Each section in your paper ends with a section break. Section breaks are important when you add chapters or sections to your paper (see “Adding and Deleting Chapters (Sections)” on page 34). NOTE: To view section breaks and other formatting marks in Word, click (Show/Hide ¶) on the Home ribbon. To hide the marks, click the button again. Formatting in Microsoft Word This section presents basic information about formatting text in Microsoft Word. You need to know this in order to use the FormatEase templates. Consult the help system in your version of Word for further information. Microsoft Word allows you to format text by (1) selecting the text, and (2) applying a style to it. The FormatEase templates contain the styles that you apply to your text—all you need to do is select the text with your mouse and then apply the style that FormatEase has created for you. Selecting Text in Microsoft Word The following are a few tips about how to select text in Microsoft Word. • You can select whole words at a time with the mouse first by double-clicking the mouse button over any word. The whole 12 3. Using the FormatEase Templates word will be selected and if you hold the button down and move the mouse, Microsoft Word will continue to select word by word. • You can select a line at a time with the mouse by moving the pointer to the left edge of the document window—until the pointer changes shape—and clicking the button. If you hold the mouse button down and move the mouse, Microsoft Word will continue to select line by line. • You can select a paragraph at a time with the mouse by moving the pointer to the left edge of the document window—until the pointer changes shape—and double-clicking the mouse button. If you continue to hold the mouse button down and move the mouse, Microsoft Word will continue to select paragraph by paragraph. You can also select a single paragraph by triple-clicking the mouse button anywhere in the paragraph. Understanding Styles A style is a set of instructions that tells Microsoft Word how text should look (its formatting)—the font face, the point size, the vertical spacing of the lines of text, and so forth. Styles are applied to text in Microsoft Word by means of a template. Microsoft’s default template is Normal.dot, which is automatically attached to all documents. You can attach additional templates to a document, which is what you do when you use FormatEase. In any Word template, styles are hierarchically organized in such a way that one style is copied from another, inheriting its characteristics, and then is given a different name and modified. In FormatEase, the Normal style (not to be confused with the name of the template, Normal.dot) is the style upon which all others are based. To work with styles in Word 2010, click the Home ribbon and the small arrow at the bottom right of the Styles area. This reveals the 3. Using the FormatEase Templates 13 Styles window. If you are not using Word 2010, consult the help system in your version of Word for instructions on how to work with styles. Paragraphs and Styles In Microsoft Word, a paragraph is defined as ending when you press the Enter key. Pressing the Enter key tells Microsoft Word to create a new paragraph. The style of the new paragraph will be determined by the preceding paragraph. For example, the style Indented Paragraph is based on the Normal style and specifies that the next paragraph should also use the Indented Paragraph style. To View the Indented Paragraph Style Definition 1. Click the Home ribbon and then the small arrow at the bottom right of the Styles area. The Styles panel opens on the right side of the document window (see Figure 1). 2. Click the arrow to the right of Indented Paragraph in the Styles and Formatting panel, and then click Modify (see Figure 2). 3. The Modify Style dialog box opens and shows details about the style (see Figure 3). As shown in Figure 3, Indented Paragraph has these characteristics: • It is based on the Normal style, and thus inherits the font and line-spacing specified in the definition of Normal. • The first line of the paragraph is indented 0.5 inches. • The default style for the following paragraph is the same style, Indented Paragraph. In all other respects, Indented Paragraph is identical to Normal. 14 3. Using the FormatEase Templates FIGURE 1. The Styles panel FIGURE 2. Opening the Modify Style dialog box 3. Using the FormatEase Templates 15 FIGURE 3. The Modify Style dialog box You can use the previous procedure to view details about the Normal style. When you are typing a paragraph that uses the Indented Paragraph style and press the Enter key at the end of the paragraph, the style assigned to the next new paragraph will also be Indented Paragraph. NOTE: Later in this chapter, you will learn how to change the Normal style if you need to do so. Changing the font face for the Normal style will change all of the styles that inherit characteristics from it. See Appendix A for a summary of FormatEase styles. 16 3. Using the FormatEase Templates An Important Note about Style Names Due to style-naming restrictions in Microsoft Word, the style names used for headings in FormatEase do not exactly match the style names used for headings in the APA Publication Manual. Table 2 shows the correspondence between APA heading levels and the style names in the template: As shown in the table, the FormatEase style names contain the name of the APA Publication Manual heading levels. Keep in mind as you work that the FormatEase style named Heading 2 represents Level 1, and so on. TABLE 2. APA and FormatEase heading levels compared For Dissertation and Thesis, that is, papers that have chapters APA Heading FormatEase Style Description n/a Heading 1, Section Heading Chapter titles Level 1 Heading 2, Level 1 Headings for main sections in chapters Level 2 Heading 3, Level 2 Headings for subsections of main sections Level 3 Heading 4, Level 3 Headings for subsections of subsections of main sections Level 4 Heading 5, Level 4 Rarely used Level 5 Heading 6, Level 5 Rarely used For APA Paper and Term Paper, that is, papers with headings-only APA Heading FormatEase Style Description Level 1 Level 1 Headings for main sections Level 2 Level 2 Headings for subsections of main sections Level 3 Level 3 Headings for subsections of subsections of main sections Level 4 Level 4 Rarely used Level 5 Level 5 Rarely used 3. Using the FormatEase Templates 17 Shift + Enter Sometimes you need to type a new line without making it a separate paragraph, for example, when your paper title or the title of a chapter is too long to fit on a single line. To do this, press Shift + Enter (press and hold the Shift key, and then press the Enter key) . Applying a Style to a Paragraph In the normal course of using the FormatEase templates, when you press the Enter key after typing a paragraph, a new paragraph will be created. That paragraph will have the same style as the paragraph you just finished typing, because that’s how the styles in the FormatEase templates were defined. Sometimes, however, you may have some text that does not have the correct style. This can occur, for example, when you paste new text into your document that you typed in a different document. In a case like that, you will need to apply the correct style to the text you pasted into your current document. If you are not using Word 2010, consult the help system in your version of Word for specific instructions on applying styles. To Apply a Style to a Paragraph in Word 2010 1. Select the text to which you want to apply a style. 2. Click the bottom-right arrow in the Styles area of the Home ribbon if the Styles panel is not already showing (Figure 1). 3. Click the style in the list that you want to apply to your text (see Figure 4, in which Indented Paragraph is shown as selected). 4. Click the text to which you applied the style and check that the style name appears in the Styles panel. 18 3. Using the FormatEase Templates FIGURE 4. The Styles panel, with Indented Paragraph selected NOTE: You can also use the Styles area of the Home ribbon to apply styles to selected text. Changing a Style The styles contained in FormatEase’s templates follow the APA Manual’s layout guidelines for the four types of documents, APA Paper, Dissertation, Term Paper, and Thesis. However, your school’s guidelines for the layout of papers may differ from the APA’s. For example, your school may require the use of a specific font. (Changing the font for the whole document is covered in the 3. Using the FormatEase Templates 19 next section.) But let’s say your school’s style is for extracts (block quotes) to be single-spaced, whereas the APA’s style for that element is double-spaced. Changing the style in the way described below will then apply to all instances of the Block Quote style. To Change the Interline Spacing for Block Quote 1. Open the Styles panel (see Figure 1). 2. Click the arrow to the right of Block Quote and click Modify. The Modify Style dialog box opens (see Figure 3 on page 15). 3. Click Format > Paragraph. The Paragraph dialog box opens (see Figure 5). 4. Under Line spacing, change Double to Single. FIGURE 5. The Paragraph dialog box, changing interline spacing 20 3. Using the FormatEase Templates 5. Click OK in the Paragraph dialog box. 6. Click OK in the Modify Style dialog box. Changing the Font The FormatEase templates use the Times New Roman font because that font is present on most computers. And in much the same way as the Block Quote style’s interline spacing was changed in the previous section the font can be changed for a particular style. The font for a whole paper can be changed without having to modify it for each individual style by changing the definition of the Normal style in your FormatEase document. To Change the Font 1. Click the Home ribbon and then the small arrow at the bottom right of the Styles area. The Styles panel opens (Figure 1). 2. Click the arrow next to Normal, and then click Modify. The Modify Style dialog box for the Normal style opens (see Figure 6). 3. At the bottom left of the dialog box click Format > Font. The Font dialog box opens (see Figure 7). 4. Under Font, select the name of the font you want to use (in Figure 7, Times New Roman was changed to Verdana). Keep the Font style as Regular. The Size can also be changed. Here it’s kept as 12 pt. 5. Click OK. The Font dialog box closes but the Modify Style dialog box remains open. NOTE: The next time you save your paper, Word will ask you if you also want to save the document template. Click No, because clicking Yes would permanently change the FormatEase template. 3. Using the FormatEase Templates 21 FIGURE 6. Modify Style for the Normal style FIGURE 7. The Font dialog box 22 3. Using the FormatEase Templates Changing the Page Numbering A particular institution may have requirements for how pages are numbered that differ from the APA Publication Manual’s guidelines or the FormatEase templates. The page numbers are generally in the header on the right. You may want to move the page number to the footer, or have it be different for the first page of a chapter. Below we show you how to make changes in the page numbers by using the functions on the Design ribbon. You can use them a guide to make other changes as you need. Using the Design Ribbon When you double click in the header area of your paper (the top of the page; the header area is there whether or not there is any text in it), you bring up the Design ribbon (Figure 8). Here you can change the format of the page numbering as well as the text of the running head. To edit the text of the header or footer, click on those buttons. To toggle back and forth from the header to the footer, click on the buttons Go to Header and Go to Footer. To Change the Pagination of Your Paper The FormatEase Thesis and Dissertation templates start with page 1 as the first page of the chapter and use lower case Roman numerals FIGURE 8. Changing page numbering and running heads 3. Using the FormatEase Templates 23 (i, ii, iii, etc.) for the beginning pages. The APA Paper template starts with page number 1 as the title page and page 2 as the abstract, then the numbers run through the paper. If you wanted to paginate your paper so that page 1 as where the text begins, follow these steps: 1. Go to the first page of the text of your paper (in the APA Paper template, the third page) and double click in the header area to open the Design ribbon (Figure 8). 2. Check the box for Different First Page. Scroll down and you will see that the page is now numbered “1” and has been placed in the footer. However the next page still says “4” instead of “2.” 3. Now click Page Numbers > Format Page Numbers to open the Page Number Format dialog box. 4. Make sure the Number Format is Arabic numerals (i.e., 1, 2, 3,). If not, select it from the drop down list. 5. In the Page Numbering section, click the radio button next to Start At: and enter the number “1” in the box next to it. 6. Click OK, then hit the X on the right to Close the Header and Footer section. Your paper now starts with page 1 at chapter 1 and continues throughout. You may find, however, that the beginning pages also are numbered starting with 1. If that is the case, use the following steps to number the beginning pages with lower case Roman numerals (i, ii, iii, etc.). 7. Go back to the title page of your paper, the first page in the template. Double click in the header area to open the Design ribbon. 8. Click Page Numbers > Format Page Numbers to open the Page Number Format dialog box. 9. Select (i, ii, iii) from the drop down list. 10. In the Page Numbering section, click the radio button next to Start At: and enter the number “i” in the box next to it. 11. Click OK. 24 3. Using the FormatEase Templates 12. Go to the next page and click in the header area. Click Page Numbers > Format Page Numbers to open the Page Number Format dialog box. 13. Make sure the Number Format is lower case Roman numerals (i, ii, iii, etc.). If not, select it from the drop down list. 14. Under Page Numbering click the radio button next to Continue from Previous Section. 15. Click OK, then click the red X on the right to Close the Header and Footer section. 16. Repeat steps 12 through 15 for each page you need to renumber and stop when you get to the page numbered 1. To Place the Page Number at the Bottom of the Page The FormatEase templates have page numbers at the top of the page. If you need to put them at the bottom of the page, follow these steps. 1. Double click in the header area to open the Design ribbon (Figure 8). 2. Click Page Number > Format Page Numbers > Bottom of Page > Plain Number 2 (centered). Of course you can choose number 1 or 3 depending on where you want the page number to be. 3. Close the Design ribbon. To Have No Page Number or Running Head on the First Page of Each Chapter 1. Double click in the header area to open the Design ribbon (Figure 8). 2. Check the Different First Page box. 3. Using the FormatEase Templates 25 3. Delete any text in the header box. This will now remove the running head from the first page and has moved the page number to the bottom. If you want to remove the page number from the page all together, scroll down to the footer, delete the page number and any other text. 4. Close the Design ribbon. Running Heads As described in the previous section, the running head that will be printed on your paper can be edited the same way as page numbers can. An additional wrinkle in paper-formatting according to APA guidelines is that when paper and chapter titles are long, the author (you) needs to specify how the long title should be abbreviated. This assists an eventual publisher in knowing how to abbreviate while retaining the clearest description of the paper/chapter’s contents. When a title exceeds 40 to 50 characters, you should provide the shortened version. The FormatEase running head macro performs this change. NOTE: The FormatEase running head macro is only applicable to the APA Paper.dot and Thesis.dot templates. It does not apply to the Term Paper.dot or Dissertation.dot templates. The running head macro allows you to change both the running head that will be shown on your title page, and the abbreviated running head shown at the top of each page next to the page number. To Change the Running Head 1. Click the Add-Ins ribbon > FormatEase > Change running head. The FormatEase Running head entry dialog box opens, as shown in Figure 9. 2. Type the text of the running head you are suggesting to the 26 3. Using the FormatEase Templates FIGURE 9. The Running head dialog box publisher into the first text entry field in the dialog box. This text will be shown on your title page. 3. Type the abbreviated version of your running head into the second text entry field in the dialog box. This will show at the top of each page. 4. Click OK. Adding Figures and Tables FormatEase can also help you when you need to include figures in your documents. When you add a figure as specified here, the figure caption is automatically captured in a list of figures (see the section “Generating a List of Figures or a List of Tables”). Of course, to add a figure, you must first create the image and have it available as a file on your computer. You can use a scanner, download images from various sites on the Internet, or get an image file in some other fashion. To Include a Figure That Is Stored in a File on Your Computer 1. Move to the location in your document where you want the figure to appear and insert a blank paragraph there. 3. Using the FormatEase Templates 27 2. Click the Picture button from the Illustrations area of the Insert ribbon. The Insert Picture dialog box opens. 3. Browse to where on your hard drive the picture file you want to insert is located, select it, and click OK. 4. You may need to crop or scale your figure, depending on its original size. To Add a Caption to a Figure 1. Select a figure by clicking it. 2. Click the Insert Caption button from the Captions area in the References ribbon. The Caption dialog box opens (see Figure 10). FIGURE 10. The Caption dialog box 3. Under Caption, click after the number and type the figure title. 4. Under Label, choose Figure. 5. Under Position, choose Below selected item. 6. Click OK. 7. Click the Add-Ins ribbon > FormatEase > Captions formatter. You do not need to run this after every figure is entered, but you should do so before finishing your paper or creating or updating your List of Figures or Tables (see page 33). 28 3. Using the FormatEase Templates Adding Tables FormatEase can also help when you need to include tables in your documents. When you add a table as specified here, and run the FormatEase (FE) Captions Formatter, the table caption is automatically captured in your list of tables. To Add a Table To add a table in Word, move the cursor to above where you want the table inserted, then from the Insert ribbon, choose Table from the Tables area > Insert Table. The Insert Table dialog box opens, as shown in Figure 11. Select the number of columns and number FIGURE 11. The Insert Table dialog box of rows you initially want to have in your table (you can add more entries or delete existing ones, so this number is not critical), then click OK. You need to add a caption to your table. The APA standard is to place the caption above the table, and to have the table number on a line by itself, followed by the caption text. 3. Using the FormatEase Templates 29 To Add a Caption to a Table 1. Select the entire table: first click somewhere in the table; a Table Tools area appears with two “tabs” (ribbons). Choose the Layout ribbon > Select Table from the Table area on the left of that ribbon. 2. Click the References ribbon > Insert Caption. The Caption dialog box opens. Make sure that Table is selected in the Label field. 3. Make sure that Above selected item is selected in the Position field. 4. Type in the title of your table. Word automatically generates the table number portion for you. 5. Click OK to insert the caption. 6. Click the Add-Ins ribbon > FormatEase > Captions formatter. You do not need to run this after every figure is entered, but you should do so before finishing your paper. NOTE: You can insert tables at the end of your document (as is required for some document types) and use the crossreferencing facility in Microsoft Word to refer to those tables in the body of your document. For more information about cross-referencing, see “Adding Cross-References” below. Adding Cross-References Microsoft Word makes it fairly easy to include a cross-reference to another location in your document. Word automatically updates cross-references when you print a document. You can use this for various purposes, including the following: • to refer to a table located somewhere in your document • to refer to a figure located somewhere in your document • to refer to the heading of another section in your document 30 3. Using the FormatEase Templates To create a cross-reference, you begin by selecting the place in your document you want to refer to as well as the format of the crossreference that you want to use. To Add a Cross-Reference 1. Move the cursor (the insertion point) to where in your document you’d like the cross-reference to appear. 2. Click the References ribbon > Cross-reference button from the Captions area. The Cross-reference dialog box opens, as shown in Figure 12. FIGURE 12. The Cross-reference dialog box 3. Select the type of object that you want to refer to in the left (Reference type) portion of the dialog box. To refer to one of your figures, choose Figure. To refer to one of your tables, choose Table. To refer to one of the headings in your document, choose Heading. 4. In the Insert reference to portion of the dialog box, select the kind of text you want in your document to represent the crossreference. To refer to a heading in your document, you usually select Heading text, as shown in Figure 12. 3. Using the FormatEase Templates 31 When referring to a figure or table, you usually select Only label and number, as shown in Figure 13. FIGURE 13. Inserting a cross-reference to a figure 5. In the For which section of the dialog box, select the object to which you want to refer. Check that the Insert as hyperlink checkbox is turned off (unchecked), if you do not want hyperlinks in your paper. 6. Press the Insert button to insert the cross-reference. 7. Click Cancel to close the Cross-reference dialog box. NOTE: To insert a compound cross-reference, such as “see Figure 33 on Page 112,” you need to insert two different cross-references. The first is the reference to the figure number, and the second is the reference to the page number. Page number is another choice in the Insert reference to portion of the Cross-reference dialog box. 32 3. Using the FormatEase Templates Adding a Table of Contents If you use FormatEase’s headings styles, Microsoft Word can automatically generate your table of contents for you. Follow these steps: 1. If your document does not already have a Table of Contents, go to the location where you want it to be inserted. (The FormatEase Thesis.dot and Dissertation.dot templates include a space for the Table of Contents.) NOTE: You do these steps to update a TOC as well, even if it is included as a section, as in the longer Templates. 2. Click Table of Contents > Insert Table of Contents from the Table of Contents area of the References ribbon. 3. Click on the Table of Contents tab in the Index and Tables dialog box. You will see a dialog box that looks like the one in Figure 14. 4. Make sure From template is selected, as shown in Figure 14. 5. Make sure the Show page numbers and Right align page numbers options are checked, as shown in Figure 14. FIGURE 14. Generating a table of contents 3. Using the FormatEase Templates 33 6. Make sure that the Show levels value is 3. 7. Click the OK button. 8. When Word asks if you want to replace the existing table of contents, click on the Yes button. Sometimes “error” warnings display while formatting your table of contents. These can be ignored. If you notice anything is missing or if items were added in error, check that the proper heading style has been applied to each item. Adding a List of Figures or a List of Tables Microsoft Word can generate a list of figures and/or a list of tables in addition to the Table of Contents. Your figure and table captions are automatically captured if you have used the directions in this user manual to insert your figures and tables. To generate a list of figures or tables in your paper, follow the steps below. To Generate a List of Figures or a List of Tables 1. Click the Add-Ins ribbon > FormatEase > Captions formatter. 2. If your document does not already have lists of figures and tables, go to the location where you want them to be inserted. (The FormatEase Thesis.dot and Dissertation.dot templates include spaces for both lists.) 3. Click the Insert Table of Figures button from the Captions area of the References ribbon. The Table of Figures dialog box will show, as in Figure 15. 5. To generate a list of the figures in your document, select Figure in the Caption label: field of the dialog box. To generate a list of the tables in your document, select Table instead. 34 3. Using the FormatEase Templates FIGURE 15. Generating a table of figures 6. Make sure From template is selected, as shown in Figure 15. 7. Make sure the Show page numbers, Right align page numbers, and Include label and number options are checked, as shown in Figure 15. 8. Click OK. 9. When Microsoft Word asks if you want to replace the existing table of figures, click Yes. Adding and Deleting Chapters (Sections) In Word, complex documents—such as theses and dissertations—use “sections” (chapters) to accomplish changes in page numbering, page headers, and so on. Sections are an advanced feature of Microsoft Word that you wouldn’t use unless you were writing a long, complex document, using the FormatEase Dissertation.dot or Thesis.dot. 3. Using the FormatEase Templates 35 About Sections in a Document Microsoft Word allows you to divide a document into a number of sections. Each section can have its own headers and footers, its own page numbering format, and its own column layout. The FormatEase Thesis.dot template, for example, contains ten standard sections and three optional sections: Section 1 Section 2 Section 3 Section 4 Section 5 Section 6 Section 7 Section 8 Section 9 Section 10 Title page Abstract Table of Contents Table of Figures (optional) Chapter 1 Chapter 2 Chapter 3 Appendix (optional) References Author Note (optional) The paper is divided into these sections to make the page numbering work as required by the formatting guidelines in the APA Publication Manual. You can delete some of the sections or add additional ones (such as additional chapters or appendices) by following the next few sets of directions. Adding Chapters To add a chapter in Microsoft Word, you need to add a section. The easiest way to do this is to copy the beginning of an existing section in your paper to a new location. If you add a section using the following procedure, the formatting for that new section will automatically be correct. 36 3. Using the FormatEase Templates To Add a Chapter (Section) to Your Paper 1. Click (Show/Hide ¶) on the Home ribbon. You should now see paragraph marks, tabs, and section breaks (see Figure 16). FIGURE 16. Paragraph marks and section breaks 2. Click just before the last paragraph marker at the end of a chapter. 3. Select the last paragraph marker in the chapter along with the first two lines of the next chapter (see Figure 17). 4. Right-click and click Copy (or select Edit > Copy). The selected text is copied to the clipboard. 5. Click in your document where you want to insert a new chapter, right-click, and then click Paste (or select Edit > Paste). 6. Check to be sure there are no extra section breaks, and then type the first two lines in the new chapter. 3. Using the FormatEase Templates 37 FIGURE 17. Selecting the paragraph marker and the first two lines of the next chapter Deleting a Section from Your Paper Each of the FormatEase templates includes several sections that you might not want in your paper. For example, you might not want a copyright page, or your paper might not include an appendix, or you might not need the list of figures. You can easily delete any of these sections from your paper. WARNING: Don’t attempt to delete a section marker without carefully following the directions here. If you “accidentally” delete a section marker, the formatting of your entire paper can be damaged. To Delete a Section from Your Paper 1. Click (Show/Hide ¶) on the Home ribbon. 2. Select all of the text and the section break in the section that you want to delete. 3. Right-click the mouse and click Cut or press the Delete key. 38 3. Using the FormatEase Templates Using FormatEase Templates with Existing Documents If you are editing a multichapter document, repeat the steps in the following procedure for each chapter in your document. To Format an Existing Document 1. Create a new FormatEase document, as described in the earlier section “Creating a Document,” on page 10. 2. Open the document you want to reformat using FormatEase. You will now have two windows open in Microsoft Word, one that contains your “old” paper, and one that will soon contain your “new” paper. 3. Select (highlight) all of the text in the old paper. (If your paper has more than one chapter, highlight all of a single chapter.) 4. Copy the selected text to the clipboard (use Copy in the Clipboard area of the Home ribbon). 5. Click in the window containing your new FormatEase document. 6. Highlight the text you want to replace in the next document. (If you are working with a multichapter paper, highlight a single chapter.) 7. Paste the clipboard contents into your new document (use Paste in the Clipboard area of the Home ribbon). 8. Apply FormatEase styles as required. 4. Creating Reference Lists and Citations FormatEase makes it easy to create reference lists and in-text citations in your documents. The program automatically creates a reference list in your paper and can add in-text citations as well. When you installed FormatEase, the menu shown in Figure 18 was added to your version of Microsoft Word. The main sections in this chapter correspond to the menu items on the FormatEase menu (which is accessible through the Add-Ins ribbon) and explain how to use the program. For further information, click Help on the FormatEase menu or in the dialog box in which you are working. If the special menu item is not showing, click File > Options > Add-Ins, and then in the Manage drop-down list toward the bottom of the dialog box choose Word Add-ins. Check to see that there is a check mark in the box next to FormatEase. If not, check it, then click OK. 39 40 4. Creating Reference Lists and Citations FIGURE 18. The FormatEase menu Create New Reference FormatEase provides 77 different reference entry types, which correspond to virtually all of the reference forms described in the 6th edition of the APA Publication Manual (see Table 3. Reference Entry Types on page 44). Creating a New Reference and/or Citation When you create a new reference in FormatEase, you can insert the reference alone or you can insert the reference together with an intext citation using the following procedure. To Create a Reference and/or Citation 1. Click in your document where you want the references to appear (this will usually be in the references section of the FormatEase template but can be in a different location). 4. Creating Reference Lists and Citations 41 NOTE: The FormatEase templates already contain bookmarks for the reference section, so steps 1 and 2 in these instructions would normally be skipped. 2. Click FormatEase > Insert bookmark for references (see Figure 19). When you complete this procedure, your references will appear where you have just inserted a bookmark. FIGURE 19. Select Insert bookmark 3. If you want an in-text citation in your text, click in the text where you want the citation to appear. 4. Click FormatEase > Create new reference. The Create Reference dialog box opens (see Figure 20). 5. Under Reference type, select the reference entry type from the list. 6. If Step 5 causes choices to appear in the Reference sub-type pane, select a subtype. 7. Under Citation type at the top right of the dialog box, select the style of citation you want in your text. The default is (Author last name, date). If you do not want to place a citation in the text, select Do not add citation. 42 4. Creating Reference Lists and Citations FIGURE 20. The Create Reference dialog box 8. Enter the text for each field in the text boxes. Follow the form given in the examples for each field exactly. FormatEase updates the display of your reference entry in the reference preview pane at the bottom of the dialog box. NOTE: Check under Reference Help for tips about the reference type you are entering. Text appears in this pane when the program has additional information that will help you enter text correctly. 9. Click OK. 4. Creating Reference Lists and Citations 43 TIP: In rare cases, a reference may exceed the limit of the total number of characters allowed in a Create Reference dialog box’s text-entry field. When this happens, the Create Reference dialog box will close. If you think this will take place, enter as much of the information as you can in the dialog box and finish your reference after it has been inserted into your paper. For example, if the title is very long, enter the beginning of the title only and then enter the information in the other text fields in the dialog box. After the reference is inserted into your paper, type the complete title into the reference. Reference Types Table 3 lists the reference types and subtypes. The list also appears on the last page of this manual so that you can cut out the page and refer to it easily. Additional Reference Help In addition to the help available in the Reference Help pane in the Create Reference dialog box, you can get help by clicking Help in the dialog box. Multiple-Entry Mode If you click the Add multiple references check box, right below the Citation type area, the Create Reference dialog box will not close after a reference has been added. NOTE: Multiple-entry mode will not work properly unless you select Do not add citation under Citation type. 44 4. Creating Reference Lists and Citations TABLE 3. Reference Entry Types Abstract (std) from secondary source on CD-rom on-line Archival materials Audio (spoken) or Podcast Podcast Spoken Book (std) DSM edited foreign language multivolume no Author or Editor same Author/Publisher translated Brochure Chapter/article in Book (std) foreign language in press in republished book reprinted Encyclopedia Court cases Data set Doctoral dissertation (unpublished) abstracted, from commercial database from online source from database Film Govermnet ageny data files Journal article (std) article translated into English cited in secondary source entire Issue in Press on-line database title translated into English Supplemental material only online Journal supplement Legislation Limited circulation publication Magazine article Master’s thesis (unpublished) Monograph, with serial number in Journal Journal supplement Musical recording Newsletter article (std) no author Newspaper article (std) letter to the Editor no author NTIS data files Paper/poster presentation Report, University ERIC GPO in an edited collection other agency private organization NTIS Review, titled untitled Software Symposium proceedings Television, broadcast series single episode from series Testimony at federal hearings Unpublished work (std) data from a study submitted for publication Web forum, news group, or blog post Web site To Enter Multiple References 1. Click FormatEase > Create new reference. The FormatEase Create Reference dialog box opens, as shown in Figure 20. 2. Select Add multiple references checkbox at the top right corner of the dialog box. 4. Creating Reference Lists and Citations 45 Make a reference entry as usual. After you insert your reference, you will return to the FormatEase Create Reference dialog box instead of to the text in your document. Sometimes references may need to be in more than one section in a paper, for example, a list of reference entries and a separate bibliography. FormatEase gives you the capability to do this with a bookmark that indicates where reference entries are to be added in your paper. Creating Another References Section You can create another list of references anywhere in your paper by inserting a bookmark at the location you want the references to appear and copying references to that list. TIP: Add another reference section only after you have completed your paper and have sorted the references in your main reference list using the FormatEase Sort references function. To Add Reference Entries in a Second Location 1. Move the cursor to the location in your document immediately preceding the location where you want entries inserted. For example, in the standard References section, this is immediately following the “s” at the end of the “References” heading. 2. Click FormatEase > Insert bookmark for references. New reference entries are added in the new location. List/Copy/Edit References + Insert Citation You can bring up a list of all of the references in your document by using the List/Copy/Edit command from the FormatEase menu or 46 4. Creating Reference Lists and Citations by pressing ALT + L (see Figure 18 on page 40). The references are sorted by their location in the reference list of your paper. To find a reference, you can sort by author, date, or titles by clicking on the column header. You can change the sort order from ascending to descending (and back again) by continuing to click on the header. From here, you can edit references, create new ones based on existing ones, or create new citations (see Figure 21). FIGURE 21. The List/Copy/Edit References dialog box Copying a Reference from Another Document Many writers find that they use the same references in many different papers, especially if they are writing frequently on the same topic. Others like to create a list of all the references they consulted when doing their research (in a separate document), and copy from that 4. Creating Reference Lists and Citations 47 master list to the current paper only the references actually cited in the current paper. NOTE: To copy references from one document to another, both documents need to have been created with the same version of FormatEase. To Copy a Reference from Another FormatEase Document 1. Choose List/Copy/Edit References command on the FormatEase menu. The List References for: dialog box opens. 2. Click Look in another document. The Select a document with FormatEase references dialog box opens. 3. Select a document from which you wish to copy a reference and click Open. The references list for the new document appears. 4. Select the reference you want to copy into the current document, and then click Copy reference to original doc. 5. Click Return to original doc. The reference list of the original document now contains the new reference. 6. To add a citation for the newly added reference, select it in the list at the top of the List References for: dialog box, and click the Insert Citation button (see steps 4, 5, and 6 on page 50). 7. Click Exit. Editing an Existing Reference You can edit an existing reference using the following procedures. In the first, you edit only the reference but leave the citation unchanged. In the second, you edit the reference and insert a new citation to replace the original one. 48 4. Creating Reference Lists and Citations To Edit a Reference without Changing the Citation 1. In your paper, go to the reference list. 2. Put your cursor anywhere in a reference that you want to edit. 3. Click FormatEase > Edit selected reference. The Edit reference dialog box opens (see Figure 22). 3. Make any necessary changes to the information for that reference. 4. Click OK. To Edit a Reference and Create a New Citation 1. In your paper, delete the old citation and click where you want the corrected citation to appear. FIGURE 22. The Edit reference dialog box 4. Creating Reference Lists and Citations 49 2. Click FormatEase > List/Copy/Edit References (see Figure 21 on page 46), select the reference you want to edit, and then click Edit Reference. The Edit reference dialog box opens (see Figure 22). 3. Make your changes in the Edit reference dialog box and click OK. You will be returned to the List references for: dialog box. 4. Click on the reference you just edited. Under Insert Citation at the bottom left of that dialog box, type the page numbers and select the citation type. 5. Click Insert Citation. Editing Citations There are a few occasions when you might need to edit only the citation text inserted by FormatEase. The following are special cases to be aware of: • If you are making more than one first-time citation within one set of parentheses, you will need to delete the extra parentheses added by FormatEase and insert semicolons between the citations. • When a citation does not include an author, FormatEase inserts a shortened version of the title of the work, as specified in the APA guidelines. However, you may want to change FormatEase’s abbreviation, which you do right in the text once FormatEase has inserted the original citation. 50 4. Creating Reference Lists and Citations Create a New Citation from an Existing Reference You can browse a list of your existing references and create new intext citations from them automatically. To Cite an Existing Reference 1. Click in your paper where you want your new citation to be inserted. 2. Click FormatEase > List/Copy/Edit References. 3. Click on the reference for which you wish to create a new citation. 4. Under Insert Citation at the bottom left of the dialog box, type the page numbers if needed and select the citation type. 5. If this work has been previously cited, click on the Repeat checkbox. FormatEase will use the proper citation format. 6. Click Insert Citation. Create a New Reference Based on an Existing One If you find that you use several parts of the same source—for example, several chapters from the same book, more than one article from the same journal, or multiple entries from the same encyclopedia—you can use the Create new ref based on existing feature and avoid retyping the same information. Choose the reference you wish to copy from a list, change what you need to change, and then insert the new reference and citation. To Use an Existing Reference for Creating a New One You can browse a list of your existing references and create a new reference based on an existing one. 4. Creating Reference Lists and Citations 51 1. Click in your text where you want the new citation to be inserted. 2. Click FormatEase > List/Copy/Edit References. 3. Click on the reference you want to reuse. 4. Click Create new ref based on existing. The dialog box for that function will appear (see Figure 23). 5. Change the information you need to change and click OK. You will be returned to the List references for: dialog box. 6. If the reference you just created is not highlighted, click on it. Pick the kind of citation you want for this reference entry, the click Insert Citation. Your reference entry and citation will be inserted into your document. FIGURE 23. The Create new reference based on existing dialog box 52 4. Creating Reference Lists and Citations Insert Bookmark for References When you click FormatEase > Insert bookmark for references, you are telling FormatEase to use that location for the location of references. You can change this location at any time if you want to create more than one reference list in your paper. Captions Formatter FormatEase will properly format all of the figure and table captions in your paper when you click FormatEase > Captions Formatter. You do not need to run this after each item is entered, but you should do so before finishing your paper. Sort References Click FormatEase > Sort references. All reference lists in your paper are quickly sorted and listed in alphabetical order. If you have created more than one reference list, click on any reference in the list you wish to sort before using the Sort Reference command. NOTE: FormatEase alphabetizes your entries based on the initial text in each entry. Some entry types, such as multiple works by the same author in the same year, require manual reordering. APPENDIX A Summary of FormatEase Styles The styles that you use in FormatEase are summarized here. The “Next style” column specifies the style that will be given to the next paragraph, which is created when you hit the Enter key. (For example, after typing in a heading, you want the next paragraph to go back to being Indented Paragraph.) Style name Used for Next style Abstract Title The title on your abstract page — Block Paragraph Paragraphs that are not indented, such as those that follow a block quote when the block quote occurs in the middle of one of your text paragraphs Indented Paragraph Block Quote Any quote that is longer than 40 words; you usually have an indented paragraph before the block quote paragraph and a block paragraph or indented paragraph after the quote Block Paragraph Caption Figure captions Indented Paragraph Dedication The dedication paragraph on the dedication page — Figure Figures that you include in your paper Indented Paragraph Footnote Reference Defining the font (including superscript) used for footnote numbers — Header Page headers — Heading 1, Section Heading Chapter titles Indented Paragraph Heading 2, Level 1 Level-1 headers—the headings for each section of your chapters Indented Paragraph 53 54 Appendix A Style name Used for Next style Heading 3, Level 2 Level-2 headers—the headings for each subsection of a section in your chapters Indented Paragraph Heading 4, Level 3 Level-3 headers—the headings for nested Indented Paragraph subsections in your chapters Heading 5, Level 4 Level-4 headers—the headings for the deepest level of subsection permitted in an APA document; this style is rarely used Indented Paragraph Indented Paragraph “Normal” paragraphs in the text of your paper Indented Paragraph Normal Defining the font that is used for all of the text in your paper — Reference Entry Each entry in your References section Reference Entry Section Header Heading at the top of sections such as the Acknowledgments and Abstract — Title The title on your Title page — TOC 1 Displaying Level-1 headings in your Table of Contents — TOC 2 Displaying Level-2 headings in your Table of Contents — TOC 3 Displaying Level-3 headings in your Table of Contents — TOC 9 Displaying figure captions in your List of — Illustrations APPENDIX B Formatting Terminology FormatEase automates formatting of your paper for you; however, you may find it useful to understand the terminology that is used in defining the styles that are used in your paper. Here are brief definitions for the terms that are commonly used in describing document and paragraph formatting: Character format This is the format of each character in the paragraph, including underlining, boldface, italicized, etc. First page special This indicates the first page of a section has different headers and footers than the other pages in the section. This is what allows FormatEase to not have a page number on the first page of each chapter while maintaining the correct automatic page numbering. Font This is the typeface in which the characters in the paragraph are rendered. Some familiar fonts are: Chicago, Geneva, Times Roman, Goudy, Monaco. FormatEase uses a proportionally spaced font, Book Antiqua. Footers Each page can have a footer printed at its bottom. Footers are typically used to print page numbers, dates, book titles, and so on. However, FormatEase does not use footers. Headers Each page can have a header printed at its top. Headers are typically used to print page numbers, dates, book titles, and so on. FormatEase templates use headers to print page numbers, and sometimes the shortened titles. Indent The amount of space the paragraph is indented from the left margin. You can specify the indentation of the entire paragraph as well as a separate indentation for the first line in the paragraph. Justification and alignment The horizontal location of the paragraph on the page: left alignment each line starts against the left edge and the right side is “ragged right” centered each line is centered 55 56 Appendix B justified the lines start against the left edge and the size of the the spaces is increased so that the lines go all the way to the right edge right alignment each line ends against the right edge, but the left side is “ragged” Keep with next This indicates that the paragraph should begin on a new page if there is not room for the paragraph that follows it to at least begin on the same page. For example, the caption for a figure should always be kept with the figure itself. Line spacing The number of points between lines in the paragraph. The APA Publication Manual specifies that line spacing for all paragraphs should be “the font size plus 2 points, multiplied by 2.” For a 12-point font size (the default), this works out to 28 points. Margins The page margins indicate the amount of space between the edges of the paper and the text printed on the paper. Page break before This indicates that the paragraph starts at the top of a new page. Point size In printing terminology, an inch is divided into 72 points. Points provide a precise measure for defining character sizes and spacing values. Section A Microsoft Word document can contain any number of sections. Each section can have its own headers and footers and its pages can be numbered independent of the other sections. FormatEase templates contain a number of sections, including one for each chapter, which make it possible to use automatic page numbering, to automatically start chapters on new pages, and to use different numbering styles in different sections. Space after This indicates the amount of space that is placed after the last line of text in the paragraph. Space before This indicates the amount of space that is placed before the first line of text in the paragraph. Widow control Widows are single lines at the end of a paragraph that do not fit onto the page and are pushed onto the top of the next page. When widow control is used (as it is for FormatEase), Microsoft Word automatically prevents this from happening by forcing the paragraph to begin on a new page. APPENDIX C Technical Support We have tried to make FormatEase as easy to use as possible. We have also tried to use this program on as many different systems as we could find, but every computer is unique. If you experience a problem, please first determine if it is a function of Microsoft Word or if is a problem with FormatEase. If it is a problem with Word, please consult the documentation that came with it or call Microsoft support. If a feature of FormatEase is not working properly, we offer you the following resources to help you. SPECIAL NOTE TO WINDOWS USERS: If the installation program does not work, we have included on the CD-ROM a special folder called Windows. It contains the template files that you can copy into the appropriate folder on your system in lieu of the installation process. Check Our Web Site Go to http://www.formatease.com and look at the frequently asked questions there. As we hear of things, we will post them there. Many problems can be resolved that way. If not, fill out the technical support request form. E-mail Us We are pleased to answer your e-mail inquiries at [email protected]. Please be sure to include a complete description of the problem you are having as well as your full name, phone number, and e-mail address so we can contact you as needed. 57 58 Appendix C Fax Us You may fax us at 212-966-6708. Please be sure to include your full name, phone number, and return fax information as well as a complete description of the problem you are having. Call Us You can call us at 800-365-7006 from 9:00 am to 5:00 pm Eastern Time Monday to Friday. Please ask to be connected to Technical Support. TABLE 3. Reference Entry Types Abstract (std) from secondary source on CD-rom on-line Archival materials Audio (spoken) or Podcast Podcast Spoken Book (std) DSM edited foreign language multivolume no Author or Editor same Author/Publisher translated Brochure Chapter/article in Book (std) foreign language in press in republished book reprinted Encyclopedia Court cases Data set Doctoral dissertation (unpublished) abstracted, from commercial database from online source from database Film Govermnet ageny data files Journal article (std) article translated into English cited in secondary source entire Issue in Press on-line database title translated into English Supplemental material only online Journal supplement Legislation Limited circulation publication Magazine article Master’s thesis (unpublished) Monograph, with serial number in Journal Journal supplement Musical recording Newsletter article (std) no author Newspaper article (std) letter to the Editor no author NTIS data files Paper/poster presentation Report, University ERIC GPO in an edited collection other agency private organization NTIS Review, titled untitled Software Symposium proceedings Television, broadcast series single episode from series Testimony at federal hearings Unpublished work (std) data from a study submitted for publication Web forum, news group, or blog post Web site