1
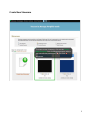
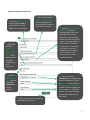
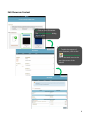
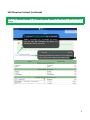
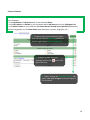
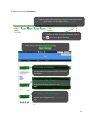
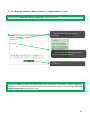
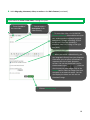
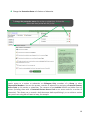
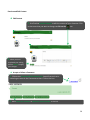
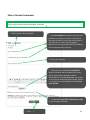
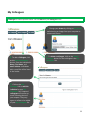
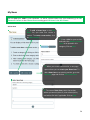
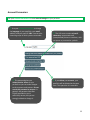
Eduportfolio User Guide The original French version of this Guide was written by André Boily, a Master of Education student at the Université de Montréal. English translation by Margaret McKyes. 1 l. Eduportfolio -‐ User Guide Table of Contents Portfolio Management .............................................................................................................................................. 3 Page Summary ...................................................................................................................................................... 3 Management Tools ............................................................................................................................................... 3 Create New Showcase ........................................................................................................................................... 4 Showcase Parameters ........................................................................................................................................... 6 Edit Showcase Content ............................................................................................................................................. 8 Structure Content ............................................................................................................................................... 10 Add an Item to the Top Banner ....................................................................................................................... 11 Add an Item to the Left Banner ....................................................................................................................... 12 Add a Biography, Document, Video, or Section to the Main Content ............................................................ 13 Change the Protection Status of a Section or Subsection ............................................................................... 19 Preview and Edit Content ................................................................................................................................... 20 Edit Content .................................................................................................................................................... 20 Accept or Refuse a Comment .......................................................................................................................... 20 Post or Receive Comments ..................................................................................................................................... 21 My News ................................................................................................................................................................. 24 Account Parameters ................................................................................................................................................ 25 Twitter ..................................................................................................................................................................... 26 2 Portfolio Management The latest version of Eduportfolio allows you to design your website using showcases for easier portfolio management. If you want to build a professional portfolio and still keep your student portfolio, simply create a new showcase, include some content from your current portfolio, and add new content. Your portfolio will contain a number of showcases designed for different visitors and different needs. Page Summary Open this page to access the My Showcases list. 1. To return to this page, click on My Showcases in the upper left corner. 2. You can sort your showcases by title, creation date, or last edit. 3 Management Tools The Portfolio Management function includes six Showcase Management tools. These are represented by the six icons in each showcase in the My Showcases page. These icons also appear in the upper right corner of the banner in each showcase. Use Open Showcase to view the showcase summary as visitors will see it. Use Edit Showcase Content to edit the showcase structure and content (add or delete sections, documents, My News, Showcase Map, Menu, and so on). Use Edit Showcase Parameters to make general changes to the showcase (title, URL, appearance, protected content access code, visitor access, add comments). Use Duplicate Showcase to create a copy of the showcase. Use Download Showcase to download a static copy of the showcase for saving or for presenting your portfolio offline. Use Delete Showcase to permanently delete the showcase. 4 Create New Showcase To create a new showcase, click on the Create New Showcase icon. A dialog page opens where you can edit the parameters of your new showcase. 5 Showcase Parameters Create New Showcase automatically takes you to the Showcase Parameters dialog box. You can choose the parameters for your new showcase. 1. You can name this showcase the Main Showcase. This is the default showcase that appears when anyone consults your portfolio without using the specific address of a particular showcase. 2. The Short URL allows you to name your showcase as it appears in your My Showcases list. This name is also a URL address that links directly to the showcase. 3. Set the presentation language for your portfolio by selecting a language from the drop-‐down menu. 4. The Protected Content Access Code is a global password that you can provide to certain visitors. Select this security option to grant access to an entire showcase or to certain sections of the showcase, or to authorize certain individuals to post comments. The access code must contain three unaccented letters and numbers (no spaces or punctuation symbols). 5. Use the Who can access this showcase? menu to manage which visitors can consult this showcase. Select from No Visitors (private), All Visitors (public), Colleagues Only, or Visitors with a Protected Content Access Code Only. 6 Showcase Parameters (continued) 1. Use the Portfolio Title menu to edit the title of your portfolio. This title appears in the top banner. 2. Use the drop-‐down Personal Name Format menu to add your first name and family name in the order you choose. 4. Select Yes from the Receive a copy of each comment by email? drop-‐ down menu to receive an emailed copy of all comments. 3. Use the Who can submit a comment? menu to manage which visitors can post comments on this showcase. Select from No Visitors (private), All Visitors (public), Colleagues Only, or Visitors with a Protected Content Access Code Only. In all cases, to prevent inappropriate comments, you must approve all comments that can be viewed by visitors. 5. Use the 6. You can choose a Edit Portfolio Style menu to change the appearance of your portfolio. 7. When you have finished creating your showcase, click on Add. Thumbnail to accompany the titles of showcases. Click on the Browse button in the Use this image for section titles textbox. Choose images from your computer or an online source. You can also change the position and format of the image. 7 Edit Showcase Content 1. Click on Open Showcase. The Consult Showcase dialog page displays. 2. To edit the content of your showcase, click on the Edit Showcase Content icon in the tools icons in the top right corner of the banner. 8 Edit Showcase Content (continued) Click on the Structure Content or the Preview and Edit Content tab, depending on what you want to change. 1. Use the Structure Content tab to edit (add, delete, rearrange, etc.) showcase the items. You can edit My Colleagues, My News, My Showcases, Menu, and so on. 2. Use the Preview and Edit Content tab to preview and edit the content of this showcase only. Click on the content you want to edit. 9 Structure Content The right column in the Structure Content tab contains the Item Bank. Choose the items to include in your showcase: -‐ In the top banner: a Search box and/ or the showcase Menu -‐ In the left column: an Outline of your showcase and/or My News and/or your Colleagues List -‐ In the Main Content of your showcase: the items that are already in your portfolio (documents, sections, biography, etc.) and New Items (new documents, sections, biography, etc.) 1. To add an item to your showcase, drag it from the left column (Item Bank) and drop it into the right column (Showcase Outline) 2. To delete an item from your showcase, click on the right of the item. icon to the 3. Before closing the Structure Content tab, always save your changes so they will apply to this showcase. 10 Add an Item to the Top Banner 1. To add an item to the top banner of your showcase, drag the item from the left column (Item Bank) and drop it into the right column (Showcase Outline). 2. To delete an item from your showcase, click on the icon to the right of the item. 3. Before exiting, remember to save your changes. Overview of the Search Box Use the Search Box to search the content of one or more showcases. Overview of the Menu Use the Menu to n avigate between the sections and subsections displayed in the upper banner. 11 Add an Item to the Left Banner 1. To add an item to the left banner, drag it from the left column (Item Bank) and drop it into the right column (Outline). 2. To delete an item from your showcase, click on the icon to the right of the item. 3. Before exiting, remember to save your changes. Overview of Outline Use the Outline to navigate between sections and subsections. Overview of My News Display new headings and items in the My News page Overview of My Colleagues Displays new colleagues in the My Colleagues page 12 Add a Biography, Document, Video, or Section to the Main Content All biographies, documents, videos, and sections contained in your showcases are displayed in the left column of the Modify Showcase Content function. 1. You can organize your items by showcase or by item (type, name, etc.) 2. To add an item to your showcase, drag it from the left column (Item Bank) and drop it into the right column (Outline). 3. To delete an item from the showcase, click on the icon to the right of the item. 4. To rearrange the items, drag and drop them into the desired order. 5. Before exiting, remember to save your changes. 13 Add a Biography, Document, Video, or Section to the Main Content (continued) 1. To add an item to your showcase, drag it from the left column (Item Bank) and drop it into the right column (Outline) 2. To delete an item from your showcase, click on the icon to the right of the item. 3. Before exiting, remember to save your changes. 14 Add a Biography, Document, Video, or Section to the Main Content (continued) If you select New Biography, a dialog box opens. 1. You can include your email address. 2. You can enter your biography directly. 3. You can include your portrait. Click on the Browse button and select an image from your computer or an external source. 5. Click on Add the biography. 4. You can include an instant video. To record the video, click on the link Record a video clip. A connection will set up to your webcam and microphone (required equipment). To begin recording, click on the left icon. Once the recording is complete, save it by clicking on the right icon (disk). You can als]o upload a previously recorded video. Click on the Browse button and select a video from your computer or an external source. 15 Add a Biography, Document, Video, or Section to the Main Content (continued) If you choose to Add a New Section or Subsection, a dialog box opens. 1. Enter the title of the new section or subsection. 2. You can enter the description of your section or subsection directly. 3. Click on Add this section. Sections are public by default. All visitors may consult its content. If the section contains confidential information or restricted-‐access content, we recommend that you protect it by providing a Protected Content Access Code to authorized visitors. 16 Add a Biography, Document, Video, or Section to the Main Content (continued) If you choose to Create a new document, a dialog box opens. 1. Enter the title of your new document. 2. You can enter the description of your new document directly. 3. To add a file (audio clip, video clip, image, text, etc.), select File from Document type, then click on the Browse button. Select a file from your computer or an external source. Files must be less than 100 Mo. in size. 4. To add a hypertext link as a document, select Link from Type of document. Enter the site address (URL) in the text field. 5. You can choose a thumbnail to represent each section of your showcase. You can use the default icon for the document type ( ). To choose your own image, click on the Browse button. Select an image from your computer or an external source. You can also display just the link with no thumbnail image. 6. Click on Add this document. If you want to add an audio clip or a video clip to your portfolio, you must add it as a document. In the Preview and Edit Content tab, click on Convert an audio or a video document into Flash (.FLV), then Change Icon and choose the option to display the clip directly on the page. 17 Add a biography, document, video, or section to the Main Content (continued) If you choose to Create a new video, a dialog box opens. 2. You can enter a 1. Enter the title of description of the video directly. the new video. 3. To record the video, click on the link Record a video clip. A connection sets up to your webcam and microphone (required equipment). To begin recording, click on the left icon. Once the recording is complete, save it by clicking on the right icon (disk). 4. When you record a video directly, you can integrate it directly into your showcase. Otherwise, you can select a thumbnail to represent the title of each showcase section. You can use the default icon for the document type ( ). You can also choose your own image. Click on the Browse button. Select an image from your computer or an external source. You can also display the video as a link with no thumbnail image. 5. Click on Add the video. 18 Change the Protection Status of a Section or Subsection 1. To change the protection status of a section or subsection, click on the Change the protection status of this item icon (to the left of X) in the Outline. Newly added elements to your portfolio are public by default (all visitors may consult them). You can restrict access to a section or subsection to Colleagues Only, members of a Group, or other Eduportfolio Members. You can also protect a section or subsection by assigning a Protected Content Access Code to this section or subsection. The contents of an Archived section are hidden from all visitors (including those with a Protected Content Access Code or an access code for a section of subsection). This allows you to rework a draft document before publishing it, or to archive a section that you are not using but still want to keep, for example. 19 Preview and Edit Content Edit Content 1. Use Preview and Edit Content to edit the content of your showcase. Click on the items that you want to change, or click on the icon. 2. When you have your editing, completed click on Modify to apply your changes. Accept or Refuse a Comment 1. Click on the Preview and Edit Content tab. You will see an icon to indicating an event in the Comments section. Click on the icon. 2. Select Delete this comment or Make this comment public, as desired. 20 1 2 Post or Receive Comments Depending on your showcase parameters, visitors can post comments on your showcase. Use the appropriate icons to post comments on your colleagues’ showcases. 1. Entering your name is optional. 2. Your email address is optional, but you must provide it if you want to receive a copy of the comment by email. You can also send a copy of the comment to others by entering their addresses in the appropriate field. Each address must be separated by a comma. 3. Enter your comment. 4. Comments may include an attached file. Note that images that are deemed too heavy will be automatically resized to reduce download time from the Web page. If you have to downsize an excessively heavy image, place it in a Zip file first. All attached files must be less than 100 Mo. 5. To receive a copy of the comment by email, check the appropriate box. 6. Click Send. 21 My Colleagues A Colleague is a fellow portfolio owner. You can Chat with your Colleagues online. 1. Change your Avatar by clicking on My Avatar and selecting an image from your computer or an external source. Test Test Test 3. To add a Colleague, click on the Search Colleagues button. Enter the individual’s Name, First Name, and email Address. Individuals with a portfolio will be listed in the results. 2. To delete a colleague, click on the Delete Colleague button for that colleague in the My Colleagues list. . 4. Click on the Add Colleague link to add this individual to your My Colleagues list. Proposed colleagues will receive an email informing them of your request. They may agree or refuse to be added to your My Colleagues list. 22 My Colleagues (continued) 1. To chat with a colleague, click on the Colleagues Online link in the lower right corner of your browser and select the desired colleague. 2. To change your status, click on the light bulb icon in the lower right corner of your browser and select the desired correspondent status. 23 My News You can post your news in your showcase. To add or remove news from your showcase, go to Edit Showcase Content. In the Content Structure tab, go to Edit items in the left column. Add an item 1. To add a News Item to the My News list, you must first create a section. To create a new section, click on Add a section. 2. Enter a title for your section and select the Number of news items to be posted in this category. Click on Add. 3. When you create a new section, a new page opens where you can create your News Item. To add a News Item to an existing section, go to the My News page and click on Add a news Item. 4. To create a News Item, select the section where you want to place it, enter a description, and add a URL link if applicable. Click on Add. 24 Account Parameters Use your Account Parameters to make overall changes to your portfolio. 1. Use your Account Parameters to change the l anguage of your portfolio, your email address, and your specific URLs. You can also view the groups of which y ou are a member. 2. The URL must contain at least 6 characters, unaccented small (uncapitalized) letters or numbers, with no spaces or punctuation symbols. 3. This password gives you Administrative Access to your portfolio so you can make changes to the structure and content. Do not reveal this password to anyone. In general, the password that was initially provided to you is sufficiently secure, but you are strongly advised to change it. 4. If you delete your account, your portfolio will be deleted at the same time. This operation is irreversible. 25 Twitter We decided to be really innovative with Eduportfolio 2.0. With a few clicks, the people who are following you on Twitter can find out about recent changes to your portfolio. 1. If you don’t have a Twitter account, create one at Twitter.com. Save your Twitter username and password to your portfolio by clicking on the Twitter Connection link below the text. 2. Each time you update your portfolio, you can enter the information that you want to share with your followers in your Twitter Update Box. Remember that Twitter has a 140-‐character limit, and we use up 49 of these to insert the link to your portfolio at the end of your message. 3. Click on Validate to keep your followers up-‐to-‐date on your latest changes. 26