1
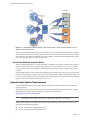
User’s Manual
VMware Virtual Machine Importer
Version 2.0
VMware Virtual Machine Importer User’s Manual
Version: 2.0
Revision: 20061002
Item: VM-ENG-Q406-184
You can find the most up-to-date technical documentation at:
http://www.vmware.com/support/pubs
The VMware Web site also provides the latest product updates.
If you have comments about this documentation, submit your feedback to:
[email protected]
© 2005 - 2006 VMware, Inc. All rights reserved. Protected by one or more of U.S. Patent Nos. 6,397,242, 6,496,847, 6,704,925,
6,711,672, 6,725,289, 6,735,601, 6,785,886, 6,789,156, 6,795,966, 6,880,022, 6,961,941, 6,961,806, and 6,944,699; patents
pending.
VMware, the VMware “boxes” logo and design, Virtual SMP and VMotion are registered trademarks or trademarks of VMware,
Inc. in the United States and/or other jurisdictions. All other marks and names mentioned herein may be trademarks of their
respective companies.
VMware, Inc.
3145 Porter Drive
Palo Alto, CA 94304
www.vmware.com
ii
VMware, Inc.
Contents
Preface . . . . . . . . . . . . . . . . . . . . . . . . . . . . . . . . . . . . . . . . . . . . . . . . . . . . . . . . . . . . . . . . . . . . . . . . . . . . . . . . . . . . . v
About This Book . . . . . . . . . . . . . . . . . . . . . . . . . . . . . . . . . . . . . . . . . . . . . . . . . . . . . . . . . . . . . . . . . . . . . . . . . . . v
Intended Audience . . . . . . . . . . . . . . . . . . . . . . . . . . . . . . . . . . . . . . . . . . . . . . . . . . . . . . . . . . . . . . . . . . . . . . . . . v
Document Feedback . . . . . . . . . . . . . . . . . . . . . . . . . . . . . . . . . . . . . . . . . . . . . . . . . . . . . . . . . . . . . . . . . . . . . . . . v
Conventions and Abbreviations . . . . . . . . . . . . . . . . . . . . . . . . . . . . . . . . . . . . . . . . . . . . . . . . . . . . . . . . . . . . . . v
Self‐Service Support . . . . . . . . . . . . . . . . . . . . . . . . . . . . . . . . . . . . . . . . . . . . . . . . . . . . . . . . . . . . . . . . . . . . . . . vi
Chapter 1 . . . . . . . . . . . . . . . . . . . Introducing VMware Virtual Machine Importer 1
What Virtual Machine Importer Does . . . . . . . . . . . . . . . . . . . . . . . . . . . . . . . . . . . . . . . . . . . . . . . . . . . . . . . . . 1
How Virtual Machine Importer Works . . . . . . . . . . . . . . . . . . . . . . . . . . . . . . . . . . . . . . . . . . . . . . . . . . . . . 2
Importer Host System Requirements . . . . . . . . . . . . . . . . . . . . . . . . . . . . . . . . . . . . . . . . . . . . . . . . . . . . . . . . . . 2
Interoperability . . . . . . . . . . . . . . . . . . . . . . . . . . . . . . . . . . . . . . . . . . . . . . . . . . . . . . . . . . . . . . . . . . . . . . . . . . . . 3
Importing Unsupported Guest Operating Systems . . . . . . . . . . . . . . . . . . . . . . . . . . . . . . . . . . . . . . . . . . . . . . 3
How Importing Affects Settings . . . . . . . . . . . . . . . . . . . . . . . . . . . . . . . . . . . . . . . . . . . . . . . . . . . . . . . . . . . . . . 4
Changes to Virtual Hardware . . . . . . . . . . . . . . . . . . . . . . . . . . . . . . . . . . . . . . . . . . . . . . . . . . . . . . . . . . . . . 4
Chapter 2 Installing and Uninstalling VMware Virtual Machine Importer . . . . . . . . 5
Installing Virtual Machine Importer . . . . . . . . . . . . . . . . . . . . . . . . . . . . . . . . . . . . . . . . . . . . . . . . . . . . . . . . . . 5
Uninstalling or Repairing Virtual Machine Importer . . . . . . . . . . . . . . . . . . . . . . . . . . . . . . . . . . . . . . . . . . . . 5
Chapter 3 Using VMware Virtual Machine Importer . . . . . . . . . . . . . . . . . . . . . . . . . . . . . . . . . 7
Selecting the Source for Your Virtual Machine . . . . . . . . . . . . . . . . . . . . . . . . . . . . . . . . . . . . . . . . . . . . . . . . . 7
Importing a Standalone Virtual Machine or System Image . . . . . . . . . . . . . . . . . . . . . . . . . . . . . . . . . . . . . . . 7
Importing an ESX Server Virtual Machine . . . . . . . . . . . . . . . . . . . . . . . . . . . . . . . . . . . . . . . . . . . . . . . . . . . . 12
Adapting an Existing Virtual Machine . . . . . . . . . . . . . . . . . . . . . . . . . . . . . . . . . . . . . . . . . . . . . . . . . . . . . . . 18
Index . . . . . . . . . . . . . . . . . . . . . . . . . . . . . . . . . . . . . . . . . . . . . . . . . . . . . . . . . . . . . . . . . . . . . . . . . . . . . . . . . . . . . . 21
VMware, Inc.
iii
Virtual Machine Importer User’s Manual
iv
VMware, Inc.
Preface
Preface
This preface describes the contents of the VMware Virtual Machine Importer User’s Manual and provides pointers to technical and educational resources. This preface contains the following topics:
!
“About This Book” on page v
!
“Intended Audience” on page v
!
“Document Feedback” on page v
!
“Conventions and Abbreviations” on page v
!
“Self‐Service Support” on page vi
About This Book
This manual, the VMware Virtual Machine Importer User’s Manual, describes how to install, use, and troubleshoot the 2.x version of the application.
Intended Audience
The information presented in this manual is written for experienced Windows or Linux system administrators who are familiar with virtual machine technology and datacenter operations.
Document Feedback
If you have comments about this documentation, submit your feedback to: http://[email protected] Conventions and Abbreviations
This manual uses the style conventions listed in Table P‐1. Table P-1. Type Conventions
VMware, Inc.
Style
Purpose
Monospace
Used for commands, filenames, directories, and paths.
Monospace bold
Applied to indicate user input.
Italic
Used for book titles and glossary terms.
< name > Used to indicate variable and parameter names.
v
VMware Virtual Machine Importer User’s Manual
Self-Service Support
Use the VMware® Technology Network for self‐help tools and technical information:
!
Product information – www.vmware.com/support/resources
!
Technology information – www.vmware.com/vcommunity/technology
!
Documentation – www.vmware.com/support/pubs
!
Knowledge base – www.vmware.com/support/kb
!
Discussion forums – www.vmware.com/community
!
User groups – www.vmware.com/vcommunity/usergroups.html
For more information about the VMware Technology Network, go to www.vmtn.net.
vi
VMware, Inc.
Chapter 1 Introducing VMware Virtual Machine Importer
Introducing VMware Virtual Machine
Importer
C HAPTER 1
VMware Virtual Machine Importer 2 is a utility for IT professionals and software developers and testers working with virtual machines. It is a freely available, stand‐alone utility to import virtual machines from a variety of source formats into most VMware product environments.
This chapter includes the following sections:
!
“What Virtual Machine Importer Does” on page 1
!
“Importer Host System Requirements” on page 2
!
“Interoperability” on page 3
!
“Importing Unsupported Guest Operating Systems” on page 3
!
“How Importing Affects Settings” on page 4
What Virtual Machine Importer Does
Virtual Machine Importer gives you great flexibility in using virtual machines:
!
It can be used as a point‐to‐point transfer mechanism to move virtual machines across different test/development and production environments that can be based on different virtualization product, or managed separately by different VirtualCenter Management Servers.
!
In environments in which multiple types and generations of VMware products are being used, it can be used to convert virtual machines to and from the formats used by different VMware products.
!
It can be used to create VMware virtual machines from third‐party system images such as Symantec Backup Exec System Recovery (formerly LiveState Recovery) and Microsoft Virtual Server.
!
Populate new virtual machine environments quickly from the large VMware directory of Virtual Machine Appliances.
!
Because most of the Virtual Machine Appliances freely available on VMTN are provided in VMware Server 1.0 format, Virtual Machine Importer is also ideal for moving virtual appliances from local workstations to remote servers.
VMware, Inc.
1
VMware Virtual Machine Importer User’s Manual
source
destination
ESX Server 3.x
host
VMware virtual
machines
virtual
machine
ESX Server 2.5.x
host
third-party
virtual
machines
VMware
Virtual
Machine
Importer
VirtualCenter
Server
virtual
machine
Workstation 5
VMware Player
VMware Server
virtual
machine
Workstation 4
GSX Server
third-party
system images
virtual
machine
.sv2i
Figure 1-1. Virtual Machine Importer imports virtual machines from a variety of source formats into most
VMware product environments.
VMware Virtual Machine Importer lets you move VMware virtual machines between Workstation, VMware Player, ESX Server, GSX Server, VMware Server, and VirtualCenter 2. Virtual Machine Importer also imports virtual machines from Microsoft® Virtual Server and Virtual PC, and from Symantec® Backup Exec System Recovery and Norton Ghost 9 and later system image.
How Virtual Machine Importer Works
The Virtual Machine Importer is a wizard that outputs a completely new VMware virtual machine based on the input virtual machine or system image. The migration process is nondestructive, so you can continue to use the original source virtual machine or system image with the product used to create the source virtual machine. Virtual Machine Importer works in three uncomplicated steps. In the first step you specify the source virtual machine or image to import. In the second step you specify the destination format, virtual machine name, and location for the virtual machine being created. In the third and final step you sit back and let Virtual Machine Importer create and convert the virtual machine on its own.
Importer Host System Requirements
The Virtual Machine Importer runs on the Windows 2000, Windows 2003, and Windows XP Professional operating systems.
All target operating systems should have the latest patches available from Microsoft. Installation of Virtual Machine Importer requires Windows Installer 3.1, which can be obtained from http://support.microsoft.com/?id=893803.
NOTE
Although the Virtual Machine Importer operates only on Windows, after the migration you can transfer the virtual machine to the VMware‐supported host platform of your choice.
Virtual Machine Importer 2 installation can interfere with the following VMware product versions, and should not be installed alongside them:
2
!
VMware VirtualCenter 1.x Management Server
!
VMware VirtualCenter 2.0 Management Server
VMware, Inc.
Chapter 1 Introducing VMware Virtual Machine Importer
!
VMware P2V 1.x and 2.x
!
VMware Consolidated Backup 1.0
Note that Virtual Machine Importer 2 can safely be installed alongside the VirtualCenter/VI Client.
Uninstalling Virtual Machine Importer causes import functionality in VMware Workstation 5.5.0/5.5.1 and VMware Server 1.0 to fail. You can resolve this problem by upgrading to Workstation 5.5.2 or VMware Server 1.0.1.
Interoperability
Table 1‐1 lists the sources and destinations supported by Virtual Machine Importer 2.
Table 1-1. Sources and Destinations Supported by Virtual Machine Importer 2
Import from Various Third-Party Formats and
VMware Products
Export to a Virtual Machine for VMware
Workstation and Datacenter Products
!
Workstation 5.x and Workstation 4.x1
!
Workstation 5.x and Workstation 4.x2
!
VMware Player 1.x
!
VMware Player 1.x
!
ESX Server 3.x
!
ESX Server 3.x
!
ESX Server 2.5.x (support only by importing to a VirtualCenter 2.x server that manages the ESX 2.5.x Server)
!
ESX Server 2.5.x (support only by importing to a VirtualCenter 2.x server that manages the ESX 2.5.x Server) !
GSX Server 3.x
!
GSX Server 3.x
!
VMware Server 1.x
!
VMware Server 1.x
!
VirtualCenter 2.x
!
VirtualCenter 2.x
!
Microsoft Virtual PC version 7 and higher
!
Any version of Microsoft Virtual Server
!
System images from Symantec Backup Exec System Recovery (formerly LiveState Recovery) and Norton Ghost versions 9 and higher
1
Only Workstation 5.5 can power on linked imports of .sv2i images.
2
Workstation 4 virtual machines are compatible with VMware GSX Server 3.0, and ACE 1.x.
Note the following limitations:
!
Virtual machines must be powered off before you import them. You cannot import suspended virtual machines.
!
Virtual machines from Macintosh versions of Virtual PC are not supported.
!
The operating system on the source Virtual PC or Virtual Server virtual machine must be a Windows guest operating system supported by the intended VMware platform (for example, VMware Workstation 4 or 5). See the VMware Web site for a list of supported operating systems:
www.vmware.com/support/guestnotes/doc/index.html
The Virtual Machine Importer supports Virtual PC and Virtual Server virtual machines with most Windows operating systems prior to NT 4.0 for cloning only. It does not support machines with earlier Windows operating systems for reconfiguring (adapting an existing virtual machine).
NOTE
Virtual PC and Virtual Server virtual machines with non‐Windows guest operating systems (for example, Linux and DOS) are not compatible with Virtual Machine Importer. This is true even when the destination VMware platform otherwise supports that guest operating system.
Importing Unsupported Guest Operating Systems
Virtual Machine Importer fully supports the Microsoft Windows NT, Windows 2000, Windows XP, and Windows 2003 guest operating systems. It can clone source images containing other operating systems, such as Linux and Windows ME or earlier, but these images might not work without additional configuration after VMware, Inc.
3
VMware Virtual Machine Importer User’s Manual
import. In particular, if the source image contains unsupported hardware, such as IDE disks under Linux, you might need to modify the configuration of the destination virtual machine before using it.
How Importing Affects Settings
Virtual Machine Importer uses the snapshot capability of VMware software to capture the entire state of the source virtual machine, including its memory state, settings state, and disk state. The VMware virtual machine created by the importer contains an exact copy of the disk state from your source virtual machine or system image, with the exception of some hardware‐dependent drivers (and sometimes the mapped drive letters). Settings from the source computer that remain identical include:
!
Operating system configuration (computer name, security ID, user accounts, profiles and preferences, and so forth)
!
Applications and data files
!
Each disk partition’s volume serial number
Because the target and the source virtual machines or system images have the same identities (name, SID, and so on), running both on the same network can result in conflicts. If you plan to redeploy the source virtual machine or system image, ensure that you do not run both the source and target images or virtual machines on the same network at the same time.
You can resolve the duplicate ID problem by using additional tools, such as the Windows 2000 System Preparation Tool (Sysprep). For example, if you use Virtual Machine Importer to test the viability of running a Virtual PC virtual machine as a VMware virtual machine without first decommissioning the original Virtual PC machine, you must resolve the duplicate ID problem first.
If you plan to run an imported VMware virtual machine on the same network as the source virtual machine, you must modify the network name and IP address on one of the virtual machines. Then the original and new virtual machines can coexist properly.
NOTE
If you create a virtual machine as a linked clone—one that shares the virtual disk of its source virtual machine—using the source virtual machine after the import can corrupt the linked clone machine.
Changes to Virtual Hardware
Most migrated applications should function correctly in the VMware virtual machine because their configuration and data files have the same location as the source virtual machine. However, applications might not work if they depend on specific characteristics of the underlying hardware such as the serial number or the device manufacturer.
When troubleshooting after migration, keep in mind the following hardware changes:
4
!
The CPU model and serial numbers (if activated) can be different after the migration. They correspond to the physical computer hosting the VMware virtual machine. !
The Ethernet adapter can be different (AMD™ PCNet™ or VMXnet) with a different MAC address. Each interface’s IP address must be individually reconfigured.
!
The graphics card can be different (VMware SVGA card).
!
The numbers of disks and partitions are the same, but each disk device can have a different model and different manufacturer strings.
!
The primary disk controllers can be different from the source machine’s controllers.
!
Applications might not work if they depend on devices that are not available from within a virtual machine.
VMware, Inc.
Chapter 2 Installing and Uninstalling VMware Virtual Machine Importer
Installing and Uninstalling VMware
Virtual Machine Importer
C HAPTER 2
This chapter describes the basic steps for installing Virtual Machine Importer.
The chapter includes the following sections:
!
“Installing Virtual Machine Importer” on page 5
!
“Uninstalling or Repairing Virtual Machine Importer” on page 5
Installing Virtual Machine Importer
You can install Virtual Machine Importer onto a physical machine or virtual machine.
To install Virtual Machine Importer
1
Make sure the importer requirements have been met. See “Importer Host System Requirements” on page 2.
2
To obtain the latest version of Virtual Machine Importer, see the VMware Web site:
www.vmware.com
3
To start the installer, go to the folder that contains the installer file and double‐click the file:
VMware-VMimporter-2.0.0-<xxxx>.exe
In this example, <xxxx> is the name of the build. This file is on the application CD, or in the local directory to which you downloaded the installer. A Preparing to Install dialog box appears momentarily and the importer installation wizard opens with a Welcome panel. 4
Click Next.
5
In the License Agreement panel, select I accept the terms in the license agreement, and click Next.
6
In the Ready to Install the Program panel, click Install. Messages indicate the progress of the installation.
7
When the wizard displays the InstallShield Wizard Completed panel, click Finish. You might have to restart your system before you can use Virtual Machine Importer. If so, a dialog box appears.
You have finished installing Virtual Machine Importer.
Uninstalling or Repairing Virtual Machine Importer
Besides being able to use the Microsoft Windows Add or Remove Programs utility from the control Panel to uninstall Virtual Machine Importer, you can also remove it using the Virtual Machine Importer installer wizard. The installer wizard has the additional capability to allow you to repair Virtual Machine Importer.
To uninstall or repair Virtual Machine Importer
1
VMware, Inc.
To start the Virtual Machine Importer installer, go to the folder that contains the installer file and double‐click the file:
VMware-VMimporter-2.0.0-<xxxx>.exe 5
VMware Virtual Machine Importer User’s Manual
In this example, <xxxx> is the name of the build. This file is on the Application CD or in the local directory to which you downloaded the installer. 2
The importer installation wizard opens with a Welcome panel. Click Next.
3
In the Program Maintenance panel, select Repair or Remove.
!
Select Repair to verify and reinstall any damaged components of the importer.
!
Select Remove to uninstall the importer.
When the wizard finishes removing or repairing the importer, you might have to restart your system before you can use Virtual Machine Importer. If so, a dialog box appears.
You have finished repairing or removing the importer.
6
VMware, Inc.
Chapter 3 Using VMware Virtual Machine Importer
C HAPTER 3
Using VMware Virtual Machine Importer
This chapter describes how to import virtual machines and system images from a variety of sources into a variety of destinations.
The chapter includes the following sections:
!
“Selecting the Source for Your Virtual Machine” on page 7
!
“Importing a Standalone Virtual Machine or System Image” on page 7
!
“Importing an ESX Server Virtual Machine” on page 12
!
“Adapting an Existing Virtual Machine” on page 18
Selecting the Source for Your Virtual Machine
Virtual Machine Importer gives you three choices for importing a virtual machine. Which method you select depends on the source of the virtual machine you want to work with:
!
Import a standalone virtual machine or system image – If your source system is a virtual machine from VMware Workstation 4 or 5, VMware Player, VMware Server, VMware GSX Server, Microsoft Virtual PC, Microsoft Virtual Server, or a Symantec Backup Exec System Recovery or Norton Ghost 9 (or higher) image, proceed to the next section, “Importing a Standalone Virtual Machine or System Image” on page 7.
!
Import an ESX Server virtual machine – If your source system is a virtual machine from a VMware ESX Server or VirtualCenter system, proceed to “Importing an ESX Server Virtual Machine” on page 12.
!
Adapt an existing virtual machine – If you have used third‐party imaging software to restore a system image into a virtual machine and you want to prepare the image to run on VMware virtual hardware, proceed to “Adapting an Existing Virtual Machine” on page 18.
Importing a Standalone Virtual Machine or System Image
Follow these steps if your source system is a virtual machine from VMware Workstation 4 or 5, VMware Player, VMware Server, VMware GSX Server, Microsoft Virtual PC, Microsoft Virtual Server, or a Symantec Backup Exec System Recovery or Norton Ghost 9 (or higher) image.
The steps you follow in this section depend on whether you are importing a virtual machine or system image to work with Workstation and GSX Server, or with ESX Server and VirtualCenter. In the second case, you are directed to skip steps that apply only to virtual machines intended for migration to Workstation and GSX Server systems.
To convert a virtual machine or system image using the importer wizard
1
Make sure the virtual machine is powered off. You cannot import a virtual machine while it is operating.
2
From your Windows Start menu, choose All Programs > VMware > VMware Virtual Machine Importer. The VMware Virtual Machine Importer Wizard starts automatically. 3
From the opening panel, click Next.
4
In the Source System Information panel, select Import a standalone virtual machine and click Next.
5
In the Specify the source for your virtual machine panel, browse or type the path to the source virtual machine (.vmc, .vmx) or Backup Exec System Recovery (formerly LiveState) image file (.sv2i). Click Next.
The Virtual Machine Importer inspects the file.
VMware, Inc.
7
VMware Virtual Machine Importer User’s Manual
NOTE
If you are running Virtual Machine Importer on a system running Microsoft Windows 2000 or later, and you are importing a Microsoft Windows NT 4.0 virtual machine or image, a warning message advises that the import process will upgrade any NTFS partitions in the resulting virtual machine to a newer version of the NTFS file system. An upgraded file system is compatible with Windows 4.0. The operating system and applications will work normally. However, some utilities shipped with Windows NT 4.0, including chkdsk and defrag, will not operate properly. Microsoft provides hotfix 872952 for this issue.
If the source virtual machine is Windows NT with SMP, the Virtual Machine Importer might require files from service packs or hot fixes. In this case, the Windows NT SMP Reconfiguration panels appears. Otherwise, proceed to Step 8.
The importer wizard shows which files it requires. 6
Select the check box in the Filename column, insert the media containing that file, and click Have Disk. Or, if you have the file available on your system or network, click Have Disk and browse to select the file. The importer reads the file. 8
7
Repeat this for each required file. Click Next. 8
In the Destination System Information panel, select the type of virtual machine to create:
!
VMware Workstation virtual machine – Select this to import the virtual machine in a form that works with Workstation, VMware Player, VMware Server, and unmanaged GSX Server. Click Next. Proceed to the next step.
!
VMware ESX Server virtual machine – Select this to import the virtual machine in a form that works with ESX Server and VirtualCenter 2. Click Next. Skip to Step 14.
VMware, Inc.
Chapter 3 Using VMware Virtual Machine Importer
9
In the Specify the Destination for Your Virtual Machine panel, enter the name of the virtual machine, and browse or type the path of the location where you want to create the VMware virtual machine.
10
Select the type of virtual machine that corresponds to the VMware product with which you want to use the virtual machine and click Next. Choose Workstation 5.x, VMware Player 1.x and VMware Server or Workstation 4.x, VMware ACE 1.x, and GSX Server 3.x.
11
Select the import options for the new virtual machine and click Next.
In the Disk Options area, you have two choices for the way in which the importer creates the clone:
!
Create a full clone – This creates a VMware virtual machine with no dependencies on the original virtual machine or system image. If you want to allocate all the disk space for this clone, select the Allocate all disk space now for better performance check box. This option gives somewhat better performance for your virtual machine. If you do not select this check box, the virtual disk’s files start small and grow as needed, until they reach the size of the source disks from which they were cloned.
If you need to support virtual disks on FAT file systems, select the Split disk into 2 GB files check box.
VMware, Inc.
9
VMware Virtual Machine Importer User’s Manual
NOTE
!
Create a linked clone – This creates a VMware virtual machine that shares the virtual disk of the source virtual machine or system image. NOTE
12
The Allocate all disk space now for better performance option creates a disk file that can be larger than the disk file of the source. For example, the source disk might be a 16GB disk of which only 2GB is used for the file, but importing the file with the Allocate option creates a 16GB disk. Take this into account when you look at free space before you import.
For linked clones, the virtual machine created by the importer is corrupted if the source is modified after the import. This is true for linked clones imported from Virtual PC and Virtual Server machines and from Backup Exec System Recovery (formerly LiveState) images. In the case of Virtual PC and Virtual Server source virtual machines, simply powering them on in Virtual PC or Virtual Server modifies them.
Review the settings shown on the Summary panel. To make changes, click Back. To proceed, click Next. Virtual Machine Importer creates a VMware virtual machine from the source virtual machine or system image.
A progress bar appears. To stop the import, click Cancel. The import process can often take more than a minute per gigabyte of disk space of the migrated virtual machine. When the migration is complete, the wizard displays a completion panel.
13
Click Finish.
If the import is not successful, the wizard displays the Virtual Machine Import was Unsuccessful panel with a message explaining why the import failed. To see the log file for the unsuccessful import, click Show log file.
This is the end of the steps to import a standalone machine or system image for use with Workstation, VMware Player, VMware Server, or GSX Server systems. The remaining steps apply only to importing a virtual machine for use with ESX Server or VirtualCenter systems.
14
In the New Virtual Machine Location panel, name the new virtual machine and log on to its destination server.
Virtual machine name – Type the name you are giving the new virtual machine.
ESX or VirtualCenter Server Login – Identify which server receives the new virtual machine and how to gain access to that server. Choose the destination server from those presented in the drop‐down box or type the name of the server if it is not listed, and type your user name and the password for the destination server.
15
Click Next.
If you selected an ESX Server, skip to Step 18.
10
VMware, Inc.
Chapter 3 Using VMware Virtual Machine Importer
16
Specify the host or cluster (or, in certain types of clusters, the host within it) for the imported virtual machine in the Specify the Destination for Your Virtual Machine panel. Click Next.
17
If you chose a cluster, set where in the inventory you want the virtual machine to exist by specifying the location in the Virtual Machine Inventory Location panel. Click Next.
VMware, Inc.
11
VMware Virtual Machine Importer User’s Manual
18
If there are two or more datastores to choose from, specify the one for the virtual machine’s configuration files and disks. Click Next.
If the destination ESX Server has only one datastore, that datastore is selected by default, and this panel appears only briefly before the next panel appears.
19
Confirm the way in which the importer creates the clones in the Virtual Machine Options panel by clicking Next.
20
Review the settings shown on the Summary panel. To make changes, click Back. To proceed, click Next. Virtual Machine Importer creates a VMware virtual machine from the source virtual machine or system image.
A progress bar appears. To stop the import, click Cancel. The import process can often take more than a minute per gigabyte of disk space of the migrated virtual machine. When the migration is complete, the wizard displays a completion panel.
21
Click Finish.
If the import is not successful, the wizard displays the Virtual Machine Import was Unsuccessful panel with a message explaining why the import failed. To see the log file for the unsuccessful import, click Show log file.
To locate the log files
The log files can be found in the directory in which Virtual Machine Importer is installed. For example,
C:\Program Files\VMware\VMware Virtual Machine Importer 2
The log files are named vmware-ufad.log-0.log, vmware-ufad.log-1.log, vmware-ufad.log-2.log, and so on to vmware-ufad.log-9.log, after which the log returns next to vmware-ufad.log-0.log. The index of the current log file in use is in vmware-ufad.log-index.
Importing an ESX Server Virtual Machine
Follow these steps if your source system is a virtual machine from a ESX Server or VirtualCenter system.
The steps you follow in this section depend on whether you are importing a virtual machine or system image to work with Workstation, VMware Player, VMware Server, or GSX Server, or with ESX Server and VirtualCenter. In the second case, you are directed to skip steps that apply only to virtual machines with Workstation, VMware Player, VMware Server, and GSX Server systems as migration destinations.
12
VMware, Inc.
Chapter 3 Using VMware Virtual Machine Importer
To convert a virtual machine using the import wizard
1
Make sure the virtual machine is powered off. You cannot import a virtual machine while it is operating.
2
From your Windows Start menu, choose All Programs > VMware > VMware Virtual Machine Importer. The VMware Virtual Machine Importer Wizard starts automatically. 3
From the opening panel, click Next.
4
In the Source System Information panel select Import an ESX Server virtual machine and click Next.
5
In the Server Authentication panel, choose the server you want to log on to in the drop‐down box or type the name of the server if it is not listed. Type your user name and the password for the server. Click Next.
If you chose an ESX Server machine, proceed to the next step. If you chose a VirtualCenter server, skip to Step 7.
6
VMware, Inc.
Choose the virtual machine you want to import from the list of those found on the ESX Server machine you logged on to. Click Next and skip to Step 8.
13
VMware Virtual Machine Importer User’s Manual
7
Specify the source for your virtual machine in the VirtualCenter virtual machine inventory browser. Click Next.
You can search the browser through one of two views of the inventory—the default Hosts & Clusters view (shown above) or the Virtual Machines & Templates view (shown below)—in the View drop‐down box.
8
14
In the Destination System Information panel, select the type of virtual machine to create:
!
VMware Workstation virtual machine – Select this to import the virtual machine in a form that works with Workstation, VMware Player, VMware Server, and GSX Server. Click Next. Proceed to the next step.
!
VMware ESX Server virtual machine – Select this to import the vitual machine in a form that works with ESX Server and VirtualCenter. Click Next. Skip to Step 14.
VMware, Inc.
Chapter 3 Using VMware Virtual Machine Importer
9
In the Specify the Destination for Your Virtual Machine panel, enter the name of the virtual machine and browse or type the path to the location where you want to create the VMware virtual machine.
10
Select the type of virtual machine that corresponds to the VMware product with which you want to use the virtual machine. Choose Workstation 5.x, VMware Player 1.x and VMware Server or Workstation 4.x, VMware ACE 1.x, and GSX Server 3.x. Click Next.
11
Select the import options for a full clone, and click Next.
In the Disk Options area you have two choices for the way in which the importer creates the full clone:
!
Create a full clone – If you want to allocate all the disk space for this clone, select the Allocate all disk space now for better performance check box. This option gives somewhat better performance for your virtual machine. If you do not select this check box, the virtual disk’s files start small and grow as needed, until they reach the size of the source disks from which they were cloned.
If you need to support virtual disks on FAT file systems, select the Split disk into 2 GB files check box.
VMware, Inc.
15
VMware Virtual Machine Importer User’s Manual
NOTE
!
12
The Allocate all disk space now for better performance option creates a disk file that can be larger than the disk file of the source. For example, the source disk might be a 16GB disk of which only 2GB is used for the file, but importing the file with the Allocate option creates a 16GB disk. Take this into account when you look at free space before you import.
Create a linked clone – Linked clones cannot be used with ESX Server or VirtualCenter systems, so this option is not available in this panel. Review the settings shown on the Summary panel. To make changes, click Back. To proceed, click Next. Virtual Machine Importer creates a VMware virtual machine from the source virtual machine or system image.
A progress bar appears. To stop the import, click Cancel. The import process can often take more than a minute per gigabyte of disk space of the migrated virtual machine. When the migration is complete, the wizard displays a completion message.
13
Click Finish.
If the import is not successful, the wizard displays the Virtual Machine Import was Unsuccessful panel with a message explaining why the import failed. To see the log file for the unsuccessful import, click Show log file.
This is the end of the steps to import a virtual machine for use with a Workstation, VMware Player, VMware Server or GSX Server system. The remaining steps apply only to importing a virtual machine for use with an ESX Server or VirtualCenter system.
14
In the New Virtual Machine Location panel, name the new virtual machine and log on to its destination server. Click Next.
Virtual machine name – Type the name you are giving the new virtual machine.
ESX or VirtualCenter Server Login – Identify which server receives the new virtual machine and how to gain access to that server. Choose the destination server from those presented in the drop‐down box, and type your user name and the password for the destination server.
If you selected an ESX Server, skip to Step 17.
15
16
Specify the host or cluster for the imported virtual machine in the Specify the Destination for Your Virtual Machine panel. Click Next.
VMware, Inc.
Chapter 3 Using VMware Virtual Machine Importer
16
If you chose a cluster, set where in the inventory you want the virtual machine to exist by specifying the location in the Virtual Machine Inventory Location panel. Click Next.
17
If there are two or more datastores to choose from, specify the one for the virtual machine’s configuration files and disks. Click Next.
If the destination ESX Server has only one datastore, that datastore is selected by default, and this panel appears only briefly before the next panel appears.
18
Confirm the way in which the importer creates the clones in the Virtual Machine Options panel by clicking Next.
19
Review the settings shown on the Summary panel. To make changes, click Back. To proceed, click Next. Virtual Machine Importer creates a VMware virtual machine from the source virtual machine or system image.
A progress bar appears. To stop the import, click Cancel. To see a log of the import while the importer is working, click Show Log.
The import process can often take more than a minute per gigabyte of disk space of the migrated virtual machine. When the migration is complete, the wizard displays a completion panel.
VMware, Inc.
17
VMware Virtual Machine Importer User’s Manual
20
Click Finish.
If the import is not successful, the wizard displays the Virtual Machine Import was Unsuccessful panel with a message explaining why the import failed. To see the log file for the unsuccessful import, click Show log file.
To locate the log files
The log files can be found in the directory in which Virtual Machine Importer is installed. For example,
C:\Program Files\VMware\VMware Virtual Machine Importer 2
The log files are named vmware-ufad.log-0.log, vmware-ufad.log-1.log, vmware-ufad.log-2.log, and so on to vmware-ufad.log-9.log, after which the log returns next to vmware-ufad.log-0.log. The index of the current log file in use is in vmware-ufad.log-index.
Adapting an Existing Virtual Machine
Follow these steps if you are adapting or reconfiguring VMware virtual machines whose disks have been populated by restoring from a backup of a physical host, by using the P2V Assistant without reconfiguration, or by some other direct means of copying.
To convert a virtual machine or system image using the import wizard
1
Make sure the virtual machine is powered off. You cannot import a virtual machine while it is operating.
2
From your Windows Start menu, choose All Programs > VMware > VMware Virtual Machine Importer. The Virtual Machine Importer Wizard starts automatically. 3
From the opening panel, click Next.
4
In the Source System Information panel, select Adapt an existing virtual machine and click Next.
5
In the Adapting an Existing Virtual Machine panel, select the type of VMware virtual machine you are adapting:
6
!
VMware Workstation virtual machine – Use this if you have restored or copied the image into a Workstation virtual machine. Click Next and proceed to the next step.
!
VMware ESX Server virtual machine – Use this if you have restored or copied the image into an ESX Server or VirtualCenter virtual machine. Click Next and skip to Step 7.
In the Specify the Source for Your Virtual Machine panel, browse for the Workstation virtual machine you want to adapt. Click Next, and skip to Step 9.
The browser shows only those files with a .vmx suffix.
7
In the Server Authentication panel, choose the server you want to log on to in the drop‐down box or type the name of the server if it is not listed. Type your user name and the password for the server. Click Next.
8
In the Specify the Source for Your Virtual Machine panel, choose the ESX Server or VirtualCenter virtual machine you want to adapt. Click Next.
If your source is a VirtualCenter, you choose from a Hosts & Clusters view.
9
Review the settings shown on the Summary panel. To make changes, click Back. To proceed, click Next. Virtual Machine Importer creates a VMware virtual machine from the source virtual machine or system image.
A progress bar appears. To stop the import, click Cancel. 10
18
Click Finish.
VMware, Inc.
Chapter 3 Using VMware Virtual Machine Importer
If the conversion is not successful, the wizard displays the Virtual Machine Import was Unsuccessful panel with a message explaining why the reconfiguring failed. To see the log file for the unsuccessful conversion, click Show log file.
To locate the log files
The log files can be found in the directory in which Virtual Machine Importer is installed. For example,
C:\Program Files\VMware\VMware Virtual Machine Importer 2
The log files are named vmware-ufad.log-0.log, vmware-ufad.log-1.log, vmware-ufad.log-2.log, and so on to vmware-ufad.log-9.log, after which the log returns next to vmware-ufad.log-0.log. The index of the current log file in use is in vmware-ufad.log-index.
VMware, Inc.
19
VMware Virtual Machine Importer User’s Manual
20
VMware, Inc.
Index
Symbols
S
.sv2i image file 7
stopping import 10, 12, 16–18
Symantec LiveState Recovery system images 1
B
Backup Exec System Recovery system images 3, 7
U
C
uninstalling 5
user groups vi
clones
full 9, 15
linked 10, 16
clusters
V
version support 3
virtual hardware
specify for destination 16
CPU issues 4
specifying for destination 11
disk device issues 4
Ethernet adapter issues 4
D
graphics card issues 4
datastores 12, 17
E
migration issues 4
virtual machine
adapting an existing 18
ESX Server support 3
G
GSX Server support 3
output compatibility 4
requirements 3
Virtual Machine Importer
installing 5
I
removing 6
import options
repairing 6
selecting for a standalone virtual machine 9, 15
selecting for an ESX Server virtual machine 12
installing Virtual Machine Importer 5
Inventory view
running imported and source virtual machines
on same network 4
uninstalling 5
Virtual PC software
L
source virtual machine 7, 13, 18
Virtual PC support 3
Virtual Server support 3
VirtualCenter support 3
VMware community forums vi
VMware Player support 3
VMware Server support 3
LiveState Recovery system images 1, 3, 7
log files, locating 12, 18–19
W
Hosts & Clusters 14
Virtual Machines & Templates 14
K
knowledge base vi
O
output compatible with VMware products 4
R
Windows NT 4.0
hot fix for utilities 8
NTFS file system upgraded 8
Workstation support 3
removing Virtual Machine Importer 6
repairing Virtual Machine Importer 6
requirements 2
VMware, Inc.
21
VMware Virtual Machine Importer User’s Manual
22
VMware, Inc.