1
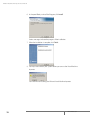
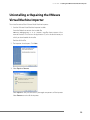
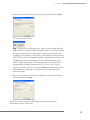
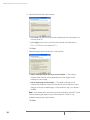
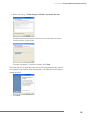
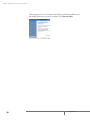
VMware
Virtual Machine Importer
User’s Manual
Please note that you will always find the most up-to-date technical
documentation on our Web site at http://www.vmware.com/support/.
VMware, Inc.
3145 Porter Drive
Palo Alto, CA 94304
www.vmware.com
The VMware Web site also provides the latest product updates.
Copyright (c) 2006 VMware, Inc. All rights reserved. Protected by one or more of U.S. Patent Nos. 6,397,242,
6,496,847, 6,704,925, 6,711,672, 6,725,289, 6,735,601, 6,785,886, 6,789,156, 6,795,966, 6,880,022, 6,961,941,
6,961,806, and 6,944,699; patents pending. VMware, the VMware “boxes” logo and design, Virtual SMP and
VMotion are registered trademarks or trademarks of VMware, Inc. in the United States and/or other
jurisdictions. Microsoft, Windows and Windows NT are registered trademarks of Microsoft Corporation. Linux is
a registered trademark of Linus Torvalds. All other marks and names mentioned herein may be trademarks of
their respective companies.
Revision 20060601 Version: 1.5.1 Item: VM-ENG-Q206-138
Table of Contents
Introducing VMware Virtual Machine Importer ______________________5
Virtual Machine Importer Overview __________________________________6
Benefits of the Importer _________________________________________6
Importer Requirements ___________________________________________7
Importer — Application Requirements _____________________________7
The Virtual Machine and System Image — Input Requirements __________7
The VMware Virtual Machine — Output Compatibility _________________7
How Virtual Machine and System Image Settings Are Affected _____________8
Installing the VMware Virtual Machine Importer _____________________9
Installing the VMware Virtual Machine Importer _______________________10
Uninstalling or Repairing the VMware Virtual Machine Importer ___________13
Using the VMware Virtual Machine Importer ______________________ 15
Using the VMware Virtual Machine Importer from the Command Line _ 21
Troubleshooting the Importer __________________________________ 23
Importer Installation Issues ________________________________________24
Importer Installation Wizard Interrupted ___________________________24
Virtual Machine Migration Issues ___________________________________25
Changes to Virtual Hardware ____________________________________25
Importer Fails to Migrate Virtual PC with More Than Six PCI Devices ______25
Virtual Machine or System Image Shared Folder Settings Not Migrated ___25
Windows NT4 Ethernet Adapter Not Migrated Correctly _______________26
Failed to Impersonate Client ____________________________________26
No Keyboard or Mouse in Migrated Virtual Machine __________________26
Importer Reports Error When Converting Virtual PC Disk Files with Duplicate
Names _____________________________________________________26
Technical Support Resources ______________________________________27
Additional Resources __________________________________________27
Index _______________________________________________________ 29
3
4
www.vmware.com
CHAPTER
Introducing VMware Virtual
Machine Importer
1
This chapter includes the following sections:
• Virtual Machine Importer Overview on page 6
• Importer Requirements on page 7
5
VMware Virtual Machine Importer User’s Manual
Virtual Machine Importer Overview
The VMware Virtual Machine Importer allows you to import virtual machines from
Microsoft® Virtual Server and Virtual PC, and Symantec® LiveState Recovery system
images to the following VMware platforms:
• Workstation 5.x and VMware Server 1.0
• Legacy Virtual Machines (for example, virtual machines compatible with
Workstation 4.x, GSX Server 3.x, ESX Server 2.x, and ACE 1.x)
The importer is a wizard that outputs a completely new VMware virtual machine
based on the input virtual machine or system image. The newly-migrated VMware
virtual machine retains the configuration of the original virtual machine or image.
The migration process is non-destructive, so you can continue to use the original
virtual machine with Virtual PC, or the original system image with LiveState Recovery.
However, if you plan to run a new VMware virtual machine on the same network as
the original Virtual PC virtual machine or Microsoft Virtual Server virtual machine, you
must modify the network name and IP address on one of the virtual machines, so the
original and new virtual machines can coexist properly.
Note: Beginning with Workstation release version 5.5 and VMware Server 1.0, the
VMware Virtual Machine Importer features are incorporated into the Workstation and
the VMware Server software. When you upgrade to Workstation version 5.5 and
VMware Server 1.0, you no longer need the separate VMware Virtual Machine
Importer application to convert a Microsoft Virtual PC virtual machine and Microsoft
Virtual Server virtual machine, or a Symantec LiveState Recovery system image to a
VMware virtual machine: you can open and convert virtual machines and system
images directly from Workstation or the VMware Server. See the user’s manual for
Workstation or VMware Server.
Benefits of the Importer
The importer lets you convert existing Virtual PC virtual machines, Microsoft Virtual
Server virtual machines, and LiveState Recovery system images to VMware virtual
machines, allowing you to:
• Avoid reinstalling operating systems and applications for system configurations
you use often.
• Overcome legacy migration barriers — certain legacy systems may be
impossible to recreate through reinstallation.
6
www.vmware.com
C H A P T E R 1 Introducing VMware Virtual Machine Importer
Importer Requirements
Requirements for the importer include the following.
Importer — Application Requirements
The importer runs on the following Microsoft Windows operating systems:
Windows NT, Windows 2000, Windows Server 2003, Windows Server 2003 R2, and
Windows XP Professional.
Note: Although the importer operates only on Windows, after the migration you can
transfer the virtual machine to the VMware-supported host platform of your choice.
The Virtual Machine and System Image — Input Requirements
• System images can be imported from Symantec LiveState Recovery.
• Virtual machines can be imported from Microsoft Virtual PC version 7 and later.
• Virtual machines can be imported from any version of Microsoft Virtual Server.
• Virtual machines from Macintosh versions of Virtual PC are not supported.
• Virtual machines must be powered off before you attempt the migration
process. Suspended virtual machines cannot be migrated.
• The operating system on the source Virtual PC or Virtual Server virtual machine
must be a Windows guest operating system — but not Windows 9x —
supported by the intended VMware platform (for example, VMware Workstation
4 or 5). See the VMware Web site for a list of supported operating systems:
www.vmware.com/support/guestnotes/doc/index.html
Note: Virtual PC and Virtual Server virtual machines with Windows 9x, and nonWindows guest operating systems (for example, Linux and DOS), are not
compatible with VMware Virtual Machine Importer. This is true even when the
destination VMware platform otherwise supports that guest operating system.
The VMware Virtual Machine — Output Compatibility
• The resulting VMware virtual machine can be used with Workstation 4.x,
Workstation 5.x, or VMware Server 1.0.
Note: Workstation 4.x virtual machines are compatible with VMware GSX Server
3.0, ESX Server 2.x, and ACE 1.x.
7
VMware Virtual Machine Importer User’s Manual
How Virtual Machine and System Image
Settings Are Affected
The VMware virtual machine created by the importer contains an exact copy of the
disk state from your source virtual machine or system image, with the exception of
some hardware-dependent drivers and, sometimes, the mapped drive letters.
Settings from the source computer that remain identical include:
• Operating system configuration (computer name, security ID, user accounts,
profiles and preferences, and so forth)
• Applications and data files
• Each disk partition’s volume serial number
Since the target and the source virtual machines or system images have the same
identities (name, SID, and so on), running both on the same network can result in
conflicts. If you are planning to redeploy the source virtual machine or system image,
be aware of this issue and do not run both the source and target images or virtual
machines on the same network at the same time.
You can resolve the duplicate ID problem by using additional tools, such as the
Windows 2000 System Preparation Tool (Sysprep). For example, if you use Virtual
Machine Importer to test the viability of running a Virtual PC virtual machine as a
VMware virtual machine without first decommissioning the original Virtual PC
machine, you need to resolve the duplicate ID problem.
Refer to Changes to Virtual Hardware on page 25 for a discussion of possible
migration issues.
8
www.vmware.com
CHAPTER
Installing the VMware Virtual
Machine Importer
2
This chapter includes the following sections:
• Installing the VMware Virtual Machine Importer on page 10
• Uninstalling or Repairing the VMware Virtual Machine Importer on page 13
9
VMware Virtual Machine Importer User’s Manual
Installing the VMware Virtual Machine
Importer
You can install the VMware Virtual Machine Importer onto a physical machine or
virtual machine.
Note: Workstation version 5.5 and VMware Server 1.0 include the importer. If you
have these applications installed, you do not need the standalone VMware Virtual
Machine Importer. However, the standalone VMware Virtual Machine Importer v1.5 is
compatible with Workstation 5.5 and VMware Server 1.0. You can install both
programs on the same machine. The Windows control panel Add or Remove
Programs will contain entries for VMware Virtual Machine Importer 1.5, Workstation
5.5, and VMware Server 1.0. The Virtual Machine Importer files will remain until you
uninstall both the importer and Workstation applications.
Caution: The standalone VMware Virtual Machine Importer v1.0 is not compatible
with Workstation 5.5 and VMware Server 1.0. If you currently have Workstation 5.5 or
VMware Server 1.0 installed, do not attempt to install VMware Virtual Machine
Importer v1.0. The version 1.0 importer cannot be installed over Workstation 5.5 or
VMware Server 1.0. Attempting this installation will damage the Workstation
installation and disable the import capability built into Workstation 5.5 or VMware
Server 1.0.
Follow these steps to install the VMware Virtual Machine Importer:
1. Make sure the importer requirements have been met. See Importer
Requirements on page 7.
2. Obtain the latest version of the VMware Virtual Machine Importer.
Check with your VMware Sales representative or see the VMware Web site:
www.vmware.com
Caution: Copy the program and run the installer locally. Do not run the importer
installer through Terminal Services.
3. Start the installer.
Go to the folder that contains the installer file:
VMware-VMimporter-1.5.0-<xxxx>.exe file, where <xxxx> is the
name of the build. This file is on the application CD, or in the local directory to
which you downloaded the installer.
Double-click the file.
10
www.vmware.com
C H A P T E R 2 Installing the VMware Virtual Machine Importer
A splash panel appears momentarily.
4. The importer Installation Wizard opens. Click Next.
5. Acknowledge the license agreement.
Select I accept the terms in the license agreement and click Next.
11
VMware Virtual Machine Importer User’s Manual
6. In the panel Ready to Install the Program, click Install.
Various messages indicate the progress of the installation.
7. When the installation is complete, click Finish.
8. You may have to restart your system before you can use the Virtual Machine
Importer.
You have finished installing the VMware Virtual Machine Importer.
12
www.vmware.com
C H A P T E R 2 Installing the VMware Virtual Machine Importer
Uninstalling or Repairing the VMware
Virtual Machine Importer
To uninstall or reinstall the VMware Virtual Machine Importer:
1. Start the VMware Virtual Machine Importer installer.
Go to the folder that contains the installer file:
VMware-VMimporter-1.0.0-<xxxx>.exe file, where <xxxx> is the
name of the build. This file is on the Application CD, or in the local directory to
which you downloaded the installer.
Double-click the file.
2. The importer wizard opens. Click Next.
3. Select Repair or Remove.
Select Repair to verify and reinstall any damaged components of the importer
Select Remove to uninstall the importer.
13
VMware Virtual Machine Importer User’s Manual
4. Depending on the changes you make, the installer may ask you to reboot your
machine.
You have finished repairing, or removing the importer.
14
www.vmware.com
CHAPTER
3
Using the VMware Virtual Machine
Importer
Use the VMware Virtual Machine Importer to create a new VMware virtual machine
from a Microsoft® Virtual PC virtual machine or a Symantec® LiveState Recovery
system image in a few simple steps.
15
VMware Virtual Machine Importer User’s Manual
To convert a virtual machine or system image using the Import command:
1. If you are importing a Virtual PC virtual machine, make sure the virtual machine
is powered off.
Note: You cannot import a virtual machine while it is operating.
2. To launch the VMware Virtual Machine Importer, from your Windows start menu,
select All Programs > VMware > VMware Virtual Machine Importer. The
VMware Virtual Machine Importer Wizard starts automatically. From the opening
panel, click Next.
3. Select the configuration and click Next.
Typical — This configuration is appropriate for most use.
Custom — Custom configurations are useful if
• You run Workstation 5.x or VMware Server 1.0, but you need to create a legacy
virtual machine for use with VMware Workstation 4, GSX 3.x, ESX 2.x, or
VMware ACE1.x.
• You run Workstation 5.x or VMware Server 1.0, and you prefer not to make a
copy of the virtual disks of the source virtual machine or system image. You
might make this choice to save disk space. The migrated VMware virtual
machine uses the virtual disks of the source virtual machine or system image.
16
www.vmware.com
C H A P T E R 3 Using the VMware Virtual Machine Importer
4. Browse or (type the path) to the source Virtual PC virtual machine. Click Next.
The importer inspects the file.
Note: If you are running Workstation on a system running Microsoft Windows
2000 or later, and you are importing a Microsoft Windows NT 4.0 virtual machine
or image, a warning panel is displayed, advising that the import process will
upgrade any NTFS partitions in the resulting virtual machine to a newer version
of the NTFS file system. An upgraded file system is compatible with Windows 4.0.
The operating system and applications will work normally. However, some
utilities shipped with Windows NT 4.0, including chkdsk and defrag, will not
operate properly. Microsoft provides hotfix 872952 for this issue. To avoid
upgrading your file system in this case, press Cancel to end the import, and run
the importer from a computer running Windows NT to import the virtual
machine or image.
5. Browse (or type the path) to the location where you want to create a VMware
virtual machine and click Next.
Steps 6 and 7 refer to the custom configuration. If you selected the typical
configuration in step 3, skip to step 8.
17
VMware Virtual Machine Importer User’s Manual
6. Select the format of the virtual machine.
• Select New if you want to use the virtual machine only with Workstation 5.x or
VMware Server 1.0.
• Select Legacy if you want to use the virtual machine with Workstation 4,
ESX 2.x, GSX Server 3.x or VMware ACE 1.x.
Click Next.
7. Select the import options for the new virtual machine.
• Make a complete copy of the source virtual machine — This creates a
VMware virtual machine with no dependencies on the original virtual
machine or system image.
• Link to the existing virtual machine — This creates a VMware virtual
machine that shares the virtual disk of the source virtual machine or system
image. If you chose to create a legacy virtual machine in step 7, this option is
disabled.
Note: If you choose to link to the existing virtual machine for a Virtual PC virtual
machine, opening the original source virtual machine in Virtual PC may
invalidate the imported virtual machine.
Click Next.
18
www.vmware.com
C H A P T E R 3 Using the VMware Virtual Machine Importer
8. Review the settings. To make changes, click Back. To proceed, click Next.
Virtual Machine Importer creates a VMware virtual machine from the source
virtual machine or system image.
A progress bar appears. To stop the migration, click Cancel.
The import process can often take more than a minute per gigabyte of disk space of
the migrated virtual machine. When the migration is complete, the wizard displays a
completion panel.
9. Click Finish.
19
VMware Virtual Machine Importer User’s Manual
If the migration is not successful, the wizard displays a panel like the following. To
see the log file for the unsuccessful migration, click Show the logfile.
20
www.vmware.com
CHAPTER
4
Using the VMware Virtual Machine
Importer from the Command Line
To import a virtual machine or system image from the Windows command line, use
the following syntax:
v2vapp [sourceVMimagepath] [targetVMname] [targetVMpath]
[options]
The following table shows the options available.
Option
Name
Description
-a
(auto)
Launch the virtual machine after migration.
-f
(fast)
Share the virtual disk of the virtual machine or system image. This option requires
Workstation 5.
-lxxx
(log)
Write the logfile to xxx.
21
VMware Virtual Machine Importer User’s Manual
22
www.vmware.com
CHAPTER
5
Troubleshooting the Importer
This chapter describes known issues with the importer.
• Importer Installation Issues on page 24
• Virtual Machine Migration Issues on page 25
• Technical Support Resources on page 27
23
VMware Virtual Machine Importer User’s Manual
Importer Installation Issues
Importer Installation Wizard Interrupted
Installation can fail with a message saying that the installation was interrupted.
The following are possible workarounds.
• Verify that you do not have a previous installation of the importer.
If you have a previous installation of the importer, use the Add/Remove
Programs control panel to remove the previous installation.
Remove any references to Virtual Machine Importer from the registry entry:
HKEY_LOCAL_MACHINE\SOFTWARE\VMware, Inc.
• Delete any previous failed installation source files or folders from your Temp
directory, or move the Temp directory to another folder during the installation.
24
www.vmware.com
C H A P T E R 5 Troubleshooting the Importer
Virtual Machine Migration Issues
Changes to Virtual Hardware
Most migrated applications should function correctly in the VMware virtual machine
because their configuration and data files have the same location as the source virtual
machine. However, applications might not work if they depend on the specific
characteristics of the underlying hardware — such as the serial number or the device
manufacturer.
When troubleshooting after migration, keep in mind the following hardware changes:
• The CPU model and serial number (if activated) may be different after the
migration. They correspond to the physical computer hosting the VMware
virtual machine.
• The Ethernet adapter is different (AMD™ PCNet™ or VMXnet) with a different
MAC address. Each interface’s IP address has to be individually reconfigured.
• The graphics card is different (VMware SVGA card).
• The number of disks and partitions is the same, but each disk device has a
different model and different manufacturer strings.
• The primary disk controllers are likely to be different from the source machine’s.
• Applications may not work if they depend on devices that are not available from
within a virtual machine.
Importer Fails to Migrate Virtual PC with More Than Six PCI
Devices
importer supports migration of only six PCI devices. If you have a virtual machine or
system image with more than six PCI devices, the importer does not import all of
them.
Workaround: Remove the default audio controller or another virtual PCI device you
don't require before you import a virtual machine or system image with the importer.
Virtual Machine or System Image Shared Folder Settings Not
Migrated
The importer does not support the migration of shared folders.
Workaround: Recreate shared folders in your VMware virtual machine after migration.
25
VMware Virtual Machine Importer User’s Manual
Windows NT4 Ethernet Adapter Not Migrated Correctly
If your Virtual PC virtual machine does not have an AMD PCnet-PCI-II compatible
Ethernet adapter, it can migrate improperly.
Workaround: After you migrate a Windows NT4 virtual machine, install a new virtual
Ethernet adapter, and then install VMware Tools.
Failed to Impersonate Client
After you select the .vmc or .sv2i file, the wizard could finish with the error:
Failed to impersonate client before deleting drive letter.
Workaround: Not available.
No Keyboard or Mouse in Migrated Virtual Machine
After you import a virtual machine or system image to VMware, the mouse and
keyboard do not work in the new machine. The mouse and keyboard are not available
in the guest operating system, but they are available in the BIOS.
Workaround: Reset the virtual machine.
Importer Reports Error When Converting Virtual PC Disk Files
with Duplicate Names
During the import process, the importer writes all the Virtual PC disk files to the same
target folder. If the Virtual PC virtual machine has virtual disk files (*.vhd) of the same
name on different paths, the import process fails when it attempts to write target
virtual disks with duplicate names into the destination folder. The completion panel of
the VMware Virtual Machine Importer Wizard displays the message: The Virtual
Machine Importer encountered a problem while copying the
disks of the source virtual machine. The log file shows the error
message The file already exists.
Workaround: Ensure that each Virtual PC .vhd file has a unique name:
1. In Virtual PC Console, remove the disk you wish to rename (set the hard disk
value to None).
2. Rename the .vhd file corresponding to the disk you just removed.
3. In Virtual PC Console, add the renamed disk file.
4. Close Virtual PC Console.
The importer should successfully convert all the disks.
26
www.vmware.com
C H A P T E R 5 Troubleshooting the Importer
Technical Support Resources
If you have problems while running the Virtual Machine Importer, please submit a
support request using the support request form on the VMware Web site at:
www.vmware.com/requestsupport.
Additional Resources
Refer to the following for additional information.
General VMware Web site — www.vmware.com
Log case issues Web site — www.vmware.com/support
New features requests email address — [email protected]
Education services email — [email protected]
Technical support Web site — www.vmware.com/support
Consulting services email — [email protected]
27
VMware Virtual Machine Importer User’s Manual
28
www.vmware.com
Index
A
T
Audio controller 25
Technical support resources 27
C
Terminal services 10
CPU 25
Troubleshooting 23
interrupted install 24
D
Disk 25
E
U
Uninstall 13
Ethernet 26
V
Ethernet adapter
Virtual Machine importer 25
Virtual hardware 25
G
Graphics card 25
I
Install
Virtual Machine Importer 10
Introduction 5
K
Keyboard 26
L
LiveState Recovery system images 6
M
virtual machine
output capability 7
Virtual Machine Importer
command line 21
install 10
remove 13
repair 13
requirements 7
uninstall 13
Virtual PC
requirements 7
source virtual machine 16
version support 7
Mouse 26
Virtual Server
version support 7
N
W
NT4 26
Wizard
interrupted 24
P
PCI devices 25
Progress 19
Workstation
version support 7
R
Registry 24
Remove 13
Repair 13
Requirements 7
S
Shared folder 25
Support 27
support files 27
Symantec
LiveState Recovery system images 6
29
30
www.vmware.com