1
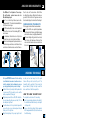
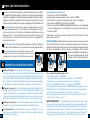
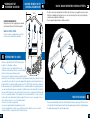
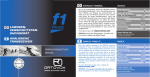
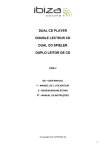
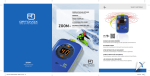
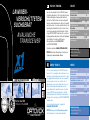
D
LAWINENVERSCHÜTTETENSUCHGERÄT
AVALANCHE
TRANSCEIVER
EINFACH FINDEN...
das ist der entscheidende Vorteil des ORTOVOX LawinenVerschütteten-Suchgerätes x1. Die sofortige Suche mit einem
VS-Gerät und Bergung mit Lawinenschaufel und Sonde
durch die Tour-Teilnehmer bieten bei einem Lawinenunfall
nahezu die einzige Überlebenschance. Wenn erst Fremdhilfe
geholt werden muss, ist es meist zu spät! Beachten Sie den
Lawinenlagebericht und wählen Sie sichere Touren. Führen
Sie stets das Lawinen-Verschütteten-Suchgerät x1 und die
nötigen ORTOVOX SAFETY Produkte mit sich. Lesen Sie die
Bedienungsanleitung aufmerksam, üben Sie die Handhabung
Ihres VS-Gerätes x1 und die Verschüttetensuche.
Wir empfehlen Ihnen die LAWINENSEMINARE
von ORTOVOX-OUTVENTURE.
Informationen dazu unter
Gebrauchsanleitung
Manual
D
E
Partner des IVBV
Partner of the UIAGM
www.ortovox.com
www.ortovox.com.
INHALT
Bedienungselemente
Technische Daten
Anlegen des VS-Gerätes
Sende- und Empfangskontrolle
Verschüttetensuche
Suchschema
Suche nach mehreren
Verschütteten
Garantie/Service
Serviceadressen
Aktuelle Informationen der
Lawinenwarndienste!
E
INDEX
this is the decisive advantage of the ORTOVOX avalanche
transceiver x1. In an avalanche, allmost all chances of survival depend on the immediate search and rescue of companions equipped with an avalanche transceiver, an avalanche
shovel and a probe. In most cases, help is too late, if
dependent upon rescue services summoned to the scene!
Please follow the avalanche warnings and select safe
routes. Always take the avalanche transceiver x1 and the
necessary ORTOVOX safety products with you. Carefully
read the manual, practice all hand motions and searching
techniques. We recommend you the ORTOVOX-OUTVENTURE
avalanche clinics.
12/13
14/15
16
www.lawine.org
ORTOVOX wünscht allen Skibergsteigern, Freeridern und
Snowboardern schöne und sichere Touren!
SIMPLY FIND IT...
3
4
5
6/7
8/9
10/11
Operating elements
Technical data
Wearing technique
Transmitting and receiving control
Search
Search sketch
Multiple burials
Warranty/Service
Service addresses
For more information, please visit our website at
www.ortovox.com.
www.lawine.org
ORTOVOX wishes great, safe skiing and deep powder to
all ski mountaineers, free riders and snowboarders!
Current avalanche warning
services information!
3
4
5
6/7
8/9
10/11
12/13
14/15
16
D
1
2
3
4
5
6
7
8
9
10
11
E
1
2
3
4
5
6
7
8
9
10
11
D
BEDIENUNGSELEMENTE
Optische
Suchrichtungspfeile
Ohrhöreranschluss
für Gruppensuche
Lautsprecher
Batteriefach
Sendeposition
Entriegelungs- und
Notumschalter
Sendekontroll-Leuchte
ON/OFF-Bajonettverschluss
Empfangsposition
Displayfenster/Digitale
Entfernungsanzeige
Empfangsumschalter
2
1
3
FUNKTION: digital und analog (2 Antennen)
GEHÄUSE: ergonomisch, wasserdicht, schlagfest
GRÖSSE: 130 x 80 x 20 mm
FREQUENZ: 457 kHz
REICHWEITE: bis zu 70 m
SUCHSTREIFENBREITE: bis zu 35 m
TEMPERATURBEREICH: -30° C bis +50° C
STROMVERSORGUNG:
2 Batterien Alkaline AA LR6 Mignon 1,5 V E91 AM3
BETRIEBSDAUER
SENDEN: ca. 300 Stunden
EMPFANGEN: ca. 40 Stunden
GEWICHT: ca. 247 g, inkl. Batterien und Tragegurt
Das ORTOVOX x1 übertrifft die hohen Anforderungen der EURO-Norm EN 300 718.
10
9
OPERATING
ELEMENTS
Visual LED
direction arrows
Earphone connection
for searching within
a group
Loudspeaker
Battery compartment
Transmit mode
Locking and emergency switch
Transmitting/function control light
Forced ON/OFF bayonet switch
Receive mode
Display/Digital indication of distance
Quick switch to receive mode
TECHNISCHE DATEN
E
11
5
4
6
8
7
TECHNICAL DATA
FUNCTIONS: digital and analog (2 antennae)
CASING: ergonomic, waterproof, shock-resistant
DIMENSIONS: 130 x 80 x 20 mm
TRANSMITTER AND RECEIVER FREQUENCY: 457 kHz
RANGE: up to 70 m
SEARCH STRIP WIDTH: up to 35 m
TEMPERATURE RANGE: -30° C to +50° C
BATTERIES: 2 Alkaline AA LR6 Mignon 1.5 V E91 AM3
(No rechargeable batteries)
WORKING LIFE
TRANSMITTING: about 300 hrs
RECEIVING: about 40 hrs
WEIGHT: approx. 247 g, batteries and body belt included
The ORTOVOX x1 surpasses the high requirements
of the European standard EN 300 718.
EU-KONFORMITÄTSERKLÄRUNG
Hersteller:
Verantwortliche Person:
X-log Elektronik GmbH
Herr Nowotny
Bahnhofstr. 95, D-82166 Gräfelfing
erklärt, dass das Produkt:
Typ:
ORTOVOX
Modell:
x1
Verwendungszweck: Lawinenverschüttetensuche
bei bestimmungsgemäßer Verwendung den grundlegenden Anforderungen gemäß Artikel 3 der R&TTE-Richtlinien 1999/5/EG entspricht und dass die nachfolgenden Normen angewandt wurden:
1. Gesundheit (Artikel 3.1.a der R&TTE-Richtlinien):
Angewandte Norm(en): ETS 300718
Ausgabe: 05/01
2. Sicherheit (Artikel 3.1.a der R&TTE-Richtlinien):
Angewandte Norm(en): ETS 300718
Ausgabe: 05/01
3. Elektromagnetische Verträglichkeit
(Artikel 3.1.b der R&TTE-Richtlinien):
Angewandte Norm(en): ETSI EN 300718-1 Ausgabe: 05/01
4. Effiziente Nutzung des Funkfrequenzspektrums
(Artikel 3.2 der R&TTE-Richtlinien):
Angewandte Norm(en): ETSI EN 300718-2 Ausgabe: 05/01
Gräfelfing, 17.01.2003
i. A. Andrea Reintges
(Ort/Datum der Konformitätserklärung)
(Name)
EC DECLARATION OF
CONFORMITY
Manufacturer:
Responsible person:
X-log Elektronik GmbH
Mister Nowotny
Bahnhofstr. 95, D-82166 Gräfelfing
declares that the product:
type:
ORTOVOX
model:
x1
intended use:
Search for persons
buried in an avalanche
complies with the essential requirements of Article 3 of the
R&TTE 1999/5/EC Directive, if used for its intended use and
that the following standards have been applied:
1. Health (Article 3.1.a of the R&TTE Directive):
Applied standard(s): ETS 300718
issue: 05/01
2. Safety (Article 3.1.a of the R&TTE Directive):
Applied standard(s): ETS 300718
issue: 05/01
3. Electromagnetic compatibility
(Article 3.1.b of the R&TTE Directive):
Applied standard(s): ETSI EN 300718-1
issue: 05/01
4. Efficient use of the radio frequency spectrum
(Article 3.2 of the R&TTE Directive):
Applied standard(s): ETSI EN 300718-2
issue: 05/01
Gräfelfing, 17.01.2003
i. A. Andrea Reintges
(Place/date of the declaration of conformity)
(Name)
ANLEGEN DES VS-GERÄTES
1
2
3
4
Das VS-Gerät x1 vor Beginn der Tour anlegen.
Nie im Rucksack, sondern immer unter der
Oberbekleidung tragen!
Das x1 so vor dem Körper halten, dass der Empfangsumschalter (11) zum Gesicht und das Batteriefach (4) nach oben zeigen.
ON/OFF-Verschluss (8) mit der rechten Hand durch
leichten Druck und eine Vierteldrehung (90°) einrasten lassen.
Die entstandene Schlaufe über den Kopf ziehen
und den linken oder rechten Arm durchführen.
Das frei herunterhängende Körperband auf die erforderliche Länge einstellen, um den Rücken führen
und mit dem Schnellverschluss am Gerät fixieren.
2
D
Das x1 nach der Tour abnehmen. Durch Öffnen
des Bajonettverschlusses (8) wird der Sender ausgeschaltet. Wickeln Sie den Trageriemen um das
Gerät und befestigen Sie ihn mit dem Druckknopf.
REINIGUNG DER TRAGEGURTE!
Die Tragegurte sind zum Waschen abnehmbar.
5 Lösen Sie mit Hilfe eines spitzen Gegenstandes
den kleinen Keil im Zentrum der Gurtbefestigung
und ziehen ihn heraus (sorgfältig aufbewahren!).
6 Mit einem kräftigen Zug (senkrecht nach oben)
lässt sich der Gurt abnehmen. Nach dem Waschen den Gurt wieder montieren und mit dem
Keil sichern.
5
6
3
1
4
WEARING TECHNIQUE
1
2
3
4
Put on your ORTOVOX transceiver x1 before starting
a tour! Avalanche transceivers should never be carried in the backpack, they should always be worn on
your body, preferably under your outer clothing!
Hold the x1 in front of your body so that the quick switch
to receive mode (11) is showing to your face and the
battery compartment (4) facing up.
Plug the bayonet switch (forced ON/OFF switch) into
its socket and, with gentle pressure, twist 1/4 of a
turn with your right hand.
You will now have a full loop shoulder strap which
you need to put over your head and pass through
either your left or right arm.
Adjust the body strap to the proper length, lead it
E
around your back and snap it into the quick
fastener. After your ski tour, take off your x1. The
transmitter will be switched off by opening the
bayonet switch (8). Wrap the strap around the
device and fasten it with the snap button.
HOW TO CLEAN THE BODY BELT
The body belts can be taken off for washing:
5 Undo the small wedge situated in the middle of
the belt attachment with a sharp tool and pull it
out (keep safe!).
6 Remove the belt by pulling it firmly upwards.
After having washed the belt, attach and secure
it with the wedge.
5
D
SENDE- UND EMPFANGSKONTROLLE
1
Einschalten/Senden: ON/OFF-Verschluss (8) einstecken, leicht andrücken und gleichzeitig um ein Viertel (90°) drehen. Im Displayfenster (10) beginnt der Displaytest. Für 10 Sekunden erscheint die verfügbare Batteriekapazität in
% (99-01). Ab einer Restkapazität von 10 % blinkt die Batterieanzeige im Displayfenster (10). Danach erlischt die
Displayanzeige (10) zur Batterieschonung. Zusätzlich blinkt nun die Sendekontroll-Leuchte (7). Das Gerät ist jetzt betriebsbereit und sendet. Die Sendefunktion kann mit einem zweiten, auf Empfang gestellten VS-Gerät überprüft werden.
2
Umschalten auf Empfang: Um in den Suchmodus zu gelangen, den Entriegelungsschalter (6) nach rechts
drücken und den Empfangsumschalter (11) nach links drehen bis der Entriegelungsschalter (6) einrastet.
Für mehrere Sekunden erscheint „CH” (=Überprüfung der Displayfunktionen und Ermittlung des optimalen
Empfangsbetriebes). Das x1 ist zum Suchen bereit. Ein versehentliches Umschalten ist ausgeschlossen. Ein
zweites VS-Gerät wird nun auf Senden (5) gestellt. Nach dem Umschalten Ihres x1 auf Empfangen (9) ist
das Signal des Senders zu hören.
3
Zurückschalten auf Senden: Um in die Position Senden (5) zurückzugelangen, drücken Sie bitte den Entriegelungsschalter (6) nach rechts. Der Empfangsumschalter (11) springt automatisch in die verriegelte Sendeposition (5) zurück.
4
Überprüfen der Ohrhörerfunktion: Führen Sie den Ohrhörerstecker in den Ohrhöreranschluss (2) ein und schalten Sie das x1 auf Empfang. Im Ohrhörer ist nun das
Sendersignal zu hören. Der Lautsprecher (3) ist bei Ohrhörerbetrieb ausgeschaltet.
E
6
Bei Abweichungen von den beschriebenen Funktionen das VS-Gerät bitte direkt an Ihre ORTOVOX-Servicestelle zur
Reparatur senden (Siehe Seite 16).
WICHTIGER HINWEIS! Wir empfehlen die Batterien während der Sommerpause aus dem Gerät zu nehmen und im nächsten Winter neue Batterien einzusetzen. Auf Geräte mit ausgelaufenen Batterien gewähren wir keine Garantie. Keine wiederaufladbaren Batterien (Akkus wie z.B. Ni-Cd-Zellen) verwenden, da bei diesen Reichweite und Betriebsdauer wesentlich kürzer
sind. Führen Sie immer Ersatzbatterien mit und wechseln Sie diese bei einer Restkapazität von 10 %. Bei verspätetem
Batteriewechsel (Restkapazität 0 %) wird der Mikroprozessor,
Entfernungs- und Richtungsanzeige abgeschaltet. Analoger
Notbetrieb für ca. 20 Std. Sende- und 1 Std. Empfangsbetrieb.
TRANSMITTING AND RECEIVING CONTROL
1
1
Tägliche Funktionsprüfung vor Antritt der Tour!
• Alle Teilnehmer stellen Ihr VS-Gerät auf EMPFANGEN.
• Ein Gruppenmitglied (vorzugsweise der Gruppenleiter) stellt sein VS-Gerät auf SENDEN.
• Wenn alle VS-Geräte einen akustischen und optischen Empfang haben, funktionieren die Empfänger.
• Nach der Prüfung der EMPFÄNGER erfolgt die Überprüfung der SENDER.
• Die Teilnehmer stellen ihr VS-Gerät auf SENDEN und gehen EINZELN und in Abständen von ca.15 m am Empfangsgerät
vorbei. Wenn das Empfangsgerät ein hör- und sichtbares Signal von jedem einzelnen VS-Gerät empfängt, ist die
Sendefunktion in Ordnung.
Switching on/Transmitting: Plug the forced ON/OFF bayonet switch (8) into the socket
and, with gentle pressure, twist 1/4 of a turn. Now the display (10) shows that the display test begins. For 10
seconds, the available battery capacity will be shown as a percentage (99-01). When battery capacity is down to
10 %, the battery reading flashes on the display (10). Next, the display indication will disappear to save battery life
and the transmitting control light (7) will start to flash. At this point, the device is now operational and transmitting.
The transmitting function of your device should be tested with a second avalanche transceiver in receive mode.
2
Switching-over to receive mode: Unlock the locking mechanism by pushing the slider/locking switch (6) to the
right and the quick switch to receive mode (11) to the left until the locking switch (6) is engaged. For a couple
of seconds the capitals "CH" appear (= check of display functions and determination of best receiving data).The
x1 is now ready for searching. An unintentional switch-over is not possible. Now a second device is put on transmit mode (5). After switching your x1 to receive mode (9), the signal of the transmitter can now be heard.
3
Switching back to transmit mode: To return to transmit mode (5), please push the locking switch (6) to the right.
The quick switch to receive mode (11) will go back and automatically lock in the transmitting position (5).
4
Test of earphone functions: Insert the earphone plug into the earphone socket (2) and put your x1 on receive
mode. Now you hear the transmitter signal in the earphone. The integrated loudspeaker (3) is switched off
automatically when using the earphone.
2
3
Please check the functions daily before going on a tour!
• All group members put their x1 on RECEIVE MODE.
• One member (preferably the group leader) puts his avalanche transceiver on TRANSMIT MODE.
• If all members receive acoustic and visual signals, the receivers are correctly working.
• After checking the RECEIVERS, the group has to test the function of their TRANSMITTERS.
• The group members put their avalanche transceivers on TRANSMIT MODE and pass the group leader’s receiver
ONE BY ONE at a distance of about 15 m. When the group leader receives acoustic and visual signals from
every single group member’s avalanche transceiver, the transmitters are working well.
When you notice any divergences from the functions described, please send your device directly to the ORTOVOX
service center to have it repaired (see page 16).
IMPORTANT INFORMATION! It is recommended that the batteries are taken out during the summer and new
batteries are put in for the winter. Leaking batteries void the warranty. Do not use rechargeable batteries (e.g. NiCd
accumulators) as the range and working life of these batteries are significantly shorter. We recommend that you
carry spare batteries and change batteries when 10% capacity is reached. If you delay the change of batteries (0 % residual capacity), the micro-processor, the reading of distance and direction will be switched off.
The analogue emergency working life in transmit mode is about 20 hrs and about 1 hr in receive mode.
7
D
1
2
E
1
2
8
VERSCHÜTTETENSUCHE
Schnellverschluss öffnen und das x1 ca. 1 m vom Körper wegziehen. Das Schulterband sichert auch weiterhin das Gerät am Körper und es kann so nicht verloren werden.
Umschalten auf Empfang: Den Empfangsumschalter (11) von der Sendeposition (5) auf die Empfangsposition
(9) stellen. Dazu muss der Entriegelungsschalter (6) nach rechts geschoben werden. Die Signale der Sender
können jetzt empfangen werden.
Reichweite: Aus physikalischen Gründen ist die Reichweite abhängig von der Lage der Antennen des Sende- und
Empfangsgerätes zueinander. Die Reichweite kann bei ungünstiger Lage der Geräte erheblich eingeschränkt
sein, was durch Drehen des empfangenden Gerätes zum Teil ausgeglichen werden kann. Die maximale Reichweite wird erreicht, wenn die beiden Geräte in Längsrichtung hintereinander angeordnet sind. Deshalb bei der
Suche nach dem Erstempfang das x1 VS-Gerät langsam in alle Richtungen drehen, um den besten Empfang
zu erhalten. Störungen in der Sende- und Empfangsleistung können durch Blitz, Lift- und Stromanlagen,
Funkgeräte, Mobiltelefone und Stirnlampen mit Spannungsregler entstehen. Mobiltelefone und Funkgeräte bei
der Suche auschalten. Mindestabstand 30 cm vom VS-Gerät zu Metall, Funkgerät, Mobiltelefon etc.
Grobsuche (= Suche nach dem Erstempfang): Bei Alleinsuche gehen Sie den vermuteten Verschüttungsraum
in 35 m breiten Suchstreifen ab. Nach dem ersten akustischen Empfang stellen Sie durch Schwenken des Gerätes
fest, aus welcher Richtung Sie das stärkste Signal erhalten
3
4
5
6
und gehen in diese Richtung. Ab ca. 50 m Entfernung zeigt die mittlere LED die Suchrichtung an. (s. Seite 10/11).
Feinortung: Bei ca. 35 m Abstand zum Verschütteten erscheint im Display (10) die digitale Entfernungsangabe 35.
Korrektur der Suchrichtung: Bei Abweichung von der korrekten Suchrichtung leuchtet ab einer Entfernung
von ca. 10 m entweder der linke oder der rechte grüne, digitale Suchrichtungspfeil (1) und führt Sie in die
richtige Richtung.
Richtungs-OK-Bestätigung: Wenn Sie sich in die korrekte Richtung bewegen, leuchtet zur Bestätigung des
richtigen Suchweges der mittlere, digitale Suchrichtungspfeil (1) auf. Zusätzlich wird die Annäherung zum
Verschütteten ab ca. 10 m durch eine schnellere Tonfolge signalisiert.
Punktortung: Bei geringen Verschüttungstiefen (weniger als 0,5 m) zeigt die Zahl im Display (10) den
Liegepunkt des Verschütteten. Zur Punktortung bei größeren Verschüttungstiefen (mehr als 0,5 m) empfehlen wir die Verwendung einer Sonde. Legen Sie zur leichteren Orientierung eine Sonde in Suchrichtung flach
auf den Boden. Markieren Sie bitte die beiden Punkte mit den kleinsten Zahlen. Halbieren Sie diese Strecke,
drehen Sie nun die Sonde um 90° und markieren Sie auf der senkrechten Linie ebenfalls die beiden kleinsten
Zahlen. Halbieren Sie auch diese Strecke und markieren
diesen Punkt mit der Sonde – hier befindet sich der
Verschüttete.
SEARCH
1
2
3
Open the quick lock clasp and pull the ORTOVOX transceiver x1 away from your body for about 1 m. The
shoulder strap will still secure the device to your body so there is no risk of losing it.
Switching to receive mode: Turn the quick switch to receive mode (11) from transmit mode (5) to receive
mode (9). To do so, the locking switch (6) has to be unlocked by pushing the slider to the right. The signals
of other devices can now be received.
Range: Due to laws of physics, transceivers’ ranges depend on the receiving and transmitting devices antennae’s
relational position to each other. If the transceivers are unfavourably positioned, the range can be considerably
reduced. This can be partially amended by pivoting the receiving beacon. A maximum range can only be achieved when
both transceivers’ longitudinal axis are aligned. Therefore, it is recommended to slowly pivot the ORTOVOX x1 in all
directions for finding the best receiving position when searching for the first signal. Transmitting and receiving
performance can be interferred by lightnings, ski lifts, power lines and plants, walkie-talkies, mobile phones and headlamps with voltage regulators. When in use, we recommend switching off mobile phones and walkie-talkies. Minimum
distance of 30 cm between avalanche transceiver and metal, walkie-talkie, mobile phone etc.
Coarse search (= search for the first signal): When you are searching on your own, please walk through
the search area by dividing the area in search strip widths of about 35 m. After receiving the first acoustic
signal, please find out the direction of the loudest signal while turning the receiving transceiver horizontally
so as to create a 90 degree angle. Walk towards this direction. At a distance of about 50 m the middle
LED arrow indicates the search direction (see page 10/11).
4
5
6
3
4
5
6
Fine search:
At a distance of about 35 m from the buried person, the digital reading of distance appears with the number 35 shown
on the display (10).
Correction of the search direction: When deviating from the correct search path, either the left or the right
green digital direction arrow (1) flashes from a distance of about 10 m on and leads you to the right direction.
Confirmation of direction: When you are walking towards the correct direction, the middle digital direction
arrow (1) flashes confirming it is the right search path. Moreover, the tone becomes faster as you approach
the person buried.
Pinpoint search: If the person is buried in a shallow snow depth (less than 0.5 m), the digital number in the display (10)
shows the point where the person is buried. For initiating the precise pinpoint search in deep snow depths (more than
0.5 m) we recommend using a probe. To facilitate the orientation, put a probe horizontally on the ground and mark both
fade points indicated by the lowest numbers on the display. Divide this line in half, place the probe perpendicular to its
current position. Again, mark the lowest numbers displayed signifying the fade points at both ends of this new axis. Once
more divide this line in half and mark this point with a probe – there you will find the buried person.
9
Die Suchrichtungspfeile
führen den Sucher präzise zum Ziel
The direction arrows lead
the searcher directly to the
buried person
Reichweite der digitalen
Entfernungsanzeige ca. 35 m
Range of the digital reading of
distance about 35 m
Bei ca. 50 m zeigt die
mittlere LED die Richtung an
At a distance of about 50 m,
the middle LED arrow
indicates the direction
Akustische Reichweite bis zu 70 m
Acoustic range
up to 70 m
max. 35 m
Erstempfang
First audible signal
Zone 1
Zone 2
Zone 3
Zone 4
Zone 5
verfügbares
Signal
Available
signal
Zone 0
Punktortung Pinpoint search
Feinortung Fine search
Feinortung Fine search
Grobsuche Coarse search
Den vermuteten
Verschüttungsraum
abgehen (Suchstreifenbreite: 35 m).
Walk through the
anticipated search area
(search strip width:
35 m)
Folgen Sie dem stärksten
akustischen Signal. Abweichungen sind deutlich hörbar.
Follow the strongest
acoustic signal. Signal
strength deviations can
be clearly heard.
Dem stärksten akustischen Signal
und dem mittleren Suchrichtungspfeil folgen. In ca. 50 m Entfernung
vom Verschütteten leuchtet die
mittlere Richtungs-LED im
Rhythmus des Senders. Die Intensität steigt bei Annäherung.
Follow the strongest acoustic signal and the middle direction arrow.
At a distance of about 50 m from
the buried person the middle LED
direction arrow flashes to the rhythm of the transmitter. The more
you approach, the more the tone
is intense.
Folgen Sie dem stärksten
akustischen Signal, dem
mittleren LED-Richtungspfeil
und der digitalen Entfernungsanzeige.
Follow the strongest acoustic signal, the middle LED
direction arrow and the
digital reading of distance.
Die Tonfolge steigt deutlich. Die Entfernungsanzeige und die LEDRichtungsanzeige
vermeiden Suchfehler.
The rate of tones is
increasing considerably.
The reading of distance
and the LED direction
arrows avoid user faults.
Im Bereich der Punktortung leuchtet die mittlere
LED-Richtungsanzeige. Der
linke und der rechte LEDSuchrichtungspfeil werden
bei einer Entfernung von
ca. 2 m ausgeschaltet.
In the zone of the pinpoint search the middle
LED direction arrow flashes. The right and the
left LED search direction
arrow will be switched off
at a 2 m distance.
11
10
COARSE SEARCH, FINE SEARCH, PINPOINT SEARCH
SITUATION: ONE SEARCHER – ONE BURIED PERSON
GROBSUCHE, FEINORTUNG, PUNKTORTUNG
SITUATION: EIN RETTER – EIN VERSCHÜTTETER
E
SEARCH SKETCH
SUCHSCHEMA
D
D
GROBSUCHE MIT
MEHREREN SUCHERN
COARSE SEARCH WITH
SEVERAL SEARCHERS
E
105 m
SUCHSTREIFENBREITE:
Wenn mehrere Helfer zur Verfügung stehen, dann wird
der Suchraum in Streifen zu 35 m Breite aufgeteilt.
SEARCH STRIP WIDTH:
If several searchers are available, divide each of their
search areas into maximum 35 m strip widths.
INFORMATION TO USER
17,5 m
max. 35 m
This device complies with Part 15 of the FCC Rules. Operation
is subject to the following two conditions:
(1) the device may not cause harmful interference and
(2) the device must accept any interference received, including
interference that may cause undesired operation.
The user's manual or instruction manual for an intentional radiator
shall caution the user that changes or modifications not expressly approved by the party responsible for compliance could void the user's authority to operate the equipment.This equipment has been tested and found to comply with the limits for an intentional radiator pursuant to part 15 of the FCC Rules. These limits are designed to
provide reasonable protection against harmful interference in a residential installation. This equipment generates,
uses, and can radiate radio frequency energy and if not installed and used in accordance with the instructions
may cause harmful interference to radio communications. However, there is no guarantee that interference will
not occur in a particular installation. If this equipment does cause harmful interference to radio or television
reception, which can be determined by turning the equipment off and on, the user is encouraged to try to correct the interference by one or more of the following measures:
• Reorient or relocate the receiving antenna.
• Increase the separation between the equipment and receiver.
• Connect the equipment into an outlet on a circuit different from that to which the receiver is connected.
• Consult the dealer or an experienced radio/TV technician for help.
12
D
• Zur Suche nach mehreren Signalen bzw. Verschütteten geht der Sucher vom Liegepunkt des zuerst georteten
VS-Gerätes rechtwinklig nach links (bzw. nach vorne oder nach rechts) weg. Das zuerst geortete Signal wird
schwächer und verschwindet schließlich ganz.
• Das neu angepeilte Signal wird nun bei Annäherung stärker.
g
tun nd
Rich seco
e
t
l
äh
gew hosen
ite
c
Zweection
Dir
Suchstreifenbreite
Search strip width
E
SUCHE NACH MEHREREN VERSCHÜTTETEN
ung
icht
e R first
t
l
h
ewä sen
te g cho
Ers ection
Dir
g
tun
Rich
lte n third
h
ä
ew
se
te g cho
Dritection
r
Di
pun
iege
1. L place
1st
kt
MULTIPLE BURIALS
E
• The searcher makes a 90 degree turn from the first located avalanche transceiver and is going to the left (or in front or
to the right) of the first located transceiver. Thus, the first located signal gets weaker and then it completely disappears.
• The newly headed signal gets stronger while approaching.
13
D
Beim Erstkauf eines ORTOVOX VS-Gerätes gewähren wir bei Vorlage der ausgefüllten Garantiekarte (Seite 15) eine 5-jährige Garantie ab Herstellungsdatum.
Die Gültigkeit der Garantiezeit ist ersichtlich auf dem Prüfsiegel im Batteriefach und auf der Verpackung des Gerätes (I/09 bedeutet z.B.: Ablauf der Werkgarantie mit Ende des 1. Quartals
2009).
Gleichzeitig erinnert Sie das Siegel an die empfohlene Geräteüberprüfung.
Im Rahmen unserer Garantie werden mangelhafte Teile unentgeltlich instand gesetzt. Ausgenommen sind Schäden, die durch unsachgemäße Handhabung und natürlichen Verschleiß hervorgerufen werden. Ohrhörer und Batterien sind von der Garantie ausgenommen. Durchgeführte Garantieleistungen
bewirken weder eine Verlängerung der Garantiepflicht, noch beginnt damit eine neue Garantiezeit.
SERVICE
Das ORTOVOX x1 ist ein Rettungsgerät, von dessen einwandfreier Funktion ein Leben abhängen kann. Sie sollten
daher das Gerät unbedingt zu dem am Prüfsiegel empfohlenen Termin zur Werksüberprüfung einsenden.
Bitte nehmen Sie unseren Überprüfungsservice in den Sommermonaten in Anspruch, damit Ihr Gerät rechtzeitig
zum Winterbeginn einsatzbereit ist. Zur Reparatur oder Werksüberprüfung bitten wir Sie, Ihr VS-Gerät direkt an
unsere Servicestelle zu senden (siehe Seite 16).
E
D
GARANTIE
Frau/Herr
Straße
WARRANTY CARD
Ms./Mrs./Mr.:
Street:
PLZ, Ort
Telefon
E
GARANTIEKARTE
City, State:
Phone:
Serien Nr.
Model: ORTOVOX x1
Serial no.:
(Innenseite Batteriedeckel
Gekauft bei
Modell
See inside battery compartment lid)
Bought from:
Genaue Fehlfunktionsbeschreibung!!!
Exact description of malfunctioning!!!
WARRANTY
At the same time the test seal reminds you of the recommended transceiver check.
Within the period of warranty, faulty parts will be repaired or replaced free of charge. Defects caused by wear and tear or improper use are excluded from warranty. Earphones and batteries are
also excluded from warranty. Warranty services neither prolong nor renew the period of warranty.
SERVICE
The ORTOVOX x1 is a rescue device. Its perfect function might be crucial for life. Therefore you should return your
device for factory service according to the date indicated on the test seal. We suggest that you send back the
device during the summer months to ensure that you have a fully tested device at the beginning of the winter season. For repairs or factory servicing, please return your ORTOVOX transceiver to an appropriate service center
(see page 16).
14
✃
If you originally bought your ORTOVOX avalanche transceiver from an authorized ORTOVOX dealer, we
grant a 5 year warranty from date of production if you submit your completed warranty card (page 15).
The warranty period is indicated on the test seal in the battery compartment and on the packing
(I/09 means for ex: end of warranty period with the end of the first quarter 2009).
Im Reklamationsfall diese Karte ausfüllen und an die für Sie zuständige Servicestelle senden (siehe Seite 16).
In case of claims please fill in this card and send your device to the ORTOVOX service center (see page 16).
WICHTIG! IMPOR TANT!
www.ortovox.com
Sorgfältig aufbewahren
Please hold in safe keeping
D
SERVICEADRESSEN
E
SERVICE ADDRESSES
AUSTRALIA marvelox adventure, p.o. box 9, AUS-glen huntly vic 3163, [email protected]
AUSTRIA ortovox vertriebsges. m. b. h., obere klaus 176, A-8970 schladming, [email protected]
CANADA the hostel shop, 730, 10th avenue s.w., T2R 0A9, CAN-calgary, AB, [email protected]
CZECH REPUBLIC sunsport, lidická 17, TCH-602 00 brno, [email protected]
DENMARK fritidsagenten a/s, lejrvej 23 A, DK-3500 vaerloese, [email protected]
FRANCE alizés, z.a.c. de l‘échangeur, F-73100 grésy-sur-aix, [email protected]
GERMANY ortovox service center, kapellenstraße 5, D-92245 kümmersbruck-moos, [email protected]
GREAT BRITAIN tr agencies, windmill cottage, mill lane, wheaton aston, stafford ST19 9NL, [email protected]
ICELAND útilíf, álfheimar 74, IS-104 reykjavik, [email protected]
ITALY outback ‘97 s.r.l., via baertsch, 4, I-24124 bergamo, [email protected]
JAPAN magic mountain co. ltd., 2-8-5 nobidome, niiza city, JAP-saitama 352-0011, [email protected]
NEW ZEALAND marvelox adventure, p.o. box 1155, NZ-christchurch 8015, [email protected]
NORWAY stibolt-norge ski as, aslakveien 20 A, N-0753 oslo, [email protected]
RUSSIA alpex, malaya pereslavskaya str., 7, stroenie 14, RUS-129110 moscow, [email protected]
SLOVENIA iglu sport d.o.o., trzaska 393, SLO-1000 ljubljana, [email protected]
SPAIN raquel fernandez, gabriel y galán 17, E-10100 miajadas (cc), [email protected]
SWEDEN outside, scandinavia ab, langgatan 56, S-82230 alfta, [email protected]
SWITZERLAND c/o st. moritz experience ag, CH-7512 champfèr/st. moritz, [email protected]
USA ortovox inc., 455 irish hill road, USA-hopkinton, NH 03229, [email protected]
Änderungen vorbehalten 08/2003 • Subject to alteration 08/2003
16