1
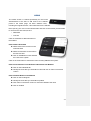
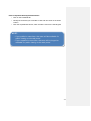
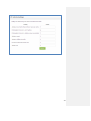
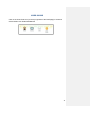
CONTENT MANAGEMENT SYSTEM (CMS) MANUAL Organization: FANIKISHA INSTITUTIONAL STRENGTHENING Date: September 2013 Project: KENYA CIVIL SOCIETY PORTAL FOR HEALTH TABLE OF CONTENTS BACKGROUND......................................................................................................................................... 1 AREAS OF THE WEBSITE THAT CAN BE UPDATED ON CMS....................... 2 AREAS OF THE WEBSITE THAT ARE INTENTIONALLY STATIC / NOT UPDATABLE ON CMS ........................................................................................................... 2 THE CONTENT MANAGEMENT SYSTEM......................................................................... 3 HOW THE CMS WORKS ................................................................................................................... 4 CMS LOGIN PAGE ........................................................................................................................... 5 DASHBOARD/HOME PAGE ............................................................................................................ 6 ADMINISTRATORS PAGE .............................................................................................................. 8 SITE CONTENT ..................................................................................................................................... 10 ORGANIZATION ................................................................................................................................... 12 Online Civil Society Organization (CSO) Vetting Standing Operating Procedures (SOP) Guidelines ................................................................................................. 14 Consultant Registration Vetting Process ………….......................................................................... 15 Associated Required Documents: .......................................................................................................... 21 Donor Registration Vetting Process................................................................................................ 22 Government of Kenya Organizations Vetting Process ............................................................. 23 International Implementing Partners Registration Vetting Process ................................. 24 INDIVIDUALS .......................................................................................................................................... 26 Individual Registration Vetting Process ........................................................................................ 26 Online Recourse Vetting Standard Operating Procedures (SOP) ........................................ 28 FORUMS ...................................................................................................................................................... 29 EVENTS........................................................................................................................................................ 31 CSO & CONSULTANTS ACTIVITY LOGS ....................................................................... 35 E-LEARNING ............................................................................................................................................ 37 SURVEY ....................................................................................................................................................... 39 SMS.................................................................................................................................................................. 40 USER GUIDE ............................................................................................................................................ 41 BACKGROUND The Kenya Civil Society Portal for Health is a helpful portal aimed at bringing together health-focused Civil Society Organizations (CSOs), professional service providers, donors, and government agencies aimed toward capacity building and enhancing the impact of health on Kenya. The website was developed in 2012 by Danya International, Inc. Who is Interested in the Kenya Civil Society Portal for Health? Parties featured on the portal: • • Civil Society Organizations Consultants Parties using the website for research: • • • • • International Implementing Partners (IPs) Donors Nongovernmental Organizations (NGOs) and Implementing Agencies Government of Kenya (GoK) Kenyans at large Objectives and tactics of developing the portal marketing: • To create a web portal and a front-end website that endorses the following ethos: − One-stop shop − An exhaustive list for your organization’s needs − Creating a support network for Kenyans • Make it easy for all browsers to find what they are looking for • Create a professional, world-class site that reinforces Kenya is a fast developing nation that is here to help itself Business: • Drive browsers to a destination page – Contact Us, Link to CSO Database, Consultants Marketplace, Make a Comment on the Forums • Ensure that users have easy access to the information they are looking for • Make it measureable • Exploit the Search Engine Optimization (SEO) technique 1 AREAS OF THE WEBSITE THAT CAN BE UPDATED ON CMS These are the portal content areas built specifically to allow the Kenya Civil Society Portal for Health Administrators from the FANIKISHA project and the NGOs Coordination Board to make updates directly onto the portal. These include: • • • • • • • • • • • • • • Home page − Sliding images − All text on the sliding images About Us − This portal − W ho we are − FANIKISHA Project Contact Us − NGOs Co-ordination Board contacts − FANIKISHA contacts Help Desk − Introductory paragraph − How to CSO Database – Introductory paragraph Consultant Marketplace – Introductory paragraph Map – Introductory paragraph Resource Centre – Introductory paragraph News and Events – Introductory paragraph Forum – Introductory paragraph Links − Introductory paragraph − Links TOR − Introductory paragraph E-Learning − Introductory paragraph − E-Learning Links Survey – Survey questions AREAS OF THE WEBSITE THAT ARE INTENTIONALLY STATIC / NOT UPDATABLE ON CMS These are the website areas that cannot be updated on CMS. They are built in such a way that changing them would require the inbuilt systems and mechanisms of the portal and admin system to be changed accordingly. Some of the static areas also 2 allowed the use of fonts that were more creative and enabled more extensive design factors. These areas are changeable; however, you will need a technical team with HTML, CSS, and database management knowledge to make changes on your behalf, as part of a maintenance agreement. NOTE: Such changes will have a significant impact on the structure and functionality of the portal and should only be undertaken should the results of the measurement and reporting show that such a change would add significant benefit to the user experience. For some of these sections you can only change the Introductory paragraph but NOT the remaining content as content is either fed in through code or pulled from the database. For example, information that originates from user registration, user profile updates, upload of news/event items, upload of documents into the resource centre, and the CSO self-assessment. Areas That Cannot Be Updated on the CMS Login/Join − Individual registration process/forms − Organization registration process/form • Advertisements − These are automated. Information is pulled from the portal database on the basis of CSO and Consultant participation. Please note that the Administrator can override the system to facilitate a specific ad as and when the need arises. • Terms & Conditions • Privacy Policy • USAID, FANIKISHA, and Ministry logos at the footer • Contact Us – Google Map and Feedback Form • Sitemap • CSO database search functionality • Consultant marketplace search functionality • Map search functionality and statistics dashboard • Resource centre – resource categories, resource subcategories, search functionality, results, and statistics • Links page • Forum – discussion categories, the descriptive text inside each category box • THE CONTENT MANAGEMENT SYSTEM THE CMS Administrators 3 Super Administrator This is the Lead Portal Administrator. He/she will have full access to the entire CMS and will be able to do the following: • Have the ability to override some portal functions should the need arise, such as the advertisement system • Create Administrators and Moderators for the CMS • • Allow or deny access to Administrators and Moderators at his/her discretion Vet and approve or decline user registration information, new events, new forums, and uploaded resources for CSOs, service providers, international IPs, and GoK-related organizations, donors, and individuals Administrators • The Administrators will assist the Super Administrator according to the 10 organizational capacity areas • Have the ability to override some portal functions should the need arise, such as the advertisement system • Vet and approve or decline user registration information, new events, new forums, and uploaded resources by organization capacity area Moderators • A Moderator’s role is to specifically assist the Super Administrator and Administrators in the forum section • Moderators can approve or decline new forum discussion topics as well as participants’ comments on all ongoing discussions according to the organizational capacity area assigned to them by the Super Administrator and Administrator • Moderators can approve or decline new resources added to the resource centre according to the organizational capacity area assigned to them by the Super Administrator and Administrator HOW THE CMS WORKS LOGON to: Portal CMS URL: www.csokenya.or.ke/cms You will need the following: User Name: To be provided to you by your Super Administrator Password: To be provided to you by your Super Administrator 4 After loading the CMS URL, the Landing page will look like the image below, where you can add your username and password to log in. CMS LOGIN PAGE Once you have logged in, you will land on the Dashboard page, which shows the number of items pending the Administrator’s vetting, as well as statistics of the website usage. On the left side of the page, there are buttons that you can click to access the various pages where you can review and vet registrants’ information, edit the introductory paragraphs on the different pages of the website, and access added functionality on the CMS. This manual will cover each of these pages and look at the actions required of the Administrator in each. 5 DASHBOARD/HOME PAGE The CMS Dashboard/Home page has the following sections and statistics: Home and Settings Buttons The top right of the Dashboard/Home page has buttons that can be accessed at all times when navigating the CMS. When navigating the CMS: Click on Home to go back to the Dashboard/Home page. Pending Approvals The pending approvals table shows a list of all the web portal user information that requires the Administrator’s review and vet. The number of items in each area of information is also indicated. Click on any of the listed user information areas to go to the relevant page to review the information and take action. 6 Summary Reports The Summary Reports section shows statistics of the different groups of registrants represented in a pie chart with percentages and a table showing the actual number of registrants in each group. 7 ADMINISTRATORS PAGE The Administrators page allows you to do the following: • • • • View all existing Administrators and Moderators Add a new Super Administrator, Administrator, or Moderator Edit the details of an existing Administrator or Moderator Delete a Super Administrator, Administrator, or Moderator For Administrator roles, please see the CMS Administrators section. How to Add a New Super Administrator or Administrator Only a Super Administrator can add a new Super Administrator, Administrator, or Moderator. Select the type of Administrator you wish to add from the dropdown menu (Super Administrator, Administrator, or Moderator) Add his/her details and use the Super Administrator password to create a record. Click on the button The new Administrator will receive the password via email. He/she can later change the password if needed or desired The new Administrator will be listed in the Administrator table How to Edit the Details of a Super Administrator, Administrator, or Moderator Identify the Administrator whose details you wish to edit in the Administrator table Click on the edit icon located on the action column Edit the information and click on the Save button to save the new details 8 How to Add a Moderator In the fields provided in the add Administrator section: Select the Moderator from the dropdown menu Add his/her details and click on the button The password will be automatically sent to the Administrator in an email, where he/she can later change the password if needed or desired After clicking on the Add New button, you will be taken to a page that has the filled-in Moderator’s details and a list of all the technical areas Click on the check box for the technical area that you would like to assign the Moderator The password will be automatically sent to the Administrator in an email, where he/she can later change the password if needed or desired Click on the Add New button The new Moderator’s details will be listed in the table NOTE: Assigning a technical area to a Moderator means that whenever a discussion topic, forum, or resource document is posted under his/her assigned technical area, he/she will receive a notification email requesting him/her to view and vet the particular item. How to Delete a Super Administrator, Administrator, or Moderator Identify the Administrator that you wish to delete from the list in the table Click on the Delete icon on the action column NOTE: Deleting a Super Administrator, Administrator, or a Moderator deletes all their information from the system and renders the Administrator unable to access the CMS. 9 SITE CONTENT The Site Content section is built specifically for the W eb Portal Administrator to be able to edit the Introductory paragraphs of the website pages and the content in the tabs on the About Us page. Place (hover) your cursor on the Site Content button and click on the website section you would like to view from the side menu. How to Edit the About Us Website Content Click on About Us from the side menu of the Site Content button Edit the text for any of the three tabs o f the About Us page; i.e., “This Portal,” “W ho W e Are,” and “FANIKISHA Project” Click on the Update button below eac h text box to save the new changes How to Edit Introductory Paragraphs of the Website Pages Click on Page Copy from the side menu of the Site Content button Edit the Introductory paragraphs of the following website pages: • • • • • • • • • • CSO Database Consultants Map Resource Centre Events − Add Events Forum E-Learning Links TOR Contact Us − NGOs Co-ordination Board Contacts − FANIKISHA Contacts Click on the Update button below each text box to save the new changes. NOTE: Once you edit the content in the text boxes and click on the Update button, the new content is automatically and immediately displayed on the respective website pages. 10 11 ORGANIZATION The Organization section allows you to view a list of all organizations whose registrations are pending approval, those that have been approved, and those whose registrations have been declined in each organization type: • • • • • CSOs Consultants GoK Donors International Implementing Partners Place (hover) your cursor on the Organization button and click on the type of organization you would like to view from the side menu. Civil Society Organizations Registration Vetting Process • ll The tabs on this page have a list of a CSOs that have registered on the web portal. • Click on the Pending tab to view a list of all CSOs that are pending review and are vetted by the Super Administrator How to Review and Vet CSO Registration Information Identify the CSO from the list Side Menu Click on the View button – connects you to the CSO’s profile as it appears on the website portal You will see an Administrator Panel on the left side of the CSO’s profile page 12 Administrator Panel Review CSO information following the standard operating procedure (SOP) guidelines After reviewing the information, click on Approve or Reject on the Administrator Panel If you choose to reject a CSO’s registration, please provide a reason in the form provided on the Administrator Panel, then click on the Reject button After taking action on a specific CSO registration, you will be taken back to the list of CSOs pending approval An approved CSO registration will now be in the Approved tab, while a rejected CSO registration will now appear in the Rejected tab Follow the same steps to vet all other CSO registrations that are pending review Click on the Approved tab to view a list of all approved CSOs. NOTE: • If you approve a CSO, the CSO’s information will be available for public viewing on the web portal. • If you undo approval of a CSO, the CSO’s information will no longer be available for public viewing on the website portal. 13 How to Undo Approval of an Approved CSO Identify the CSO from the list of approved CSOs Click on the Undo Approval button To review the CSO’s profile information before undoing approval, click on the View button; from the Administrator Panel, review the information then click on the Undo Approval button Click on the Rejected tab to view a list of all declined CSOs. How to Approve a Rejected CSO Registration Identify the CSO from the list of rejected CSOs Review the CSO’s registration information following the SOP guidelines Go back to the list of rejected CSOs and click on the Undo Reject button Online Civil Society Organization (CSO) Vetting Standing Operating Procedures (SOP) Guidelines The below SOPs will help guide the Kenya Civil Society Portal for Health administrative staff through the appropriate steps needed to approve a newly registered CSO on the web portal. The following steps are to be followed for any CSOs that register online. 1. The portal Super Administrator will review the description of the organization provided when the CSO registers. The Super Administrator will look at the information areas that were not filled out correctly and/or seek if the information is not logical 2. To verify the login information, the Super Administrator will visit the organization’s website (if it exists) and check: a. If the CSO exists b. If the description provided in the website is similar to what was given during the login process c. If the CSO does not have a website (or if it does not work), the Administrator will contact the CSO by phone and verify the information provided d. If a KRA PIN number was provided, the Super Administrator will verify the KRA number at http://www.kra.go.ke/index.php/pin-checker to confirm that it is associated with the CSO e. If the CSO selected “NGO Co-Ordination Board” from “other registration type,” the Super Administrator will verify the identification number at: http://www.ngobureau.or.ke/Default.aspx to confirm that it is associated with the CSO f. If the CSO selected “Attorney General’s Office (Companies and Societies)” from “other registration type,” the Super Administrator will verify the identification number at http://www.attorney-general.go.ke/ to confirm that it is associated with the CSO 3. If the above information appears valid, the CSO should be accepted. The Super Administrator will send a validation email to the CSO 4. If the Super Administrator still has additional questions regarding the CSO, he/she will contact the organization via the email and/or phone number provided for follow-up 5. After communication, if the Administrator is satisfied with the answers received, the CSO should be accepted 6. After communication, if the Administrator is still not satisfied with the information received, the administration will send an email to the CSO with a message stating that the CSO was rejected because their login information could not be verified 14 Consultant Registration Vetting Process The tabs on this page include lists of all service providers that have registered on the web portal. Click on the Pending tab to view a list of all consultants that are pending review and vetting by the Super Administrator. How to Review and Vet a Consultant’s Registration Information (Four Stages) 1. Stage one: Identify the consultant from the pending list, Click on the View button; this will connect you to the consultant’s profile as it appears on the web portal. You will see an Administrator Panel on the left side of the consultant profile page, this Panel will be labeled “Administrator Panel: Stage One”. The staff member assigned to check for completeness of this application visits the in box [email protected] to confirm that all documents (Bio data form, Vendor Information Template, Certificates, Vendor Details document, Copy of PIN certificate) have been sent by the consultant, if the staff member is satisfied with the documents he/she will visit e-rooms and create a folder for the consultant and place all documents received. If documents are incomplete the assignee while logged into the CMS http://www.csokenya.or.ke/cms, will enter some comments on the Administrator Panel in the text box just above the “Send Mail” button about the incomplete documents and click on “Send Mail” to send an email to the consultant. If the documents received are complete, the assignee will simply click on “Next” to move the vetting process to stage 2, IS advisors will be cc’d via email about this consultant. If the assigned staff member does not perform the above tasks within the agreed 7 calendar days for Stage One, system generated escalation email will be sent to their supervisor. 2. Stage two The IS advisor will have received an email from Stage One above informing them that the consultant submitted complete documents. IS advisor will then log in to the Content Management System (CMS) http://www.csokenya.or.ke/cms using their assigned CMS username (usually FANIKISHA staff email address) & CMS password, go to the area containing pending consultants, click on “view” to view the profile of the particular consultant and have a detailed look at the profile giving special attention to the “TECHNICAL AREAS” section. Next to the consultant’s status, the control panel will have the title of the IS advisors required to review the application. The IS advisor will also be required to have a look at the consultants folder in E-Rooms (created in stage one above by the assigned staff member) and confirm from the documents submitted that the consultant is fit to work in the particular technical area. If the IS advisor is satisfied with the application and feels that the consultant should be moved to the next stage (background checks by finance team), and If the profile is in order he/she will click on “Next” to move to Stage Three, they should also ensure that they provide brief comments supporting the approval in the text box below before clicking “Next”. If any of the documents received from the consultant require updates or if the consultants needs to provide additional information in the profile, the IS Advisor will explain briefly in the text box at the bottom and click on “Send Mail” to inform the applicant via email. The application can also be completely rejected. The IS Advisor will provide a reason for rejection and then click on the “Reject” button. If the assigned staff member does not perform the above tasks within the agreed 14 calendar days for Stage Two, a system generated escalation email will be sent to their supervisor. 3. Stage Three The staff member in charge of background checks in the finance department will have received an email from Stage Two above informing them that the IS Advisor has reviewed the application submitted and has approved it. The Finance staff member will then log in to the Content Management System (CMS) - http://www.csokenya.or.ke/cms using their assigned CMS username (usually FANIKISHA staff email address) & CMS password, go to the area containing pending consultants, click on “view” to view the profile of the particular consultant and collect all contact information required to carry out background checks. The Finance staff member will also be required to have a look at the consultants folder in E-Rooms (created in stage one above by the assigned staff member) and use the documents submitted (such as copy of PIN/ID) to carry out background checks. If the Finance staff member is satisfied with the application and feels that the consultant should be moved to the next stage (approval by SMT & signing of MOU), he/she will click on “Next” on the admin panel to move to Stage Four. If the assigned finance staff member does not perform the above tasks within the agreed 7 calendar days for Stage Three, a system generated escalation email will be sent to their supervisor. 4. Stage Four The Technical Director - DCOP will have received an email from Stage Three above indicating that the IS advisor and background checks by finance have approved and moved the application to Stage Four. The DCOP will then log in to the Content Management System (CMS) - http://www.csokenya.or.ke/cms using the assigned CMS username (usually FANIKISHA staff email address) & CMS password, go to the area containing pending consultants, click on “view” to view the profile of the particular consultant and have a detailed look at the profile. The Technical Director - DCOP will also be required to have a look at the consultants folder in E- Rooms (created in stage one above by the assigned staff member) and have a look at the documents reviewed by the IS advisor. If the Technical Director - DCOP has any queries about the application, these will be explained briefly in the text box on the admin panel, and the user will click on “Send Mail” to inform the applicant via email. If the application is in order an MOU will be prepared and signed, the DCOP will then approve the application by clicking on the “Approve” button on the admin panel to inform the consultant that their application is successful. Once approved, the consultant’s profile will be visible to the public on the portal. If the Technical Director - DCOP does not perform the above tasks within the agreed 5 calendar days for Stage Four, a system generated escalation email will be sent as a reminder. NOTE: • If you approve a consultant, their information will be available for public viewing on the web portal. • If you undo approval of a consultant, their information will no longer be available for public viewing on the website portal. How to Undo Approval of an Approved Consultant Identify the consultant from the list of approved consultants. Click on the Undo Approval button. To view the consultant’s profile information before undoing approval, click on the View button; from the Administrator Panel, review the information then click on the Undo Approval button. Click on the Rejected tab to view a list of all declined consultants. How to Approve a Rejected Consultant’s Registration Identify the consultant from the list of rejected consultants. Review the guidelines. consultant’s registration information following the vetting Go back to the list of rejected consultants and click on the Undo Reject button. undo approval of a consultant, their information will no longer be available for public viewing on the website portal. 21 Donor Registration Vetting Process The tabs on this page list all donors that have registered on the web portal. Click on the Pending tab to view a list of all donors whose registration is pending review and vetting by the Administrator. How to Review and Vet a Donor’s Information Identify the donor from the list. Click on the View button; this will take you to a page that has all donor registration details. Review the donor’s information. After reviewing the information, click on Approve or Reject at the end of the information. If you choose to reject a donor’s registration, please provide a reason for rejecting in the form provided, then click Reject. After taking action on the donor’s registration, you will be taken back to the list of donors pending approval. Follow the same steps as above to vet all other donor registration information Click on the Approved tab to view a list of all approved donor registrations. How to Undo Approval of an Approved Donor Registration Identify the donor from the list of approved donor registrations Click on the Undo Approval button. To review the donor’s information before undoing approval, click on the View button; this will take you to a page where you can view all the donor’s registration details. At the bottom of the page, click on the Undo Approval button Click on the Rejected tab to view a list of all declined donor registrations. How to Approve a Rejected Donor’s Registration Identify the donor from the list of rejected donors Review the donor’s registration information and click on the Undo Reject button • Donor, GoK, international IPs, and individual information is not available for public viewing on the web portal. 22 Government of Kenya Organizations Vetting Process The tabs on this page list all Government of Kenya (GoK) organizations that have registered on the web portal. Click on the Pending tab to view a list of all GoK organizations whose registration is pending review and vetting by the Super Administrator. How to Review and Vet GoK Organization Information Identify the GoK organization from the list Click on the View button; this will take you to a page that has all GoK organization registration details Review the GoK organization’s information After reviewing the information, click on Approve or Reject at the end of the information If you choose to reject a GoK organization registration, please provide a reason for declining in the form provided, then click Reject After taking action on the GoK organization registration, you will be taken back to the list of GoK organizations pending approval Follow the same steps as above to vet all other GoK organizations’ registration information Click on the Approved tab to view a list of all approved GoK organization registrations. How to Undo Approval of an Approved GoK Organization Registration Identify the GoK organization from the list of approved GoK organization registrations Click on the Undo Approval button To review the GoK organization’s information before undoing approval, click on the View button; this will take you to a page where you can view all the GoK organizations’ registration details At the bottom of the page, click on the Undo Approval button Click on the Reject tab to view a list of all rejected GoK organization registrations. How to Approve a Rejected GoK Organization Registration Identify the GoK organization from the list of rejected GoK organizations Review the GoK organization registration information and click on the Undo Reject button 23 International Implementing Partners Registration Vetting Process The tabs on this page list all international IPs that have registered on the web portal. Click on the Pending tab to view a list of all international IPs whose registration is pending review and vetting by the Super Administrator. How to Review and Vet an International Implementing Partner’s Information Identify the international IP from the list Click on the View button; this will take you to a page that has all the international IP registration details Review the international IPs’ information After reviewing the information, click on Approve or Reject at the end of the information If you choose to reject an international IP’s registration, please provide a reason for rejecting in the form provided, then click Reject After taking action on the international IP’s registration, you will be taken back to the list of international IP registrations that are pending approval Follow the same steps as above to vet all other international IPs’ registration information Click on the Approved tab to view a list of all approved international IP registrations. How to Undo Approval of an Approved International Implementing Partner’s Registration Identify the international IP from the list of approved international IP registrations Click on the Undo Approval button To review the international IP’s information before undoing approval, click on the View button; this will take you to a page where you can view all the international IP registration details At the bottom of the page, click on the Undo Approval button Click on the Rejected tab to view a list of all rejected international IPs’ registrations. 24 How to Approve a Rejected International Implementing Partner’s Registration Identify the international IPs from the list of rejected registrations Review the international IP’s information and click on the Undo Reject button 25 INDIVIDUALS The Individuals section has information on all the individuals that have registered on the web portal. The different tabs allow you to view a list of all individuals whose registrations are pending approval, those that have been approved, and those whose registrations have been rejected. Individual Registration Vetting Process Click on the Pending tab to view a list of all individuals whose registration is pending review and vetting by the Super Administrator. How to Review and Vet Individual Registration Information Identify the individual from the list Click on the View button; this will take you to a page that has all the individual registration details Review the individual’s information After reviewing the information, click on the Approve or Reject button at the end of the information If you choose to reject an individual’s registration, please provide a reason for rejecting in the form provided, then click Reject After taking action on the individual’s registration, you will be taken back to the list of individuals whose registration is pending approval Follow the same steps as above to vet all other individuals’ registration information Click on the Approved tab to view a list of all approved individuals’ registrations. How to Undo Approval of an Approved Individual’s Registration Identify the individual from the list of approved individuals’ registrations Click on the Undo Approval button To review the individual’s information before undoing approval, click on the View button; this will take you to a page where you can view all the individuals’ registration details At the bottom of the page, click on the Undo Approval button Click on the Rejected tab to view a list of all rejected individuals’ registrations. How to Approve a Rejected Individual’s Registration Identify the individual from the list of rejected individuals Review the individual’s information, then click on the Undo Reject button 26 DOCUMENTS The Documents section allows you to view a list all documents (documents/videos/photos/TORs) that are pending approval, those that have been approved, and those that have been rejected. Note that documents that are TOR are indicated with “ TOR” on their names. Click on the Pending tab to view a list of all documents that are pending review and vetting by the Administrator. How to Review and Vet a Document/Photo/Video Identify the document/photo/video from the list in the table Click on the View button to view the details of the document/photo/video To view document contents, click on Download next to the document name to download the document or open a website link to view photo/video Review the document/photo/video following the SOP guidelines After reviewing the document/photo/video, click on Approve or Reject at the end of the document’s details If you choose to reject a document/photo/video, please provide a reason for rejecting in the form provided, and then click Reject Follow the same steps as above to vet all other resources and documents Click on the Approved tab to view all documents that have been approved. How to Undo Approval of an Approved Document Identify the document from the list of approved documents and click on the View button Click on the Undo Approval button Click on Download next to the document name to download the resource Review the document following the SOP guidelines After reviewing the document, click on Reject at the end of the document details Click on the Reject tab to view a list of all rejected resources. How to Approve a Rejected Document Identify the document from the list of rejected resources and click on the View button Click on Download next to the document name to download the document or link 27 Review the document following the SOP guidelines Click on the Approve button Online Recourse Vetting Standard Operating Procedures (SOP) What are documents? Documents include written articles, research studies, tools, and reports; videos; links; audio clips; pictures, etc. All these can be uploaded to the portal. Who can upload documents? 1. 2. 3. 4. FANIKISHA staff NGOs Co-ordination Board staff FANIKISHA partner organizations (MSH, PACT, Danya, RATN) Organizations that registered in the portal: CSOs, service providers, GoK, donors, international implementing partners What are the vetting criteria for uploading a document? 1. Relevance of document/video/picture to technical area (all documents have to be categorized under one of the 10 OCA areas) 2. Author(s) of the document 3. Year of publication What documents need approval to upload? All documents (new or updated) will need to be approved prior to appearing on the web portal. For each document to be submitted for approval, the uploading party must tick a box stating that: “This document is fully authorized to be made available to registered users of the Kenya Civil Society Portal for Health, and its uploading does not result in any copyright infringement.” 28 What is the Approval Process? Document Origin Vetting Process for Resource Centre, ELearning, Links and TOR FANIKISHA Staff FANIKISHA technical advisors will have rights to upload documents in their respective technical areas. No other vetting or approval is needed. FANIKISHA Partners Once uploaded, documents go to the respective FANIKISHA technical advisors for review and approval. Registered CSO The relevant FANIKISHA technical advisors will have 48 hours to review the document and Approve/Reject the document and upload the document to the portal in the relevant technical areas. Service Provider GoK If the advisor does not respond to the uploading request within 48 hours, The Web Administrator is authorized to approve the document. Donor Implementing Partner The account responsible for the upload is automatically informed via email that the document has been uploaded or rejected (with an explanation). If in doubt whether or not permission is needed regarding United States Governmentrelated documents, please reference the following link for guidance: http://www.cendi.gov/publications/04-8copyright.html#531 FORUMS The Forums section allows you to view a list of all forum topics and comments that are pending approval, those that have been approved, and those that have been rejected. Place (hover) your cursor on the Forums button and click on the section you would like to view from the side menu; that is: • • Forum topics Forum comments 29 Forum Topics and Comments Vetting Process Forum Topics Click on the Pending tab to view a listof all forum topics that are pending reveiw and vetting by the Administrator. How to Review and Vet a Forum Topi c Identify the forum topic from th e list on the table Click on the View button to view the details of the forum topic After reviewing the forum topic, click on Approve or Reject at the end of the forum topic’s details If you choose to reject a forum topic, please provide a reason for rejecting in the form provided, and then click Reject Follow the same steps as above to vet all other forum topics Click on the Approved tab to view all forum topics that have been approved. How to Undo Approval of an Approved Forum Topic Identify the forum topic from the list Click on the View button to view the forum topic details before undoing approval. Click on the View button; after reviewing, click on the Undo Approval button Click on the Rejected tab to view a list of all rejected forum topics. How to Approve a Rejected Forum Topic Identify the forum topic from the list of rejected forum topics Click on the Review button to view the Administrator’s reason for rejecting the forum topic Review the forum topic Click on Approve Forum Comments Click on the Pending tab to view a list of all forum comments that are pending review and vetting by the Administrator. 30 How to Review and Vet Forum Comments Identify the forum comment from the list in the table Click on Approve or Reject at the end of the forum comment details If you choose to reject a forum comment, please provide a reason for rejecting in the form provided, and then click Reject Follow the same steps as above to vet all other forum comments Click on the Approved tab to view all forum comments that have been approved. How to Undo Approval or Reject an Approved Forum Comment Identify the forum comment from the list On the action column of the comment, click on the Undo Approval button to approve the comment or the Reject button to reject the comment Click on the Reject tab to view a list of all rejected forum comments. How to Approve a Rejected Forum Comment Identify the forum comment from the list of rejected comments Click on Approve EVENTS Click on the Pending tab to view a list of all events that are pending review and vetting by the Administrator. How to Review and Vet an Event Identify the event from the list in the table Click on Approve or Reject at the end of the event details If you choose to reject an event, please provide a reason for rejecting the event in the form provided, and then click Reject Follow the same steps as above to vet all other events Click on the Approved tab to view all events that have been approved. How to Undo Approval or Reject an Approved Event Identify the event from the list 31 On the action column of the event, click on the Undo Approval button to reject an event or the Reject button to reject the event Click on the Reject tab to view a list of all rejected events. How to Approve a Rejected Event Identify the event from the list of rejected events Click on Approve 32 NEWS The News section is created specifically for the Portal Administrators to be able to add news to the website portal in the News page. All other website users, including the registered users, cannot add news to the website. Place (hover) your cursor on the News button and click on the section you would like to view from the side menu; that is: • Add News • View All Click on Add News to add news items to the website. How to Add a News Item Add the title of the new item in the news title field Add the information on the news in the text box field Click on Add News to save and ad d the news to the system Click on the View button to view all the news currently added to the system . How to View All News That Has Been Published on the Website Click on the Published tab Identify the news that you would like to view and click on View on the action column How to Publish News on the Website Click on the Pending tab Identify the news that you would like to publish Click View on the action column to review the details of the news Click on Publish 33 How to Unpublish Already Published News • Click on the Published tab • Identify the news that you would like to view and click View on the action column • Click the Unpublished column, which sends the news to the Pending tab NOTE: • If you publish a news item, the news will be available for public viewing on the web portal • If you unpublish a news item, the news will no longer be available for public viewing on the web portal 34 CSO & CONSULTANTS ACTIVITY LOGS The administrator can view activities for CSOs and consultants and points gained by each. The points are used for getting the CSO/Consultant of the month. How Consultant/CSO of the Month is Chosen This is done automatically. The CSO/Consultant with the highest number of aggregated points in the previous month is chosen as the CSO/Consultant of the current month. Featured Advertisements Aggregated points are also used in choosing which CSO/Consultant should be featured in the ads section of the website. The current top three CSOs/Consultants are chosen at random at every single display. This gives all the top three fair visibility. How to Change Points Earned for Each Activity On the main menu, click on Organization > Activity Settings Adjust the respective points in the text boxes Click on Update button 35 36 E-LEARNING Adding a new E-Learning Link On the main menu, click on E-Learning Click on Add New button Type in the Title, description of the link, link to the e-learning site (starting with http://...), choose the category from those provided Click on Add E-learning button Editing an E-Learning Link On the main menu, click on E-Learning On the list of links provided, choose the link you would like to edit. You can also search using the search text-box at the top of the table Click on View/Edit in the Action column of the table Edit the particular item(s) on the form Click on the Update button Deleting an E-Learning Link On the main menu, click on E-learning On the list of links provided, choose the link you would like to delete. You can also search using the search text-box at the top of the table. Click on Delete in the Action column of the table 37 LINKS This is for managing the Links page on the front-end of the website. Adding a new Link On the main menu, click on Site Content > Links On the form, type the Link Title, Link URL (starting with http://...), choose the Category Click on Add Link button Editing a Link On the main menu, click on Site Content > Links Select the Link from the table of links Click on View/Edit in the Action column of the table Edit the particular item(s) on the form Click on the Update Link button Deleting a Link On the main menu, click on Site Content > Links Select the Link from the table of links. Click on Delete in the Action column of the table Adding a Link Category On the main menu, click on Site Content > Links Click on the Link Categories tab Type the name of the new category in the textbox Click on the Add button 38 SURVEY To access Surveys, click on the Survey icon on the list of icons on the top-right side of the CMS page. Only one survey can be published at any particular time. W hen none of the surveys are published, the Template Survey is chosen by default. You can add as many surveys as possible and published each at its time. Add a New Survey On the Survey page, type the name of the survey on the form at the top of the page Click on Add button A survey is created and now you can add questions on the survey The questions are either closed or open type. Closed questions have definite answers, i.e. extremely, very, moderately, slightly, not at all. The open type questions are those that provide a text box where the user types in the answer. Type the question in the textbox and choose the type of the question. Click on Add Question button You can repeat the steps of adding more questions to the survey Click on Survey icon to go back to the Survey home. Choose the survey and click on Publish, if you wish to publish at this time. Editing an E-Learning Link On the main menu, click on E-Learning On the list of links provided, choose the link you would like to edit. You can also search using the search text-box at the top of the table Click on View/Edit in the Action column of the table Edit the particular item(s) on the form Click on the Update button View Survey Responses Choose the survey on the list in the table Click on the View Responses link 39 SMS This module is used for sending bulk SMS to CSOs, Consultants, Partners and/or Individuals. You can send to all or selected COSs/Consultants/Partners/Individuals. This can be accessed by clicking on the SMS icon found at the top-right side of the CMS page. Send Test SMS You can send a Test SMS to make sure that everything is working fine. Type the test SMS recipient, start with county code (without “+”) e.g. 254… Click on Send Test Only checkbox Type the message; it is restricted to 140 characters. Click on Send button Send Actual SMS Type the test SMS recipient, start with county code (without “+”) e.g. 254…, this will act as a control to make sure that the SMS is working. Type the message; it is restricted to 140 characters. Click on View/Edit in the Action column of the table Select the recipient from the list of CSOs, Consultants, Partners and Individuals. You can click on Select All per each of the categories if you wish to send to the whole group. Click on Send button After the messages have been sent, a notification will be displayed showing how many messages have been sent. This does not indicate delivery. View SMS Delivery Reports SMS delivery reports can be accessed through the dashboard provided by SilverStreet, that is outside this SMS. 40 USER GUIDE Click on the User Guide icon (on the top-right side of the CMS page) to view and download this User Guide/CMS Manual 41