1
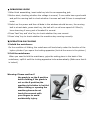
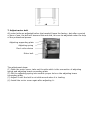
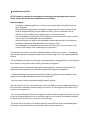
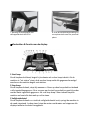
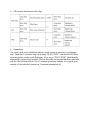
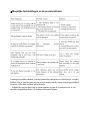
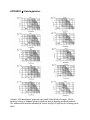
HANDLEIDING
Joy Sport
Life Fit
CONTENTS
SAFETY CONSIDERATION
1
TECHNOLOGICALDATA
2
INSTALLATION GUIDE
3
THE PARTNAME OF THE CONTROL METER 4
DEBUGGING GUIDE
8
FOLDING OPERATION
8
OPERATING GUIDE
9
DAILY MAINTENANCE
12
LIST OF ITEM IN THE PACKAGE 15
COMMON FAULT AND THE PROCESSING METHOD 16
APPENDIX:PULSE LEVEL TABLES
17
Ⅰ SAFETY CONSIDERATION
FRIENDLY REMIND: Because of the improvement of technology, if there have
any changes, all the right for interpretation belong to our company.
WARNINGS:
- The treadmill should be put inside of room and avoid aquosity, water on the
treadmill is prohibited and any object is forbidden to be put on or inserted into
treadmill.
- The ground should be level, confirm it is steady to put the treadmill, all feet must
land before use.
- The plug must connected, try hard to avoid using other electric apparatuses on the
same supply line.
- Wear sportswear and appropriate sports shoes while using the treadmill , barefeet is
forbidden while using the machine.
- Do not allow two or more persons on the treadmill at the same time.
- Do not start the machine when you are standing on the running belt, you should
stand on the regulars and grip the armrests before doing exercises. You can exercises
on the machine when it is started normally.
- At you feel incompatibility any or have abnormal condition in using, press STOP or
pull out SAFE KEY or adopt the emergency method: While you are griping the handles
and shoring up the body, put your feet on the regulars, and get off the treadmill from
one side.
- The sensor of heart rate is not a medical apparatus, a lot of reasons can be caused
and measured inaccurately, it is only for reference to measure the result.
- The heart disease patient should not use the treadmill alone, and should not use the
automatic speed change function, either.
- Please confirm the speed according to your physical condition. The patient should
use the machine under the direction of the doctor.
- Please shut off the treadmill power in time after finishing using it.
- The treadmill should be laid in the comparatively spacious place, forbid putting
incidentals around, guarantee that there is the security area of 2m*1m.
- The children should not use the machine alone, they should under the ward of the
adult if they want to use.
- Please pluck the power cord and put it on the place where the children can not find,
in order to avoid the children starting the machine accidently.
- Overload operation will cause the motor and controller become damaged, and make
the bearing , the running board and the running board ageing quickly, so we must
avoid long time overload operation.
- The dust covered on the sensor will affect its sensitivity, so we must reduce the dust
in our house.
- Do not touch any parts which are moving
- The runner must keep the body center of gravity on the forward 1/3 or 1/2 part of
the running belt when running. If we do this, we will operate the electricity table
easily. The location of the runner must near the front of the machine to avoid danger.
- Long hair user should tie the hair to avoid the accidents occur when she are
running.
Ⅱ TECHNOLOGICAL DATA
Distance scope: 0.000—9.999(km)
Incline degree: 0—18%
Time scope: 00:00--99:59(min:sec)
The biggest supporting value: 180kg
Input Voltage: 220V(50Hz/60Hz)
Speed scope: 0.8--18(km/h)
Ⅲ INSTALLATION GUIDE
1. Open the packing chest and
carry out the mainframe of the
treadmill, put theconnect line in
the mainframe through the right
poling.
3.
2. Connect the polings and
the mainframe with
M10x70, locknut M10 and
bolt M10x20
Fix the base sheathings on
4. Put the meter sheatings on
right and left sides with self
the corresponding polings.
tapping bolt M4x16 and M4x25
5. Connect the centre yarn in the
meter with the one in the right
poling. Attention: Aim the gaps
before insert them tightly.
6. Fix the electronic meter
with panhead screw M8x16.
—
3
—
7. Fix the meter sheathings with
self-tapping M4.2×16.
8. Loosen the pack fixed stick,
and move to the suitable place
to avoid scotching.
ⅣTHE PARTS NAME&FUNCTION OF CONTROL METER HX—0918LCD:
13 14 15 16 18 19 17 20 21
1 Start key
When the treadmill is in stop state, it begins to work if we press this key; When the
machine is in set state, press this key, all the revised data is confirmed and the
machine begins to work.
2 Stop key
When the treadmill is working, first press of this key will make the machine stop
running, keep all the data.If press the START key,the machine will run,and the
former date will be accumulated.Press this key for twice continuously,the machine
will stop,and all the data become zero.
3 Safety key
When the treadmill is running, take out the safety key, the machine will in the
emergency stop state. In this state, the motor stops turning, and all the windows
flicker.
4 Grade rise and decline keys
5 Speed up and down keys
When the treadmill is running,press „speed up‟ and „speed down‟ key,the speed will
increase or decrease;when in the set state, press this key to amend the data.
6 Handle pulse sensor:
7 Setup key
It is used to set the time,distance and pulse,and to choose the speed programmes.
8 Speed direct choose key area(2km/h—16km/h)
9 Grade direct choose key area(2%--14%)
10 AMP 11 PLAY/STOP 12 EQ 13 PRE 14 NEXT 15 VOL+ 16VOL-17 LCD
display 18 Earphone jack 19 Audio frequency input jack 20 USB interface 21
SD card interface
Ⅴ DEBUGGING GUIDE
1 After finish assembling, insert safe key into the corresponding jack.
2 Before start, checking whether the voltage is normal, 3-core cable has a good earth
and pull the running belt to check whether it moves well and if there is exceptional
noise.
3 Switch on the power and then all data in the windows should be zero, the running
belt is at rest state, press start key, the belt will run at lower speed of 0.8km/h,
here observing if every part of treadmill is normal.
4 Press „fast‟ key and „slow‟ key to check whether they are normal.
5.Press „stop‟ key to check whether the machine stop running normally.
Ⅵ OPERATION ON FOLDING
1 Unfold the mainframe:
On the condition of folding, the mainframe will land slowly under the function of the
hydro cylinder if you spurn the locking apparatus.(look at the arrow in the picture.)
2 Fold the mainframe:
When you need to fold the mainframe, gripe the waling piece in the back of the
mainframe, uplift it until the locking apparatus locks automatically.(Make sure that it
is locked.)
Warning: Please confirm if
the grade is on the 0 position
before folding,if the grade is
not on the 0 position,the
machine is forbiden to be fold.
When folding or opening the
machine,please do not
touch the armrest with
your fingers to avoid
accidentally injury.
Ⅶ OPERATION
1. Switch on power:
Insert three poles plug into socket (note: it must have a complete earthing); and
insert safe key, then switch on power, the monitor will moo, and all data become
zero, here the treadmill is in stop state.
2. Direct start:
Press start key when the treadmill is in stop state and all the data in the LCD
screen are zero, it run at the lowest speed; press fast key, the speed will increase;
press slow key, the speed will decrease.
3. Set start:
At the state of rest, press set key to set time、distance、pulse、auto change
speed,auto incline and hilly country data. At the state of time, distance and pulse
setting, initial data will be shown in relevant window and the radix point winks(for
the 0918TV, the corresponding window winks) , press “∧ ” or “∨ ” of “speed key” to
modify the data, if press “stop” key, all the setting will be concelled, after finish
setting, press“start”, treadmill will run according the setting data; if time and
distance are set for certain data, the data reducing till it comes to zero, at this
time, the machine will moo and begin to count. The pulse settlement works for
speed controlled by pulse, at this time, the aim data is 100 times per minute, the
data of speed is 2.8km/h, press slow and fast key can amend the aim data of
pulse. At this time, press the start key, the data will be confirmed and adjust the
speed according to comparation of the runner‟s pulse and pulse setted, thereby
make the runner‟s actual pulse be kept on the aim data. Note: many factors
influence the testing of pulse, so the testing data is for reference only. The max
speed of this mode is 6km/h, and there is no use of direct speed choice key. The
scale of pulse control speed is from 50 times per minute to 160 times per minute.
4. Pause and stop
0918LCD: During treadmill runs, first press stop key, it‟s paused, the treadmill
stops and keep all data, if here press start key, the treadmill will run as per original
state; if press stop key in second time, all data in the windows will become to zero.
0918TV: During treadmill runs, first press stop key, it‟s paused, the treadmill stops
and keep all data(the speed show 0.8km/h);if here press start key, the treadmill
will continue to run; if press stop key in second time, all data in the windows will
become to zero.
5. Direct speed choice key
Under the electric meter are 2--16, all the 8 keys are direct speed choice key, when
start treadmill, on non-pulse control speed state, choose any number key, the
treadmill will auto adjust to the chosen key speed.
6. Auto change speed
Choose the suitable sports program, relevant oscillogram will be shown at the top
of LCD, for 0918TV,the grade and the speed programme number will be shown on
the LED window. Start treadmill, speed will change automatically per 200m by
choose program table, there are 10 speed for every sport program, so the whole
distance is 2000m for each program operation.
7. Handle grade adjustment
After start treadmill, adjust grade by pressing rise and drop key.
8. Incline direct
After start treadmill, on the right of electric meter, 7 keys from 2% to 14% are
for direct grade choice, choose one number key, treadmill adjust automatically by
chosen grade.
9. Auto incline running
Choose the suitable sports program, relevant program No. will be shown on incline
window of LCD, start treadmill, grade will change automatically per 200m by
choose program table, there is 10 speed for every sport program, so the whole
distance is 2000m for each program operation.
10. Hilly country running
Choose the suitable sports program, start treadmill, incline and speed will change
automatically per 200m by choose program table, there is 10 speed for every sport
program, so the whole distance is 2000m for each program operation.
11. 0918LCD SD card play system introduction
1、There are 2 sets of electric treadmill training course enclosed, they could be
priority play when no SD card inserted.2、With the same basic function of those
Mp3 products available in market.3、Insert SD card, Mp3 format and WMA format
music could be play, and SD card priority play.4、Support MP3 and WMA
format.5、All key operation introduction as follows:
Long
time
press
Play/Stop
Short
time
press
Short
EQ
time
press
PRE
Short
time
press
Start/Stop/Shut
down
Play/Pause
NEXT
V+
Play state:switch
EQ
The last one
V-
Short time
press
The next one
Long time
press
Speediness
volume added
Short time
press
Single step
volume added
Long
time
press
Speediness
volume
reduced
Single step
volume
reduced
Short
time
press
6、Operation notice:
At first, press Amplifier on/off to start power Amplifier ( red light on ) , then press
“PLAY/STOP” for 3 seconds, then could SD card play system be started (red light
on), at this time press “PLAY/STOP” it could be play or pause. It can direct close
the power Amplifier (red light off) when close the system. If no press key operation
or music playing, the system will shut down in 3 minits automatically.
Ⅷ DAILY MAINTENANCE:
1. Running board and running belt
●Brief:
The motorized treadmill use imported running belt, it‟s with lower friction
coefficient,
higher intensity of tension, the running board is specially with double shock
absorption system, its special smoothness and abrasion prevention make the
movement more
comfortable and fluent .
●Clean Keep cleanness of treadmill, it can prolong treadmill‟s life, please usually
clean the exposed running board both side of the running belt and foot board.
Reduce the accumulation of the dust and trash under the running belt. Clean the
running belt by dipped soap water; please note not to let water flow into machine
and under the running belt.
2. Lubricating The running board/belt must be lubricated by special lubrication after
a period of use. The methods and steps are in the following:(You‟d better do it
under the instruction of the professional person)
(1) Loosen the adjusting bolts of the back adjust ware on the both sides by inner
hexagon spanner. Make the running belt loose.
(2) Slime the lubricant on the sport zone of the running board homogeneously.
(3) Adjust the running belt refer to the„ adjust slanted running belt‟ as a reference.
(4) Let the treadmill works for some time in a low speed after adjusting the running
belts. Make sure that the running belt is unbiassed. Suggestion: Treadmill works no
more than 3 hours every week. It‟s lubricated one time every half of year. Treadmill
works from 3 to 6 hours every week. It‟s lubricated one time every 3 months.
Treadmill works more than 6 hours every week. It‟s lubricated one time every month.
Superfluous lubrication is not ok, it‟s not good with more lubrication.
Please remember: reasonable lubricating is an important factor for
prolonging treadmill’s life!
3. Clean Please eliminate the dust regularly after a period of use, to keep the power
panel and the head of the sensor clean.
4. Evaluation of friction The friction between running belt and board will be
increased as dust or reduced lubrication, this perhaps can harm motor, controller
increased friction is with following character:
(1) When shut off power of treadmill, the running belt can‟t be moved or it‟s difficult
for user to move by foot.
(2) Causing harm of motor of controller, open circuit and the fuse blows.
5.Adjust slanted running belt
All running belt are adjusted before the treadmill leaving the factory, but after a
period of time of using, the belt will become slanting, it may caused by the following
reasons:
(1) The engine frame is not steady.
(2) The user‟s feet are not in the middle of the running belts when they are using it.
(3) The force on the feet is not even. If the running belt is slanted by the user, it can
return to normal after running without anyone for a few minutes. If the running belt
can not return to normal by itself, we can adjust the running belt regulator with the
inner hexagon spanner, adjust it semicycle once. If the running belt is near the left
side, adjust the left bolt clockwise or adjust the right bolt counter clockwise.(look at
picture a) If the running belt is near the right side, adjust the right bolt clockwise or
adjust the left bolt counter clockwise.(look at picture b)
6.Adjust flab or tight belt
After a period of using, the running belt will become a little longer and give us some
feeling of stopping when we are running. When this kind of phenomenon appears,
adjust the running belt adjustable bolts clockwise and make the two sides equable,
adjust them semicycle once.(look at picture c).Continue to do this until the running
belt is not skided or slanted. The adjustment should not exceed 2---3circles every
time, and it should not too tight , avoiding the running belt damaged permanently.
7. Adjust motor belt
All motor belts are adjusted before the treadmill leave the factory, but after a period
of time of use, the belt will become flab and skid, this can be adjusted under the help
of the professional person.
Adjusting supporting plate
Adjusting spring
Pinch roller device
Motor belt
The adjustment steps:
(1) Open the motor cover, take out the side which is the connection of adjusting
spring and adjusting brace connecting plate.
(2) Put the adjusting spring into another proper hole on the adjusting brace
connecting plate.
(3) Adjust it until the belt is not skid around when it is loading.
(4) Install the motor cover again after adjusting it..
ⅨLIST OF ITEM IN THE PACKAGE:
NO
DESCRIPTION
UNIT
QUANTITY
1
Mainframe
SET
1
2
Poling
SUIT
1
3
Electrical Head
PC
1
4
Safety Switch
PC
1
5
Silicon Oil
BOTTLE
1
6
Base sheathing
SUIT
1
7
Meter sheathing
SUIT
1
8
Audio frequency line(no one in
0918TV)
PC
1
9
Earphone
PAIR
1
10
Specification
PAD
1
11
Power line
PC
1
12
Standard component
SET
1
ⅩCOMMON FAULT AND THE PROCESSING METHOD
Fault Symptom
Possible Causes
Solution
Either turning on or turning
off the switch power, the
treadmill can not display
when we the electric power
is connected.
1. The attaching plug is
not inserted well. 2 .The
electrical head‟s
attaching plug is not
inserted well. 3. The
tube fuse is destroyed.
1. Insert it again. 2.
Connect it once
more. 3. Change the
tube fuse.
All the display windows
flicker.
The safety switch is not
settled well or damaged.
It stops by itself when it is
working. And all the
displays are normal.
The automatic system
protection.
The running belt can not
work normally, and it has
buzz, with displaying
normally.
It is regular when it is
running by itself ,and
disordered when someone
walking on it.
It can not display normally
or can not display.
The enter voltage is too
low.
Put the safety switch
on the correct place
or mend it.
1. Press the „STOP‟
key, then start it. 2
.Turn off the power
switch, and start it in
one minute.
Use it when the
voltage return to
normal.
Please adjust the
Check whether the
running belt
running belt is too loose. according to the right
method.
The electrical head can
not work because of the
external disturbance .
Turn off the power
switch, then turn on
it in one minute.
Because of some reasons, the technical parameter may has a little difference. So we
can not take it as criterion to measure our state of health, all the data is just as a
reference.
Please cut off the power immediately and contact with our agents when there is
special fault symptom. We will provide you the best service in time.
APPENDIX:PULSE LEVEL TABLES
Attention: All the pulse test value above is just an reference. If the pulse data is too
high, we can adjust it by the heart rate control speed function. We can choose the
control speed numerical value according to the age , the time we exercises, and the
table.
HANDLEIDING
Joy Sport
Life Fit
Inhoud
Veiligheids voorschriften
blz. 1
Technische gegevens
blz. 2
Installatie overzicht
blz. 3
Overzicht display
blz. 4
Test voor gebruik
blz. 8
Op- en uitvouw instructies
blz. 8
Bedienings overzicht
blz. 9
Dagelijks onderhoud
blz. 13
Onderdelenlijst
blz. 15
Storingen en wat te doen
blz. 16
Hartslagtabellen
blz. 17
Ⅰ Veiligheidsvoorschriften
LET OP: Omdat er vanwege de vooruitgang van technologie veranderingen plaats kunnen
vinden, blijven alle rechten voor interpretatie aan ons bedrijf.
Waarschuwingen:
- Lees deze handleiding goed door, en hou u aan de regels tijdens het gebruik voor uw
eigen veiligheid.
- De loopand moet opgevouwen en vastgezet worden voordat u deze verplaatst of tilt.
Raak de veiligheidssluiting niet aan tijdens het tillen. Tillen en verplaatsen van de
machine is strikt verboden als hij uitgevouwen is of niet op slot staat.
- Om verwondingen te voorkomen, is het raadzaam om de armsteunen niet aan te raken
met het open- en dichtklappen van het hoofdframe.
- Houd uw kinderen ver weg van de uitgeklapte en werkende machine. Uw kinderen en
huisdieren moeten een afstand houden van minstens 3 meter.
- Het is belangrijk voor de gebruikers die ouder dan 35 jaar zijn, om eerst contact op te
nemen met uw dokter voor u oefeningen uit gaat voeren.
- De loopband zou binnen in een kamer geplaatst moeten worden, en voorkom vochtigheid,
water op de loopband is verboden en geen enkel voorwerp mag op of in de loopband geplaatst
worden.
- De ondergrond moet gelijk zijn. Zorg dat u zeker weet dat het stevig genoeg is om de loopband
op te plaatsen, alle pootjes moeten op de grond staan voor gebruik.
- De stekker moet in een geaard stopcontact worden geplaatst, probeer te voorkomen dat
andere elektrische apparatuur op dezelfde stroomvoorziening zitten aangesloten.
- Draag sportkleding en geschikte sportschoenen tijdens het gebruik van de loopband, blote
voeten is ten strengste verboden als u de machine gebruikt.
- Laat niet twee of meerdere personen tegelijk op de loopband.
-Start de machine niet als u op de band staat, u kunt het beste op de vaste delen gaan staan en
de armsteunen vasthouden voordat u begint met trainen. U kunt beginnen met trainen als de
machine normaal gestart is.
- Als u zich oncomfortabel voelt of een ongewone conditie tijdens het gebruik, druk dan op stop
of trek de veiligheidssleutel eruit. Een noodoplossing kan ook zijn dat u de handvaten vastpakt,
uw voeten op de zijrails zet en er aan een kant vanaf stapt.
- De sensor van de hartslag is niet medisch gekeurd, vele redenen kunnen onnauwkeurigheid
veroorzaken. Het is alleen voor een referentie om het resultaat te meten.
- Een patient met hartslagproblemen mag de loopband niet alleen gebruiken en mag ook niet de
functie voor automatische snelheidsverandering gebruiken.
- Bevestig de snelheid naar aanleiding van uw lichamelijke conditie.
- Schakel de loopband op tijd uit nadat u klaar bent met het gebruik.
- De loopband moet geplaatst worden op een ruime plaats. Het is verboden om voorwerpen in
de buurt te plaatsen, zorg dat er een vrij ruime is van 2m x 1m.
- De kinderen mogen de machine niet alleen gebruiken, als ze hem willen gebruiken moet dit
onder het toezicht van een volwassene.
- Als u de loopband niet gebruikt, haal dan de veiligheidssleutel eraf en leg hem op een plaats
waar de kinderen hem niet kunnen vinden, zodat de kinderen de machine niet per ongeluk
kunnen starten.
- Overbelasting veroorzaakt dat de motor en besturing beschadigd raken. Ook raakt de lagering
en het loopvlak snel verouderd, dus moet u overbelasting proberen te voorkomen.
- Als er stof op de sensor zit, beïnvloed dit de gevoeligheid, dus moet u stof proberen te
beperken.
- Raak geen onderdelen aan die bewegen.
- De renner moet het bovenlichaam voorwaarts op 1/3 of 1/2 deel van de loopband houden
tijdens het rennen. Als u dit doet, kunt u het display makkelijk bedienen.
- Mensen met lang haar moeten hun haar vastmaken om voorvallen te voorkomen.
Ⅱ Technische gegevens
● Weergave afstand:0.000—9.999(km)
● Hellingshoek in graden: 0—18%
● Weergave tijd: 00:00--99:59(min:sec)
● Maximaal gebruikersgewicht: 180kg
● Stroomtoevoer: 220V(50Hz/60Hz)
● Weergave snelheid:0.8--18(km/h)
Ⅲ Installatie instructies
1. Open het pakket en til het hoofdframe
eruit. Stop de kabel door de rechter paal.
2. Verbind de palen en het
hoofdframe met bout M10×70,
borgmoer M10 and bout M10×20.
3. Bevestig de basiskappen op de linker
en rechterkant met zelftappende
M4×25.
4. Plaats de displaykapjes over de
bijbehorende palen.bout M4×16 and
5. Verbind de hoofdkabel van de display
met de kabel in de rechterpaal.
LET OP: Mik de gaatjes voordat
u ze vastklikt.
6. Bevestig de display met
inbus schroef M8×16.
7. Bevestig de displaykapjes met
zelftappende bout M4.2×16.
8. Draai de tranportvergrendeling los,
en verplaats deze naar een passende
plaats.
ⅣOnderdelen & Functies van de display:
1 Start knop
Als de loopband stilstaat, begint hij te draaien als u deze knop indrukt. Als de
machine in “set-status” staat, druk op deze knop zodat alle gegevens bevestigd
worden en de machine begint met werken.
2 Stop knop
Als de loopband draait, stopt hij wanneer u 1 keer op deze knop drukt en behoud
u alle ingestelde gegevens. Als u nu weer op de start knop drukt en gaat hij verder
met de laatst ingestelde gegevens. Als u de stop knop 2 keer induwt stopt de
machine en komt alle data ook op nul te staan.
3 Veiligheidssleutel
Als de loopband draait en u trekt de veiligheidssleutel eruit, springt de machine in
de nood-stopstand. In deze stand, stopt de motor met draaien en knipperen alle
displays totdat u de sleutel terugplaats.
4 Graden omhoog en omlaag knoppen.
5 Snelheid omhoog en omloog knoppen
Wanneer de loopband draait, druk dan op de “snelheid omhoog” of “snelheid
omlaag” knop en de snelheid neemt toe of af. Tijdens de “set-status”, drukt u op
deze knoppen om de data aan te passen.
6 Handvat hartslagmeters.
7 Setup knop
Wordt gebruikt om de tijd, afstand en hartslag in te stellen. Ook wordt deze
gebruikt om de snelheidsprogramma’s te kiezen.
8 Directe snelheidsknoppen (2km/h—16km/h)
9 Directe hellingshoek knoppen (2%--14%)
10 AMP
11 Spelen/Stoppen
12 EQ
13 Vorige
14 Volgende
15 Volume+
16 Volume17 LCD display
18 Ingang koptelefoon
19 Ingang audio frequentie
20 USB ingang
21 SD card ingang
Ⅴ Test voor gebruik
1 Na het monteren, plaats de veiligheidssleutel in de bijbehorende aansluiting.
2 Voordat u start, controleer of het voltage normaal is en de hoofdkabel een
goede aarde heeft. Trek aan de band om te controleren of hij normaal loopt en
geen herrie maakt.
3 Zet de stroomschakelaar aan. Nu moet alle date in de schermpjes op nul staan
en de band moet stil staan. Druk op de startknop, de band begint te draaien op de
laagste snelheid van 0.8km/h. Hier kunt u observeren of elk onderdeel van de
loopband normaal werkt.
4 Druk op de “snel” en “langzaam” toets om te controleren of deze normaal
werken.
5.Druk op de “stop” knop om te controleren of de machine op een normale
manier stopt.
Ⅵ Op- en uitvouw instructies
1 Uitvouwen van het hoofdframe:
Het hoofdframe komt langzaam omlaag door de functie van de cylinder als u de
beveiliging eraf haalt (kijk naar de pijl in het plaatje).
2 Opvouwen van het hoofdframe:
Als u het hoofdframe op wil vouwen, pakt u de achterkant van het loopvlak en tilt
u deze omhoog totdat de beveiliging automatisch vastklikt (Zorg dat deze zeker
vastzit).
LET OP: Zorg dat de hellingshoek
Zeker op de 0 positie staat voordat u de loopband opvouwt. Als de
helling niet op de 0 positie, is het
verboden om de machine op te
vouwen. Tijdens het opvouwen of
openen van de loopband mag u de
armsteunen niet aanraken om
ongelukken te voorkomen.
Ⅶ Bedienings overzicht
1. Schakel stroom aan:
Doe de 2-polige stekker in het stopcontact (opmerking: hij moet compleet geaard
zijn) en doe de veiligheidssleutel erin. Zet daarna de knop aan, de monitor piept en
alle data komt op nul te staan. De loopband is hier in stop-stand.
2. Directe start:
Druk op de startknop als de loopband in de stopstand staat, alle data staat op nul en
de loopband draait op de laagste snelheid. Druk op de knop “snelheid-omhoog”, de
snelheid neemt toe. Druk op de knop “snelheid-omlaag” , de snelheid neemt af.
3. Vooraf ingesteld starten:
Wanneer de loopband stilstaat, druk op de “set” knop om de tijd, afstand, hartslag,
automatische snelheidsverandering en automatische hellingshoekverandering in te
stellen.
U kunt zien of u zich bevind in tijd, afstand of hartslag instelling, want begindata is
zichtbaar in het bijpassende venster en het scheidingsteken knippert. Druk op “∧”
of “∨” of “snelheidstoets” om de data aan te passen. Als u op de “stop knop”
drukt, word de ingestelde waarde gewist. Nadat u alles naar wens ingesteld heeft,
drukt u op start en de loopband begint te draaien zoals u ingesteld heeft. Als tijd en
afstand zijn ingesteld, telt de data af totdat hij op nul staat. Op dit moment geeft hij
een piep en begint te tellen. De hartslaggestuurde programma’s werken op snelheid
gestuurd door hartslag, de richtlijn van de hartslag is hierbij 100 keer per minuut,
de instelling van de snelheid is 2.8km/h. Door op de “sneller” of “ langzamer” knop
te drukken kunt u de richtlijn van hartslag aanpassen. Als u nu op de “start knop”
drukt , worden de gegevens bevestigd en de snelheid wordt aangepast volgens de
vergelijking van de hartslag van de gebruiker en de ingestelde hartslag, daardoor
wordt de hartslag van de gebruiker gehouden op de ingestelde richtlijn.
Opmerking: veel factoren beïnvloeden de waarneming van de hartslag, dus de
waargenomen gegevens is alleen een richtlijn. De maximale snelheid in deze
modus is 6km/u, en er kan geen gebruik gemaakt worden van de “directe
snelheidsknoppen”. De schaal van de hartslag gecontroleerde snelheid is van 50
keer per minuut tot 160 keer per minuut.
4. Pause en stop
Als de loopband draait, en u drukt 1 keer op stop, staat de loopband op pauze, de
band stopt met draaien en behoud alle gegevens. Als u nu op start drukt, gaat de
loopband verder waar u gebleven was. Als u een tweede keer op stop drukt, worden
alle gegevens op nul gezet.
5. Directe snelheidskeuze
Op het display ziet u knoppen van 2 tot 16, alle 8 knoppen zijn directe snelheids
snelheidskeuzes. Als u de loopband start, of niet hartslaggestuurd traint, kunt u een
van de directe snelheidsknoppen kiezen en de loopband past zich automatisch aan
aan de snelheid die u gekozen heeft.
6. Automatisch snelheid veranderen
Kies het geschikte programma, het geschikte oscillogram is zichtbaar bovenaan de
LCD. Start de loopband en de snelheid veranderd automatisch per 200 meter naar
aanleiding van het gekozen programma. Er zijn 10 snelheden voor ieder
programma, dus de hele afstand is 2000 meter voor elk programma.
7. Handle grade adjustment
After start treadmill, adjust grade by pressing rise and drop key.
8. Directe wijziging hellingshoek
Aan de rechterkant van het display zitten 7 directe hellingshoekwijziging knoppen
van 2% tot 14%, deze zijn voor de hellingshoek direct te veranderen. Als de
loopband draait, kunt u een van deze knoppen kiezen en de loopband past zich
automatisch aan aan de gekozen hellingshoek.
9. Automatische wijziging hellingshoek
Kies het geschikte programma, het nummer van het programma is zichtbaar op het
schermpje “helling” van de LCD. Als u de loopband start, verandert de
hellingshoek automatisch per 200 meter naar aanleiding van het gekozen
programma. Er zijn 10 snelheden voor ieder programma, dus de hele afstand is
2000 meter voor ieder programma.
11. SD-kaart afspelen systeem introductie
1、Er zijn hier 2 elektronische loopbandtrainingen ingeprogrammeerd, deze
kunnen hoofdprioriteit zijn als er geen SD kaart in het apparaat zit.
2、Met dezelfde basisfuncties als de MP3 producten uit de winkel.
3、Plaats de SD-kaart. MP3 formaat en WMA formaat muziek kunnen afgespeeld
worden, en zodra u een SD-kaart plaatst heeft deze de voorkeur.
4、Ondersteunt MP3 en WMA formaat.
5、Alle toetsen functioneren als volgt:
6、Opmerking:
Als eerste, druk op de schakelaar aan/uit om de stroom te activeren (rood lampje
aan). Druk dan 3 seconden lang op de knop “PLAY/STOP”, dan kan het SD-kaart
systeem gestart worden (rode licht aan). Als u nu op “PLAY/STOP” drukt kan hij
afgespeeld of gepauzeerd worden. Het kan direct de stroom uitschakelen (rode licht
uit) als u het systeem afsluit. Als u 3 minuten geen knop indrukt, of er speelt geen
muziek af, dan sluit het systeem na 3 minuten automatisch af.
V Dagelijks onderhoud.
1. Loopplank en loopband.
●Beschrijving:
Joy sport series gemotoriseerde loopbanden zijn voorzien van speciale loopbanden.
Met een lage wrijvingsweerstand, de loopplank is speciaal met een dubbel
schokabsorptie systeem, waardoor deze soepel en comfortabel loopt.
● Schoonmaken.
Het schoonhouden van de loopband zal de levensduur bevorderen, let vooral op het
schoonhouden van de loopplank en bord. Vermijd het verzamelen van stof onder de
loopband. Reinig de loopband met een sopje maar vermijd dat er water in de
machine komt of onder de loopband
2. Smering:
De ruimte tussen de loopplank en de loopband dient op gezette tijden gesmeerd te
worden met een speciale (silicone olie) na een periode van gebruik.
De manier is als volgt:
(1) Haal de spanning van de loopband door het lossen van de inbusbouten aan het
einde van de band. Tel de slagen zodat u deze met hetzelfde aantal slagen terug
kunt spannen.
(2) Verdeel wat olie onder de band op de plank, gelijkmatig over de hele breedte.
(3) Span de band weer op met het gelijke aantal slagen die u losgedraaid hebt.
(4) Laat de loopband gedurende enige tijd onbelast op lage snelheid draaien zodat
de olie zich kan verdelen.
Suggestie:
Loopband werkt niet meer dan 3 uur per week, smeer eenmaal per halfjaar.
Loopband werkt 3 tot 6 uur per week, smeer eenmaal per 3 maanden.
Loopband werkt meer dan 6 uur per week, smeer een keer per maand.
Overdadig smeren is niet verstandig en onthoud dat regelmatige smering de
levensduur van uw loopband bevorderd.
3 .Schoonmaken
Draag zorg voor de omgeving van de loopband. Verwijder het stof onder de band
regelmatig. Maak het oppervlak van de machineschoon met sop en een vochtige
doek. Gebruik geen agressieve reinigingsmiddelen.
4.Controle van de weerstand:
De weerstand tussen band en loopplank kan groter worden door vuil of gebrek aan
olie. Of de weerstand nog aanvaardbaar is kunt u als volgt controleren, Maak de
machine stroomloos en probeer de band met uw voet te laten draaien. Als dit niet of
zeer zwaar gaat de loopplank reinigen en opnieuw oliën.
5.Herstel van scheeflopende loopband:
Alle loopbanden worden afgesteld voor ze de fabriek verlaten. Maar na een periode
van gebruik kan de band scheef gaan lopen door verscheidene redenen.
(1) De loopband staat niet vlak op de ondergrond.
(2) De loper loopt niet midden op de band of ongelijkmatig.
(3) Als de band scheef gelopen is kan deze zich automatisch herstellen door hem
enige tijd onbelast te laten draaien.
Als de band niet uit zichzelf terug in positie komt dienen we door middel van de
inbusbouten dit euvel te verhelpen. Uitlijnen gaat als volgt, als de loopband naar
links is gelopen draai de linkerbout met de klok mee een kwartslag of draai de
rechterbout een kwartslag tegen de klok in.(bekijk afb. a)
Als de loopband naar rechts is gelopen draai de rechterbout een kwartslag met de
klok mee of de linkerbout een kwartslag tegen de klok in. (bekijk afb. b)
6. Herstellen van slappe loopband.
Na een periode van gebruik kan de loopband wat oprekken en het gevoel geven dat
de band af en toe blijft stilstaan. Als dit verschijnsel zich voordoet dient u de band
na te spannen. Dit doet u door de inbusbouten links en rechts gelijkmatig iets met
de klok mee te draaien. Niet meer dan 1 slag per keer en controleer dan eerst het
resultaat voor u verder gaat. Het te strak spannen van de band kan blijvende schade
veroorzaken.
7. Spannen van de motorriem
Alle motorriemen zijn afgesteld voordat de loopband de fabriek verlaat, maar na
een tijd gebruik kan de riem rekken en gaan slippen. Dit kan aangepast worden met
behulp onder toezicht van professional.
Aanpassen gaat als volgt:
(1) Open de motorkap en haal de kant eruit welke de verbinding is met de
aanspanveer en motorspanner.
(2) Doe de aanspanveer in een ander geschikt gaatje aan de motorspanner.
(3) Pas hem zo ver aan dat de band niet meer slipt.
(4) Plaats de motorkap terug.
ⅨLijst van onderdelen in het pakket:
NR.
1
2
3
4
5
6
7
8
9
10
11
OMSCHRIJVING
Hoofdframe
Palen
Bedieningspaneel
Veiligheidsschakelaar
Siliconen olie
Base sheathing
Meter sheathing
Koptelefoon
Specificaties
Stroomkabel
Standaard component
AANTAL
1
1
1
1
1
1
1
1
1
1
1
ⅩMogelijke foutmeldingen en de procesmethode
Vanwege bepaalde redenen , kan de technische parameter een klein beetje verschil
hebben. Dus u kunt het niet als een criteria nemen om de status van uw gezondheid
te meten. Alle data is alleen een referentie.
- Schakel de stroom direct uit en neem contact op met de leverancier als er een
speciale foutmelding komt. Zij kunnen u hiermee helpen.
APPENDIX Ⅱ:Hartslagtabellen
Attentie: Alle hartslagtest gegevens zijn enkel bedoeld als referentie. Als de
hartslag te hoog is kunnen we deze reguleren met de hartslag snelheidscontrole.
We kunnen deze instellen afhankelijk van de leeftijd, de tijd van de oefening en de
tabel.