1
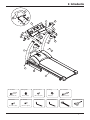
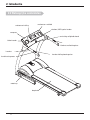
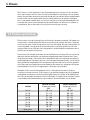
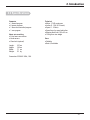
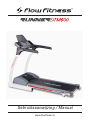
Gebruiksaanwijzing / Manual
www.flowfitness.nl
Runner DTM600 Treadmill
Handleiding (Nederlands)
Manual (English)
3 35 -
34
66
Copyright © Flow Fitness B.V.
Alle rechten voorbehouden. Niets uit deze gebruiksaanwijzing mag worden gebruikt of gereproduceerd
in welke vorm of op welke wijze dan ook zondervoorgaande schriftelijke toestemming van Flow Fitness B.V.
All rights reserved. Nothing in this instruction manual may be used or reproduced in any form or way without
the express written permission of Flow Fitness B.V.
Inhoud
1. Belangrijke informatie
4
2. Introductie
6
3. Fitness
10
4. Gebruik
13
5. Algemene informatie
26
6. Garantie
34
1.1 Gezondheid
1.2 Veiligheid
2.1 Inhoud verpakking
2.2 Belangrijke onderdelen
2.3 Specificaties
3.1 Trainen op hartslag
3.2 Warming up & cooling down
4.1 Montage
4.2 Opbergen/ in gebruik nemen
4.3 Gebruik computer
4.4 Onderhoud
5.1 Trainingsschema’s
5.2 Exploded view en onderdelenlijst
5.3 Problemen oplossen
6.1 Garantie
4
4
6
8
9
10
12
13
17
19
22
26
30
32
34
3
1. Belangrijke informatie
1.1 Gezondheid
Belangrijk:
lees eerst deze handleiding en volg de instructies nauwkeurig op voordat
u het product gaat gebruiken.
· Raadpleeg een deskundige om het trainingsniveau te bepalen dat voor u het beste
geschikt is.
· Indien u tijdens het trainen last krijgt van duizeligheid, misselijkheid of ander
lichamelijk ongemak, stop dan direct met trainen en raadpleeg een arts.
· Houd tijdens het trainen uw hartslag in de gaten en stop onmiddellijk bij afwijkende
waarden.
· Wij adviseren u warming up en cooling down oefeningen te doen gedurende vijf tot
tien minuten voor en na gebruik van het product. Zo kan uw hartslag geleidelijk
toe- en afnemen en voorkomt u spierpijn.
1.2 Veiligheid
· Controleer voor gebruik of het product juist functioneert. In geval van storing of
defect stoppen met trainen en direct contact opnemen met uw dealer.
· Gebruik het product nooit als deze defect is.
· Dit product is alleen bedoeld voor thuisgebruik en dient op een vlakke onder
grond te staan.
· Dit product mag door maximaal één persoon tegelijk worden gebruikt.
· Het apparaat is geschikt voor personen met een lichaamsgewicht tot 120 kilogram.
· Zorg ervoor dat er altijd minimaal één meter vrije ruimte in alle richtingen rondom het
apparaat is wanneer u aan het trainen bent.
· Steek geen voorwerpen in openingen van het apparaat.
· Houd kinderen en huisdieren uit de buurt van het apparaat.
· Personen met een handicap moeten medische goedkeuring hebben en begeleiding
krijgen bij gebruik van de loopband.
· Plaats geen handen en voeten onder het product.
· Houd nooit uw adem in tijdens het trainen. Uw ademhaling moet op een normaal tempo
zijn, afhankelijk van de intensiviteit van uw training.
4
1. Belangrijke informatie
· Begin uw trainingsprogramma langzaam en bouw dit geleidelijk op.
· Draag altijd geschikte kleding wanneer u aan het trainen bent. Draag geen te wijde
kleding, die tussen bewegende delen van het product kan komen.
· Gebruik voor het verplaatsen van het product altijd daarvoor geschikte
tiltechnieken om rugklachten te voorkomen.
· Controleer regelmatig of schroeven en bouten goed vastzitten en draai ze indien nodig
aan.
· De eigenaar van dit apparaat is er verantwoordelijk voor dat alle gebruikers op de
hoogte zijn van de waarschuwingen en voorschriften zoals vermeld in deze
gebruiksanwijzing.
· Dit product is bedoeld voor gebruik in een schone, droge omgeving. Opslag in koude
en/ of vochtige ruimtes zou tot problemen in de loopband kunnen leiden.
· Dit product is niet geschikt voor therapeutische ondersteuningen/ of het profesioneel
gebruik ervan in de fysiotherapie.
WAARSCHUWING
Laat uw conditie controleren door een arts voordat u begint met trainen. Dit is extra
belangrijk voor personen ouder dan 35 jaar of personen met gezondheidsproblemen.
Lees alle instructies voor gebruik. Flow Fitness is niet verantwoordelijkheid voor persoonlijk letsel of schade aan bezittingen veroorzaakt door gebruik van dit product.
Dit product is niet geschikt voor verhuur of gebruik in een commerciële of institutionele
omgeving.
5
2. Introductie
Dank u voor de aanschaf van de Flow Fitness Runner DTM600 loopband. Met de Runner
DTM600 loopband heeft u een hoogwaardig trainingsapparaat in huis gehaald.
Met de Runner DTM600 loopband heeft u de mogelijkheid om 9 verschillende trainingsprogramma’s in te stellen om zo gevarieerde trainingen te kunnen volgen. De snelheid
is in te stellen van 0 tot 16 Km/h en de loophoek kan tussen de 0% en 12% variëren. De
hartslag kan met de handsensoren of met een hartslagband geregistreerd worden.
Tevens is de loopband geconstrueerd met robuust frame en een krachtige motor, die
zorgt voor een soepel loopcomfort. Doordat de loopband zo veelzijdig en eenvoudig te
bedienen is, kan deze optimaal op uw behoeften worden afgestemd.
In deze handleiding staat alle informatie die nodig is voor het gebruiken en bedienen
van de loopband. Tevens bevat deze handleiding tips en adviezen over hoe u het beste
kunt trainen. Wij adviseren u voor het gebruik van de Runner DTM600 loopband eerst
deze handleiding aandachtig te lezen, zodat het product optimaal en veilig kan worden
gebruikt.
Flow Fitness wenst u veel succes en plezier met trainen.
2.1 Inhoud Verpakking
1.
2.
3.
4.
5.
6.
7 A.
7 B.
8.
9.
10.
11.
12.
13.
14.
6
Frame loopband
Basisframe
Voorbuis links
Voorbuis rechts
Inbusbout
Borgmoer
Displaykabel boven
Displaykabel onder
Handgreep
Computer
Inbusbout
Bidonhouder
Veiligheidssleutel
Handgreepkap links boven
Handgreepkap links onder
15.
16.
17.
18.
19.
20.
21.
22.
23.
24.
Schroef
Handgreepkap rechts boven
Handgreepkap rechts onder
Schroef
Ring
Inbusbout
iPad houder
iPad houder beugel
Schroeven M5
Schroeven M4
2. Introductie
21
22
24
18
10
9
23
16
8
7B
10
18
11
13
7A
12
17
15
4
3
6
14
15
5
6
5
2
1
5: Inbusbout
M10 X 60L (2x)
15: Schroef
#8 X 5/8”L (2pcs)
6: Brogmoer
M10 X 10t (2x)
18: Schroef
20: Inbus bout
M8 X 15L (4pcs)
Inbussleutel 6mm
19: Ring
M8 (4pcs)
Inbussleutel 5mm
10: Inbusbout
M8 X 70L (4pcs)
Multitool
Schroevendraaier
#8 X 3/4”L (2pcs)
7
2. Introductie
2.2 Belangrijke onderdelen
sneltoetsen helling
sneltoetsen snelheid
telefoon / MP3 speler houder
computer
aansluiting veiligheidskoord
bidon houder
Handvat snelheidregelaar
handvat
handvat hellingshoekregelaar
hand hartslagmeter
motorkap
loopvlak
8
2. Introductie
2.3 Specificaties
Computer
• 1 handmatig programma
• 6 voorgeprogrammeerde programma’s
• 1 hartslag gestuurde programma
• 1 gebruikersprogramma’s
Hartslagmeting
• Polar hartslag ontvanger
• Handsensoren
• Borstband (optioneel)
Lengte:
Hoogte:
Breedte:
Gewicht:
Techniek
• Motor 1,7 PK continuous
• Hoekverstelling 0 - 12% (0-12 niveaus)
• Snelheid 1 - 16 km/u
• Speed keys voor snelheid en hellingshoek
• Loopvlak (lxb) 128 x 42 cm
• 120 kg maximaal gebruikersgewicht
Extra
• Opklapbaar
• Ipadhouder
167 cm
126 cm
77 cm
70 kg
Aansluiting: 230 V AC 50Hz, 15A.
9
3. Fitness
Wat is fitness? In het algemeen is een fitnessoefening te omschrijven als een activiteit
die er voor zorgt dat uw hart meer zuurstof via het bloed van uw longen naar uw spieren
pompt. Hoe zwaarder de training, hoe meer brandstof (zuurstof) de spieren nodig hebben
en hoe harder het hart moet werken om zuurstofrijk bloed naar de spieren te pompen.
Als u in een goede conditie bent, kan uw hart met elke hartslag meer bloed pompen. Het
hart hoeft dan niet zo vaak te pompen om de noodzakelijke zuurstof naar uw spieren te
transporteren. Uw rusthartslag en hartslag bij inspanning gaan omlaag.
3.1 Trainen op hartslag
Bij het trainen is het dus belangrijk om uw hartslag in de gaten te houden. De hoogte van
uw hartslag is namelijk bepalend voor het resultaat van de training. Wat voor u de beste
hartslag is om op te trainen, hangt ten eerste af van uw leeftijd. Aan uw trainingsdoel. Als
uw trainingsdoel is om gewicht te verliezen dan kunt u het beste op 60% van uw maximale hartslag trainen. Wanneer uw trainingsdoel is om de conditie te verebeteren dan is
dat 85% van uw maximale hartslag.
Het lichaam slaat energie op in twee vormen; koolhydraten en vetten. Bij een inspanning
gebruiken we een combinatie van deze twee engergievoorraden. Wanneer de in spanningsintensiteit hoog is, kiest het lichaam grotendeels voor snel verbrandare energie, te
weten koolhydraten. Aangezien hiervan maar een beperkte hoeveelheid is, zal dit slechts
korte tijd worden volgehouden. Bij trainingen op lage intensiteit zal het lichaam grotendeels kiezen voor een langdurige en energievoorraad te weten vet. Aangezien dit in grote
hoeveelheden in het lichaam is opgeslagen, is dit langer vol te houden.
Hieronder is een schema weergegeven waarin u kunt aflezen wat voor u de beste
hartsllag is om mee te trainen. In dit schema is per leeftijdscategorie een hartslaggebied
aangegeven waarbinnen uw hartslag moet liggen tijdens de training. in de middelste kolom staan de waarden vermeld die u moet aanhouden als u gewicht wilt verliezen. Indien
u uw conditie wilt verbeteren dient u de waarden in de rechterkolom aan te houden.
Leeftijd
20 - 24
25 - 29
30 - 34
35 - 39
40 - 44
45 - 49
50 - 54
55 - 59
60 en ouder
10
Gewicht verliezen
(slagen per minuut)
60%
120 - 118
117 - 115
114 - 112
111 - 109
108 - 106
105 - 103
102 - 100
99 - 97
96 - 94
Conditie verbeteren
(slagen per minuut)
85%
170 - 167
166 - 163
162 - 158
157 - 154
153 - 150
149 - 145
144 - 141
140 - 137
136 - 133
3. Fitness
De beste manier om te beginnen met trainen is per persoon verschillend. Als u ongetraind
bent of overgewicht heeft, moet u rustig aan beginnen en uw trainingsarbeid geleidelijk
opvoeren.
In het laatste hoofdstuk van deze gebruiksaanwijzing (zie: 5.Algemene informatie) staan
verschillende trainingsschema’s weergeven. Deze schema’s kunt u gebruiken bij het
bereiken van uw trainingsdoel. Het programma is verdeeld in twee fasen. De eerste fase
bestaat uit zes weken en is een goede richtlijn voor beginners of personen die sinds lange
tijd weer gaan trainen. gedurende deze fase wordt de intensiteit van de training langzaam
opgebouwd. Na zes weken begint de tweede fase. U kunt dan kiezen voor een trainingsschema om gewicht te verliezen of om uw conditie te verbeteren.
Op www.flowfitness.nl kunt uw vooruitgang berekenen.
11
3. Fitness
3.2 Warming up en cooling down
Een goed trainingsprogramma begint met een warming up en eindigt met een cooling
down. Hiermee kunnen spierpijn en blessures worden voorkomen. Hieronder vindt u een
aantal geschikte oefeningen.
Head Roll
Kantel uw hoofd naar rechts. Hou dit één tel vast, zodat u de linkerkant van uw nek licht
voelt trekken. Doe dezelfde beweging naar links, naar voren en naar achteren. Herhaal dit
twee tot drie keer.
Toe Touch
Buig langzaam voorover met ontspannen armen en rug. Doe dit zover u kunt en houd dit
tien seconden vast. Herhaal dit twee tot drie keer.
Shoulder Lift
Til uw rechterschouder op en draai deze tweemaal met de klok mee. Doe dit vervolgens
tweemaal tegen de klok in. Ontspan en doe dezelfde oefening met de linkerschouder.
Herhaal dit drie tot vier keer.
Calf Stretch
Plaats twee handen tegen een muur. Zet één been schuin naar achteren met uw voet plat
op de grond. Buig uw voorste been en leun tegen de muur. Houd uw achterste been recht,
zodat uw onderbeen gestrekt wordt. Houd dit vijf seconden vast en herhaal dit vervolgens
met uw andere been. Doe dit twee of drie keer.
Side Stretch
Steek uw beide armen in de lucht en rek met uw rechterarm zo hoog als u kunt. Buig naar
links, zodat uw rechterzijde wordt gestrekt. Houd dit gedurende één seconde vast.
Ontspan en doe vervolgens dezelfde beweging met uw linker arm. Herhaal dit drie tot vier
keer.
Inner Thigh Stretch
Ga op de grond zitten en buig uw benen. Zorg dat uw voetzolen tegen elkaar aan komen te
liggen. Houd uw rug recht en buig voorover over uw voeten. Hierdoor worden de spieren
aan de binnenzijde van uw bovenbenen gespannen. Houd dit gedurende vijf seconden
vast, ontspan en herhaal dit drie of vier keer.
Hamstring Stretch
Ga op de vloer zitten met uw rechterbeen gestrekt en plaats uw linkervoet plat tegen de
binnenkant van uw rechter bovenbeen. Buig voorover richting uw rechtervoet en houd dit
gedurende tien seconden vast. Ontspan en doe dit vervolgens met uw linkerbeen
gestrekt. Herhaal dit twee tot drie keer.
12
4. Gebruik
4.1 Montage
Stap 1: Monteren van de displaybuizen.
In dit hoofdstuk wordt beschreven hoe de loopband gemonteerd dient te worden. Haal alle
onderdelen uit de doos en zorg dat er voldoende ruimte beschikbaar is om de loopband te
monteren. Vanwege veiligheidsredenen en ter voorkoming van beschadigingen adviseren
wij u om de loopband met 2 personen te monteren.
1. Zet het hoofdframe op de plek waar u de loopband gaat monteren.
2. Verwijder de inbusbouten (5) en de borgmoeren (6) van de linker- en rechterkant van het
basisframe.
3. Zet beide voorbuizen links (3) en rechts (4) rechtop. (fig. 1)
4. Draai vervolgens beide buizen weer vast met de inbusbouten (5) en de borgmoeren (6).
FIG.1
FIG.1
3
5
FIG.2
3
6
6
4
5
5
13
4. Gebruik
Stap 2: Bevestigen van de computer
1. Verbind de displaykabels (7A) en (7B) met elkaar in de rechter voorbuis (4). (Fig 3).
2. Plaats de computer (9) inclusief de handvaten op de 2 voorbuizen (3) en (4).
3. Bevestig de computer (9) met de 4 inbusbouten (10) en de 4 M8 ringen per buis.
Let hierbij op dat er geen bedrading klem zit tussen de metalen onderdelen.
4. Plaats vervolgens de bidonhouder (11) in de ronde uitsparing aan de linker kant
van de computer (9).
Fig. 3
10
11
9
8
7B
10
12
7A
Stap 3: Vastzetten van computer
1. Zet de computer in de gewenste hoek ten opzichte van de het loopvlak (Fig. 4.).
De hoek is afhankelijk van uw lengte.
2. Met behulp van de 4 inbusbouten (20) en de ringen (19) die aan weerszijden
dienen te worden aangbracht, kan de hoek waaronder de computer staat
worden geborgd.
Fig. 4.
19
20
14
19
20
4. Gebruik
Stap 4: Bevestigen handvatkappen
1. Plaats de handvatkap links boven (13) zoals aangegeven in Fig. 5.
2. Plaats de handvatkap links onder (14) tegen de handvatkap boven (13) aan,
zodat:
a) de vergrendelingspinnen (B in Fig. 6) op de juiste positie zitten.
b) de kunstof pinnen (A in Fig. 6) in de daarvoor aangebrachte gaten in
de handvaten vallen.
3. Schroef eerst de handvatkap links (14) onder vast aan de handgreep met behulp
van bout (15) en daarna de handvatkap links boven met behulp van bout (18).
4. Doorloop stappen 1 t/m 3 voor de rechterkant en gebruik daarbij de handvatkap
rechts boven (16) en de handvatkap rechts onder (17).
Fig. 5
18
16
18
13
17
15
14 15
Fig. 6
14
A
B
15
4. Gebruik
Stap 5: Plaatsen van iPadhouder
1. Plaats de twee iPadhouder steunen (22) aan de achterkant van de computer
en schroef ze vast met de 4 bouten (23). (Fig. 7)
2. Schuif de iPadhouder (21) over de steunen (22) en monteer deze met behulp
van de 4 bouten (24).
21
Back of console
24
22
23
16
4. Gebruik
4.2 Opbergen / in gebruik nemen
Inklappen
U kunt de loopband na gebruik
inklappen. Til het loopvlak aan de
achterzijde op, totdat deze vastklikt.
Zorg er voor dat het loopvlak vergrendeld is, voordat u het weer loslaat.
Door de loopband in ingeklapte
positie naar u toe te trekken, kantelt
het op de transportwielen. Nu is de
loopband verrijdbaar.
Uitvouwen
Om de loopband weer uit te vouwen
voor gebruik, voert u de volgende
stappen uit:
1. druk met uw handen het loopvlak
omhoog
2. ontgrendel het loopvlak met uw
voet zoals aangegeven in de
tekening.
3. laat voorzichtig het hoofdframe
los en stap opzij. Het frame zakt
vanzelf naar beneden op de
gasveren.
Horizontaal afstellen
U kunt met stelschroeven de loopband horizontaal afstellen, zodat deze
stabiel op de vloer kan staan. De 2
stelschroeven bevinden zich aan de
voorkant onder het hoofdframe.
17
4. Gebruik
Stroomvoorziening
Voordat u kunt beginnen met trainen dient u de loopband van stroom te voorzien.
Zorg dat de stekker van het netsnoer in het stopcontact zit en dat de aan/uit knop op “I”
staat. De aan/uit knop bevindt zich aan de voorkant van het hoofdframe.
Het is belangrijk voor uw veiligheid dat het netsnoer in een geaard stopcontact wordt
gebruikt!
Veiligheidskoord
De veiligheidssleutel dient op de daarvoor bestemde plek te zitten op de computer. Zonder
deze veiligheidssleutel kan de loopband niet worden ingeschakeld. Wanneer de
veiligheidssleutel wordt verwijderd tijdens het trainen schakelt de loopband zichzelf
direct uit. U wordt uit veiligheids redenen geadviseerd om de clip van de veiligheidssleutel
altijd aan een kledingstuk vast te maken tijdens het trainen.
18
4. Gebruik
4.2
4.3Gebruik
Gebruikcomputer
computer
Cardio Control DTM600
Designed by Flow Fitness
Remove safety key when not in use and
store out of reach of children.
To avoid injury please follow instructions
below before starting treadmill.
1. Attach clip of safety key to clothing
2. Hold on to hand rail
3. Stand on side rail
energy
Display weergave
INCLINE INLCLINE
: Selecteren van programma’s en niveau instellen
: Verkleinen van de hellingshoek
: Selecteren van programma’s en niveau instellen
: Vergroten van de hellingshoek
MODE
START/STOP
RESET
: Bevestiging van selectie programma en niveau
: Wisselen tussen weer te geven waarden op het display
: Starten en stoppen van de loopband
: Resetten van alle waarden
SPEED
SPEED : Selecteren van programma’s en niveau instellen
: Verhogen van snelheid
: Selecteren van programma’s en niveau instellen
: Verhogen van snelheid
Snelkeuze toetsen voor hellingshoek: 4, 6, 8 en 10%
Snelkeuze toetsen voor snelheid: 4, 6, 8, 10 km/uur
Linker handgreep toets: Hellingshoek (in te stellen met 1%)
Rechter handgreep toets: Snelheid (in te stellen met 0,1 km/uur)
energy
Indien de computer langer dan 10 minuten in standby modus staat zal
het automatisch overschakelen naar energy saving modus om energie te
besparen. Het lampje bij de START/STOP toets zal dan aangaan. Indien u
terug wilt schakelen naar standby modus houd dan de START/STOP toets 1
seconde lang ingedrukt. Het lampje op de START/STOP toets zal dan weer
uitgaan
19
4. Gebruik
Het eerste gebruik
Zet de loopband aan door de aan/uit schakelaar achter op de motorkap op “I” te zetten.Plaats
vervolgens de sleutel van het veiligheidskoord aan de voorkant van de computer in de daarvoor aangebrachte uitsparing. Bevestig het andere uiteinde aan uw kleren. U bent nu klaar
om te trainen. U heeft een keuze uit vier verschillende type trainingsprogramma’s:
1. 1 x snelstart programma
2. 6 x voorgeprogrammeerde programma
3. 1 x hartslaggestuurd programma
4. 1 x zelf in te stellen programma
Snelstart programma
U kunt direct beginnen met trainen door op de START/STOP knop te drukken.
De loopband begint te draaien en u kunt snelheid en hellingshoek naar wens aanpassen
door de daarvoor bedoelde insteltoetsen te gebruiken. De tijd zal oplopen en eindigen bij
99:00. De loopband zal dan automatisch stoppen.
Indien u een trainingstijd wilt instellen doe dan het volgende:
1. Voordat u op de START/STOP toets drukt, druk dan eerst op de MODE toets.
2. Gebruik de INCLINE
toets of de SPEED
toets om de tijd in te stellen.
3. Druk op de START/STOP toets om de training te beginnen. De ingestelde tijd zal terug lopen
naar 00:00. Daarna zal de loopband automatisch stoppen.
Tijdens een training kan de hellingshoek en de snelheid worden veranderd met behulp van de
INCLINE
toets of de SPEED
toets.
Indien u de training wilt pauzeren druk dan op de START/STOP toets. Een P zal dan knipperen
in het display. Om de training weer verder te vervolgen druk dan weer op de START/STOP
toets.
Voorgeprogrammeerde programma’s
Om een voorgeprgrammeerd trainingsprogramma te kiezen dient u na het aansluiten van de
veiligheidssleutel met INCLINE
toets of de SPEED
toets een programma te
selecteren. In totaal zijn er 6 programma’s om uit te kiezen P1-P3 hebben een voorgeprogammeerde snelheid en blijft de hellingshoek constant. Programma P4-P6 hebben een voorgeprogrammeerde hellingshoek en blijft de snelheid constant.
1. Indien u het gewenste programma heeft geselecteerd, druk dan op MODE om de keuze te
bevestigen.
2. Stel vervolgens het niveau L1-3 in en druk de MODE toets in ter bevestiging.
3. Stel daarna de trainingstijd 12-99 min. in. Standaard staat de trainingstijd ingesteld op 24
min.
4. De training kan nu gestart worden door op de START/STOP toets te drukken.
Tijdens een training kan de hellingshoek en de snelheid worden veranderd met behulp van de
INCLINE
toets of de SPEED
toets.
20
4. Gebruik
Zelf in te stellen programma
Het is ook mogelijk om een eigen trainingsprogramma samen te stellen. Doorloop daarvoor de
volgende stappen.
1. Selecteer met behulp van de INCLINE
of de SPEED
toetsen programma U en
druk op de MODE toets om de selectie te bevestigen.
2. Gebruik vervolgens de INCLINE
of de SPEED
toetsen om de trainingstijd in te
stellen en druk op de MODE toets om de selectie te bevestigen.
3. Nu kunt u het programma instellen. Gebruik de INCLINE
toetsen om per segment
de hellingshoek in te stellen. Door op de MODE toets te drukken kunt u het niveau van ieder
segment bevestigen. Doe hetzelfde met de snelheidsegmenten en gebruik daarvoor de
SPEED
toetsen.
4. Als de hellingshoek en de snelheid voor alle 12 segmenten is ingesteld kan de training
gestart worden door op de START/STOP toets te drukken.
Hartslaggestuurd programma
Het hartslaggestuurde programma past de snelheid en de hellingshoek aan om de hartslag tijdens het trainen op het vooraf ingestelde hartslagniveau te houden. De grafiek op de volgende
pagina geeft aan op welk hartslag niveau u dient te trainen om een bepaald trainingsdoel te
bereiken. Het niveau is tevens afhankelijk van uw leeftijd.
1. Selecteer met behulp van de INCLINE
of de SPEED
toetsen programma H.
Druk op de MODE toets om de selectie te bevestigen.
2. Gebruik vervolgens de INCLINE
of de SPEED
toetsen om de trainingstijd
(12-99 min.) in te stellen. (standaard op 24 min.) Druk op de MODE toets om de selectie te
bevestigen.
3. Gebruik de INCLINE
of de SPEED
toetsen om de leeftijd (10-99) in te
stellen. (standaard op 30). Druk op de MODE toets om de selectie te bevestigen.
4. Gebruik de INCLINE
of de SPEED
toetsen om het hartslagniveau (80-180 bpm)
in te stellen. Druk op de MODE toets om de selectie te bevestigen.
5. Gebruik de INCLINE
of de SPEED
toetsen om de snelheid (1-16 km/uur)
in te stellen.
6. Druk vervolgens op de START/STOP toets en de warming-up van 3 minuten, met een snelheid van 3 km/uur en een hellingshoek van niveau 5, zal starten.
7. Nadat de warming-up is voltooid zal het programma beginnen. Iedere 5 seconden wordt de
hartslag gecontroleerd en het programma daarop aangepast.
8. Indien er binnen 30 seconden na aanvangen van het programma geen hartslag wordt ont
vangen, zal de motor uitschakelen en langzaam tot stilstand komen.
21
4. Gebruik
Doel hartslag tabel
Maximale hartslag zone
Conditie verbetering
Afvallen
Minimale hartslag zone
leeftijd
Hartslagband (niet bij geleverd)
Voor het trainen op hartslag adviseert Flow Fitness om een hartslagband te gebruiken.
Hiermee krijgt u een accurate meting van de hartslag en kunt u op efficiente wijze uw
doel bereiken. De hartslagband wordt niet standaard geleverd bij de Runner DTM600
loopband. U kunt hiervoor terecht bij uw fitnessdealer.
22
4. Gebruik
4.4 Onderhoud
Loopband spannen en centreren
In de eerste weken dat u de loopband gebruikt, kan het voorkomen dat u het
loopvlak opnieuw moet centreren. Dit kan als u bijvoorbeeld meer met uw
linkervoet afzet dan uw rechter.
Zorg dat de loopband met een snelheid tussen de 3 en 5 km/u draait. Aan de
achterkant van het frame zitten 2 stelbouten. Hiermee kunt u de achterste roller afstellen. In het geval dat loopband naar links loopt, dient u de
stelbout aan de linkerkant met de klok mee te draaien en de rechter stelbout
tegen de klok in te draaien. In het geval dat de loopband naar rechts loopt,
dient u de linker stelbout tegen de klok in te draaien en de rechter stelbout
met de klok mee. Zorg ervoor dat de band goed gespannen blijft en niet gaat
golven.
.
4.5 Onderhoud
23
4. Gebruik
Glijvlak onderhouden
U wordt aangeraden om elke 1 tot 2 maanden of na elke 50 uur gebruik
het glijvlak onder het loopvlak in te smeren met de het bijgevoegde glijmiddel. Zorg dat er geen stroom meer op de loopband staat en draai de stelbouten van de achterrol los. Smeer vervolgens wat glijmiddel op het glijvlak
en verdeel dit gelijkmatig. Wanneer u klaar bent, kunt u de loopband weer
centreren en de stelbouten vastdraaien.
Schoonmaken en onderhouden
Belangrijk: schakel eerst de loopband uit voordat u de loopband gaat
schoonmaken. De aan/uit schakelaar zit achter de motorkap.
Verwijder transpiratievocht na elk gebruik met een vochtige doek.
De metalen en kunststof onderdelen van de loopband zijn met standaard
schoonmaakmiddelen te reinigen. Zorg er echter wel voor dat alle onderdelen goed droog zijn, voordat deze weer worden gebruikt.
Flow Fitness adviseert om eens in de zes weken de bouten en moeren van
de loopband te controleren en indien nodig aan te draaien. Gebruik
hiervoor het bij het product geleverde gereedschap.
Om slijtage te voorkomen, moet de loopband uitsluitend binnenshuis en in
een droge omgeving worden gebruikt.
24
25
5. Algemene informatie
5.1 trainingsschema’s
Introductie trainingsschema.
Trainingsschema week 1 en 2
Train op 60% van uw maximale hartslag.
Maximaal 3 keer per week.
Warming up 5 - 10 minuten.
Train 4 minuten.
Rust 1 minuut.
Train 2 minuten.
1 minuut rustig bewegen.
Cooling down 5 minuten.
Trainingsschema week 3 en 4
Train op 60% van uw maximale hartslag (programma 7).
Maximaal 4 keer per week.
Warming up 5 - 10 minuten.
Train 5 minuten.
Rust 1 minuut.
Train 3 minuten.
1 minuut rustig bewegen.
Cooling down 5 minuten.
26
5. Algemene informatie
Trainingsschema week 5 en 6
Train op 60% van uw maximale hartslag (programma 7).
Maximaal 5 keer per week.
Warming up 5 - 10 minuten.
Train 6 minuten.
Rust 1 minuut.
Train 4 minuten.
3 minuut rustig bewegen.
Cooling down 5 minuten.
Na het volbrengen van het zes weken durende introductie trainingsschema, kunt
u een keuze maken uit vervolgtrainingen. U kunt kiezen tussen een trainingsschema om gewicht te verliezen of een trainingsschema om conditie te verbeteren. Beide trainingsschema’s staan weergegeven op de volgende pagina’s.
27
5. Algemene informatie
Trainingsschema om conditie te verbeteren
(vervolg op introductie trainingsschema)
Trainingsschema week 7 en 8
Train op 85% van uw maximale hartslag.
Maximaal 6 keer per week.
Warming up 5 - 10 minuten.
Train 7 minuten.
Rust 1 minuut.
Train 5 minuten.
1 minuut rustig bewegen.
Cooling down 5 minuten.
Trainingsschema week 9 en verder
Train op 85% van uw maximale hartslag.
Maximaal 6 keer per week.
Warming up 5 - 10 minuten.
Train 10 minuten.
Rust 1 minuut.
Train 10 minuten.
Herhaal training 1 a 2 keer.
1 minuut rustig bewegen.
Cooling down 5 minuten.
28
5. Algemene informatie
Trainingsschema om gewicht te verliezen
(vervolg op introductie trainingsschema)
Trainingsschema week 7 en 8
Train op 60% van uw maximale hartslag.
Maximaal 6 keer per week.
Warming up 5 - 10 minuten.
Train 7 minuten.
Rust 1 minuut.
Train 5 minuten.
1 minuut rustig bewegen.
Cooling down 5 minuten.
Trainingsschema week 9 en verder
Train op 60% van uw maximale hartslag.
Maximaal 6 keer per week.
Warming up 5 - 10 minuten.
Train 10 minuten.
Rust 1 minuut.
Train 10 minuten.
Herhaal training 2 a 3 keer.
1 minuut rustig bewegen.
Cooling down 5 minuten.
Ga naar www.flowfitness.nl en controleer uw vooruitgang.
29
5. Algemene informatie
5.2 Exploded view
30
5. Algemene informatie
Belangrijkste onderdelen
1
2
3
7
8
9
11
12
13
14
15
16
17
19
20
21
22
24
26
27
28
29
33
35
36
Frame voor
Transportwieltje
Frame achter
Voorbuis
Handvaten set
Plastic kappen set
Hellinkshoek motor 220V
Gasveer
Roller set
Aandrijfmotor
Aandrijfriem
Speed sensor
Motor controller board
Computer
display Sticker
Veiligheids sleutel
Display kabel set
Loopplank
Loopband
Zij strip Motor kap
Achterkap Stroomkabel 220V
Bekerhouder display
Ipad houder
1
4
1
2
2
4
1
1
2
1
1
1
1
1
1
1
1
1
1
2
1
2
1
1
1
s
31
5. Algemene informatie
5.3 Problemen oplossen
Probleem: Oplossing:
De computer gaat niet aan
- controleer of stekker in een geaard stopcontact zit.
- controleer of schakelaar op O of I staat. De schakelaar zit bij de uitgang van
het netsnoer achterop de motorkap.
- controleer de zekering bij de schakelaar. Als deze is verbroken, neem dan
contact op met uw dealer.
Probleem:
Oplossing:
Segmenten in het display lichten niet meer op
LEDs van het display zijn beschadigd; neem contact op met uw dealer.
Probleem:
Oplossing:
display geeft “- - “ weer
Veiligheidssleutel ontbreekt. Plaats de sleutel om de loopband te gebruiken.
Probleem:
Oplossing:
Loopband loopt stroef
Er is niet of te weinig glijmiddel tussen de band en het loopvlak aangebracht. Dit dient regelmatig te worden aangebracht.
Probleem: Oplossing:
De band slipt over de rollers
De band moet worden gespannen. Kijk hiervoor in hoofdstuk 4.2 voor de
beschrijving hiervoor.
Probleem: Oplossing:
Bij het aanraken van metalen delen van de loopband ontstaat er statische
elektriciteit.
- De loopband dient op een geaard stopcontact aangesloten te zijn.
- Het loopvlak dient gesmeerd te worden met glijmiddel. Doordat de band over
de loopplank loopt ontstaat er door de wrijving statische electriciteit. Dit wordt voorkomen door regelmatig glijmiddel aan te brengen.
Probleem: Oplossing:
Computer geeft fout code E1
Snelheidssensor geeft abnormale waarde aan. Voer de volgende stappen uit:
1. Schakel de loopband helemaal uit (stekker uit stopcontact halen),
wacht 10 seconden en schakel de stroom weer in.
2. Druk op START/STOP en controleer het volgende:
a. begint het loopvlak te bewegen?
b. als het loopvlak beweegt, is de foutcode E1 nog steeds zichtbaar?
3. Als de loopband weer normaal werkt, span dan het loopvlak opnieuw en
gebruik glijmiddel voor goede smering onder het loopvlak. Zie hiervoor hoofdstuk 4.4 van deze handleiding.
32
Als het loopvlak niet beweegt en/of foutcode E1 is nog steeds zichtbaar,
neem dan contact op met uw dealer.
5. Algemene informatie
Probleem:
Oplossing:
Computer geeft fout code E2
Geheugenchip van de computer is beschadigd. Neem contact op
met uw dealer.
Probleem:
Computer geeft fout code E4 of registreert geen hartslag.
Oplossing:
- Indien u gebruik maakt van de handsensoren zorg voor schone handen en houd de sensoren stevig vast. Hand creme, beweging of zelf zweet kan de
registratie namelijk verstoren.
- Indien u gebruik maakt van een hartslagband, zorg ervoor dat:
a) de sensoren eerst nat zijn gemaakt voordat het op de huid wordt
aangebracht.
b) de band strak genoeg zit
c) de hartslagband niet gecodeerd is
d) de batterij vol is
Probleem:
Oplossing:
Computer geeft fout code E6
De helling (incline) motor is beschadigd. Neem contact op met uw dealer.
Probleem:
Oplossing:
Computer geeft fout code E7
De helling (incline) motor is beschadigd. Neem contact op met uw dealer.
Probleem:
Oplossing:
Computer geeft fout code E9
De stroomkabel is niet goed verbonden.
- Controleer de verbinding tussen stroomkabel boven (7A) en onder (7B).
- Controleer of de stroomkabel beschadigd is tijdens montage van de loopband.
Indien uw probleem niet is opgelost of niet staat beschreven, raadpleeg dan de fitnessdealer waar
u het product heeft gekocht.
33
6. Garantie
6.1 Garantie
Flow Fitness verleent een garantie aan huis van 3 jaar op onderdelen, voorrijkosten en
uurloon, te rekenen vanaf de datum van aankoop. De garantie heeft uitsluitend betrekking
op materiaal- en/of productiefouten.
Indien u optimaal gebruik wilt maken van deze garantie, vul dan het online garantie aanmeld formulier in en voeg daarbij een kopie van het aankoopsbewijs. Dit formulier kunt u
vinden op:
www.flowfitness.nl/nl/service/garantie.php
Indien het product defect is, neem dan contact op met de fitnessdealer bij wie u het product heeft gekocht en meld het defect. Omdat Flow Fitness uitsluitend met gespecialiseerde
en ervaren dealers samenwerkt, kan deze in veel gevallen het defect verhelpen. Indien
nodig neemt de dealer contact op met Flow Fitness. Vervolgens zal Flow Fitness in samenwerking met de dealer het defect naar eigen inzicht verhelpen. Indien het defect binnen het
garantietermijn valt, zal dit kosteloos gebeuren.
De garantie vervalt wanneer:
· er gebreken zijn onstaan aan het product door een onjuiste montage van het toestel
dan wel wanneer er sprake is van het niet juist opvolgen van de instructies zoals
beschreven in deze handleiding,
· reparaties aan het product zijn verricht door anderen dan door Flow Fitness
aangewezen personen of zonder haar schriftelijke toestemming,
· het product naar het oordeel van Flow Fitness is verwaarloosd dan wel onvoorzichtig
en/of ondeskundig is gebruikt, behandeld en/of onderhouden, en/of sprake is van
normale slijtage,
· het product op andere wijze is gebruikt dan in deze gebruiksaanwijzing is beschreven,
· het product onder andere omstandigheden is gebruikt dan in deze gebruiksaanwijzing is
beschreven,
· defecten zijn ontstaan door overige factoren van buitenaf.
Het garantietermijn wordt niet verlengd of vernieuwd door uitvoering van garantiewerkzaamheden, met dien verstande dat de garantie op uitgevoerde werkzaamheden
drie maanden bedraagt.
34
Content
1. Important information
36
2. Introduction
38
3. Fitness
42
4. Use
45
5. General information
58
6. Warranty
66
1.1 Health
1.2 Safety
2.1 Contents of package
2.2 Important parts
2.3 Specifications
3.1 Training by hart rate
3.2 Warming up & cooling down
4.1 Assembly
4.2 Storage / usage
4.3 Use of the console
4.4 Maintenance
5.1 Training schedule
5.2 Exploded view and part list
5.3 Troubleshooting
6.1 Warranty
36
36
38
40
41
42
44
45
49
51
55
58
62
64
66
35
1. Important information
1.1 Health
Important:
read this instruction manual first and follow the instructions
carefully before using the product.
· Consult an expert to determine the training level that is most suitable for you.
· If you experience any dizziness, nausea or any other physical discomfort while
training, cease the training immediately and consult a physician.
· Watch your heart beat during the training and immediately stop training when
values are inconsistent.
· We advise you to do warming up and cooling down exercises during five to ten
minutes before and after use of the product. This way your heart rate can increase
and decrease gradually and you can prevent painful muscles.
1.2 Safety
· Only use this product as described in this instruction manual.
· Before using this product check that the product functions as it should. In case of
malfunction or a defect stop training immediately and contact your vendor.
· Do not use the product when there is a malfunction.
· The product is only meant for use in the home and it has to be positioned on a
flat surface.
· The product can only be used by one person at the time.
· The product can be used by persons with a body weight of up to 120 kilos.
· Always make sure that there is at least one meter of free space in all directions around
the product when you are training.
· Don’t stick any objects in any opening of the equipment.
· Keep children and pets away from the product.
· Handicapped persons should get consent from a medical expert and follow their
directions for training with the product.
· Do not place hands or feet under the product.
36
1. Important information
· Never hold your breath during a training session. Your breathing should be at a normal
interval depending on the intensity of the training.
· Start your training schedule slowly and build it up gradually.
· Always wear appropriate clothing during training. Don’t wear anything that’s too loose
and can get caught between moving parts of the equipment.
· When moving the equipment always use the appropriate lifting techniques to
prevent back injury.
· Check screws and bolts regularly and fasten them if they are loose.
· The owner of the product is responsible for all users to be aware of the
warnings and instructions as mentioned in this instruction manual.
· This product is intended for use in a clean and dry environment. Storage in cold and / or
moist areas could lead to problems with the product.
· This product is not suitable for therapeutic supports / or professionally
use in physical therapy.
WARNING
Have your physical condition checked by a licensed physician before you start training.
This is particularly important for persons over 35 years old or persons who have any
problems with their health. Read all instructions before using the equipment.
Flow Fitness is not responsible for any personal injury or damage to property caused by
the use of this equipment.
This product is not suited for rental or use in a commercial or
professional environment.
37
2. Introduction
Thank you for purchasing the Flow Fitness Runner DTM600 treadmill. With the Runner
DTM600 treadmill you have purchased a high quality training machine.
With the Runner DTM600 treadmill you can have varied work outs due to the 9 different
training programs. The speed can be set from 0 to 16 km/h, the incline can vary between
0% and 12%. The heart rate can be measured by using the hand sensors or with a chest
belt (not included). This treadmill has a sturdy frame and a powerful engine, this ensures
smooth running comfort. Because the treadmill is so versatile and easy to use, it can be
used for your training needs.
In this instruction manual you will find all information necessary to use the treadmill.
Your also will find tips and advice on how to make the most of your training sessions.
We advise you to carefully read this instruction manual before using the Runner
DTM600 treadmill, so that you can use it safely and benefit from it maximally.
Flow Fitness wishes you successful and enjoyable training sessions.
2.1 Contents of package
1.
2.
3.
4.
5.
6.
7 A.
7 B.
8.
9.
10.
11.
12.
13.
14.
38
Frame
15.
Base frame
16.
Support post left
17.
Support post right
18.
Allen bolt
19.
Self locking nut
20.
Power plug
21.
Power wire
22.
Handrail
23.
Console
24.
Screws
Water bottle holder
Safety key
Support post housing (upper left)
Support post housing (lower left)
Screws
Support post housing (upper right)
Support post housing (lower right)
Screws
Washers
Allen bolt
iPad holder
iPad holder bracket
Screws M5 x 10L
Screws M4 x 8L
2. Introduction
21
22
24
18
10
9
23
16
8
7B
10
18
11
13
7A
12
17
15
4
3
6
14
15
5
6
5
2
1
5: Allen bolt
M10 X 60L (2x)
15: Screw
#8 X 5/8”L (2pcs)
6: Self locking nut
M10 X 10t (2x)
18 Screw
20: Allen bolt
M8 X 15L (4pcs)
Allen 6mm
19: Washer
M8 (4pcs)
Allen 5mm
10: Allen bolt
M8 X 70L (4pcs)
Multitool
Screwdriver
#8 X 3/4”L (2pcs)
39
2. Introduction
2.2 Important parts
quick keys incline
quick keys speed
holder for phone / MP3 player
console
connection safety cord
bottle holder
handrail speed keys
handrail
handrail incline keys
hand heart
rate sensor
motor cover
running deck
40
2. Introduction
2.3 Specifications
Computer
• 1 manual program
• 6 preset programs
• 1 heart rate controlled program
• 1 user program
Heart rate receiving
• Polar heart rate receiver
• Hand sensors
• Chest belt (optional)
Length:
Height:
Width:
Weight:
Technical
• Motor 1,7 HP continuous
• Incline 0 - 12% (0-12 levels)
• Speed 1 - 16 km/u
• Speed keys for speed and incline
• Running deck (lxw) 128 x 42 cm
• 120 kg max user weight
Extra
• Foldable
• Book / iPad holder
167 cm
126 cm
77 cm
70 kg
Connection: 230V AC 50Hz, 15A.
41
3. Fitness
What is fitness? Generally it can be described as an fitness exercise that causes your
heart to pump more oxygen to your muscles via the blood from your lungs. The harder
the workout, the more fuel (oxygen) the muscles require to achieve this rate of oxygen.
The heart has to pump harder to get the oxygenated blood into the muscles. If you have a
good stamina, your heart pumps more blood with each heartbeat. The heart will not have
to beat that often to transport the necessary oxygen into your muscles. Your resting heart
rate and heart rate during exercise will reduce.
3.1 Training by heart rate
While training it is important to monitor your heart rate. The heart rate is essential for
the result of your training. Your best training heart rate depends firstly on your age. Your
maximum heart beat can be determined by this. Secondly the most effective heart rate
depends on your training goals. If your training goal is to lose weight, then the most
effective training is at 60% of your maximum heart rate. If your training goal is to improve
your stamina, then you should train at 85% of your maximum heart rate.
The body stores energy in two forms: carbohydrates and fat. When we exercise we use
a combination of these two energy supplies. If the training intensity is at a high level
the body will mostly choose the energy that burns fast: carbohydrates. Since there is a
limited supply of these carbohydrates you can’t continue this for a long period of time.
When training at a low intensity the body will mostly choose to use a long lasting source
of energy: fat. Since this is stored in large quantities in the body, you can continue this
kind of training for a longer time.
Below you will find a schedule allowing you to calculate the best heart rate for your
training. In this schedule each age category has a range that your heart rate should be in
during your training. The middle column has the values you should try to maintain if you
want to lose weight. If you want to improve your stamina you should try to maintain the
rates in the right column.
Age
42
Weight lost
Improve stamina
(beats per minute)
60%
(beats per minute)
85%
20 -24
120 - 118
170 - 167
25 -29
117 - 115
166 - 163
30 - 34
114 - 112
162 - 158
35 - 39
111 - 109
157 - 154
40 - 44
108 - 106
153 - 150
45 - 49
105 - 103
149 - 145
50 - 54
102 - 100
144 - 141
55 - 59
99 - 97
140 - 137
60 and older
96 - 94
136 - 133
3. Fitness
For each individual the best way to start training is different. If you have not exercised in
some time or are overweight, you should start your training schedule slowly and gradually
increase the level of activity.
In the last chapter of this instruction manual you will find several different training schedules (chapter 5. general information). You can use these schedules to reach your training
goals. The schedules are divided in two phases. The first phase can be used for beginners
or persons who start training after a long period of inactivity. During this phase the level
of intensity is built up gradually. After six weeks the second phase begins. You can then
choose a training schedule to lose weight or improve your stamina.
At www.flowfitness.nl you can calculate your progress.
43
3. Fitness
3.2 Warming up and cooling down
A good training schedule starts with a good warming up and ends with a cooling down of
the muscles. This will prevent painful muscles and injury. Below you will find some
suitable exercises.
Head Roll
Tilt your head to the right. Hold this for one second, so that you feel a little pull in the
muscles on the left side of your neck. Do the same for the other side, front and back.
Repeat two or three times.
Toe Touch
Slowly bend forward with your back and arms relaxed. Bend as far as you can and hold
the position for ten seconds. Repeat this two or three times.
Shoulder Lift
Lift your right shoulder and turn it clockwise two times. Then turn it counter clockwise
two more times. Relax and do the same exercise with your left shoulder. Repeat this three
or four times.
Calf Stretch
Place two hands against a wall. Place one foot about thirty centimeters behind its original
position and put your foot flat on the floor. Bend your forward leg and lean against the
wall. Stretch your back leg and feel the muscle in your calf stretch. Hold this position for
five seconds and repeat with your other leg. Repeat this two or three times
Side Stretch
Extend both your arms up in the air and reach as high as you can with your right arm.
Lean a bit to the left so that the muscles in the right side of your torso are stretched. Hold
this position for one second. Relax and make the same motion on the other side of your
body. Repeat this three or four times.
Inner Thigh Stretch
Sit down on the floor and bend your legs. Place the soles of your feet against each other.
Keep your back straight and bend forward over your feet. This stretches the muscles on
the inside of your upper legs. Keep this position for five seconds, relax and repeat it three
or four times.
Hamstring Stretch
Sit down on the floor with your right leg extended in front of you and place the sole of your
left foot on the inside of your right upper leg. Bend forward in the direction of your right
foot and hold this position for ten seconds. Relax and then do the same with your other
leg. Repeat two or three times.
44
4. Use
4.1 Assembly
Step 1: Assembling the supports posts.
This chapter describes how the treadmill needs to be assembled. Remove al parts from the
box and make sure there is enough working space available to assemble the treadmill. Due
to safety reasons and to prevent damaging the treadmill we advise you to assemble the
treadmill with two persons.
1.
2.
3.
4.
Place the Frame in an area where you can assemble the product.
Remove the Allen bolts (5) and self locking nuts (6) on the left and right side of the frame.
Put both support post left (3) and right (4) in an upright position (fig. 1).
Fasten both post with Allen bolt (5) and Allen bolt (6) (fig. 2).
Fig.1
FIG.1
3
5
Fig.2
3
6
6
4
5
5
45
4. Use
Step 2: Connect the console
1. Connect the power plug (7A) and power wire (7B) in the right support post (4). (Fig 3).
2. Place the console (9) with handrails on the 2 support posts (3) and (4).
3. Fasten the console (9) with the 4 Allen bolts (10) and 4 M8 washer a supporting post.
Make sure that no wires are pressed between the metal parts.
4. Place the water bottle holder (11) in the round hole on the left side of the console (9)
Fig. 3
10
11
9
8
7B
10
12
7A
Step 3: Fasten the console
1. Place the console at the preferred angle to the running deck (Fig. 4). The angle
depends on your height.
2. Lock the angle into place with 4 Allen bolts (20) and washers (19) that can be
fastened on both sides of the console.
Fig. 4.
19
20
46
19
20
4. Use
Step 4: Assemble the support post housing
1. Place the support post housing (upper left) (13) as described in Fig. 5.
2. Place support post housing (lower left) (14) against support post housing (13)
Make sure that:
a) the mounting pins (B) (Fig. 6) are in correct position.
b) the plastic pins (A) (Fig. 6) are aligned with the designated holes in
the hand rail.
3. First fasten the bolts (15) in support post housing (lower left) (14), then fasten
support post housing (upper left) (13) with bolt (18).
4. Repeat steps 1 t/m 3 right side with support post housing (upper right) (16) and
support post housing (lower right) (17).
Fig. 5
18
16
18
13
17
15
14 15
Fig. 6
14
A
B
47
4. Use
Step 5: Placing the iPad holder
1. The two iPad holder brackets (22) on the back of the console and fasten them
with 4 bolts (23). (Fig. 7).
2. Slide the iPad holder (21) over the brackets (22) and fasten the holder with 4
bolts (24).
Fig. 7
21
Back of console
24
22
23
48
4. Use
4.2 Store / Usage
Folding
After a training, you can store the
treadmill. Lift the running deck (at the
back) until you feel it lock. Make sure
the running deck is locked before
releasing.
By pulling the folded treadmill
towards you to get the product on its
transport wheels. Now the treadmill is
mobile for transport.
Unfolding
To unfold the treadmill:
1. Push the running deck upwards
with your hands.
2. Release the running deck as
described in the drawing.
3. Release the deck and move
aside while the running deck
automatically comes down due to
the gas springs.
Adjust horizontally
You can adjust the treadmill horizontally with adjusting screws, so that
the treadmill can stand stable onto
the floor. The two adjusting screws
are located at the front beneath the
frame.
49
4. Use
Power connection
Before you start exercising, you must provide the treadmill with power. Make sure the
power cord is plugged in and that the on / off switch is switched to “I”. The on / off button is
located on the front of the frame.
For your own safety it is important that the power cord is plugged into a grounded outlet!
Safety cord
The security key must sit at the designated place in the console. Without this security key
the treadmill cannot be turned on. When the safety key is removed during training excises
the treadmill will immediately shuts down. You will be advised for safety reasons to always
wear the safety key during excise. The safety key can be clipped on a piece of clothing.
50
4. Use
4.2
computer
4.3Gebruik
Use of the
console
Cardio Control DTM600
Designed by Flow Fitness
Remove safety key when not in use and
store out of reach of children.
To avoid injury please follow instructions
below before starting treadmill.
1. Attach clip of safety key to clothing
2. Hold on to hand rail
3. Stand on side rail
energy
INCLINE INCLINE
MODE
START/STOP
RESET
SPEED
SPEED : Selection of programs and level
: Decrease the incline
: Selection of programs and level
: Increase the incline
: Confirmation of the program and level selection
: Switch between values shown on the display
: Start and stop the treadmill
: Resetting al values
: Selection of programs and level
: Increase speed
: Selection of programs and level
: Decrease speed
Quick keys for incline: 4, 6, 8 and 10%
Quick keys for speed: 4, 6, 8, 10 km/hrs
Left handrail keys: Incline (increase or decrease by 1%)
Right handrail keys: Speed (increase or decrease by 0,1 km/hrs)
energy
In case the console is in standby mode for 10 minutes it will automatically
change to energy saving mode to improve energy efficiency. The light
near the START/STOP key will light up. In case you want to go back to the
standby mode press the START/STOP key for 1 second. The light near the
START/STOP key will turn off.
51
4. Use
First usage
Set the treadmill’s on / off switch near the back of the motor cover to “I”. Then place the
key with the safety rope on the front of the console in the provided slot. Clip the other end to
your clothes. You are now ready to train. You have a choice of four different types of training
programs:
1. 1x Quick Start Program
2. 6x preset programs
3. 1x heart rate controlled program
4. 1 x user program
Quick start program
You can direct start with training by pressing the START/STOP key.
The treadmill will start to rotate and you can adjust your speed and incline to your preferences by pressing the designated keys. Your training time will increase and end by a value of
99:00, at which the treadmill will automatically stop.
In case you want to select an exercise duration follow these steps:
1. Before pressing START/STOP, first press MODE.
2. Use INCLINE
or SPEED
to select the trainings duration.
3. Press START/STOP to start the exercise. The selected time will decrease to 00:00. After the
time has elapsed the treadmill will automatically stop.
During a training the incline and speed can be adjusted with the INCLINE
SPEED
keys.
and
In case you want to pause the training press START/STOP. A P will flash in the display. To
resume the training press the START/STOP key again.
Preset programs
After you have connected the safety key, you can select a preset program with the
INCLINE
or SPEED
keys. In total there are 6 different programs to choose
from. Program P1-P3 have a preset speed and the incline will be consistent. Program P4-P6
have a preset incline and the speed keeps consistent.
1. In case you have selected the preferable program, press MODE to confirm the selection.
2. Then select the level L1-3 and press MODE to confirm.
3. Select the duration 12-99 min. Default is 24 minutes.
4. Now the training can be started by pressing the START/STOP button.
During a training the incline and speed can be adjust with the INCLINE
keys.
52
and SPEED
4. Use
User program
It is also possible to create your own training program by following these steps:
1. Select with INCLINE
or SPEED
keys program U and press MODE to confirm
the selection.
2. Then use INCLINE
or SPEED
keys to select the training duration and press
MODE to confirm the selection.
3. Now you can select the program. Use the INCLINE
keys to select the incline by
segment. Pressing the MODE key will confirm every segment. Use the same method for
selecting the speed with the SPEED
keys.
4. When the incline and speed is set for all 12 segments the training can be started by pressing
START/STOP.
Heart rate controlled program
The heart rate controlled program adjust the speed and incline to keep your heart rate at the
preselected value. The chart on the next page shows witch heart rate is required to achieve an
particular trainings goal. The level also depends on your age.
1. Select with the INCLINE
or SPEED
keys program H. Press MODE to confirm
the selection.
2. Then use INCLINE
or SPEED
keys to select the training duration (12-99 min)
(default is 24 min.) Press MODE to confirm the selection.
3. Use the INCLINE
or SPEED
insert your age (10-99) (default is 30). Press
MODE to confirm the selection.
4. Use the INCLINE
or SPEED
keys to select the heart rate level (80-180 bpm)
Press MODE to confirm the selection.
5. Use the INCLINE
or SPEED
keys to select the speed (1-16 km/hrs)
6. Press START/STOP and a 3 minute warming-up will start with a speed of 3 km/hrs and a
level 5 incline.
7. After the warming-up is completed the program will start. The heart rate will be checked
every 5 seconds and if necessary the program will be adjusted.
8. In case the program will not receive a heart rate for 30 seconds, the motor will shut down
and easily come to a stop.
53
4. Use
Goal heart rate chart
Max. heart rate zone
Improve stamina
Weight loss
Min. heart rate zone
Age
Chest belt (not included)
For heart rate controlled training, Flow Fitness advises to use a chest belt. With a chest
belt you will receive a accurate measuring of the heart rate which result in an more
efficient way to reach your goal. The chest belt is not supplied as standard with the
Runner DTM600 treadmill. For a chest belt you can visit your fitness dealer.
54
4. Use
4.4 Maintenance
Centering and tensioning the treadmill
Within the first weeks of using the treadmill, it is possible that you need to
center the belt. For example this can happen when applying more pressure
to the left foot over your right.
Make sure the treadmill is running with a speed between 3 and 5 km / hrs.
At the back of the frame there are two adjustment screws. These screws
allows you to adjust the rear roller. When the treadmill is running to the left,
you need to turn the left adjusting screw clockwise on the and the right
adjustment screw counter clockwise. In the event that the treadmill is right,
you have to turn the left adjustment screw counter-clockwise and the right
adjustment screw clockwise. Make sure the belt stays well tensioned and
is not waving.
.
55
4. Use
Maintain the sliding surface
Every 1 or 2 months or every 50 hours of use, your advised to lubricate the
sliding surface under the running deck with the included silicone lubricant.
When lubricating the running deck, make sure the power cord is unplugged,
so there is no power going trough the treadmill. Loosen the adjustment
screws of the rear roller. Then put some lubricant on either side of the
running deck and spread evenly. When you’re done, you can center the belt
and fasten the adjustment screws.
Cleaning and maintenance
Important. Switch the treadmill off before cleaning. The on / off switch is
located behind the motor cover
Wipe the product and al its parts clean after every work out. This prevents
sweat marks what could lead to corrosion of the product.
The metal and plastic parts of the treadmill can be cleaned by using standard cleaning products. However, make sure that all parts are completely
dry before they are used again.
Flow Fitness advises to check and if necessary tighten all nuts and bolts
every six weeks. For tightening use the supplied tools.
To prevent damage and wear to the treadmill, the product can only be used
indoors and in a dry environment.
56
57
5. General information
5.1 Training schedule
Introduction training schedule
Training schedule week 1 and 2
Train at 60% of your maximum heart rate.
Max. 3 times a week.
Warming up 5 - 10 minutes.
Train 4 minutes.
Rest 1 minute.
Train 2 minutes.
Calmly train 1 minute.
Cooling down 5 minutes.
Training schedule week 3 and 4
Train at 60% of your maximum heart rate (program 7).
Max. 4 times a week.
Warming up 5 - 10 minutes.
Train 5 minutes.
Rest 1 minute.
Train 3 minutes.
Calmly train 1 minute.
Cooling down 5 minutes.
58
5. General information
Training schedule week 5 and 6
Train at 60% of your maximum heart rate (program 7).
Max. 5 times a week.
Warming up 5 - 10 minutes.
Train 6 minutes.
Rest 1 minute.
Train 4 minutes.
Calmly train 3 minutes.
Cooling down 5 minutes.
After completing the introduction training schedule for six weeks, you can
choose the follow-up training schedule that is best suited to your needs. You can
choose a schedule that will maximize your weight loss, or one that will improve
your stamina. Both training schedules are on the next pages.
59
5. General information
Training schedule to improve stamina.
(follow-up to introduction training schedule)
Training schedule week 7 and 8
Train at 85% of your maximum heart rate.
Max. 6 times a week.
Warming up 5 - 10 minutes.
Train 7 minutes.
Rest 1 minute.
Train 5 minutes.
Calmly train 1 minute.
Cooling down 5 minutes.
Training schedule week 9 and beyond
Train at 85% of your maximum heart rate.
Max. 6 times a week.
Warming up 5 - 10 minutes.
Train 10 minutes.
Rest 1 minute.
Train 10 minutes.
Repeat training one or two times.
Calmly train 1 minute.
Cooling down 5 minutes.
60
5. General information
Training schedule to lose weight
(follow-up to introduction training schedule)
Training schedule week 7 and 8
Train at 60% of your maximum heart rate.
Max. 6 times a week.
Warming up 5 - 10 minutes.
Train 7 minutes.
Rest 1 minute.
Train 5 minutes.
Calmly train 1 minute.
Cooling down 5 minutes.
Training schedule week 9 and beyond
Train at 60% of your maximum heart rate.
Max. 6 times a week.
Warming up 5 - 10 minutes.
Train 10 minutes.
Rest 1 minute.
Train 10 minutes.
Repeat training one or two times.
Calmly train 1 minute.
Cooling down 5 minutes.
Go to www.flowfitness.nl to check your progress
61
5. General information
5.2 Exploded view
62
5. General information
Important parts
1
2
3
7
8
9
11
12
13
14
15
16
17
19
20
21
22
24
26
27
28
29
33
35
36
Main frame
Transport wheel
Frame base set
Support post
Handrail set
Handlerail cover set
Incline motor motor 220V
Folding shock set
Roller set
Motor
Deive belt
Sensor set
MCB group
Console
Console overlay
Safety key set
Cable set
Running deck set
Running belt
Side rail set
Motor cover set
Rear end cap set
AC power cord 220V
Cup set
iPad houder
1
4
1
2
2
4
1
1
2
1
1
1
1
1
1
1
1
1
1
2
1
2
1
1
1
s
63
5. General information
5.3 Troubleshooting
Problem: Solution:
The console / display will not turn on.
-Check if the treadmill is pugged into a grounded outlet.
- Check if the 0 / I switch is on (I) . The switch is near the power cord on the
back of the motor cover. - Check the fuse near the switch. If the fuse is broken, please contact your
dealer.
Problem:
Solution:
Segments of the display don’t light up.
LEDs of the display are damaged; please contact your dealer.
Problem:
Solution:
display shows “- - “.
The safety key is missing. Place the key in the designated place to use the
treadmill.
Problem:
Solution:
The treadmill is running rough.
There is not enough lubricant between the belt and the running deck.
The treadmill should be lubricated at regular intervals.
Problem: Solution:
The running belt slips on the rollers.
The belt needs to be tensioned. How to tensioning the belt is described in
chapter 4.2.
Problem: Solution:
When touching metal parts of the treadmill static electricity is released.
- The treadmill should be powered by an grounded outlet.
- The running surface needs to be lubricated. Friction is created between the
belt and running board. This causes static energy and can be prevented by
regular lubrication.
Problem: Solution:
The display shows error code E1.
An abnormal value is send to speed sensor. Perform the following steps:
1. Remove power from the treadmill (by unplugging the product from the
outlet), wait 10 seconds before turning on the power again.
2. Press START/STOP and check the following:
a. Does the belt starts to move?
b. If the belt is moving, is the error code E1 still in the display?
3. If the treadmill is running correctly, tension the belt again and lubricate the
running surface (chapter 4.4 of this manual)
64
If the belt is not rotating or error code E1 is still visible, please contact your
dealer.
5. General information
Problem:
The display shows error code E2.
Solution:
The memory chip of the computer / display is damaged. Please contact your
dealer
Problem:
The display shows error code E4 or is not registering the heart rate.
Solution:
- In case your using the hand sensors in the handle bar make sure your hands
are clean and firmly hold the handle bar. Hand creme, movement or even sweat can disturb the heart rate registration.
- In case your using a chest belt, make sure that:
a) The sensor is moist before applying to the skin.
b) The belt is worn tight enough.
c) The chest belt in not coded.
d) The battery is not empty.
Problem:
Solution:
The display shows error code E6.
The incline motor is damaged. Please contact your dealer.
Problem:
Solution:
The display shows error code E7
The incline motor is damaged. Please contact your dealer.
Problem:
Solution:
The display shows error code E9
The power cable is not properly connected.
- Check the connection between Power plug (11) and the Power wire (12).
- Check if the power cables have been damaged during the assembly of the
treadmill.
In case your problem is not resolved or not described, consult the fitness dealer where you purchased this product.
65
6. Warranty
6.1 Warranty
Flow Fitness provides 3 years of warranty at home, including call-out charge and labor. This
warranty is valid 3 years as of the date of purchase. The warranty only covers defects in
materials and / or production errors.
If you want to fully make use this warranty, fill out the online warranty registration form and
include a copy of the proof of purchase . This form can be found at :
http://www.flowfitness.nl/en/service/garantievoorwaarden.php
If the product has a defect, please contact the fitness dealer from whom you purchased
the product and report the defect. Flow Fitness exclusively cooperates with specialized and
experienced dealers who can fix the problem in many cases. If necessary, the dealer or
distributor will contact Flow Fitness. Flow Fitness will then in collaboration with the dealer
or distributor correct the defect. If the defect is reported within the warranty period, the
repair will be free of charge.
The warranty does not cover:
· Defects of the product resulted by an incorrect installation of the device
or if the steps described in this manual are not precisely followed.
· Repairs to the product carried out by others than by Flow Fitness
or designated persons without its written permission.
· When the product in the opinion of Flow Fitness is neglected or is used carelessly
and / or incompetent. The product is wrongly processed and / or maintained. The product
has normal wear and tear.
· The product is used in any other way than described in this manual.
· The product is used under other conditions than described in this manual.
· Defects caused by other external factors.
The warranty period is not extended or renewed due to use of the warranty, because the
performed work has a warranty of three months.
66
www.flowfitness.nl