1
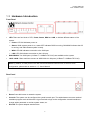
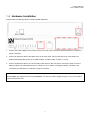
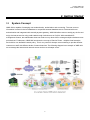
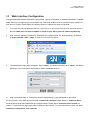
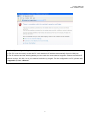
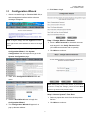
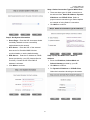
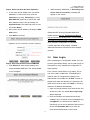
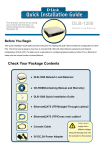
Network Access Control
Quick Installation Guide
Version 3.1
WMS-208
PheeNet WMS-208
Quick Installation Guide
1. Introduction
1.1 Preface
PheeNet WMS-208 is a Network Access Controller, specially designed for wired and wireless data network
environments in small to middle scaled businesses and hotspots. This Quick Installation Guide provides
instructions and reference material for getting started with the PheeNet WMS-208. This guide will also show
how to connect PheeNet WMS-208 to other network equipments.
1.2 Package Contents
Open the package carefully, and make sure that none of the items listed below are missing.
•
PheeNet WMS-208 x 1
•
Quick Installation Guide (QIG) x 1
•
CD-ROM (with User’s Manual and QIG) x 1
•
DC 12V Power Adaptor x 1
•
Ethernet Cable x 1
•
Console Cable x 1
Attention: It is highly recommended to use all the supplies in the package instead of substituting any
components by other suppliers to guarantee best performance.
1
PheeNet WMS-208
Quick Installation Guide
1.3 Hardware Introduction
Front Panel
?
LED: There are four kinds of LED, Power, Status, WAN and LAN, to indicate different status of the
system.
Ø
Power: LED ON indicates power on.
Ø
Status: While system power is on, status OFF indicates BIOS is running; BLINKING indicates the OS
is running, and ON indicates system is ready.
Ø
WAN: LED ON indicates connection to the WAN port.
Ø
LAN: LED ON indicates connection to the LAN port.
?
WAN1/WAN2: Two WAN ports (10 Base-T / 100Base-TX RJ-45) are available on the system.
?
LAN1~LAN8: Client machines connect to WMS-208 via LAN ports (10 Base-T / 100Base-TX RJ-45).
Note: By Default, all LAN ports are set with Port-based Default Service Zone; for Service Zone
configuration, please refer to section 4.1.7, User’s Manual.
Rear Panel
?
Reset: Press this button to restart the system.
?
Console: The system can be configured via a serial console port. The administrator can use a terminal
emulation program such as Microsoft’s HyperTerminal to login to the configuration console interface to
change admin password or monitor system status, etc.
?
DC+12V: The power adapter attaches here.
2
PheeNet WMS-208
Quick Installation Guide
1.4 Hardware Installation
Please follow the following steps to install PheeNet WMS-208:
1.
Connect the power adapter to the power socket on the rear panel. The Power LED should be on to indicate a
proper connection.
2.
Connect an Ethernet cable to the WAN1 Port on the front panel. Connect the other end of the cable to an
external networking device such as an ADSL modem, a cable modem, a switch, or a hub.
3.
Connect an Ethernet cable to one of the LAN1~LAN8 Ports on the front panel. Connect the other end of the
Ethernet cable to an administrator’s PC or a client PC, AP, or switch in managed network. The LED of the
connected port should be on to indicate a proper connection.
Attention:
PheeNet WMS -208 supports Auto Sensing MDI/MDIX. You may use either straight through or cross-over cable to
connect the Ethernet Port.
3
PheeNet WMS-208
Quick Installation Guide
2. Getting Started
2.1
System Concept
WMS-208 is capable of managing user authentication, authorization and accounting. The user account
information is stored in the local database or a specified external database server. Featured with user
authentication and integrated with external payment gateway, WMS-208 allows users to easily pay the fee and
enjoy the Internet service using credit cards through Authorize.net or PayPal. With centralized AP
management feature, the administrator does not need to worry about how to manage multiple wireless access
point devices. Furthermore, WMS-208 introduces the concept of Service Zones - multiple virtual networks,
each with its own definable network policy. This is very useful for hotspot owners seeking to provide different
customers or staff with different levels of network services. The following diagram is an example of WMS-208
set to manage the Internet and network access services at a hotspot venue.
4
PheeNet WMS-208
Quick Installation Guide
2.2
Web Interface Configuration
PheeNet WMS-208 supports web-based configuration. Upon the completion of hardware installation, PheeNet
WMS-208 can be configured via web browsers with JavaScript enabled such as Internet Explorer version 6.0
and above or Firefox. Please follow the following steps to complete the quick configuration.
1.
To access the web management interface, connect a PC to one of the LAN1~8 ports, and then launch a
browser. Make sure you have set DHCP in TCP/IP of your PC to get an IP address dynamically.
2.
Next, enter the gateway IP address of WMS-208 at the address field. The default gateway IP address
is“https://192.168.1.254” (“https” is used for a secured connection).
3.
The administrator login page will appear. Enter “admin”, the default username, and “admin”, the default
password, in the User Name and Password fields. Click Enter to log in.
4.
After a successful login, a “Welcome to System Administration” page will appear on the screen.
For the first time, if the WMS-208 is not using a trusted SSL certificate , there will be a “Certificate Error”,
because the browser treats WMS-208 as an illegal website. Please press “Continue to this website” to
continue. The default user login page will then appear in the browser. For more information, please see 4.2.5
Additional Configuration, User’s Manual.
5
PheeNet WMS-208
Quick Installation Guide
Caution: If you can’t get the login screen, the reasons may be:
(1) The PC is set incorrectly so that the PC can’t obtain the IP address automatically from the LAN port;
(2) The IP address and the default gateway are not under the same network segment. Please use default IP
address such as 192.168.1.xx in your network and then try it again. For the configuration on PC, please refer
to Appendix F, User’s Manual
6
PheeNet WMS-208
Quick Installation Guide
2.3
6. Click Next to begin.
Configuration Wizard
1. After a successful login to PheeNet WMS-208, a
web management interface with a welcome
message will appear.
Note: To logout, simply click the Logout icon on the
Step 1. Change Admin’s Password
upper right corner of the interface to return to the login
Ø Enter a New Password for the admin account
screen.
and retype it in the Verify Password field
2. To quickly configure WMS-208 by using the
(20-character maximum and no spaces).
Ø Click Next to continue.
Configuration Wizard, click System
Configuration from the top menu to go to the
System Configuration page.
3. Then, click Configuration Wizard on the left
menu.
Note: During every step of the wizard, if you wish to
go back to modify the settings, please click the Back
button to go back to the previous step.
Step 2. Choose System’s Time Zone
Ø Select a proper time zone from the drop-down
4. Click the Run Wizard button to begin the
list box.
Ø Click Next to continue.
Configuration Wizard.
5. The Configuration Wizard will appear in a
pop-up browser window.
9
PheeNet WMS-208
Quick Installation Guide
Step 4. Select Connection Type for WAN1 Port
Ø
There are three types of WAN connections to
be selected from: Static IP Address, Dynamic
IP Address and PPPoE Client. Select a
proper Internet connection type. Below depicts
an example of using Static IP connection.
Ø
Click Next to continue.
Step 3: Set System Information
Ø Home Page: Enter the URL that users should
be initially directed to when successfully
authenticated to the network.
Ø NTP Server: Enter the URL of the external
time server for PheeNet WMS-208 time
synchronization or use the default setting.
Ø DNS Server: Enter the IP Address of a DNS
Step 4 (Cont). Set WAN1 Port’s Static IP
Server provided by your ISP (Internet Service
Address
Provider). Contact the ISP if the DNS IP
Ø Enter the IP Address, Subnet Mask and
Address is unknown.
Default Gateway provided by your ISP.
Ø Click Next to continue.
Ø Click Next to continue.
Ø For Dynamic IP Address or PPPoE Client,
follow the instructions showing on the screen.
10
PheeNet WMS-208
Quick Installation Guide
Ø While restarting WMS-208, a “Restarting now.
Step 5. Add Local User Account (Optional)
Ø A new user can be added to the Local User
Please wait for a moment.” message will
database. To add a user here, enter the
appear on the screen.
Username (e.g. test), Password (e.g. test),
MAC Address (optional, to specify the valid
MAC address of this user) and assign an
Applied Group to this particular user (or use
the default None).
Ø More users can be added by clicking the Add
Now button.
Please do NOT interrupt PheeNet WMS-208
Ø Click Next to continue.
restart process until the Configuration Wizard
pop-up window has disappeared – which indicates
the restart process has been completed.
Now, the basic configuration is completed.
If all the steps are done properly, PheeNet
WMS-208 has been connected to the managed
network.
2.4
User Login
After completing the configuration wizard, the user
Step 6. Save and Restart PheeNet WMS-208
account generated in Step 5 can be used to login to
Ø Click Restart to save current settings and
the system to verify whether the configuration is
restart PheeNet WMS-208. The Setup Wizard
done properly.
is now complete.
First, connect a client device (e.g. laptop, PC) to
one of the LAN1~LAN8 Ports. If eliminating the
need for client IP configuration is desired, the
administrator can enable the “IP PnP” function to
support both static and dynamic IP. Otherwise, the
client device must be set to use DHCP in TCP/IP to
obtain an IP address automatically.
1. Open an Internet browser on a client device and
access any URL, the default User Login Page
will be displayed.
2. Enter a username and password previously
created in the Local User account database (e.g.
“test@local” for Username and “test” for
Password) or from an On-demand User account.
Check the Remember Me box to store the
username and password on the current
11
PheeNet WMS-208
Quick Installation Guide
computer in order to automatically login to the
2.5
system at next login. Then, click the Submit
button.
Service Zone & AP
Management
The Remaining button on the User Login Page
is for on-demand users only, where they can
PheeNet WMS-208 has introduced an important
check their Remaining Usage time.
new concept called “Service Zone”. For how to
set up Service Zones, please refer to the User’s
Manual, Appendix C. Service Zone Deployment
Example.
PheeNet WMS-208 can centrally manage up to 12
access points (APs). For how to set up the “AP
Management” feature, please refer to the “AP
Management” section of the User’s Manual.
Attention: To provide temporary users with free or
paid wireless Internet access, the administrator can
enable On-demand User authentication to create
On-demand User accounts. Please refer to 4.2.1.6
For further configuration and information, please
Authentication Method – On-demand User,
refer to the User’s Manual.
User’s Manual.
3. Congratulation!
The Login Successful page appearing means
PheeNet WMS-208 has been installed and
P/N: V31220080529
configured successfully. Now, you are
connected to the network and Internet!
12