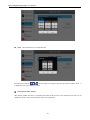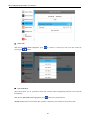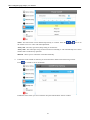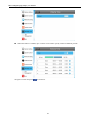
1
High Definition LCD Digital Signage Display User Manual Applicable Models L/PFxxH7(Android Version) MxxSA HD LCD Digital Signage Display User Manual Cautions 1. Do Not install and use the unit in moisture, high temperature, outdoor and closed environment. 2. Turn off the power supply before cleaning the unit. Spray cleaning solution on rag to wipe down unit. Do Not spray cleaning solution directly on to unit. 3. Do Not block air vent and other holes, do not put the unit beside near any heat source and other devices which may affect the vent. 4. In order to avoid the high voltage risk, do not attempt to disassemble and repair the unit, please call your representative or ask a professional to maintain if a problem still appear. 5. Use the unit under stable power supply. Do not use it together with other high power devices from the same power supply, this may affect the unit, or even damage it. 6. Turn off power or remove the power cable and network cable during a thunder storm or severe weather. 7. Power off the unit if it is not being used or has stopped working. HD LCD Digital Signage Display User Manual Contents: Packing List................................................................................................................................................................. 1 Chapter 1 Overview..............................................................................................................................................2 1.1 1.2 1.3 1.4 1.5 1.6 1.7 1.8 Chapter 2 Brief Introduction......................................................................................................................... 2 Key Features................................................................................................................................. 2 I/O Ports........................................................................................................................................2 Media Formats..............................................................................................................................3 Operation Instructions.................................................................................................................. 3 Wall Mounting Plate (Optional)................................................................................................... 3 I/O Ports Cover.............................................................................................................................4 Remote Control............................................................................................................................ 4 Playback and Update......................................................................................................................... 5 2.1 2.2 Program Playback.........................................................................................................................5 Content Update.............................................................................................................................5 2.2.1 2.2.2 Chapter 3 Network Download......................................................................................................... 6 USB Drive Delivery........................................................................................................ 6 OSD Menu........................................................................................................................................... 8 3.1 System Setting.............................................................................................................................. 9 3.1.1 3.1.2 3.1.3 3.1.4 3.1.5 3.1.6 3.1.7 3.1.8 3.1.9 3.1.10 3.2 Display Language............................................................................................................9 Switch Screen Mode........................................................................................................9 Switch Screen Dpi......................................................................................................... 10 Real Time Clock............................................................................................................ 10 Play Log.........................................................................................................................11 USB................................................................................................................................11 Scroll Text......................................................................................................................12 Sync Setting (Optional)................................................................................................. 12 Restore to Factory Settings........................................................................................... 13 Auto Start......................................................................................................................14 System Control........................................................................................................................... 15 3.2.1 3.2.2 3.2.3 3.2.4 3.2.5 Work Mode.................................................................................................................... 15 Play Mode......................................................................................................................16 Manage Soft...................................................................................................................17 Storage........................................................................................................................... 17 Playtime......................................................................................................................... 18 HD LCD Digital Signage Display User Manual 3.3 Network Setting..........................................................................................................................19 3.3.1 3.3.2 3.3.3 3.3.4 3.3.5 3.3.6 3.4 3.5 3.6 Date And Time............................................................................................................................25 Power On/Off............................................................................................................................. 29 Strategy Time..............................................................................................................................32 3.6.1 3.6.2 3.7 3.8 Chapter 4 Server Configuration..................................................................................................... 19 IP Type........................................................................................................................... 22 WIFI Setting.................................................................................................................. 23 3G Setting...................................................................................................................... 24 Local ID.........................................................................................................................25 MAC Address................................................................................................................ 25 Volume Time..................................................................................................................32 Port Time....................................................................................................................... 34 File Management........................................................................................................................ 36 Exit..............................................................................................................................................36 System Upgrade................................................................................................................................ 37 4.1 4.2 Network Upgrade....................................................................................................................... 37 USB Drive Upgrade................................................................................................................... 37 HD LCD Digital Signage Display User Manual Packing List In the carton, you will find the following: LCD display Remote controller Wall plate (Optional) Power cable Key (Optional) CD 1 HD LCD Digital Signage Display User Manual Chapter 1 Overview 1.1 Brief Introduction High definition LCD display has a powerful capacity of image and video decoding, offering full HD up to 1080P. With integrated USB and wire/wireless internet connection, the unit can work well with both CDMS and EzPoster digital signage software, which can provide multi-zone function for both horizontal and vertical mode, customized template is available for users with different schedule and playlist. 1.2 Key Features Built-in 8GB memory, support TF card and USB expansion, allows you to store thousands of HD media files. Supports stand-alone, LAN, WIFI and 3G (Optional) connection. Supports portrait and landscape display. Support multi-zone screen function, different templates and transition modes are available. Capable of running multiple playlists as scheduled. Support scrolling text, real-time clock, logo, etc. Set the timer On/Off function by daily and weekly. High security, encryption function can be used to protect the content. Program can be updated via network or USB device on site. Media files can be played from USB stick directly, or import the media files from USB stick to internal flash memory in stand-alone mode. An external media player can be used via the VGA or HDMI ports. 1.3 I/O Ports Reset: At the bottom of the HDMI Input Port. LAN: Network port, connect with internet via cable (invalid in standalone mode). HDMI: HDMI signal input port. VGA: VGA signal input port. USB 1/USB 2: USB2.0 slot, used to import media files, program or updating file. TF: TF card slot, used to expand the memory, located under USB 1. SIM: SIM card slot, used to connect with 3G network (only valid in 3G mode), located under USB 2. 2 HD LCD Digital Signage Display User Manual 1.4 Media Formats Various formats of media files to compose contents can include: Video: MPEG1, MPEG2, MPEG4, H.264, WMV Audio: MP3 Image: JPEG, BMP, PNG 1.5 Operation Instructions Please make sure that the power cord and the storage card are correctly installed before system start up. This unit comes with parameters pre-defined at factory before delivery. Do not expose the unit to rain or damp areas. 1.6 Wall Mounting Plate (Optional) 3 HD LCD Digital Signage Display User Manual 1.7 I/O Ports Cover 1.8 Remote Control Most of the operations can be completed by using a remote for your convenience. Buttons Description POWER MENU SETUP SOURCE Turn on/off the unit Call out the display drive menu Call out the OSD menu Call out the signal source menu Play or confirm Move up Move down Move left / Skip to next Move right / Skip to previous Stop and turn to the home page Mute Volume up Volume down Switch to HDMI input Switch to VGA input Switch to YPbPr input HDMI VGA YPbPr *Other buttons have not been defined yet. Note: User can only call out the OSD menu on the home page by pressing STOP button. If you press the STOP button to stop the playing program, the playback will not resume when you start again and the scheduled program will be played instead. 4 HD LCD Digital Signage Display User Manual Chapter 2 Playback and Update 2.1 Program Playback The unit will start to playback program automatically after powered on. If there is no content to be played, the home page will be shown out. 1. Make sure that the power cord and the storage card are correctly installed. 2. Turn on the unit and the system will enter playback mode automatically. 3. The home page will be shown as below when there is no program for playback. Unit Status Playlist Status System Info. Unit Status - Show the current status of unit, which can be STOP or Downloading. Playlist Status - Show the current status of playlist, which can be Normal or error messages like Screen Mode Mismatch or Invalid playlist. System Info. – Show the current system information which contains storage info, time and date, IP address, network connection and software version in LAN/WiFi/3G mode, while in stand-alone mode, storage info, time and date, local ID and software version. 2.2 Content Update There are two ways to update contents according to the network connection. 5 HD LCD Digital Signage Display User Manual 2.2.1 Network Download You can create playlists and send them to network version unit by using digital signage software CDMS. The unit checks for updates at starting up and by regular intervals after that. The new contents will be downloaded automatically once they are detected by the unit from server. 2.2.2 USB Drive Delivery If the unit works in stand-alone mode or the network is disconnected, you can create and save content packages to a USB disk by using digital signage software EzPoster, and then import them to unit on site. NOTE: You cannot import programs by USB disk when the unit is downloading programs over network. Here are the importing steps. 1. Enable the USB port in the OSD menu System Settings > USB. 2. Decompress the content package to get MEDIA and SYSTEM folders. Save the two folders to the root directory of a USB disk. 3. Plug the USB disk into the unit USB port, and system will return to the home page and check the files as shown below. 6 HD LCD Digital Signage Display User Manual 4. Files will be copied to the unit after checking. 5. The copy result will be given when completing. Skipped - the same file will be skipped. Overwrite - the file with the same name will overwrite the previously existing one. Copied- the files, except the skipped and overwrite files, will be copied to the unit. 6. Remove the USB disk to complete the update. TIPS: The files delivered to the unit from the USB disk include not only playlists, but also include configuration parameters including on/off timing strategy, download strategy and display strategy. 7 HD LCD Digital Signage Display User Manual Chapter 3 OSD Menu You are allowed to configure system parameters in the OSD menu using the remote controller. 1. Press STOP on the remote controller to stop the current playback and show out the home page as shown below. 2. Press SETUP on the remote controller to call out the OSD menu as shown below NOTE: User can only call out the OSD menu on the home page by pressing STOP button firstly, then pressing SETUP button. 3. Press on the remote controller to navigate, and press 8 to confirm it. HD LCD Digital Signage Display User Manual 3.1 System Setting Navigate to System Setting on the main menu and press Press on the remote controller to confirm it. on the remote controller to navigate to a sub menu, and press to confirm it 3.1.1 Display Language This menu allows you to choose the language of the OSD menu. 3.1.2 Switch Screen Mode This menu allows you to adjust the screen display mode, which should consist with its actual mounting 9 HD LCD Digital Signage Display User Manual type. 3.1.3 Switch Screen Dpi This menu allows you to set the screen resolution which should consist with its actual resolution. 3.1.4 Real Time Clock This menu allows you to choose whether to display the real-time clock on the screen or not, and define its position. 10 HD LCD Digital Signage Display User Manual Up Left/Right - display the clock in the top left / right corner on the screen. Left/Right Down- display the clock in the bottom left / right corner on the screen. Close - turn off this feature and do not display clock on the screen. 3.1.5 Play Log Press to turn on this feature, keep a log of playback and report it to the management platform. 3.1.6 USB This menu allows you to enable or disable the USB port. 11 HD LCD Digital Signage Display User Manual Press to disable or enable the USB port for external USB device connection. 3.1.7 Scroll Text This setting allows you to turn on or off the feature of scroll text. Off - scroll text, no matter included or not in the playlist, it will not be appeared on the screen. On - scroll text, if included in the playlist, it will be appeared on the screen. 3.1.8 Sync Setting (Optional) This feature can make multiple LCD units to playback the contents synchronously. This menu allows you to enable or disable this function and define how it works if enabled. 12 HD LCD Digital Signage Display User Manual Sync Setting– enables or disables the feature of synchronization. Sync Setting - set the role of the unit during synchronization. Host- set up the unit as the only host in a network and the slave units will get synchronous starting time from this host. Slave- as a slave, the unit will play synchronous contents with the host. Sync Methods - allows you to choose the unit communication method for synchronous playback. 2.4G- The host and slave units will communicate via the 2.4G band by using a 2.4G module, which can achieve a short distance wireless communication within 100 meters. Network- the host and slave units in a LAN will communicate via the network. This option is not available when the unit works in standalone type. 3.1.9 Restore to Factory Settings 13 HD LCD Digital Signage Display User Manual Press Restore to Factory Settings and you’ll be prompted with a message. Choose Yes to have all parameters in System Setting to be restored to factory settings. 3.1.10 Auto Start If you enable this feature, the pre-loaded digital signage software will start automatically after the unit is turned on. Otherwise, Android system will be loaded instead. 14 HD LCD Digital Signage Display User Manual 3.2 System Control Navigate to System Control on the main menu and press navigate to a submenu, and press to confirm it. to confirm it. Then press to 3.2.1 Work Mode The unit can work in single (stand-alone), LAN, WIFI or 3G mode. NOTE: The OSD menu differs as the work mode changes. SINGLE – that is stand-alone. The unit works independently of any sever or player, and the network related menus will be unavailable. LAN - the unit works in a wired LAN and the network related menus are available except for 15 HD LCD Digital Signage Display User Manual WIFI/3G networks. WIFI - the unit works in wireless LAN and all the network related menus are available. 3G – the unit is networked via 3G and all the network related menus are available. 3.2.2 Play Mode This menu is only available when the player works in single mode. Three playback modes are supported when unit works in stand-alone mode. Open - Media files, such as images and videos, stored in the root directory of a USB disk can be played directly, support plug and play without any software. Encrypt - Only encrypted content packages, created by software EzPoster, with the same password 16 HD LCD Digital Signage Display User Manual as the unit can be played. The unit password file ADPKeyRenew.BIN can be created and imported together with the content package by EzPoster, and the initial password is 12345678 by default. No Encrypt - Only content packages without encryption password, which is created by EzPoster, can be played. 3.2.3 Manage Soft You are allowed to choose a content management software running on the server platform when the unit works in LAN/WIFI/3G mode. This menu is unavailable in single (stand-alone) mode. GTV- using CDMS as the content management software to create and publish playlists as well as control the unit through internet. Ezposter/ADPE - use EzPoster or ADPE as the content management software to create and publish playlists through USB disk or intranet. 3.2.4 Storage This menu allows you to choose where the program be stored. The window differs as the unit work mode changes. LAN/WIFI/3G mode– the program are downloaded from server and stored in the internal memory or SD card. 17 HD LCD Digital Signage Display User Manual Internal Storage - only the program stored in the built-in memory will be played. SD Card- only the program stored in the SD Card or USB disk will be played. SINGLE (stand-alone) mode - The unit can play contents stored in built-in memory or external SD card or USB disk. USB- only the program stored in the USB disk will be played. 3.2.5 Playtime When the unit works in Open play mode, you can setup the playback duration for each image to be played, this is not applicable other play modes. 18 HD LCD Digital Signage Display User Manual Network SettingNavigate to Network Setting on the main menu and press to confirm it. To navigate to a sub-menu, press the arrow buttons . This menu is not available in stand-alone mode. 3.3 3.3.1 Server Configuration This menu allows you to choose how the unit communicates with the server and setup the connection. 19 HD LCD Digital Signage Display User Manual The Server Setting window differs according to the content management software running on the server platform, which is configured in the menu System Control > Manage Soft. If the content management software is set to CDMS, the Server Configuration window will appear like above. Local Server Server connection mode – the unit can find server by its IP or domain name. In IP mode, you need to enter the server IP address and port, while in domain name mode, enter the sever domain name and port. 20 HD LCD Digital Signage Display User Manual Remote Server Enable the remote file server and then set the server connection mode and enter its IP address and port. If the content management software is set to EzPoster, NET_ID is required for server connection. 21 HD LCD Digital Signage Display User Manual 3.3.2 IP Type This menu is only available when the unit works in LAN mode. This menu allows you to define the unit IP in DHCP mode or static IP mode. 22 HD LCD Digital Signage Display User Manual DHCP- IP address is allocated by DHCP server and requires no manual setup. Static IP- you are allowed to define a stable IP address for the unit. 3.3.3 WIFI Setting This menu allows you to set up wireless network when the unit works in WIFI mode, but is not available in LAN, 3G or single mode. Go to Network Setting> Wireless Network Settings. With wireless network adapter installed, system will search and present the available wireless networks for your choice. Choose a wireless network from the list and press on the remote to connect with the network. If you want to connect with a secured network, a password may be required like below. Enter the password and press Connect. 23 HD LCD Digital Signage Display User Manual 3.3.4 3G Setting When the unit works in 3G mode, this menu is available for you to enable 3G connection. Navigate to 3G Setting and press to confirm it. 24 HD LCD Digital Signage Display User Manual Press to turn off/on 3G connection. 3.3.5 Local ID Local ID is a unique identifier number of the unit, which is view only when the unit works in LAN, WIFI or 3G mode. 3.3.6 MAC Address The unit MAC address is provided here for view only, and cannot be changed. 3.4 Date And Time Navigate to Date And Time on the main menu and press you to set system date and time. 25 on the remote to confirm it, which allows HD LCD Digital Signage Display User Manual The options Start Sync Time Setting and Sync Time Now are not available when the unit works in single (stand-alone) mode. Date– choose the date bar to adjust the date. Press the arrow buttons on the remote to navigate to the box you want to operate. Press +/to adjust the date, press Save to confirm. 26 HD LCD Digital Signage Display User Manual Time– choose the time bar to adjust the time. Press the arrow buttons on the remote to navigate to the box you want to operate. Press +/to adjust the time, press Save to confirm. Startup Sync Time Setting This feature enables the unit to synchronize local time with the server time when the unit starts. If you disable this feature, time synchronization will not be performed. 27 HD LCD Digital Signage Display User Manual Time zone With the bar Time Zone highlighted, press pressing the buttons. to confirm it. Choose the zone your unit located by Sync Time Now This button allows you to synchronize local time with the online management platform across network immediately. With the bar Sync Time Now highlighted, press to start the synchronization. NOTE: Define the time zone before this operation. Otherwise, time maybe incorrect afterwards. 28 HD LCD Digital Signage Display User Manual When the process finishing, a popup message will be given. If success, the unit will display the same time as the online the management platform. 3.5 Power On/Off This menu allows you to control unit on/off time either in daily mode or in weekly mode. 29 HD LCD Digital Signage Display User Manual 1. Choose Setting Mode. Week Setting - This mode will have the unit turned on/off automatically at your specified time on each day of each week. Uniform Setting - This mode will have the unit turned on/off automatically at your specified time every day. For example, you can have the unit power on from 8:00 to 22:00 every day. 2. Select the day to configure from Sunday to Saturday in week mode. For example, if you want to specify the on/off time of Sunday, highlight the Sunday box. Skip this step for uniform setting. 3. Highlight Control Mode and select your preferred control mode. 30 HD LCD Digital Signage Display User Manual Timer –On and off time can be defined respectively in 5 timers. Press the the remote to move to a box and make adjustment. arrows on Always On - The unit, if powered, keeps being on all the time. Always Off - The unit keeps being off and if turned on manually, it will automatically turn off two minutes later if without any operation. Manual – allows you to control the on/off time manually. 4. If the timer control mode is selected, you’ll be allowed to define on/off time using 5 timers. Press on a timer to set its on/off time. Enable the timer before you set on/off time. Only the enabled timer will be in effect. 31 HD LCD Digital Signage Display User Manual 3.6 Strategy Time This menu allows you to specify playback volume and display source in a specified period. 3.6.1 Volume Time This allows you to specify playback volume in specified periods. When this feature is disabled, you are allowed to adjust the playback volume by hand. 32 HD LCD Digital Signage Display User Manual When this feature is enabled, up to 5 timers can be used to specify volume in different periods Navigate to a timer and press to confirm it. 33 HD LCD Digital Signage Display User Manual Turn on the timer before make settings and press Save to confirm the settings. 3.6.2 Port Time This allows you to switch different display sources in different periods. When this feature is disabled, you are allowed to adjust the display sources by hand. When this feature is enabled, up to 5 timers allow you to specify sources in different periods. 34 HD LCD Digital Signage Display User Manual 1. Navigate to a timer and press to confirm it. 2. Turn on the timer, and then you can set its start and end time. 35 HD LCD Digital Signage Display User Manual 3. Press the port type bar to choose the port it the period. 4. Press Save to save the setup. 3.7 File Management Press File Management to open the menu which allows you to check the storage space usage and format the disk if necessary. This window gives you the storage information. The button Format allows you to format the built-in storage. 3.8 Exit Navigate to Exit in the main menu, and press to return to the home page. 36 HD LCD Digital Signage Display User Manual Chapter 4 System Upgrade The unit system can be upgraded across network remotely or via a USB disk on site. Network Upgrade USB Drive Upgrade 4.1 Network Upgrade Each time the unit is turned on, it will check if there is any update on the management platform via network. If upgrade file is detected, the unit will download and run it automatically. 4.2 USB Drive Upgrade If the unit is network disconnected or works in stand-alone mode, you are allowed to upgrade the system by using a USB disk. 1. Enable the USB port in the OSD menu System Setting > USB. 2. Save the upgrade file android_update.zip to the root directory of a USB disk. 3. Plug the USB disk into the unit USB port with the player turned on. NOTE: Do not plug in the USB disk during content downloading. 4. Once the USB disk is detected, system will check the files in it. 5. During file checking, the upgrade file version will be compared with the current one and the result will be given to you like below, allowing you to choose whether to continue or not. 37 HD LCD Digital Signage Display User Manual 6. Click YES to continue and system will start to copy the upgrade file. NOTE: Do not remove the USB disk during file copying! 7. When copying completed, you’ll be prompted with the following message. 8. Remove the USB disk as instructed. Then system will restart and prompts System Upgrade… 9. The upgrade will be completed about 90 seconds later with the home page appearing. NOTE: Avoid power outage during system upgrade. Otherwise, the system may be destroyed and cannot run or upgrade anymore. 38