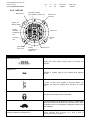
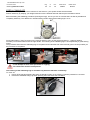
1
Instruction Manual Genny 2.0 Urban(English) Document code 03-09-12_UIMG2 Manual ENG Pag. of Rev. SAVE DATA PRINT DATA 1 1 01 23/07/13 23/07/13 USER INSTRUCTION MANUAL MACHINE Denomination Function Model Type Serial numbers Year of construction Number Revision number Creation date Revision date Written by Approved by MOTORIZED WHEELCHAIR TRANSPORT OF1 PERSON IN SEATED POSITION GENNY 2.0 URBAN Electrical with two wheels U0000000001-U0000009999 2012 04_12_XXX_GENNY 2.0.doc 00 23/07/13 23/07/13 GM Distribution S.r.l. GM Distribution S.r.l. Instruction Manual Genny 2.0 Urban(English) Document code 03-09-12_UIMG2 Manual ENG Pag. of Rev. SAVE DATA PRINT DATA 1 3 01 23/07/13 23/07/13 Index CAP. 1. CONTENTS AND METHOD OF CONSULTATION ......................................................................................... 2 1.1. FOREWORD ............................................................................................................................................ 2 1.2. PURPOSE OF THIS MANUAL ................................................................................................................ 2 1.2.1. IMPORTANCE OF THIS MANUAL ....................................................................................................... 2 1.2.2. PURPOSE / AIMS OF THIS MANUAL.................................................................................................. 2 1.2.3. UPDATES, INTEGRATIONS AND REPLACEMENT ........................................................................... 4 1.2.4. GENERAL INFORMATION ................................................................................................................... 4 1.3. CONSULTATION ..................................................................................................................................... 5 1.4. UNITS OF MEASUREMENT ................................................................................................................... 6 1.5. MEANING OF SYMBOLS ........................................................................................................................ 7 1.6. DEFINITIONS ........................................................................................................................................... 7 1.7. WARRANTY ............................................................................................................................................. 9 1.8. NOT COVERED .....................................................................................................................................10 1.9. HOW TO CONSULT THE MANUAL ......................................................................................................10 CAP. 2. GENERAL INFORMATION AND FEATURES ...............................................................................................11 2.1. PRE-DELIVERY TESTS ........................................................................................................................11 2.2. TECHNICAL FEATURES .......................................................................................................................11 2.2.1. AIM – PURPOSE - MANUFACTURING PARTS ...............................................................................11 2.2.2. TECHNICAL AND CONSTRUCTION SPECIFICATIONS ..................................................................14 2.2.3. TECHNICAL DATA BATTERIES ........................................................................................................14 2.2.4. MAXIMIZING RANGE ......................................................................................................................15 Maximum range distances are provided in the previous table. The range of your Genny 2.0 is affected by many variables, including: ...................................................................................................................15 2.2.5. AIRBORNE NOISE EMISSIONS ........................................................................................................15 2.2.6. VIBRATIONS.......................................................................................................................................16 2.3. SERVICE CONDITIONS ........................................................................................................................16 2.4. NORMAL USE, IMPROPER USE, INCORRECT / PROBIHITED / REASONABLY FORESEEABLE USE .....................................................................................................................................................17 2.4.1. NORMAL USE.....................................................................................................................................17 2.4.2. IMPROPER USE .................................................................................................................................18 2.4.3. INCORRECT USE AND PROHIBITED USE ......................................................................................18 CAP. 3. CONSISTENCY OF SUPPLY ........................................................................................................................21 3.1. MACHINE IDENTIFICATION .................................................................................................................21 3.2. MACHINE CERTIFICATION ..................................................................................................................21 3.3. TECHNICAL REFERENCE STANDARDS ............................................................................................22 3.4. FACSIMILE OF THE DECLARATION OF CONFORMITY ' ..................................................................22 CAP. 4. SAFETY INSTRUCTIONS .............................................................................................................................23 4.1. INTRODUCTION ....................................................................................................................................23 4.2. DUTIES AND RESPONSIBILITIES .......................................................................................................24 4.2.1. BUYER'S OBLIGATIONS ...................................................................................................................24 4.2.2. GENERAL REQUIREMENTS OF THE PERSONNEL .......................................................................24 4.2.3. TRAINING COURSE FOR OPERATORS ..........................................................................................26 4.2.4. TRAINING FOR SET UP AND MAINTENANCE TECHNICIANS .......................................................27 4.3. GENERAL STANDARDS FOR PROTECTION OF MACHINES ...........................................................28 4.4. MOVING STRUCTURES .......................................................................................................................28 4.5. LIFTING MEANS ....................................................................................................................................28 4.6. INDICATIONS ON RESIDUAL RISKS ...................................................................................................29 4.7. DATAPLATES ........................................................................................................................................34 4.8. SAFETY FEATURES .............................................................................................................................35 4.8.1. PROTECTIVE EQUIPMENT ON MACHINE .......................................................................................35 4.8.2. SAFETY SHUTDOWN ........................................................................................................................39 4.9. SAFETY ALERTS ..................................................................................................................................43 CAP. 5. TRANSPORT, INSTALLATION AND HANDLING ........................................................................................... 1 5.1. INSTALLER REQUISITES ....................................................................................................................... 1 5.2. INSTALLATION REGULATIONS ............................................................................................................. 2 5.3. STORAGE, TRANSPORT AND HANDLING ........................................................................................... 2 5.3.1. STORAGE ............................................................................................................................................. 2 Instruction Manual Genny 2.0 Urban(English) Document code 03-09-12_UIMG2 Manual ENG Pag. of Rev. SAVE DATA PRINT DATA 2 3 01 23/07/13 23/07/13 5.3.2. CHECKS ON ARRIVAL ........................................................................................................................ 4 5.3.3. TRANSPORT, LIFTING AND HANDLING - GENERAL RULES .......................................................... 4 5.3.4. TRANSPORT AND SHIPPING OF BATTERIES .................................................................................. 6 5.3.5. SHIPPING LI-ION BATTERIES ............................................................................................................ 7 5.4. PRELIMINARY PREPARATION AND ADJUSTMENT OPERATIONS ................................................... 7 5.4.1. POSITIONING ....................................................................................................................................... 7 5.4.2. ASSEMBLY OF THE SEPARATELY SUPPLIED EQUIPMENTS ........................................................ 7 5.5. CHARGING THE BATTERIES ................................................................................................................. 8 5.5.1. CHARGE INDICATOR LIGHTS ..........................................................................................................10 5.5.2. CHARGE INDICATOR LIGHTS ON STABILIZING UNIT ...................................................................10 5.5.3. CHARGING FAILURES OF THE SELF-BALANCING UNIT ..............................................................10 5.5.4. CHARGING FAILURES OF STABILIZING UNIT ................................................................................11 5.5.5. REGENERATIVE BRAKING ...............................................................................................................11 5.5.6. READING THE BATTERY CHARGE LEVEL DISPLAY .....................................................................11 5.5.7. RECALIBRATING THE DISPLAY OF THE INFOKEY CONTROLLER ..............................................12 5.5.8. HOT OR COLD TEMPERATURES.....................................................................................................13 5.5.9. PARTIAL CHARGE .............................................................................................................................13 CAP. 6. OPERATING MODE ........................................................................................................................................ 1 6.1. WORKSTATIONS AND DUTIES OF THE DRIVER ................................................................................ 2 6.2. RECORDING SERIAL NUMBERS .......................................................................................................... 3 6.2.1. MACHINE AND INFOKEY CONTROLLER .......................................................................................... 3 6.2.2. INFOKEY CONTROLLER ..................................................................................................................... 4 6.2.3. OPERATING LIMITS ............................................................................................................................ 5 6.3. USE OF THE INFOKEY CONTROLLER ................................................................................................. 6 6.3.1. BUTTONS ............................................................................................................................................. 6 6.3.2. DISPLAY ............................................................................................................................................... 7 6.4. BUTTON FUNCTIONS............................................................................................................................. 9 6.4.1. POWERING ON / STANDBY ................................................................................................................ 9 6.4.2. BEGINNER BUTTON FUNCTIONS...................................................................................................... 9 6.4.3. INFORMATION DISPLAY BUTTON ...................................................................................................10 6.4.4. SECURITY BUTTON FUNCTIONS ....................................................................................................12 6.4.5. BUTTON COMBINATION FUNCTIONS .............................................................................................12 6.5. SWITCH-ON - CONTROLS - CHECKS - ADJUSTMENTS - START-UP..............................................14 6.6. HOW THE MACHINE WORKS ..............................................................................................................17 6.7. RIDING GUIDELINES ............................................................................................................................18 6.7.1. RIDING FORM ....................................................................................................................................18 6.7.2. HAZARDOUS SITUATIONS ...............................................................................................................18 6.7.3. RIDING GENNY 2.0 ............................................................................................................................20 6.7.4. PRACTICE RIDING.............................................................................................................................28 6.8. RIDER PRESCRIPTIONS ......................................................................................................................29 6.9. START-UP PROCEDURE WHEN STATIONARY .................................................................................30 6.10. STOPPING PROCEDURE ...................................................................................................................31 CAP. 7. MAINTENANCE, TROUBLESHOOTING AND CLEANING ............................................................................ 1 7.1. MAINTENANCE TECHNICIAN REQUISITES ......................................................................................... 1 7.2. MAINTENANCE PRESCRIPTIONS......................................................................................................... 2 7.3. ROUTINE MAINTENANCE ...................................................................................................................... 3 7.4. CLEANING ............................................................................................................................................... 5 7.5. LUBRICATION ......................................................................................................................................... 7 7.6. REPLACING PARTS................................................................................................................................ 8 7.6.1. REMOVING/ATTACHING THE HANDLEBAR ..................................................................................... 8 7.6.2. REMOVING / REATTACHING THE BATTERIES ................................................................................ 9 7.6.3. REPLACING THE INFOKEY CONTROLLER BATTERY ...................................................................10 7.6.4. REMOVING THE TIRE/WHEEL ASSEMBLY .....................................................................................11 7.7. TROUBLESHOOTING/ FAILURES .......................................................................................................12 7.7.1. GENNY 2.0 WILL NOT POWER ON ..................................................................................................13 7.7.2. THE MACHINE WILL NOT ENTER IN BALANCE MODE ..................................................................13 7.7.3. TIRE/WHEEL ASSEMBLY IS LOOSE AND WOBBLES ....................................................................13 7.7.4. GENNY 2.0 PULLS TO ONE SIDE WHEN RIDING ...........................................................................14 7.7.5. TIRE IS FLAT OR WILL NOT HOLD AIR ...........................................................................................14 7.7.6. SAFETY SHUTDOWN AT BUILDING ENTRANCE ...........................................................................14 7.7.7. GENNY 2.0 WILL NOT POWER DOWN ............................................................................................14 7.8. FIRE EXTINGUISHING MEANS ............................................................................................................18 Instruction Manual Genny 2.0 Urban(English) Document code 03-09-12_UIMG2 Manual ENG Pag. of Rev. SAVE DATA PRINT DATA 3 3 01 23/07/13 23/07/13 CAP. 8. SCRAPPING and DISPOSAL .......................................................................................................................... 1 8.1. SCRAPPING ............................................................................................................................................ 1 8.2. DISPOSAL ............................................................................................................................................... 2 CAP. 9. APPENDICES/ ENCLOSURES ....................................................................................................................... 1 9.1. MAINTENANCE LOG............................................................................................................................... 1 9.2. EVENTS LOG SHEETS ........................................................................................................................... 4 CAP. 10. 10.1. 10.2. 10.3. 10.4. IDENTIFICATION DATA ....................................................................................................................... 1 MANUFACTURER ................................................................................................................................. 1 AUTHORIZED SERVICE CENTERS ..................................................................................................... 1 MACHINE TYPE .................................................................................................................................... 1 DOCUMENT ........................................................................................................................................... 1 Instruction Manual Genny 2.0 Urban(English) Document code 03-09-12_UIMG2 Manual ENG Pag. of Rev. SAVE DATA PRINT DATA 1 46 01 23/07/13 23/07/13 Instruction Manual Genny 2.0 Urban(English) Document code 03-09-12_UIMG2 Manual ENG CAP. 1. Pag. of Rev. SAVE DATA PRINT DATA 2 46 01 23/07/13 23/07/13 CONTENTS AND METHOD OF CONSULTATION 1.1. FOREWORD Dear Customer, Thank you for choosing the machine described in this manual. We are confident that you will be fully satisfied with its features and performance. This product has been designed and built in compliance with the most stringent European Union safety regulations and standards. To guarantee the safety of the operators and personnel that use the machine described in this manual, the machine must be handled, installed, used, serviced and disassembled/eliminated by scrupulously following the prescriptions given in this manual and in compliance with the legal regulations. 1.2. PURPOSEOF THIS MANUAL 1.2.1. IMPORTANCE OF THIS MANUAL This Manual needs to be considered as an integral part of the machine: a. It has to be safely kept during the entire lifetime of this machine b. It has to stay with the machine when the machine is passed on to others. c. Not only it contains all useful information for the users but also the electrical layouts (in specific chapters) that you will need for possible interventions of maintenance or repair. 1.2.2. PURPOSE / AIMSOF THIS MANUAL This manual is an integral part of the machine and has been written entirely by the constructor to provide the necessary information to who is authorized to interact with it. This Manual refers to the state of the product at the time of publication.It cannot in any way reflect future or non-standard products. The contents of the manual have been checked to ensure they are correct and in compliance with the equipment described. However, the possibility of discrepancies cannot be entirely discounted. GM Distribution S.r.l. is constantly involved in technological research and therefore reserves the right to make modifications or improvements to their products at any time. No part of this Manual can be reproduced, copied or transmitted to third parties in any form, including electronicmedia or mechanical formats for any purpose without prior written permission of GM Distribution s.r.l. All the products or registered brands appearing in this file belong to their rightful owners. The User Instruction Manualis designed to provide the purchaser with all the necessary information so he can use the supplied machine properly and manage it in the most independent and safest of ways: The correct operator awareness on safety aspects; The safe handling of the machine, both when packed and unpacked; The correct installation of the machine; The detailed knowledge of operating principles of the machine and its limitations; The correct machine use in safe conditions; Correct and safe execution of maintenance operations Dismantle the machine in a safe way respecting regulations in force to protect the health of workers and the environment. Instruction Manual Genny 2.0 Urban(English) Document code 03-09-12_UIMG2 Manual ENG Pag. of Rev. SAVE DATA PRINT DATA 3 46 01 23/07/13 23/07/13 Persons in charge of the company departments in which the machineis to be used are obliged, in compliance with statutory legislation, to read this manual carefully and ensure that it is read by operators and maintenance technicians (in relation to their relative duties). The time taken for this task will be greatly rewarded by the ability to use the machine in a safe, correct manner. This document assumes that in the plant, i.e. the place where the machine will be used, the current heath and safety regulations are fully observed. The instructions, the designs and the documentation in this Manual are of confidential and technical nature, remain exclusive property of the Manufacturer and cannot be reproduced in any way, either entirely or partially, irrespective of the system utilized. The customer has the responsabilityto make sure that, if this document is modified by the Manufacturer, only the updated versions of the Manual are available for consultation in the locations where the machine is used. Moreover this manual has been drawn up in order to provide indications and warnings to know the supplied machine to fully understand its operating principals and its limits. This User Instruction Manual has been created exclusively for the customers of the Company GM Distribution S.r.l. and contains information retaining intellectual property rights. The text, designs and diagrams that are in this User Instruction Manual are of confidential and technical nature, remain the property of GM Distribution S.r.l. and cannot be reproduced or copied in any way, either entirely or partially. Before performing any operations on the machine, the user has to carefully read this Manual. This part is an essential and integral part of the machine. It containts important information and knowing this information is fundamental to be able to act correctly and in completely safe conditions. The machine needs to be used only for the purpose it was specificlydesigned, programmed and sold for. Any use of the machine that differs from the indications in paragraph 2.6 is to be considered unproper and therefore the Manufacturer declines any reposibility for it. The Manufacturercan not be held responsible for every possible defect caused by an unreasonable, unproper and/or incorrect use. For any clarification, please contact the technical department of GM Distribution S.r.l.. The User needs to very carefully read and fully understand the informations in this User Manual, as a correct preparation, installation, use and maintenance of the machine are the basis the user - Manufacturer relationship In case of doubts concerning the correct interpretation of the instructions, consult the Manufacturer of the machine for necessary explanations. Instruction Manual Genny 2.0 Urban(English) Document code 03-09-12_UIMG2 Manual ENG Pag. of Rev. SAVE DATA PRINT DATA 4 46 01 23/07/13 23/07/13 1.2.3. UPDATES, INTEGRATIONS AND REPLACEMENT This Manual must be kept in the immediate proximity of the machine, inside a special container and most importantly protected from fluids, humidity, excessive heat and any other factor or condition which could affect the legibility of the document. Consult the Manual making sure that the contents are non PRESERVATIONcompletely or partiallly damaged. When consulting the manual make sure not to deface the pages; Do not remove pages from the manual; Do not write notes in the Manual. A blank space for notes is provided in the specially designated tables. In case of damage or loss of this Manual, a copy can be requested to the Manufacterer GM Distribution S.r.l. This Manual reflects the technical state of the machine at the time of manufacturing. The Manufacterer preserves the right to update its production and therefore issue other editions of the manual, without any obligation to update previous productions or manuals, except for specific cases related to health or safety of individuals. The user can however ask GM Distribution S.r.l.for any amendments or updates, if required, which will subsequently be considered an integral part of the manual; If the user should want to receive further information he is invited to contact the Manufacturer GM Distribution S.r.l. directly. If the machine is sold, the user is kindly asked to inform GM Distribution S.r.l. the details of the new owner in order to facilitate the handing over of any integrations of the Manual that, as already stated before, needs to stay with the machinealso in case of a transfer to new owner. GM Distribution reserves the right to modify the design and make improvements onthe machine without notifying the Customer and without updating the manual already given to the user. Moreover, in case of modifications made, in agreement with the manufacturer,on the machine already installed on the customer’s premises that lead to the need to amend of one or more chapters of the Manual, the Manufacturer must provide the new customer/holder of the Instruction Manual the chapters affected by the changes,plus the new overall revision of the Manual; It is theresponsibility of the user, in accordance with the indications supplied with the updated documentation, to replace thesuperseded chapters with the new ones and the frontispiece and table of contents with the new pages indicating of the new revised level in all the copies held; The manufacturer assumes responsiblilityfor the descriptions in Italian language, any translations may not be fully exhaustively checked, so if an inconsistencyor discrepancy is detected, the Italian version will always prevail; If necessary call our sales office, which will make the amendments it considers necessary. 1.2.4. GENERAL INFORMATION Use the machine properly. Observe and apply safety requirements outlined in the manual. Pay particular attention to the content of chapter n. 4 in which the residual risks present on the machine are highlighted and the presescroptionsthat theoperators need to follow. GM Distribution S.r.l.considers herself responsible for the machine in its original configuration. Any intervention that changes the structure of the machine and its duty cycle must be approved and registered in the office of the GM Technical Distribution S.r.l. GM Distribution S.r.l. is not responsible for damage caused by improper or incorrect use of the machine and documentation. GM Distribution S.r.l. is not responsible for damages caused by violation of compulsory regulations, negligence, inexperience, recklessness and failure to comply with regulatory standards by the employer, machine operator or maintenance technician. Instruction Manual Genny 2.0 Urban(English) Document code 03-09-12_UIMG2 Manual ENG Pag. of Rev. SAVE DATA PRINT DATA 5 46 01 23/07/13 23/07/13 GM Distribution S.r.l.declines all liability for the consequences caused by the use of nonoriginal spare parts. GM Distribution reserves the right to make changes to this manual and the machine without prior notice. GM Distribution S.r.l. is available with all its acquired experience and assistance to resolve any problems which may arise. GM Distribution S.r.l. assumes responsibility solely and exclusively for the information givenin the original Italian version of the manual. Failure to observe the requirements contained in this manual will automatically result in immediate invalidation of the warranty. WARNING ! For reasons of clarity, some illustrations of this Manual may show the machine or parts of it with the panels or fenders removed. DO NOT use the machine in that condition. The machine can only work if equipped with all its protections 1.3. CONSULTATION During the consultation of this manual, you will find the symbol on the side. It is associated with the words: DANGER, CAUTION. This means that you are inthe presence of a potentially hazardous situation,which, if disregarded, can cause damage to the equipment or injury to the operator. The entire machinesupplied representsno inherent risk to the operator whenit is used in compliance with the contents of this User Instruction Manual, providing the safety devices are constantly kept in good working order. Before intervening on the machine, pay close attention to the labels on the machines itself and onanyelectric equipment, which may be installed. During allactivitiesnever deactivate or tamper with safety devices for any reason, either to createbypasses, or to use them for purposes other than those prescribed by the manufacturer. After any work carried out, it is necessary to resetand reactivate all the safety devices. Do not tamper with or deliberately damagethe protective screensor remove conceal warning labels.In case of deterioration or illegibility immediately request replacement to the supplier of the machine. Instruction Manual Genny 2.0 Urban(English) Document code 03-09-12_UIMG2 Manual ENG Pag. of Rev. SAVE DATA PRINT DATA 6 46 01 23/07/13 23/07/13 1.4. UNITS OF MEASUREMENT The units of measurement are those of the present international system (IS). Instruction Manual Genny 2.0 Urban(English) Document code 03-09-12_UIMG2 Manual ENG 1.5. Pag. of Rev. SAVE DATA PRINT DATA 7 46 01 23/07/13 23/07/13 MEANING OF SYMBOLS Below the meaning of symbols and definitions that are used in this document is clearly specified. DANGER Indicates the presence of danger for those who operate the machine and for those nearby. The activity in question must be carried out in compliance with safety regulations and the prescriptions contained in this manual. CAUTION Indicates a warning of important information and / or additional tips and / or measures concerning the operation in question. WARNING Indicates an operation to be carried out with caution to avoid damaging the machine. OPERATOR Person qualified and authorized, responsible for operting the machine with protection activated, and to cargo and / or unload the material in use. MECHANICAL MAINTENANCE OPERATOR A qualified and authorized technician capable of installing and performing routine and / or supplementary maintenance of mechanical nature only. ELECTRICAL MAINTENANCE TECHNICIAN Person qualified and authorized to install and perform routine and / or extraordinary maintenance of electric nature only. 1.6. DEFINITIONS DANGER ZONE Any zone within and / or around machinery, in which an exposed person is subject to health or safety risk (Annex I, art.1.1.1 Directive 2006/42/EC). EXPOSED PERSON Any person who is wholly or partially present inside a danger zone (Annex I, art. 1.1.1 Directive 2006/42/EC). OPERATOR Person in charge of running the machine in accordance with its designated use, informed of the residual risksand performing thefunctionsrequired forits use, cleaning, adjustment, etc. ....using only his/her hands or the special tools provided by the manufacturer. MAINTENANCE TECHNICIAN Person responsible for servicing the machine in accordance with its designated use, informed of the residual risks and authorised to perform transport, handling, installation, adjustment, maintenance, cleaning, repair, Instruction Manual Genny 2.0 Urban(English) Document code 03-09-12_UIMG2 Manual ENG Pag. of Rev. SAVE DATA PRINT DATA 8 46 01 23/07/13 23/07/13 dismantling, scrappingoperations etc. ... with the use of tools normally made available to maintenance personnel or found in the toolbox at his/her disposal. OPERATOR QUALIFICATION Minimum skill level that the operator must possessto perform the described operation. NUMBER OF OPERATORS Adequate number of operators required to perform the described operation in the best possible wayas calculated by careful analysis carried out by the manufacturer. This means that the use of a different number of operatorsmight jeopardise the required result or endanger the safety of the persons involved. MAN-MACHINE INTERACTION Any situation in which an operator interacts with the machine in any of itsoperating phases at any moment during the machine’s lifetime. MACHINE - MACHINERY The machine described in this users instruction manual. ALMOST - MACHINE An assembly, which together constitutes a partly completed machine but which on its own,is not able to guarantee a specific application. The almost-machine is exclusively intended to be incorporated in or coupled to(an)othermachine(s) and/or to (an)other partly completed machine(s) and/or equipment, governed by the applicable directives. MACHINE STATUS: The machine status includes the mode of functioning, for example in automatic mode, jog mode, stop mode, etc.and the condition of safety devices installed on the machine such as active guards, excluded guards, emergency button pressed, tpe of isolation from energy sources, etc. FIXED GUARD Guard held in position (i.e., closed), or permanently (by welding, etc.) or by means of fixing elements (screws, nuts, etc.) that make it impossible to remove / open without the use of tools. MOBILE GUARD Guard generally mechanically connected (for example by means of hinges or guides) to the frame of the machine or to a close by fixed element and which can be opened without the use of tools. ADJUSTABLE GUARD Fixed or mobile guards that can be adjusted as a single part or that incorporate one or more adjustable components. The adjustment setting remains fixed throughout a specific operation. INTERLOCKED GUARD Guard associated with an interlock device in such a way that: - The hazardous functions of the machine "controlled" by the guardcannot be carried out until the guardhas been closed. - If the guard is opened during the execution of a hazardous machine function, a stop command is given; - Closing the guard allows the execution of a hazardous machine function "controlled" by the guard, but he does not in itself give the start command for the said hazardous function. INTERLOCKED GUARD WITH GUARD LOCKING FACILITY Guard associated with an interlock device and a device for locking the guard, so that: Instruction Manual Genny 2.0 Urban(English) Document code 03-09-12_UIMG2 Manual ENG Pag. of Rev. SAVE DATA PRINT DATA 9 46 01 23/07/13 23/07/13 - Hazardous machine functions "controlled" by the guard cannot be executed until the guard has been closed and locked; - The guard remains closed and locked until the risk of injury deriving from hazardousmachine function has not ceased; - The closing and locking the guard allow the execution of the dangerous machine functions "controlled" by the guard, but do not in themselves give the start command for the said hazardous function. PROTECTION DEVICE Device (other than a guard), which reduces the risk, either alone or associated with a guard. INTENDED USE Use of the machine in compliance with the information supplied in the User Instruction Manual. REASONABLY FORESEEABLE INCORRECT USE Using the machine in a manner different from the one indicated in the User’s Instructions, but which canbe the immediate result of easily predictable human behaviour. SAFETY DEVICES / COMPONENTS Means a component used to ensure a safety function which if faulty or malfunctioning will jeopardise the safety and / or health of the exposed individuals (lifting equipment; fixed or mobile or adjustable guard, etc., electrical, electronic, optical, pneumatic, hydraulic or interlocking or protective device etc.). RESIDUAL RISK: A danger that has not been possible to eliminate or reduce sufficientlyby means of design solutions, against which the protections are not (or are not completely) effective. The user is given the information of the existence of said dangers and the associated instructions and warnings to overcome them (See, respectively, 5.4 and 6.5.1 of the European standards EN ISO 12100-1 and EN ISO 121000-2). MANUFACTURER The company: GM Distribution S.r.l. - Piazza Velasca, 5 - 20122 Milano (MI) - ITALY PURCHASER - EMPLOYER - USER The company including its CEO that uses the machine, object of this instruction manual. 1.7. WARRANTY The GM Distribution S.r.l.guarantees that the machine has been tested and verified at their factory. The warranty of the machine and its accessories, the mechanical and the pneumatic part is valid for a period of 24 months,as from the date of delivery (for specific options remains valid what has been established by contract), for a maximum of 7500 working hours. This guarantee consists in the repair or replacement of components that, after careful inspection by the Technical Service of the Manufacturer, prove to be defective. The warranty covers the parts of the machine produced byGM DistributionS.r.l., any other parts installed (such as groups or special devices) are covered by the warranties provided by the manufacturer of those products.The warranty is limited to defects of materials and ceases to have effect whenever the damaged parts of the machine prove to be tampered with or otherwise disassembled by unauthorized personnel to do so. Warranty repairs are carried out exclusively at theGM Distribution S.r.l. and freight costs will be charged entirely to thepurchaser.The warranty does not include the sendingof technical personnel. The warranty excludes: • The liability for direct and indirect injury to people, animals or property caused by failure or malfunction of the machine. Instruction Manual Genny 2.0 Urban(English) Document code 03-09-12_UIMG2 Manual ENG Pag. of Rev. SAVE DATA PRINT DATA 10 46 01 23/07/13 23/07/13 • The costs for the replacement of lubricants, transportation costs, meals and lodging based on current rates of GM Distribution S.r.l. for work performed at the users’ premises, any customs fees for machines shipped abroad. • Taxes (VAT) and anything else not written in the supply contract are in any case charged to purchaser. • The replacement or repair of materials under warranty do not extend in any case the terms of the warranty. The purchaser may enforce his warranty rights only if he has fulfilled the requirements for application of the warranty, listed in the supply contract. If it appears that the parties choose to submit the disputes arising from the supply contract to arbitration or in any other case in which the pronouncement is required by an ordinary Court of Law, only the Court of Pesaro – Italy will be of territorial jurisdiction. 1.8. NOT COVERED Upon delivery you must ensure that the machine was not damaged during transport. All claims must be submitted within 8 days after delivery of the product. The purchaser may enforce his warranty rights only when he has fulfilled the conditions regarding the application of warranty, listed in the supply contract. In addition to the cases described in the supply contract, the warrantyis invalidated: •whenever you verify an error attributable to the operator, in not in compliance with or contrary to the instructions in this user guide. •whenever the damage to the machine is caused by insufficient maintenance. •whenever the machine is used for purposes other than those specified in this user guide. •whenever the damage to the machine is caused by the environmental conditions in which it operates, or by phenomena not depending from its normal functioning, such as irregularities in the voltage or frequency of the power supply of the electrical distribution in the plant. •whenever, following repairs performed by the user without the consent of the GM Distribution S.r.l. or because of installation of not original spare parts, the machine has undergone changes and the damage is caused by these changes. •wheneverthe instructions described in this manual are not observed. 1.9. HOW TO CONSULT THE MANUAL The Manual is subdivided into independent chapters, each aimed at specific personnel (operator, maintenance electrician/installer, maintenance mechanic/installer), for whom the necessary skills for safe machine use are defined. The sequence of chapters complies with the temporal logicof the machine’s lifecycle. To facilitate the immediateunderstanding of the text, a series of terms, abbreviations and pictograms are used whose meaning has been specified in the previous and following paragraphs: a. b. c. d. e. f. g. Sect. = Section Ch. = chapter Par. = paragraph Pag. = page Fig. = figure Tab. = table UIMM = User Instruction and Maintenance Manual Instruction Manual Genny 2.0 Urban(English) Document code 03-09-12_UIMG2 Manual ENG Pag. of Rev. SAVE DATA PRINT DATA 11 46 01 23/07/13 23/07/13 h. A = Risk Analysis i. PPE = Personal Protective Equipment j. RR = Residual Risk k. EP = Electrical Cabinet l. BM = on board machine m. NC = non-conformity n. FG = fixed guard / s o. MG= mobile guard(s)with micro switch without Yale key, mounted on hinges or on a profiled cam, to prevent tampering / reclosing with additional keys.Ideally the micro switches should be installed in the area inside the guards and/or covered with metal panels. p. MG + B= mobile guard(s) + mechanical lock and release with electric impulse (micro switch with electric lock).Do not use safety micro switches with lock and / or release with Yale type key. Such guards must be installed inside the machine danger zone key for unlocking mounted alongside them in order to avoid the risk of becoming trapped in the machine. The revision and printing dates of the manual and the current revision level are shown at the foot of each page. ORIGINAL INSTRUCTIONS - (PLEASE KEEP FOR FUTURE REFERENCES) CAP. 2. GENERAL INFORMATION AND FEATURES 2.1. PRE-DELIVERY TESTS Prior to delivery, all the installed components are subjected to careful visual inspections and instrumental checks in orderto guaranteecompliance with normative provisions and contractual specifications. Meticulous observance of our instructions will ensure that in normal operating conditions and when used correctly, your machine will provide lasting and reliable operation. 2.2. TECHNICAL FEATURES 2.2.1. AIM – PURPOSE - MANUFACTURING PARTS The electric wheelchair, hereinafter called the "machine", is an electrically powered wheelchair, destined for use by a person of age. The machine is a self-balancing personal mobility device with n. 2 wheels and a self balancing system which incorporates a support for a seat forn. 1user of age, propelled by 2 electric motors controlled by the user who electronically or manually commands speed and direction. The machine moves by detecting the movements of the body and so the correct position on the bodyallows full control. The automatic functions,programming and operating sequence of the machine are managed by the electromechanical components in hard-wired logic and by a PLC. It is possible to equip the machine with authorized accessories, contact your authorized service centre or visit www.gennymobility.com for available accessories. Instruction Manual Genny 2.0 Urban(English) Document code Pag. of Rev. SAVE DATA PRINT DATA 12 46 01 23/07/13 23/07/13 03-09-12_UIMG2 Manual ENG OBSERVE LOCAL LAWS AND REGULATIONS The relevant authorities shall govern the use of the device on public streets and sidewalks. In addition to other requirements, current legislation may impose limitations, such as maximum speed or the minimum age for driving the machine.Check with local authorities to receive information about laws and regulations. BALANCE MODE You ride your Genny in Balance Mode. In this mode, Genny detects when you lean forward or backward, when youtilt the LeanSteer Frame left or right and moves its Wheels in response to your movements. The machine also offers the Balance Mode with no person on board, with which it is possible to accompany the machine slowly by hand. When the machine is in Balance Mode with no person on board, it is important to always hold the handlebar to prevent it from moving independently. When the machine is in balance mode, the Controller displaysa happy face. Instruction Manual Genny 2.0 Urban(English) Document code 03-09-12_UIMG2 Manual ENG Pag. of Rev. SAVE DATA PRINT DATA 13 46 01 23/07/13 23/07/13 MAIN GROUPS H I A B C D E F L G REF. DESCRIPTION M REF. DESCRIPTION A Back rest H Infokey Controller B Seat module I Handlebar C Lateral handles for the emergency deployment of parking legs L Rearguard D Controlling console M Rear Parking Leg E LeanSteerframe F Wheel, tire and fender assembly G Foot rest The electrical equipment of the machine consists of: 1. a section contained within n. 1 plastic space on the bottom of the machine in which are located the batteries, which power the machine. In the front area of the machine is the slot for charging the batteries. At the front right next to the handle on the side are the control buttons and visual signals 2. a section with motors, wired devices and components on the machine. Instruction Manual Genny 2.0 Urban(English) Document code 03-09-12_UIMG2 Manual ENG Pag. of Rev. SAVE DATA PRINT DATA 14 46 01 23/07/13 23/07/13 2.2.2. TECHNICAL AND CONSTRUCTION SPECIFICATIONS Technical Data Genny 2.0 Urban Weight of the user Max weight 75 Kg Min weight 50 Kg Performance Max speed 6 Km/h Rechargeable batteries Lithium Ion batteries (Li-ion) Range* 26 ~ 39 Km Turning Radius Zero. Wheels can rotate in opposite directions enabling the machine to turn in place Tireinflation pressure Power Requirements (Worldwide) 1,03 bar 100 ~ 240 V, 50 o 60 Hz Dimensions Machine Weight Without Batteries 79,2 kg Battery Weight Ground Clearance (Unloaded) 10,3 kg Dimensions 670 x 630 mm Height with closed back rest 690 mm Height with open back rest …mm Height with leansteer 920 mm adjustable Height of seat from ground (min.) 64 mm Tire diameter 483 mm 85 mm Controller InfoKey Battery CR2430 replacement batteries are available at Electronics stores. 2.2.3. TECHNICAL DATA BATTERIES Battery type 92 cells Li-on Charging time Before first use 12 hours Recharge from empty 8 hours circa Temperature Ranges Operating -10°C ~ 50°C Charging -10°C ~ 50°C Storage and transport -20°C ~ 50°C General Capacity (Ah) and voltage 5,8 Ah, 73,6 V Instruction Manual Genny 2.0 Urban(English) Document code Pag. of Rev. SAVE DATA PRINT DATA 15 46 01 23/07/13 23/07/13 03-09-12_UIMG2 Manual ENG Dimensions 35,7 x 19 x 8,2 cm Battery pack weight (pair) 10,3 kg Technical data batteries Gel Charging time Before first use 12 hours Recharge from empty 8 hours Temperature Ranges Operating -10°C ~ 50°C Charging -10°C ~ 50°C Storage and transport -20°C ~ 50°C General Capacity (Ah) and tension 5.0 Ah, 12 V Dimension 7 x 9 x 14 Weight 2 Kg If you use, charge, or store your batteries outside the limits specified, you may invalidatethe limited warranty, damage your batteries, and/or experience reduced range and ineffective Battery charging. 2.2.4. MAXIMIZING RANGE Maximum range distances are provided in the previous table. The range of your Genny 2.0 is affected by many variables, including: Terrain: Riding on smooth, flat terrain improves range, and riding on hilly terrain and unpaved surfaces reduces range. Speed and Riding Style: Riding at a consistent, moderate speed will increase range while frequent starting, stopping, acceleration, and deceleration reduces range. Tire Inflation Pressure: Riding with tire pressures below the specified limit reduces range. Rider Weight and Cargo: Lighter riders with less cargo experience have better range than heavier riders with more cargo. Temperature: Storing, charging, and riding in temperatures close to the median of the recommended temperature range improves range. Riding in colder temperatures reduces range significantly. Battery Condition: Properly charged and maintained Batteries provide greater range. Old, cold, heavily used, or poorly maintained Batteries provide less range. Wind: Riding with a tailwind increases range. Riding against a headwind reduces range. 2.2.5. AIRBORNE NOISE EMISSIONS The operating conditions of the machinery during measurement and the methods used are described in the report included in Chapter 9. Instruction Manual Genny 2.0 Urban(English) Document code 03-09-12_UIMG2 Manual ENG Pag. of Rev. SAVE DATA PRINT DATA 16 46 01 23/07/13 23/07/13 INFORMATION CONCERNING THE AIRBORNE NOISE EMISSIONS Level A-weighted sound pressure levels Near the driver's seat Level A-weighted sound power level emitted by the machine, if the A-weighted sound pressure level in the workplace exceeds 80 dB (A). Near the driver's seat CHARACTERISTICS The above-mentionedvalues are those established by measurements on the machine in question. As this is a machine of medium size, the following are indicated: ➢ the A-weighted sound power levels ➢ the A-weighted emission sound pressure levels at specified positions around the machine. The acoustic data are measured using the methods defined in the standardized regulations and the most appropriate measurement code in relation to the machine. The weighted sound pressure levels are measured at 1 meter from the machine surface and at a height of 1.60 meterfrom the ground or access platform. 2.2.6. VIBRATIONS The operating conditions of the machinery during measurement and the methods used are described in the report included in Chapter 9. INFORMATION RELATING TO VIBRATION Level of vibration transmitted to the hand-arm In the driver’s seat Level of vibration transmitted to the entire body In the drivers’ seat CHARACTERISTICS ... M / sec 2 ... M / sec 2 The above-mentioned values are those established by measurements on the machine in question. The data are measured using the methods defined in the standardised regulations and the most appropriate measurement code in relation to the machine. 2.3. SERVICE CONDITIONS SERVICE CONDITION Conditions of use Minimum required illumination Floor conditions Characteristics supporting surface Load-Bearing capacity of the floor Maximum ambient air temperature Minimum ambient air temperature Ambient working Temperature Transport and storagetemperature USER LIMITS Inside or outdoors 300 lux Horizontal and smooth: flatness and slope errors in the content ...% gradient Pavement or concrete pavement in accordance with the provisions of health and saf on the workplace under the applicable legislation 2 ....Kg / m +40 ° C 5 ° C (if the device has at least degree of protection IP54) 0 ° C (if the device has a lower degree of protection IP54) +5 ° C <T <+45 C Between -25 ° C to +55 ° C (for periods of less than 24 h it is possible to have temperatures up to +70 ° C) Instruction Manual Genny 2.0 Urban(English) Document code 03-09-12_UIMG2 Manual ENG Pag. of Rev. SAVE DATA PRINT DATA 17 46 01 23/07/13 23/07/13 Relative humidity of 100% at a temperature of +25 ° C (if the device has at least IP54 protection degree) Relative humidity must not exceed 50% at +40 ° C or 90% at +20 ° C (if the device has a lower degree of protection IP54 Equipment for machine installed indoors Machine is unsuitable for operation in environments where contaminants are present: for example, powders, acids, corros gases, salt and similar Machine is unsuitable for operation in environments where there are dangerous areas classified as Zone 0 or Zone 1 or Zo 2. Machine is unsuitable for operation in environments where ionizing and non-ionizing radiation are present: for example, microwaves, UV radiation, laser, X-rays and similar Electrical equipment unsuitable for use on machines or in environments subjected to vibrations and jolts, otherwise assemb the equipment far from the device and install anti-vibration supports May be used in residential, commercial and light industry sector as it complies with EN 61000-6-1 ➢ the treatment of potentially explosive material ➢ use in potentially explosive and / or flammable atmospheres ➢ use with specific risks during processing of certain materials ➢ use in mine ➢ use at high temperature Special and additional unforeseen ➢ use in corrosive environments prescriptionsmay apply for the ➢ the use in strong magnetic fields machine used for: ➢ use in conditions of radioactivity ➢ The use for loads that may lead to a risk situation (for example, molten metal, acids / alkalis, particularly fragile loads, explosives) ➢ use on ships and in seismic areas ➢ contact in use with foodstuffs 2.4. NORMALUSE, IMPROPER USE, INCORRECT/PROBIHITED/REASONABLY FORESEEABLE USE The machine described in this manual is expected to be conducted by n. 1 operatorsuitablytrained and instructed with regards to the residual risks, with the same safety skillsas drivers of vehicles on the road and with the professional skills as described in Chapter n.4.The occupant / rider must be a person of age without disability and with the full ability to use motor vehicles. This manual contains a list and description of the residual risks that could not be eliminated in the design stage and that therefore remain present on the machine. For each risk, suitable instructions or prescriptions are given that the customer must observe in order to avoid hazards affecting the machine operator and the maintenance technicians. For reasons of safety, during the processing operations the presence of other persons apart from the operator in the area surrounding the machine is strictly forbidden. 2.4.1. NORMALUSE The Rider of the machine must have at heart its own safety and that of people he may cross: during training for the use of the machine, one must remember how one learned to use other mobility vehicles.Probably a spotter assisted the Rider, he chose a place without obstacles or dangers, etc.... these techniques are equally applicable to the machine of this manual. If you comply with and respect all instructions and warnings in the User Manual you will learn to use and drive the machine. For the first experience on board it is important to have read and understood all the instructions contained in this manual and in any case be to get help from a qualified person who already knows how to operate the machine. Instruction Manual Genny 2.0 Urban(English) Document code 03-09-12_UIMG2 Manual ENG Pag. of Rev. SAVE DATA PRINT DATA 18 46 01 23/07/13 23/07/13 When making 'NORMAL USE’ of the machine it is mandatory: 1. to use the machine within the limits of and following the logic of its functioning defined in Chapter n. 2 and n.5. The use of the machine for operations other than those described in this manual is considered improper and therefore strictly forbidden. 2. to always wear the helmet on board the vehicle.A bicycle or skateboard helmet of the correct size and with a strap under the chin provides adequateprotection in case of a fall to the back.According to the environmental conditions and the experience of each individual, we recommend the use of other protective accessories such as gloves, elbow and eye protection. 3. to avoid obstacles and slippery surfaces that can lead to loss of balance or grip to the ground and cause fall. 4. to pay attention to all warning signs that the machine generates, as they are symptomatic of unsafe operating conditions. To learn to interpret warnings of the machine as described in the user documentation and respond as indicated by the instructions. 5. that all components are properly installed. The use of the machine with missing parts or improperly installed can cause damage to the vehicle and cause serious injury due to loss of control, collisions and falls. 6. that the use of the machine is operated by a single operator, informed of all the functions, performances and dangers inherent to the use of the machine. 7. to make sure there are no people exposed in the machine’s working area before starting any operation. 8. to check if all safety devices are in perfect conditions and in good working order before you start operating the machine 9. to check before use, to check the conditions of ambient lighting, and ensure there are no areas of shadow or glare or potentially hazardous strobe effects 10.todisconnect the electrical power sources before performing any maintenance on the machine. 2.4.2. IMPROPER USE The machine must not be used IMPROPERLY, in particular: 1. it can not be used with parameters different from those reported in the technical specifications table (see paragraph no.2.2) 2. any use of the machine with modes different from those indicated in this manual, is considered improper and therefore, the manufacturer declines any responsibility. 3. the user is responsible for damages resulting from failure to observe operating conditions agreed at the time of technical specification and order confirmation. 2.4.3. INCORRECTUSE AND PROHIBITED USE The machine must not be used in an INCORRECT/PROHIBITED/ REASONABLY FORESEEABLE INCORRECT MANNER. In particular: 1. it is forbidden to manually deploy the emergency parking legs while the machine is moving. 2. it is forbidden to step on the machinewhen the stabilizing parking legs are not firmly on the ground 3. you may not alter in any way the machine.Any alteration made without the prior written permission of the manufacturer may affect the functioning of the machine, result in serious injury and / or damage and invalidate your warranty. 4. It is forbidden to pull the power cord to disconnect the power plug while charging the batteries 5. use by unauthorized personnel and with clothing other than indicated for use is forbidden. 6. it is forbidden to smoke or use open flame devices, and handling glowing hot materials during use 7. itis forbidden to activate or adjust the control or blocking devices such as handles and similar during functioning of the machine 8. it is forbidden to hang objects or weights to the machine 9. it is forbidden to use the machine with protective guards open, incorrectly fastened or removed 10. it is forbidden to partially or totally neutralize, remove, modify or even ineffective the protections and warning information 11. it is forbidden to use the machine without having taken all the measures and precautions by the user regarding the elimination of the residual risks indicated in this Instruction Manual. Instruction Manual Genny 2.0 Urban(English) Document code 03-09-12_UIMG2 Manual ENG Pag. of Rev. SAVE DATA PRINT DATA 19 46 01 23/07/13 23/07/13 12. it is forbidden to use the machine in operations other than those explicitly specified in this instruction manual (see Chapter n.6). 13. use is forbidden in areas for which the operation is not expected or foreseen, without prior appropriate safety measures (cf. paragraph.2.2) 14. it is forbidden to put the machine in contact with foodstuff. 15. it is forbidden to operate the control command to move the unit without first having checked and verified that no person is present in the in the dangerous zones of movement 16. it is forbidden to enter the working area / danger zone of the machine while the machine’s moving parts are being commanded. (see Chapter n.4) 17. it is forbidden to enter the working area of the machine with any part of the body, including hands and arms, before the dangerous mobile parts have come to a complete stop (see Chapter n.4) 18. it is forbidden to access the dangerous areas for cleaning, lubrication, maintenance, etc. ... without first disconnecting the machine from the batteries or the power source. 19. it is forbidden to use of the machine in critical conditions of stability, outside of the set limits. 20. It is forbidden to unlock the handles to enable an immediate complete stop while moving with the machine 21. it is forbidden after a complete stop and having commanded the deployment of the parking legs to resume movement of the machine. 22. it is forbidden to let go of the machinewhen in Balance Mode with no person on board, because the machine will travel independently for some distance before stopping, and this could be a danger of injury to bystanders. Moreover, the machine itself may be damaged. 23. It is forbidden to place any object on the seat cushion, because they might interfere with the presence sensor, allowing the machine to move on its own, hitting a pedestrian or an object and causing injury or damage. 24. it is forbidden to try to start or move the machine with empty batteries and even moreso after a safety shutdown due to this condition, since the machine may not be able to maintain dynamic stability, especially if this requires a lot of power block. Restart and resume to circulate in these conditions means taking the risk of falling. Moreover, this may damage the batteries and affect longevity and payload capacity. If the condition persists, contact your authorized service center. 25. it is forbidden to use the machine if the batteries are not sufficiently charged (condition indicated on the Controller display with the sad face and the absence of horizontal lines on the display of battery charge level).Carefully check the charge level of the battery to be prepared to stabilize the means deploying the the parking stand legs. 26. It is forbidden immerge the machine, the batteries or the platform in water. 27. it is forbidden to expose the machine to rain or water for extended periods, both during use, transport or storage 28. it is forbidden to try to open the platform or seat module, as they contain no parts that are repairable or replaceable by the user, but only by authorized service center 29. it is forbidden to open the Gearboxes and seat module, as they contain no parts that are repairable or replaceable by the user, but only by authorized service center 30. it is forbidden to rock back and forth or make sudden weight shifts that can lead to loss of traction on the ground and cause a fall. 31. it is forbidden to move in reverse, if not just to move slightly backwards or to maneuver 32. It is forbidden to bend while maneuver backwards or slowing downand. 33. it is forbidden to ride over obstacles, loose objects or on uneven terrain, slippery surfaces or steep slopes: it is very easy to lose control of the vehicle, with serious consequences (fights, falls and injuries).As all means of transport, the machine may endanger the personal safety. 34. it is forbidden to let the machine be used by people who have not read this Instruction manual. 35. it is forbidden letting the machine be used by beginners that do not use the setting for beginners.Assume the task of instructing the inexperienced. 36. it is forbidden to board the machine for the first time without an assistant holding the vehicle firmly 37. it is forbidden to wear loose clothing that could get caught in the wheels and prevent steering 38. it is forbidden to offer rides, the machine is intended for one person only.Do not carry passengers a board, especially children in a backpack or babies in a baby carrier. 39. it is forbidden to climb the stairs or go through revolving doors.It is extremely dangerous to climb stairs on board the machine, even when they are escalators 40. it is forbidden to ride in the dark.Do not use the machine in conditions of poor visibility.For safe driving, it is necessary that the visibility is good to see what is in front and also to be seen by others. 41. it is forbidden to use the phone while riding the machine Instruction Manual Genny 2.0 Urban(English) Document code 03-09-12_UIMG2 Manual ENG 42. Pag. of Rev. SAVE DATA PRINT DATA 20 46 01 23/07/13 23/07/13 it is forbidden to transport objects The manufacturer can not be held responsible for any failure caused by unreasonable, improper and / or incorrect use. The customer is in any case responsible for damages resulting from failure to comply with the specified terms of use. If you have any questions, please contact our Technical Support Center. The User is always reponsible for providing suitable personal protective equipment to machine operators and for informing them of the permissible uses of the machine. Instruction Manual Genny 2.0 Urban(English) Document code Pag. of Rev. SAVE DATA PRINT DATA 21 46 01 23/07/13 23/07/13 03-09-12_UIMG2 Manual ENG CAP. 3. CONSISTENCY OF SUPPLY 3.1. MACHINE IDENTIFICATION The identification plate of the machine is on the frame and mentions the following data: [Facsimile] Via Frasca, 3 6900 Lugano SWITZERLAND POWERED WHEELCHAIR DESIGNATION MODEL SERIAL NUMBERS GENNY 2.0 URBAN U0000000001-U0000009999 MASS 89,5 kg YEAR 2012 CAPACITY 75 kg 3.2. MACHINE CERTIFICATION Directive 2006/42/EC sets out the minimum conditions in which a machine can be released on the EU market. The Directive requires that all machines can be sold and commissioned only if they do not jeopardize the safety and health of humans,pets or property. The machine with manualloading and unloading of pieces does not fall into any of the machines categories listed in the list provided in Annex IV of the Directive. To certify the conformity of the machine with the prescriptions indicated in the Machinery Directive, prior to commissioning, GM Distribution S.r.l. has carried out all tests and inspections required by the reference standards, including risks analysis, in order to evaluate punctual compliance with the essential health and safety requirements specified in the Directive. The technical file of the construction, which contains the fundamental project data and all the characteristics correlated to the safety of the machine, was developed in accordance with Annex VII to Directive 2006/42/EC and has been deposited in our offices and available to inspection by supervising organs at motivated request, as required under current regulations. GM Distribution S.r.l. having checked by means of the above mentioned analysis that the machine was designed and built in compliance with the provisions contained in Directive 2006/42/EC, andthat it therefore meets the relevant prescriptions, and that it can be safely used in service conditions listed in this manual, has released the machine on the marketaccompanied by the following: ➢ CE Marking ➢ EC Declaration of Conformity ➢ User Instructions (User Manual) Instruction Manual Genny 2.0 Urban(English) Document code 03-09-12_UIMG2 Manual ENG Pag. of Rev. SAVE DATA PRINT DATA 22 46 01 23/07/13 23/07/13 3.3. TECHNICAL REFERENCE STANDARDS The conformity of the machine have been assessed in relation to European standards, drafts of European or national standards included and mentioned in the technical file for this machine in our offices. 3.4. FACSIMILE OF THE DECLARATION OF CONFORMITY ' 2006/42/EC (Annex II, Part A) The undersigned, representing the following manufacturer Manufacturer GennyMobility SA Address Via Frasca, 3 6900 Lugano SWITZERLAND Instructed the person authorized to compile and maintain a technical file First Name+Last Name GM Distribution S.r.l. Address Piazza Velasca, 5 20122 Milan (MI) - ITALY The manufacturer herewith declares that the machine Denomination MOTORIZED WHEELCHAIR Function TRANSPORT OF N. 1 PERSON IN SEATED POSITION Model GENNY 2.0 URBAN Type Electric two-wheeled Serial numbers: U0000000001-U0000009999 Year of construction 2012 Complies with all relevant prescriptions contained in the following EC directives (including all applicable amendments) 2006/42/EC - Machinery Directive 2004/108/EC - Electromagnetic Compatibility Directive MILAN ...................................... Administrator __________________________ _ Name in block letters and Instruction Manual Genny 2.0 Urban(English) Document code 03-09-12_UIMG2 Manual ENG Pag. of Rev. SAVE DATA PRINT DATA 23 46 01 23/07/13 23/07/13 signature FACSIMILE OF THE ORIGINAL CAP. 4. SAFETY INSTRUCTIONS 4.1. INTRODUCTION Always observe the safety regulations. The failure to observe rules and safety procedures can be a source of danger and harm to personnel and the machine. The safety instructions given in general in these User Instructions Manual are of general nature and, though based on experience, do not extend to all situations that may occur. These instructions complement and do not replace a constant application, by the purchaser of the machine, of the basic security rules known to those working in the specific field. It is therefore recommended to observe the rules for safety and prevention already set and applied in the location where the machine will be used. This chapter highlights the residual risk on the machine despite the correct application of design and safety standards and safety, it also shows the modalities to be followed by the purchaser in order to reduce and/or eliminate the highlighted residual risks. The use (operation and maintenance) of the machineis constrained in respect of: 1. all rules concerning integration in the environment and behavior of people, established by law and / or applicable standards 2. all warnings and instructions for use that are part of the technical documentation / graphics that accompany the machine itself. The machine must be handled, protected, used, maintained and eventually dismantled (after it is no longer used), so as to avoid danger, as far as is reasonably possible, to persons, animals or objects and one must ensure the necessary maintenance. Instruction Manual Genny 2.0 Urban(English) Document code 03-09-12_UIMG2 Manual ENG Pag. of Rev. SAVE DATA PRINT DATA 24 46 01 23/07/13 23/07/13 4.2. DUTIES AND RESPONSIBILITIES 4.2.1. BUYER'SOBLIGATIONS The purchaser must, within their respective competence and responsibility: a. implement security measures; b. inform the driver of the specific risks they face and make them aware of the essential rules of prevention; c. arrange for and demandthat the driver observes safety rules and uses the means of protection made available to him. 4.2.2. GENERALPERSONNEL REQUISITES The staff that interacts with/ uses the machine must: a. have read and understood all safety instructions in the user instruction manual; b. be of age and possess a driving license and in any case have all the specific information about the vehicle concerning : b.1. trafficregulation in the country of employment b.2. the meaning of signs and road markings c. have no disability or have normal physical and mental condition; d. have been informed and trained about: d.1. the dangers of injury or other damages that may result from direct or indirect contacts; d.2. the dangers associated with overheating, electrical arcingor radiation produced and / or emitted by electrical equipment that may be present; d.3. the dangers of non-electric kind that, as experience shows, can be derived from the electrical equipment that may be present; d.4. the dangers of injury or other damages resulting from the residual risks reported in this User Instructions Manual; e. have (or acquire through appropriate training), the requirements listed below: e.1. general technical education sufficient to understand the contents of this User Instruction Manual and to correctly interpret the electric diagram and all technical drawings enclosed; e.2. knowledge of the primary rules of hygiene, safety and technology; e.3. have overall familiarityof the machine and of any installed electrical equipment; e.4. know how to react in case of emergencies; e.5. know where to find the individual protective equipment and how to use it correctly, if the manufacturer's instructions prescribe it or if the collective protection is insufficient; f. In addition: f.1. immediately report to the buyer the deficiencies of the devices and means of security and protection, and other dangerous conditions, if any, of which they know, and in case of urgency, make every effort within their competence and ability to eliminate or reduce these deficiencies or dangers; f.2. not remove or modify the devicesand other means of security and protection without prior authorization; f.3. not carry out operations or maneuvers on his own initiative that are outside their assigned duties and that can jeopardize their own safety or that of others: f.4. not wear rings, wristwatches, jewelry, torn clothing, scarves, ties, or any loose garment or accessory that could cause risk; tighten the sleeves around the wrists, and always keep long hair well tied back; g. be physically and mentally fit to carry out the work of particular technical difficulty; h. be instructed about the use and maintenance of the machine; i. be able to understand and interpret the operator's manual and safety regulations; j. be aware of emergency procedures and their implementation; k. be able to operate the specific type of equipment; l. have read and understood the operating procedures defined by the Manufacturer of the machine. Instruction Manual Genny 2.0 Urban(English) Document code 03-09-12_UIMG2 Manual ENG Pag. of Rev. SAVE DATA PRINT DATA 25 46 01 23/07/13 23/07/13 Unless otherwise specified, the personnel performing maintenance, re-use and reinstallation interventions, does troubleshooting, cleaning and sanitization, scrapping and disposal must be expert personnel trained in relation to safety and informed on the residual risks, with the same skillsas maintenance technicians. Saidexpert personnelmust be able to assess the tasks assigned to him/her recognizing the possible hazards on the basis of their training, knowledge and professional experience and his knowledge of the machine, the related equipment and applicable standards and regulations. Hemust also be in possession of an adequate professional qualification concerning the machines in question. The personnel must be trained in safety matters and be informed about the residual risks as described in Chapter n.4. It must also be skilled rather than simply aware, or must have knowledge about the machine and related equipment and related legislation, and have a particular technical expertise or training. He not only carries out all maintenance work, in some cases he is also of support to the operator to setup some activities. Themaintenance technician can also access the electrical panel with the equipment live. For safety reasons, during the working operations, in the area surrounding the machine, the presence of persons other than the operator is not allowed. As an exception to this requirement the presence of maintenance personnel specifically authorized by the production manager is permitted. The staff member in charge of the adjustment, tuning, use and servicing the machine must immediately suspend activities and inform the employer or the person in charge of the department when he or shedetects any anomalies or defects. In case the user does not have experienced or informed staff,he must authorize the activities in question to a company responsible for this purpose, such as for example, the supplier of the machine. Instruction Manual Genny 2.0 Urban(English) Document code 03-09-12_UIMG2 Manual ENG 4.2.3. Pag. of Rev. SAVE DATA PRINT DATA 26 46 01 23/07/13 23/07/13 TRAININGCOURSE FOR OPERATORS The machine is identified by the following features: Type of machine: .............................................. Model: .............................................. S/N: ………………………………... Year of Construction ............................................. Teacher: (name) ........................................... ............................ appointed by ........................................ organizer of the course. 1. Topics The training course has the following topics: ❖ description of the composition and the functionality of the machine; ❖ description of the programming mode; ❖ description of control devices and safety devices adopted; ❖ using the machine in all its modes; ❖ detailed information about risks and dangers deriving from it while using the machine. To take the course is used the Users Instructions Manual supplied by .............................. ..... manufacturer of the machine and in the language of the user. 2. Assessments (one per student) Operators intended for machine (Number and name of each) Result of final interview and assessment Positive Negative Note: when classes are in the final interview successfully, were ascertained knowledge on security. 3. Certificates (one for each student) The operator shall: (name) ......................................... .................................., having attended a course organized by ......... ..............................., the machine manufacturer, successfully, certifies that all information on safety and in particular those relating to residual risks are understood and implemented. Signatures: Operator: (name) ....................................... ..................... The teacher assigned by the manufacturer of the machine: (name) ..................................... ....... The manager of the Company (name) ........................ user: (name) ............................................. ... Date Instruction Manual Genny 2.0 Urban(English) Document code 03-09-12_UIMG2 Manual ENG Pag. of Rev. SAVE DATA PRINT DATA 27 46 01 23/07/13 23/07/13 4.2.4. TRAININGFOR SET UP AND MAINTENANCE TECHNICIANS The machine is identified by the following features: Type of machine: .............................................. Model: .............................................. S/N: ………………………………… Year of Construction .............................................. Teacher: (name) ........................................... ............................ appointed by ........................................ organizer of the course. 1. Developed topics The training course has the following topics: ❖ description of the composition and the functionality of the machine; ❖ description of the programming mode; ❖ description of control devices and used safety devices; ❖ using the machine in all its modes; ❖ information on routine and special maintenance; ❖ detailed information about risks and dangers deriving for it when using the machine. To take the course please use Users Instructions Manual supplied by ................................... manufacturer of the machine and in the language of the user. 2. Assessments (one per student) Set-up / maintenance operators for the machine (Number and name of each) Result of final interview and assessment Positive Negative Note: when classes are in the final interview successfully, were ascertained knowledge on security. 3. Certificates (one for each student) The set–up / maintenance operator: (name) ....................................... ...................................., having attended a course organized by ....... ................................., the machine manufacturer, successfully, certifies that all information relating to safety and in particular those relating to residual risks are understood and implemented. Signatures: Operator: (name) ............................................................ The teacher instructed by the manufacturer of the machine: (name) ............................................ The manager (name) ................................................of the using Company (name) ........................ Date Instruction Manual Genny 2.0 Urban(English) Document code 03-09-12_UIMG2 Manual ENG Pag. of Rev. SAVE DATA PRINT DATA 28 46 01 23/07/13 23/07/13 4.3. GENERAL STANDARDS FOR PROTECTION OF MACHINES TEMPORARY REMOVAL OF PROTECTIONS AND SAFETY DEVICES The protections and safety devices of the machines should not be removed except for professional needs. If they are to be removed measures need to be immediately taken to highlight and reduce to a minimum the possible danger that comes with it. As soon as the reasons that necessitated their temporary removal exist no longer, the protectionor safety device must be put into place again. NO CLEANING, OILING OR GREASING OF MOVING PARTS It is forbidden to clean, oil or grease manually the organs and moving parts of the machine, unless particular technical reasons require it, in which case it must be made use of the appropriate means to avoid danger. Workers must be made aware by clearly visible notices. PROHIBITION OF REPAIRS OR ADJUSTMENT ON MOVING ORGANS It is forbidden to perform any repair or adjustment on moving organs. If you need to perform them in motion, you should use appropriate precautions to ensure the safety of the worker. Workers must be made aware by clearly visible notices. BLOCK OF THE STOP POSITION OF THE MACHINE The machines involved in loading, adjustment, replacement of parts, cleaning, repair and maintenance, that require that the employee is introduced in them, leaning with parts of the body in or between the organs that can get in motion, must be equipped with devices that assure the stop position of the machine and its organs during the execution of such operations. They have to have taken the necessary measures and precautions to ensure that the machine or its parts are not put in motion by others. 4.4. MOVING STRUCTURES Before moving structures always make sure that the area of movement is not occupied by personnel or by objects that cou represent danger. If the lighting and / or visibility is poor do not move any structure until a manager has established that there is the necessa freedom of movement within the work area; do not assume that the work area is free, but always visually make sure. Electrically and mechanically lock all moving parts of a structure or equipment to be transported. 4.5. LIFTING MEANS When using a lifting device for handling a machine, make sure that the pins for fastening and lifting are put in place correctly. Take the necessary precautions to prevent dangerous overloads due to acceleration, deceleration or impact forces. Before lifting a load to make sure it is properly fastened and properly balanced in the lifting device. DO NOT LIFT LOADS OVER PEOPLE; IN THESE CASES REDUCE THE LOAD OR FREE THE MOVING AREA FROM PEOPLE. Make sure that the slings, used for lifting, are in good condition and suitable for the type of work to be done. Make sure that the workload of safety of the crane is greater than the weight to be lifted. Instruction Manual Genny 2.0 Urban(English) Document code 03-09-12_UIMG2 Manual ENG Pag. of Rev. SAVE DATA PRINT DATA 29 46 01 23/07/13 23/07/13 4.6. INDICATIONS ON RESIDUAL RISKS GENERAL INFORMATION This manual lists and describes the residual risks that could not be eliminated at the planning stage and which remain on the machine. For each riskare given instructions or requirements that the user must follow to avoid danger to the operator and maintenance managers. For safety reasons, during work on the machine, in the area surrounding the machine the presence of persons other than the operator is not allowed. After considering the possible risks related to the use and maintenance of machinery, all the necessary measures to eliminate dangers and reduce the potential danger to exposed persons have been taken.However on the machine remain the following possible residual risks be eliminated or reduced with the indicated precautions. The purchaser must instruct the driver on the rider of injury, on safety devices and on the general rules regarding accident prevention required by EU directives and by the legislation of the country where the machine is used. The purchaser has the responsibility to educate operators and maintenance operators activating a training course, possibly in cooperation with the manufacturer of the machine, so that they are properly educated about the risks in general and the residual risks mentioned in this Manual. It is therefore necessary tha tthe use, maintenance and cleaning carried out by the user, are handled by trained and competent personnel. The purchaser has the responsibility to ensure that the instructions have been properly implemented. When necessary, it is also the responsibility of the purchaser: 1. to activate a training course / training, possibly in cooperation with the manufacturer of the machine, so that operators and maintenance personnel are adequately educated about the risks in general and the residual risks indicated in this Manual; 2. use personal protective equipment conforming to requirements of the Directive 2009/104/EC and its as amendmends and updates. Instruction Manual Genny 2.0 Urban(English) Document code 03-09-12_UIMG2 Manual ENG Pag. of Rev. SAVE DATA PRINT DATA 30 46 01 23/07/13 23/07/13 USING THE MACHINE The machine must be used solely for the purpose of which it is expressly designed, as specified in Chapter n.2. The use of the machine is reserved only to personnel who have followed a specific Users and safety course and must have carefully read and understood the contents of this manual. The operator not only needs to be adequately informed and trained, act with caution and pay attention to warnings marked on the machine, but he must also always pay attention during normal use and respect the modalities of the intended use. IPM: Safety helmets RESIDUAL RISK DUE TO NOISE The machine produces, as proven in experimental tests, a level of equivalent continuous A-weighted sound pressure of (see Chapter 2). To avoid risk of injury to the ear by piercing and insistent noises, the operator and maintenance personnel, not only needs to be as well as adequately informed and trained, during the machine operation and maintenance, he also must always wear appropriate ear protection devices, such as headphones or protective earplugs or similar personal ear protection. IPM: Hearing Protection RESIDUAL RISK DUE TO VIBRATION The machine produces vibrations, as proven by tests, (see Chapter 2). To prevent risk of injury of the limbs or the muscular system, the driver in addition to being adequately informed and trained, should not use the machine for a continuous time of more than 4 hours Instruction Manual Genny 2.0 Urban(English) Document code 03-09-12_UIMG2 Manual ENG Pag. of Rev. SAVE DATA PRINT DATA 31 46 01 23/07/13 23/07/13 RESIDUAL RISK DUE TO THE IMFLAMMABLE NATURE OF THE SUBSTANCES USED IN THE MACHINE AND OF THE TREATED PRODUCTS. To avoid danger of fire, the purchaser, in addition to adequately train and inform the operator and maintenance operator, must provide near the control post of the machine a suitable fire protection system, adapted to the types of materials that can catch fire. IPM: Protective gloves Body Protection RESIDUAL RISK DUE TO FAULTS IN THE LIGHTING SYSTEM As indicated in Chapter n. 2, in the areas of use, the lighting must not be less than 300 lux. If the lamps for the illumination of the site of use break down, during normal opertions or during the cleaning and in general during adjustment / setup and maintenance operations, generates a residual risk for the operator and the maintenance operator, who would be forced to work with insufficient lighting. In such a case the useshould be immediately discontinued. Any intervention by the operator or maintenance operator, can take place only after the restoration of adequate lighting. RESIDUAL RISK CAUSED BY THE NATURE OF CLEANING PRODUCTS there is a residual risk for both the operator and the maintenance operator, due to the nature and chemical composition of the products used in cleaning, because of their use during the cleaning. Please refer to safety data sheets for these materials in Chapter n. 9,on which are also listed the specific residual risks that these products represent together with the precautions to be taken. IPM: Eye Protection Protective gloves Body Protection Instruction Manual Genny 2.0 Urban(English) Document code 03-09-12_UIMG2 Manual ENG Pag. of Rev. SAVE DATA PRINT DATA 32 46 01 23/07/13 23/07/13 RESIDUAL RISK DUE TO ELECTRIC SHOCK There isis a residual risk for the maintenance operator working on the electrical equipment, in the intermediate circuitsin DC of the drives when the fixed guards which guarantee a degree of protection IP 2X are open, due to the presence of a voltage higher than 60V for a period greater than 5 seconds after the power failure, opening the general sectioning device on the power supply. Therefore, the maintenance operators must operate with caution, observe the instructions on the labels put near the mentioned components and wait 5 minutes after power failure, opening the general sectioning device on the power supply before making changes in DC intermediate circuits DC of the activations. These people must also follow the specific safety standards of maintenance operators. IPM: Eye Protective Protection gloves Safety shoes Body Face Protection protection RESIDUAL RISK DUE TO LIFTING OPERATIONS AND TO INTERVENTIONS THAT REQUIRE MANUAL OPERATIONS The lifting and transportation of the machine or its parts, the set-up or handling, even if performed in accordance with the guidelines of this manual, are manual operations which involve a residual risk mainly due to impact, crushing, dragging, sliding or abrasion . These operations require a considerable degree of attention from professionals, the operations manager must adequately inform the staff of these residual risks. There is also a residual risk for the operator or manintenance operator of impact, abrasion, cut, puncture and sliding during the setup, themaintenance, cleaning and other manual operations that may involve the fallingof parts or components from above, also due to the necessity of performing a manual intervention on the machine. Therefore, both the operator and maintenance operator as besides being adequately informed and trained, whenever performing manual tasks, in addition to respecting the normal user modalities, must use protection devices for the head (if there is any danger of elements falling down ) the hands, feet and clothing suitable for the workplace such as: the safety helmet, safety gloves, slip resistant shoes, suitable for the particular nature of the risk, with an iron tip. IPM: Protective gloves Safety shoes Body Protection Safety helmets Instruction Manual Genny 2.0 Urban(English) Document code 03-09-12_UIMG2 Manual ENG Pag. of Rev. SAVE DATA PRINT DATA 33 46 01 23/07/13 23/07/13 RESIDUAL RISK POSED BY REMOVAL OF THE FIXED GUARDS, INTERVENTIONS OF BROKEN / WORN PARTS The operator under no circumstances must try to open a guard during work or remove a fixed guard. With the guards open, there remains a residual risk during the setup, maintenance and cleaning, and during all othermanual operations that take place by putting the hands or other parts of the body in dangerous areas of the machine, mainly due to sliding and / or abrasion, crushing, etc ... These operations require a considerable degree of attention from professionals, the operations manager must adequately inform the staff of these residual risks. The workers should not wear rings, watches, jewelry, torn clothes, scarves, ties, or any other garment or accessory that hangs loose and can be dangerous; tighten the sleeves around the wrists, and keep hair well together. The operator and maintenance operator as well as being adequately informed and trained, each time they carry out the above operations, must use head protection devices for the head (if there is any danger of elements falling down), for hands, for feet, clothing appropriate to the workplace and to protect respiratory ways, such as the safety helmet, safety gloves, slip resistant shoes, suitable to the particular nature of the risk, with iron tip and dust masks or other suitable devices. Additionally, operators and maintenance staff must be trained for interventions related to manual operations in with open guards or with safety devices temporarily excluded, must be educated on the connected consequential risks and need authorizion by a manager. Whenever, during routine maintenance or special maintenance, the safety devices must be temporarily suspended, measures to highlight and reduce to a minimum the possible danger that comes with it, must be taken immediately. As soon as the reasons that necessitated their temporary removal exist no longer, the protection or safety device must be put into place again. IPM: Protective gloves Safety shoes Body Protection Safety helmets Instruction Manual Genny 2.0 Urban(English) Document code 03-09-12_UIMG2 Manual ENG Pag. of Rev. SAVE DATA PRINT DATA 34 46 01 23/07/13 23/07/13 4.7. DATAPLATES The data plates and signs must always be clearly visible and should never be removed. The plates and signs are a safety tool and should not be considered lightly. The purchaser is required to immediately replace any safety and / or warning plates that become defaced and illegible, due to wear and tear. LIST AND EXPLANATION OF THE PLATES ON THE MACHINE Wear safety helmets Do not remove guards and protective devices Posted near the mechanical locks that descend and ascend Posted on mechanical locks that descend and ascend AC 100 ~ 240 V, 50 Hz or 60 Posted near the connector for charging the batteries 15 psi or 1.3 bar Posted on wheel caps to indicate the maximum pressure of the wheels Instruction Manual Genny 2.0 Urban(English) Document code 03-09-12_UIMG2 Manual ENG Pag. of Rev. SAVE DATA PRINT DATA 35 46 01 23/07/13 23/07/13 4.8. SAFETY FEATURES 4.8.1. PROTECTIVE EQUIPMENT ON MACHINE Since the electrical equipment malfunctions or disturbances may lead to a dangerous condition or cause damage to the machine, appropriate measures to reduce the likelihood of such failures or disturbances were taken. Below you find the degree of adoption of any measure, the level of application depends on the risk level related to the particular application. The guards and safety devices of the machine must not be removed except for the need to work on the part of the maintenance technician. If they need to be removed measures to highlight and reduce to a minimum the possible danger that comes with it shall be taken immediately. As soon as the reasons that necessitated their temporary removal exist no longer, the protective or safety device must be put into place again. FIXED GUARDS The movement transmission organs of the machine are completely segregated by means of appropriate fixed guards locked with screws. For the removal of a fixed guard the use of a tool is required. Concerningfixed guards is also states that: 1. the dimensions of the fixed guards are such as to leave no openings in the protected danger work zone when they are set in place; 2. guards not fixed permanently welded to the machine are secured with screws that require the use of special keys (Allen keys) and can be removed, with the appropriate key, only those who are responsible for maintenance; 3. access to areas protected by a fixed guard is allowed only to the maintenance technician. Not under any circumstances the operator must try to open a fixed guard; 4. it is not possible to reassemble a guard in the wrong position so as to leave dangerous openings in the fairing; are not fastened in their place with the appropriate special screws, they can not remain closed and backed into that place in the absence of fasteners. When measuring and selecting safety devices and guards, the accessibility of people aged 14 years or morewas taken into account. Access to areas protected by a guard is allowed to both the operator and the maintenance technician. Under no circumstances, the operator must tryto willfully evade a guard. Access to areas protected by a fixed guard is allowed only to the maintenance technician. Under no circumstances, the operator musttry to willfully evade a guard. Prior to putting in service, all guards and safety devices must be properly installed, adjusted / tuned and made operational, scrupulously and carefully following the instructions in the manuals for installation use and maintenance of these safety devices (all delivered together with equipment) and the user instructionmanual. The manufacturer strictly forbidstampering with some of the safety devices, even if partially or only temporarily, as they were installed on purpose for the physical safety of both operators and staff present. Violation of this precept causes risk and is inconsistent with existing legal provisions on work safety. Instruction Manual Genny 2.0 Urban(English) Document code 03-09-12_UIMG2 Manual ENG Pag. of Rev. SAVE DATA PRINT DATA 36 46 01 23/07/13 23/07/13 PRESENCE SENSORS The machine is equipped with a sensor under the cushion, which detects the presence or absence of a rider when switched on. The person sitting properly on the cushion pressesthe presence sensor, and thisin combination with stabilizing legsdeployed allows the machine to function normally in Balance Mode. If the activation sensors do not work properly, the machine reduces the maximum speed, regardless of the setting (beginner or not). Once the sensors are repositioned, the machine regains its maximum performance. If you move the machine extremely quickly and suddenly for at least 2 meters in the Balance Mode and the presence sensor is not pressed, the means will produce the vibration of the handlebar before going into Standby Mode. FAILURECONTROLLER BOARDS The figure shows the location of the Controller Boards. The two Controller Boards receive input from the various components of the machine: batteries, motors, Rider Detect Sensors, Lean Steer Sensors and tilt sensors. Based on this input, the Controller Board sends the appropriate commands to the Motors that turn the wheels. When the system senses a malfunction in a critical componentor a battery that is depleted beyond its safe limit, the machine performs a safety shutdown. FAILURE MOTORS The figure shows the location of the motors. Each wheel is independently driven byredundant high-speed electric motors that are quiet and efficient. The two engines are electronically controlled to precisely regulate the motion. Each motor is wound by two separate circuits, capable of independent operation, acting as one mechanical entity. If either winding in a Motor fails, the machine performs a safety shutdown. Instruction Manual Genny 2.0 Urban(English) Document code 03-09-12_UIMG2 Manual ENG BALANCE SENSOR ASSEMBLY The figure shows the location of the Balance Sensor Assembly. The Balance Sensor Assembly contains five angular rate sensors (solid state gyroscopes) and two tilt sensors. The Balance Sensor Assembly sends information about the machine’s orientation to the Controller Boards. All sensors are constantly monitored by the machine to ensure each is operating correctly. If one of these sensors fails, the machine will perform a Safety Shutdown. BATTERIES The figure shows the location of the Batteries. The two Batteries are sealed units (when properly installed) that require no maintenance other than proper charging and storage. The Batteries are interchangeable and can each be installed in either the front or rear of the Powerbase. For the machine to operate, both Batteries must be installed, and both must be Li-ion Batteries. The battery, which governs the security control that activates the stabilizing parking stand, have LeadGel technology. If one Battery fails or is depleted beyond its safe limit, the machine will perform a Safety Shutdown. Pag. of Rev. SAVE DATA PRINT DATA 37 46 01 23/07/13 23/07/13 Instruction Manual Genny 2.0 Urban(English) Document code 03-09-12_UIMG2 Manual ENG Pag. of Rev. SAVE DATA PRINT DATA 38 46 01 23/07/13 23/07/13 SPEED LIMITER When you approach the maximum allowed speed, the machine ‘s Speed Limiter will push the Handlebar back to slow you down This safety procedure is called “Speed Limiter”. The Speed Limiter is an alert that you are moving too fast! When the Speed Limiter pushes the Handlebar back, stop leaning forward and slow down. Always leave a gap between yourself and the Handlebar The speed at which the Speed Limiter pushes the Handlebar back depends first of all whether or not the Beginner Setting is enabled on the controller Info Key and secondly on a variety of other factors including riding style, terrain, payload, Battery condition, foot positioning, and other. Instruction Manual Genny 2.0 Urban(English) Document code 03-09-12_UIMG2 Manual ENG Pag. of Rev. SAVE DATA PRINT DATA 39 46 01 23/07/13 23/07/13 4.8.2. SAFETY SHUTDOWN If the machine detects a fault in any of its redundant systems or a Battery is depleted beyond its safe limit, it performs a Safety Shutdown When a Safety Shutdown occurs, machine automatically reduces its speed, gives the shakes the Handlebar and makes growling noises and the InfoKey Controller displays an unhappy face. You have approximately 10 seconds from the start of a Safety Shutdown to come to a controlled stop and deploy the stabilizing parking legs. After 10 seconds, the machine will immediately shut down when the Wheels reach zero speed. If a Safety Shutdown occurs: Immediately come to a controlled stop in a suitable place Press in sequence buttons 1-2 (maximum wait 3 seconds) which are placed near the right handle. A slight ticking will be heard during the descent of the stabilizing feet. The procedure of lowering the stabilizing feet ends after 5 seconds they both have touched the ground. At the end of the procedure, the MOTORIZED WHEELCHAIR will beep. Instruction Manual Genny 2.0 Urban(English) Document code 03-09-12_UIMG2 Manual ENG Pag. of Rev. SAVE DATA PRINT DATA 40 46 01 23/07/13 23/07/13 Instruction Manual Genny 2.0 Urban(English) Document code 03-09-12_UIMG2 Manual ENG Pag. of Rev. SAVE DATA PRINT DATA 41 46 01 23/07/13 23/07/13 It is extremely important to remember never to unfold the lateral handles during motion. This would immediately trigger the deployment of the parking stand with very dangerous consequences. Never restart and ride your machine after it has indicated an empty Battery condition or performed Safety Shutdown due to low Battery. The machine may not have enough power to keep you balanced, especially if you demand a lot of power at once. If you restart and continue riding, you risk falling. Also, you risk damaging your Batteries, resulting in reduced Battery life and capacity. If the condition persists, contact an Authorized Distributor Theft detection systems, such as the type used in some libraries and retail stores can interfere with the machine’s ability to balance and/or cause the machine to perform a Safety Shutdown. Do not ride within 1.5 meters (five feet) of any theft detection system. Instruction Manual Genny 2.0 Urban(English) Document code 03-09-12_UIMG2 Manual ENG Pag. of Rev. SAVE DATA PRINT DATA 42 46 01 23/07/13 23/07/13 The table shows the icon displayed on the Infokey Controller in case of a safety shutdown and describes the recommended action. Display Icon Description Recommended Action If a Safety Shutdown occurs: 1. Immediately come to a controlled stop. The system has detected a fault and is slowing to zero speed before shutdown (full Battery charge level shown). 2. Stabilize the means by deploying Parking Stand. You have approximately 10 seconds from the start of the Safety Shutdown to come to a controlled stop. Do not resume use of your machine after a Safety Shutdown has occurred until you have identified and corrected the condition that caused it. Instruction Manual Genny 2.0 Urban(English) Document code 03-09-12_UIMG2 Manual ENG Pag. of Rev. SAVE DATA PRINT DATA 43 46 01 23/07/13 23/07/13 4.9. SAFETY ALERTS This chapter describes the machine’s safety alerts. The safety alerts include: Speed Limiter Handle Bar Vibration Safety shutdown Read and follow all the instructions in the User Manual and this Reference Manual and for important safety information about the Speed Limiter, Handle Bar Vibration, and Safety Shutdown safety alerts. PUSHING OF THE HANDLEBAR, SPEED LIMITER When you approach the maximum allowed speed, the machine’s Speed Limiter will push the Handlebar back to slow you down.The machine’s Speed Limiter is an alert that you are moving too fast. When the Speed Limiter pushes the Handlebar back, stop leaning forward and slow down. Always leave a gap between yourself and the Handlebar. Once you slow to a speed that the machine determines is safe, it will resume normal operation and riding position. The speed at which the Speed Limiter pushes the Handlebar back depends first of all on whether or not the Beginner Setting is enabled and secondly on a variety of factors including riding style, terrain, payload, Battery condition, foot positioning, and other. Riding against the Handlebar can cause loss of control, collisions, falls, and injury. Conditions that may cause the Speed Limiter to activate and show the face icon with the straight mouth along with the Warning icon, when you are traveling at less than the maximum speed allowed for your operating mode include: Riding up a steep hill Riding on bumpy terrain Rider detect sensors not correctly depressed The first few seconds after you power on after reentering the stabilizing Parking Legs Low Battery charge Batteries that are too hot or too cold Riding down a hill with fully charged Batteries Because of regenerative charging, if the Batteries are fully charged, the machine will activate the Speed Limiter to avoid overcharging. The Table shows the icons that display on the InfoKey Controller when the Speed Limiter is engaged at a speed lower than the top speed set by the InfoKey Controller. This table also describes the error that has occurred and the recommended action you should take. Display Icon Description Recommended Action Instruction Manual Genny 2.0 Urban(English) Document code 03-09-12_UIMG2 Manual ENG Pag. of Rev. SAVE DATA PRINT DATA 44 46 01 23/07/13 23/07/13 The machine is operating at reduced performance levels due to a temporary condition. The speed limit has been lowered until the condition clears. When the Speed Limiter pushes the Handlebar back, stop leaning forward and slow down. Always leave a gap between yourself and the Handlebar. HANDLEBAR VIBRATION One of the ways that the machine notifies you when you are at risk is by shaking the Handlebar and making growling noises. This is called Stick Shake Warning. The Stick Shake Warning can occur in conjunction with, or independent of the Speed Limiter and Safety Shutdown alert, depending on your riding situation: RIDER ON If the Stick Shake Warning occurs while riding, slow down. If the Stick Shake Warning persists, come to a stop and safely step off. Do not attempt to ride again until the condition that caused the persistent Stick Shake Warning has been identified and corrected. If the Stick Shake Warning occurs while you are stopped or stuck, step off immediately and do not attempt to ride again until: ou are clear of all obstacles and slopes. When riding, the Stick Shake Warning occurs to notify improper use for example if you ride backward too fast or if you demand too much power from the Genny 2.0. riding on a steep slope, rough terrain, or against an obstacle, or when accelerating or decelerating abruptly. The Stick Shake Warning is more likely to occur when your Batteries are low, cold, heavily used, or poorly maintained because there is less energy available to keep you balanced. The Table lists possible causes of the Stick Shake Warning and recommended actions to take when the Stick Shake Warning occurs with a Rider Detection sensor depressed and Parking stand legs reentered. Possible Causes Riding aggressively, accelerating or stopping abruptly. Recommended Action Ride more smoothly and slowly. Riding against the Handlebar causing you to demand too much power. Leave a gap between you and the Handlebar. Riding on rough terrain or steep slopes causing you to demand too much power. Ride on smoother, flatter, less demanding terrain. If on a slope, turn perpendicular to the slope, step off, and walk your Machine in Riderless Balance Mode. Riding against an obstruction such as a doorframe or curb that stops the Wheel while you continue to demand power. Stop pushing against the obstruction. Stop and go around the obstruction. Instruction Manual Genny 2.0 Urban(English) Document code 03-09-12_UIMG2 Manual ENG Pag. of Rev. SAVE DATA PRINT DATA 45 46 01 23/07/13 23/07/13 Riding backwards too quickly. Stop, turn in place, and proceed forward. Safety Shutdown has begun. Come to a controlled stop and deploy the Parking Stand within 10 seconds. Instruction Manual Genny 2.0 Urban(English) Document code 03-09-12_UIMG2 Manual ENG Pag. of Rev. SAVE DATA PRINT DATA 46 46 01 23/07/13 23/07/13 RIDER OFF You do not have to be riding Genny 2.0 for the Stick Shake Warning to occur. The Stick Shake Warning occurs if the Genny 2.0 is moved too quickly while in Balance Mode without a rider on board (or with Genny 2.0 in Balance Mode after the rider has come off the machine). The Stick Shake Warning also occurs if the Wheels spin as you pull Genny 2.0 along with you. The table lists possible causes of the Stick Shake Warning and recommended actions to take when the Stick Shake Warning occurs with no Rider on Board (the rider detect sensor is not activated). Possible causes Recommended actions Moving the machine too quickly with no rider on board while in Balance Mode. When moving your Genny 2.0 in Riderless Balance Mode, you must move slowly and carefully. Always keep the Genny in front of you EMPTY BATTERY CONDITIONOF THE SELF-BALANCING UNIT Genny 2.0 notifies the rider of a pending empty Battery condition before starting a Safety Shutdown. An unhappy face icon displays on the InfoKey Controller, Genny’s speed is limited, Genny emits a warning tone. Whenever there is a notification of a pending empty Battery condition, come to a controlled stop before the Safety Shutdown begins. The table shows the InfoKey Controller icon that displays when a pending empty Battery notification occurs and describes the recommended action you should take. Display Icon Description Recommended action The system has detected and notified you of a pending empty Battery condition. Come to a controlled stop before the Safety Shutdown begins. Do not resume use of your Genny until you have charged the Batteries. EMPTY BATTERY CONDITION OF THE STABILIZING UNIT The Machine notifies the rider of a pending empty battery condition showing a led illuminated stripe near the command buttons that activates the stabilizing parking legs. In some cases, old, cold, heavily used, or poorly maintained Batteries may develop a high resistance condition. This can cause a pending empty Battery condition to occur even if the Batteries were recently charged. User instruction Manual Document code 03-09-12_UIMG2 Manual ENG CAP. 5. Pag. di Rev. SAVE DATA PRINT DATA 1 13 00 23/07/13 23/07/13 TRANSPORT, INSTALLATION AND HANDLING 5.1. INSTALLER REQUISITES The installation involves a range of important issues of a mechanical and electric nature, so the installer must have a thorough knowledge (both theoretical and practical) of the machine. Specifically, the person responsible for installing the machine will be a maintenance technician who should work in compliance with the following aims: 1. limit the deterioration of parts subject to wear; 2. reduce accidents to the absolute minimum; 3. reduce costs arising from faults; 4. limit the number and duration of interventions; 5. work in collaboration with the line operators to improve the efficiency of the plant. It is essential that, for installation activities performed by the user, this task be assigned to expert personnel who are competent and authorized by the employer. These expert personnel must be capable of assessing the work assigned to them, and recognizing any possible hazards on the basis of their training, knowledge, and professional experience and their knowledge of the machines in question, the relative equipment and the applicable standards and legislation; they must also possess an adequate professional qualification concerning the machines in question. The personnel must also be trained in safety matters, and informed of the residual risks as described in chapter 4 of this manual. The personnel must also be skilled rather than simply aware, i.e. must be a high school or university graduate with specific know-how concerning the machine and its equipment and the relative standards and legislation, and must also have specific technical knowledge and training. In addition to performing all installation tasks: 1. he may access the electrical panel while the equipment is live; 2. he may access the dangerous areas of the machine, with the mobile guards open but with the guarantee of no movements. The personnel responsible for carrying out the operations described in this chapter must not only have the characteristics set down in chapter 4, but must also have read and understood the safety prescriptions given in chapter 4. If the user does not have suitably trained/expert/knowledgeable personnel, an installation contract must be drawn up with a specialized firm, such as the machine manufacturer. User instruction Manual Document code Pag. di Rev. SAVE DATA PRINT DATA 2 13 00 23/07/13 23/07/13 03-09-12_UIMG2 Manual ENG 5.2. INSTALLATION REGULATIONS All the installation operations must be carried out with both this machine and all the previously and subsequently connected equipment absolutely idle, and only after disconnecting all external power supplies; the machinery must not be merely "stopped". The external power circuits must be fully discharged. Refer directly to the manuals of the relevant machinery for information on how to disconnect and discharge the systems safely. In order to carry out the interventions described in this chapter in conditions of the maximum safety, the area around the machine (for a radius of 360° and for a distance of at least 1000mm) must be free of partitions/walls, other machines, equipment, or any other obstructions such as pillars. It is forbidden to perform any maintenance work on parts in motion. In specific cases, certain maintenance operations cannot be performed with the machine stationary, due to the technical requirements of the processes involved or because their execution is necessary in order to avoid greater damage or hazards (replacement of belts). In such cases, all the supplementary measures and precautions must be adopted to guarantee the safety of all persons. 5.3. STORAGE, TRANSPORT AND HANDLING 5.3.1. STORAGE The machinemust be stored, if necessary, in well-ventilated storage facilities and protected from dust. The delivered elements must remain in their original packaging until the time of installation. All machine parts subject to the risk of oxidation are protected with grease and protective sprays at the time of dispatch, to prevent oxidation caused by weather conditions. In the case of prolonged inactivity, the machine must be stored taking into consideration the relative precautions concerning the location and storage times: 1. store the machine in an enclosed place; 2. protect the machine from impact and strain; 3. protect the machine from humidity and excessive temperature swings (refer to the table below); 4. do not allow corrosive substances to come into contact with the machine; 5. check that the packaging has not been damaged, and that it is perfectly dry; 6. in particular, if the machine is inside a shipping container, the storage area are must be covered and protected from direct adverse weather conditions including rain, snow and hail, and it must be accessible to authorized personnel only. The machine is designed to withstand the temperatures, humidity and vibration levels typically associated with transport and storage. Ambient Temperature -25 / +40 °C (if the electrical equipment has at least a IP54 protection degree) 0 / +40 °C (if the electrical equipment has aprotection degree less than IP54) Storage Temperature -25 / +55 °C (if the electrical equipment has at least a IP54 protection degree) 0 / +55 °C (if the electrical equipment has aprotection degree less than IP54) Relative humidity 100% at a temperature of +25°C (if the electrical equipment has at least a IP54 protection degree) Less than 50% at a temperature of +40°C Less than 90% at a temperature of +20°C (if the electrical equipment has aprotection degree less than IP54) Do not store in places subject to sudden temperature changes that may cause condensation or freezing 2 Vibration 5.9 m/s (0.6G) o higher Atmospheric pressure 900 mbar o higher These storage temperatures are intended as short-term values, e.g. during transportation. Condensation or freezing normally occurs in sites subject to significant temperature excursions. Even if relative humidity in such conditions falls within the values shown in the table, these locations should be avoided. User instruction Manual Document code 03-09-12_UIMG2 Manual ENG Pag. di Rev. SAVE DATA PRINT DATA 3 13 00 23/07/13 23/07/13 User instruction Manual Document code 03-09-12_UIMG2 Manual ENG Pag. di Rev. SAVE DATA PRINT DATA 4 13 00 23/07/13 23/07/13 5.3.2. CHECKS ON ARRIVAL It is essential to check all packs carefully at the time of arrival. The check is performed in two stages for each pack received; this will avoid misunderstandings with the shipping agent. Administrative check 1. crate number and number of packs; 2. weight and size; 3. the correspondence between the information on the shipping document, and the material effectively delivered (description, serial number, etc.). The technical data on the machine identification data plate must correspond with that in the technical data supplied; 4. the correspondence between the shipping document data and the actual order. Technical check 1. condition of the packaging; 2. no visible damage on the packaging, caused during transport and handling operations. All the above checks must be performed immediately, in presence of the shipping agent’s delivery person. If damage is noted, or the supply is incomplete or incorrect, inform the manufacturer’s sales department immediately. In relation to the above prescriptions, the manufacturer informs the user that in compliance with current international and national rulings, goods are always shipped at the risk and responsibility of the purchaser and, unless otherwise stated in writing at the time of the order confirmation, freight travels without insurance cover. 5.3.3. TRANSPORT, LIFTING AND HANDLING - GENERAL RULES REQUISITES FOR PERSONNEL Transport, lifting and handling activities are of critical importance, because any operations/interventions not envisaged, or not carried out in compliance with the following indications, may cause damage to the machine, its internal parts, the supply system, the processed products/production, or even injury to workers, causing warranty coverage to be invalidated. All transport, lifting and handling operations must be carried out by personnel who are adequately informed and trained concerning the risks and hazards that may arise during the execution of these activities. Such personnel must have read and understood the safety prescriptions in this operating manual, and must also be trained and competent, i.e. must be in possession of the professional skills and competences outlined in chapters 4 and 6 of this manual. User instruction Manual Document code 03-09-12_UIMG2 Manual ENG Pag. di Rev. SAVE DATA PRINT DATA 5 13 00 23/07/13 23/07/13 GENERAL LIFTING AND HANDLING RULES 1. The handling of the unpacked machine must be carried out exclusively in covered areas/worksites. 2. Ensure that the safe working load of the lifting equipment is greater than the weight of the machine to be lifted, and suitable for its dimensions. 3. The lifting equipment employed must be type-approved and subjected to regular maintenance, in compliance with the statutory legislation and applicable regulations. 4. Adopt all the necessary measures to ensure the maximum stability of the loads in relation to their weight and center of mass, in compliance with the indications provided by the machine manufacturer. 5. Before lifting a load, make sure it is well restrained and correctly balanced on the lifting means. 6. Take the necessary precautions to avoid hazardous overloads caused by acceleration, deceleration or impact. 7. If the size of the load is such as to impede visibility of the ground, enlist the assistance of a second person on the ground. 8. The machine must be handled with smooth movements, without any abrupt acceleration or repeated stops and starts. 9. When handling the machine, keep the load at the minimum possible height from the ground to pass over any obstacles; this ensures greater stability of the load itself, and improved visibility. 10. All parts, assemblies or subassemblies that may shift while the machine is being handled (parts inside the crate) must be securely fixed with suitable restraining systems to avoid hazardous movements that may impair the stability and balance of the load, causing it to overturn, causing parts to fall, or even causing the total or partial overturning of the handling vehicle itself. 11. To aid stability and avoid undue mechanical stress during lifting, handling and transport, the electric panels and various separately shipped items, irrespective of their geometrical characteristics, must remain upright. 12. Furthermore, the safety measures and prescriptions provided in chapter 4 must be observed. LIFTING OF THE MACHINE Use proper techniques to safely lift the machine: the operation should be performed with two people. To lift: 1. Re-enter the stabilizing parking legs. 2. Make sure the machine is unplugged and powered off. 3. Select firm non-moving lifting points such as the handles. 4. Bend your knees while lifting; do not force your back. Do not ever lift the machine by its tires, its fenders or its wheels. Hands or fingers could become caught between wheel and fender resulting in severe injury. User instruction Manual Document code Pag. di Rev. SAVE DATA PRINT DATA 6 13 00 23/07/13 23/07/13 03-09-12_UIMG2 Manual ENG HOW TO DISPOSE OF PACKING MATERIALS The polyethylene and cardboard packaging can be disposed of without having to shred it into small pieces. Just separate out the main parts according to the chemical/physical nature of the materials, and load them onto the transport vehicle for scrapping (respecting the general principles of differentiated waste collection). Dispose of the materials in compliance with the applicable regulations, seeking advice from the delegated authorities and/or the assistance of specialist companies authorized for waste sorting/waste disposal. Make sure that plastic; metals and electric components are properly separated for subsequent obligatory waste sorting. The employer must be aware of the statutory legislation in force in the country of use, and must comply with such provisions. The act of abandoning the machine and electrical equipment in the environment is forbidden, and may be subject to penalties. Only at this point should you remove any packaging from the machine, bearing in mind that the various materials/components which cannot be reused for future repacking (in the case of transfer to another worksite) must be disposed of in compliance with statutory legislation, seeking advice from the delegated authorities and/or the assistance of specialist companies authorized for the disposal of pollutant or recyclable waste. Warning - pollution hazard: do not dispose of the packaging materials in the environment; retain them for any future transport needs or consign them to a recycling company. The evaluation and management of the packaging material for purposes of biological compatibility are the duty and responsibility of the user. 5.3.4. TRANSPORT AND SHIPPING OF BATTERIES If you are transporting your machine, protect the Batteries to avoid damage during shipment. Do not expose the Batteries to direct heat or moisture, and avoid heavy vibration during transportation. Do not use or transport a Battery if the casing breaks open, leaks any substance, becomes excessively hot, or if you detect an unusual odor. Do not handle a damaged or leaking Battery unless you are wearing disposable rubber gloves, eye protection, and are in a well-ventilated area. Dispose of the rubber gloves and damaged Battery properly in accordance with regulations governing disposal of toxic materials. User instruction Manual Document code 03-09-12_UIMG2 Manual ENG Pag. di Rev. SAVE DATA PRINT DATA 7 13 00 23/07/13 23/07/13 5.3.5. SHIPPING LI-ION BATTERIES The table lists the shipping methods allowed for Li-ion Batteries Ground Sea Air Batteriesinstalled Allowed Allowed Not Allowed. Hazardous Materials Batteries Not installed Not allowed. Hazardous Materials regulations apply. Li-ion Batteries are considered Hazardous Materials under shipping regulations. Comply with all local and country laws when transporting them. If you need to arrange air shipment of your machine with Li-ion Batteries installed, or if you need to arrange shipment of your Li-ion Batteries separate from the machine by any means of transport, contact an Authorized Service Center for detailed information on shipping of hazardous materials. 5.4. PRELIMINARY PREPARATION AND ADJUSTMENT OPERATIONS 5.4.1. POSITIONING SUITABILITY OF GROUND – POSITIONING SURFACE The machine needs to be used on sites with characteristics and errors in terms of flatness and slope as indicated in paragraph 2.2. The foundation needs to be designed and set –up by the employer 5.4.2. ASSEMBLY OF THE SEPARATELY SUPPLIED EQUIPMENTS DOCKING THE INFOKEY CONTROLLER Tool required: none. Install the Infokey controller Dock and dock the InfoKey Controller prior to every ride. To dock the Infokey Controller no tools are required: 1. Make sure the Adapter is installed in the Infokey Controller Dock. 2. Slide the Infokey Controller up into the Infokey Controller Dock. To Undock the InfoKey Controller: 1.Press the Release Tab at the bottom of the InfoKey Controller Dock. 2.Slide the InfoKey Controller out of the InfoKey Controller Dock User instruction Manual Document code 03-09-12_UIMG2 Manual ENG Pag. di Rev. SAVE DATA PRINT DATA 8 13 00 23/07/13 23/07/13 5.5. CHARGING THE BATTERIES On your machine are pre-installed two Li-ion Batteries located on the underside of the Powerbase and one battery with lead-gel technology located under the seat. Charge the Batteries of your new machine for at least 12 hours as soon as possible after you receive it. To maximize the performance of your Batteries, fully charge your Batteries for at least 12 hours, once a month, or after every 12 hours of operation Charging times vary depending on the following: Amount of charge already stored in the Batteries— The lower the Battery Charge Level is, the longer it will take to complete the charging process. Temperature of the Batteries— Batteries that are too hot or too cold may not charge or may take much longer to charge. Batteries charge most efficiently when they are close to the center of the recommended charging temperature range. Before charging the batteries, please verify recommended charging temperature range (refer to technical specifications of the battery. Do not use the battery if the casing: Seems to be broken or damaged; Emits an unusual odour or excessive heat; leaks any substance. Avoid contact with any substance seeping from the batteries. Keep the batteries away from children and pets. Exposure Battery voltage could result in death or serious injury. Unplug and disconnect your machine from AC power before removing or installing Batteries or performing any service. It is hazardous to work on any part of your machine when it is plugged into AC power. You risk serious bodily injury from electric shock as well as damage to your Machine. The cells within the Batteries contain toxic substances. Do not attempt to open Batteries. Do not insert any object into the Batteries or use any device to pry at the Batteries casing. If you insert an object into any of the Batteries’ ports or openings you could suffer electric shock, injury, burns, or cause a fire. Attempting to open the Batteries casing will damage the casing and could release toxic and harmful substances. Only charge the Batteries using charging devices approved by the Manufacturer. Comply with all country laws when disposing of and transporting the machine’s Batteries. Failure to charge the Batteries could result in permanent damage to them. Left unplugged, the Batteries could fully discharge over time, causing permanent damage. Use only charging devices approved by the Manufacturer. . Always charge Batteries in a clean, dry location, free of debris. User instruction Manual Document code 03-09-12_UIMG2 Manual ENG Pag. di Rev. SAVE DATA PRINT DATA 9 13 00 23/07/13 23/07/13 To charge the Batteries: 1. Open the Charge Port. 2. Verify that the Charge Port is dry. 3. Plug one end of the Power Cord into a grounded AC outlet (100 V~ to 240 V~; 50 Hz or 60 Hz). The Power Cord should be properly grounded. 4. Plug the other end of the Power Cord provided with your machine into the Charge Port on the front side. 5. Verify that the Charge Indicator lights, located under the cushion near the command buttons, are green. When you are ready to use the machine, remove the Power Cord, then close the Charge Port Cover as follows: 1. Disconnect the Power Cord from the Charge Port. 2. Disconnect the Power Cord from the grounded AC outlet. 3. Store the Power Cord in a safe place. 4. Close the Charge Port Cover. The charging system is automatically controlled to prevent overcharging. Plug your machine into a grounded AC power outlet when it is not in use, even if you do not plan to use it for an extended period of time. The batteries are usually warmer than the ambient temperature because of the energy that is generated during electricity release (while riding) and electricity absorption (while recharging). It is best to keep your batteries at the charging temperature before or during recharging. Batteries charge most efficiently when they are close to the center of the recommended charging temperature range. Batteries that are too hot or too cold may not charge or may take much longer to charge. Do not insert the plug if the Charge Port, Power Cord or AC Power outlet is wet or humid. The electrical installation used for charging the batteries must comply with all the relevant legislation of the country where the machine is used. The system of the user, upstream from the battery charging, must be entirely designed, installed and serviced in compliance with the relevant prescriptions of the safety rules for “low voltage user systems”, in accordance with IEC3644 / HD384 / CEI 64-8 (most recent editions). User instruction Manual Document code 03-09-12_UIMG2 Manual ENG Pag. di Rev. SAVE DATA PRINT DATA 10 13 00 23/07/13 23/07/13 5.5.1. CHARGE INDICATOR LIGHTS Two Charge Indicator lights on the Console, visible inside the setting module lifting the cushion, indicate the charge status of the Batteries when the machine is plugged in. The front Charge Indicator light corresponds to the front Battery and the rear Charge Indicator light corresponds to the rear Battery. When the machine is plugged in and charging, both Charge Indicator lights will be flashing or solid green. If one or both Charge Indicator lights is red or fails to illuminate, there is a charging problem with the corresponding Battery. The status of the Charge Indicator lights on the Console are: Solid green indicates the Batteries are charging. Flashing green indicates charge is complete. Red indicates a fault condition. 5.5.2. CHARGE INDICATOR LIGHTS ON STABILIZING UNIT A led indicator bar, near 2 command buttons that activate the extraction of the parking legs, indicates the status of the charging status when the machine is plugged-in and AC powered. 5.5.3. CHARGING FAILURES OF THE SELF-BALANCING UNIT If a failure is detected during charging, all charging will stop. Depending on the nature of the failure, a solid red Charge Indicator light displays or the Charge Indicator light is off. If either or both Charge Indicator lights are red or off, check the following: 1. If the Charge Indicator lights are off (no illumination), check that AC power is present, and ensure the Power Cord is full seated in the Charge Port. 2. If AC power is present and the Charge Indicator lights are either red or off, unplug the power cord, then remove and reseat the Battery Pack(s). User instruction Manual Document code 03-09-12_UIMG2 Manual ENG Pag. di Rev. SAVE DATA PRINT DATA 11 13 00 23/07/13 23/07/13 5.5.4. CHARGING FAILURES OF STABILIZING UNIT If a failure is detected during charging, all charging will stop. In this case the lights of the Indicator Led Bar are off. You need to: 1. Check that AC power is present, and ensure the Power Cord is full seated in the Charge Port. 2. If AC power is present and the Indicator Led Bar is off, unplug the power cord, then remove and reseat the Battery Pack(s). 3. If the problem persists, contact an authorized service Centre 5.5.5. REGENERATIVE BRAKING The machine has a regenerative braking system that charges the Batteries when descending a hill or slowing down. When you ride down a hill, you may notice an increase in the Battery charge level. If your Batteries are already completely full at the top of a hill, when you descend, you may feel the Speed Limiter engage to keep the machine from overcharging its Batteries. 5.5.6. READING THE BATTERY CHARGE LEVEL DISPLAY The horizontal bars on the left side of the Info Key Controller display indicate the levels of the charge. The figure shows how the Battery Gauge on the Info Key Controller changes as the Battery is depleted. The more charge the Batteries contain, the more horizontal bars are shown. If the battery charge level is very low, the machine will notify you of a pending empty Battery condition prior to initiating safety shutdown. Do not ride the machine if there is inadequate charge in the Batteries (indicated by the unhappy face icon on the Info Key Controller and no dark horizontal lines on the Battery Charge display). Carefully monitor your battery gauge and be prepared to stabilize your machine lowering the parking stand legs if your battery charge becomes completely depleted. User instruction Manual Document code 03-09-12_UIMG2 Manual ENG Pag. di Rev. SAVE DATA PRINT DATA 12 13 00 23/07/13 23/07/13 5.5.7. RECALIBRATING THE DISPLAY OF THE INFOKEY CONTROLLER The machine indicates the Battery charge level in the InfoKey Controller The display may be inaccurate after long periods of storage, or during initial use. To recalibrate the display: 1.Fully charge the Batteries for 12 hours. 2.Discharge the Batteries until the bottom bar in the Display is blinking (approximately 10 percent Battery charge remaining). The InfoKey Controller will display the following: Leave your machine in a safe; secure location, powered on, until the Battery charge is fully depleted, and your machine powers down. Fully recharge the Batteries for a minimum of 12 hours, after which the Battery Charge Level Display will be recalibrated. Depleting your Genny 2.0 Batteries from the bottom bar to empty could take several hours, depending on Battery condition and the amount of charge remaining. To avoid injury, damage, and to deter theft, be sure your machine discharges in a safe, secure location, powered on in Riderless Balance Mode. User instruction Manual Document code 03-09-12_UIMG2 Manual ENG Pag. di Rev. SAVE DATA PRINT DATA 13 13 00 23/07/13 23/07/13 5.5.8. HOT OR COLD TEMPERATURES The Batteries will run at the highest efficiency when you operate them nearest the center of the recommended operating temperature range. If the Batteries on your Machine become too hot or too cold while riding, the machine may activate a safety alert. The table shows the InfoKey Controller icon that displays when the machine’s batteries become too hot or too cold. Display Icon Description Recommended action Speed Limiter or Stick Shake Warning Respond as instructed in Chapter 4. Allow your Batteries to warm or cool to within the recommended operating temperature range prior to riding. Safety shutdown As with all batteries, less energy is available at low battery temperatures. You may not be able to travel the same distance when the batteries are cold, as when the batteries are nearer to ambient temperature. 5.5.9. PARTIAL CHARGE Whenever you do not fully charge the machine’s Batteries, surface charge or partial charge may affect the accuracy of the Battery charge level display, causing it to show a higher charge level than actually exists. After you power on, check the Battery charge level display and then ride for at leastthree or four minutes and check the Battery charge level display again. If the Battery charge level display shows rapid charge depletion during this time, the Batteries havereceived only a surface charge. If necessary, plug the machine back in and recharge. Manualedelleistruzioni per l’uso Document Code Pag. di Rev. SAVE DATA PRINT DATA 1 31 00 23/07/13 23/07/13 03-09-12_UIMG2 Manual ENG CAP. 6. OPERATING MODE The machine must only be managed by authorized and duly trained personnel with adequate technical experience. The personnel assigned to operate the machine must be aware of the fact that the knowledge and application of safety rules is an integral part of their work. Before switching on the machine: carefully read the technical documentation know which protective equipment and emergency devices are available on the machine, where they are located, and how they work. fully know the position, function and use of all commands; fully know the position, function and use of all safety devices; fully know the characteristics of the machine; be entirely familiar with this manual, and know how to consult it. The operator must also have been duly trained. The partial removal of the guards and warning signs is forbidden. Unauthorized use of commercial parts and accessories belonging to the guards and safety devices can result in malfunctions and the occurrence of dangerous situations for operators. Manualedelleistruzioni per l’uso Document Code 03-09-12_UIMG2 Manual ENG Pag. di Rev. SAVE DATA PRINT DATA 2 31 00 23/07/13 23/07/13 6.1. WORKSTATIONS AND DUTIES OF THE DRIVER Moving around with the machine can be dangerous and loss of control, collisions or a fall can result in serious injury. In order to reduce risks and dangers, the user must take note of the instructions for safe use. This manual provides all the necessary information on techniques for proper circulation. The machine described in this manual is designed to be conducted by n. 1 operator trained and made aware of the residual risks, but with the skills, safety, drivers of vehicles on the road and having professionals as described in Chapter n.4. The driver / operator is responsible for: 1. operating the machine in the service conditions specified in this manual 2. verifiy the reading of data from the control panel or tools, such maneuvers are easy when carried out is safe conditions and as clearly described in the User Instructions; 3. normal riding of the machine, starting and stopping the machine in normal conditions and stopping in emergency conditions; 4. general surveillance on the condition of the machine which for example control of the state of cleanliness of the machine, etc ...; in case of necessity, must not carry out interventions but must activate the maintenance service. 5. cleaning the exterior and interior of the machine and any other parts that need to be cleaned, such as the inside of the liquid containers, with fixed and movable guards in locked and closed position (cleaning the internal parts that require a removal of fixed guards are assigned to the maintenance technician). In addition to the normal operation of the machine, the operator has the task to start and stop the machine in normal condizioniand to stop it in emergency conditions. The Operator also has the responsibility to monitor and surveil the general condtitionof the machine. In case of necessity, he must not carry out interventions, but activate the maintenance service or contact the authorized service center. All operations are carried out by the operator in charge, must be conducted with all protective devices enabled, including fixed guards if any and all safety equipment active, otherwise there is danger of injury to the limbs, or other body parts. All handling, preparation, adjustment, recording, installation, and testing must be performed by trained and competent maintenance personnel (refer Chapter n.7). All maintenance and control, must be performed by trained and skilledmaintenance personnel (refer Chapter n.). Manualedelleistruzioni per l’uso Document Code 03-09-12_UIMG2 Manual ENG 6.2. Pag. di Rev. SAVE DATA PRINT DATA 3 31 00 23/07/13 23/07/13 RECORDING SERIAL NUMBERS Record the unique serial numbers for both the machine and the InfoKey Controller. Store this information in a secure location. The serial numbers are unique and provide helpful information in the future for asset and warranty tracking, InfoKey Controller replacement, insurance claims, or to report loss or theft at the insurance company of the machine. 6.2.1. MACHINE AND INFOKEY CONTROLLER 1. In the lower part of the machine, after removing the battery in the front you find the serial number engraved in the chassis. 2. On the right side of the seating module is located the CMP code + 6 figures Manualedelleistruzioni per l’uso Document Code 03-09-12_UIMG2 Manual ENG Pag. di Rev. SAVE DATA PRINT DATA 4 31 00 23/07/13 23/07/13 InfoKey Controller Serial Number 6.2.2. INFOKEY CONTROLLER To record the InfoKey Controller serial number: X XX XX XX S/ N XX Serial Number Location X XX XX XX XX XX XX XX IC: - XX P/N XX X X- XX XX XX X 1.1. Locate number beginning on back the back of your Locatethe theserial number beginning withwith S/NS/N, on the of your InfoKey InfokeyController Controller(located (locatedunder underthe thetrim trimring) ring)(see Figure 2). -XX X FC C ID :X Figure 2. Location of InfoKey Controller Serial Number 2. Record the InfoKey Controller serial number. 3 Manualedelleistruzioni per l’uso Document Code 03-09-12_UIMG2 Manual ENG Pag. di Rev. SAVE DATA PRINT DATA 5 31 00 23/07/13 23/07/13 6.2.3. OPERATING LIMITS It is important that you familiarize yourself with the operating limits of the machine. These limits are set to maximize rider safety while reducing the risk of damage to the machine. The machine will perform better when you observe these limits. DYNAMIC WEIGHT LIMITS To keep the machine and rider in balance, the machine must always have enough power to be able to turn its Wheels forward and backward. Exceeding the weight limits, especially when combined with other variables that require more power, will increase your risk of falling or damaging themachine. The variables that require more energy and powere are: Higher load (weight of rider) Steeper slopes Bumpier surface conditions Higher Speeds Abrupt maneuvres The machine monitors the amount of power being used and will activate safety alerts when it senses excessive power demands. It is important that you learn to anticipate and recognize when the machine is reaching the limits of performance. Learn to recognize and respond to Safety Alerts; review “Speed Limiter”, “Stick Shake Warning” and “Safety Shutdown” MINIMAL WEIGHT LIMITS The rider’s weight must not be less than indicated in paragraph 2.2 It is important to comply with this weight limit as the rider may not be able to ride safely because he/she cannot shift his/her weight far enough back (behind the centerline of the Wheels) to safely slow down and stop. This is especially true when riding downhill. Also, riders below the minimum weight limit might fail to properly interact with the self-balancing system. In the same way exceeding maximum weight limits could jeopardize the dynamic stability and cause the machine to accelerate forward involuntarily, risking injury and damage. STRUCTURAL WEIGHT LIMITS Exceeding the maximum weight limit increases the risk of damage to the machine. Heavier payloads place greater stress on the machine. It is important not to exceed the structural weight limit placing or attaching certain unforeseen accessories to the machine. Several factors affect the loads transmitted to the machine: Skill level of the rider. Payload (weight of the rider and all cargo). Surface condition (obstacle height, etc.). Exceeding the rider or cargo weight limits, especially when riding on uneven terrain, could damage the machine. Manualedelleistruzioni per l’uso Document Code 03-09-12_UIMG2 Manual ENG Pag. di Rev. SAVE DATA PRINT DATA 6 31 00 23/07/13 23/07/13 6.3. USE OF THE INFOKEY CONTROLLER You use the InfoKey Controller to operate and monitor your machine. The InfoKey Controller has four buttons around the outer edge and a display in the center. The InfoKey Controller must be within 15-ft. (5m) in order to communicate with the machine. You use the InfoKey Controller to communicate with the Segway PT. Using the InfoKey Controller The InfoKey Controller has four buttons around the outer edge and a display in the center: 6.3.1. BUTTONS Beginner button Information Display button Display Area Power/Standby button Type Power/standby button Security button Description 8 Allows you to power the machine on and off and switch from Balance Mode to Standby Mode. Beginner button Allows you to enable and disable the beginner setting and to illuminate the display backlight Information Display button Allows you to scroll through information including time, date, speed, average speed, trip distance, and odometer. Allows you to set time, speed/distance format, date and reset the average speed and trip distance. Security button Allows you to activate the security function (alarm). InfoKey Controller Display Area Manualedelleistruzioni per l’uso The Display Area provides status information Document Code suchPag. as messages and di Rev. warnings. 03-09-12_UIMG2 Manual ENG 7 31 00 SAVE DATA PRINT DATA 23/07/13 23/07/13 Figure 7 shows icons and data that display on the InfoKey Controller. 6.3.2. DISPLAY Warning Icon Information Display (time, distance, speed, etc.) Wrench Icon (Service) Segway PT Battery Gauge InfoKey Controller Low Battery Icon Face Icons Security Icon AC Power Icon Rider Detect Error Icons Control InfoKey Controller Link Signal Icon Beginner Icon Figure 7. InfoKey Controller Display Description Information Display Displays time, date, speed, average speed, trip distance and odometer. Wrench icon Indicates a system fault on the machine that requires service. Face Icons 20 A series of face icons display to indicate status. For example, you may see a happy face, sad face, or neutral face. Security icon Indicates the security function is activated. Beginner icon A turtle indicates that the Beginner Setting is enabled (top speed and turning sensitivity are set at lower rates). When the Beginner icon is not displayed, the Beginner Setting has been disabled. Indicatesthe InfoKey Controller has detected the Genny 2.0. The InfoKey Controller Link Signal icon InfoKey Controller must be within 15 ft. (5m) in order to communicate with your machine. Manualedelleistruzioni per l’uso Document Code 03-09-12_UIMG2 Manual ENG Pag. di Rev. SAVE DATA PRINT DATA 8 31 00 23/07/13 23/07/13 Rider Detect Error icons If synchronization of stabilizing parking legs and presence sensors should not function properly, this icon is displayed. AC Power icon Indicates that Genny 2.0 is plugged in to AC power. Infokey Controller low battery icon Indicates the InfoKey Controller battery must be replaced. Dispose of the battery properly in accordance with regulations governing disposal of toxic materials. CR2430 replacement batteries are available at electronics stores. Genny 2.0 Battery Gauge Indicates the amount of power remaining in the Genny 2.0 Batteries. Warning icon Indicates a warning condition caused by factors such as aggressive riding, system operating outside of temperature range, rider lifting off of seat, etc. Manualedelleistruzioni per l’uso Document Code 03-09-12_UIMG2 Manual ENG Pag. di Rev. SAVE DATA PRINT DATA 9 31 00 23/07/13 23/07/13 6.4. BUTTON FUNCTIONS 6.4.1. POWERING ON / STANDBY The following functions can be performed using the Power/Standby button. Powering On and Off To power on the machine: 1. Stand no more than 15 ft. (5m) from your machine. 2. To power on, tap the Power/Standby button on the controller InfoKey 3. To power off, press the Power/Standby button for 2 seconds. The machine will only power off when no Rider Detect Sensors are depressed, or when the parking stand legs are deployed. Switching to Standby Mode from Balance Mode 1. Ensure the machine is powered on and in Balance Mode. 2. To switch to Standby Mode, tap the Power/Standby button after having deployed the parking stand. 3. Confirm that there is no face in the Display and that no Balance Indicator Lights are flashing. The machine will only accept this command when no Rider Detect Sensors are depressed or when the parking stand legs are deployed. 6.4.2. BEGINNER BUTTON FUNCTIONS The following functions can be performed using the Beginner button. Enabling and disabling the beginner setting 1. To disable the Beginner Setting, confirm that the Beginner icon (turtle) is displayed, then tap the Beginner button. The Beginner icon will no longer show in the Display. 2. To enable the Beginner Setting, confirm that the Beginner icon is not displayed, then tap the Beginner button. The Beginner icon will show in the Display. The machine will only accept these commands when no Rider Detect Sensors are depressed or when the parking stand legs are deployed. Illuminating the backlight 1. Press and hold the Beginner button to illuminate the Backlight. 2. Release the Beginner button to turn off the Backlight. Manualedelleistruzioni per l’uso Document Code 03-09-12_UIMG2 Manual ENG Pag. di Rev. SAVE DATA PRINT DATA 10 31 00 23/07/13 23/07/13 6.4.3. INFORMATION DISPLAY BUTTON The following functions can be performed using the Information Display Button. Scrolling Through Information Tap the Information Display button to scroll through the following information: Time Date The speed/distance format flashes. Average speed The speed/distance format does not flash; all trips are averaged until you reset the average speed function. Trip distance The speed/distance format flashes, and shows distance traveled with no leading “0”s. Odometer The speed/distance format does not flash, and shows total distance traveled on board the machine. When you replace or reseat the InfoKey Battery, all information will revert to the default setting. Trip distance and average speed will reset to “0.” The odometer will not reset. Setting and Resetting Information The following procedures are covered in this section: Setting time format, hour and minute Setting speed/distance format, date format, year, month, and day Resetting average speed Resetting trip distance Setting Time Format, Hour, and Minute 1. Set Time Format (12- or 24-hour Clock) Tap the Information Display button until the time displays. Press and hold the Information Display button until the time for- mat segment flashes either “12” or “24.” Select the 12- or 24-hour format by tapping the Security button until the desired format is displayed. Release the Information Display button. Tap the Information Display button to confirm and advance to the hour setting. 2. Set Hour Select the hour by tapping the Security button until the desired hour is displayed. Press and hold the Security button to fast- advance hours. Tap the Information Display button to confirm and advance to the minute setting. 3. Set Minutes Select the minute by tapping the Security button until the desired minute is displayed. Press and hold the Security button to fast- advance minutes. Tap the Information Display button to confirm the time setting. The time is now set. Manualedelleistruzioni per l’uso Document Code 03-09-12_UIMG2 Manual ENG Pag. di Rev. SAVE DATA PRINT DATA 11 31 00 23/07/13 23/07/13 Setting Speed/Distance Format, Date Format, Year, Month, and Day 1. Set Speed/Distance Format (MI or KM) Tap the Information Display button until you see the month/day or day/month alternating with the year. Press and hold the Information Display button until the MI/H or KM/H shows in the display. Release the Information Display button. Select the MI/H or KM/H format by tapping the Security button until the desired format is displayed. Tap the Information Display button to confirm and advance to the date format setting. 2. Set Date Format (MO.DA or DA.MO) Select the MO.DA (Month.Day) or DA.MO (Day.Month) format by tapping the Security button until the desired format is displayed. Tap the Information Display button to confirm and advance to the year setting. 3. Set Year Select the year by tapping the Security button until the desired year is displayed. Press and hold the button to fast- advance years. Tap the Information Display button to confirm and advance to the month setting. 4. Set Month Select the month by tapping the Security button until the desired month is displayed. Press and hold the Security button to fast- advance months. Tap the Information Display button to confirm and advance to the day setting. 4. Set Day Select the day by tapping the Security button until the desired day is displayed. Press and hold the Security button to fast-advance days. 5. Tap the Information Display button to confirm speed/distance format, date format, year, month, and day. These are now set. Resetting Average Speed Tap the Information Display button until you see the average speed (“MI/h” or “KM/h” does not flash). Press and hold the Information Display button until average speed resets to “0.0.” Resetting Trip Distance Tap the Information Display button until you see your trip distance (“MI” or “KM” flashes). Press and hold the Information Display button until the trip odometer resets to “0.0. Manualedelleistruzioni per l’uso Document Code 03-09-12_UIMG2 Manual ENG Pag. di Rev. SAVE DATA PRINT DATA 12 31 00 23/07/13 23/07/13 6.4.4. SECURITY BUTTON FUNCTIONS The following functions can be performed using the Security Button. Enabling and Disabling the Security Function 1. To enable the Security Function, tap the Security button. The Security icon (lock) will show in the Display. 2. To disable the Security Function, tap the Security button. The Security icon (lock) will no longer show in the Display. The machine will only accept these commands when no Rider Detect Sensors are depressed (when the stabilizing parking legs are deployed). The Security Function includes an alarm and a mechanism that makes it difficult to move your machine and discourages tampering. The best way to deter theft of your machine is to keep it in a secure indoor location with the InfoKey Controller stored separately. If you must leave your machine unattended in a location that is not secure, enable the Security Function and remain within audible range so you can respond, should the alarm sound. 6.4.5. BUTTON COMBINATION FUNCTIONS The following functions require you to simultaneously push a combination of InfoKey Controller buttons. Configuring and locking the beginner setting For your first ride, the machine is set to operate exclusively with the Beginner Setting enabled. If the Beginner icon (turtle) does not display, do NOT ride the machine until you enable the Beginner Setting. The machine ships from the factory with the Beginner Setting locked, to encourage new riders to learn using the Beginner Setting. To unlock the Beginner Setting: 1. Power on the machine. 2. Press and hold the Beginner Button and the Information Display Button simultaneously for more than 10 seconds. The Information Display button will flash. 3. Confirm that the Beginner icon (turtle) toggles when the Beginner button is tapped. Once the Beginner Setting is unlocked, you can toggle the Beginner Setting on or off by tapping the Beginner button. To lock the Beginner Setting: 1. Repeat Steps 1 and 2 above. 2. Confirm that the Beginner icon (turtle) is showing on the InfoKey Display. 3. Test the lock by tapping the Beginner button and confirming that the Beginner icon remains showing in the InfoKey Display. Manualedelleistruzioni per l’uso Document Code 03-09-12_UIMG2 Manual ENG Pag. di Rev. SAVE DATA PRINT DATA 13 31 00 23/07/13 23/07/13 Activating the Training Safety Shutdown Before you demonstrate a Safety Shutdown for training purposes, you must read about “Safety Shutdown” in the Getting Started Manual, and watch the Safety Video. The purpose of demonstrating Safety Shutdown for training purposes is to introduce the rider to the experience while in a predictable, controlled environment with a spotter. Read all the following steps prior to activating the Training Safety Shutdown. English 1. Make sure the machine is in Balance Mode. 2. Ask the spotter to hold firmly the machine, ready to keep it steady and stationary when the safety shutdown 5. The third person may then press and hold both the Information begins. Display button and theand Power/Standby button 3. A spotter should hold the InfoKey Controller, confirm that both thesimultaneously rider and the spotter are ready. until the Safety Shutdown initiates. Figure 8 shows the InfoKey 4. The third person may then press and hold both the Information Display button and the Power/Standby button Controller display during a training Safety Shutdown. simultaneously until the Safety Shutdown initiates. The figureshows the InfoKey Controller display during a training Safety Shutdown. Information Display button Power/Standby button Figure 8. InfoKey Controller Display During a Training Safety 5. The spotter must continue holding the machine so it does not move. Shutdown 6. The rider must stabilize the machine before 10 seconds elapse. The rider has approximately 10 seconds from the 6. The to spotter thestabilize Segway the PT machine. so it does After not 10 seconds, the machine start of a Safety Shutdown comemust to a continue controlledholding stop and will immediately shut down when the Wheels reach zero speed. move. 7. The rider must step off the Segway PT before 10 seconds elapse.The rider has approximately 10 seconds from the start of a Safety Shutdown to come to a controlled stop and step off. After 10 seconds, the Segway PT will immediately shut down when the Wheels reach zero speed. 33 Manualedelleistruzioni per l’uso Document Code 03-09-12_UIMG2 Manual ENG Pag. di Rev. SAVE DATA PRINT DATA 14 31 00 23/07/13 23/07/13 6.5. SWITCH-ON - CONTROLS - CHECKS - ADJUSTMENTS - START-UP All the functions/operations relating to the operating modes must always respect the safety measures and the prescriptions to protect against residual risks (see chapter 4). The machine must always be used exclusively for the product workings indicated in paragraph 2.2. During the working cycle, it is essential to respect the safety measures and prescriptions to protect against residual risks (see chapter 4). For details of the functions of each command and information device, refer to the “Layout” and the description of the command and signaling devices given in the electrical diagram enclosed with this manual. It is also emphasized that the user's personnel should attend a training course if necessary. Contact the manufacturer to define the contents, methods and times of the proposed course All adjustment and recording interventions must be carried out by the operator of the machine (refer to paragraph 4.2.2)to guarantee a correct and safe use of the machine, these include all the periodical checks/ verifications, periodical adjustment and recording interventions (electrical components and electrometricalor magnetic position registration) before every start-up and in any case periodically. You can find these interventions listed in: Chapter 7 “Interventions to be carried out by Operators” In those parts of the Manual dedicated to starting up the machine. Only after the designated operator has made sure that all safety regulations in this Manual are observed, he can proceed to starting up the machine for its normal productive use. LEANSTEER FRAME/HANDLEBAR ASSEMBLY Ensure the following: The Handlebar is attached to the LeanSteer Frame. The LeanSteer Frame is attached to the Powerbase. The Handlebar is adjusted to the appropriate height. The LeanSteer Frame pivots at the base to control left/right direction of the machine. If you lean to the left while holding the Handlebar, the LeanSteer Frame pivots and the machine turns left. If you lean to the right while holding the handlebar, the LeanSteer Frame pivots and the machine turns right. Always lean left or right in coordination with the LeanSteer Frame. TIRE/WHEEL ASSEMBLY AND FENDERS Ensure that Tires are inflated to the proper tire inflation pressure as specified in chapter 2 on technical specifications. Tires and Wheels are shipped as an assembly. Do not remove the Tire from the Wheel. The Fenders on the machine are designed to protect the rider from debris and to safeguard the rider while leaning into turns. Ensure that they are in perfect condition (no cracks or deformations). Manualedelleistruzioni per l’uso Document Code 03-09-12_UIMG2 Manual ENG Pag. di Rev. SAVE DATA PRINT DATA 15 31 00 23/07/13 23/07/13 SEAT MODULE The machine is shipped with a cushion and a special adjustable Backrest to sit on and lean against in order to assume the correct riding position. Underneath the cushion a Rider Detect Sensor is located that needs to be depressed correctly by the user during the ride. Ensure the sensors are depressed correctly, otherwise reposition your weight. BACKREST To guarantee comfortable seating and full control of the machine, The Backrest needs to be completely unfolded while riding. Open it completely, making it rotate on the joint until it is practically perpendicular to the seat. Rest your back keeping it in contact with the Back Rest and remember the machine moves reacting to your movements. Therefore a correct posture allows you to fully control the machine. Manualedelleistruzioni per l’uso Document Code 03-09-12_UIMG2 Manual ENG Pag. di Rev. SAVE DATA PRINT DATA 16 31 00 23/07/13 23/07/13 FOOTREST The Footrest is located at the front of the machine and allows you to place your feet safely and keep the lower limbs together thanks to the lateral support. Place your feet with the heels as close to the machine’s structure as possible and with sufficient space between them to freely move the Handlebar support. Make sure the lower limbs are kept together correctly. Manualedelleistruzioni per l’uso Document Code 03-09-12_UIMG2 Manual ENG Pag. di Rev. SAVE DATA PRINT DATA 17 31 00 23/07/13 23/07/13 6.6. HOW THE MACHINE WORKS On board the machinethe movement of leaning your body forward activates the wheels that make the machine head in that direction. The machine uses technology called dynamic stabilization to maintain its balance and move forward or backward. When you lean, your center of gravity moves beyond the contact patch (the place where the tire contacts the ground) causing the machine to tilt. The machine’s systems sense this change, powering the Wheels to keep them underneath the center of gravity of the person seated on the machine. FORWARD BACKWARD When you pivot the LeanSteer Frame left, the machine turns left. When you pivot the LeanSteer Frame right, the machine turns right. To turn, point the LeanSteer Frame in the direction you want to go, keeping the Handlebar in line with your body. When the LeanSteer Frame is centered, the machine travels straight ahead. The machine’s dynamic stabilization technology balances forward and backward but not side-to-side. If you tip the machine onto one Wheel, it will not dynamically bring itself underneath you and it could fall over. The rider is responsible for maintaining side-to-side stability while riding the machine. To do this, keep your body aligned with the LeanSteer Frame. Lean into turns and lean uphill when riding across a slope to maintain side-to-side balance. When riding across a slope with one Wheel higher than the other, keep the LeanSteer Frame vertical to keep from turning. Manualedelleistruzioni per l’uso Document Code 03-09-12_UIMG2 Manual ENG Pag. di Rev. SAVE DATA PRINT DATA 18 31 00 23/07/13 23/07/13 6.7. RIDING GUIDELINES 6.7.1. RIDING FORM Your posture and stance affect your ability to ride safely: Be alert. Scan both far ahead and in front of the Wheels—your eyes are your best tool for safely avoiding obstacles and slippery surfaces. Keep a firm grip on the Handlebar, knees and elbows bent. This helps you maintain your balance over rough terrain. Leave a gap between yourself and the Handlebar. Do not lean over or into the Handlebar. Leaning over or into the Handlebar dramatically increases the risk of loss of control, collisions, and falls. Remain seated keeping the back against Backrest. Practice controlled stopping. Keep your body aligned with the LeanSteer Frame and lean into turns. Point the LeanSteer Frame in the direction you want to travel. 6.7.2. HAZARDOUS SITUATIONS The machine is highly maneuverable and allows you to easily navigate around obstacles. However, to prevent the loss of traction, you must always be careful when riding and learn to identify and avoid slippery, icy, or wet surfaces, loose materials (sand/gravel), steep slopes, and obstacles. Stop and go around the obstacle taking a different way. SLIPS The machine’s Tires must be able to grip the ground for the machine to stay upright! Slips occur when the machine loses traction, potentially causing loss of control and a fall. Abrupt maneuvers, and riding over slippery surfaces, loose objects and materials, or steep slopes can cause the machine to lose traction. Avoid abrupt maneuvers, such as fast stopping or starting. Avoid riding on slippery surfaces such as snow, ice, wet floors, Wet grass, or any other surface that might cause slipping. Avoid riding over loose objects or materials such as small branches, litter, or small stones. Use caution when riding over any terrain change such as pavement to grass, or over a threshold or speed bump. Avoid riding on steep slopes. Maintain Tire contact with the ground. Manualedelleistruzioni per l’uso Document Code 03-09-12_UIMG2 Manual ENG Pag. di Rev. SAVE DATA PRINT DATA 19 31 00 23/07/13 23/07/13 TRIPS Trips occur when the machine’s Wheel or Powerbase encounters an obstacle or terrain change that prevents the machine from moving, bringing it to an abrupt stop and potentially causing a fall. Avoid holes, curbs, steps, and other obstacles. Avoid riding over too irregular or bumpy surfaces where the bottom of the machine may strike the bumps or any object. Use caution when riding over any terrain change such as pavement to grass, or over a threshold or speed bump. TIPS The machine balances front to back but not side-to-side. You are responsible for maintaining side-to-side balance by leaning into turns. If you fail to actively maintain this side-toside balance, the machine can tip sideways and fall. Avoid riding across steep slopes. Lean into turns and lean uphill when riding across gentle slopes. Keep the LeanSteer Frame vertical when riding across a slope. Avoid turning on slopes or ramps. Never let go of the Handlebar when riding across a slope. The Machine will turn downhill and you could lose your balance. Stay centered on narrow sidewalks or elevated paths. Avoid turning when maneuvering backward. Make sure that one Wheel does not drop off a curb. Manualedelleistruzioni per l’uso Document Code 03-09-12_UIMG2 Manual ENG Pag. di Rev. SAVE DATA PRINT DATA 20 31 00 23/07/13 23/07/13 6.7.3. RIDING GENNY 2.0 This section describes how to ride the machine. It discusses riding for the first time and helpful hints for all rides. Follow these steps to learn to ride your machine. It is important that you practice riding in a controlled, familiar environment until you are comfortable using your machine and InfoKey Controller. Before riding, make sure your machine is assembled correctly and charged. Inspect your machine before each use. Do not ride if any part is loose, damaged, or if Tires are not properly inflated. Do not wear loose clothing or jewelry that could get caught in the machine. STEP 1 PREPARING FOR YOUR RIDE To prepare for your first ride: 1. Select an appropriate area for your first ride. This area may be indoors or outdoors and should measure at least 12 feet by 12 feet (4 meters by 4 meters). It must have a level, smooth riding surface with good traction and should be free of obstructions and away from vehicles, bicycles, pets, small children, and other distractions. 2. You will need a spotter who has studied all the instructions and warnings in this manual to help you and assist you with the instructions. 3. Put on your helmet and fasten and adjust the chinstrap in accordance with the manufacturer’s instructions. 4. 5. 6. 7. 8. Move the machine to the center of the riding area you chose for your first ride Extract the handlebar and place it on the supports (handles). Acquaint yourself with the icons that may be displayed on theInfoKey Controller. Ensure that the stabilizing parking legs are steadily on the ground, then sit on the machine You can take place on the machine from any side, left or right provided there are no obstacles to do so. Manualedelleistruzioni per l’uso Document Code Step 2: Powering On the Segway PT Pag. di Rev. SAVE DATA PRINT DATA 21 the31InfoKey 00 Controller, 23/07/13 Using power on 23/07/13 your Segway PT by pressing the Power/Standby button. The Power/Standby button is located on the bottom left-hand side of the InfoKey Controller. STEP 2: POWERING ON GENNY 2.0 Using the InfoKey Controller, power on your machine by pressing the Power/Standby button. The Power/Standby button is 03-09-12_UIMG2 Manual ENG Power/Standby button located on the bottom left-hand side of the InfoKey Controller. Make sure that you are seated correctly with back against the back rest, the Rider Detection Sensor correctly depressed and your feet rested on the foot rest. You will hear a tone from the machine and the InfoKey Controller is activated. STEP 3: CONFIRMING THE BEGINNER SETTING Ensure that the Beginner Setting is enabled by confirming that the Turtle icon shows on the InfoKey Controller display. For your first ride, the machine is set to operate exclusively with the Beginner Setting enabled. If the Turtle icon does not display, do NOT ride the machine until you enable the Beginner Setting. See “InfoKey Controller Buttons and Display”. 63 Manualedelleistruzioni per l’uso Document Code 03-09-12_UIMG2 Manual ENG Pag. di Rev. SAVE DATA PRINT DATA 22 31 00 23/07/13 23/07/13 STEP 4: BEFORE RIDING Your machine is on and you are seated correctly with the handlebar properly put in place. Make sure your correctly installed InfoKey Controller displays the Battery Gauge icon and the Link Signal icon prior to sitting on the machine. The first time have your spotter stand next to you, to keep the machine steady by holding the handles on the sides. Then with you right hand press the frontal button once. The led bar display illuminates. Only then it is possible to command the re-entering of the parking legs by pressing the two buttons consecutively with sequence 1-2. The sequence needs to be completed within 3 seconds. In this position the machine re-enters the stabilizing legs and at the same time activates the Balance Mode. Do not move until the parking legs are completely reentered. Manualedelleistruzioni per l’uso Document Code 03-09-12_UIMG2 Manual ENG Pag. di Rev. SAVE DATA PRINT DATA 23 31 00 23/07/13 23/07/13 The InfoKey Controller now shows a happy face. At his point the spotter can loosen his grip on the handles so that you can start experiencing and understanding your position to stay in place and which are the movements that control the machine. Be prepared. Some people slightly rock back and forth involuntarily when they first use Genny. Keep your hands firmly on the HandleBar and go to the next phase. The machine is equipped with a system that allows the rider to deploy the stabilizing legs mechanically. This system is only to be used for emergencies and only when the machine is NOT moving. To activate it, pullupward one of the smaller inner handles and at the same time deploy the large handle outwards. As soon as possible after this procedure it is necessary to carry out the sequence for re-entering the stabilizing legs in order to allow the system to reconnect the mechanical part to the electric actuators. Never activate the mechanical deployment of the parking legs while the machine is moving. This would almost certainly result in a loss of traction and cause a fall. STEP 5: MOVING FORWARD AND BACKWARD The machine moves forward and backward in response to changes in your position. With your spotter available to assist you, slowly lean forward and feel the machine move forward. Then stop leaning forward and feel it slow down and stop. Do this a few times. forward backward 1. Look behind you and then slowly lean back and feel the machine move backward. Then stop leaning back and feel it slow down and stop. Do this a few times. 2. With your spotter standing close by, practice going forward and backward a short distance in each direction. Be careful not to run the Wheels into any wall or object. This could cause you to fall. Avoid rocking back and forth or shifting your weight abruptly, as this could result in a loss of traction and cause a fall. You should not ride backward except to maneuver a few feet. Instead, turn and ride forward. Do not turn or go fast when maneuvering backward. Manualedelleistruzioni per l’uso Document Code 03-09-12_UIMG2 Manual ENG Pag. di Rev. SAVE DATA PRINT DATA 24 31 00 23/07/13 23/07/13 STEP 6: STOPPING Stop the machine by shifting your weight away from the direction you are moving. To stop the machine: 1. When you are moving forward, gently push your back against the back rest to bring the machine to a stop. 2. Once stopped, center your weight over the seat to remain stationary. If you continue to lean back, you will move backward. 3. Practice choosing a spot on the ground, and coming to a smooth controlled stop at that spot. Then remain stationary. To stop shift your weight to the back. Avoid abrupt stops and slippery surfaces, stopping abruptly especially on slippery surface the machine may loose grip and this may result in fall. Always perform a controlled stop. Avoid abrupt stops. Come to a controlled stop by gently shifting your weight away from the direction of movement. Avoid slippery surfaces. The machine’s tires could lose traction causing you to fall STEP 7 TURNING The machine turns in the direction that you lean the Handlebar. You turn the machine by leaning the Handlebar left or right. Turning in Place First, practice turning in place. To turn in place, slowly pivot the Handlebar to the side in the direction that you want to turn. The machine will rotate so that you turn in place. Practice turning to the right and to the left using this technique. Right Left Turning while moving After you are comfortable going forward and backward and turning in place, try slowly riding forward and turning at the same time. Keep your knees slightly bent and lean in the direction of the turn in coordination with the angle of the LeanSteer Frame. Keep your body aligned with the LeanSteer Frame while turning. Because abrupt turns can be dangerous, always lean into turns slowly and smoothly. Manualedelleistruzioni per l’uso Document Code 03-09-12_UIMG2 Manual ENG Pag. di Rev. SAVE DATA PRINT DATA 25 31 00 23/07/13 23/07/13 STEP 8: COMING OFF When you are ready to come off the machine for the first time, your spotter should hold the handle. Remain stationary by keeping your weight centered over the Wheels and seat and keep the Handlebar vertical. Before activating the stabilizing procedure (lowering the legs), ensure you are on a terrain that is as flat as possible and completely stationary. The difference in height between terrain and entered parking legs is 5 cm. Press again button 1 (front) to power on the Led bar and then carry out the sequence button 1 – button 2 (within 3 seconds). You find the buttons near the right handle. The lowering of the stabilizing legs is accompanied by a gentle ticking sound. The procedure that lowers the stabilizing legs is completed 5 seconds after both have touched ground. A beep notifies you the procedure is completed. Do not attempt to move while procedure is ongoing. This could have serious consequences. The lowering of the stabilizing legs is activated only when the machine is stationary. To come off: 1. Power off the machine keeping the power on/standby button on the InfoKey Controller pressed for 2 seconds 2. Extract the Handlebar lifting it up while pressing the insert below the articulation. Manualedelleistruzioni per l’uso Document Code 03-09-12_UIMG2 Manual ENG Pag. di Rev. SAVE DATA PRINT DATA 26 31 00 23/07/13 23/07/13 STEP 9 SECURING The machine provides a Security function in case you need to leave it unattended. The Security function includes an alarm and uses the motors to make it difficult to move your machine. The best way to discourage tampering with your machine is to keep it in a secure indoor location with the InfoKey Controller stored separately. The Security function is intended for use when you remain in the general area of the machine, To set the Security function: and are able to respond to an alarm. If you must leave your machine unattended in a location that is not secure, activate 1. Step off your Segway PT. InfoKey Controller and use a lock. the Security function with your 2. Press the Security button on the InfoKey Controller. To set the Security function: 1. Before coming off the machine, press the Security button on the InfoKey Controller. Security button 2. The machine provides an audio indication that the Security function is activated and a lock icon displays on the InfoKey Controller: 94 3. Be sure to take your InfoKey Controller with you (do not leave it with the machine). 4. To deactivate the Security function, press the Security button on the InfoKey Controller. The Lock icon on the InfoKey Controller disappears and the Security function is no longer activated. Manualedelleistruzioni per l’uso Document Code 03-09-12_UIMG2 Manual ENG Pag. di Rev. SAVE DATA PRINT DATA 27 31 00 23/07/13 23/07/13 STEP 10: POWERING OFF 1. Power off the machine by pressing and holding the Power/ Standby button on the InfoKey Controller for two seconds. 2. The display on the InfoKey Controller will show a sleepy face and the Machine will emit a tone as the Machine powers off. Manualedelleistruzioni per l’uso Document Code 03-09-12_UIMG2 Manual ENG Pag. di Rev. SAVE DATA PRINT DATA 28 31 00 23/07/13 23/07/13 6.7.4. PRACTICE RIDING You will need to become very familiar with your machine before you attempt to ride outside of your controlled practice environment. The more you practice, the safer you will be when you move into new places. Remember the following as you practice: Use the Beginner Setting and ride in areas free of obstacles and distractions until you are comfortable on your machine. Practice at the Beginner level until you can step on, ride forward and backward, turn, stop, and step off with precision and confidence. With practice, you should be able to ride in narrow areas. You should also be able to ride, turn, and stop on a narrow, curving, paved walkway. Until you can ride with this precision, do not attempt to ride in any area where you might encounter children, pedestrians, pets, vehicles, bicycles, or other obstacles and potential hazards. Your first rides without the Beginner Setting should be in the same secure areas where you learned to ride with the Beginner Setting. Use caution when riding in new environments. Be careful when riding through a doorway. Make sure you leave enough Wheel clearance. Watch out for terrain transitions such as pavement and grass. Keep you feet always placed ON the footrest, not in front of it. DIFFERENT TERRAIN, DIFFERENT TECHNIQUES With practice, you can learn to ride over many different types of terrain, provided you avoid slippery surfaces, loose materials, steep slopes, and obstacles. Always proceed slowly over unfamiliar terrain. Never allow the machine to become airborne, even for short periods of time, because the machine has no traction when airborne, and you could lose control upon landing. TERRAIN COMPENSATION Genny is designed to compensate for uneven terrain. When riding straight on uneven terrain, keep the LeanSteer Frame vertical. Point the LeanSteer Frame in the direction you want to move and allow the Powerbase to follow the contour of the ground. STAIRS ANS CURBS Take a differentway. Stairs and curbs cannot be taken. Never attempt to ride the machine up or down stairs or curbs. Never activate the manual deployment mechanism for lowering the stabilizing legs while the machine is still moving. RIDING ETIQUETTE Use proper etiquette when riding your machine. Be careful and considerate of others. Always ride under control at a speed that is safe for you and those around you. Always be prepared to stop. Respect pedestrians by always yielding the right of way. Avoid startling pedestrians. When approaching from behind, announce yourself and slow down to walking speed when passing. Pass on the left whenever possible. When approaching a pedestrian from the front, stay to the right and slow down. In heavy pedestrian traffic, slow down and proceed at the pace of pedestrian traffic. Pass only if there is ample space to do so safely. Do not weave in and out of pedestrian traffic. When riding with other Genny riders, maintain a safe distance, identify hazards and obstacles, and do not ride sideby- side unless there is plenty of room left for pedestrians. Cross roads at designated crosswalks or signaled intersections. Do not jaywalk/ride. Only travel on a road when a pedestrian way is not available or when sidewalk use is not allowed. Do not ride your machine on private property (inside or outside) unless you have obtained permission to do so. Learn about and obey applicable laws and regulations. Manualedelleistruzioni per l’uso Document Code 03-09-12_UIMG2 Manual ENG Pag. di Rev. SAVE DATA PRINT DATA 29 31 00 23/07/13 23/07/13 6.8. RIDER PRESCRIPTIONS Use caution on slopes. Use caution when ascending, descending, or crossing slopes. Do not attempt to ride across any slopes with loose material or slippery surfaces. When riding across any slope, lean uphill to maintain balance. Watch those turns! Always turn slowly and with caution. Fast turns can lead to loss of control and falls. Lean into turns. Do not take risks. When you encounter a slope, uneven terrain, or other terrain feature with which you are not experienced or that makes you at all concerned about your safety, do not risk riding over it. Instead choose an alternative route. Always keep your hands firmly on the Handlebar and your feet on the footrest when riding. Do not hold any object in your hands. Be relaxed. Ride in a relaxed position with your elbows slightly bent and head up. Be prepared to stop. Be especially careful when approaching or crossing intersections, driveways, corners, doorways, and other areas where you may need to slow down or stop to avoid motor vehicles, bicyclists, or pedestrians. Be alert. As with any other transportation device, you must be mentally alert to safely ride the machine. Do not attempt to ride if you are ill or if you cannot comply fully with the instructions and warnings in this Manual. Do not ride under the influence of alcohol or drugs. Avoid distractions. Do not use a cell phone, listen to headphones, or engage in any other activity that might distract you or interfere with your ability to monitor your surroundings while riding. Do not ride backward. You should not ride backward, except to maneuver a few feet. Instead, turn and ride forward. There is a difference between maneuvering backward and riding backward, similar to the difference between stepping back and walking backward. Maneuver backward only when necessary to open a door or back away from an obstacle. Never restart and ride your machine after it has indicated an empty Battery condition or performed a low Battery Safety Shutdown. The machine may not have enough power to keep you balanced, especially if you demand a lot of power at once. If you restart and continue riding, you risk falling. Also, you may damage your Batteries resulting in reduced Battery life and capacity. Never let go of a balancing machine. Never let go of your machine when in Balance Mode, because the machine will travel some distance on its own before transitioning to Standby Mode. The machine will not travel very far if you let go of it when it is stopped. But, if you let go of it when it is moving at any speed, it could travel much farther, risking injury to others and damage to the machine. Riding on the road. The machine is not intended or recommended for primary use on roads. If you must ride on the road, or must cross the road, be extremely careful. Ride as far away from traffic as possible. Allow plenty of time for crossing roads. Remember, the Speed Limiter or an unexpected obstacle could slow your crossing. Check to make sure that riding on the road is allowed by law. Leave a gap! Leave a gap between yourself and the Handlebar. Do not lean over or into the Handlebar. Leaning over or into the Handlebar dramatically increases the risk of loss of control, collisions, and falls. Do not exceed the maximum weight limit (rider) specified in the Reference Manual. If you exceed the maximum weight limit, you are at greater risk of falling and injury, and damage to the machine could result. Also, the rider's weight must not be less than the minimum rider weight limit specified in the Reference Manual. If you are below the minimum rider weight limit, you may not be able to ride safely because you cannot shift your weight far enough back (behind the center line of the Wheels) to safely slow down and stop, especially when riding downhill. Riders below the minimum weight limit might also fail to properly activate the machine's Rider Detect Sensors. Maintain Tire inflation pressure at the level stated in the “Technical Specifications Table” in the Reference Manual. If you exceed the Tire inflation pressure stated on the Wheel label, you increase the risk of loss of control, collisions, and falls. Lower pressure reduces range and risks Tire and Wheel damage. Pre-ride inspection. Inspect your machine before each use. Do not use if any part is loose or damaged. Do not place any objects on seat. This could cause the machine to move on its own when in Balance Mode with the parking legs deployed. The machine could be damaged or become unsafe to use. Do not open the Powerbase. There are no user-serviceable parts inside the Powerbase. By opening the Powerbase, you risk electric shock injury. Also, you could void your limited warranty, damage your machine, and render it unsafe to use. Do not open the Gearboxes. There are no user-serviceable parts inside the Gearboxes. You could damage your machine and render it unsafe to use. Do not use in hazardous atmospheres. The machine has not been certified for use in hazardous atmospheres. Hazardous atmospheres are locations where fire or explosion hazards may exist due to flammable gases, vapors, liquids, dust or fibers. Manualedelleistruzioni per l’uso Document Code 03-09-12_UIMG2 Manual ENG Pag. di Rev. SAVE DATA PRINT DATA 30 31 00 23/07/13 23/07/13 6.9. START-UP PROCEDURE WHEN STATIONARY In normal use, the machine has to be used within the limits described in paragraph 2.2 During use all safety regulations, warnings and prescriptions in case of residual risks (refer to chapter 4) need to be observed. The initial state is when both Segway and the wheelchair kit are powered off and the parking legs are deployed. Phase Operations 1 Get on the wheelchair and install the Handlebar as described in this Manual 2 Power on the wheelchair as described in the start-up procedure Power on the wheelchair pressing button P1 (button next to the battery charge indicator) 3 4 Wait for the Battery charge indicator to have reached 13 (Volt). If the battery does not reach 13 Volt (red led lights near number 11) the battery needs to undergo a recharging cycle. Connect the kit’s charge port (front side next to the handle bar blockage. 5 Press button P1 and P2 in successively. The interval between pressing the buttons should not exceed 3 seconds. Otherwise the sequence needs to be repeated. 6 The parking legs re-enter until they are completely up and the machine starts to function stabilizing the load. 7 It is very important to maintain a steady and in balance position during re-entering cycle of the parking legs. Do not move in any way (back and forth or push the handlebar) until the cycle is completed. Manualedelleistruzioni per l’uso Document Code 03-09-12_UIMG2 Manual ENG 6.10. Pag. di Rev. SAVE DATA PRINT DATA 31 31 00 23/07/13 23/07/13 STOPPING PROCEDURE In normal use, the machine has to be used within the limits described in paragraph 2.2 During use all safety regulations, warnings and prescriptions in case of residual risks (refer to chapter 4) need to be observed. Phase 1 Operations Find a stable and in balance position with the wheelchair stationary Press button P1 and immediately after button P2. The interval between the pressing of the buttons should not exceed 3 seconds. WARNING: the difference in level between the wheel and the parking legs should not exceed 5 cm.The mechanism could break and jeopardize normal functioning. 2 3 The procedure of deployment of the parking legs is complete 5 seconds after having touched he ground. At the end of the procedure the wheelchair emits a beeping signal. WARNING: do not attempt to move the wheelchair in any way (back and forth or pushing the handle Bar) while the procedure is still on going. 4 Now you can get off the wheelchair’s seat. The wheelchair automatically powers off after 15 min of non-activity Manualedelleistruzioni per l’uso Document code 03-09-12_UIMG2 Manual ENG CAP. 7. Pag. di Rev. SAVE DATA PRINT DATA 1 18 00 23/07/13 23/07/13 MAINTENANCE, TROUBLESHOOTING AND CLEANING 7.1. MAINTENANCE TECHNICIAN REQUISITES Maintenance” does not merely refer to the periodic checking of correct machine operation; it also involves the analysis and consequent solution of any situation that puts the machine out of action. "Maintenance" therefore covers a range of important issues of a mechanical, pneumatic, hydraulic and electric nature, so the technician must have a thorough knowledge (both theoretical and practical) of the machine. Specifically, personnel assigned to the responsibility of servicing, cleaning, parts replacement and troubleshooting should set themselves the following aims: 1. limit the deterioration of parts subject to wear; 2. minimize accidents; 3. reduce costs arising from faults; 4. limit the number and duration of interventions; 5. work in collaboration with the line operators to improve plant efficiency. Personnel responsible for servicing, cleaning, parts replacement and troubleshooting are obliged to comply with a series of basic rules in order to achieve these objectives. More specifically, they must: 1. fill out the maintenance sheets relative to the various machines, with the type and frequency of operations performed or to be performed; 2. promptly carry out scheduled lubrication (if required); 3. co-operate in defining and managing spare parts and soliciting repeat orders as soon as the minimum agreed stocks have been reached. It is essential that, for activities of servicing, cleaning, parts replacement and troubleshooting performed by the user, this task be assigned to expert personnel who are competent and authorized by the employer. Said expert personnel must be capable of assessing the work assigned to them, and recognizing any possible hazards on the basis of their training, knowledge, and professional experience and their knowledge of the machines in question, the relative equipment and the applicable standards and legislation; they must also be in possession of an adequate professional qualification concerning the machines in question. The personnel must also be trained in relation to safety, and informed of the residual risks as described in chapter 4 of this manual. The personnel must also be skilled rather than simply aware, i.e. they must be a high school or university graduate with specific know-how concerning the machine and its equipment and the relative standards and legislation, and must also have specific technical knowledge and training. The maintenance technician, in addition to performing all maintenance tasks, must: 1. in certain cases work to support the operator for specific tooling procedures. The maintenance technician can also gain access to the mains panel while the equipment is live; 2. he may access the dangerous areas of the machine, with the mobile guards open but with the guarantee of no movements. Manualedelleistruzioni per l’uso Document code 03-09-12_UIMG2 Manual ENG Pag. di Rev. SAVE DATA PRINT DATA 2 18 00 23/07/13 23/07/13 The personnel responsible for carrying out the operations described in this chapter must not only have the characteristics set down in Chapter4, but must also have read and understood the safety prescriptions given in chapter 4. If the user does not have suitably trained/expert/knowledgeable personnel, a maintenance contract must be drawn up with a specialized firm, such as the electrical equipment supplier. Certain scheduled maintenance operations forming part of the routine maintenance procedures, the execution of which does not call for special professional skills, can be carried out by trained although non-expert personnel, or by machine operators or the user’s general maintenance technicians, who are always informed or, if necessary, supervised by an expert maintenance technician to avoid or prevent hazards relating to the overall machine. The trained operator must be instructed in relation to the duties assigned to him, and the possible hazards caused by negligent conduct and also, if necessary, must be trained to an appropriate level of skill. Thereafter, said person must be either qualified by the user’s internal training service or must attend a specific training course, held by the manufacturer, in compliance with the indications on the next page. 7.2. MAINTENANCE PRESCRIPTIONS In order to carry out the interventions described in this chapter in conditions of the maximum safety, the area around the machine (for a radius of 360° and for a distance of at least 1000mm) must be free of partitions/walls, other machines, equipment, or any other obstructions such as pillars. It is forbidden to perform any maintenance work on parts that are in motion. In specific cases, certain maintenance operations cannot be performed with the machine stopped, due to the technical requirements of the processes involved or because their execution is necessary in order to avoid greater damage or hazards (replacement of belts). In such cases, all the supplementary measures and precautions must be adopted to guarantee the safety of all persons. GENERAL WARNINGS Before any servicing, cleaning, parts replacement and troubleshooting operation, pay close attention to the labels in the machine or on the electrical equipment. During these activities, do not tamper with or deactivate any of the safety devices for any reason, do not create bypasses, and do not use them for purposes other than their intended use as prescribed by the manufacturer. After every intervention, reset and reactivate all the safety devices. Do not tamper with or deliberately damage the protective screens, or remove or conceal the warning decals. In the event of deterioration or illegibility, immediately order replacement ones from the supplier of the electrical equipment. Before performing any maintenance work, ensure that the machine is powered off and disconnected form the AC power outlet. Manualedelleistruzioni per l’uso Document code 03-09-12_UIMG2 Manual ENG Pag. di Rev. SAVE DATA PRINT DATA 3 18 00 23/07/13 23/07/13 7.3. ROUTINE MAINTENANCE The personnel responsible for carrying out the operations described in this chapter must not only have the characteristics set down in paragraph4.2.2, but must also have read and understood - and must observe - the safety prescriptions given in chapter 4. Note that the greater the care taken with adjustments, set-ups and routine/scheduled maintenance, the longer the machine will retain its original characteristics unaltered and the less likely the need for supplementary maintenance/repairs. Always perform all checks, inspections and cleaning operations described in this paragraph in accordance with the specified frequency. In any event, the general rules must be observed in order to keep the machine in perfect working order: 1. keep the machine clean and tidy; 2. avoid any unnecessary damage; 3. avoid a situation where makeshift or urgent repairs become commonplace; 4. do not use the machine to perform any work processes that produce chips; if you need to drill holes for example, carefully check that no residues remain on the machine parts. For the disposal of worn or replaced materials, refer to the prescriptions given in paragraph 8.2. During all work, both the machine operator and the maintenance technician must scrupulously adhere to the prescriptions given for each type of task. Maintenance interventions must only be performedafter powering off and disconnecting Genny from its external energy (AC) supply Do not attempt to open the Powerbase o the seating module. There are no user-serviceable parts inside the Powerbase. Only authorized service center can repair or replace parts. By opening them, you risk electric shock injury. Also, you could void your limited warranty, damage your machine, and render it unsafe to use. Do not open the Gearboxes. There are no user-serviceable parts inside the Gearboxes. You could damage your machine and render it unsafe to use. FREQUENCY EVERY DAY CHECK Check the proper functioning of: the emergency stop device; the parts of the command/control system relating to safety METHODS AND RESPONSE All these devices and circuits must carry out their function correctly. Directly command the devices so they produce the intended result (e.g. stopping, etc.). As soon as any problem is noted, initiate the necessary checks to verify the perfect electrical and mechanical functioning of the devices. The actuators and all parts must in any case be replaced at the first sign of erosion or breakage. Visual check of integrity of : fixed guards All the fixed guard need to be functioning properly Check integrity on outside (surface) and inside and check if there are no signs of erosion or breakage) EVERY WEEK Visual check of integrity of all data plates In case of illegibility they are to be requested to Manufactureror to be replaced by user with other plates containing identical information, as indicated in chapter 4. EVERY WEEK Visual check of integrity of wheel/Tire assembly The machine is unplugged and powered off.Shake the wheel tire assembly to check if the wheel is loose. The assembly should not be able to move laterally. If loose, check the nuts and tighten them. EVERY DAY Manualedelleistruzioni per l’uso Document code 03-09-12_UIMG2 Manual ENG Pag. di Rev. SAVE DATA PRINT DATA 4 18 00 23/07/13 23/07/13 The Tires on the machine provide suspension and traction. The tire inflation pressure affects both functions. Be sure to: 1. Make sure the machine is unplugged and powered off 2. Maintain the tire inflation pressure at the level indicated on the Tires. Improperly inflated Tires will result in less than optimal range. 3. Check that both Tires are inflated equally. The tire pressure stated on any affixed Wheel label (near the inflation valve) supersedes any recommended pressure stated on the Tires. Higher pressure reduces suspension performance and tractionand increases risk of loss of control, collisions, and falls. Lower pressure reduces range and increases risk of damage to the Tire/ Wheel Assembly. Check: Tire inflation pressure Unequal pressure causes the machine to turn in the direction of the lower pressure tire. Tools required: Low pressure Tire Gauge To check the Tire inflation pressure: 1. Tip the machine onto its side, making sure the Tire to be checked is on the ground. 2. Rotate the Powerbase until the valve stem on the inside of the Wheel becomes visible. 3. Check the inflation pressure 4. Reposition the machine in its original upright position EVERY WEEK EVERY YEAR Authorized Service Centre Contact an authorized service centre to carry out a check if no connection/components have worn loose and to tighten them to the right degree, to check the good condition of all the module’s mechanical parts subject to wear. Replacement is to be considered in case of excessive wear. During an annual check the authorized service centre will eliminate possible wobbling and abnormalities on the parts en will lubricate the components subject to mechanical arthritis. Also will be carried out a check of the reliability and functioning of all the safety devices in normal use conditions and in emergencies. For all interventions and parts replacement, contact the authorized service centre. Parts replacements must always be carried out using the manufacturer’s genuine original parts, or at least parts of equivalent quality and safety levels. Replacement instructions are not given in this manual, and must therefore be explicitly requested from the machine manufacturer, who reserves the responsibility for any replacement interventions. To equip the machine with accessories, contact the authorized service centre or check the website www.gennymobility.com to learn what accessories are available. Manualedelleistruzioni per l’uso Document code 03-09-12_UIMG2 Manual ENG Pag. di Rev. SAVE DATA PRINT DATA 5 18 00 23/07/13 23/07/13 7.4. CLEANING Workers must be informed by means of clearly visible warning notices. The following section describes cleaning operations that can be performed by maintenance technicians. Normally, certain cleaning operations can be performed by the machine operator, i.e. normal operations on the outside of the machine, calling for the use of simple personal protective equipment. Cleaning operations of the internal machine parts must be performed by the maintenance service. To avoid the inadvertent and dangerous activation of the machine, or inappropriate modifications of any nature (also involuntary or accidental), cleaning should ideally be carried out by the same person that operates on the machine, rather than by cleaning contractors who are unable to provide guarantees in relation to compliance with these prescriptions. Cleaning operations must only be performedafter disconnecting Genny from its external energy (AC) supply Never use petrol, solvents or other flammable and/or corrosive fluids to clean the machine, its components, and the electrical equipment. Use only type-approved non-flammable and non-toxic trade solvents. Comply with the methods of use, and employ all the necessary personal protective equipment specified by the supplier of such substances. The machine, its components, and the electrical equipment must never be washed with water jets Do not use a power washer or high-pressure hose to clean your machine. Do not allow water to get into the Charge Port. Do not clean the Tires with any specialized cleaners. Use of such products may reduce traction. Manualedelleistruzioni per l’uso Document code 03-09-12_UIMG2 Manual ENG FREQUENCY PERSONNEL Pag. di Rev. SAVE DATA PRINT DATA 6 18 00 23/07/13 23/07/13 AREA - MODALITIES/METHODS Make sure the machine is unplugged and powered off Always close the machine’s charge port after charging and prior to cleaning. EVERY DAY Operator Clean the seating module with a soft, non–abrasive humid cloth. (No soap) Blow air in the mechanical joints using compressed air spray to keep them clean (for example stabilizing legs, release lever, back rest hub, etc.). EVERY DAY EVERY WEEK Operator Operator Make sure the machine is unplugged and powered off. Clean with a non-abrasive brush and with plastic bristlethe tires to remove possible debris that can jeopardize traction during use of the machine. Make sure the machine is unplugged and powered off. Clean backrest, cushion and footrest with vacuum cleaner. The cushion and the removable part of the backrest may be periodically washed manually, using neutral soap. Manualedelleistruzioni per l’uso Document code 03-09-12_UIMG2 Manual ENG Pag. di Rev. SAVE DATA PRINT DATA 7 18 00 23/07/13 23/07/13 7.5. LUBRICATION During lubrication operations: 1. avoid bringing oils and/or greases into contact with the skin; 2. during oil and/or grease changes, use protective gloves. Both spent and fresh lubricants are highly polluting: for disposal of lubricants consult your lubricant dealer or contact a specific toxic waste disposal company. All lubrication operations must be performed in strict compliance with the indications given in chapter 4;scrupulously observing the safety indications given in the “safety datasheets” of each lubricating product. Power off Genny and disconnect the power cord from the AC power outlet prior to any maintenance intervention. The following section describes the lubrication operations that must be performed by maintenance technicians in compliance with the contents of paragraph 6.1. To obtain high performance and faultless operation, it is important to lubricate mobile machine parts periodically. Fixed guards must be removed in order to gain access to some of the parts requiring lubrication. FREQUENCY LUBRICATION EVERY WEEK Articulated elements METHODS AND RESPONSE After thoroughly cleaning the joints lubricated with Teflon spray or other dry lubricants to prevent the accumulation of impurities. Manualedelleistruzioni per l’uso Document code 03-09-12_UIMG2 Manual ENG Pag. di Rev. SAVE DATA PRINT DATA 8 18 00 23/07/13 23/07/13 7.6. REPLACING PARTS Power off Genny 2.0 and disconnect the power cord from the AC power outlet prior to any maintenance intervention. 7.6.1. REMOVING/ATTACHING THE HANDLEBAR Tool Required: 3mm hex wrench. To remove the Handlebar from the LeanSteer Frame: 1. Make sure the machine is unplugged and powered off. 2. Using the 3mm hex wrench, remove the 3 fasteners that secure the Handlebar Clamp to the LeanSteer Frame. 3. When you remove these fasteners and the Handlebar Clamp, the Handlebar is released from the LeanSteer Frame. Tool Required: Torque wrench with 3mm bit. To attach the Handlebar to the LeanSteer Frame: 1. Make sure the machine is unplugged and powered off. 2. Align the Handlebar in place against the LeanSteer Frame using the alignment guides. 3. Position the Handlebar Clamp against the Handlebar. 4. Insert the 3 fasteners through the Handlebar Clamp into the LeanSteer Frame. 5. Using the 3mm hex wrench, alternate between the 3 fasteners, evenly tightening in small increments until the full torque setting of 6.0 N-m (4.4 ft-lbf) is achieved. Check to ensure that the gap between the Handlebar Clamp and the LeanSteer Frame is even, and the same between the top and bottom. Manualedelleistruzioni per l’uso Document code 03-09-12_UIMG2 Manual ENG Pag. di Rev. SAVE DATA PRINT DATA 9 18 00 23/07/13 23/07/13 7.6.2. REMOVING / REATTACHING THE BATTERIES Your machine is powered by two rechargeable Li-ion Batteries and one Lead-gel battery. With normal usage and proper maintenance, Batteries should last the equivalent of 600 to 1000 full charges. As your Batteries are near the end of their useful life, they need more frequent charging and your machine’s range will be reduced. The battery located under the seat of the machine, guarantees the activation of the stabilizing parking legs and of all the control electronics that synchronizes the self-balancing unit with the mechanical parking. This battery should be checked at least once a year. To order replacement batteries, contact your authorized service center. REPLACING ION BATTERIES IN PAIRS Whenever you need to replace a Battery, consider replacing both Batteries, and always use pairs of Batteries with the same chemistry. Replacing only one Battery will not necessarily increase the performance or range of your machine, because the machine is designed to operate only at the level allowed by the lower- energy Battery. Redundancy is a critical safety feature built into the machine that also applies to the Batteries. Therefore, you should replace Batteries in pairs, except for the unusual situation where a Battery is replaced because of damage or defect and the other Battery is relatively new. This rule does not apply to the Lead-gel Battery. It is not safe to perform this procedure while the machine is powered on or charging. The cells within the Batteries contain toxic substances. Do not attempt to open Batteries. Do not use the Batteries if the casing is broken or if it emits an unusual odor or excessive heat or leaks any substance. Do not handle a damaged or leaking Batteries unless you are wearing disposable rubber gloves, eye protection, and are in a well-ventilated area. Dispose of rubber gloves and damaged Batteries properly in accordance with regulations governing disposal of toxic materials. To avoid risk of damage, do not use a power tool to install or tighten fasteners. Manualedelleistruzioni per l’uso Document code 03-09-12_UIMG2 Manual ENG Pag. di Rev. SAVE DATA PRINT DATA 10 18 00 23/07/13 23/07/13 Tool Required: 3mm hex wrench. To remove the batteries (Lithium only): 1. Remove Lean/steer Frame 2. Tip the machine onto its side so that the Wheel lays flat against a smooth clean surface making sure to put a pad or something thick cloth between wheel and floor in order to avoid the edge of the Fender to scrape against the floor. 3. Using the 3mm hex wrench, remove the fasteners, which hold the Batteries in place (4 per Battery). 4. Pull Batteries straight off chassis. Tool Required: Torque wrench with 3mm bit. To reseat the batteries (Lithium only): 1. Reseat one of the Batteries on the Powerbase with curved edge facing out 2. Ensure the Battery is aligned straight against the edge of the Powerbase trim, and there are no uneven gaps. 3. Install and tighten the 2 center fasteners with the 3mm hex wrench to 1.0 N-m (9 in-lbf) 4. Install and tighten the 2 outer fasteners with the 3mm hex wrench to 1.0 N-m (9 in-lb.) 5. Ensure the Battery is aligned straight against the edge of the Powerbase trim, and there are no uneven gaps. 6. Repeat these Steps for the second Battery. 7. Put the machine back in vertical position 7.6.3. REPLACING THE INFOKEY CONTROLLER BATTERY Tool Required: Flathead Screwdriver. To remove the Info Key Controller battery (only lithium): 1. Remove the Info Key Controller from the Dock and unscrew the Info Key Controller Dock Adapter. 2. Using a coin or a flathead screwdriver, unscrew the back cover of the Info Key Controller. 3. Remove the Info Key Controller battery. 4. If you are replacing the battery, verify that the new battery is type CR2430. CR2430 replacement batteries are available at Electronics stores. 5. Insert the Info Key Controller battery with the positive (+) side showing. 6. Screw on the Info Key Controller's back cover. 7. Screw on the Info Key Controller Dock Adapter. Manualedelleistruzioni per l’uso Document code Pag. di Rev. SAVE DATA PRINT DATA 11 18 00 23/07/13 23/07/13 03-09-12_UIMG2 Manual ENG 7.6.4. REMOVING THE TIRE/WHEEL ASSEMBLY Tools Required: 13mm socket wrench To remove the Tire/Wheel assembly: 1. Extract the LeanSteer frame 2. Tip the machine onto its side so the Wheel you want to remove is facing up, and the other Wheel rests against a clean, smooth surface. 3. Remove the Wheel Cap by pressing down on the outside edge, and lifting the opposite outside edge with your fingers or a plastic wedge. 4. Remove the 3 Wheel Nuts with a 13mm socket wrench. Hold the Wheel to keep it from rotating. 5. Lift off the Wheel. 6. Clean all debris from the Wheel’s mounting surfaces. 7. Put the machine back in its original vertical position. Tools Required: 13mm socket, torque wrench To install the Tire/Wheel assembly 1. Extract the LeanSteer frame 2. Tip the machine onto its side so the Wheel you want to remove is facing up, and the other Wheel rests against a clean, smooth surface, making sure to put a pad or something thick between wheel and floor to avoid scraping of the fairing against to floor. 3. Clean all debris from the Wheel’s mounting surfaces. 4. Place the Tire/Wheel assembly over the 3 threaded posts. 5. Hold the Wheel to prevent it from rotating. 6. Thread on the 3 Wheel Nuts, and tighten to 35 N-m (26 ft-lbf) with a 13mm socket. 7. Replace the Wheel Cap by aligning the three plastic fittings on the underside of the Wheel Cap with the 3 holes in the Wheel. 8. Press down until the Wheel Cap snaps into place. 9. Put the machine back in its original vertical position. Manualedelleistruzioni per l’uso Document code 03-09-12_UIMG2 Manual ENG Pag. di Rev. SAVE DATA PRINT DATA 12 18 00 23/07/13 23/07/13 7.7. TROUBLESHOOTING/FAILURES If any of the moving parts become jammed, in order to release them in conditions of safety the machine operator must first stop the machine (by pressing one of the emergency stop buttons if necessary) and then - if he was not authorized to perform this task - inform the persons in charge of maintenance. The following section describes operations for troubleshooting and releasing jammed moving parts, that can be performed by maintenance technicians Before performing any work or inspection: 1. Before restarting the machine, make sure no personnel are still performing cleaning and/or maintenance operations on it; 2. For mechanical repairs, always seek the assistance of the authorized service center 3. Always consult the piece manufacturer, as specified in of this manual; 4. Do not zero-set or reset the safety devices automatically by means of an external sequence without first checking and identifying the cause of the stoppage. All information devices (visual, audible) aimed at avoiding potential ergonomic hazards are shown in, along with the relative explanations and the type of information to be passed on to the operator(s). Depending on the type of information, action must be taken to eliminate the cause that generated the visual/audible warning signal. The type and method of intervention depend exclusively on the information transmitted. For the correct identification and interpretation, refer to the etched wording or the symbol above the information device, and the indications given in the electrical diagram supplied with the machine. Before resuming normal productive functioning, the maintenance service must check the good condition and operation of the mechanical and electrical and must always consult the machine manufacturer. The machine is built using the most advanced technology, and all components are carefully selected on the basis of their quality. Despite this, during normal use of the machine various problems may occur that are anyway easily rectified by following the procedures given below. Instructions concerning replacement are not given in this manual, and must therefore be explicitly requested from the machine manufacturer, who reserves the responsibility for any replacement interventions. Always power off and unplug the power cord form the grounded AC outlet prior to performing any maintenance intervention. Manualedelleistruzioni per l’uso Document code 03-09-12_UIMG2 Manual ENG Pag. di Rev. SAVE DATA PRINT DATA 13 18 00 23/07/13 23/07/13 7.7.1. GENNY 2.0 WILL NOT POWER ON Your machine will not power on when you press the Info Key Controller Power/Standby button. The procedure below will help you determine if you are standing in range for the Info Key Controller to communicate with the machine, whether the Info Key Controller Battery needs replacement, whether your machine needs to be “reset” by removing and reattaching the Batteries, or if you are experiencing a startup error. You should review the following service procedures prior to troubleshooting this problem for important instructions and torque values. Removing the Batteries Reattaching the Batteries Replacing the Info Key Controller Battery Recommended Action: 1. Make sure your machine's Batteries are charged. 2. Make sure you are standing with the Info Key Controller no further than 15 ft. (5m) from your machine. 3. Tap the InfoKey Controller Power/Standby button and verify that the Link Signal icon appears in the InfoKey display. 4. For more information, see “InfoKey Controller” 5. If no Link Signal icon is displayed or the display is blank (no information displayed), remove and reseat the InfoKey Battery. 6. Tap the InfoKey Controller Power/Standby button. If the InfoKey display is blank, replace the InfoKey Controller Battery. 7. If the Warning icon appears (see “InfoKey Controller”) in the InfoKey Display when attempting to power on, see “Startup Error Conditions” 8. If your machine will still not power on, remove both Batteries and then reattach them. 7.7.2. THE MACHINE WILL NOT ENTER IN BALANCE MODE Recommended action 1. Ensure that you have properly followed all instructions in “ Balance Mode” 2. Confirm power has been turned on. 3. Confirm the LeanSteer Frame/Handlebar Assembly is centered and the seat is level. (If you are positioned across a gentle slope, the LeanSteer Frame/Handlebar Assembly must be vertical side-to-side). 4. Make sure there are no objects underneath the rider presence sensor and the stabilizing parking legs are up. 5. If the machine still will not enter Balance Mode, identify the error icon on the InfoKey Controller, and attempt to clear the fault following the recommended actions in “Startup Error Conditions” 7.7.3. TIRE/WHEEL ASSEMBLY IS LOOSE AND WOBBLES The Tire/Wheel assembly is not secure. It appears to be loose and wobbles. You should review the following service procedures prior to troubleshooting this problem for important instructions and torque values. Removing the Tire/Wheel Assembly Installing the Tire/Wheel Assembly Recommended action: 1. Remove the Wheel Cap by pressing down on the outside edge, and lifting the opposite outside edge with your fingers or a plastic wedge. 2. Tighten the Wheel Nuts. 3. If the Tire/Wheel Assembly is still loose or wobbles, remove, clean, and reseat the Tire/Wheel Assembly and the flange on which the Tire/Wheel Assembly mounts. Manualedelleistruzioni per l’uso Document code 03-09-12_UIMG2 Manual ENG Pag. di Rev. SAVE DATA PRINT DATA 14 18 00 23/07/13 23/07/13 7.7.4. GENNY 2.0 PULLS TO ONE SIDE WHEN RIDING Your machine pulls to one side when you are riding. You should review the following service procedure prior to troubleshooting this problem for important instructions: Checking Tire Inflation Pressure. Recommended Action: 1. Check to make sure tire inflation pressure is equal, and set to recommended specifications in both Tires. See Tire Inflation Pressure. 2. If either Tire is not set at the proper tire inflation pressure, inflate the Tire or Tires until both are at equal and correct pressure. 3. Distribute your weight evenly on the seat. 7.7.5. TIRE IS FLAT OR WILL NOT HOLD AIR One of the Tires on your machine is flat or will not hold air. You should review the following service procedure prior to troubleshooting this problem for important instructions: Checking Tire Inflation Pressure. Recommended Action: 1. Check for Tire damage. If the Tire is damaged, contact an Authorized Service Center to order a replacement Tire/Wheel Assembly. 2. If there is not visible Tire damage, check to make sure the Tire valve stem core is tight. Tighten the valve stem if necessary. 3. Inflate the Tire and check for leaks. If the Tire goes flat or will not maintain inflation pressure, contact an Authorized Segway Dealer or Distributor to order a replacement Tire/Wheel Assembly. 7.7.6. SAFETY SHUTDOWN AT BUILDING ENTRANCE Theft detection systems, such as the type used in some libraries andretail stores can interfere with the machine’s ability to balance and/or cause the machine to perform a Safety Shutdown. Do not ride within 5 feet (1.5 meters) of any theft detection system. Thesesystems may not always be visible. Recommended action: ask a responsibleif you can use an alternative entrance without theft system or ask for temporary deactivation of the system. 7.7.7. GENNY 2.0 WILL NOT POWER DOWN Genny 2.0 will not power down when you press and hold the Power/Standby button on the InfoKey Controller. You should review the following service procedure prior to troubleshooting this problem for important instructions Replacing the InfoKey Controller Battery Recommended Action: 1. Check that the stabilizing parking legs are steadily on the ground. 2. If necessary re-enter them and lower them again 3. Press and hold the Power/Standby button on the InfoKey Controller for two seconds to confirm the problem is resolved. 4. If your machine still will not power down, check that your InfoKey Controller Battery is not fully depleted and that the InfoKey Controller is not damaged. If necessary replace or reseat the InfoKey Controller Battery. 5. If reseating the InfoKey Controller Battery did not resolve theproblem, and you do not have a replacement InfoKey Controller Battery. Leave your machine in a secure location for 15 minutes until it automatically powers down. Install a new InfoKey Controller Battery. 6. Press the Power/Standby button on the Infokey Controller to power on the machine, then press and hold the button for two seconds to confirm the problem is resolved. Manualedelleistruzioni per l’uso Document code 03-09-12_UIMG2 Manual ENG Pag. di Rev. SAVE DATA PRINT DATA 15 18 00 23/07/13 23/07/13 DIAGNOSING ERRORS WITH INFOKEY CONTROLLER ICONS This section describes the icons and the recommended actions to resolve a problem. InfoKey Controller icons assist you in diagnosing certain errors.Match the icon shown in your InfoKey Controller display to those inthe tables in this section to identify and attempt to correct the fault. If the information on the Infokey controller does not resolve the problem, contact an authorized GM or Client service; You can find a list of authorized distributors on the website www.gennymobility.com. Do not use Genny 2.0 until you have cleared all error conditions. START-UP ERROR CONDITIONS If you attempt to power on the machine and an error condition occurs that prevents the machine from powering on and entering Standby Mode, the icons shown in the table will appear on the InfoKey Controller. To clear these conditions, follow the instructions in the Recommended Action column Display Icon Description Recommended Action The machine is plugged in Unplug the Power Cord. If the machine has powered off, power on again The charge in the machine Batteries istoo low to allow safeoperation of themachine Charge the Batteries and then attempt topower on. A Rider Detect sensoris on at startup. (Thecorresponding icon in the display will blink). Reposition yourself on the seat making sure to correctly press the Rider Detect sensor and repeat the procedure of reentering and then lowering the stabilizing parking legs. Manualedelleistruzioni per l’uso Document code 03-09-12_UIMG2 Manual ENG Pag. di Rev. SAVE DATA PRINT DATA 16 18 00 23/07/13 23/07/13 BALANCE MODE ERROR CONDITIONS If you unsuccessfully attempt to enter Balance Mode the icon shown in the table will appear on the InfoKey Controller. To clear this condition, follow the instructions in the Recommended Action column. Displayed Icon Description During the Re-entering of the stabilizing parking legs the sensors are not depressed correctly and the Rider detect sensor is not depressed contemporarily. The LeanSteer Frame is tilted when attempting to enter Balance Mode. Recommended Action Repeat the procedure for re-entering stabilizing parking legs while keeping the LeanSteer frame in front of you. REDUCED PERFORMANCE LEVELS When the machine is operating at reduced performance levels dueto an error condition, the icon shown in the table will appear on theInfoKey Controller. See “Speed Limiter” for a list of theconditions that cause reduced performance. To clear this condition, follow the instructions in the RecommendedAction column Display Icon Description The machine is operating at reduced performance levels, with the speed limit lowered, due to a temporary condition. Recommended Action The machine’s Speed Limiter is an alert that you are moving too fast. When the Speed Limiter pushes the Handlebar back, stop leaning forward and slow down. Always leave a gap between yourself and the Handlebar. Once you slow to a speed that the machine determinesis safe, it will resume normal functioning. CRITICAL FAULTS WHILE RIDING During normal riding, if the machine detects a fault in any of its redundant subsystems, the icon shown in the tablewill appear on the InfoKey Controller. When such a fault is detected, machine performs a Safety Shutdown. When a Safety Shutdown occurs, the machine automatically reduces its speed, gives the Stick Shake Warning(shakes the Handlebar and makes a growling sound) and the InfoKey displays a Safety Shutdown icon. Asthe machine slows, it emits an audio alert. Follow the instructions in the Recommended Action column Display Icon Description Recommended action The system has detected a critical error in its redundant subsystems and performs a Safety Shutdown. The rider has approximately 10seconds from the start of a Safety Shutdown to come to a controlled stop and deploythestabilizing parking legs. After 10 seconds, the machine will immediately shut downwhen the Wheels reach zero speed. Manualedelleistruzioni per l’uso Document code 03-09-12_UIMG2 Manual ENG Pag. di Rev. SAVE DATA PRINT DATA 17 18 00 23/07/13 23/07/13 PITCH OR ROLL ANGLE EXCEEDED If the machine shuts down because a forward/backward (pitch), or side (roll) tilt limit was exceeded, or no Rider Detect sensors were depressed while the machine was moving at speed, the icon shown in the tablewill appear on the InfoKey Controller. The machine is programmed to shut down in these situations because the rider is not in control of the machine. Follow instructions in the recommended action column of the table Display icon Description Recommended action The machine shuts down because aforward/backward(pitch), or side tilt limitwas exceeded, or no Rider Detect sensorswere depressed whilethe machine was moving at speed. Check the machine for damage. If there is no damage, turn onpower by tapping thePower/Standby buttonon the InfoKey Controller. SYSTEM FAULTS If the machine detects a hardware fault, the icons shown in the tablewill appear on the InfoKey Controller.The machine cannot be used until the fault is cleared. To attempt clear system faults, follow the instructions in the RecommendedAction column of the table. Display Icon Description There is a fault in the Powerbase or Batteries. Recommended Action 1. Power on machine 2. If the same icon appears, confirm that both Li-ion Batteries are installed correctly. 3. If the same icon appears remove and reseat both Batteries (see Removing the Batteries and Reattaching the Batteries). 4. If the same icon appears, plug in your machine and verifythat both Battery ChargeIndicator lights are green. Plugin and charge the machine overnight. Manualedelleistruzioni per l’uso Document code 03-09-12_UIMG2 Manual ENG Pag. di Rev. SAVE DATA PRINT DATA 18 18 00 23/07/13 23/07/13 7.8. FIRE EXTINGUISHING MEANS The indications of fire extinguishers are of critical importance, because any operations/interventions not carried out in compliance with the following indications (or not even envisaged) may cause damage to the machine, its internal parts, the power supply system, or the processed products/production, or even injury to workers, causing warranty coverage to be invalidated. Any fire extinguishing operations must be carried out by personnel adequately informed and trained with regards the risks and hazards that may arise during the execution of these tasks. Said personnel must have read and understood the safety prescriptions given in this operating manual, and must be in conditions of normal psychological and physical health. In the event of fire on the electrical equipment, machine parts, or the worked product, you are advised to use CO2 type C extinguishers. A fire extinguisher of this type must be permanently available near the machine's main workstation. Manualedelleistruzioni per l’uso Document Code 03-09-12_UIMG2 Manual ENG CAP. 8. Pag. di Rev. SAVE DATA PRINT DATA 1 2 00 23/07/13 23/07/13 SCRAPPING AND DISPOSAL If the machine described in this manual is no longer to be used because it is obsolete and/or has suffered an irreparable breakdown or is worn to the point at which its repair would not be cost-effective, it must be decommissioned to make it inoperative and remove all potential hazards. Decommissioning must be carried out by specialized and suitably equipped personnel with at least the professional skills of maintenance technicians. If the customer does not have suitable personnel or equipment to scrap the machine in conditions of absolute safety, and in such a way as to ensure the safety of operators, he must enlist the assistance of the technical personnel of the manufacturer (see chapter 10). Before starting the scrapping procedures, display signs informing persons in the area that work is in progress. 8.1. SCRAPPING In order to carry out the work in 100% safe conditions, the areas around the machine (within a radius of 360° and for a distance of at least 2000mm) must be free of partitions/walls, other machines, equipment, or any other obstructions such as pillars. The main sequential stages for dismantling and scrapping include (the list is just a guideline and is not comprehensive): the disassembly of all the components, and their delivery to an authority or company for differentiated waste collection in compliance with statutory legislation All disconnection operations must be performed using adequate tools and equipment of suitable size (e.g. slotted screwdriver or crosshead screwdriver, hex wrenches, Allen wrenches, etc.), depending on the type of screws. During the disassembly procedures do not go under or climb onto the machine under any circumstances: always stand alongside the machine. Before disassembling parts and/or disconnecting and/or loosening any joining elements, take steps to ensure that the connected parts cannot subsequently fall onto you. To do this, use the necessary supports, restraints, or type-approved and certified lifting devices in compliance with statutory legislation in force in your country. Never attempt to disassemble the machine unaided; always enlist the assistance of someone to help with the operations and/or provide assistance in the event of accidents. This person must possess at least the minimum professional skills of a maintenance technician, as defined in paragraph 6.1. Take particular care over any labels affixed directly on the components to be disconnected and near clamps When the machine has been fully dismantled, all the identification plates and documents referring to the machine must be destroyed. Manualedelleistruzioni per l’uso Document Code 03-09-12_UIMG2 Manual ENG Pag. di Rev. SAVE DATA PRINT DATA 2 2 00 23/07/13 23/07/13 8.2. DISPOSAL Before disposing of the components that make up the machine and the electrical equipment, always consult the machine manufacturer who will specify the correct methods to comply with safety principles and environmental protection. The machine can be disposed of without having to dismantle it into small pieces. Simply separate the main units and load them onto a lorry for transfer to a waste disposal facility. To do this, use the necessary type-approved and certified lifting and moving devicesthat are in compliance with statutory legislation in force in your country. Dispose of the materials in compliance with the applicable regulations, seeking advice from the delegated authorities and/or the assistance of specialist companies authorized for the disposal of waste, and ensuring that plastic and metal materials are properly separated for the subsequent obligatory differentiated collection. The employer must be aware of the statutory legislation in force in the country of use, and must comply with such provisions. The act of abandoning the machine in the environment is forbidden, and may be subject to penalties. Manualedelleistruzioni per l’uso Document Code 03-09-12_UIMG2 Manual ENG CAP. 9. Pag. di Rev. SAVE DATA PRINT DATA 1 6 00 23/07/13 23/07/13 APPENDICES/ ENCLOSURES 9.1. MAINTENANCE LOG This maintenance log is used to record the installation, maintenance, repair and modification tasks carried out, and must be made available for any inspections performed by authorized bodies. Description of the intervention (Tick the box corresponding to the intervention carried out. Describe any residual risks and/or predictable improper use) Installation Date: Start-up Adjustments Technician’s signature: Maintenance Repairs Modifications Customer’s signature: Description of the intervention (Tick the box corresponding to the intervention carried out. Describe any residual risks and/or predictable improper use) Installation Start-up Adjustments Maintenance Technician’s signature Date: Repair Modifications Customer’s signature: Description of the intervention (Tick the box corresponding to the intervention carried out. Describe any residual risks and/or predictable improper use) Installation Date: Start-up Technician’s signature: Adjustments Maintenance Repairs Customer’s signature: Modifications Manualedelleistruzioni per l’uso Document Code 03-09-12_UIMG2 Manual ENG Pag. di Rev. SAVE DATA PRINT DATA 2 6 00 23/07/13 23/07/13 Description of the intervention (Tick the box corresponding to the intervention carried out. Describe any residual risks and/or predictable improper use) Installation Start-up Adjustments Maintenance Technician’s signature: Date: Repairs Modifications Customer’s signature: Description of the intervention (Tick the box corresponding to the intervention carried out. Describe any residual risks and/or predictable improper use) Installation Start-up Adjustments Maintenance Technician’s signature: Date: Repairs Modifications Customer’s signature: Description of the intervention (Tick the box corresponding to the intervention carried out. Describe any residual risks and/or predictable improper use) Installation Start-up Adjustments Maintenance Technician’s signature: Date: Repairs Modifications Customer’s signature: Description of the intervention (Tick the box corresponding to the intervention carried out. Describe any residual risks and/or predictable improper use) Installation Date: Start-up Adjustments Technician’s signature: Maintenance Repairs Customer’s signature: Modifications Manualedelleistruzioni per l’uso Document Code 03-09-12_UIMG2 Manual ENG Pag. di Rev. SAVE DATA PRINT DATA 3 6 00 23/07/13 23/07/13 Manualedelleistruzioni per l’uso Document Code 03-09-12_UIMG2 Manual ENG Pag. di Rev. SAVE DATA PRINT DATA 4 6 00 23/07/13 23/07/13 9.2. EVENTS LOG SHEETS REPLACEMENT OF STRUCTURAL PARTS Replacement of part:..............................................................................Date:............................................................... Code:.....................…….........Manufacturer:.....……........................................Serial Number:........….…….................. Replaced with part:........................................................................................................................................................ Code:.....................…….........Manufacturer:.....……........................................Serial Number:........….…….................. Reason for replacement:................................................................................................................................................ ……………………………………………………………………………………………………………………………….......... Company responsible for replacement:......................................................................................................................... Maintenance technician:................................................. Customer:.............................................................................. Replacement of part:..............................................................................Date:............................................................... Code:.....................…….........Manufacturer:.....……........................................Serial Number:........….…….................. Replaced with part:........................................................................................................................................................ Code:.....................…….........Manufacturer:.....……........................................Serial Number:........….…….................. Reason for replacement:................................................................................................................................................ ……………………………………………………………………………………………………………………………………... Company responsible for replacement:......................................................................................................................... Maintenance technician:................................................. Customer:.............................................................................. Replacement of part:..............................................................................Date:............................................................... Code:.....................…….........Manufacturer:.....……........................................Serial Number:........….…………........... Replaced with part:........................................................................................................................................................ Code:.....................…….........Manufacturer:.....……........................................Serial Number:........….…….................. Reason for replacement:................................................................................................................................................ ……………………………………………………………………………………………………………………......................... Company responsible for replacement:......................................................................................................................... Maintenance technician:................................................. Customer:.............................................................................. Manualedelleistruzioni per l’uso Document Code 03-09-12_UIMG2 Manual ENG Pag. di Rev. SAVE DATA PRINT DATA 5 6 00 23/07/13 23/07/13 REPLACEMENT OF COMPONENTS Replaced component:……….......……….……..........……Electrical diagram code::….......Date:.................................... Code:.....................…….........Manufacturer:.....……........................................Serial Number:........….…….................. Replaced with part:........................................................................................................................................................ Code:.....................…….........Manufacturer:.....……........................................Serial Number:........….…….................. Reason for replacement:................................................................................................................................................ The technician responsible for the replacement declares that the perfect efficiency of the replacement part and the restoration of pre-existing safety conditions have been checked following installation of the replacement part. Company responsible for replacement:......................................................................................................................... Maintenance technician:................................................. Customer:.............................................................................. Replaced component:……….......……….……..........……Electrical diagram code::….......Date:.................................... Code:.....................…….........Manufacturer:.....……........................................Serial Number:........….…….................. Replaced with part:........................................................................................................................................................ Code:.....................…….........Manufacturer:.....……........................................Serial Number:........….…….................. Reason for replacement:................................................................................................................................................ The technician responsible for the replacement declares that the perfect efficiency of the replacement part and the restoration of pre-existing safety conditions have been checked following installation of the replacement part. Company responsible for replacement:......................................................................................................................... Maintenance technician:................................................. Customer:.............................................................................. Replaced component:……….......……….……..........……Electrical diagram code::….......Date:.................................... Code:.....................…….........Manufacturer:.....……........................................Serial Number:........….…….................. Replaced with part:........................................................................................................................................................ Code:.....................…….........Manufacturer:.....……........................................Serial Number:........….…….................. Reason for replacement:................................................................................................................................................ The technician responsible for the replacement declares that the perfect efficiency of the replacement part and the restoration of pre-existing safety conditions have been checked following installation of the replacement part. Company responsible for replacement:......................................................................................................................... Maintenance technician:................................................. Customer:.............................................................................. Manualedelleistruzioni per l’uso Document Code 03-09-12_UIMG2 Manual ENG Pag. di Rev. SAVE DATA PRINT DATA 6 6 00 23/07/13 23/07/13 MAJOR FAILURES AND THEIR REPAIR Description of the failure:.......................................................................................................................... ……………………………………………………………………………………………………………………... ……………………………………………………………………………………………………………………... ……………………………………………………………………………………………………………………... Causes: .................................................................................................................................................... ……………………………………………………………………………………………………………………... ……………………………………………………………………………………………………………………... ……………………………………………………………………………………………………………………... Repair carried out: ................................................................................................................................... ……………………………………………………………………………………………………………………... ……………………………………………………………………………………………………………………... ……………………………………………………………………………………………………………………... Place .........................................................................................................Date: ...................................... Technician responsible for repair: ...............................................................User: .................................... Description of the failure:.......................................................................................................................... ……………………………………………………………………………………………………………………... ……………………………………………………………………………………………………………………... ……………………………………………………………………………………………………………………... Causes: .................................................................................................................................................... ……………………………………………………………………………………………………………………... ……………………………………………………………………………………………………………………... ……………………………………………………………………………………………………………………... Repair carried out: ................................................................................................................................... ……………………………………………………………………………………………………………………... ……………………………………………………………………………………………………………………... ……………………………………………………………………………………………………………………... Place: .........................................................................................................Date: ..................................... Technician responsible for repair: ...............................................................User: .................................... Manualedelleistruzioni per l’uso Codicedocumento 03-09-12_UIMG2 Manual ENG Pag. di Rev. SAVE DATA PRINT DATA 1 1 00 23/07/13 23/07/13 CAP. 10. IDENTIFICATION DATA 10.1. MANUFACTURER GM Distribution S.r.l. Piazza Velasca, 5 20122 Milano (MI) – ITALIA 10.2. AUTHORIZED SERVICE CENTERS For assistance, contact the authorized distributor where you have purchased a GM Distribution S.r.l. product.You can find a list of authorized distributors on the website www.gennymobility.com. 10.3. MACHINE TYPE POWERED WHEELCHAIR TRANSPORTATION OF 1 PERSON IN SEATED POSITION Function Model GENNY 2.0 URBAN Type Two-wheeled electrical Serial numbers Construction year 10.4. U0000000001-U0000009999 2012 DOCUMENT USER INSTRUCTION MANUAL No of volumes: 1 Data: 23/07/2013 Revision: 00 © Copyright 2012 -GM Distribution S.r.l. Without the prior written permission of GM Distribution S.r.l, this manual or any part thereof may not be reproduced in any form, edited, transcribed, translated into any language, made available to third parties, or otherwise used in a way that could prejudice the interests of GM Distribution S.r.l. All violations of the foregoing prescriptions will attract penalties in compliance with the law and the rules of copyright.