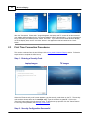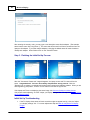
1
Intel® Wireless Display Manual
© 2009 Intel Corporation
Intel® Wireless Display
Intel® Wireless Display
© 2009 Intel Corporation
All rights reserved. No parts of this work may be reproduced in any form or by any means - graphic, electronic, or
mechanical, including photocopying, recording, taping, or information storage and retrieval systems - without the
written permission of the publisher.
Products that are referred to in this document may be either trademarks and/or registered trademarks of the
respective owners. The publisher and the author make no claim to these trademarks.
While every precaution has been taken in the preparation of this document, the publisher and the author assume no
responsibility for errors or omissions, or for damages resulting from the use of information contained in this
document or from the use of programs and source code that may accompany it. In no event shall the publisher and
the author be liable for any loss of profit or any other commercial damage caused or alleged to have been caused
directly or indirectly by this document.
Printed: October 2009
Contents
5
Table of Contents
Part I Introduction
8
1 About the
...................................................................................................................................
Manual
8
2 Legal ................................................................................................................................... 9
Part II Connecting and Using Intel® Wireless
Display
12
1 Connecting
...................................................................................................................................
an Adapter Featuring Intel® Wireless Display
12
2 Using...................................................................................................................................
Intel® Wireless Display
14
3 First Time
...................................................................................................................................
Connection Procedures
18
4 Disconnecting
................................................................................................................................... 21
5 Exiting
................................................................................................................................... 21
Part III Troubleshooting
24
1 Initial...................................................................................................................................
Set Up Problems
24
2 Changing
...................................................................................................................................
the TV Input
25
3 Adapter
...................................................................................................................................
Encountered a Problem on Startup
25
4 There...................................................................................................................................
are No Adapters Detected
25
5 Security
...................................................................................................................................
Code Issues
26
6 TV Image
...................................................................................................................................
is Rough, Frozen or Delayed
26
7 Your Video
...................................................................................................................................
Mode has Changed...
26
8 Unsupported
...................................................................................................................................
Audio Mode
27
9 Intel®...................................................................................................................................
Wireless Display Requires a Different Security Profile
27
10 Your Wireless
...................................................................................................................................
is Off
27
11 Intel®...................................................................................................................................
My WiFi Technology is Disabled
28
12 Unsupported
...................................................................................................................................
Laptop Hardware
28
13 Firewall
...................................................................................................................................
Issues
28
14 Windows
...................................................................................................................................
Power Saving
28
15 Could...................................................................................................................................
Not Obtain a Network Address
29
16 Adapter
...................................................................................................................................
Does Not Work
29
17 Checking
...................................................................................................................................
the Access Point Frequency
29
18 Common
...................................................................................................................................
Solutions to Many Issues
30
19 Known
...................................................................................................................................
Issues
30
Part IV FAQ's
34
1 How do
...................................................................................................................................
I Update the Firmware?
34
2 How do
...................................................................................................................................
I Reset the Application Settings?
34
© 2009 Intel Corporation
5
6
Wireless Display
3 How do
...................................................................................................................................
I Reset the Adapter?
34
4 How do
...................................................................................................................................
I Clear the Adapter Memory?
35
5 Can I ...................................................................................................................................
Close the Laptop Lid and Still Use Intel® Wireless Display?
35
6 What ...................................................................................................................................
are Adapter Properties?
35
7 Why does
...................................................................................................................................
My Laptop's Color Look Different on My TV?
36
8 How do
...................................................................................................................................
I Adjust the TV Display Image?
36
9 How do
...................................................................................................................................
I Adjust the Audio?
36
10 How do
...................................................................................................................................
I Train My Displays?
37
11 Can I ...................................................................................................................................
play DVD's with Intel® Wireless Display?
38
12 How do
...................................................................................................................................
I Contact Customer Support?
38
Index
39
© 2009 Intel Corporation
Introduction
Section
I
8
1
Wireless Display
Introduction
Intel® Wireless Display allows consumers to use their HDTV as a huge, remote screen for their laptop.
Because it utilizes Wi-Fi, there are no unsightly cords or cables stretching across the room. With
Intel® Wireless Display, consumers can connect their laptop to their TV and enjoy and share their
personal media collections, latest YouTube videos, downloaded or streamed movies, music, or a variety
of other Internet content from the comfort of their couch.
Intel® Wireless Display requires the following key elements:
· A laptop computer with Intel® Wireless Display installed. This will be used to manage the connection
to the TV / adapter.
· An adapter featuring Intel® Wireless Display. This is a small device that connects to the TV via either
an HDMI or composite cable(s). The adapter receives Wi-Fi signals from the laptop, translates the
signals into an image, and sends the image to the TV.
Laptop
Adapter / TV
Note: For simplicity, the word "TV" is used throughout this document; however, Intel® Wireless Display
can also be used with a monitor or projector.
1.1
About the Manual
© 2009 Intel Corporation
Introduction
9
Intel® Wireless Display User's Manual
The Introduction and Connecting and Using sections of this manual are presented in sequential order.
Use the "Top," "Previous," and "Next" buttons located on the top right corner of every page to guide
yourself through the sections. In the panel to the left, the "Contents," tab provides easy topic selection,
while the "Index," and "Search" tabs allow general and key word searches. (The PDF version of the
manual does not have "Next" and "Previous" buttons. Instead use the scroll bar to move from page to
page. Also, use the provided "Bookmarks" and the "Find" window to locate specific pages.)
This manual is set up very similar to a webpage. Hyperlinks take you from one topic to a related one.
Purple underlined text show visited hyperlinks, while blue underlined text show hyperlinks not yet visited.
In the Connecting and Using section there are occasional areas of bold red text. This text provides
specific instructions depending on whether or not this is the initial Intel® Wireless Display set up. The
bold red text directions are obvious to see and easy to follow.
There are four main chapters in this manual: Introduction, Connecting and Using, Troubleshooting, and
FAQ's (Frequently Asked Questions). The Introduction chapter provides a basic description of Intel®
Wireless Display and includes instructions on using the manual. The Connecting and Using chapter
contains step-by-step directions and screenshots that guide you through the initial set up and regular
use of Intel® Wireless Display. It is highly recommended that you read this chapter. The
Troubleshooting and FAQ's chapterss are the first steps in answering Intel® Wireless Display related
questions. For continued help, see How do I Contact Customer Support?
1.2
Legal
INTEL SOFTWARE LICENSE AGREEMENT
IMPORTANT - READ BEFORE COPYING, INSTALLING OR USING.
Do not use or load this software and any associated materials (collectively, the “Software”) until you have
carefully read the following terms and conditions. By loading or using the Software, you agree to the terms
of this Agreement. If you do not wish to so agree, do not install or use the Software.
LICENSE. You may copy the Software onto a single computer for your personal, noncommercial use, and you
may make one back-up copy of the Software, subject to these conditions:
1. You may not copy, modify, rent, sell, distribute or transfer any part of the Software except as provided
in this Agreement, and you agree to prevent unauthorized copying of the Software.
2. You may not reverse engineer, decompile, or disassemble the Software.
3. You may not sublicense or permit simultaneous use of the Software by more than one user.
4. The Software may include portions offered on terms in addition to those set out here, as set out in a
license accompanying those portions.
OWNERSHIP OF SOFTWARE AND COPYRIGHTS. Title to all copies of the Software remains with Intel or its
suppliers. The Software is copyrighted and protected by the laws of the United States and other countries, and
international treaty provisions. You may not remove any copyright notices from the Software. Intel may make
changes to the Software, or to items referenced therein, at any time without notice, but is not obligated to
support or update the Software. Except as otherwise expressly provided, Intel grants no express or implied
right under Intel patents, copyrights, trademarks, or other intellectual property rights. You may transfer the
© 2009 Intel Corporation
10
Wireless Display
Software only if the recipient agrees to be fully bound by these terms and if you retain no copies of the Software.
SOFTWARE MODIFICATION AND SUPPORT. Intel or its suppliers may make changes to the Software, or to
items referenced therein, at any time and without notice. Intel may provide support for the Software, including
the provision of updates, upgrades or bug fixes thereto, at times and in manners and amounts at its sole
discretion.
LIMITED MEDIA WARRANTY. If the Software has been delivered by Intel on physical media, Intel warrants the
media to be free from material physical defects for a period of ninety (90) days after delivery by Intel. If such a
defect is found, return the media to Intel for replacement or alternate delivery of the Software as Intel may
select.
EXCLUSION OF OTHER WARRANTIES. EXCEPT AS PROVIDED ABOVE, THE SOFTWARE IS PROVIDED "AS IS"
WITHOUT ANY EXPRESS OR IMPLIED WARRANTY OF ANY KIND INCLUDING WARRANTIES OF
MERCHANTABILITY, NONINFRINGEMENT OF INTELLECTUAL PROPERTY, OR FITNESS FOR A PARTICULAR
PURPOSE. Intel does not warrant or assume responsibility for the accuracy or completeness of any
information, text, graphics, links or other items contained within the Software.
LIMITATION OF LIABILITY. IN NO EVENT SHALL INTEL OR ITS SUPPLIERS BE LIABLE FOR ANY DAMAGES
WHATSOEVER IN CONNECTION WITH THIS AGREEMENT, WHETHER ARISING FROM LOSS OF PROFITS, LOSS
OF USE, LOSS OR CORRUPTION OF DATA, INDIRECT, INCIDENTAL, CONSEQUENTIAL, OR SPECIAL DAMAGES,
IRRESPECTIVE OF WHETHER INTEL HAS ADVANCE NOTICE OF THE POSSIBILITY OF SUCH DAMAGES.
IN NO EVENT SHALL INTEL'S OR ITS SUPPLIERS’ TOTAL CUMULATIVE LIABILITY TO YOU ARISING FROM
THIS AGREEMENT EXCEED THE LESSER OF THE SUM PAID TO INTEL BY LICENSEE FOR SOFTWARE
LICENSED UNDER THIS AGREEMENT WHICH IS BOTH THE SUBJECT OF AND DIRECTLY AFFECTED BY THE
SUBJECT CLAIMS OR FIFTY UNITED STATES DOLLARS ($50.00).
THE LIMITED WARRANTY, LIMITED REMEDIES, WARRANTY DISCLAIMER AND LIMITED LIABILITY ARE
FUNDAMENTAL ELEMENTS OF THE BASIS OF THE BARGAIN BETWEEN INTEL AND YOU. INTEL WOULD NOT
BE ABLE TO PROVIDE THE SOFTWARE WITHOUT SUCH LIMITATIONS. SOME JURISDICTIONS MAY PROHIBIT
EXCLUSION OR LIMITATION OF LIABILITY FOR IMPLIED WARRANTIES (IF ANY) OR CONSEQUENTIAL OR
INCIDENTAL DAMAGES, SO THE ABOVE LIMITATION MAY NOT APPLY TO YOU IN ITS ENTIRETY. YOU MAY
ALSO HAVE OTHER LEGAL RIGHTS THAT VARY FROM JURISDICTION TO JURISDICTION.
TERMINATION OF THIS AGREEMENT. Intel may terminate this Agreement at any time if you violate its terms.
Upon termination, you will immediately destroy the Software or return all copies of the Software to Intel.
APPLICABLE LAWS. Claims arising under this Agreement shall be governed by the laws of California,
excluding its principles of conflict of laws and the United Nations Convention on Contracts for the Sale of
Goods. You may not export the Software in violation of applicable export laws and regulations. Intel is not
obligated under any other agreements unless they are in writing and signed by an authorized representative of
Intel.
GOVERNMENT RESTRICTED RIGHTS. The Software is provided with "RESTRICTED RIGHTS." Use, duplication,
or disclosure by the Government is subject to restrictions as set forth in FAR52.227-14 and DFAR252.2277013 et seq. or its successor. Use of the Software by the Government constitutes acknowledgment of Intel's
proprietary rights therein. Contractor or Manufacturer is Intel Corporation, 2200 Mission College Blvd., Santa
Clara, CA 95052.
© 2009 Intel Corporation
Connecting and Using
Intel® Wireless Display
Section
II
12
2
Wireless Display
Connecting and Using Intel® Wireless Display
This section provides screenshots and step-by-step instructions for connecting and using Intel®
Wireless Display. The bold red text provides specific guidance depending on whether or not this is the
initial set up. For additional assistance, see the Troubleshooting and FAQ's section or visit How do I
Contact Customer Support?
2.1
Connecting an Adapter Featuring Intel® Wireless Display
If this is the initial set up, proceed through this section. Otherwise, make sure the adapter and
TV are plugged in and turned on, and proceed to Using Intel® Wireless Display.
The back of your adapter m ay look like this.
1.
2.
3.
4.
5.
6.
7.
Adapter power connector
Power switch
HDMI connector
Composite video
Analog audio
Analog audio
Reset button
Step 1
Push one end of the power cord into the adapter power connector (1) and the other end into an electrical
outlet. For power cord help visit Initial Set Up Problems.
Pow er Cord
Step 2
For optimal video and audio quality, connect the adapter to the TV with an HDMI cable. One end of the
© 2009 Intel Corporation
Connecting and Using Intel® Wireless Display
13
cable is inserted into #3 in figure 2.1 above. The other end is inserted into a similar shaped plug on the
back or side of your TV. If you do not own an HDMI cable or your TV does not support HDMI, you may
use an RCA Audio/Video cable. Insert the Audio/Video cables into #4, 5, and 6 in figure 2.1 above and
attach the other end to your TV. Both HDMI and RCA Audio/Video cables can be found at any
electronics store, and examples are shown below. For connection cable help, visit Initial Set Up
Problems.
HDMI
Cable
Audio/Video
Cable
Step 3
Turn the adapter on by pushing the power button (2) on the back of the adapter. For power button help
visit Initial Set Up Problems.
Note: The adapter has a tri-color LED to communicate the state and connection status of the adapter.
The adapter will proceed through the following color changes each time a connection is established.
1.
2.
3.
4.
Solid red: adapter is plugged in and powered on
Solid orange: adapter is ready to connect with the laptop
Blinking green: laptop and adapter are establishing a connection
Solid green: adapter is connected and laptop content should be displayed on the TV
If an error occurs on power up, the adapter LED will blink red.
Step 4
Change the input mode on the TV to match the adapter. After approximately 30 seconds, the screen
below should be displayed by the adapter.
For help with input selection visit Changing the TV Input.
© 2009 Intel Corporation
14
2.2
Wireless Display
Using Intel® Wireless Display
Follow the steps below to set up and use Intel® Wireless Display. The side-by-side laptop and TV
images shown below correspond to each step and occur at the same time. When a laptop or TV
screenshot is the same for multiple steps, the image is left blank.
Step 1: Opening Intel® Wireless Display on the Laptop
To open Intel® Wireless Display, click on the Windows "Start" icon on the laptop's taskbar. Type "Intel
Wireless Display" into the search field. In the search results click on "Intel® Wireless Display."
Some laptops may have a button or key that starts Intel® Wireless Display. This key will be located in
different places depending on the brand of laptop. It is usually found on or around the keyboard. The
key will contain a small version of the symbol below.
If this is the initial set up continue to Step 2. If this is the not the initial set up, it is not
necessary to repeat Steps 2 and 3. Proceed to Step 4.
Step 2: Windows Firewall Security Alert
In the initial set up, a firewall may block Intel® Wireless Display and a firewall alert message may be
displayed. If this happens, make sure to 'Allow' access for both private and public networks. For firewall
help visit the Firewall Issues section or see your firewall's user manual.
Step 3: Consenting to the License Agreement
© 2009 Intel Corporation
Connecting and Using Intel® Wireless Display
Laptop Images
15
TV Images
After reading and agreeing to the license agreement, click on the "I agree to the terms of this license"
button and proceed to the next screen. If you do not agree to the terms of the license, click the "I do not
agree" button. You will not be able to continue and the application will close.
At this point, the TV status reads "Ready for connection."
Step 4: Scanning for Adapters
After opening Intel® Wireless Display (or after agreeing to the license), the application begins scanning
for available adapters and the status reads "Scanning for adapters." If the application does not
automatically begin scanning, click the "Scan for available adapters" button.
Step 5: Detected Adapter
© 2009 Intel Corporation
16
Wireless Display
After the scan is complete, any adapters in range will be displayed in the "Detected adapters" box. If
your adapter is not detected, click again on the "Scan for available adapters" button. If your adapter still
does not appear, visit the There are No Adapter's Detected section.
Detected Adapters Column Information
Headings include: "Type," "Name," "ID," "Model," and "Signal."
· Type ~ If this is a first time connection, the circle on the TV icon will be gray. If the
connection has been used previously, the icon circle will be orange.
· Name ~ This refers to the adapter and is initially set by the adapter manufacturer. (If this is
the initial set up, you can rename the adapter in a following step. In the example above the
adapter has been renamed "My Living Room.")
· ID ~ If the default name has not been changed, use the ID to distinguish multiple entries and
find your adapter.
· Model ~ This is the adapter manufacturer and product model name.
· Signal ~ The number of bars represents signal strength. The scale ranges from one bar
(weakest signal) to five bars (strongest signal). The bars turn from green to yellow if the signal
strength falls below three bars.
Step 6: Connecting to the TV
© 2009 Intel Corporation
Connecting and Using Intel® Wireless Display
17
To connect the laptop to the TV, click once on the adapter and then click on the "Connect" button. (If
there are multiple adapters detected, use the ID to find the adapter.) When connecting, the laptop and
TV screens both read "Connecting..." If the laptop status reads "Connecting..." and the TV screen still
reads "Ready for Connection," click on the "Cancel connect" button and try connecting again. If this
does not work, the connection may be blocked by a firewall. For help allowing the application through a
firewall visit Firewall Issues. For additional connection help, visit the Common Solutions to Many Issues
section.
If this is the initial set up, you will not see Steps 7 and 8. Proceed to First Time Connection
Procedures.
Step 7: Connected to the Adapter
After the laptop connects to the adapter, the TV reads "Connected. Please wait." This image will appear
for only a few seconds. If the TV reads "Connected. Please Wait" for more than one minute the
connection attempt failed. Click the "Disconnect" button and try connecting again.
Step 8: Ready to Use Intel® Wireless Display
© 2009 Intel Corporation
18
Wireless Display
After the "Connected. Please wait." image disappears, the laptop and TV screen will be the same and
your adapter will be displayed in the "Connected adapters" area of the application. You are now ready to
enjoy and share your favorite pictures, videos, and music. If you want to move Intel® Wireless Display
out of the display area, use the "minimize" button in the application title bar instead of the "close"
button.
2.3
First Time Connection Procedures
This section continues from the end of Step 6 in the Using Intel® Wireless Display section. Follow the
steps below to complete the initial set up.
Step 1: Entering a Security Code
Laptop Images
TV Images
When the "Enter security code" screen appears, type the security code shown on the TV. The security
code numbers shown above are for example only! Type the numbers on your TV. Click on the
"Continue" button after typing the security code. To stop the set up process click the "Cancel" button.
For security code questions, visit Security Code Issues.
Step 2: Security Configuration Successful
© 2009 Intel Corporation
Connecting and Using Intel® Wireless Display
19
The "Security configuration successful" TV image indicates a correct security code entry.
Step 3: Adapter is Connected
After the laptop connects to the adapter, the TV shows "Connected. Please wait." This image will
appear for only a few seconds. If the TV reads "Connected. Please wait" for more than one minute, the
connection attempt failed. For help, visit the Common Solutions to Many Issues section.
Step 4: Rename Adapter
© 2009 Intel Corporation
20
Wireless Display
After entering the security code, you may type a new descriptive name for the adapter. (The example
above has the name "My Living Room.") This new name will be used in all future connections from the
laptop to this adapter. If you have multiple adapters, changing the default name will make it easier to
identify each adapter. When finished click on the "Continue" button.
Step 5: Finishing the Initial Set Up Process
After the "Connected. Please wait" image disappears, the laptop screen and TV screen will be the
same. Congratulations! You have successfully completed the set up process! Click the
"Register" link to register your adapter and receive product support and software updates. When you are
done registering your product, click the "Finish" button to exit the set up process.
If the laptop and TV are not displaying the same image, visit Common Solutions to Many Issues.
If the screen needs adjusting, click the "Adjust your display settings" link. For help visit How do I Adjust
the TV Display Image?
Initial Set Up Troubleshooting
·
If the TV display shows areas of black around the edges or appears too big, click the "Adjust
your display settings" link. For screen adjustment help visit How do I Adjust the TV Display
Image?
© 2009 Intel Corporation
Connecting and Using Intel® Wireless Display
2.4
21
·
If the TV image is rough, frozen, or delayed, close the application and try connecting again. If
this does not help, visit the TV Image is Rough, Frozen, or Delayed section.
·
If the audio is not correct, adjust the volume using the TV remote. If this does not solve the
issue, visit How do I Adjust the Audio?
·
If both the application and the TV screen show that you are connected, but they are not showing
the same image, the laptop's firewall may be stopping the connection. For firewall help visit
Firewall Issues.
·
If the TV screen is blank, the application may have learned an incorrect display setting. For
help visit How do I Train My Displays? The TV screen may also be blank if the adapter is too
warm after being used for a long time. (The adapter is not designed to be connected for more
than four hours.) If this is the case, do not use the adapter until it has cooled down.
Disconnecting
To disconnect from the adapter, click on the "Disconnect" button.
2.5
Exiting
To exit Intel® Wireless Display, click on the "Disconnect" button, wait until the adapter disconnects,
and click on the "Close Window" button (red x) in the upper right corner of application window. If you
click on the "Close Window" button while still connected, the application asks if you want to close the
connection. Click the "Yes" button to exit and the "No" button to cancel exiting. To not view this screen
again, check the "Don't ask me next time" box.
If you would like to turn off Intel® My WiFi Technology after closing the application, click on the Intel®
My WiFi Technology icon
Technology."
© 2009 Intel Corporation
in the Windows taskbar and choose "Disable Intel® My WiFi
Troubleshooting
Section
III
24
3
Wireless Display
Troubleshooting
Look through the Troubleshooting contents for a topic that comes closest to describing your problem. If
you are unable to resolve the problem after reading through the Troubleshooting topics, search the FAQ
topics. For additional help, visit How do I Contact Customer Support?
3.1
Initial Set Up Problems
The back of your adapter m ay look like this.
Cords and Cables
HDMI
Cable
(B)
Pow er Cord (A)
Audio/Video
Cable (Y, W, & R)
The power cord (A) connects to position (1) on the adapter. Plug the other end of the power cord into an
electrical outlet. The HDMI cable (B) goes into the adapter position (3). Only connect either the HDMI
cable or the audio/video cable, not both. An HDMI cable will produce higher quality images than
the Audio/Video cable. (HDMI and Audio/Video cables can be found at any electronics store.) Match
the audio/video cable to the correct colors on the adapter: Y = 4, W = 5, and R = 6. Connect each cord
and cable into their correct inputs on the TV. (See your TV owner's manual if needed.) Once plugged
in, make sure the cords and cables are pushed all the way into their correct input positions.
Using the composite video cable (the yellow input on the Audio/Video cable) may cause the TV image to
be off-centered. Consult the TV owner's manual for image adjustment.
© 2009 Intel Corporation
Troubleshooting
25
On/Off Button
The "On/Off" button (2) is located on the back of the adapter. If the adapter is not turning on, make sure
the power cord is pushed all the way into both the wall outlet and the adapter. If power is not getting to
the adapter, there might be a faulty power cord.
3.2
Changing the TV Input
Different TV brands have various methods of changing the TV input. Five of the most common
processes are covered here. If these options do not cover your TV, consult your TV owner's manual for
additional help.
3.3
·
Some TV remote controls have buttons labeled "HDMI," "HDMI 1," "HDMI 2," "A\V," etc. Push
the appropriate button to choose the TV input.
·
Other TV remote controls include a button labeled "Input," "Source," "TV," or "TV/Video." Press
this button to cycle the TV through the input options.
·
Pushing the "Input" button on some remote controls results in a list of inputs on the TV screen.
Simply select the desired input.
·
Input selection happens on some TV's by pressing the "Input" button on the front or side panel
of the TV screen. Simply push the button until the desired input is selected.
·
Sometimes the inputs are located beneath the regular channels on the TV. Try selecting the
lowest TV channel and then going down one channel.
Adapter Encountered a Problem on Startup
If the TV image reads "The adapter encountered a problem on startup...," the adapter is experiencing
technical difficulties. First turn the adapter off and back on again. If this does not resolve the issue,
please visit the Adapter Does Not Work section.
3.4
There are No Adapters Detected
If the "Detected adapters" section on the laptop reads "There are no adapters detected," it may be
necessary to scan multiple times. If rescanning does not solve the issue, make sure the adapter is on
and the TV is displaying the "To get started" screen. Also, try moving the laptop and/or the adapter to
different places in the room. The adapter and TV should be in the same room to work properly. If this
does not work visit the Common Solutions to Many Issues section.
© 2009 Intel Corporation
26
3.5
Wireless Display
Security Code Issues
The phrase, "That security code is not correct..." in the "Security Code" section, means the wrong
security code has been entered. Make sure to type the code exactly as shown on the TV screen. The
security code number will change after an incorrect entry.
If the connection fails right after a correct security code is entered, it is necessary to connect again and
retype the security code.
3.6
TV Image is Rough, Frozen or Delayed
To fix a rough, frozen, or delayed image try each of the following steps individually.
·
Check the laptop's CPU status. Right click on the task bar and choose "Start Task Manager."
In the "Task Manager" window click the "Processes" tab. Under the "CPU" heading check
"WiDiApp.exe." If the "WiDiApp.exe" CPU number is 80 or above, save documents, and close
unused applications.
·
Check the network link speed. Right click on the task bar and choose "Start Task Manager."
In the "Task Manager" window click the "Networking" tab. The link speed should be higher than
36 Mbps. If not, try moving the adapter to a different position that is farther away from other
electronic equipment, or closer to the laptop. If this does not help, try disconnecting the
adapter and connecting again.
·
Change the channel on the wireless router. See the router's manual for channel changing
instructions. (If you are not using a router, see the next solution.)
·
If you are not connected to a router change the wireless channel. Open Intel® My WiFi Utility
by clicking on the Intel® My WiFi Technology icon
in the taskbar and selecting "Open
Intel® My WiFi Utility." Use the help document in Intel® My WiFi Utility and search for
"Access Points." In the results, click on "Advanced Settings" and follow the instructions.
3.7
Your Video Mode has Changed...
The video display resolution may change while using Intel® Wireless Display. This can happen
regardless of whether you change the display resolution manually or it is changed by another
application. On the "Your Video Mode has Changed..." screen, click the "Restore settings and resume
connection" button to allow the application to automatically reset the display to the correct settings.
Choosing "Keep settings and close connection" results in the display session ending. The supported
video display settings are: Screen resolution (in landscape or portrait mode) = 1280 x 720, 1280 x 768,
or 1280 x 800. Color depth = 32-bit. Intel® Wireless Display does not support extended or remote
display modes.
© 2009 Intel Corporation
Troubleshooting
3.8
27
Unsupported Audio Mode
The laptop must have specific audio settings for Intel® Wireless Display to work properly. Adjusting
these settings to a unsupported audio mode is not recommended. The "Unsupported audio mode"
screen appears if the audio display settings need adjusting. To restore the audio settings to the correct
values, follow the steps below.
3.9
1.
In the "Unsupported audio mode" window click on the "Adjust audio settings" button.
2.
In the "Sound" window, double click on "Speakers."
3.
Under the "Advanced" tab choose either 16 bit, 44100 Hz (CD Quality) or 48000 Hz (DVD
Quality) and click "OK". (Unpredictable results may occur if different audio modes are used.)
Intel® Wireless Display Requires a Different Security Profile
Security Profile is Incorrect
The message: "Intel® Wireless Display requires a different security profile...," means the wireless
security settings have been reconfigured using the Intel® My WiFi Utility. Follow the steps below to
allow the application to automatically choose the correct profile.
1.
Right-click on the "Intel® My WiFi Technology" icon
2.
Select "Disable Intel® My WiFi Technology."
3.
Click the "Scan for available adapters" button on Intel® Wireless Display. While scanning, the
application automatically enables Intel® My WiFi Technology and selects the correct security
profile.
on right end of the task bar.
Manually Setting the Correct Security Profile
If the steps above do not automatically select the correct security profile, click the Intel® My WiFi Utility
icon
in the taskbar and select "Open Intel® My WiFi Utility." Use the help document in "Intel® My
WiFi Utility" and search for "Security." In the results, click on "Security Settings" and follow the
instructions.
3.10
Your Wireless is Off
Normally, Wi-Fi allows the laptop to connect to the router for wireless Internet access. A new feature
included with Intel® Wireless Display uses Wi-Fi to wirelessly connect the laptop to the TV through the
adapter.
For this new Wi-Fi connection to work correctly, three switches must be turned on. The first switch is
the hardware switch. It is usually located around the edge of the laptop or above the keyboard. It may
© 2009 Intel Corporation
28
Wireless Display
be identified by a pole with two half circles on each side.
location. Turn the switch on and scan again.
Check the laptop manual for the exact
When needed, the other two switches are automatically turned on by the application. If it is still
impossible to connect because the application is not automatically turning the other switches on, visit
the Common Solutions to Many Issues section.
3.11
Intel® My WiFi Technology is Disabled
Intel® My WiFi Technology allows the laptop to become a Wi-Fi access point for other laptops. If the
laptop screen reads "Intel My WiFi Technology is disabled," click on the "Scan for available adapters"
button to automatically enable Intel® My WiFi Technology. If the Wi-Fi is already on, Intel® Wireless
Display will automatically enable Intel® My WiFi Technology. If the Wi-Fi is off, the application asks if
you would like to turn on Intel® My WiFi Technology. Select "Yes" and scan again. If this does not
work, visit the Common Solutions to Many Issues section.
3.12
Unsupported Laptop Hardware
For Intel® Wireless Display to run, Intel® My WiFi Technology must be installed, and the laptop must
have an Intel® Core™ i7, i5, or i3 processor with Intel Graphics Media Accelerator HD.
3.13
Firewall Issues
Sometimes the laptop's firewall will block the Wi-Fi connection between the laptop and the adapter. If
this is the case, the laptop's firewall settings must be changed. The following instructions apply to a
Microsoft Windows Firewall. To allow Intel® Wireless Display through a different firewall, see that
firewall's product manual. There may be inconsistent results allowing the application through a firewall
that is not a Microsoft Windows firewall.
3.14
1.
Click on the Windows "Start" icon and type in the search field "Allow a program through a
Windows Firewall."
2.
In the search results, click on "Allow a program through Windows Firewall."
3.
In the firewall control panel, make sure the "Name," "Private," and "Public" boxes are checked
for both "WiDiApp" and "Wireless PAN DHCP Server."
4.
When done, click "OK" and connect again.
Windows Power Saving
Microsoft Windows software may be set to dim the display or put the computer to sleep after a period of
time. To avoid the laptop's screen dimming while using Intel® Wireless Display, change the laptop's
power settings by following the steps.
© 2009 Intel Corporation
Troubleshooting
3.15
29
1.
Click on the Windows "Start" icon.
2.
Type "Power Options" in the search field and click on the "Power Options" result.
3.
Under the "Select a Power Plan" heading make sure the "Balanced" radio button is marked.
4.
Click on "Change Plan Settings" next to the current plan.
5.
Change the "Dim the display," "Turn of the display," and "Put the computer to sleep" options
under either/or "On Battery" and "Plugged in" headings to a longer time setting.
Could Not Obtain a Network Address
Occasionally, while attempting to connect, the TV screen may read "Could not obtain network
address..." To correct this issue, try closing Intel® Wireless Display and restarting the laptop. The
laptop's firewall could be blocking the adapter's request for a network address. To allow the address
request through a firewall, visit the Firewall Issues section. If this does not resolve the issue, visit the
Common Solutions to Many Issues section.
3.16
Adapter Does Not Work
If the adapter is not working, try the solutions found on the Common Solutions to Many Issues section
before following the instructions below.
If the adapter will not turn on, or it is impossible to update the firmware, perform a factory reset by
holding the reset button (7) down while pushing the power button (2) off and then on. Continue to hold
the reset button (7) down until the adapter LED begins flashing. Try connecting again. After the factory
reset, the adapter connection settings will be erased and the firmware will need to be updated.
The back of your adapter m ay look like this.
3.17
Checking the Access Point Frequency
Intel® Wireless Display only works at 2.4GHz on both the PAN connection to the TV and LAN
connection to the Internet via a home wireless router. The Wi-Fi standard uses both 2.4GHz and 5GHz
frequency bands. Most home wireless routers are only 2.4GHz and have no interoperability issue with
Intel® Wireless Display. Some newer 802.11n home wireless routers are starting to include support for
both frequency bands. When using Intel® Wireless Display, while also connected to the internet via
your home wireless router, make sure the connection to the router is set to 2.4GHz.
© 2009 Intel Corporation
30
Wireless Display
After making the changes required, it may be necessary to disable/enable Intel® My WiFi Technology
using the following steps:
1. Right-click on the "Intel® My WiFi Technology" icon
on right end of the task bar.
2. Select "Disable Intel® My WiFi Technology."
3. Click the "Scan for available adapters" button on Intel® Wireless Display. While scanning, the
application automatically enables Intel® My WiFi Technology.
3.18
Common Solutions to Many Issues
This section describes five procedures to try if the other troubleshooting sections have not helped. Try
each solution one at a time starting with step one. For additional help, please visit How do I Contact
Customer Support?
3.19
1.
Close Intel® Wireless Display, reopen the application, scan for available adapters, and connect.
2.
Shutdown the laptop, restart, open the application, scan for available adapters, and connect.
3.
Reset the adapter, scan for available adapters, and connect. For help resetting the adapter visit
How do I Reset the Adapter?
4.
Check the laptop's firewall settings. A firewall may be blocking the application. For firewall help
visit Firewall Issues.
5.
Try updating the firmware. For firmware update instructions visit How do I Update the Firmware?
Known Issues
This section lists known Intel® Wireless Display issues and workarounds.
·
After disconnecting from the application, it may be necessary to manually enable the laptop's
sound. For audio help see How do I Adjust the Audio?
·
The application will usually not work if it is located in the Windows startup group.
·
Wait until Microsoft Windows has fully booted before opening Intel® Wireless Display.
·
If the media application in use can only be set to mute or unmute both the laptop and TV at the
same time, it is recommended to use a different media application.
·
Pressing "Control" + "Alt" + "Delete" on the laptop might freeze the TV image.
·
For analog TV's, the adapter does not support NTSC (National Television System Committee)
format 4.43 variations on the composite interface. See the TV's owner's manual for NTSC
© 2009 Intel Corporation
Troubleshooting
31
variation information.
·
Changing the wireless LAN or connection settings when Intel® Wireless Display is connected,
may cause of momentary disruption, or end the connection.
© 2009 Intel Corporation
FAQ's
Section
IV
34
4
Wireless Display
FAQ's
Look through the FAQ contents for a topic that comes closest to describing your problem. If you are
unable to resolve the problem after reading through the FAQ topics, search the Troubleshooting topics.
For additional help, visit How do I Contact Customer Support?
4.1
How do I Update the Firmware?
If the firmware needs updating, there will be a button labeled "Update available" on the Adapter
Properties page. (The Properties button is only available if you are currently connected to an adapter.)
Click on the "Update available" button to begin the update process. Once the update begins the TV
screen will read "Updating adapter. Please wait." After the procedure is complete, the adapter
automatically disconnects from the laptop. Scan again to connect to the adapter.
4.2
How do I Reset the Application Settings?
Resetting reverts the application back to its out-of-the-box state. To reset, click on "Help" and choose
"About." Click on "Reset Settings." To proceed with the reset click the "Yes" button on the "Reset
Intel® Wireless Display settings" page.
After starting Intel® Wireless Display, all detected adapters will be displayed as not previously
connected. However, it will not be necessary to enter a security code since the security settings are
stored in the adapter.
4.3
How do I Reset the Adapter?
If the adapter is not responding correctly, and resetting the application has not helped, try resetting the
adapter. There are two ways to reset the adapter, either push the power button (2) once to turn the
adapter off, and push it again to turn it on, or push the small black reset button (7). After the "To get
started" screen appears on the TV rescan before trying to connect.
© 2009 Intel Corporation
FAQ's
35
The back of your adapter m ay look like this.
4.4
How do I Clear the Adapter Memory?
Clearing the adapter's memory will erase security settings and the user modified adapter name. This is
helpful if you choose to sell your adapter, or if a neighbor came to your house and connected to your
adapter, but now you do not want them to accidentally connect from their house.
To clear the adapter's memory, press and hold the reset button (7) on the back of the adapter for more
than five seconds or until the LED starts blinking. Clearing the adapter memory requires the user to
enter the security code displayed on the TV in order to connect again.
The back of your adapter m ay look like this.
4.5
Can I Close the Laptop Lid and Still Use Intel® Wireless
Display?
Closing the lid of the laptop may put the system to sleep or turn it off, and as a result, end the Intel®
Wireless Display session. Follow the steps below in order to close the lid and continue using the
application.
4.6
1.
Click on the Windows "Start" icon and type "Closing the lid" in the search field.
2.
Click on the "Change what closing the lid does" link.
3.
Next to the "When I close the lid" heading and under both the "On battery" and "Plugged in"
headings, choose "Do nothing."
4.
Click the "Save changes" button.
What are Adapter Properties?
Adapter Properties Definitions
·
Adapter Name ~ This is either the default factory name or the name you choose in the initial
© 2009 Intel Corporation
36
Wireless Display
set up process. It is okay to change the name at anytime. Just type a new name. If the
default "Name" is deleted and the field is left empty, the application will restore the name to the
previous value.
·
Network address ~ This is the IP (Internet Protocol) address.
·
Adapter ID ~ A preset and unchangeable number set by the adapter.
·
Adapter firmware version ~ This number shows the version of the application. If a web
update is required, click the "Update Available" button.
Register Adapter
Register your adapter to obtain support and get the latest software updates.
Cursor
By default Intel® Wireless Display enables the cursor to be shown on the TV. To make the mouse
cursor disappear on the TV, uncheck the box. Resetting Intel® Wireless Display will return the cursor to
its default setting.
Audio/Visual Tuning
If the laptop display is cropped or not filling the entire TV screen, visit How do I Adjust the TV Display
Image? To troubleshoot audio problems visit How do I Adjust the Audio?
4.7
Why does My Laptop's Color Look Different on My TV?
Sometimes colors on the TV screen and the laptop may be a slightly different. To match the colors,
change the TV settings until the screens are the same. (See your TV manual for color adjustment help.)
4.8
How do I Adjust the TV Display Image?
If the laptop display is cropped or not filling the entire TV screen, the image needs to be adjusted. To
adjust the TV image click on the "Properties" button. In the "Adapter properties" page click on the
"Resize TV picture" button. On the next page, click on the "plus" icon to increase the size, or the
"minus" icon to decrease the size. When the image is correct click "OK" to return to the previous page.
If the image still does not fit the entire TV screen, try adjusting the TV settings.
4.9
How do I Adjust the Audio?
Once a connection begins, the laptop's sound is muted. When the connection ends, the laptop's sound
is enabled.
Sample Audio Testing
© 2009 Intel Corporation
FAQ's
37
When connected, clicking on the "Test audio" button on the Adapter properties page will take you to an
audio test page. If you do not hear audio after clicking on the "Play sample" button, increase the volume
on the TV speakers by using the TV remote.
Global Volume Control
Normally the laptop's sound is muted after connecting to Intel® Wireless Display. Sometimes, however,
other applications may automatically turn on the laptop's sound. This will result in hearing the same
sound from the laptop before hearing it from the TV. To turn the volume off, click the little speaker icon
located on the far right of the taskbar. This will bring up the Global Volume Control pop up window, click
the speaker icon just below the slider to mute the laptop's sound. If the laptop's sound keeps coming
back on, try turning the volume all the way down using the slider in the pop up window instead of muting.
Moving the volume slider will automatically unmute the laptop's speakers.
Windows Audio Mixer
Attempting to change audio settings in the Windows Audio Mixer while using the application, may result
in a connection disruption. (The Windows Audio Mixer is found by clicking the "Mixer" link in the Global
Volume Control.) Usually the connection will automatically reestablish. The TV image may flicker
during this time. If the connection does not automatically reestablish, manually reconnect.
Changing the Sound using the Windows Control Panel
To bring up the audio device window go to the start menu, type "audio device" in the search field, and
press the "Enter" key. On the "Playback" tab, make sure the green circle with a check mark is on local
speakers.
4.10
How do I Train My Displays?
Training Two Displays
While using a laptop and a TV, sometimes the laptop's display settings may be inadvertently changed.
This may result in the TV showing a blank screen after connecting. If this is the case, simultaneously
push the "Windows" button and the letter "P" on the keyboard. Select "Duplicate" in the popup window
to make both laptop and TV screens the same.
Training Three Displays
While using a laptop, a TV, and an external monitor sometimes the laptop's display settings may be
inadvertently changed. This may result in the TV showing a blank screen after connecting. The laptop
is capable of only displaying on two screens at the same time including its own. The TV screen needs
to be one of the two selected screens. To select which screens to use, follow the steps below.
1.
Simultaneously push the "Windows" button and the letter "P" on the keyboard. Select
"Duplicate" in the popup window. If your laptop screen is not duplicated on your TV, proceed to
the next step.
© 2009 Intel Corporation
38
4.11
Wireless Display
2.
Click on the Windows "Start" icon.
3.
In the search box type "Adjust screen resolution" and press "Enter."
4.
Next to the heading "Display" select the option other than "Multiple Monitors."
5.
Next to the heading "Multiple displays" choose either one of the duplicate combinations.
6.
To try the new settings, click "Apply."
7.
If the laptop screen is showing on the desired combination of displays, click the "Keep changes"
button in the pop up dialog box then click "OK." Otherwise, click "Revert" and go back to step
4 and choose the other combination in step 5.
Can I play DVD's with Intel® Wireless Display?
Many DVDs and Blu-ray Discs include copy protection mechanisms which prevent playback over
unprotected outputs. Intel® Wireless Display is currently an unprotected output; and as a result, many
DVDs and Blu-ray Discs will not work. However, personal content (pictures, home movies, etc) that you
have burned to DVDs and Blu-ray Discs are not protected in the same manner and will work with Intel®
Wireless Display.
4.12
How do I Contact Customer Support?
Contact your computer or adapter manufacturer to get support for your specific product.
Visit http://www.intel.com/go/wirelessdisplay to access general Intel® Wireless Display support forums.
© 2009 Intel Corporation
Index
Customer Support
Index
-D-
-AA\V
25
Access Point
29
Adapter
8, 12, 14, 24, 25, 28, 29, 34, 35
Adapter Firmware Version
35
Adapter has a Problem
25
Adapter ID
35
Adapter Name
35
Adjust Display Settings
18
Adjust Screen Resolution
37
Alt
30
Application
8, 12, 30, 34
Audio
36
Audio Mixer
36
Audio Mode
27
Audio/Video
12, 24
Audio/Visual
35
-BBlu-ray
38
Bold Red Text
Brand
14
38
Delay
18
Delayed
26
Delete
30
Dim
28
Disabled
28
Disclaimers
9
Disconnect
21
Disconnecting
21
Display
26
Display Settings
36
Displays
37
Duplicate
37
DVD
38
Dynamic IP Address
29
-EExit
21
Exiting
21
-F12
Factory Reset
29
FAQ's
8, 34
Finish
18
Firewall
14, 28
Firmware
34
-CCables
12, 24
Channel
25, 26
Close
21
Close Window
21
Code
26
Color
36
Common Solutions to Many Issues
Connecting
12
Connecting and Using
8
Continued Procedures
18
Control
30
Copy Protection
38
Copy Right
9
Cords
24
CPU
26, 28
Cursor
35
© 2009 Intel Corporation
-GGlobal Volume Control
Graphic Card
28
30
-HHardware
27
HDMI 12, 24, 25
Headphones
36
Hyperlinks
8
36
39
40
Wireless Display
-I-
-P-
ID
14
Image
36
Initial Set Up
12, 18
Initial Set Up Problems
24
Input
12, 24, 25
Intel My WiFi Technology
27
Intel My WiFi Utility
27
Intel® My WiFi Technology
28
Intel® My Wi-Fi Technology
28
Intel® My WiFi Utility
26
Intel® Wireless Display
8, 12, 14, 21, 27, 29, 34,
35
Intel® Wireless Display Compatible Adapter
8, 14,
21, 24, 26, 27, 28, 29
Introduction
8
Issues
30
PAN
29
Playback Devices Utility
Power
35
Power Button
34
Power Cord
12, 24
Power Options
28
Power Saving
28
Properties
35
-LLAN
29
Laptop
8, 14, 27, 28, 35, 36
Legal
9
License Agreement
14
Lid
35
-MManual
8
My Wi-Fi
28
-NName
Network
Network
NTSC
14, 18
Address
35
Link Speed
26
30
-OOn
12
On/Off 12, 24
36
-RReset
29, 34, 35
Reset Adapter
34
Resetting
25
-SSample Audio Testing
36
Scan
14
Scan for Avalible Displays
28
Scanning
14
Security Code
18, 26
Security Profile
27
Settings
26
Signal
14
Size
36
Sleep
28
Speakers
36
Startup
25
Successful Set Up
18
Switch
27
System Requirements
28
-TTrain
37
Troubleshooting
8, 24
TV
14, 24, 25, 26, 29, 36
Type
14
-UUnsupported Audio Mode
27
© 2009 Intel Corporation
Index
Update
34
Update the Adapter
User's Manual
8
Using
12, 14
34
-VVideo Mode
26
Volume
36
-WWiDiApp
28
Wi-Fi
8, 27
Wireless Access Point
26, 29
Wireless Displays
25
Wireless PAN DHCP Server
28
© 2009 Intel Corporation
41
Intel® Wireless Display