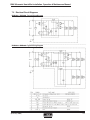
1
BNU Ultrasonic Humidifier Installation, Operation & Maintenance Manual
MODELS
BNU2000
BNU3000
BNU4000
BNU6000
BNU8000
(©January, 2008)
Air Technology Systems, Inc.
BNU Ultrasonic Humidifier Installation, Operation & Maintenance Manual
Notice
This document contains information protected by copyright. All rights are reserved. The owner of the equipment for
which this manual is written may photocopy the contents of this manual for internal use only. No part of this document may be photocopied, reproduced, or translated into another language for use by anyone other than the owner
of the equipment for which this manual is written without the prior written consent of Stulz Air Technology Systems,
Inc. (SATS).
This document contains confidential and proprietary information of Stulz Air Technology Systems, Inc. Distributing or
photocopying this document for external distribution is in direct violation of U.S. copyright laws and is strictly
prohibited without the express written consent of SATS.
Unpublished — rights reserved under the copyright laws of the United States and of other countries.
Other brands and tradenames are trademarks of their respective owners.
Copyright 2007 by Stulz Air Technology Systems, Inc.
Printed in the United States of America.
All rights reserved.
Stulz Air Technology Systems, Inc.
1572 Tilco Drive
Frederick, MD 21704
USA
(©January, 2008)
01/08
Air Technology Systems, Inc.
BNU Ultrasonic Humidifier Installation, Operation & Maintenance Manual
TABLE OF CONTENTS
1.0
Introduction ....................................... 1-1
1.1
1.2
1.2.1
1.2.2
1.3
1.4
1.5
1.6
1.7
General ...................................................... 1-1
Safety ........................................................ 1-1
General ...................................................... 1-1
Safety Summary ........................................ 1-1
Product Warranty ...................................... 1-3
Specifications ............................................ 1-4
General Design .......................................... 1-5
Main Parts ................................................. 1-5
Parts Illustrations ....................................... 1-6
2.0
Installation ......................................... 2-1
2.1
2.2
2.3
2.4
2.5
2.6
Receiving the Equipment. .......................... 2-1
Site Preparation ......................................... 2-1
Mounting/Placement .................................. 2-2
Exit Pipe Adjustment ................................. 2-2
Supply and Overflow Piping ........................ 2-2
Main Power/Control Wiring ........................ 2-4
5.4.1
5.4.2
5.4.3
5.4.5
Preparation For Repairs ............................. 5-7
Re-Assembing ........................................... 5-8
Replacing Transducer and Nebulizer
Print Plate ................................................. 5-9
Water Supply Solenoid Valve, Float
Switches and Printed Circuit Board .......... 5-10
Fan ...........................................................5-11
6.0
Product Support Group ................... 6-1
6.1
6.2
6.3
Technical Support ...................................... 6-1
Obtaining Warranty Parts .......................... 6-1
Obtaining Spare/Replacement Parts .......... 6-1
7.0
Drawings ............................................ 7-1
7.1
7.2
Layout Drawing of Humidifier ...................... 7-1
Electrical Circuit Diagrams ........................ 7-2
5.4.4
List of Figures
3.0
Trial Operation .................................. 3-1
Figure 1-
Installation of Humidifier .......................... 2-1
3.1
3.1.1
3.1.2
3.1.3
Initial Operation .......................................... 3-1
Initial Operation Checklist .......................... 3-1
Procedure For Initial Operation ................... 3-1
Purge the Water Line ................................. 3-1
Figure 2-
Locating the Humidifier ........................... 2-2
Figure 3-
Exit Pipe ................................................ 2-2
Figure 4-
Compression Fitting Section View .......... 2-3
Figure 5-
Piping Connection .................................. 2-3
4.0
Operation .......................................... 4-1
4.1
4.2
4.3
Precautions ............................................... 4-1
Operation Procedure and Control ............... 4-1
Steps for Long Term Shutdown ................... 4-1
5.0
Maintenance/Repairs ....................... 5-1
5.1
5.1.1
5.2
5.2.1
5.2.2
5.3
5.4
Periodic General Maintenance ................... 5-1
General ...................................................... 5-1
Maintenance Items and Necessary Tools ... 5-2
Air Filter ..................................................... 5-3
Water Tank Interior and Electrical Parts ..... 5-3
Troubleshooting and Repair ........................ 5-5
General Common Repairs/Parts
Replacement ............................................. 5-7
(©January, 2008)
i
Air Technology Systems, Inc.
BNU Ultrasonic Humidifier Installation, Operation & Maintenance Manual
ii
Air Technology Systems, Inc.
(©January, 2008)
BNU Ultrasonic Humidifier Installation, Operation & Maintenance Manual
1.0
INTRODUCTION
A safety alert symbol
accompanies a general
WARNING or CAUTION safety statement.
1.1 General
Recognized as a world leader, Stulz Air Technology
Systems, Inc. (SATS) ultrasonic humidifiers are
designed and manufactured with the highest quality
craftsmanship using the finest materials available in the
industry. Your ultrasonic humidification system will
provide years of trouble free service if installed and
maintained in accordance with this manual. Damage to
the unit from improper installation, operation or maintenance is not covered by the warranty.
A safety alert symbol
accompanies an electrical
shock hazard WARNING or CAUTION safety statement.
This manual contains information for installation,
operation, maintenance, troubleshooting and repair.
STUDY the instructions contained in this manual.
They must be followed to avoid difficulties. Spare parts
are available from SATS to ensure continuous operation. Using substitute parts or bypassing electrical
components in order to continue operation is not
recommended and will VOID THE WARRANTY. Due
to technological advancements, components are
subject to change without notice.
Prior to performing any installation, operation, maintenance or troubleshooting procedure read and understand all instructions, recommendations and guidelines contained within this manual.
SATS BNU Series Ultrasonic Humidifiers are designed as stand alone direct room humidifiers. Any
use beyond this is deemed to be not intended. SATS
is not liable for any damage resulting from improper
use. The system is designed to be installed indoors
unless otherwise noted on the equipment nameplate.
1.2
Safety
1.2.1
General
1.2.2
Safety Summary
The following statements are general guidelines
followed by warnings and cautions applicable throughout the manual.
WARNING
High voltage is used in the operation of this
equipment. Death on contact may result if
personnel fail to observe safety precautions.
CAUTION
This unit must be installed according to local
and national electric codes.
CAUTION
All maintenance and/or repairs must be performed by a qualified technician. All personnel
working on or near equipment should be familiar
with hazards associated with electrical maintenance.
Stulz Air Technology Systems, Inc. uses NOTES
along with CAUTION and WARNING symbols
throughout this manual to draw your attention to
important operational and safety information.
CAUTION
A bold text NOTE marks a short message in the
information to alert you to an important detail.
Always turn off the main power and unplug the
unit before beginning work on the equipment.
A bold text CAUTION safety alert appears with
information that is important for protecting your
equipment and performance. Be especially careful to
read and follow all cautions that apply to your application.
A bold text WARNING safety alert appears with
information that is important for protecting you from
harm and the equipment from damage. Pay very close
attention to all warnings that apply to your application.
NOTE
Wiring terminations may become loose during
transit of the equipment therefore; verify all wiring terminations are secure prior to operation.
NOTE
Do not attempt to make repairs without the
proper tools.
1-1
(©January, 2008)
Air Technology Systems, Inc.
BNU Ultrasonic Humidifier Installation, Operation & Maintenance Manual
NOTE
SATS offers no warranty protection on
humidifcation systems using controls that are
not provided by SATS.
CAUTION
Never attempt to remove the mist guide cover
and/or the mist blow tubes while the humidifier
is operating, or electrical shorts may result.
CAUTION
It is essential that De-ionized (DI) or Reverse
Osmosis (RO) water be used as the supply
water source to maintain full warranty coverage. The use of untreated water will VOID THE
WARRANTY.
CAUTION
Use only non-corrosive stainless steel or poly
tubing rated for use with DI water to supply the
humidifier.
CAUTION
If there is a risk of supply water freezing, pipe
insulation should be provided.
CAUTION
Never apply power when the humidifier is
overturned or upside down. Damage to the
ultrasonic nebulizer unit or transducer may
result.
CAUTION
CAUTION
Never block the mist outlet or the opening of
the air inlet. The humidifier may be filled with
the condensed mist and electrical shorts may
result.
CAUTION
Observe the unit for water leakage. A short
circuit could occur if the humidifier is splashed
with water while operating.
Never drop the humidifier or apply hard shock
to it. It may damage internal parts.
CAUTION
Drain the water in the tank for sanitary reasons when humidifier is turned is off for more
than 3 days.
Ultrasonic Humidifier- Model BNU2000
(©January, 2008)
1-2
Air Technology Systems, Inc.
BNU Ultrasonic Humidifier Installation, Operation & Maintenance Manual
1.3 Product Warranty
SATS offers a standard two year limited warranty as stated below:
2-Year Standard Limited Warranty:
Stulz Air Technology Systems, Inc., warrants to the original buyer of its products that the goods
are free from defects in material and workmanship. Stulz Air Technology Systems, Inc.’s
obligation under this warranty is to repair or replace, at its option, free of charge to the customer,
any part or parts which are determined by Stulz Air Technology Systems Inc. to be defective
for a period of 24 months from date of shipment when a completed start-up form has been
submitted to Stulz Air Technology Systems, Inc. within 90 days from shipment. In the event
that a completed start-up form is not received by Stulz Air Technology Systems, Inc. within 90
days from shipment, the company’s obligation will be for a period of 12 months from date of
shipment. Parts repaired or replaced under this warranty are shipped FOB Factory, and
warranted for the balance of the original warranty period or for 90 days from the date of
installation, whichever is greater.
Stulz Air Technology Systems, Inc.’s warranty does not cover failures caused by improper
installation, abuse, misuse, misapplication, improper or lack of maintenance, negligence,
accident, normal deterioration (including wear and tear), or the use of improper parts or improper
repair.
Purchaser’s remedies are limited to replacement or repair of non-conforming materials in
accordance with the written warranty. This warranty does not include costs for transportation,
costs for removal or reinstallation of equipment or labor for repairs or replacement made in the
field.
If any sample was shown to the buyer, such sample was used merely to illustrate the general
type and quality of the product, and not to represent that the equipment would necessarily
conform to the sample.
This is the only warranty given by the seller, and such warranty is only given to buyers for
commercial or industrial purposes. This warranty is not enforceable until the invoice(s) is paid
in full.
THE FOREGOING SHALL CONSTITUTE SATS’S ENTIRE LIABILITY AND YOUR EXCLUSIVE
REMEDY. IN NO EVENT SHALL SATS BE LIABLE FOR ANY DIRECT, INDIRECT, SPECIAL,
INCIDENTAL, CONSEQUENTIAL, OR EXEMPLARY DAMAGES, INCLUDING LOST PROFITS
(EVEN IF ADVISED OF THE POSSIBILITY THEREOF) ARISING IN ANY WAY OUT OF THE
INSTALLATION, USE OR MAINTENANCE OF THE EQUIPMENT. THIS WARRANTY IS IN
LIEU OF ALL OTHER WARRANTIES, EXPRESS OR IMPLIED, INCLUDING WARRANTIES OF
MERCHANTABILITY OR FITNESS FOR A PARTICULAR PURPOSE.
Conditions for Maintaining Warranty Coverage:
1) De-ionized (DI) or Reverse Osmosis (RO) water is used as the supply water for the humidifier.
2) SATS provided controls are used with the humidification system.
3) Input voltage to the humidifier does not exceed 51VAC.
(©January, 2008)
1-3
Air Technology Systems, Inc.
BNU Ultrasonic Humidifier Installation, Operation & Maintenance Manual
1.4 Specifications
Type
Ultrasonic Humidifier BNU
Model
Nebulizing capacity (lb/h)
Nos. of Ultrasonic nebulizer unit
BNU2000
BNU3000
BNU4000
BNU6000
BNU8000
4.4
6.6
8.8
13.2
17.6
2
6
8
10
16
Power source
Single-phase 48VAC; 50/60Hz
Rated power consumption (W)
145
220
285
430
565
Fan Motor (FLA)
0.54
0.87
0.92
0.54, 0.92
0.92, 0.92
Weight (lbs)
17.6
24.2
33.0
46.2
59.4
Electrical Characteristics
Allowable voltage range
Within ±10% on primary side of transformer; 51VAC (max.) on secondary side.
Insulation resistance
100 M.Ohms or more (excluding solid-state components).
Dielectric voltage withstand
Operational when 1500VAC is applied for 1 minute (excluding solid-state components).
Operating conditions
Ambient working conditions
34 to 122°F; 90%RH or less.
Water supply quality
DI or RO water. Water conductance <20 microsiemens purity.
Water supply pressure
30 to 75 psi
Water supply temperature
40°F to 104°F
Parts to be provided by user
Humidistat, DI or RO supply water, Water supply valve, Water supply tubing (1/4” stainless steel or poly tubing rated
for DI water, Transformer, Power source and wiring to Transformer (Wire type: 16AWG minimum rated 125V, 176°F).
Notes:
1) Calcium, magnesium or other agents that may be contained in the supply water are atomized into the
air together with the mist and may form white powders after the water has evaporated. To avoid this,
always use DI or RO supply water.
2) The nebulizing capacity of the transducer in the ultrasonic nebulizer unit decreases gradually with
use. It should usually be exchanged after about 10,000 to 15,000 hours of operation, (depending on
water quality and suitable voltage), although the unit may continue to run as long as it’s effective
capacity meets the particular requirements.
3) To ensure full warranty coverage, the input voltage to the humidifier must not exceed 51VAC. If the
voltage on the secondary side of the transformer exceeds 51VAC, damage to the transducers and
print plates will result.
(©January, 2008)
1-4
Air Technology Systems, Inc.
BNU Ultrasonic Humidifier Installation, Operation & Maintenance Manual
1.5 General Design
The BNU Ultrasonic humidifier directly atomizes water producing a fine mist and is equipped with a fan to deliver
the mist into a room. It is possible to adjust the atomization to maintain room conditions by changing the air
volume.
A complete system consists of the humidifier to produce mist and a transformer (optionally provided by SATS), to
supply power to the humidifier. The humidifier incorporates ultrasonic nebulizer unit(s) to produce ultrasonic waves,
a fan to send out the mist, and an automatic water supply mechanism to maintain the supply water at a constant
level. When conducting routine maintenance, it is important to clean the air filter and water tank because it
significantly affects the humidifying capacity and life of the ultrasonic nebulizers.
1.6 Main Parts
1.6.1
Ultrasonic Nebulizer Unit
1.6.4
Fan(s)
Blows the mist produced from the humidifier into the
Modular sub-assembly, located in the bottom of the
water tank, incorporating a plate with amplifying circuitry conditioned space.
and a transducer. The transducer oscillates at a high
1.6.5 Air Filter
frequency, producing ultrasonic waves which are
directed to the water surface, atomizing the water.
Filter for removing coarse dust from the air and prevent
the humidifier water tank and interior from becoming
1.6.2 Solenoid Valve and Float Switch
dirty.
(Automatic water supply mechanism)
For maximum atomization, it is essential that the water 1.6.6 Control Board
level in the tank be constantly maintained. Water level
Contains relays and protective circuit devices used to
suitable for atomizing is maintained by means of a
control the operation of the unit.
solenoid valve and float switch. When the water level in
the tank falls below the designed level, the float switch
1.6.7 Water Supply Valve
contact turns ON and the solenoid valve opens to
(To be provided by user)
supply water to the tank. When the correct water level
This valve should be installed upstream from the
is attained the float switch contact turns OFF, closing
humidifier for service and maintenance. The valve must
the solenoid valve.
be rated for use with DI water.
1.6.3
Relay Board and Float Switch
1.6.8
Water Supply Tubing
(Automatic low water level shutdown mechanism)
(To be provided by user)
Operating the humidifier when the water level in the tank This connects the water supply to the water supply
is below the top of the transducers will damage the
compression fitting. The tubing must be rated for use
transducers and the circuitry in the ultrasonic nebulizer with DI water.
unit. A float switch and a relay are used to prevent the
humidifier from “dry” running. If the water in the tank falls
below a safe level for any reason, the float switch
contact turns off shutting off the relay thus, cutting off
the power supply to the unit.
(©January, 2008)
1-5
Air Technology Systems, Inc.
BNU Ultrasonic Humidifier Installation, Operation & Maintenance Manual
1.7 Parts Illustrations
1.7.1 Mist Generator
1-6
(©January, 2008)
Air Technology Systems, Inc.
BNU Ultrasonic Humidifier Installation, Operation & Maintenance Manual
1.7.2 Humidifier
1-7
(©January, 2008)
Air Technology Systems, Inc.
BNU Ultrasonic Humidifier Installation, Operation & Maintenance Manual
2.0
INSTALLATION
2.1
Receiving the Equipment
Your Ultrasonic humidifier has been tested and inspected prior to shipment. To ensure that your equipment has
been received in excellent condition, make a visual inspection of the equipment immediately upon delivery. Carefully remove the shipping container and all protective packaging. Open the box and thoroughly inspect the unit for
any signs of transit-incurred damage. If there is shipping damage, it must be noted on the freight carrier's delivery
forms BEFORE signing for the equipment. Any freight claims MUST be done through the freight carrier. SATS
ships all equipment FOB factory. SATS is not liable for any equipment damage while in transit. SATS can assist in
the claim filing process with the freight carrier. Should any such damage be present, notify the SATS Product
Support Group prior to attempting any repairs. Refer to Section 6.0 of this manual for instructions.
Check the equipment against the packing slip to see if the shipment is complete. Report all discrepancies to the
appropriate authority.
Contents of Package:
1. Humidifier
2. Compression Fitting (1/4”).
3. Installation, Operation and Maintenance manual.
Avoid dropping or jarring the unit to prevent damage to the internal parts. The unit should always be stored in a dry
location prior to installation.
A Data Package has been sent with your unit. It contains this manual, system drawings, applicable MSDS’s and
other applicable instructions based on the configuration and options of your unit. The data package has been
placed in your unit in a clear plastic envelope. These documents need to be kept with the unit for future reference.
2.2
Site Preparation
SATS ultrasonic humidifiers are designed with easy service access in mind. Install the unit in a secure location
where it cannot be tampered with and the power switch cannot be inadvertently turned off. Allow access to the
unit for routine operation, servicing and for necessary maintenance. Position the humidifier in such a way that the
unit can be easily removed for future maintenance and inspection. Refer to the installation drawing provided with
your unit for the dimensions of the humidifier.
NOTE
Working clearance requirements need to be
established prior to mounting the unit. Refer
to local and national electrical codes.
Figure 1- Installation of Humidifier
When selecting the installation location,
attention should be paid to the air flow in the
room so that the atomized mist can be
uniformly diffused throughout the room. When
it is installed above the air conditioner, ensure
mist isn’t attracted toward the bottom of the
humidifier. If any obstacle exists in front of the
atomized mist outlet, the mist will be condensed on the obstacle to form water droplets.
(©January, 2008)
2-1
Air Technology Systems, Inc.
BNU Ultrasonic Humidifier Installation, Operation & Maintenance Manual
The humidifier must be installed horizontally and level. Prepare hanging bolts for ceiling or brackets for wall (see
Figure 1). The distance from the humidifier to the ceiling should be a minimum of 18” and the distance to the wall
3” or more. For the installation mounting base dimensions, see “Layout Drawing of Humidifier” on page 7-1.
Figure 2- Locating the Humidifier
3.0" Min.
Ceiling
Smoke
Detector
12'
18.0" Min.
Humidifier Path
Support
Bracket
Air
Diffuser
16'
NOTE
Humidity control can only be achieved in a sealed room or if the room has vapor barriers installed. It is
recommended that walls, ceilings and floors be sealed to prevent migration of humidity.
2.3
Mounting/Placement
SATS ultrasonic humidifiers are designed for mounting to a flat surface. Ensure the base is capable of supporting the
weight of the unit. Weight estimates can be found on the installation drawing provided with your unit. Secure the
unit with fasteners (field supplied by others), so that it will not move during operation. Ensure the front of the humidifier is
not hanging out over the edge of the support bracket.
2.4
Exit Pipe Adjustment
The exit pipes are provided to direct mist out horizontally. During initial operation, adjust the exit pipes shown in
Figure 3 to direct blown mist away from obstructions and towards the room.
Figure 3- Exit Pipe
(©January, 2008)
2-2
Air Technology Systems, Inc.
BNU Ultrasonic Humidifier Installation, Operation & Maintenance Manual
2.5
Supply and Overflow Piping
The humidifier will require a field installed water supply line and overflow line. Refer to the piping diagram provided with
your unit for details. For the water supply, use DI or RO water. The water supply to the humidifier cannot be taken
directly from the public water service pipe. Untreated supply water will cause a problem in the room where “white
powder” is produced after evaporation from calcium or magnesium dissolved in the water. In cases where water
quality, especially “residue from evaporation”, “pH”, “total hardness” and “water conductivity” exceeds or is outside
the range of standard, routine maintenance intervals for keeping normal operation will be shorter than usual. Also,
the operating life of the transducers and print plates will be significantly reduced.
CAUTION
It is essential that DI or RO water be used as the supply water source to maintain warranty coverage. The use
of untreated water will VOID THE WARRANTY.
NOTE
The water supply piping must be non-corrosive stainless steel or poly tubing rated for use with de-ionized water
Prepare the water supply piping. The water supply piping should be equipped with a water supply valve, (user
provided), at a place as close as possible to the humidifier. The valve must be rated for use with DI water. After the
water supply valve is installed, flushing should be done by supplying water, (see Section 3.0, “Trial Operation”).
This is a necessary step to prevent chips and oil in the piping from entering the humidifier.
Connect the water supply piping to the humidifier by means of a 1/4” stainless steel or poly tubing, (user provided). A compression fitting is provided (see Figure 4). Use two adjustable wrenches to tighten the connection on
the humidifier. (Tightening torque: approximately 90 in/lbs).
Figure 5- Piping Connections
Figure 4- Compression Fitting Section View
Install an isolation valve in the supply water line for maintenance purposes.
If there is a risk that the water supply piping could freeze, wrap the piping with insulating material.
Overflow piping must be provided from the water tank for safety should any failure or problem occur. The overflow
pipe stub, approximately 1/2” outside diameter, should be connected with tubing so that overflowing water can be
directed into a drain pan or an appropriate place such as building drain. The overflow tubing must be sloped
downward and away from the unit and the end should not be plugged.
NOTE
The drain plug in the bottom of the water tank should not be removed unless an optional “drain down” solenoid
is supplied.
2-3
(©January, 2008)
Air Technology Systems, Inc.
BNU Ultrasonic Humidifier Installation, Operation & Maintenance Manual
2.6
Main Power And Control Wiring
For wiring, refer to the electrical drawing supplied with your unit to determine the total number of
interconnecting conductors required for your system and for the proper wire terminations.
For internal wiring of the humidifier, see the “Electrical Circuit Diagrams” on page 7-2.
NOTE
Wiring terminations may become loose during transit of the equipment therefore, verify all wiring terminations
are secure prior to operation.
Verify that the main power supply coincides with the voltage, phase and frequency information specified on the
system nameplate. The nameplate also provides the full load amps (FLA), the current that the unit will draw under
full design load, the minimum circuit ampacity (MCA) for wire sizing, and the maximum fuse size (MFS) for circuit
protection. The power source must be provided with a circuit breaker for safety. Ensure a ground is connected to
the unit. The humidifier is rated to operate with an input of 48VAC/single phase. To maintain warranty coverage,
never allow the humidifier input voltage to exceed 51 volts as damage will occur to the transducers and print
plates.
WARNING
On SATS supplied control boxes, the 48 volt “Hot” wire will not be connected when the unit ships. Depending
on the incoming power supply voltage, the taps on the secondary side of the transformer may be a higher
voltage than labeled. It is important that the taps be checked with a voltmeter to ensure the voltage is within
the proper range. Select the secondary transformer tap that is the closest to 48 volts and connect the “Hot”
wire. Never exceed 51 volts as damage will occur to the transducers and print plates.
CAUTION
It is important to note that if the control transformer is supplied with the equipment by SATS, it is sized and
selected based upon the expected load for the unit. Do not connect any additional loads to the control
transformer. Connecting additional loads to the factory supplied control transformer may result in overloading
of the transformer which will cause the transformer circuit breaker to trip.
2.6.1 Humidistat
The humidistat may be optionally provided by SATS. It should be installed at a well ventilated place where changes
in room humidity can be accurately sensed. If customer provided, the humidistat must be a normally open dry
contact type which closes when the relative humidity drops to a user selected setpoint. Refer to the electrical
drawing for the voltage and current rating requirements for the contact. When one humidistat is used to control
multiple humidifiers, relays should be provided so each humidifier has an independant contact.
2-4
(©January, 2008)
Air Technology Systems, Inc.
BNU Ultrasonic Humidifier Installation, Operation & Maintenance Manual
3.0
TRIAL OPERATION
3.1 Initial Operation
3.1.1 Initial Operation Checklist
For new installations, ensure the unit is ready to operate by going through the following checklist prior to start-up:
1. The humidifier is installed horizontally and level.
2. No obstacle is within 15 feet in front of the atomizing direction.
3. The electrical wiring is correctly connected.
4. De-ionized or Revere Osmosis water supply is used.
5. The water supply piping and overflow piping are correctly connected and secured.
6. All parts are correctly installed.
After the above items are checked, the trial operation may begin.
3.1.2 Procedure for Initial Operation
1. Open the water supply valve allowing water to flow to the unit.
2. Set the humidistat to a desired humidity level.
3. Turn the main power source switch (circuit breaker) to ON.
4. If the humidistat is ON, power is supplied to the humidifier, the water supply is started and when
the required water level is reached, atomizing starts.
5. If the operation does not start, increase the set point of the humidistat.
After operation is started, check the following items on a regular basis:
Atomizing is visible through all the mist exit pipes.
Check the humidifier parts, overflow pipe and other piping for signs of leaking water.
By operating the ON/OFF contact of the humidistat, ensure that it is interconnected properly and
controls operation of the humidifier.
Check to see that the mist diffusion is good and that objects in the room or any obstacle is not directly
exposed to the mist.
After the above items are checked and if no trouble is found, the trial operation is completed.
3.1.3 Purge the Water Line
The first time the unit is operated, metal shavings or debris that may form during the installation process will be
flushed through the supply water piping. After performing the steps in Section 3.1.2 above, follow the steps below
to purge the water line:
Set the main switch of the power source to OFF for safety.
Close the water supply valve.
Remove the water tank drain plug and drain the tank. After draining, securely install the plug.
(©January, 2008)
3-1
Air Technology Systems, Inc.
BNU Ultrasonic Humidifier Installation, Operation & Maintenance Manual
4.0
OPERATION
4.1 Precautions
Do not remove the mist exit pipe base from the humidifier during operation.
Do not remove the air filter at the back of the humidifier during operation.
Do not block the mist outlet of the mist exit pipes. It could cause a failure when the mist flow is reversed.
Drain the water from the water tank for sanitary reasons if the unit is turned off for more than 3 days.
4.2 Operation Procedure and Control
1. Open the water supply valve and supply water to the unit.
2. Check the setting of the humidistat and set it to a desired humidity level.
3. Turn on the main power switch (circuit breaker), suppying power to the humidifier.
4. When power is supplied to the humidifier, water flows into the unit. When the required water level is reached,
atomizing starts.
5. During operation, stopping and restarting of the humidifier is controlled by means of the signal from the humidistat.
6. The water level in the water tank is maintained by means of the float switch and solenoid valve.
4.3 Steps for Long Term Shutdown
When operation is stopped for a long time (one week or longer), the following steps must be performed. Also, refer
to Section 5.1, “Periodic General Maintenance”.
Set the main switch (circuit breaker), from the power source to OFF.
Close the water supply valve.
Drain the water tank.
Check and clean the water tank interior and air filter.
For restarting operation after a long-term shutdown, see the previous Section 4-2, “Operation Procedure and
Control”.
(©January, 2008)
4-1
Air Technology Systems, Inc.
BNU Ultrasonic Humidifier Installation, Operation & Maintenance Manual
5.0
MAINTENANCE/REPAIRS
5.1
Periodic General Maintenance
Systematic, preventive maintenance of the humidifier is recommended for optimum system performance. Routine
periodic maintenance should include, but is not limited to the following:
Tightening electrical connections.
Cleaning, inspecting the unit’s components visually.
Checking the level of water and ensuring no leaks are present.
A system should be established to record any problems, defects or deficiencies noted by operators and discovered during maintenance inspections, together with the actions taken. For assistance, contact the SATS Product
Support Group. Ensure adherence to all safety precautions while performing any type of maintenance.
5.1.1
General
Before the maintenance inspection and repairs are done, be sure to set the power supply circuit breaker (main
switch) to OFF and close the water supply valve.
WARNING
Turn off power to the unit unless you are performing tests that require power. With power and controls
energized, the unit could begin operating automatically at any time.
CAUTION
The transducer is a very delicate part. When the water tank interior is cleaned, special care must be taken to
ensure the transducer is not scratched on the surface with a screwdriver, etc.
Do not supply power to the ultrasonic nebulizer units while the transducer lead wires (yellow and orange) are
removed.
Proper tools must be used. Excessive tightening or insufficient tightening may cause failure.
When performing maintenance or repairs, care must be taken to ensure small parts such as screws will not
be lost.
Care must be taken avoid injury by sharp edges of the sheet metal, etc.
Solid scaffolding must be provided for working in high places.
Testing insulation resistance and dielectric withstand voltage should be avoided because the humidifier incorporates sensitive electronic parts.
When parts are replaced, genuine SATS parts must be used. Contact SATS Product Support Group for
assistance.
(©January, 2008)
5-1
Air Technology Systems, Inc.
BNU Ultrasonic Humidifier Installation, Operation & Maintenance Manual
5.2
Maintenance Items and Necessary Tools
Item
Cycle
Description
Necessary Tools
Routine Maintenance
Air filter cleaning.
Check water tank
interior, mist exit pipes
and electrical parts.
About once a month depending on the extent of contamination. The interval should be
shortened if environmental
conditions are particularly
dusty.
Once every 6 months or as
required if environment is
dusty or water supply quality
is poor.
Sect. 5.2.1 on
page 5-3
Sect. 5.2.2 on
page 5-3
Adjustable wrenches (2)
Replacing Parts
Replacing transducer.
Replacing nebulizer print
plate.
After about 10,000 to 15,000
hours of operation.
If damaged or upon failure.
Also recommended when
replacing transducer
None
Phillips screwdriver
Sect. 5.4.3 on
page 5-8
7/32” Nut driver
Soft cleaning cloth
Small brush
Replacing water supply
solenoid valve.
Diagonal wire cutter
Replacing float switches.
If damaged or upon failure.
Sect. 5.4.4 on
page 5-9
Replacing the printed
circuit board.
Sect 5.4.5 on
page 5-9.
Replacing the fan.
(©January, 2008)
5-2
Air Technology Systems, Inc.
BNU Ultrasonic Humidifier Installation, Operation & Maintenance Manual
5.2.1 Air Filter
1) Locate the air filter in the rear of the unit and slide the filter up
along the guides to remove it.
Photo 1
2) Wash the filter media with clean water.
3) Lightly shake off excess water and dry it well in the shade.
4) When the filter is dried, slide it back in the guides.
5) If the filter is seriously clogged and cannot be cleaned by
washing with water, or if it is seriously deteriorated, it should be
replaced with a new one.
5.2.2 Water Tank Interior and Electrical Parts
1) Stop the humidifier, set the power supply circuit breaker (main
switch) to OFF and close the water supply valve.
2) Remove the plug from the drain pipe and drain the water tank.
After draining, re-install the plug securely.
Photo 2
3) Remove the the water supply piping. Be sure to use two
wrenches to prevent the body of the compression fitting on the
Photo 3
humidifier from turning.
4) Remove the junction box cover and the power cables from the
terminal block. Then remove the screws from the conduit plate.
5) Take the humidifier to a convenient place for working.
6) Remove the screws (4 Pcs.) holding the junction box and
remove it.
Photo 4
7) Remove the screws holding the enclosure cover and remove
it.
Photo 5
8) Remove the air flow guide panel.
Photo 6
5-3
(©January, 2008)
Air Technology Systems, Inc.
BNU Ultrasonic Humidifier Installation, Operation & Maintenance Manual
9) Remove the exit pipe base and inspect the interior of the
water tank.
Photo 7
Note
Be careful not to splash water onto the electrical parts.
10) If the water tank interior is contaminated, clean the interior of
the tank and the surface of the transducers by wiping with a
Photo 8
soft, oil free cleaning cloth.
Note
Be careful not to scratch the surface of the transducers.
11) If any damage or scaling is present on the surface of a
transducer, replace it referring to Sect. 5.4.3 on page 5-9.
12) Remove the control water tank cover.
Photo 9
Inspect the inside of the control water tank and check the
following points:
No parts are leaking and no water leakage from the
solenoid valve joint.
No condensation.
No discoloration, deformation or deterioration of printed
circuit board.
No damage to electrical wires or cables.
13) Remove the float panel and check for contamination of the
float switches. Manually operate the float switch arms to ensure
they raise and lower smoothly. Wipe and clean the float
switches with a small brush.
Note
Be careful not to remove the float portion from the stem.
14) Remove the mist exit pipes from the exit pipe base, (removed in step 9).
15) Clean the mist exit pipes with clean water.
Note
It is essential that the mist outlet and its surrounding area
are free from foreign material.
Note
Be careful not to damage the rubber ring on the exit pipes.
16) If no defects are found through the above inspection, reassemble by reversing the above procedure.
Note
When assembling, be careful not to pinch the wires between the sheet metal.
5-4
(©January, 2008)
Air Technology Systems, Inc.
BNU Ultrasonic Humidifier Installation, Operation & Maintenance Manual
5.3 Troubleshooting and Repair
Should any failure occur, make the necessary repairs referring to the following table. As a rule, power must be
turned off when troubleshooting is performed but if it is absolutely necessary to troubleshoot when power is
supplied, special attention must be paid to avoid electric shock and short-circuiting.
1) First the humidifier and its surrounding area should be checked.
Failure
No mist is
generated.
Cause
Checking
Power source switch
(circuit breaker) turned off.
Power supply
system
Remedy
Visually check switch
position.
Turn switch on.
Humidistat set too low.
Raise the setpoint.
Incorrect wiring.
Correct.
Measure the voltage at
transformer input and
output terminals.
Replace the
transformer.
Water supply valve is
closed.
Check opening/closing of
the valve.
Open the valve
Thermo protector switch
(TP) tripped due to
overheating.
Check if ambient temperature and water temperature
are within specified range.
Correct.
Power supply system Supply voltage is low.
Check voltage at transformer
input and output terminals.
Correct the
voltage.
Water supply control
system
Operating water level is
high and overflowing.
Visually check.
See 3) on next
page.
Other
Humidifier is not level.
Visually check.
Correct.
‡Air filter clogging.
Pull out the filter and
visually check.
Clean the filter.
Supply voltage is high.
Check voltage at transformer input and output
terminals.
Humidistat is not on.
Faulty transformer.
Water supply system
Other
Amount of mist is
too low.
Mist supply is too
high.
Power supply system
Modify the mist
output by adjusting
the supply voltage.
2) If the cause can not be located through the above checking, remove the mist exit pipes
base and check the interior of the water tank.
Failure
Cause
Checking
No mist is
generated.
‡ Dust and foreign material are accumulated in
the water tank.
Amount of mist is
too low.
‡ Dust and foreign material are accumulated in
the water tank.
‡ Scale deposited on transducer surface.
Remedy
Clean the interior of the water
tank.
Visually check the
interior of the
water tank.
Clean interior of water tank and
replace the transducer.
Remarks:
The causes of failures marked ‡ can be prevented through periodic maintenance/inspection. See Section 5.1, “Periodic
General Maintenance”.
5-5
(©January, 2008)
Air Technology Systems, Inc.
BNU Ultrasonic Humidifier Installation, Operation & Maintenance Manual
3) If the cause cannot be located through the above checking, parts may faulty. Check the
interior of the mist generator.
Failure
No mist is
generated.
Cause
Water supply
control system
Checking
Water supply float
switch (FS1) is faulty.
‡ Water supply float
switch arm sticking.
Water supply
solenoid valve is
faulty.
Oscillation control
system.
Water supply
system overflowing.
Clean the switch. If
operation is not restored, replace switch.
No water supply is provided
even if the water tank is
drained and voltage of the
SV terminal on the printed
circuit board is 48VAC.
Float switch for low
water level is faulty.
water level is sticking.
Amount of mist
is too low.
If there is no continuity, replace the switch.
Drain the water tank,
remove the printed circuit
board terminal (FS1) and
test the continuity of the
float switch.
‡ Float switch for low
Fan
Remedy
With the water tank filled
with water, remove the
wire from terminal (FS2)
on the printed wiring
board and check continuity of float switch.
Replace the
solenoid valve.
If no continuity exists,
replace the switch.
Clean the switch. If
operation is not restored, replace switch.
Fan lead wires are
loose or disconnected
from the terminals.
Open the electrical
section and check the
lead wire connecting
terminals.
Correct.
Fan is Faulty
Fan won’t operate when
48 VAC is applied.
Replace fan
Water supply float
switch is faulty.
If the water level in the tank
is up to the overflow pipe,
remove the wire from
terminal (FS1) on the
printed circuit board and
ensure there is no continuity on the float switch.
If there is continuity,
replace the switch.
‡ Water supply float
switch arm sticking.
Water supply solenoid
valve is faulty.
Overflowing occurs even
after power is turned off.
Clean the switch. If
operation is not restored, replace switch.
Replace the
solenoid valve.
4) Consumable parts
Failure
Cause
Checking
No mist output,
or mist output is
too low.
Deterioration of transducer due to
aging.
The life is about 10,000 to
15,000 hours of humidifier
operation.
Remedy
Replace the transducer.
Remarks:
If the humidifier is operated for a long time with a deteriorated transducer, the nebulizer print plate may fail. The transducers should be replaced using the estimated lifetime of 10,000 to 15,000 hours as the point of reference.
If the cause cannot be located through the above checking, please contact SATS Product Support Group.
If the humidification system is supplied with a water conductivity meter control (optional), ensure the meter is operating
properly and that the supply water is within the recommended guidelines for mineral content.
5-6
(©January, 2008)
Air Technology Systems, Inc.
BNU Ultrasonic Humidifier Installation, Operation & Maintenance Manual
5.4 Common Repairs/Parts Replacement
When parts are replaced, the following sections “5.4.1 Preparation for Repairs” and “5.4.2 Re-assembling” must be observed.
5.4.1
Preparation for Repairs
1) Stop the humidifier, set the power supply circuit breaker (main
switch) to OFF and close the water supply valve.
2) Remove the drain pipe plug and drain the water tank. After
draining, re-install the plug securely.
Photo 10
3) Remove the connection of the water supply. Be sure to use
two wrenches to prevent the body of the compression fitting on
the humidifier from turning.
4) Remove the junction box cover and the power cables from the
terminal block. Then remove the screws from the conduit plate.
5) Move the Humidifier body to a place where you can work on it
easily.
6) Remove four screws holding the junction box and remove it.
Photo 11
7) Remove screws for the enclosure cover and remove it.
Photo 12
8) Remove the screws holding the airflow guide panel and
Photo 13
remove it.
9) Remove exit pipe base and check the interior of Water tank.
Photo 14
10) Remove the screws from the fan base.
Photo 15
(©January, 2008)
5-7
Air Technology Systems, Inc.
BNU Ultrasonic Humidifier Installation, Operation & Maintenance Manual
11) Remove the control water tank, and remove the 2 lead wires
from terminals (H and G) on the printed circuit board.
Photo 16 & 17
Note
Grasp the terminals when removing wires. Never pull the
lead wires.
12) Remove the water supply piping by loosening the fitting in
two places.
Photo 18
13) Loosen the hose clamp and remove the drainage hose.
Photo 19
14) Remove the screws (fan side), from the mist generator’s
Photo 20
mounting tabs and remove the mist generator.
5.4.2
Re-assembling
1) Before re-assembling the humidifier, confirm there is no water
leakage by pouring water into the tank.
2) When re-assembling after replacing parts, inspect the interior
and check the following points:
All the screws must be securely tightened.
All the lead wires must be correctly and securely connected.
(Special attention should be paid to the fan lead wires.)
All the plates, boards and relays must be free from discoloration,
deformation and deterioration.
Electrical wires must not be damaged.
Mist generator must be properly secured.
3) After re-assembly is completed, supply water and power and
operate the unit. Check to see that normal nebulizing mist is
visible from all the mist exit pipes and that there is no water
leakage.
(©January, 2008)
5-8
Air Technology Systems, Inc.
BNU Ultrasonic Humidifier Installation, Operation & Maintenance Manual
5.4.3
Replacing the Transducer and Nebulizer
Print Plate
1) Referring to Section 5.4.1, “Preparation for Repairs” on page 5-7,
take the water tank to a convenient place for working.
2) Turn the mist generator upside down. Remove the screws holding
the bottom and remove it.
Photo 21
3) When replacing the transducer, remove the two transducer lead
wires, (yellow and orange) from the nebulizer print plate.
Photo 22
Note
Grasp the terminals when removing wires. Never pull the lead wires.
4) Using a phillips screwdriver, remove the transducer mounting screws
(2 Pcs.) and remove the transducer, spacer and o-ring. Save the
screws to mount the new part.
Photo 23
5) Clean the spacer, o-ring groove and o-ring.
6) Assemble the new transducer with the spacer and o-ring and install
them with the saved mounting screws.
Photo 24
Notes
Ensure the o-ring is not damaged. If it is damaged, replace it with
a new one.
Carefully align the transducer’s rubber packing in the indent in
the bottom of the water tank to prevent leakage.
The mounting screws must be evenly tightened. Do not overtighten.
7) Connect the lead wires to the nebulizer print plate. The colored lead
wires must be inserted as shown on the plate. (Orange wire to ORG,
Yellow wire to YEL)
8) To replace the nebulizer print plate, remove the four wires connected
to the circuit board terminals from the plate to be replaced.
9) Remove the plate mounting screws and remove the plate from the
heat sink. Save the screws to mount the new part.
Photo 24
10) Install the new plate together with the silicon sheet provided to
promote heat transmission, using the saved mounting screws.
11) Connect the nebulizer print plate interconnecting wires
(black to H, white to G) and transducer lead wires (orange to ORG,
yellow to YEL)
Note
When the nebulizer print plate is replaced, it is recommended that the
transducer be replaced also.
12) When replacing the heat sink, remove the 2 nebulizer print plates.
Loosen the 4 screws securing the heat sink and remove it. Photo 25
13) Replace the heat sink and o-ring. Tighten the mounting screws
securely taking care not to damage the o-ring.
Photo 26
14) Referring to Sect. 5.4.2, “Re-assembling” on page 5-7, re-assemble
by reversing the above procedure.
5-9
(©January, 2008)
Air Technology Systems, Inc.
BNU Ultrasonic Humidifier Installation, Operation & Maintenance Manual
5.4.4
Water Supply Solenoid Valve, Float Switches and
Printed Circuit Board
1) Referring to Section “5.4.1, “Preparation for Repairs” on page 5-7,
take the humidifier to a convenient place for working.
2) Cut the band bundling the solenoid valve and float switch lead wires.
Photo 27
Note
Be careful not to damage the lead wires.
3) Remove the connecting wires of the parts to be replaced from the
terminals on the printed circuit board.
Photo 28
Note
Grasp the terminals when removing wires. Never pull the lead wires.
4) When the solenoid valve is replaced, remove the pipe fitting from the
Photo 29
inlet side of the solenoid valve.
5) Loosen the 2 screws holding the float panel and remove it with the
solenoid valve and float switches.
Photo 30
6) Remove the solenoid valve mounting screw on the reverse side of the
float panel and remove the solenoid valve.
Photo 31
7) Remove the elbow on the outlet side and install it on the outlet side
of the new solenoid valve. Be sure to seal the fittings with teflon tape.
Note
Ensure the elbow is facing the correct direction.
8) Install the new solenoid valve to the float panel and re-install the pipe
fitting.
Note
Ensure the o-ring is not damaged. If it is damaged, replace it with
a new one.
5-10
(©January, 2008)
Air Technology Systems, Inc.
BNU Ultrasonic Humidifier Installation, Operation & Maintenance Manual
9) To replace the float switch, remove the nut securing the float switch
and replace the switch with a new one.
Photo 32
Note
Since there are two types of float switches, one type for the water
supply and one type for low water level, the type must be checked
Photo 33
when the float switch is replaced.
Type for water supply
FS1
Type for low water level
FS2
10) To replace the printed circuit board, remove the bottom of the mist
generator and remove all the lead wires connected to the bottom of the
board.
Photo 34
11) Slide the printed circuit board out along the guides; remove it and
install a new one.
Photo 35
12) Referring to Section 5.4.2, “Re-assembling” on page 5-7, assemble
by reversing the above procedure.
5.4.5
Fan(s)
1) Referring to Section “5.4.1, “Preparation for Repairs” on page 5-7,
take the humidifier to a convenient place for working.
2) Remove the fan lead wires from the terminals on the printed circuit
Photo 36
board.
Note
Grasp the terminals when removing wires. Never pull the lead wires.
3) Remove the screws securing the fan to be replaced and install a new
fan using the same mounting screws.
Photo 37
Ensure the new fan is facing the correct direction.
4) Referring to Section 5.4.2, “Re-assembling” on page 5-7,
re-assemble the humidifier.
5-11
(©January, 2008)
Air Technology Systems, Inc.
BNU Ultrasonic Humidifier Installation, Operation & Maintenance Manual
6.0
PRODUCT SUPPORT GROUP
SATS provides to its customers a Product Support
Group (PSG) which not only provides technical support
and parts but the following additional services, as
requested: performance evaluations, start-up assistance and training.
6.1 Technical Support
The SATS Product Support Group (PSG) is dedicated
to the prompt reply and solution to any problem
encountered with a unit. Should a problem develop that
cannot be resolved using this manual, you may
contact PSG at (240) 529-1399 Monday through
Friday from 8:00 a.m. to 5:00 p.m. EST. If a problem
occurs after business hours, dial the page number
(301) 414-4514 and follow the steps below:
1. Wait for the dial tone.
2. Dial your telephone number (including area code).
3. Press the pound (#) key.
5. Hang up the telephone.
One of our service technicians will return your call.
When calling to obtain support, it is vital to have the
following information readily available, (information is
found on unit's nameplate):
Unit Model Number (BNUXXXX)
•
SATS Item Number (123456)
•
Unit Serial Number (1234567)
•
Description of Problem
•
Purchase Order Number
•
Date of Order
•
SATS Stated Part Price (obtained from PSG)
•
Customer Billing Address
•
Shipping Address
•
Customer's Telephone and Fax Numbers
•
Contact Name
•
Unit Model No., Serial No. & SATS Item No.
The customer is responsible for the shipping cost
incurred for shipping the defective part(s) back to
SATS. Return of defective part(s) must be within 30
days at which time an evaluation of the part(s) is
conducted and if the part is found to have a manufacturing defect a credit will be issued.
When returning defective part(s) complete the Return
Material Authorization Tag and the address label
received with the replacement part.
4. Wait for a busy signal.
•
A written (or faxed) purchase order is required on
warranty parts and must be received prior to 12:00
p.m. for same day shipment. The purchase order must
contain the following items:
See SATS Standard Warranty located in section one
of this manual.
6.3 Obtaining Spare/Replacement Parts
Spare and replacement parts requests are to be made
through the Product Support Group (PSG) by fax (301)
620-1396, telephone (240) 529-1399 or E-mail
([email protected]). Quotes are given for specified
listed parts for a specific unit.
6.2 Obtaining Warranty Parts
Warranty inquires are to be made through the Product
Support Group (PSG) at (240) 529-1399 Monday
through Friday from 8:00 a.m. to 5:00 p.m. EST. A
service technician at SATS will troubleshoot the
system over the telephone with a field service technician to determine the defect of the part. If it is determined that the part may be defective a replacement
part will be sent UPS ground. If the customer requests
that warranty part(s) be sent by any other method than
UPS ground the customer is responsible for the
shipping charges. If you do not have established credit
with SATS you must provide a freight carrier account
number.
SATS accepts Visa and MasterCard. SATS may
extend credit to its customers; a credit application
must be prepared and approved (this process could
take one week).
A 25% minimum restocking charge will be applied on
returned stocked parts that were sold as spare/
replacement parts. If the returned part is not a stocked
item, a 50% restocking charge may be applied.
Additionally a Return Material Authorization Number is
required when returning parts. To receive credit for
returned repair/replacement parts, the parts must be
returned to SATS within 30 days of the purchase date.
Spare part sales over 30 days old will be considered
final and the parts will remain the sole property of the
ordering party.
6-1
(©January, 2008)
Air Technology Systems, Inc.
BNU Ultrasonic Humidifier Installation, Operation & Maintenance Manual
7.0
DRAWINGS
7.1 Layout Drawing of Humidifier
(©January, 2008)
7-1
Air Technology Systems, Inc.
BNU Ultrasonic Humidifier Installation, Operation & Maintenance Manual
7.2 Electrical Circuit Diagrams
BNB1000 ~ BNB4000- Typical Wiring Diagram
BNB5000 & BNB8000- Typical Wiring Diagram
(©January, 2008)
7-2
Air Technology Systems, Inc.
BNU Ultrasonic Humidifier Installation, Operation & Maintenance Manual
(©January, 2008)
Air Technology Systems, Inc.