1
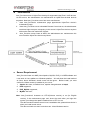
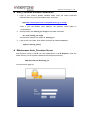
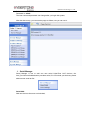
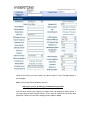
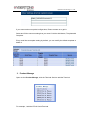
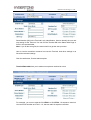
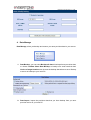
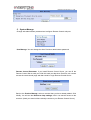
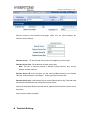
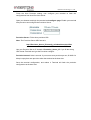
User Manual
Auto_Configure Server
HyberTone Technology Co.,Ltd.
Http://www.hybertone.com
[email protected]
[email protected]
2011-4-11
HyberTone Technology Co.,Ltd.
l
Introduction
Auto_Provision server is HyberTone develop for supported HyberTone’s VoIP devices.
Via this server, the administrator can maintenance all HyberTone terminal devices
anywhere. New Auto_Provision server has more new features:
1. New Auto_Provision’s maintenance page approximate HyberTone device’s
maintenance page.
2. New Auto_Provision server embedded Remote Control server, the administrator
can direct login to anyone connecting in this server’s HyberTone devices anytime
without the client side make NAT forward.
3. Auto_Provision server base at WEB, the administrator can maintenance this
server and the HyberTone devices anywhere.
l
Server Requirement
Auto_Provision base on LAMP (Linux Apache; MySQL; PHP), it is WEB software and
it can work in Linux platform or Windows platform. We will show the install method
as Linux, about Windows’s install course will be ignore. Before install, you must
confirm the follow module is installed in you server:
1. Apache 2 or later; In Redhat Linux, apache changed name as httpd;
2. PHP supported;
3. PHP_MySQL supported;
4. MySQL 4 or later;
Note: Auto_Provision’s character as UTF-8(Chinese version) or en (for English
version), if the maintenance page can’t show the word when you login this
system, just change the apache’s default font to UTF-8 or en.
The above module inside at some Linux’s installation disk, please direct choice it
when you install a new server.
The above module can work in windows too. It has Windows version.
HyberTone Technology Co.,Ltd.
l Auto_Provision Software Installation
1.
Login to your server’s apache installed folder, enter the follow command
download the Auto_provision software from our server:
wget http://www.hybervoice.com/update/autocfg_en-v2.tgz
2.
Note: If you use Redhat Linux platform, the apache’s install folder is:
/var/www/html;
decompression the autocfg_en-v2.tgz file as follow command:
tar –xzvf autocfg_en-v2.tgz
the folder will make a new folder as: autocfg_en
3.
Login to this new folder, enter follow command to install all database:
mysql < autocfg_en.sql
l Maintenance Auto_Provision Server
Auto-Provision server is WEB; you can maintenance it via IE Explorer, enter the
follow URL as your IE Explorer’s address field and press enter key:
http://Your Server IP/autocfg_en
You can see the page as:
HyberTone Technology Co.,Ltd.
Default user name is: admin
Password is: admin
The user name and password can change after you login this system;
After the above stop, you can see the page as follow, now you can use it.
1. Serial Manage:
Serial Manage is use to add one new serial HyberTone VoIP devices, the
Auto_Provision embedded some prevalent serial, if it not include your devices; please
add one new serial at first.
Serial Add:
Add new devices the server not included;
HyberTone Technology Co.,Ltd.
Serial Config file is a special file. If default install didn’t have serial that you need,
please
Connect us to add new serial devices when you need it.
2. Template Manage
Open out the Template Manage, and click the Template Add.
Open the Template Add, you can see the Template setting as like as the Terminal
Use Template Manage. You can set the Terminal common setting beforehand, Like
the
SIP Proxy, Relay Server, Provision Server and Remote Server settings etc.
HyberTone Technology Co.,Ltd.
Select a Serial that you want to add in the Server Name, Fill the Template Name to
this Template.
Note: the Provision Server address format is:
http://your_server_ip/autocfg_en/index/down.php?file=
Auto Provision Server only supports to configure the Call Setting by default option. If
you want configure some special setting. As you want to change the Terminal’s Web
password. Please fill in the other settings like this.(Match Case)
HyberTone Technology Co.,Ltd.
If you want need more special configuration, Please contact us to gain it.
Select and fill the common setting that your need. Click the Add button, Template add
Complete.
Every serial has a template setting by default; you can modify the default template or
delete it.
3. Product Manage
Open out the Product Manage; click the Terminal Serial to add the Terminal.
For example, i add the HT812 Serial Terminal.
HyberTone Technology Co.,Ltd.
Serial Number (SN) is the Terminal’s only identification. Used to identify the one and
only setting for the Terminal. You can fine the Terminal SN in the Status Web Page or
fine it in the terminal label.
Note. If you fill the wrong SN, the terminal will not get the auto provision.
User is used to remember customer how use the Terminal. And other settings is as
like as the terminal settings.
Click the add button, Product add complete.
Terminal Bath add allow you to add more sequence terminal at a time.
For example, you want to add the SN HT001 to SN HT010, 10 sequence terminal.
You can fill SN number as HT010 – 10, that can add 10 sequence terminal.
HyberTone Technology Co.,Ltd.
Product Manage you can modify and delete the terminal what you are already add.
Terminal Search And Batch Modify, you can search the terminal with some
condition like SN, SIP Server and Relay Server etc. And modify the terminal that you
searched.
Chose the search result terminals, you can modify some common settings for the
terminals.
HyberTone Technology Co.,Ltd.
4. Data Manage
Data Manage, allow you backup and restore your auto provision date in your server.
1. Data Backup, you can select Backup all data to backup all auto provision data,
or choose Leaflets Sheet Data Backup to backup one serial terminal data.
Choice of target locations can choose the backup date where to save. Backup
to server or backup to your local PC.
2. Data Import, Import the provision data that you have backup from you auto
provision server or you local PC.
HyberTone Technology Co.,Ltd.
5. System Manage.
Change web administrator password and configure Remote Control web port.
User Manage. You can change the Auto Provision administrator password.
Remote Control Parameter. If you install Remote Control Server, you can fill the
Remote Control Server web port. With this web port that Auto Provision can remote
access the terminal web page and that needn’t to login Remote Control Server.
Back to the Product Manage, select a terminal that you have already added. Click
Modify. You will see the Remote to http settings, click it can remote access to the
terminal. (Need your terminal have already connect to your Remote Control Server)
HyberTone Technology Co.,Ltd.
Remote access to the terminal’s web page, make sure you have configure the
Remote Control settings.
Remote Server: Fill the Remote Control Server IP address you have input.
Remote Server Port: Fill the Remote Control access port.
Note. This port is terminal connect to Remote Control Server’s port, not the
Remote Control web port.
Remote Server ID: Auto Provision use the terminal SN connects to the Remote
Terminal. Please keep the value $(SN). $(SN) equal the terminal’s SN.
Remote Server Key: If the Remote Server set the Remote Server key. Terminal need
set the same that terminal can connect to Remote Server.
And more detail about Remote Control Server, please see the Remote Control Server
document.
Auto Provision setting complete.
l Terminal Setting:
HyberTone Technology Co.,Ltd.
Finish the Auto Provision setting; now configure your terminal to fetch the
configurations from Auto Provision Server.
Open your browser and login the terminal web configure page. Enable your terminal
Auto provision and configure the Provision Server.
Provision Server: Fill the Auto provision URL.
Note: The Provision Server URL format is:
http://Provision_Server_IP/autocfg_en/index/down.php?file=
Use your Provision Server IP instead of Provision_Server_IP. If you fill the wrong
URL format. Terminal can’t get the Provision configure.
Provision Interval: Units is second. If you want to auto provision per out, fill 3600. Or
Keep it empty that auto provision when the terminal at the boot time.
Save the terminal configuration, and reboot it. Terminal will fetch the provision
configuration at the boot time.