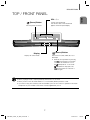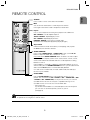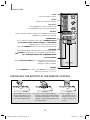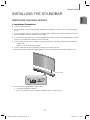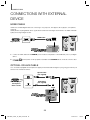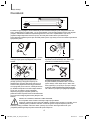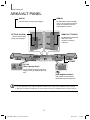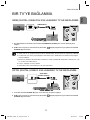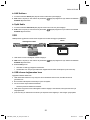
1
HW-J6000 HW-J6001 User manual Curved Soundbar Imagine the possibilities Thank you for purchasing this Samsung product. To receive more complete service, please register your product at www.samsung.com/register HW-J6000_J6001_TK_ENG_0312.indd 1 2015-03-12 1:57:47 GETTING STARTED GETTING STARTED FEATURES Samsung Remote App Bluetooth Function Control your Soundbar in the palm of your hand with the Samsung Audio Remote App*. This convenient app is a control hub for basic controls like power, volume, and media controls, as well as custom settings like equaliser setting. You can connect a Bluetooth device to the Soundbar and enjoy music with high quality stereo sound, all without wires! LICENCES Surround Sound Expansion The Surround Sound Expansion feature adds depth and spaciousness to your listening experience. TV SoundConnect Connect your TV and Soundbar easily through Bluetooth with TV Sound Connect. The absence of trailing wires between the Soundbar and TV allows you to showcase the slim and sleek design of both systems, while maintaining a clean look in your living environment. Easily control the Soundbar and TV from a single TV remote. HDMI HDMI transmits video and audio signals simultaneously, and provides a clearer picture. The unit is also equipped with the ARC function which lets you listen to sound from your TV through the Soundbar via an HDMI cable. This function is only available if you connect the unit to an ARC compliant TV. Manufactured under licence from Dolby Laboratories. Dolby and the double-D symbol are trademarks of Dolby Laboratories. For DTS patents, see http://patents.dts.com. Manufactured under licence from DTS Licensing Limited. DTS, the Symbol, & DTS and the Symbol together are registered trademarks, and DTS 2.0 Channel is a trademark of DTS, Inc. © DTS, Inc. All Rights Reserved. The terms HDMI and HDMI High-Definition Multimedia Interface, and the HDMI Logo are trademarks or registered trademarks of HDMI Licensing LLC in the United States and other countries. USB Host Support You can connect and play music files from external USB storage devices such as MP3 players, USB flash memory, etc. using the Soundbar's USB HOST function. 2 HW-J6000_J6001_TK_ENG_0312.indd 2 2015-03-12 1:58:52 GETTING STARTED SAFETY INFORMATION TO REDUCE THE RISK OF ELECTRIC SHOCK, DO NOT REMOVE THE COVER (OR BACK). NO USER-SERVICEABLE PARTS ARE INSIDE. REFER SERVICING TO QUALIFIED SERVICE PERSONNEL. ENG SAFETY WARNINGS This symbol indicates “dangerous voltage” inside the product that presents a risk of electric shock or personal injury. CAUTION RISK OF ELECTRIC SHOCK DO NOT OPEN This symbol indicates important instructions accompanying the product. WARNING : To reduce the risk of fire or electric shock, do not expose this appliance to rain or moisture. CAUTION : TO PREVENT ELECTRIC SHOCK, MATCH WIDE BLADE OF PLUG TO WIDE SLOT, FULLY INSERT. • This apparatus shall always be connected to a AC outlet with a protective grounding connection. • To disconnect the apparatus from the mains, the plug must be pulled out from the mains socket, therefore the mains plug shall be readily operable. CAUTION • Do not expose this apparatus to dripping or splashing. Do not put objects filled with liquids, such as vases on the apparatus. • To turn this apparatus off completely, you must pull the power plug out of the wall socket. Consequently, the power plug must be easily and readily accessible at all times. 3 HW-J6000_J6001_TK_ENG_0312.indd 3 2015-03-12 1:58:52 GETTING STARTED PRECAUTIONS 68.6 mm 99.1mm 99.1mm 99.1mm Ensure that the AC power supply in your house complies with the power requirements listed on the identification sticker located on the back of your product. Install your product horizontally, on a suitable base (furniture), with enough space around it for ventilation (7~10 cm). Make sure the ventilation slots are not covered. Do not place the unit on amplifiers or other equipment which may become hot. This unit is designed for continuous use. To fully turn off the unit, disconnect the AC plug from the wall outlet. Unplug the unit if you intend to leave it unused for a long period of time. During thunderstorms thunderstorms, disconnect the AC plug from the wall outlet. Voltage peaks due to lightning could damage the unit. Do not expose the unit to direct sunlight or oth other heat sources. This could lead to overheating and cause the unit to malfunction. Protect the product from moisture (i.e. vases), and excess heat (e.g. a fireplace) or equipment creating strong magnetic or electric fields. Disconnect the power cable from the AC supply if the unit malfunctions. Your product is not intended for industrial use. It is for personal use only. Condensation may occur if your product has been stored in cold temperatures. If transporting the unit during the winter, wait approximately 2 hours until the unit has reached room temperature before using. The batteries used with this product contain chemicals that are harmful to the environment. Do not dispose of batteries in the general household trash. Do not dispose of batteries in a fire. Do not short circuit, disassemble, or overheat the batteries. There is a danger of explosion if the battery is incorrectly replaced. Replace only with the same or equivalent type. WARNING, DO NOT INGEST BATTERY, CHEMICAL BURN HAZARD, The remote control supplied with this product contains a coin/button cell battery. If the coin/button cell battery is swallowed, it can cause severe internal burns in just 2 hours and can lead to death. Keep new and used batteries away from children. If the battery compartment does not close securely, stop using the product and keep it away from children. If you think batteries might have been swallowed or placed inside any part of the body, seek immediate medical attention. 4 HW-J6000_J6001_TK_ENG_0312.indd 4 2015-03-12 1:58:52 GETTING STARTED CONTENTS ENG 2 GETTING STARTED 23 FUNCTIONS 2 Features 23 Input Mode 3 Safety Information 24 Bluetooth 6 What’s Included 27 Software Update 7 DESCRIPTIONS 28 TROUBLESHOOTING 7 Top / Front Panel 28 8 Rear / Bottom Panel 9 Remote Control Troubleshooting 29 APPENDIX 29 Specifications 11 INSTALLATION 11 Installing the Soundbar 11 Installing the Wall Mount 14 Attaching the Soundbar to your TV's Stand 14 Installing Soundbar to Free-Standing ● Figures and illustrations in this User Manual are provided for reference only and may differ from actual product appearance. 15 Connecting the Subwoofer 17 Connecting to a TV 17 Connections with TV Using HDMI (Digital) Cable ● An administration fee may be charged if either (a) an engineer is called out at your request and there is no defect with the product (i.e. where the user manual has not been read). (b) you bring the unit to a repair centre and there is no defect with the product (i.e. where the user manual has not been read). 17 Connections with TV Using Optical (Digital) Cable ● You will be informed of the administration fee amount before a technician visits. 15 CONNECTIONS 18 TV SoundConnect 20 Connections with External Device 20 HDMI Cable 20 Optical or AUX Cable 21 USB 5 HW-J6000_J6001_TK_ENG_0312.indd 5 2015-03-12 1:58:53 GETTING STARTED WHAT’S INCLUDED BEFORE READING THE USER’S MANUAL Note the following terms before reading the user manual. + Icons used in this manual Icon Term Caution Note Definition Indicates a situation where a function does not operate or settings may be cancelled. Indicates tips or instructions on the page that help you operate a function. Check for the supplied accessories shown below. Remote Control / Lithium Battery (3V : CR2032) Power Cord : 2EA DC Adapter HDMI Cable USB Cable User Manual Holder-Fix Mount : 2EA Bracket-Wall : 2EA [ZW Wall Mount Guide ● The appearance of the accessories may differ slightly from the illustrations above. ● Use the dedicated USB cable to connect external USB devices to the unit. 6 HW-J6000_J6001_TK_ENG_0312.indd 6 2015-03-12 1:58:53 DESCRIPTIONS DESCRIPTIONS TOP / FRONT PANEL Controls the volume level. The numeric value of the volume level appears in the front panel display. (Power) Button Turns the power on and off. ENG VOL. - / + (Source) Button Display Selects the D.IN, AUX, HDMI, BT, TV, or USB input. Displays the current mode. ● While the unit is powered on, pressing (Source) button for more than the 3 seconds sets the button to act as (Mute) button. To cancel the the (Mute) button setup, press the (Source) button for more than 3 seconds again. ● When you plug in the AC cord, the power key will work in 4 to 6 seconds. ● When you turn on this unit, there will be a 4 to 5 second delay before it produces sound. ● If you want to enjoy the sound only from the Soundbar, you must turn off the TV's speakers in the Audio Setup menu of your TV. Refer to the owner's manual supplied with your TV. 7 HW-J6000_J6001_TK_ENG_0312.indd 7 2015-03-12 1:58:56 DESCRIPTIONS REAR / BOTTOM PANEL AUX IN HDMI IN Connect to the Analogue output of an external device. Inputs digital video and audio signals simultaneously using an HDMI cable. Use when connecting a supported external device. OPTICAL IN (D.IN) HDMI OUT (TV-ARC) Connect to the digital (optical) output of an external device. Outputs digital video and audio signals simultaneously using an HDMI cable. HDMI IN DC 14V AUX IN HDMI OUT (TV-ARC) OPTICAL IN 5V 0.5A LABEL DC14V DC 14V (Power Supply In) 5V 0.5A Connect the DC power adaptor to the power supply jack, and then connect the AC power adaptor plug to a wall outlet. (USB Port) Connect USB devices here to play files on the devices. ● When disconnecting the power cable of the AC power adaptor from a wall outlet, pull the plug. Do not pull the cable. ● Do not connect this unit or other components to an AC outlet until all connections between components are complete. 8 HW-J6000_J6001_TK_ENG_0312.indd 8 2015-03-12 1:58:57 DESCRIPTIONS REMOTE CONTROL ENG SOURCE Press to select a source connected to the Soundbar. Mute You can turn the volume down to 0 with the push of a button. Press again to restore the sound to the previous volume level. Repeat Press to set the Repeat function during music playback from a USB device. OFF - REPEAT : Cancells Repeat Playback. TRACK - REPEAT : Repeatedly play a track. ALL - REPEAT : Repeatedly play all tracks. RANDOM - REPEAT : Plays tracks in random order. (A track that has already been played may be played again.) Skip Forward If there is more than one file on the device you are playing, and you press the $ button, the next file is selected. SOUND CONTROL Press to select TREBLE, BASS, or AUDIO SYNC. Then, use the #,$ buttons to adjust the Treble, Bass volume from -6 to +6. Press and hold the SOUND CONTROL button for about 5 seconds to adjust the sound for each frequency band. 150Hz, 300Hz, 600Hz, 1.2KHz, 2.5KHz, 5KHz, 10KHz and SW are selectable and each can be adjusted to a setting between -6 and +6. If the Soundbar is connected to a digital TV and the video appears out of sync with the audio, press the SOUND CONTROL button to sync the audio with the video. Use the #,$ buttons to set the audio delay between 0 ms and 300 ms. In USB mode, TV mode, and BT mode, the Audio Sync function may not available. AUTO POWER Press the AUTO POWER button to turn the Anynet+ function on or off. (Default : Auto Power Link OFF, ON - ANYNET+ / OFF - POWER LINK or OFF - ANYNET+ / ON - POWER LINK). The Anynet+ function lets you control the Soundbar with the remote from an Anynet+ compatible Samsung TV. The Soundbar must be connected to the TV via an HDMI cable. * Auto Power Link Synchronizes the Soundbar to a connected Optical source via the Optical jack so it turns on automatically when you turn on your TV. (See page 18) ● Soundbar is a Samsung proprietary name. ● Operate the TV using the TV's remote control. 9 HW-J6000_J6001_TK_ENG_0312.indd 9 2015-03-12 1:58:59 DESCRIPTIONS Power Turns the Soundbar on and off. Volume Adjusts the volume level of the unit. Play / Pause Press the & button to pause a file temporarily. Press the & button again to play the selected file. Skip Back If there is more than one file on the device you are playing, and you press the # button, the previous file is selected. SOUND EFFECT You can select from 6 different sound modes - STANDARD (Original Sound), MUSIC, VOICE, SPORTS, CINEMA, and NIGHT MODE - depending on the content you want to listen to. Select the STANDARD mode if you want to enjoy the original sound. SOUND Surr.Sound adds depth and spaciousness to the sound. Pressing the SOUND button repeatedly cycles through the Surr.Sound settings : ON - SURROUND SOUND, OFF - SURROUND SOUND Bluetooth POWER Press the Bluetooth POWER button on the remote to turn the Bluetooth POWER On function on and off. See pages 19 and 25 for details. WOOFER Press the WOOFER button. Then, use the #,$ buttons to adjust the Subwoofer volume from -12, -6 to +6. INSTALLING THE BATTERY IN THE REMOTE CONTROL 1. Use a suitable coin to turn the remote control's battery cover counterclockwise to remove it as shown in the figure above. 2. Insert a 3V lithium battery. Keep the positive (+) pole facing up when inserting the battery. Put the battery cover on and align the '●' marks side by side as shown in the figure above. 3. Use a suitable coin to turn the remote control battery cover clockwise as far as it will go to fix it in place. 10 HW-J6000_J6001_TK_ENG_0312.indd 10 2015-03-12 1:59:00 INSTALLATION INSTALLATION INSTALLING THE SOUNDBAR ENG INSTALLING THE WALL MOUNT + Installation Precautions ● Install on a vertical wall only. ● For the installation, avoid a location with high temperature or humidity, or a wall that cannot sustain the weight of the set. ● Check the strength of the wall. If the wall is not strong enough to support the unit, reinforce the wall or install the unit on a different wall that can support the unit's weight. ● Purchase and use the fixing screws or anchors appropriate for the kind of wall you have (plaster board, iron board, wood, etc.). If possible, fix the support screws into wall studs. ● Purchase wall mounting screws according to the type and thickness of the wall you will mount the Soundbar on. - Diameter : M5 Length: L 35 mm or longer recommended. ● Connect cables from the unit to external devices before you install it on the wall. ● Make sure the unit is turned off and unplugged before you install it. Otherwise, it may cause an electric shock. 5 cm or more 1. Place the installation guide against the wall surface. • The installation guide must be level. • If the TV is mounted on the wall, install the Soundbar at least 5 cm below the TV. 11 HW-J6000_J6001_TK_ENG_0312.indd 11 2015-03-12 1:59:01 INSTALLATION Center Line Center Line 2. Mark the location where the screws will go through on the wall, and then remove the installation guide. Next, drill holes for the screws using an appropriately sized drill bit. 3. Fasten the Bracket-Wall (2EA) and screws to the marked locations. 4. Lift up the product after inserting the Bracket-Wall as shown. 12 HW-J6000_J6001_TK_ENG_0312.indd 12 2015-03-12 1:59:01 INSTALLATION ENG OPTICAL IN HDMI OUT (TV-ARC) 5V 0.5A AUX IN DC 14V HDMI IN 5. Insert and fasten Holder-Fix Mount into each hole on the product’s bottom side. The product is fixed to the Bracket-Wall. ● Do not hang onto the installed unit and avoid striking or dropping the unit. ● Secure the unit firmly to the wall so that it does not fall off. If the unit falls off, it may cause an injury or damage the product. ● When the unit is installed on a wall, please make sure that children do not pull any of the connecting cables, as it may cause it to fall. ● For the optimal performance of a wall mount installation, install the speaker system at least 5 cm below the TV, if the TV is mounted on the wall. ● For your safety, if you do not mount the unit on the wall, install it on a secure, flat surface where it is unlikely to fall. 13 HW-J6000_J6001_TK_ENG_0312.indd 13 2015-03-12 1:59:02 INSTALLATION ATTACHING THE SOUNDBAR TO YOUR TV'S STAND You can attach the Soundbar to your TV's stand if you have a Samsung TV that has a stand that is compatible with this Soundbar. ● This Soundbar is compatible with model JU6700, JU6500 and JU7500, 48 inch, 55 inch and 65 inch, JU6610 - 48 inch and 55 inch, 2015 Samsung curved TVs. Please visit the home page of Samsung Electronics (www.Samsung.com) to see a detailed list of the compatible models. ● This Soundbar cannot be installed to a non-compatible TV, in either form of TV mount or TV stand. 1. Align the Soundbar’s centre with the centre of the base of the TV, and then carefully push it onto the stand as far as it will go, as shown in the illustration. Be careful not to unbalance the TV. INSTALLING SOUNDBAR TO FREE-STANDING 1. Centre the Soundbar on the flat area in front of the TV. ● Install it on a level and firm surface. 14 HW-J6000_J6001_TK_ENG_0312.indd 14 2015-03-12 1:59:03 CONNECTIONS CONNECTIONS ENG ● Do not connect the power cord of this product or your TV to a wall outlet until all connections between components are complete. ● Before moving or installing this product, be sure to turn off the power and disconnect the power cord. CONNECTING THE SUBWOOFER CONNECTING TO THE SUBWOOFER AUTOMATICALLY The main unit and subwoofer should link (connect wirelessly) automatically when the main unit and subwoofer are turned on. • If it is completely connected, the blue LED in the subwoofer stops blinking. CONNECTING TO THE SUBWOOFER MANUALLY The Subwoofer's linking ID is preset at the factory and the main unit and subwoofer should link (connect wirelessly) automatically when the main unit and subwoofer are turned on. If the Link indicator does not light when the main unit and subwoofer are turned on, please set the ID by following the procedure below. POWER 1. Plug the power cords of the main unit and subwoofer into an AC wall outlet. 2. Press the ID SET button on the back of the subwoofer with a small, pointed object for 5 seconds. • The STANDBY indicator is turned off and the LINK indicator (Blue LED) blinks quickly. 3. While the main unit is powered off (in STANDBY mode), press and hold the seconds. (Mute) on the remote control for 5 4. The ID SET message appears on the Soundbar's display. 5. To finalise the link, turn the main unit’s power on while the subwoofer’s Blue LED blinks. • The main unit and the subwoofer should now be linked (connected). • The Link indicator (Blue LED) on the subwoofer should be on. • If the Link indicator is not solid blue, the linking process has failed. Turn off the main unit and start again from Step 2. • You can enjoy better sound from the wireless subwoofer by selecting a Sound Effect. (See page 10) 15 HW-J6000_J6001_TK_ENG_0312.indd 15 2015-03-12 1:59:03 CONNECTIONS ● Before moving or installing the product, be sure to turn off the power and disconnect the power cord. ● If the main unit is powered off, the wireless subwoofer will be in standby mode and the STANDBY LED on the upper side will come on after the Link indicator (Blue LED) blinks for 30 seconds. ● If you use a device that uses the same frequency (2.4GHz) as the Soundbar near the Soundbar, interference may cause some sound interruption. ● The transmission distance of the wireless signal between the main unit and subwoofer is about 10 meters, but may vary depending on your operating environment. If a steel-concrete or metallic wall is between the main unit and the wireless subwoofer, the system may not operate at all, because the wireless signal cannot penetrate metal. ● If the main unit doesn't make a wireless connection, follow steps 1-5 on the previous page to re-set the connection between the main unit and wireless subwoofer. ● The wireless receiving antenna is built into the wireless subwoofer. Keep the unit away from water and moisture. ● For optimal listening performance, make sure that the area around the wireless subwoofer location is clear of any obstructions. 16 HW-J6000_J6001_TK_ENG_0312.indd 16 2015-03-12 1:59:04 CONNECTIONS CONNECTING TO A TV ENG CONNECTIONS WITH TV USING HDMI (DIGITAL) CABLE HDMI Cable HDMI IN HDMI OUT (TV-ARC) HDMI OUT (TV-ARC) HDMI IN DC 14V AUX IN 5V 0.5A HDMI OUT (TV-ARC) OPTICAL IN 1. Connect an HDMI cable from the HDMI OUT (TV-ARC) jack on the back of the product to the HDMI IN jack on your TV. (Source) button on the top panel of Soundbar or the SOURCE button on remote control to select 2. Press the the D.IN mode. ● HDMI is an interface that enables the digital transmission of video and audio data with just a single connector. ● If the TV provides an ARC port, connect the HDMI cable to the HDMI IN (ARC) port. ● We recommend you use a coreless HDMI cable if possible. If you use a cored HDMI cable, use one whose diameter is less than 14 mm. ● Anynet+ must be turned on. ● This function is not available if the HDMI cable does not support ARC. CONNECTIONS WITH TV USING OPTICAL (DIGITAL) CABLE Optical Cable (not supplied) OPTICAL OUT OPTICAL IN HDMI IN DC 14V AUX IN OPTICAL IN HDMI OUT (TV-ARC) 5V 0.5A 1. Connect OPTICAL IN (Audio) on the Soundbar to the OPTICAL OUT jack of the TV. 2. Press the (Source) button on the top panel of Soundbar or the SOURCE button on remote control to select the D.IN mode. 17 HW-J6000_J6001_TK_ENG_0312.indd 17 2015-03-12 1:59:04 CONNECTIONS + Auto Power Link If you have connected the main unit to a TV with a digital optical cable, set the Auto Power function ON to have the Soundbar turn on automatically when you turn the TV on. AUTO POWER LINK Display ON OFF - ANYNET+ / ON - POWER LINK OFF ON - ANYNET+ / OFF - POWER LINK 1. Connect the Soundbar and a TV with an Optical cable (not supplied). (Source) button on the main unit’s top panel or the SOURCE button on the remote control to 2. Press the select the D.IN mode. 3. Press the AUTO POWER button on the remote control to toggle the Auto Power Link function on and off. ● Depending on the connected device, Auto Power Link may not function. TV SOUNDCONNECT You can enjoy TV sound through your Soundbar when it is connected to a Samsung TV that supports the TV SoundConnect function. Connect 1. Turn on the TV and Soundbar. • Turn on the menu of the TV. • Move to Speaker Settings on "Sound" tab. • Set the "Add New Device" menu to "On". (Source) button on the main unit’s top panel or the SOURCE button on the remote control to 2. Press the select the TV mode. 3. On the TV, a message asking whether to enable the TV SoundConnect function appears. 4. Select <Yes> to finish connecting the TV and Soundbar using the TV's remote control. 18 HW-J6000_J6001_TK_ENG_0312.indd 18 2015-03-12 1:59:06 CONNECTIONS ENG ● Switching the Soundbar’s mode from TV to another mode automatically terminates TV SoundConnect. ● To connect the Soundbar to another TV, the existing connection must be terminated. ● Terminate the connection to the existing TV, and then press the & button on the remote control for 5 seconds to connect to another TV. ● The TV SoundConnect (SoundShare) function is supported by some Samsung TVs released from 2012 on. Check whether your TV supports the TV SoundConnect (SoundShare) function before you begin. (For further information, refer to the TV’s user manual.). ● If your Samsung TV was released before 2014, check the SoundShare setting menu. ● If the distance between the TV and Soundbar exceeds 10 meters, the connection may not be stable or the audio may stutter. If this occurs, relocate the TV or Soundbar so that they are within operational range, and then re-establish the TV SoundConnect connection. ● TV SoundConnect Operational Ranges: - Recommended pairing range: within 2 meters. - Recommended operational range: within 10 meters. ● The Play/Pause, Next, and Prev buttons on the Soundbar or Soundbar's remote do not control the TV. + Using the Bluetooth POWER On function The Bluetooth POWER On function is available after you have successfully connected the Soundbar to a Bluetooth compatible TV using TV SoundConnect. When the Bluetooth POWER On function is ON, turning the connected TV on or off will turn the Soundbar's power on and off as well. 1. Connect the TV to your Soundbar using the TV SoundConnect function. 2. Press the Bluetooth POWER button on the Soundbar remote. ON - BLUETOOTH POWER appears on the Soundbar's display. • ON - BLUETOOTH POWER : The Soundbar turns on and off when you turn the TV on or off. • OFF - BLUETOOTH POWER : The Soundbar only turns off when you turn the TV off. ● This function is supported by some Samsung TVs released from 2013 on. 19 HW-J6000_J6001_TK_ENG_0312.indd 19 2015-03-12 1:59:07 CONNECTIONS CONNECTIONS WITH EXTERNAL DEVICE HDMI CABLE HDMI is the standard digital interface for connecting to TVs, projectors, DVD players, Blu-ray players, set top boxes, and more. HDMI prevents any degradation to the signal due to conversion to analogue and maintains the video and audio quality of the original digital source. HDMI Cable Digital Devices HDMI OUT HDMI IN HDMIIN HDMI IN DC 14V AUX IN OPTICAL IN HDMI OUT (TV-ARC) 5V 0.5A 1. Connect an HDMI cable from the HDMI IN jack on the back of the product to the HDMI OUT jack on your digital device. (Source) button on the top panel of Soundbar or the SOURCE button on remote control to select 2. Press the the HDMI mode. OPTICAL OR AUX CABLE This unit comes equipped with one optical in digital jack and one audio analogue in jack, giving you two ways to connect it to an External Devices. Optical Cable (not supplied) OPTICAL IN OPTICAL OUT BD / DVD player / Set-top box / Game console Audio Cable (not supplied) AUX OUT AUX IN 20 HW-J6000_J6001_TK_ENG_0312.indd 20 2015-03-12 1:59:07 CONNECTIONS + AUX Cable 1. Connect AUX IN (Audio) on the main unit to the AUDIO OUT jack of the Source Device. ENG 2. Press the (Source) button on the top panel of Soundbar or the SOURCE button on remote control to select the AUX mode. + Optical Cable 1. Connect OPTICAL IN (Audio) on the main unit to the OPTICAL OUT jack of the Source Device. 2. Press the (Source) button on the top panel of Soundbar or the SOURCE button on remote control to select the D.IN mode. USB You can play music files located on USB storage devices through the Soundbar. Display USB port HDMI IN DC 14V AUX IN OPTICAL IN 5V 0.5A HDMI OUT (TV-ARC) 5V 0.5A 1. Connect the USB device to the USB port on the back of the product. 2. Press the (Source) button on the main unit’s top panel or the SOURCE button on the remote control to select the USB mode. 3. USB appears on the display screen. • The Soundbar connection to the USB device is complete. • The Soundbar automatically turns off (Auto Power Off) if no USB device has been connected for more than 25 minutes. + Before you connect a USB device Be aware of the following: ● If the file name of a file or folder on a USB device exceeds 10 characters, it is not displayed on the Soundbar's display. ● This product may not be compatible with certain types of USB storage media. ● The Soundbar supports the FAT16 and FAT32 file systems. - The NTFS file system is not supported. ● Connect USB devices directly to the USB port of the product. Otherwise, you may encounter a USB compatibility problem. ● Do not connect multiple storage devices to the product via a multi-card reader. It may not operate properly. 21 HW-J6000_J6001_TK_ENG_0312.indd 21 2015-03-12 1:59:09 CONNECTIONS ● Digital camera PTP protocols are not supported. ● Do not remove the USB device while it is transferring files. ● DRM-protected music files (MP3, WMA) from commercial web sites cannot be played. ● External HDDs are not supported. ● Mobile phone devices are not supported. ● File Format Type Compatibility list: Extension Codec Sampling Rate Bit rate MPEG 1 Layer2 16KHz ~ 48KHz 80kbps~320kbps MPEG 1 Layer3 16KHz ~ 48KHz 80kbps~320kbps MPEG 2 Layer3 16KHz ~ 48KHz 80kbps~320kbps MPEG 2.5 Layer3 16KHz ~ 48KHz 80kbps~320kbps Wave_Format_MSAudio1 16KHz ~ 48KHz 56kbps~128kbps Wave_Format_MSAudio2 16KHz ~ 48KHz 56kbps~128kbps AAC 16KHz ~ 96KHz 48kbps~320kbps AAC-LC 16KHz ~ 96KHz *.mp3 *.wma 128kbps~192kbps *.aac 5.1ch 320kbps 48kbps~64kbps HE-AAC 24KHz ~ 96KHz 5.1ch 160kbps *.wav - 16KHz ~ 48KHz up to 3000kbps *.ogg OGG 1.1.0 16KHz ~ 48KHz 50kbps~500kbps *.flac FLAC 1.1.0, FLAC 1.2.1 16KHz ~ 96KHz up to 3000kbps ● If there are too many folders and files stored in the USB device, reading may take some time. 22 HW-J6000_J6001_TK_ENG_0312.indd 22 2015-03-12 1:59:09 FUNCTIONS FUNCTIONS INPUT MODE Input mode ENG Press the (Source) button on the main unit’s top panel or the SOURCE button on the remote control to select the mode you want. Display Optical Digital input D.IN ARC (HDMI OUT) input AUX input AUX HDMI input HDMI BLUETOOTH mode BT TV SoundConnect TV USB mode USB The unit turns off automatically in the following situations. ● D.IN / HDMI / BT / TV / USB / ARC Mode - If there is no audio signal for 25 minutes. ● AUX Mode To turn the Auto Power Down function ON or OFF, press and hold the & button for 5 seconds. ON - AUTO POWER DOWN / OFF - AUTO POWER DOWN appears on the display. - If the AUX cable is disconnected for 25 minutes. - If there is no KEY input for 8 hours when the AUX cable is connected. 23 HW-J6000_J6001_TK_ENG_0312.indd 23 2015-03-12 1:59:10 FUNCTIONS BLUETOOTH You can connect a Bluetooth device to the Soundbar and enjoy music with high quality stereo sound, all without wires! TO CONNECT THE SOUNDBAR TO A BLUETOOTH DEVICE Check if the Bluetooth device supports the Bluetooth compliant stereo headset function. Connect Bluetooth device 1. Press the (Source) button on the main unit’s top panel or the SOURCE button on the remote control to select the BT mode. • You will see BT READY on the front display of the Soundbar. 2. Select the Bluetooth menu on the Bluetooth device you want to connect. (Refer to the Bluetooth device's user manual.) 3. Select "[Samsung] Soundbar J-Series" from the list. • When the Soundbar is connected to the Bluetooth device, it will display [Bluetooth device name] BT on the front display. • The device name can only be displayed in English. An underline " _ " will be displayed if the name is not in English. • If the Bluetooth device has failed to pair with the Soundbar, delete the previous "[Samsung] Soundbar J-Series" found by the Bluetooth device and have it search for the Soundbar again. 4. Play music on the connected device. • You can listen to the music playing on the connected Bluetooth device over the Soundbar. • In BT mode, the Play / Pause / Next / Prev functions are not available. However, these functions are available in Bluetooth devices supporting AVRCP. 24 HW-J6000_J6001_TK_ENG_0312.indd 24 2015-03-12 1:59:10 FUNCTIONS ● ● ● ● ● If asked for PIN code when connecting a Bluetooth device, enter <0000>. Only one Bluetooth device can be paired at a time. The Bluetooth connection will be terminated when you turn the Soundbar off. The Soundbar may not perform Bluetooth search or connection correctly under the following circumstances: - If there is a strong electrical field around the Soundbar. - If several Bluetooth devices are simultaneously paired with the Soundbar. - If the Bluetooth device is turned off, not in place, or malfunctions. - Note that such devices as microwave ovens, wireless LAN adaptors, fluorescent lights, and gas stoves use the same frequency range as the Bluetooth device, which can cause electric interference. The Soundbar supports SBC data (44.1kHz, 48kHz). Connect only to a Bluetooth device that supports the A2DP (AV) function. You cannot connect the Soundbar to a Bluetooth device that supports only the HF (Hands Free) function. Once you have paired the Soundbar to a Bluetooth device, selecting "[Samsung] Soundbar J-Series" from the device's scanned devices list will automatically change the Soundbar to BT mode. Available only if the Soundbar is listed among the Bluetooth device’s paired devices. (The Bluetooth device and the Soundbar must have been previously paired at least once.) ENG ● ● ● ● ● Soundbar will appear in the Bluetooth device’s searched devices list only when the Soundbar is displaying BT READY. ● In the TV SoundConnect mode, the Soundbar cannot be paired to another Bluetooth device. BLUETOOTH POWER ON (BLUETOOTH POWER) When the Bluetooth POWER On function is on and the Soundbar is turned off, if a previously paired Bluetooth device tries to pair with the Soundbar, the Soundbar turns on automatically. 1. Press the Bluetooth POWER on the remote while the Soundbar is turned on. 2. ON - BLUETOOTH POWER appears on the Soundbar's display. TO DISCONNECT THE BLUETOOTH DEVICE FROM THE SOUNDBAR You can disconnect the Bluetooth device from the Soundbar. For instructions, see the Bluetooth device's user manual. ● The Soundbar will be disconnected. ● When the Soundbar is disconnected from the Bluetooth device, the Soundbar will display BT DISCONNECTED on the front display. TO DISCONNECT THE SOUNDBAR FROM THE BLUETOOTH DEVICE Press the SOURCE button on the remote control or the from BT to another mode or turn off the Soundbar. (Source) button on the product's top panel to switch ● The connected Bluetooth device will wait a certain amount of time for a response from the Soundbar before terminating the connection. (Disconnection time may differ, depending on the Bluetooth device) 25 HW-J6000_J6001_TK_ENG_0312.indd 25 2015-03-12 1:59:11 FUNCTIONS ● In Bluetooth connection mode, the Bluetooth connection will be lost if the distance between the Soundbar and the Bluetooth device exceeds 10 meters. ● The Soundbar automatically turns off after 25 minutes in the Ready state. + More About Bluetooth Bluetooth is a technology that enables Bluetooth-compliant devices to interconnect easily with each other using a short wireless connection. ● A Bluetooth device may cause noise or malfunction, depending on usage, when: - A part of your body is in contact with the receiving/transmitting system of the Bluetooth device or the Soundbar. - It is subject to electrical variation from obstructions caused by a wall, corner, or office partition. - It is exposed to electrical interference from same frequency-band devices including medical equipment, microwave ovens, and wireless LANs. ● Pair the Soundbar with the Bluetooth device while they are close together. ● The further the distance between the Soundbar and Bluetooth device, the worse the quality is. If the distance exceeds the Bluetooth operational range, the connection is lost. ● In poor reception areas, the Bluetooth connection may not work properly. ● The Bluetooth connection only works when it is close to the unit. The connection will be automatically cut off if the Bluetooth device is out of range. Even within range, the sound quality may be degraded by obstacles such as walls or doors. ● This wireless device may cause electric interference during its operation. USING SAMSUNG AUDIO REMOTE APP + Install Samsung Audio Remote App To control the product with your Smart Device and the Samsung Audio Remote app, download the Samsung Audio Remote App through Google Play store. Market search : Samsung Audio Remote ANDROID APP ON + Accessing the Samsung Audio Remote App After you install the Samsung Audio Remote app, follow the instructions in the app. ● The APP function only supports mobile phone Android devices running Android OS 3.0 or later. 26 HW-J6000_J6001_TK_ENG_0312.indd 26 2015-03-12 1:59:11 FUNCTIONS SOFTWARE UPDATE ENG HDMI IN DC 14V AUX IN OPTICAL IN 5V 0.5A HDMI OUT (TV-ARC) 5V 0.5A Samsung may offer updates for the Soundbar's system firmware in the future. If an update is offered, you can update the firmware by connecting a USB device with the firmware update stored on it to the USB port on your Soundbar. Note that if there are multiple update files, you must load them onto the USB device singly and use them to update the firmware one file at a time. Please visit samsung.com or contact the Samsung call centre to receive more information about downloading updates files. ● Insert a USB device containing the firmware update into the USB port on the main unit. ● Updating firmware may not work properly if audio files supported by the Soundbar are stored in the USB storage device. ● Do not disconnect the power or remove the USB device while updates are being applied. The main unit will turn off automatically after completing the firmware update. ● After the update, all settings are reset to their factory default settings. We recommend you write down your settings so that you can easily reset them after the update. Note that updating firmware resets the subwoofer connection too. If connection to the subwoofer is not re-established automatically after the update, refer to page 15. If the firmware fails to update, we recommend formatting the USB device in FAT16 and trying again. ● Once the software update is completed, turn off the product and then press and hold the ( & ) button on the remote control for more than 5 seconds. “INIT” appears on the display and the unit is powered off. The upgrade is complete. ● Do not format the USB device in the NTFS format. The Soundbar does not support the NTFS file system. ● Depending on the manufacturer, some USB devices may not be supported. 27 HW-J6000_J6001_TK_ENG_0312.indd 27 2015-03-12 1:59:12 TROUBLESHOOTING TROUBLESHOOTING TROUBLESHOOTING Before requesting service, please check the following. The unit will not turn on. • Is the power cord plugged into the outlet? Connect the power plug to the outlet. A function does not work when the button is pressed. • Is there static electricity in the air? Disconnect the power plug and connect it again. Sound is not produced. • Is the Mute function on? Press the • Is the volume set to minimum? Adjust the Volume. (Mute) button to cancel the function. The remote control does not work. • Are the batteries drained? Replace with new batteries. • Is the distance between the remote control and main unit too far? Move closer to the unit. The TV SoundConnect (TV pairing) failed. • Does your TV support TV SoundConnect? TV SoundConnect is supported by some Samsung TVs released from 2012 on. Check your TV to see if it supports TV SoundConnect. • Is your TV firmware the latest version? Update your TV with the latest firmware. • Does an error occur when connecting? Contact the Samsung call centre. • Reset the TV mode and connect again. Press and hold the & button for 5 seconds to reset the TV SoundConnect connection. The red LED on the subwoofer blinks and the subwoofer is not producing sound. • Your subwoofer may not be connected to the main body of the product. Try to connect your subwoofer again. (See Page 15) The subwoofer drones and vibrates noticeably. • Try to adjust the vibration of your subwoofer. Press the WOOFER button on your remote control to adjust its value (between -12, -6 to +6.). 28 HW-J6000_J6001_TK_ENG_0312.indd 28 2015-03-12 1:59:12 APPENDIX APPENDIX SPECIFICATIONS ENG Model name HW-J6000, HW-J6001 USB Weight GENERAL Dimensions (W x H x D) 5V / 0.5A Main Unit 2.7 kg Subwoofer (PS-WJ6000, PS-WJ6001) 6.8 kg Main Unit 1078 x 47.5 x 129 mm Subwoofer (PS-WJ6000, PS-WJ6001) 452 x 335 x 154 mm Operating Temperature Range +5°C to +35°C Operating Humidity Range 10 % to 75 % Main Unit AMPLIFIER 22W/CH x 6, 4ohm, THD=10%, 1KHz Rated Output Subwoofer Power (PS-WJ6000, PS-WJ6001) 168W, 3ohm, THD=10%, 100Hz S/N Ratio (Analogue Input) 65 dB Separation (1kHz) 65 dB * S/N ratio, distortion, separation, and usable sensitivity are based on measurements using AES (Audio Engineering Society) guidelines. * Nominal specification - Samsung Electronics Co., Ltd reserves the right to change the specifications without notice. - Weight and dimensions are approximate. - For the power supply and Power Consumption, refer to the label attached to the product. a Open Source Licence Notice - To send inquiries and requests regarding open sources, contact Samsung via Email ([email protected]). Hereby, Samsung Electronics, declares that this equipment is in compliance with the essential requirements and other relevant provisions of Directive 1999/5/EC. The original Declaration of Conformity may be found at http://www.samsung.com, go to Support > Search Product Support and enter the model name. This equipment may be operated in all EU countries. 29 HW-J6000_J6001_TK_ENG_0312.indd 29 2015-03-12 1:59:12 HW-J6000 HW-J6001 Kullanım kılavuzu Curved Soundbar Olanakları hayal edin Bir Samsung ürünü aldığınız için teşekkür ederiz. Daha eksiksiz bir hizmet alabilmek için lütfen ürününüzü www.samsung.com/register adresinden kaydettirin. HW-J6000_J6001_TK_TUR_0313.indd 1 2015-03-13 11:44:10 BAŞLANGIÇ başlangıç ÖZELLIKLER Samsung Remote Ayar Uygulaması Bluetooth İşlevi Samsung Uzak Ses Ayarı Uygulamasıyla* Soundbar'ınızı avucunuzun içinden kumanda edin. Bu kullanışlı uygulama, güç (açma/kapama), ses ve medya ayarları gibi temel ayarlar ile birlikte ekolayzer ayarları gibi özel ayarlar için bir kumanda merkezidir. Soundbar’a Bluetooth özellikli bir cihaz bağlayarak müzik dosyalarınızı yüksek kaliteli stereo sesle, üstelik hiç kablo kullanmadan dinleyebilirsiniz! PATENTLERI Surround Ses Genişletme Surround Ses Genişletme özelliği, dinlediğiniz sese derinlik ve genişlik hissi katar. Dolby Laboratories lisansıyla üretilmiştir. Dolby ve çift D sembolü, Dolby Laboratories'in ticari markalarıdır. TV SoundConnect TV SoundConnect sayesinde TV'niz ve Soundbar'ınızı Bluetooth ile kolayca birbirine bağlayın. Soundbar ve TV arasında uzanan kablolar olmaması sebebiyle, yaşam alanınızdaki düzenli görünümü koruyarak her iki sistemin zarif ve gösterişli tasarımını sergileyebilirsiniz. DTS patentleri için bkz: http://patents.dts.com. DTS Licensing Limited lisansı ile üretilmiştir. DTS, Sembol ve DTS ile Sembol birlikte tescilli ticari markalardır ve DTS 2.0 Channel, DTS, Inc. © DTS, Inc.’in ticari markasıdır. Bütün Hakları Saklıdır. HDMI HDMI video ve ses sinyallerini eşzamanlı olarak iletir ve daha net bir görüntü sağlar. Ayrıca ünite, bir HDMI kablosu aracılığıyla Soundbar ile TV'nizden ses dinleyebilmenizi sağlayan ARC işlevine sahiptir. Bu işlev ancak cihaz ARC uyumlu bir TV'ye bağlandığında kullanılabilir. HDMI ve HDMI High-Definition Multimedia Interface (Yüksek Tanımlı Multimedya Arabirimi) terimleri ve HDMI Logosu HDMI Licensing LLC’nin ABD ve diğer ülkelerdeki ticari markaları veya tescilli ticari markalarıdır. USB Sunucu Desteği Soundbar’in USB SUNUCU işlevini kullanarak, MP3 çalar, USB flash bellek, vs. gibi harici USB depolama cihazlarını bağlayıp içerisindeki müzik dosyalarını çalabilirsiniz. 2 HW-J6000_J6001_TK_TUR_0313.indd 2 2015-03-13 11:44:15 BAŞLANGIÇ GÜVENLIK BILGILERI TUR GÜVENLIK UYARILARI ELEKTRİK ÇARPMA RİSKİNİ AZLATMAK İÇİN KAPAĞI (YA DA ARKA KISMI) SÖKMEYİN. ÜRÜN İÇİNDE KULLANICI TARAFINDAN TAMİR EDİLEBİLECEK BİR PARÇA BULUNMAMAKTADIR. SERVİS İŞLEMLERİNİ, YETKİN SERVİS PERSONELİNE BIRAKIN. Bu simge, ürün içinde elektrik çarpması veya yaralanma riski barındıran "tehlikeli gerilim" bulunduğunu gösterir. DİKKAT ELEKTRİK ÇARPMA RİSKİ AÇMAYIN Bu simge, ürünle birlikte önemli talimatlar verildiğini gösterir. UYARI : Yangın ya da elektrik çarpması riskini azaltmak için cihazın, su veya neme maruz kalmasına izin vermeyin. DİKKAT : ELEKTRİK ÇARPMASINI ENGELLEMEK İÇİN FİŞİN GENİŞ UCUNU YUVAYLA EŞLEŞTİRİN VE YERİNE TAM OTURTUN. • Bu cihaz, koruyucu topraklama bağlantısına sahip bir AC prizine takılmalıdır. • Cihazın şebeke bağlantısını kesmek için, fişi şebeke soketinden çekilmelidir; dolayısıyla şebeke fişi uygun bir yerde olmalıdır. DİKKAT • Bu cihaza sıvı damlatılmamalı veya dökülmemelidir. Vazo gibi sıvı dolu nesneler cihazın üstüne konulmamalıdır. • Bu cihazı tamamen kapatmak için güç fişini duvardaki prizden çıkarmanız gerekir. Dolayısıyla, güç fişi her zaman hızla ve kolayca erişilebilir bir noktada olmalıdır. 3 HW-J6000_J6001_TK_TUR_0313.indd 3 2015-03-13 11:44:15 BAŞLANGIÇ ÖNLEMLER 68.6 mm 99.1mm 99.1mm 99.1mm Evinizdeki AC güç kaynağının, ürünün arkasında yer alan tanımlama etiketiyle uyumlu olduğundan emin olun. Ürünü, havalandırma için yeterli boşluk 7-10 cm olacak şekilde, uygun bir kaide (mobilya) üzerine yatay biçimde yerleştirin. Havalandırma deliklerinin kapatılmadığından emin olun. Ürünü amplifikatörlerin veya ısınma yapabilecek diğer ekipmanların üzerine koymayın. Bu ünite çalar sürekli kullanım için tasarlanmıştır. Üniteyi tamamen kapatmak için AC fişini duvardaki prizden çıkarın. Eğer üniteyi uzun bir süre kullanmayacaksanız fişini prizden çıkarın. Fırtınalı havalarda AC ana fifişi şi, prizden çıkarın. çıkarı Yıldırım nedeniyle oluşan gerilim tepe değerleri üniteye zarar verebilir. Üniteyi doğrudan güneş ışığı ya da diğer ısı kaynaklarına maruz bırakmayın. Bu, cihazın aşırı ısınmasına ve arızalanmasına yol açabilir. Ürünü, neme (örneğin, vazo) ve aşırı ısınmaya Bu ürünle kullanılan piller, çevreye zarar veren (örneğin, şömine) ya da güçlü manyetik ya da kimyasal maddeler içermektedir. Pilleri, normal ev elektriksel alan oluşturan ekipmanlara karşı koruyun. çöpüne atmayın. Pilleri ateşe atmayın. Pillere kısa Ünitenin hatalı çalışması durumunda güç kablosunu devre yaptırmayın, içini açmayın veya aşırı ısıtmayın. AC kaynağından çıkarın. Bu ürün, endüstriyel kullanım Pil düzgün şekilde değiştirilmediği takdirde patlama için tasarlanmamıştır. Bu ürün sadece kişisel kullanım riski. Yalnızca aynı tiple veya eşdeğer tiple değiştirin. içindir. Ürün veya diskini, soğuk sıcaklıklarda depolanmışsa yoğuşma meydana gelebilir. Kış şartlarında ünitenin taşınması durumunda kullanmadan önce ünite oda sıcaklığına gelene kadar yaklaşık 2 saat bekleyin. DİKKAT, PİLİ YUTMAYIN, KİMYASAL YANIK TEHLİKESİ, Bu ürün [birlikte verilen uzaktan kumanda] bir düğme pil içermektedir. Düğme pil yutulursa yalnızca 2 saat içinde şiddetli iç yanıklara neden olup ölüme yol açabilir. Yeni ve kullanılmış pilleri çocuklardan uzak tutun. Pil bölmesi güvenli bir biçimde kapanmıyorsa ürünü kullanmayı bırakıp çocuklardan uzak tutun. Pillerin yutulmuş veya vücudun herhangi bir bölümünün içine yerleştirilmiş olabileceğini düşünüyorsanız derhal tıbbi yardıma başvurun. 4 HW-J6000_J6001_TK_TUR_0313.indd 4 2015-03-13 11:44:15 BAŞLANGIÇ IÇINDEKILER BAŞLANGIÇ 23 FONKSIYONLAR 2 Özellikler 23 Giriş Modu 3 Güvenlik bilgileri 24 Bluetooth 6 Birlikte Verilenler 27 Yazilim güncelleme 7 AÇIKLAMALAR 28 SORUN GIDERME 7 Üst/Ön Panel 28 8 Arka/Alt Panel 9 Uzaktan kumanda Sorun giderme 29 EK 29 11 KURULUM 11 TUR 2 Spesifikasyonlar Soundbar'ın Kurulumu 11 Duvara montaj terti̇batinin monte edi̇lmesi̇ 14 Soundbar'in TV standiniza takilmasi 14 Soundbar'ın Serbest Kurulumu ● Bu Kullanma Kılavuzundaki şekiller ve çizimler yalnızca referans amaçlı olarak verilmiştir ve gerçek ürün görünümünden farklı olabilir. 15 BAĞLANTILAR 15 Subwoofer'ın Bağlanması 17 Bir TV’ye Bağlanma 17 HDMI (Dijital) Kablosu Kullanarak TV ile Bağlanma 17 Optik (Dijital) Kablo Kullanarak TV ile Bağlanma 18 TV SoundConnect 20 Harici Cihazlara Bağlantı 20 HDMI Kablosu 20 Optik veya AUX Kablosu 21 USB ● Aşağıdaki durumlarda servis ücreti alınabilir (a) talebiniz üzerine bir mühendis geldiğinde ama üründe hiçbir arıza olmadığında (yani bu kullanım kılavuzunu okumadıysanız). (b) üniteyi bir onarım merkezine getirdiğinizde ama üründe hiçbir arıza olmadığında (yani bu kullanım kılavuzunu okumadıysanız). ● Evinize onarım için gelinmeden veya herhangi bir onarım yapılmadan önce servis ücreti size bildirilir. 5 HW-J6000_J6001_TK_TUR_0313.indd 5 2015-03-13 11:44:16 BAŞLANGIÇ BIRLIKTE VERILENLER KULLANIM KILAVUZUNU OKUMADAN ÖNCE Kullanım kılavuzunu okumadan önce aşağıdaki terimlere göz atın. + Kılavuzda kullanılacak simgeler Simge Terim Tanım Dikkat Bir işlevin çalışmadığı veya ayarların iptal edilebileceği bir durumu gösterir. Not Bu, her fonksiyonun çalışmasına ilişkin ipuçları ve talimatları içermektedir. Aşağıda gösterilen aksesuarların sağlanıp sağlanmadığını kontrol edin. Uzaktan Kumanda / Lityum Pil (3V : CR2032) Güç Kablosu : 2 AD DC Adaptörü HDMI Kablosu USB Kablosu Kullanım Kılavuzu Tutucu Duvar Sabitleyici : 2 AD Duvar Konsolu : 2 AD [ZW Duvara Montaj Kılavuzu ● Aksesuarların görünümü yukarıdaki çizimlerde görünenden biraz farklı olabilir. ● Harici USB cihazlarını üniteye bağlamak için ürüne ait USB kablosunu kullanın. 6 HW-J6000_J6001_TK_TUR_0313.indd 6 2015-03-13 11:44:16 AÇIKLAMALAR açıklamalar ÜST/ÖN PANEL TUR VOL. - / + Ses seviyesini kontrol eder. Ses seviyesinin sayısal değeri ön panel ekranında görüntülenir. (Güç) Düğmesi Soundbar'i açar veya kapatır. (Kaynak) Düğmesi Ekran D.IN, AUX, HDMI, BT, TV ve USB girişini seçer. (Kaynak) ● Cihaz açıkken, düğmesini 3 saniyeden fazla basılı (Sessiz) tutmak düğmenin düğmesi olarak işlev görmesini sağlar. (Sessiz) düğmesi ayarını iptal (Kaynak) düğmesini etmek için tekrar 3 saniyeden fazla basılı tutun. Geçerli modu görüntüler. ● AC kablosunu taktığınızda, güç düğmesi 4 ila 6 saniye içinde çalışacaktır. ● Bu ünitenin gücünü açtığınızda, ses gelmeden önce 4 ila 5 saniyelik bir gecikme olur. ● Sadece Soundbar sesini duymak istiyorsanız, televizyonunuzun Audio Setup (Ses Ayarları) menüsündeki TV hoparlörlerini kapatmalısınız. Televizyonunuzla birlikte gelen kullanım kılavuzuna başvurun. 7 HW-J6000_J6001_TK_TUR_0313.indd 7 2015-03-13 11:44:18 AÇIKLAMALAR ARKA/ALT PANEL AUX IN HDMI IN Harici bir cihazın Analog çıkışına bağlayın. Bir HDMI kablosu kullanarak dijital video ve ses sinyallerini eş zamanlı olarak alır. Desteklenen bir harici cihaza bağlarken kullanın. OPTICAL IN (D.IN) HDMI OUT (TV-ARC) Bir harici cihazın dijital (optik) çıkışına bağlayın. Bir HDMI kablosu kullanarak dijital video ve ses sinyallerini eş zamanlı olarak iletir. HDMI IN DC 14V AUX IN OPTICAL IN HDMI OUT (TV-ARC) 5V 0.5A ETİKET DC14V DC 14V (Güç Kaynağı Girişi) 5V 0.5A DC güç adaptörünü güç kaynağı jakına bağlayın ve AC güç adaptörü fişini prize takın. (USB bağlanti noktasi) USB cihazlarını buraya takarak cihazlardaki dosyaları çalabilirsiniz. ● AC güç adaptörünün güç kablosunu prizden çıkarırken fişten tutarak çekin. Kablodan tutarak çekmeyin. ● Bileşenler arasındaki tüm bağlantılar tamamlanmadan bu üniteyi veya diğer bileşenleri AC prizine takmayın. 8 HW-J6000_J6001_TK_TUR_0313.indd 8 2015-03-13 11:44:20 AÇIKLAMALAR UZAKTAN KUMANDA TUR SOURCE Soundbar'e bağlı bir kaynak seçmek için basın. Sessiz Ses seviyesini tek bir düğmeye basarak 0'a düşürebilirsiniz. Sesi, önceki seviyeye geri getirmek için tekrar basın. Tekrar USB sürücüden müzik dosyası oynatırken Tekrar işlevini ayarlayabilirsiniz. OFF - REPEAT : Tekrar Oynatma işlemini iptal eder. TRACK - REPEAT : Bir parçayı tekrar çalar. ALL - REPEAT : Tüm parçaları tekrar çalar. RANDOM - REPEAT : Parçaları rasgele çalar. (Zaten çalınmış olan bir parça tekrar çalınabilir.) İleri Sar Oynattığınız cihazda iki veya daha fazla dosya varken $ düğmesine basarsanız, bir sonraki dosya seçilir. SOUND CONTROL TREBLE, BASS veya AUDIO SYNC ayarlarını seçmek için basın. Ardından Tiz ve Bas sesini -6 ila +6 arasında ayarlamak için #, $ düğmelerine basın. Her frekans bandının sesini ayarlamak için SOUND CONTROL düğmesine yaklaşık 5 saniye basılı tutun. 150Hz, 300Hz, 600Hz, 1.2KHz, 2.5KHz, 5KHz, 10KHz ve SW seçilebilir ve her biri -6 ile +6 arasında bir ayara getirilebilir. Soundbar bir dijital TV'ye bağlandıysa, video ile ses arasındaki senkronizasyon bozuk olabilir, ses ve video arasındaki senkronizasyonu sağlamak için SOUND CONTROL düğmelerini kullanın. Ses gecikme süresini 0 ms ile 300 ms arasında bir değere ayarlamak için #,$ düğmelerini kullanın. USB modunda, TV modunda ve BT modunda, Audio Sync (Ses Senkronizasyonu) işlevi çalışmayabilir. AUTO POWER Anynet+ Fonksiyon işlevini kapatıp açmak için AUTO POWER düğmesine basın. (Varsayılan : Auto Power Link OFF, ON - ANYNET+ / OFF - POWER LINK veya OFF - ANYNET+ / ON - POWER LINK). Anynet+ işlevi, Soundbar'ı uzaktan kumanda ile Anynet+ uyumlu bir Samsung TV den kontrol etmenizi sağlar. Soundbar, bir HDMI kablosu ile TV'ye bağlanmış olmalıdır. * Auto Power Link Soundbar'ı bağlı bir Optik kaynağa, Optik soket üzerinden senkronize eder, böylece TV’nizi açtığınızda o da otomatik olarak açılır. (Bkz. sayfa 18) ● Soundbar, Samsung müseccel ticari markasıdır. ● TV uzaktan kumandasını kullanarak TV çalıştırın. 9 HW-J6000_J6001_TK_TUR_0313.indd 9 2015-03-13 11:44:21 AÇIKLAMALAR Güç Soundbar'i açar veya kapatır. Ses Ünitenin ses seviyesini ayarlar. Çalma/Duraklatma Dosya oynatma işlemini geçici olarak duraklatmak için & düğmesine basın. Seçilen dosyayı oynatmak için tekrar & düğmesine basın. Geri Atla USB cihazında birden fazla dosya varsa ve # düğmesine basarsanız, bir önceki dosya seçilir. SOUND EFFECT Kullanmak istediğiniz kaynak türüne bağlı olarak 6 farklı ses modundan - STANDARD (Orijinal Ses), MUSIC, VOICE, SPORTS, CINEMA ve NIGHT MODE birini seçebilirsiniz. Orijinal sesi dinlemek istiyorsanız STANDARD modunu seçin. SOUND SOUND düğmesine Surround Ses, sese derinlik ve genişlik hissi katar. tekrar tekrar basarak Surround Ses ayarları arasında geçiş yapabilirsiniz: ON - SURROUND SOUND, OFF - SURROUND SOUND Bluetooth POWER Bluetooth POWER On işlevini açık ve kapalı konuma getirmek için, uzaktan kumanda üzerindeki Bluetooth POWER düğmesine basın. Ayrıntılar için bkz. sayfa 19-25. WOOFER WOOFER düğmesine basın. Subwoofer ses seviyesini -12, -6 ila +6 arasında ayarlamak için #, $ düğmelerini kullanın. PILLERIN UZAKTAN KUMANDAYA TAKILMASI 1. Uzaktan kumandanın pil kapağını yukarıdaki şekilde gösterildiği gibi saatin aksi yönünde çevirip çıkarmak için uygun bir bozuk para kullanın. 2. 3V Lityum pil takın. Pili takarken pozitif (+) kutup yukarı bakmalıdır. Pil kapağını yerleştirin ve yukarıdaki şekilde gösterildiği gibi '●' işaretlerini yan yana getirin. 3. Uzaktan kumandanın pil kapağını yerine oturturken sonuna kadar saat yönünde çevirmek için uygun bir bozuk para kullanın. 10 HW-J6000_J6001_TK_TUR_0313.indd 10 2015-03-13 11:44:22 KURULUM KURULUM SOUNDBAR'IN KURULUMU TUR DUVARA MONTAJ TERTİBATININ MONTE EDİLMESİ + Montaj Önlemleri ● Yalnızca dik bir duvara monte edin. ● Kurulum için yüksek sıcaklık veya neme sahip yerleri veya setin ağırlığını taşıyamayacak bir duvarı kullanmayın. ● Duvarın direncini kontrol edin. Duvar ürünü destekleyecek kadar güçlü değilse duvarı güçlendirin veya cihazı, ağırlığını taşıyabilecek başka bir duvara monte edin. ● Duvarınızın türüne (alçı, demir levha, ahşap vs.) uygun sabitleme vidaları veya ankrajları alıp kullanın. Mümkünse, destekleyici vidaları duvar dikmelerine sabitleyin. ● Soundbar'ı monte edeceğiniz duvarın türüne ve kalınlığına uygun montaj vidaları alın. - Çapı : M5 - Uzunluk: 35 mm veya daha uzun vidalar tavsiye edilir. ● Üniteyi duvara monte etmeden önce ünitenin kablo çıkışlarını harici cihazlara bağlayın. ● Kurulumdan önce üniteyi kapattığınızdan ve prizden çıkardığınızdan emin olun. Aksi takdirde elektrik çarpabilir. 5 cm veya daha fazla 1. Kurulum kılavuzunu duvar yüzeyine yerleştirin. • Kurulum kılavuzu aynı hizada olmalıdır. • TV duvara monte edilmişse, Soundbar'ı TV'den en az 5 cm aşağıya kurun. 11 HW-J6000_J6001_TK_TUR_0313.indd 11 2015-03-13 11:44:23 KURULUM Center Line Center Line 2. Bir kalem kullanarak vidaların duvarda hangi noktalara geleceğini işaretleyin, daha sonra kurulum kılavuzunu çıkarın. Ardından, uygun boyuttaki bir matkap ucu kullanarak vidalar için delikler açın. 3. Duvara monte edilecek Duvar Konsolu (2 AD) ve vidaları işaretlenen yerlere sabitleyin. 4. Duvar Konsolu gösterildiği gibi yerleştirdikten sonra ürünü kaldırın. 12 HW-J6000_J6001_TK_TUR_0313.indd 12 2015-03-13 11:44:24 KURULUM TUR OPTICAL IN HDMI OUT (TV-ARC) 5V 0.5A AUX IN DC 14V HDMI IN 5. Ürünün alt tarafındaki her bir deliğe Tutucu Duvar Sabitleyici yerleştirin ve sabitleyin. Ürün Duvar Konsolu sabitlenmiştir. ● Kurulu üniteye asılmayın ve ünitenin darbelere maruz kalmamasına veya düşürülmemesine dikkat edin. ● Üniteyi düşmemesi için duvara sıkıca sabitleyin. Ünite düşerse, yaralanmaya veya ürünün zarar görmesine neden olabilir. ● Üniteyi, bir çocuğun bağlantı kablolarını çekmemesini sağlayacak şekilde duvara monte edin; aksi takdirde ürün düşebilir. ● Duvara montaj tertibatından en iyi performansı almak için, televizyon duvara monte edilmişse, hoparlör sistemini TV'den en az 5 cm aşağıya kurun. ● Güvenliğiniz için, üniteyi duvara monte etmeyecekseniz, düşmeyeceği sağlam, düz bir yüzeye kurun. 13 HW-J6000_J6001_TK_TUR_0313.indd 13 2015-03-13 11:44:24 KURULUM SOUNDBAR'IN TV STANDINIZA TAKILMASI Bu Soundbar ile uyumlu bir Samsung TV standına sahipseniz, Soundbar'ı televizyon standınıza takabilirsiniz. ● Bu Soundbar JU6700, JU6500 ve JU7500, 48 inç, 55 inç ve 65 inç, JU6610 - 48 inç ve 55 inç, 2015 Samsung kavisli TV'ler ile uyumludur. Lütfen uyumlu modellerin detaylı bir listesini görmek için Samsung Electronics ana sayfasını (www.Samsung.com) ziyaret edin. ● Bu Soundbar uyumlu olmayan bir TV'ye takılamaz (TV ister montaj ister stand düzeneğinde olsun). 1. Soundbar'ın ortasını TV'nin alt tarafının ortasıyla hizalayarak şekilde gösterildiği gibi standın üzerine olabildiğince itin. TV dengesini bozmamaya özen gösterin. SOUNDBAR'IN SERBEST KURULUMU 1. Soundbar'ı TV'nin önündeki düz alanın ortasına yerleştirin. ● Kurulumu düz bir zeminde yapın. 14 HW-J6000_J6001_TK_TUR_0313.indd 14 2015-03-13 11:44:25 BAĞLANTILAR bağlantılar TUR ● Bileşenler arasındaki tüm bağlantılar tamamlanana kadar bu ürünün veya TV'nizin güç kablosunu prize takmayın. ● Bu ürünü taşımadan veya kurmadan önce gücü kapattığınızdan ve güç kablosunu çıkardığınızdan emin olun. SUBWOOFER'IN BAĞLANMASI SUBWOOFER'A OTOMATIK BAĞLANMA Ana ünite ile subwoofer açıldığında, subwoofer ile ana ünite otomatik olarak bağlanmalıdır (kablosuz bağlanır). • Tamamen bağlandığında, Subwoofer'ın mavi LED ışığının yanıp sönmesi durur. SUBWOOFER'A MANUEL BAĞLANMA Subwoofer’ın bağlantı kimliği fabrikada önceden ayarlanmıştır ve ana ünite ile subwoofer açıldığında, subwoofer ile ana ünite otomatik olarak bağlanmalıdır (kablosuz bağlanır). Ana ünite ile subwoofer açıldığında Link göstergesi yanmıyorsa, lütfen aşağıdaki işlemi uygulayarak bağlantı kimliğini ayarlayın. POWER 1. Ana ünite ile subwoofer'ın güç kablolarını bir AC prizine takın. 2. Küçük, ince uçlu bir nesneyle subwoofer'ın arkasındaki ID SET düğmesini 5 saniye basılı tutun. • STANDBY göstergesi kapanır ve LINK göstergesi (Mavi LED) hızla yanıp sönmeye başlar. 3. Ana ünite kapalı konumdayken (STANDBY modundayken), uzaktan kumandadaki saniye basılı tutun. (Sessiz) düğmesini 5 4. Soundbar ekranında ID SET mesajı görünür. 5. Bağlantıyı tamamlamak için subwoofer üzerindeki Mavi LED yanıp sönerken ana üniteyi açın. • Ana ünite ve subwoofer bağlanmış olmalıdır (birbirine bağlanır). • Subwoofer üzerindeki Link göstergesi (Mavi LED) açık olmalıdır. • LINK göstergesi sürekli mavi renkte yanmıyorsa, bağlantı işlemi başarısız olmuştur. Ana üniteyi kapatın ve 2. Adımdan itibaren işlemleri tekrarlayın. • Ses efektini seçerek kablosuz subwoofer'dan daha iyi ses elde edebilirsiniz. (Bkz. sayfa 10) 15 HW-J6000_J6001_TK_TUR_0313.indd 15 2015-03-13 11:44:25 BAĞLANTILAR ● Ürünü taşımadan veya kurmadan önce gücü kapattığınızdan ve güç kablosunu çıkardığınızdan emin olun. ● Ana ünite kapatılınca kablosuz subwoofer bekleme moduna geçer ve Bağlantı göstergesi (Mavi LED) 30 saniye yanıp söndükten sonra üst tarafta bulunan STANDBY LED'i yanmaya başlar. ● Soundbar'ın yakınında Soundbar ile aynı frekansta (2,4GHz) çalışan bir cihaz kullandığınızda, meydana gelen girişim seste kesilmelere neden olabilir. ● Kablosuz sinyalin ana ünite ile subwoofer arasındaki iletim mesafesi yaklaşık 10 m'dir fakat çalıştırma ortamına bağlı olarak farklılık gösterebilir. Ana ünite ile kablosuz subwoofer arasında çelik-betonarme veya metal duvar varsa, kablosuz sinyali metalin içinden geçemeyeceği için sistem hiç çalışmayabilir. ● Ana ünite bir kablosuz bağlantı kuramıyorsa, bir önceki sayfada açıklanan 1-5 arası adımları izleyerek ana ünite ile kablosuz subwoofer arasındaki bağlantıyı kurmayı yeniden deneyin. ● Kablosuz alıcı anten, kablosuz subwoofer'ın içine yerleştirilmiştir. Üniteyi su ve nemden koruyun. ● En iyi dinleme deneyimi için, kablosuz subwoofer'ın bulunduğu yerin etrafındaki alanda herhangi bir engel olmamasına dikkat edin. 16 HW-J6000_J6001_TK_TUR_0313.indd 16 2015-03-13 11:44:26 BAĞLANTILAR BIR TV’YE BAĞLANMA TUR HDMI (DIJITAL) KABLOSU KULLANARAK TV ILE BAĞLANMA HDMI Kablosu HDMI IN HDMI OUT (TV-ARC) HDMI OUT (TV-ARC) HDMI IN DC 14V AUX IN 5V 0.5A HDMI OUT (TV-ARC) OPTICAL IN 1. Bir HDMI kablosunu kullanarak ürünün arkasındaki HDMI OUT (TV-ARC) jakını TV'nizin HDMI IN jakına bağlayın. (Kaynak) düğmesine veya uzaktan kumandadaki 2. D.IN modunu seçmek için ana ünitenin üst panelindeki SOURCE düğmesine basın. ● HDMI, video ve ses verilerinin tek bir konnektör üzerinden dijital olarak aktarılmasını sağlayan bir arabirimdir. ● TV'de bir ARC (Ses Dönüş Kanalı) bağlantı noktası bulunuyorsa, HDMI kablosunu HDMI IN (ARC) bağlantı noktasına bağlayın. ● Mümkünse çekirdeksiz bir HDMI kablosu kullanılması önerilir. Çekirdekli bir HDMI kablosu kullanılıyorsa, çapı 14 mm'den az bir kablo kullanın. ● Anynet+ özelliğinin açık olması gerekir. ● HDMI kablosu ARC'yi desteklemiyorsa, bu işlev kullanılamaz. OPTIK (DIJITAL) KABLO KULLANARAK TV ILE BAĞLANMA Optik Kablo (birlikte verilmez) OPTICAL OUT OPTICAL IN HDMI IN DC 14V AUX IN OPTICAL IN HDMI OUT (TV-ARC) 5V 0.5A 1. Soundbar üzerindeki OPTICAL IN'i (Ses) TV'nin OPTICAL OUT jakına bağlayın. 2. D.IN modunu seçmek için ana ünitenin üst panelindeki SOURCE düğmesine basın. (Kaynak) düğmesine veya uzaktan kumandadaki 17 HW-J6000_J6001_TK_TUR_0313.indd 17 2015-03-13 11:44:26 BAĞLANTILAR + Auto Power Link Ana üniteyi dijital bir optik kablo ile bir TV’ye bağlarsanız, TV’yi açtığınızda Soundbar'ın otomatik olarak açılması için Auto Power işlevini ON olarak ayarlayın. AUTO POWER LINK Ekran AÇIK OFF - ANYNET+ / ON - POWER LINK KAPALI ON - ANYNET+ / OFF - POWER LINK 1. Soundbar ve TV'yi bir Optik kablo (ayrı satılır) ile bağlayın. 2. D.IN modunu seçmek için ana ünitenin üst panelindeki SOURCE düğmesine basın. (Kaynak) düğmesine veya uzaktan kumandadaki 3. Auto Power Link işlevini açma/kapatma arasında geçiş için uzaktan kumandada AUTO POWER düğmesine basın. ● Her bağlı cihazda Otomatik Güç Bağlantısı fonksiyonu çalışmayabilir. TV SOUNDCONNECT TV sesini, TV SoundConnect işlevini destekleyen bir Samsung TV’ye bağlı Soundbar aracılığıyla dinleyebilirsiniz. Bağlantı 1. TV'yi ve Soundbar sistemini açın. • TV menüsün açın. • "Ses" sekmesinde bulunan Hoparlör Ayarları'nın üzerine gelin. • "Yeni Cihaz Ekle" menüsünü "Açık" olarak ayarlayın. 2. TV modunu seçmek için ana ünitenin üst panelindeki SOURCE düğmesine basın. (Kaynak) düğmesine veya uzaktan kumandadaki 3. TV'de, TV'nin SoundConnect işlevinin etkinleştirilip etkinleştirilmeyeceğini soran bir mesaj belirir. 4. Televizyon ve Soundbarı’ı bağlamayı tamamlamak için, televizyon kumandasından <Evet> seçin. 18 HW-J6000_J6001_TK_TUR_0313.indd 18 2015-03-13 11:44:28 BAĞLANTILAR TUR ● Soundbar’ın modunu TV’den başka bir moda geçirmek TV SoundConnect’i otomatik olarak sona erdirir. ● Soundbar’i başka bir TV’ye bağlamak için mevcut bağlantının sonlandırılması gerekir. ● Mevcut TV bağlantısını sona erdirin, sonra başka bir TV’ye bağlamak için uzaktan kumandadaki & düğmesini 5 saniye süreyle basılı tutun. ● TV SoundConnect (SoundShare) işlevi 2012’de satışa çıkarılan bazı Samsung TV’lerde desteklenir. Başlamadan önce TV’nizin TV SoundConnect (SoundShare) işlevini destekleyip desteklemediğini kontrol edin. (Daha fazla bilgi için, TV'nin kullanım kılavuzuna bakın.) ● Samsung TV’niz 2014’ten önce satışa sunulmuşsa SoundShare ayar menüsünü kontrol edin. ● TV ve Soundbar arasındaki mesafe, 10 m üzerindeyse bağlantı düzgün olmayabilir veya ses takılabilir. Böyle bir durumda, televizyonun veya Soundbar'in yerini çalışma aralığında olacak şekilde değiştirin ve TV SoundConnect bağlantısını tekrar kurun. ● TV SoundConnect Çalışma Aralığı: - Önerilen eşleştirme aralığı: 2 m dahilinde - Önerilen çalışma aralığı: 10 m dahilinde ● Soundbar veya Soundbar uzaktan kumandası üzerindeki Oynatma/Duraklatma, Sonraki ve Önceki düğmeleri TV'yi kontrol etmez. + Bluetooth POWER On işlevinin kullanılması Bluetooth POWER On işlevi, Soundbar'ın TV SoundConnect kullanılarak Bluetooth uyumlu bir televizyona başarıyla bağlanmasından sonra kullanılabilir. Bluetooth POWER On işlevi AÇIK konumdayken, bağlı televizyonu açmak veya kapatmak Soundbar'ı da açıp kapatacaktır. 1. TV SoundConnect işlevini kullanarak televizyonu Soundbar'a bağlayın. 2. Soundbar ve uzaktan kumandanızın Bluetooth POWER düğmelerine basın. Soundbar ekranında, ON - BLUETOOTH POWER mesajı görünür. • ON - BLUETOOTH POWER : Televizyonu açtığınızda veya kapattığınızda Soundbar de açılır ve kapanır. • OFF - BLUETOOTH POWER : Soundbar yalnızca televizyonu kapattığınızda kapanır. ● Bu işlev, sadece 2013’ten itibaren satışa sunulan Samsung TV’lerde desteklenir. 19 HW-J6000_J6001_TK_TUR_0313.indd 19 2015-03-13 11:44:29 BAĞLANTILAR HARICI CIHAZLARA BAĞLANTI HDMI KABLOSU HDMI; TV’ler, projektörler, DVD oynatıcıları, Blu-ray oynatıcıları, set üstü kutuları gibi cihazlara bağlantı kurmak için kullanılan standart bir dijital arabirimdir. HDMI en yüksek kalitede dijital sinyal ilettiği için, aynen dijital kaynakta ilk oluşturulduğundaki gibi, üstün ses ve görüntü kalitesi elde edebilirsiniz. HDMI Kablosu Dijital Cihazlar HDMI OUT HDMI IN HDMIIN HDMI IN DC 14V AUX IN OPTICAL IN HDMI OUT (TV-ARC) 5V 0.5A 1. Bir HDMI kablosu kullanarak ürünün arkasındaki HDMI IN jakını dijital cihazlarınızın HDMI OUT jakına bağlayın. 2. HDMI modunu seçmek için ana ünitenin üst panelindeki SOURCE düğmesine basın. (Kaynak) düğmesine veya uzaktan kumandadaki OPTIK VEYA AUX KABLOSU Bu ünite, bir Harici Cihaza iki şekilde bağlantı yapmanızı sağlayan bir optik dijital jakı ve bir ses analog jakıyla donatılmıştır. Optik Kablo (birlikte verilmez) OPTICAL IN OPTICAL OUT BD/ DVD oynatıcı/ Set üstü kutu/ Oyun konsolu Ses Kablosu (birlikte verilmez) AUX OUT AUX IN 20 HW-J6000_J6001_TK_TUR_0313.indd 20 2015-03-13 11:44:29 BAĞLANTILAR + AUX Kablosu 1. Ana ünite üzerindeki AUX IN (Ses) Kaynak Cihazın AUDIO OUT jakına bağlayın. (Kaynak) düğmesine veya uzaktan kumandadaki TUR 2. AUX modunu seçmek için ana ünitenin üst panelindeki SOURCE düğmesine basın. + Optik Kablo 1. Ana ünite üzerindeki OPTICAL IN (Ses) Kaynak Cihazın OPTICAL OUT jakına bağlayın. 2. D.IN modunu seçmek için ana ünitenin üst panelindeki SOURCE düğmesine basın. (Kaynak) düğmesine veya uzaktan kumandadaki USB USB depolama aygıtlarında bulunan müzik dosyalarını Soundbar aracılığıyla oynatabilirsiniz. Ekran USB bağlanti noktasi HDMI IN DC 14V AUX IN OPTICAL IN 5V 0.5A HDMI OUT (TV-ARC) 5V 0.5A 1. USB cihazını ürünün USB bağlantı noktasına bağlayın. 2. USB modunu seçmek için ana ünitenin üst panelindeki SOURCE düğmesine basın. (Kaynak) düğmesine veya uzaktan kumandadaki 3. Ekranda USB görünür. • Soundbar ve USB aygıtı bağlantısı tamamlandı. • 25 dakikadan uzun süreyle hiçbir USB cihazı bağlanmazsa otomatik olarak kapanır (Auto Power Off). + USB cihazını bağlamadan önce Aşağıdaki maddelere dikkat edin : ● USB cihazındaki bir klasörün veya dosyanın adı 10 karakterden daha uzunsa, Soundbar ekranında görüntülenmez. ● Bu ürün belirli USB depolama ortamlarıyla uyumlu olmayabilir. ● FAT16 ve FAT32 dosya sistemleri desteklenir. - NTFS dosya sistemi desteklenmemektedir. ● USB cihazını doğrudan ürünün USB bağlantı noktasına bağlayın. Aksi takdirde, USB uyumluluk sorunuyla karşılaşabilirsiniz. ● Çoklu kart okuyucu kullanarak ürüne birden çok depolama cihazı bağlamayın. Ürün düzgün çalışmayabilir. 21 HW-J6000_J6001_TK_TUR_0313.indd 21 2015-03-13 11:44:31 BAĞLANTILAR ● Dijital kamera PTP protokolleri desteklenmemektedir. ● USB cihazını dosya aktarımı yaparken çıkarmayın. ● Ticari bir web sitesinden indirilmiş DRM korumalı müzik dosyaları (MP3, WMA) oynatılmayacaktır. ● Harici HDD'ler desteklenmemektedir. ● Cep telefonları desteklenmez. ● Uyumluluk listesi: Uzantı *.mp3 Codec Örnekleme Hızı Bit oranı MPEG 1 Layer2 16KHz ~ 48KHz 80kbps~320kbps MPEG 1 Layer3 16KHz ~ 48KHz 80kbps~320kbps MPEG 2 Layer3 16KHz ~ 48KHz 80kbps~320kbps MPEG 2.5 Layer3 16KHz ~ 48KHz 80kbps~320kbps Wave_Format_MSAudio1 16KHz ~ 48KHz 56kbps~128kbps Wave_Format_MSAudio2 16KHz ~ 48KHz 56kbps~128kbps AAC 16KHz ~ 96KHz 48kbps~320kbps AAC-LC 16KHz ~ 96KHz HE-AAC 24KHz ~ 96KHz *.wav - 16KHz ~ 48KHz *.ogg OGG 1.1.0 16KHz ~ 48KHz 50kbps~500kbps *.flac FLAC 1.1.0, FLAC 1.2.1 16KHz ~ 96KHz 3000kbps’ye kadar *.wma *.aac 128kbps~192kbps 5.1ch 320kbps 48kbps~64kbps 5.1ch 160kbps 3000kbps’ye kadar ● USB cihazında saklanan çok fazla klasör ve dosya varsa, okunması zaman alabilir. 22 HW-J6000_J6001_TK_TUR_0313.indd 22 2015-03-13 11:44:32 FONKSIYONLAR fonksiyonlar GIRIŞ MODU Giriş modu Optik Dijital Giriş ARC (HDMI OUT) girişi (Kaynak) düğmesine veya uzaktan TUR İstediğiniz modu seçmek için ana ünitenin üst panelindeki kumandadaki SOURCE düğmesine basın. Ekran D.IN AUX girişi AUX HDMI girişi HDMI BLUETOOTH modu BT TV SoundConnect TV USB modu USB Ünite aşağıdaki durumlarda otomatik olarak kapanır: ● D.IN/HDMI/BT/TV/USB/ARC Modu - 25 dakika boyunca ses sinyali olmadığında. ● AUX Modu Otomatik Güç işlevini ON veya OFF için, & düğmesini 5 saniye boyunca basılı tutun. Ekranda ON - AUTO POWER DOWN / OFF - AUTO POWER DOWN görüntülenir. - AUX kablosu 25 dakika boyunca bağlı olmadığında. - AUX kablosu bağlandığında 8 saat süreyle TUŞ girişi yapılmazsa. 23 HW-J6000_J6001_TK_TUR_0313.indd 23 2015-03-13 11:44:32 FONKSIYONLAR BLUETOOTH Soundbar’a Bluetooth özellikli bir cihaz bağlayarak müzik dosyalarınızı yüksek kaliteli stereo sesle, üstelik hiç kablo kullanmadan dinleyebilirsiniz! SOUNDBAR'I BIR BLUETOOTH CIHAZINA BAĞLAMAK IÇIN Bluetooth cihazının Bluetooth uyumlu stereo kulaklık işlevini destekleyip desteklemediğini kontrol edin. Bağlantı Bluetooth cihazı 1. BT modunu seçmek için ana ünitenin üst panelindeki SOURCE düğmesine basın. • (Kaynak) düğmesine veya uzaktan kumandadaki Soundbar’ın ön ekranında BT READY seçeneğini göreceksiniz. 2. Bağlanmak istediğiniz Bluetooth cihazındaki Bluetooth menüsünü açın. (Bluetooth cihazının kullanım kılavuzuna bakın.) 3. Listeden "[Samsung] Soundbar J-Series" seçeneğini seçin. • Soundbar Bluetooth cihazına bağlandığında, ön kısımda [Bluetooth cihaz adı] BT görüntülenecektir. • Cihaz adı sadece İngilizce görüntülenebilir. Ad İngilizce değilse bir alt çizgi " _ " görüntülenir. • Bluetooth cihazı Soundbar ile eşleştirilemezse, Bluetooth cihazı tarafından bulunan önceki "[Samsung] Soundbar J-Series" öğesini silin ve cihazın Soundbar'i tekrar aramasını sağlayın. 4. Bağlanan cihazda müzik çalın. • Bağlı Bluetooth cihazında çalınan müziği Soundbar sisteminden dinleyebilirsiniz. • BT modunda Oynat/Duraklat/Sonraki/Önceki işlevleri mevcut değildir. Ancak bu işlevler AVRCP’yi destekleyen Bluetooth cihazlarında bulunur. 24 HW-J6000_J6001_TK_TUR_0313.indd 24 2015-03-13 11:44:33 FONKSIYONLAR Bir Bluetooth cihazını bağlarken PIN kodu istenirse <0000> girin. Bir defada sadece bir Bluetooth cihazı eşleştirilebilir. Soundbar kapalı konumuna getirildiğinde Bluetooth bağlantısı sona erdirilir. Soundbar, aşağıda belirtilen durumlarda Bluetooth aramasını ve bağlantısını doğru şekilde gerçekleştirmeyebilir: - Soundbar'in çevresinde güçlü bir elektrik alanı olduğunda. TUR ● ● ● ● - Birden çok Bluetooth cihazı Soundbar ile eşzamanlı olarak eşleştirildiğinde. - Bluetooth cihazı kapalı olduğunda, yerinde değilse veya arızalı olduğunda. - Mikrodalga fırın, kablosuz LAN adaptör, fl oresan lamba ve gazlı fırın gibi cihazların Bluetooth cihazıyla aynı frekans aralığını kullandığını ve bu durumun elektrik geçirgenliğine neden olabileceğini unutmayın. ● ● ● ● Soundbar, SBC verilerini (44,1kHz, 48kHz) destekler. Yalnızca A2DP (AV) işlevini destekleyen bir Bluetooth cihazını bağlayın. Soundbar'i yalnızca HF (Eller Serbest) işlevini destekleyen bir Bluetooth cihazına bağlayamazsınız. Soundbar ile Bluetooth cihazını eşleştirdiğinizde, cihazın taranmış cihazlar listesinden "[Samsung] Soundbar J-Series" seçeneğini seçerseniz Soundbar otomatik olarak BT moduna geçer. ● Sadece Soundbar, Bluetooth cihazının eşlenen cihazları listesinde bulunuyorsa kullanılabilir. (Bluetooth cihazı ve Soundbar en az bir kere önceden eşleştirilmiş olmalıdır.) ● Soundbar, ancak Soundbar BT READY görüntülediğinde Bluetooth cihazının aranan cihazlar listesinde görüntülenir. ● TV SoundConnect modunda Soundbar, başka bir Bluetooth cihazıyla eşleştirilemez. BLUETOOTH POWER ON (BLUETOOTH POWER) Bluetooth Power On (Bluetooth Güç Açık) işlevi açık ve Soundbar kapalıyken, daha önce eşleştirilmiş bir Bluetooth cihazı Soundbar ile eşleşmeye çalışırsa, Soundbar otomatik olarak açılır. 1. Soundbar açıkken uzaktan kumandadaki Bluetooth POWER düğmesine basın. 2. Soundbar ekranında ON - BLUETOOTH POWER gözüküyor. BLUETOOTH CIHAZININ SOUNDBAR BAĞLANTISINI KESMEK IÇIN Bluetooth cihazının Soundbar bağlantısını kesebilirsiniz. Talimatlar için Bluetooth cihazının kullanım kılavuzuna bakın. ● Soundbar bağlantısı kesilecektir. ● Soundbar sisteminin Bluetooth cihazıyla bağlantısı kesildiğinde, Soundbar'in ön panelinde BT DISCONNECTED mesajı görüntülenir. SOUNDBAR SISTEMININ BLUETOOTH CIHAZI BAĞLANTISINI KESMEK IÇIN BT’den başka bir moda geçmek veya Soundbar’ı kapatmak için uzaktan kumandadaki SOURCE düğmesine veya (Kaynak) düğmesine basın. ürünün üst panelindeki ● Bağlı Bluetooth cihazı bağlantıyı sonlandırmadan önce belli bir süre boyunca Soundbar'den yanıt gelmesini bekleyecektir. (Bağlantı kesme süresi Bluetooth cihazına bağlı olarak farlılık gösterebilir) 25 HW-J6000_J6001_TK_TUR_0313.indd 25 2015-03-13 11:44:33 FONKSIYONLAR ● Bluetooth bağlantısı modunda, Soundbar ile Bluetooth cihazı arasındaki mesafe 10 m aştığında Bluetooth bağlantısı kaybolur. ● Soundbar, Hazır durumdayken 25 dakika sonra otomatik olarak kapanır. + Bluetooth Hakkında Daha Fazla Bilgi Bluetooth, Bluetooth uyumlu cihazların kısa mesafeli bir kablosuz bağlantı kullanarak birbirine kolayca bağlanmasını sağlayan bir teknolojidir. ● Aşağıdaki durumlarda, kullanıma bağlı olarak Bluetooth cihazı parazite veya arızaya neden olabilir: - Vücudunuz Bluetooth cihazının ya da Soundbar'in alıcı/verici sistemiyle temas halinde olduğunda. - Duvar, köşe veya ofi s bölmeleri gibi engellerden kaynaklanan elektrik dalgalanmalarına maruz kaldığında. - Tıbbi ekipman, mikrodalga fırın ve kablosuz LAN dahil olmak üzere aynı frekans bandını kullanan cihazların neden olduğu elektrik girişimine maruz kaldığında. ● Soundbar sistemini yakın mesafe içerisinde tutulan Bluetooth cihazıyla eşleştirin. ● Soundbar ile Bluetooth cihazı arasındaki mesafe ne kadar artarsa kalite de o denli düşecektir. Bu mesafe Bluetooth’un çalışma aralığını aştığında bağlantı kaybolur. ● Sinyal alım hassasiyetinin düşük olduğu alanlarda Bluetooth bağlantısı düzgün çalışmayabilir. ● Bluetooth bağlantısı yalnızca sete yakın olduğunda çalışır. Mesafe bu aralığın dışına çıktığında bağlantı otomatik olarak kesilir. Bu aralık içinde bile, duvar veya kapı gibi engeller ses kalitesini düşürebilir. ● Bu kablosuz cihaz çalışırken elektrik geçirgenliğine neden olabilir. SAMSUNG AUDIO REMOTE UYGULAMASININ KULLANILMASI + Samsung Audio Remote Uygulamasını Kurun Ürününüzü Akıllı Cihazınız ve Samsung Audio Remote uygulaması aracılığıyla kontrol etmek için Google Play mağazasından Samsung Audio Remote Uygulamasını indirin. Mağaza arama : Samsung Audio Remote ANDROID APP ON + Samsung Audio Remote Uygulamasına Erişim Samsung Audio Remote uygulamasını yükledikten sonra uygulamadaki talimatları takip edin. ● Uygulama sadece Android 3.0 ve üstü işletim sistemine sahip Android mobil telefonları destekliyor. 26 HW-J6000_J6001_TK_TUR_0313.indd 26 2015-03-13 11:44:33 FONKSIYONLAR YAZILIM GÜNCELLEME TUR HDMI IN DC 14V AUX IN OPTICAL IN 5V 0.5A HDMI OUT (TV-ARC) 5V 0.5A Samsung ileride Soundbar sistem yazılımı için güncellemeler sunabilir. Bir yazılım güncellemesi sunulduğunda, yazılım güncellemesini kaydettiğiniz bir USB cihazını Soundbar sisteminizin USB bağlantı noktasına takarak cihaz yazılımını güncelleyebilirsiniz. Birden çok güncelleme dosyası varsa, bunları USB cihazına tek tek yüklemeniz ve cihaz yazılımını güncellemek üzere tek tek kullanmanız gerektiğini unutmayın. Güncelleme dosyalarının indirilmesi hakkında daha fazla bilgi almak için lütfen Samsung.com'u ziyaret edin veya Samsung müşteri hizmetleriyle irtibat kurun. ● Yazılım yükseltmesini içeren bir USB cihazını ana ünitedeki USB bağlantı noktasına takın. ● Soundbar tarafından desteklenen ses dosyaları USB depolama aygıtında kayıtlıysa, güncelleme yazılımı düzgün çalışmayabilir. ● Güncellemeler uygulanırken gücü kapatmayın veya USB cihazını çıkarmayın. Ana ünite, cihaz yazılımı güncellemesini tamamladıktan sonra otomatik olarak kapanır. ● Güncellemeden sonra, tüm ayarlar varsayılan fabrika ayarlarına döner. Güncellemeden sonra kolaylıkla tekrar ayarlayabilmeniz için, ayarlarınızı bir yere not etmenizi öneririz. Güncelleme yazılımının subwoofer bağlantısını da sıfırladığını unutmayın. Güncelleme sonrasında subwoofer bağlantısı otomatik olarak tekrar kurulmazsa, sayfa 15'e bakın. Yazılım güncellenemezse USB cihazını FAT16’da biçimlendirmenizi ve tekrar denemenizi öneririz. ● Yazılım güncellemesi tamamlandıktan sonra ürünü kapatın ve sonra uzaktan kumandadaki ( & ) düğmesini 5 saniyeden uzun süreyle basılı tutun. Ekranda "INIT" mesajı görüntülenir ve ünite kapanır. Yükseltme işlemi tamamlanır. ● USB sürücüsünü NTFS formatında biçimlendirmeyin. Soundbar, NTFS dosya sistemini desteklemez. ● Üreticisine bağlı olarak bazı USB depolama cihazları desteklenmeyebilir. 27 HW-J6000_J6001_TK_TUR_0313.indd 27 2015-03-13 11:44:34 SORUN GIDERME sorun giderme SORUN GIDERME Servis talep etmeden önce aşağıdakileri kontrol edin. Ünite artık açılacaktır. Güç fişini prize takın. • Güç kablosu prize takılı mı? Düğmeye basıldığında fonksiyon çalışmıyor. Güç fişini çıkarın ve tekrar takın. • Havada statik elektrik var mı? Ses üretilmiyor. • Sessiz fonksiyonu açık mı? İşlevi iptal etmek için • Ses minimuma mı getirilmiş? Sesi açın. (Sessiz) düğmesine basın. Uzaktan kumanda çalışmıyor. • Piller bitmiş mi? Yeni pillerle değiştirin. • Uzaktan kumanda ile ana cihaz arasındaki mesafe çok mu fazla? Cihaza daha yaklaştırın. TV SoundConnect (TV eşleşmesi) başarısız. TV SoundConnect, 2012’den sonra satışa sunulan bazı Samsung TV’ler tarafından desteklenir. TV’nizin TV SoundConnect’i destekleyip desteklemediğini kontrol edin. • TV’niz TV SoundConnect işlevini destekliyor mu? • TV’nizin yazılımı en son sürüm mü? TV’nizi en son sürümüne güncelleyin. • Bağlantı sırasında bir hata oluşuyor mu? Samsung çağrı merkeziyle iletişim kurun. • TV modu’nu sıfırlayın ve yeniden bağlayın. TV SoundConnect bağlantısını sıfırlamak için & düğmesini 5 saniye süreyle basılı tutun. Subwoofer üzerindeki kırmızı LED yanıp sönüyor ve subwooferdan ses çıkmıyor. • Subwooferınız ürünün ana gövdesine bağlanmamış olabilir. Subwooferınızı yeniden bağlamayı deneyin. (Bkz. sayfa 15) Subwoofer belirgin biçimde vızıldayarak titreşir. • Subwooferınızın titreşimini ayarlamayı deneyin. Subwoofer değerini (-12, -6 ila +6 arasında) ayarlamak için uzaktan kumandanızdaki WOOFER düğmesine basın. 28 HW-J6000_J6001_TK_TUR_0313.indd 28 2015-03-13 11:44:35 EK ek SPESIFIKASYONLAR TUR Model adı HW-J6000, HW-J6001 USB Ağırlık GENEL Ebatlar (G x Y x D) 5V / 0,5A Ana Ünite 2,7 kg Subwoofer (PS-WJ6000, PS-WJ6001) 6,8 kg Ana Ünite 1078 x 47,5 x 129 mm Subwoofer (PS-WJ6000, PS-WJ6001) 452 x 335 x 154 mm Çalışma sıcaklığı aralığı +5°C ila +35°C Çalışma nem aralığı 10 % ila 75 % Ana Ünite Nominal çıkış Subwoofer gücü (PS-WJ6000, PS-WJ6001) AMPLİFİKATÖR S/N Oranı (analog giriş) Ayırma (1kHz) 22W/CH x 6, 4 OHM, THD=10%, 1KHz 168W, 3 OHM, THD=10%, 100Hz 65 dB 65 dB * S/N oranı, distorsiyon, ayrıştırma ve kullanılabilir hassaslık, AES (Ses Mühendisliği Grubu) kılavuzu kullanılarak yapılan ölçüme dayanmaktadır. * Nominal özellikler - Samsung Electronics Co., Ltd, önceden bildirimde bulunmaksızın özellikleri değiştirme hakkını saklı tutmaktadır. - Ağırlık ve boyutlar yaklaşık değerlerdir. - Güç kaynağı ve Güç Tüketimi için, ürüne yapıştırılan etikete bakın. a Açık Kaynak Lisans Bildirimi - Açık kaynaklarla ilgili soru ve talepleriniz için E-posta yoluyla Samsung’a başvurun ([email protected]). İşbu belge ile, Samsung Electronics bu ekipmanın 1999/5/EC Direktifinin esas gerekliliklerine ve diğer ilgili hükümlerine uygun olduğunu beyan eder. Orijinal Uyumluluk Beyanı http://www.samsung.com adresinde bulunabilir, Destek > Ürün Desteği Ara bölümüne gidin ve model adını girin. Bu cihaz tüm AB ülkelerinde kullanılabilir. 29 HW-J6000_J6001_TK_TUR_0319.indd 29 2015-03-19 12:45:11 SAMSUNG Electronics İstanbul Pazarlama ve Ticaret LTD. ŞTİ Flatofis İstanbul İş Merkezi, Otakçılar Cad. Bina No: 78, Kat:3, No: B3, 34050, Eyüp, İstanbul / Türkiye Tel: (0212) 467 06 00 Bu ürünün ortalama yaşam süresi 10 yıldır İmalatçı : SAMSUNG ELECTRONICS CO., LTD. 416 Maetan-3 Dong, Yeongtong-Gu,Suwon City Gyeonggi-Do, Korea, 442-742 Tel: +82 2 2255 0114 / Fax: +82 2 2255 0117 L V D : Korea Testing Laboratory 222-13 Guro3-dong Guro-gu Seoul, Korea 152-718 Tel: +82 2 860 1309, Fax: +82 02 8601 285 E M C : CTK Co.,Ltd. 386-1, Ho-dong, Cheoin-gu, Yongin-si, Gyeonggi-do, 449-100, Korea Tel: +82 31 339 9970, Fax: +82 31 339 9855 © 2015 Samsung Electronics Co., Ltd. All rights reserved. Contact SAMSUNG WORLD WIDE If you have any questions or comments relating to Samsung products, please contact the SAMSUNG customer care centre. © 2015 Samsung Electronics Co., Ltd. Tüm hakları saklıdır. SAMSUNG WORLD WIDE ile iletişim Samsung ürünleri ile ilgili soru ve taleplerinizde lütfen Samsung Çağrı Merkezi ile iletişime geçiniz. Contact Centre Area TURKEY Web Site 444 77 11 www.samsung.com/tr/support Bu Ürünün Doğru Şekilde Atılması (Atık Elektrikli ve Elektronik Cihazlar) [Bu üründeki pillerin doğru atılması] (Ayrı toplama sistemlerine sahip ülkeler içindir) (Ayrı toplama sistemlerine sahip ülkeler içindir) Pildeki, kılavuzdaki veya ambalajdaki bu işaret bu üründeki pillerin kullanım ömürlerinin sonunda diğer ev atıkları ile birlikte atılmaması gerektiğini belirtir. Hg, Cd veya Pb kimyasal sembolleri pilin EC Yönetmeliği 2006/66'da belirtilen referans değerlerin üstünde cıva, kadmiyum veya kurşun içerdiğini gösterir. Piller düzgün atılmazsa, bu maddeler insan sağlığına veya ortama zarar verebilir. Ürünün, aksesuarların veya ilgili belgelerin üzerinde bulunan bu işaret, ürünün ve elektronik aksesuarlarının (örn. şarj cihazı, kulaklık, USB kablo) kullanım ömrü sonunda diğer ev atıklarıyla birlikte atılmaması gerektiğini belirtir. Atıkların kontrolsüz olarak imha edilmesinin çevre ve insan sağlığı üzerindeki zararlı etkisini engellemek için lütfen bunu diğer atık türlerinden ayırın ve malzeme kaynaklarının sürdürülebilir şekilde yeniden kullanılabilmesi için geri dönüştürülmesini sağlayın. Ev kullanıcıları, bu ürünü çevresel açıdan güvenli bir geri dönüştürme işlemi için nereye ve nasıl ulaştıracakları hakkında ayrıntılı bilgi için ürünü satın aldıkları bayi ile veya yerel resmi makamla irtibat kurmalıdır. İş kullanıcıları tedarikçileri ile irtibat kurup satın alma sözleşmesinin hüküm ve koşullarına bakmalıdır. Bu ürün ve ürünün elektronik aksesuarları, imha için diğer ticari atıklarla karıştırılmamalıdır. Doğal kaynakları korumak ve malzemelerin yeniden kullanılmasını özendirmek için pilleri diğer atık türlerinden ayırıp bölgenizdeki ücretsiz pil iade sistemiyle geri dönüştürülmesini sağlayın. AEEE Yönetmeliğine Uygundur AH68-02833L-00 HW-J6000_J6001_TK_TUR_0313.indd 30 AH68-02833L-00 2015-03-13 11:44:35