1
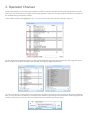
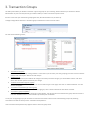
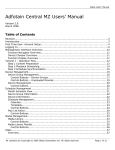
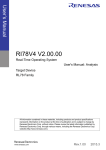
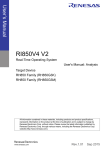
MiS Advanced User Manual
Choosing Operators
Transaction Groups
Introduction
This document is intended for MiS users who are generally comfortable logging in to MiS and running reports within it. This
section focuses on the operator selection screen and transaction groups.
Prerequisites
•
•
An MiS user login
Knowledge of running report in MiS
2. Operator Chooser
On some MiS reports you can choose which operators you want to include / exclude from the report. Picking operators can be
done at any time and saved into a schedule. When picking operators, there are a few extra options to be aware of in addition to
the standard filtering and selection routines.
Firstly, deleted operators are highlighted in grey. This is the same for Sales Accounts and Transaction Types too.
You can quickly filter on deleted operators by clicking the deleted label next to the legend, seen below, the image on the left is
before the filter, the image on the right is after the filter. Click again to toggle between them;
You can also ‘Select All’ or ‘Select None’ in the bottom left. Use these in conjunction with the "Search on Operator Code/Name"
filter. You may also select just deleted or everything except deleted by right clicking on the deleted label. When happy with your
selection, click Confirm to save your choice or Cancel to abort and return to the previous screen.
3. Transaction Groups
The MIS system allows you bundle Transaction Types into groups of your choosing. Please note that you will have to be the
administrator of your account (normally your ABTA number) in order to access this option in MiS.
All users can choose your transaction groupings but only the administrator may set them up.
To begin configuration select the Transaction groups maintenance screen from the menu.
You will see the following screen;
•
•
•
•
•
To create a new group
Over on the left, at the top of the grid there is a line where you can enter your new grouping, this must consist of at least
a Name and a Description. Names must be unique.
To edit a group
Click twice on the field you would like to change in the lower part of the left grid, you will be able to edit it. Click Save
when done and the system will record your change.
To attach a transaction type to a group
Click once on a group on the left, click once on a transaction type on the right, click once on "Attach Selected". You will
see the link appear.
To remove a transaction type from a group
Click once on the transaction type over on the right grid, click "release selected" the link will be removed.
To remove a group completely
Right click on the group over on the left grid, select delete. This will clear all items linked to this group and will remove it
from the database forever. A confirmation is presented prior to deletion.
To use your configured groups just choose them from the transaction criteria screen when building a report by selecting
Transactions and look at the top for the Transaction Group button*
*The Transaction Group button only appears when at least one group exists.