1
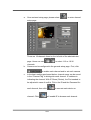
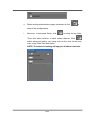
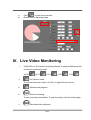
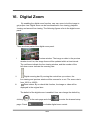
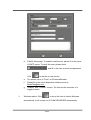
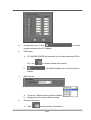
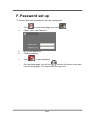
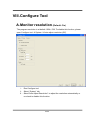
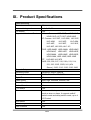
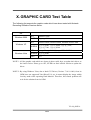
User Manual
IP Camera Recorder
1/32
Index
PREFACE .............................................................................................................................................................. 3
I.
SYSTEM REQUIREMENTS ..................................................................................................................... 3
A.
MINIMUM REQUIREMENTS ......................................................................................................................... 3
B.
SUGGESTED REQUIREMENTS ...................................................................................................................... 3
II.
PROGRAM INSTALL AND UN-INSTALL.............................................................................................. 3
A.
PROGRAM INSTALL .................................................................................................................................... 3
B.
UN-INSTALL ............................................................................................................................................... 3
III. SET UP DEVICES & HDD SPACE ........................................................................................................... 3
A.
SET UP IP CAMERA/ VIDEO SERVER ........................................................................................................... 3
B.
SET UP HDD TO RECORD VIDEO ................................................................................................................. 3
IV.
LIVE VIDEO MONITORING ................................................................................................................... 3
V.
VIDEO PLAYBACK ................................................................................................................................... 3
A.
VIDEO PLAYBACK ...................................................................................................................................... 3
B.
EXPORT VIDEO ........................................................................................................................................... 3
VI.
DIGITAL ZOOM ......................................................................................................................................... 3
VII. OTHERS....................................................................................................................................................... 3
A.
SCHEDULE RECORD SETTING ...................................................................................................................... 3
B.
MOTION DETECTION .................................................................................................................................. 3
C.
PTZ SET UP AND CONTROL ......................................................................................................................... 3
D.
I/O CONTROL ............................................................................................................................................. 3
E.
SYSTEM ..................................................................................................................................................... 3
F.
PASSWORD SET UP ...................................................................................................................................... 3
VIII. CONFIGURE TOOL................................................................................................................................... 3
A.
MONITOR RESOLUTION (DEFAULT: ON) ..................................................................................................... 3
B.
WINDOW CONTROL FUNCTION (DEFAULT: DISABLE) ................................................................................. 3
C.
ENABLE/ DISABLE “PC TIME” (DEFAULT: ON)............................................................................................ 3
D.
ENABLE/ DISABLE “PING” (DEFAULT: OFF) ................................................................................................ 3
E.
ENABLE/ DISABLE “USE OVERLAY” (DEFAULT: ON)................................................................................... 3
F.
BACKUP CONFIGURATIONS ........................................................................................................................ 3
2/32
IX.
PRODUCT SPECIFICATIONS ................................................................................................................. 3
X.
GRAPHIC CARD TEST TABLE ............................................................................................................... 3
3/32
Preface
IP Camera Recorder is a 36 Channel video recording software which supports IP
Camera, and Video Server . Users use this software to monitor real-time video,
record video on PC then playback recorded video when necessary.
IP Camera Recorder supports 3 different ways to record video, including schedule
recording, motion-triggered recording, and manual recording.
I. System Requirements
A.Minimum requirements
i.
ii.
iii.
iv.
v.
B.
i.
ii.
iii.
iv.
v.
CPU: Intel Pentium 4 2.0G
Memory: 512MB
VGA card: 128MB (ATI chipset suggested)
Monitor Resolution: 1024 x 768
OS: Windows XP / 2000
Suggested requirements
CPU:Intel Pentium D 3.2G or higher
Memory: 1024MB or higher
VGA card: 256MB or higher(ATI chipset suggested)
Monitor Resolution: 1024 x 768
OS: Windows XP / 2000
4/32
II. Program Install and Un-install
A.Program Install
i.
To install IP Camera Recorder, please double click
ii.
Please select the language for installation. IP Camera Recorder now
supports “English”, “Tradition Chinese”, and “Simplified Chinese”.
iii.
Next, please read and accept software License Agreement
5/32
.
iv.
Please select installation path. Default directory is “C:\Program
Files\IPCamera Recorder”. Click next
v.
Set up the name of the program folder. Default “IPCamera Recorder” is
recommended. Click “Install” to start the installation.
vi.
Click on Close to finish Installation.
6/32
vii.
To start the program, please follow 『Start』Æ『Programs』Æ『IPCamera
Recorder』Æ『IPCamera Recorder』
B.Un-install
a.
To remove the program, please follow 『Start』Æ『Programs』Æ
『IPCamera Recorder』Æ『Uninstall』.
7/32
III. Set up devices & HDD space
Before starting recording, please set up the IP camera/ Video server & HDD.
A.Set up IP Camera/ Video Server
There are 2 ways to set up the IP Camera/ Video Server
i.
Using Configure Tool
a. Select『Start』Æ『Programs』Æ『IP Camera Recorder』Æ『Tools』
Æ『Configure Tool』
b.
ii.
IP Installer function has been integrated in Configure tool. When
starting Configure tool, it will search IP camera & video server
automatically. To re-search the device, please click “Scan IP”
c. Select the IP camera/ video server you would like to add.
Drag-and-drop the device on video channel listed above. Then type
in correct ID (user name) & password of the device.
d. When finish the configuration, click “Save” to save all the
information.
Using IP Camera Recorder software:
Start IP Camera Recorder program, and select 『Setup』to enter setup
page.
8/32
a.
Once entered setup page, please select
to enter channel
setup page.
There are 18 channels listed on the left side of the administrator
page. Users can use
b.
to select 1-18 or 19-36
channels.
Camera can be configured in the general setup page. First, click
to enable each channel and to set each camera.
c.
In the basic setting as showed below, channel name can be saved
in the “Channel Tag” to distinguish each channel. IP address is
indicating the channel. With IP Share (Router), the Port needed to
be adjusted in case of conflict. Fills in the ID and the Password for
each channel, then click
channel. Click
to connect each device or
will enable IE to browse each channel.
9/32
d.
Within the Image setup page as showed below, users can change
image Resolution, Quality, Video Format, and Frame Rate.
e.
In the Information setting page as showed below,Tag / Date / Time
can be displayed on the live viewing。
f.
In the Display setting page as showed below,users can select
display mode.
When
is selected, only one I-Frame will be
transferred and displayed in live-viewing ;
When Click
, in the live view screen, if the
original video size is smaller than viewing frame, the video will show
it’s original size, and won’t be enlarged
10/32
If original video size is larger than the viewing frame, it will show it’s
original video size larger than the viewing frame, user may use the
sub-screen to scroll thru the area needed
g.
In the Audio setting page, if click on Enable Audio
the audio will be recorded with the video.
11/32
,
h.
Before exiting administration page, remember to click
to
save all the configurations.
i.
Moreover, in Advanced Setup, click
to setup the tag, Date
/Time and status location of each shown channel. Click
within advanced setting can setup such as the size, format and
color of tag, Date/Time and status.
NOTE: The advanced setting will apply to all shown channels.
12/32
B.Set up HDD to record video
To record video on PC with IP Cam Recorder, you must mount HD space first.
i.
Start the program, click on “setup”
click
to enter the setup page and
.
ii.
Before you mount the space, every time you log into the administration
page, the dialog box will show up to remind you to do this.
iii.
Click
iv.
v.
Select the Disk drive
.
Use the slide bar to set up the volume of the HD you would like to keep
to record the video.
to access this page.
13/32
vi.
vii.
Click
to start the procedure.
Please refer to following steps.
1
3
2
IV. Live Video Monitoring
i.
HVM-36IP is a 36 channel recording software. It supports different kinds
of real-time monitoring mode.
36-CH
ii.
, 16-CH
, 9-CH
, 4-CH
, 1-CH
.
: Full Screen mode:
To exit the full screen mode, use “Esc” or right-click the mouse.
iii.
: Minimize the program.
iv.
: Manual recording:
To start recording immediately. To stop recording, click the button again.
v.
: Recorded video playback.
14/32
vi.
: Get into administration page.
vii.
: Close the program
viii.
: When select the channel, by not checking
“disable digital zoom”, the extra image zoom will be displayed to control
the digital zoom in/out.
ix.
It shows the status of each channel.
Indicate the video recording status.
Indicate Motion Detection.
Indicate Alarm status.
x.
xi.
:I/O switch. Up to 4 channels ( if remote device supported)
: if the selected ch supports PTZ function,
double click on the ch to enter single screen mode, and the PTZ
interface will show in order to control Pan, Tilt, Zoom, Focus, IRIS, and
Preset Point.
xii.
: if the selected ch supports audio input/output, double click on
the ch to enter single screen mode, user may click on CHAT to start
two-way audio
15/32
V. Video Playback
Click
to enter video playback mode.
16/32
A.Video Playback
i、 Use calendar to select the date. As shown in the following figure, the
“day” means there are recorded videos in that day. For example, there
are videos in 2007/07/20.
ii、 After selecting the date, please click
to select the video
channel you would like to play.
iii、 When choose the date and video channel, it will show the recording
status.
a.
b.
c.
d.
No color: No video data.
Yellow: Motion-triggered recording data.
Red: Normal recofding data.
Gray:The time you choose to play.
iv、 Click
v、 Use
to start playback. Click
to pause it
to fasten the speed. 1x, 2x, 4x, 8x, 16x and 32x available
(depends on the hardware and total channels).
vi、 Use
to go to previous/ next frame.
vii、 Check “Show tag”, “Show time” to show title & time on each channel.
viii、
Check “Disable Digital Zoom” to disable digital zoom function.
ix、 Check “Event List” to see the event records.
B.Export Video
Video data can be exported as JPEG or AVI format besides playing back.
17/32
i.
ii.
Export as JPEG format:
. It will show the following dialogue box.
a.
Click
b.
The filename will be “channel number_yyyymmdd_hhmmss.jpg”.
Export as AVI format
. It will show the following dialogue box.
a.
Click
b.
Select “start time”, “end time”, “video channel”, and the directory to save
the video. Click
c.
d.
to start the procedure.
If audio recorded is needed, click on Includiing Sound
It exports the video into different AVI files for each channel if
multi-channel have been selected.
18/32
VI. Digital Zoom
By enabling the digital zoom function, user can zoom in/out the image to
get proper view. Digital zoom can be functionalized in live-viewing, playback
viewing and second live-viewing. The following figures refer to the digital zoom
panel.
There are there parts of the digital zoom panel.
i.
Preview window: The image or video in the preview
window is not live, the image frame will be updated within a time interval.
The red frame indicate the live-viewing window, and the number of the
left-down corner indicate the zooming rate.
Digital zooming bar: By moving the control bar up or down, the
ii.
live-viewing and preview window will be zoomed in or out. The zoom rate is
from 100% to 1000%.
iii.
Zoom status: By un-check this function, the image or video will be
displayed in the original size.
The default of the digital zoom is enabled. User can change the default by
clicking
page. Check
in the main page and click
to enter the channel setup
to disable digital zoom control.
19/32
VII. Others
A.Schedule record setting
IP Camera Recorder supports different recording mode for different channel.
i、 Enter setup page by click on
, then enter channel setup page by
click
.
ii、 In the channel setup page, first select channel #, then select『schedule』
tab to enter schedule recording page.
iii、 IP Camera Recorder supports 3 recording modes.
RED – Recording
YELLOW – Motion Detection Recording
White – No Recording
iv、 Select area of recording time first, then choose one of three recording
modes to activate recording mode.
v、 If you like to set all the channels with the same recording setting, you
may finish setting one channel first and click
setting on all other channels
20/32
to apply the
B.Motion Detection
Each channel can set up 3 areas to detect motion.
to enter setup page and click
i.
Click
ii.
Select channel to set up the motion, then select 『Motion』tab.
iii.
Detection Area Setting: Click area, use mouse to drag and draw the
area to detect motion.
Motion Sensitivity: adjust the sensitivity for each channel.
iv.
C.PTZ set up and control
IP Camera Recorder supports remote PTZ control.
i.
Click
ii.
Select the channel which supports PTZ as following figure, Select
『PTZ』
iii.
iv.
to enter setup page, then click
tab.
IP Camera Recorder supports different PTZ protocols.
Make sure choosing the right protocol, ID, baud rate.
21/32
v.
Detacting ponint preset setup: Please refer to following figure.
4
1
2
3
vi.
When finish the PTZ setup, use the control panel to control the PTZ.
22/32
D.I/O Control
i.
Get into administration page. Click
ii.
Select the channel which supports I/O, Select “IO ” tab.
iii.
IP CAM RECORDER supports 2 types of I/O. Users can determine
iv.
delay time interval from 1 to 60 seconds.
In the live-viewing, I/O interface may have different controller depending
on each channel or remote device.
E. System
i.
E-mail alert: When motion detection is triggered, IP Camera Recorder
sends the e-mail to some specific account.
a.
Get into administration page. Click
b.
Check
c.
Click
.
to get into setup page.
23/32
.
d.
E-MAIL setup page: To enable e-mail service, please fill in the name
of SMTP server. To verify the user, please check
,and fill in the user account and password.
Click
ii.
to test the e-mail service.
e.
f.
The default value of "From” is IPCameraRecoder.
Please fill in the e-mail destination address such as
[email protected].
g.
“Subject” and “Content” column: The title and the reminder of a
triggered event.
Windows reboot: Click
to set up the time to reboot Windows
automatically. It will re-start the IP CAM RECORDER automatically.
24/32
to run the
iii.
Program auto-run: Check
iv.
program whenever the PC reboots.
HDD setup:
a.
IP CAM RECORDER will overwrite the old data when the HDD is
full. Click
b.
to enable/ disable this function.
The default configuration of this function is
enable.
v.
Date Format:
vi.
a. There are 5 different date formats available
b. Please save the changes before exiting.
Product Information:
a.
Click
to show product information.
25/32
.
F. Password set up
IP Camera Recorder supports security user mangement.
to enter setup page, then click
i.
Click
ii.
Check “Use Local Password.
iii.
Key in new password
iv.
Confirm password
v.
Click
i.
Exit user setup page, you will see
at lower left corner in the main
live monitoring page. You may click on it to log in/out.
。
to save password
26/32
VIII. Configure Tool
A.Monitor resolution (Default: On)
The program resolution is at default 1024 x 768. To disable this function, please
open Configure tool Æ System Æ Auto adjust resolution (Off).
i、 Run Configure tool
ii、 Select “System” tab
iii、 Select”Auto Adjust Resolution” to adjust the resolution automatically or
un-check to disable this function.
27/32
B.Window Control function (Default:
Disable)
This function can only be used when screen resolution is set larger than 1024 x 768, and
can not be used with “Auto Adjust Resolution”. After enabled “Window Control”
function, if the screen resolution is larger than 1024 x 768, user may drag recording
software screen, and move it to preferred position.
C.Enable/ Disable “PC Time” (default: on)
By enabling this function, system will synchronize the camera/ web server/ DVR
time to the PC. Note: By disabling this function, the recording time of the
remote devices may different from the PC time.
D.Enable/ Disable “Ping” (default: off)
Some network device will disable the “ping” function. To connect IP camera/
video server which are protected by the firewall, please disable this function to
make sure it can connect correctly.
E. Enable/ Disable “Use Overlay” (default:
on)
Disable the overlay function if the graphic cards don’t support this function.
Note: By enabling overlay function will reduce CPU load and enhance PC
performance.
28/32
F. Backup Configurations
Use Configure tool to back up all the configurations. It will be very useful to
maintain the software using these configurations.
i、 Select the back up directory. You may open a new folder in the directory.
ii、 Click “Export” to export all configurations.
iii、 To import the configurations into IP Camera Recorder, select the backup
folder, click “Import”.
29/32
IX. Product Specifications
Video Monitoring
Channel
36
Live monitoring mode
1, 4, 9, 16, 36
Full Screen
Yes
Supported Hardware Device
Video
Server: HWS-01HP, HWS-01HE,
HWS-01HD, HVT-01HT, HWS-04HD
IP Camera: HLC-36F, HLC-36M, HLC-36P,
HLC-42M,
HLC-42P,
HLC-49M,
HLC-49P,
HLC-82F,
HLC-810,
HLC-82F, HLC-830, HLC-1CI
DVR: HDR-04MD, HDR-04MN, HDR-04MP,
HDR-04NP, HDR-04FE, HDR-04DE,
HDR-08MN, HDR-09MP, HDR-09RE,
HDR-16MN, HDR-16MP, HDR-16NE
PT: HLC-860, HLC-870
AXIS: 205, 206, 207, 210, 211A, 213, 214,
221, 225, 231D, 232D, 241 (4Ch
Server), 2100, 2110, 2120, 2130, 2420
Channel Setup
Recording mode
Schedule, Motion, Manual
Record resolutions
SXGA, D1, VGA, CIF, QCIF
Digtail Zoom
Yes
Video quality
best, high, standard, medium, low
Show title and time
Yes
Motion Detection
Yes
PTZ control
Yes
IO control
Yes, can activate preset alarm devices
such as siren or alarm, It supports on&off
switch mode and delay switch mode, up to 4
I/O Control
Auto reboot
Yes
Auto startup
Yes
Data overwrite
Yes
30/32
E-mail function
Yes, send mail when motion or sensor is
triggered
Video Playback
Video Search
By time
Video Export
JPEG, AVI
Digtail Zoom
Yes
Print image
Yes
Video Forward/ backward
1x, 2x, 4x, 8x, 16x, 32x(Depends on
hardware or the number of playback chanels)
Event warning
On screen display
Yes
E-mail warning
Yes, with event attachment
Security
Security setup
Yes, user password
Configure Tool
Hardware auto search
Yes
Auto resolution adjustment
Yes
Window Control Function
Yes, screen resolution must be larger than
1024 x 768
ON/OFF Ping function
Yes
ON/OFF time synchronization
Yes, synchronization between devices and
PC
ON/OFF overlay
Yes
Backup import/export
Yes
31/32
X. GRAPHIC CARD Test Table
The following list presents the graphic cards which have been tested with Network
Recording Software Premium series.
OS
Windows 2000
Windows XP
Windows Vista
ATI
RADEON 7500
NVIDIA GEFORCE 6200
ATI
RADEON 9200, RADEON 9550, RADEON XPRESS 200
NVIDIA
GEFORCE 6200, GEFORCE 6600, GEFORCE 7100,
GEFORCE 7300, GEFORCE 8500
ATI
RADEON XPRESS 200M, RADEON HD 2400 PRO
NVIDIA GEFORCE 8500
Intel
G33
NOTE 1: All the graphic cards which are shown in above table have to update their driver to
the latest version. Please go to ATI, NVIDIA or Intel official website to update the
driver.
NOTE 2: By using Windows Vista, due to Intel G33 Driver (Version: 7.14.10.1461) from its
OEM have not supported Vista DirectX 10 yet, it cannot display the image within
Overlay mode while operating Dual-Monitor. Therefore, this caused problem still
wait for the solution from its OEM.
V2.4.4_080516
32/32