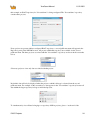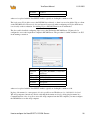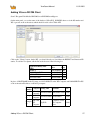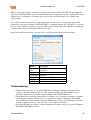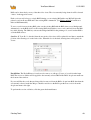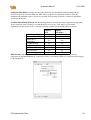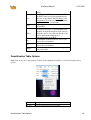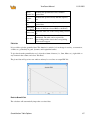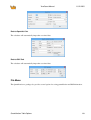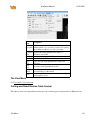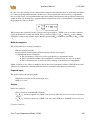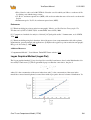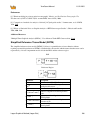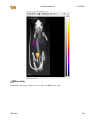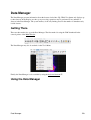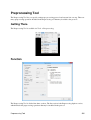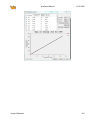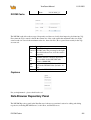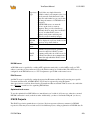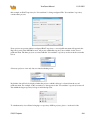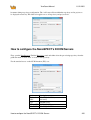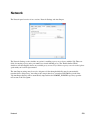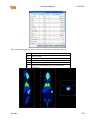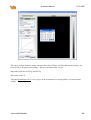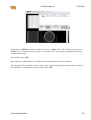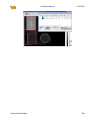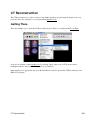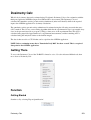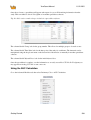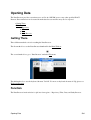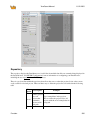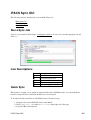
1
VivoQuant User Manual Version: Thu Nov 12 17:36:12 EST 2015 VivoQuant Manual Table of Contents VivoQuant Manual.............................................................................................................................................1 VivoQuant Installation.......................................................................................................................................2 Installation Quick Guide....................................................................................................................................3 1. Downloading........................................................................................................................................3 2. Installing..............................................................................................................................................4 A. Windows.......................................................................................................................................4 B. Mac OS X.....................................................................................................................................4 C. Linux.............................................................................................................................................5 3. License Registration.............................................................................................................................5 I. Active Accounts.............................................................................................................................5 II. Trail Accounts.............................................................................................................................5 4. Installing License Key.........................................................................................................................8 Installation Details..............................................................................................................................................9 Choose Components................................................................................................................................9 Choose Install Location.........................................................................................................................10 VivoQuant Configuration................................................................................................................................12 Configuration Panels..............................................................................................................................12 Getting There.........................................................................................................................................12 Display................................................................................................................................................................13 General...................................................................................................................................................13 Maximum Intensity Projection..............................................................................................................14 Color Palettes.........................................................................................................................................14 Data....................................................................................................................................................................15 Data Loading..........................................................................................................................................15 Quantification Options...........................................................................................................................17 Data Manager.........................................................................................................................................18 DICOM Settings................................................................................................................................................19 Getting There.........................................................................................................................................19 Configuration Dialog.............................................................................................................................19 DICOM Settings..............................................................................................................................20 DICOM Cache.................................................................................................................................21 Captures...........................................................................................................................................21 Data Browser Repository Panel.............................................................................................................21 DICOM Editor.................................................................................................................................22 iPACS Projects................................................................................................................................23 How to configure the NanoSPECT's DICOM Servers..........................................................................25 Adding VQ as a DICOM Client......................................................................................................27 Troubleshooting...............................................................................................................................28 i VivoQuant Manual Table of Contents Network..............................................................................................................................................................30 Registration.......................................................................................................................................................31 Getting There.........................................................................................................................................31 Contents.................................................................................................................................................31 Operators...........................................................................................................................................................32 Navigation..........................................................................................................................................................33 Getting There.........................................................................................................................................33 Function.................................................................................................................................................33 Scrolling.........................................................................................................................................34 Zooming.........................................................................................................................................34 Panning...........................................................................................................................................34 Resetting Viewport.........................................................................................................................34 MIP-Specific Function..........................................................................................................................34 VTK MIP........................................................................................................................................34 Classic (non-VTK) MIP.................................................................................................................35 Tooltip............................................................................................................................................35 3D ROIs..............................................................................................................................................................37 Overview................................................................................................................................................37 Getting There.........................................................................................................................................38 ROI Creation and Deletion....................................................................................................................39 ROI Loading, Saving, and Quantification Tools...................................................................................43 Painting Tools........................................................................................................................................47 2D Drawing Tools..................................................................................................................................49 3D Segmentation Tools.........................................................................................................................50 Expert Settings.......................................................................................................................................56 Undo/Redo Functionality.......................................................................................................................59 Quantification++...............................................................................................................................................60 Getting There.........................................................................................................................................60 Using the tool.........................................................................................................................................60 Choosing the View Direction..........................................................................................................61 Choosing the ROI type....................................................................................................................64 The Quantification Table.................................................................................................................65 Quantification Table Options..........................................................................................................66 File Menu........................................................................................................................................68 The View Menu...............................................................................................................................69 Cutting and Quantification Table Control.......................................................................................69 Reorientation/Registration Tool......................................................................................................................71 Getting There.........................................................................................................................................71 Using the Tool.......................................................................................................................................71 ii VivoQuant Manual Table of Contents Reorientation/Registration Tool 3D and 2D Manual Options.............................................................................................................73 3D and 2D Automatic Options........................................................................................................74 Menu Options........................................................................................................................................76 Automatic Non-Linear Registration......................................................................................................77 Automatic Slice-by-Slice Non-Linear Registration...............................................................................78 How to Set a Default Image Shift..........................................................................................................79 Time Series........................................................................................................................................................82 Getting There.........................................................................................................................................82 Using the Tool.......................................................................................................................................82 Saving a Movie......................................................................................................................................82 Distance/Annotation Tool.................................................................................................................................84 Getting There.........................................................................................................................................84 Using the tool.........................................................................................................................................84 Goto with-in the object....................................................................................................................85 Removing Distance Measures.........................................................................................................85 Profile..............................................................................................................................................85 Landmark-based Co-Registration....................................................................................................86 Checkerboard....................................................................................................................................................88 Getting There.........................................................................................................................................88 Using the tool.........................................................................................................................................88 Cropping tool.....................................................................................................................................................90 Getting There.........................................................................................................................................90 Using the tool.........................................................................................................................................90 Arithmetics........................................................................................................................................................92 Getting There.........................................................................................................................................92 Using the tool.........................................................................................................................................92 Filtering Tool.....................................................................................................................................................94 Getting There.........................................................................................................................................94 Using the tool.........................................................................................................................................94 Bias Field Correction.............................................................................................................................97 Modeling............................................................................................................................................................99 Getting There.........................................................................................................................................99 Function.................................................................................................................................................99 Models.................................................................................................................................................100 Two-Tissue Compartment Model (2TCM)...................................................................................100 One-Tissue Compartment Model (1TCM)....................................................................................102 Logan Graphical Method (Logan Plot).........................................................................................104 iii VivoQuant Manual Table of Contents Modeling Simplified Reference Tissue Model (SRTM)...............................................................................106 Simplified Reference Tissue Model 2 (SRTM2)..........................................................................108 Logan Non-Invasive Graphical Method (Logan reference plot)...................................................110 Patlak Analysis (Patlak Plot)........................................................................................................112 Main Window..................................................................................................................................................115 Menus...................................................................................................................................................115 Docks...................................................................................................................................................116 Thumbnails..........................................................................................................................................116 View Modes........................................................................................................................................117 Operators.............................................................................................................................................117 Display.................................................................................................................................................118 Projections vs. Reconstructions.....................................................................................................119 Save Image Data..............................................................................................................................................121 Getting There.......................................................................................................................................121 Function...............................................................................................................................................121 Save Movie.......................................................................................................................................................124 Getting There.......................................................................................................................................124 Function...............................................................................................................................................124 Docks................................................................................................................................................................127 Using docks..........................................................................................................................................127 Displays............................................................................................................................................................129 Slice View.........................................................................................................................................................130 Getting There.......................................................................................................................................130 Using the Slice View Display..............................................................................................................130 Scrolling Example.........................................................................................................................131 Scrolling Shortcuts Table..............................................................................................................132 Other Slice View Tools................................................................................................................133 Tile View..........................................................................................................................................................134 Getting There.......................................................................................................................................134 Using the Tile View Display................................................................................................................134 Multi View.......................................................................................................................................................137 Getting There.......................................................................................................................................137 Setting Up the Multi View Display.....................................................................................................137 Using the Multi View Display.............................................................................................................141 Navigation....................................................................................................................................141 Viewer Control in Multi View.....................................................................................................141 iv VivoQuant Manual Table of Contents MPR View........................................................................................................................................................143 Getting There.......................................................................................................................................143 Using the MPR View Display.............................................................................................................143 Capture Viewer...............................................................................................................................................145 Getting There.......................................................................................................................................145 Function...............................................................................................................................................145 Info................................................................................................................................................146 Convert..........................................................................................................................................147 Edit................................................................................................................................................147 Image View...................................................................................................................................148 View Menu.......................................................................................................................................................149 Slice Number...................................................................................................................................................150 Getting There.......................................................................................................................................150 Function...............................................................................................................................................150 Cross-hairs.......................................................................................................................................................151 Getting There.......................................................................................................................................151 Function...............................................................................................................................................151 Position Labels................................................................................................................................................152 Getting There.......................................................................................................................................152 Function...............................................................................................................................................152 Patient Name...................................................................................................................................................153 Getting There.......................................................................................................................................153 Function...............................................................................................................................................153 Active Indicator...............................................................................................................................................155 Getting There......................................................................................................................................155 Function...............................................................................................................................................155 Layout..............................................................................................................................................................157 Getting There.......................................................................................................................................157 Layout Options....................................................................................................................................157 Grid 2x2........................................................................................................................................157 Grid 1x4........................................................................................................................................158 MIP only........................................................................................................................................159 Slices only...................................................................................................................................160 Transverse only..........................................................................................................................161 v VivoQuant Manual Table of Contents Zoom.................................................................................................................................................................163 Getting There.......................................................................................................................................163 Function...............................................................................................................................................164 Zoom In.........................................................................................................................................164 Zoom Out......................................................................................................................................164 Normal Size...................................................................................................................................165 Full Screen.....................................................................................................................................165 Auto Zoom....................................................................................................................................165 Tools.................................................................................................................................................................167 VQScript..........................................................................................................................................................168 JavaScript structures............................................................................................................................168 Loop...............................................................................................................................................168 Function.........................................................................................................................................168 Array..............................................................................................................................................168 Hash...............................................................................................................................................168 The VQScript Toolbar.........................................................................................................................168 Adding Script Shortcuts to the Toolbar.........................................................................................168 VQScript Examples............................................................................................................................170 VQScript Objects and Object Methods........................................................................................................171 VQ Object............................................................................................................................................171 mainWin Object...................................................................................................................................175 dataManager Object.............................................................................................................................178 SliceViewer Object..............................................................................................................................179 Controler Object...................................................................................................................................180 MinMaxTool Object............................................................................................................................181 IPACSWebDisk Object.......................................................................................................................182 ZipArchive Object...............................................................................................................................182 DataList Object....................................................................................................................................182 mipViewer Object................................................................................................................................182 mipControler Object............................................................................................................................183 VTKController Object.........................................................................................................................183 VTKViewer Object..............................................................................................................................184 DicomRepository Object.....................................................................................................................185 Viewer Control................................................................................................................................................186 Getting There.......................................................................................................................................186 Function...............................................................................................................................................186 Sliders............................................................................................................................................187 Color Controls...............................................................................................................................187 Viewer Control in Multi-View.............................................................................................................187 vi VivoQuant Manual Table of Contents MIP Controls...................................................................................................................................................190 Getting There.......................................................................................................................................190 Function...............................................................................................................................................190 Playing a MIP Movie....................................................................................................................191 VTK Viewer..................................................................................................................................191 Data Manager..................................................................................................................................................193 Getting There.......................................................................................................................................193 Using the Data Manager.....................................................................................................................193 Ordering Data................................................................................................................................195 Options..........................................................................................................................................195 More Information..........................................................................................................................196 Min/Max Tool..................................................................................................................................................197 Getting There.......................................................................................................................................197 Function...............................................................................................................................................197 Histogram......................................................................................................................................198 Percentile Tool..............................................................................................................................198 Histogram........................................................................................................................................................200 Getting There.......................................................................................................................................200 Function...............................................................................................................................................200 Data Controls.................................................................................................................................201 File Controls..................................................................................................................................201 Preprocessing Tool..........................................................................................................................................202 Getting There.......................................................................................................................................202 Function...............................................................................................................................................202 Resample Data.................................................................................................................................................205 Getting There.......................................................................................................................................205 Using the tool.......................................................................................................................................205 DICOM............................................................................................................................................................206 DICOM Dump.....................................................................................................................................206 Getting There.................................................................................................................................206 Function.........................................................................................................................................207 Anonymizer..........................................................................................................................................209 Getting There.................................................................................................................................209 Function.........................................................................................................................................209 Rename DICOM Files.........................................................................................................................209 Getting There.................................................................................................................................210 Function.........................................................................................................................................210 Relabel Study.......................................................................................................................................210 Getting There.................................................................................................................................211 vii VivoQuant Manual Table of Contents DICOM Function.........................................................................................................................................211 Rename DICOM Files....................................................................................................................................212 Getting There.......................................................................................................................................212 Function...............................................................................................................................................212 Keyboard Shortcuts........................................................................................................................................213 Autoradiography Calibration........................................................................................................................216 Getting There.......................................................................................................................................216 Function...............................................................................................................................................216 Getting Started...............................................................................................................................216 Image Calibration..........................................................................................................................217 Image Magick..................................................................................................................................................219 Getting There.......................................................................................................................................219 Function...............................................................................................................................................219 Split Movie Into Frames...............................................................................................................219 Join Frames to Movie....................................................................................................................219 Change Delay................................................................................................................................220 Image to Poster..............................................................................................................................220 Image to Capture...........................................................................................................................220 How to make a dynamic movie....................................................................................................220 Update Check..................................................................................................................................................231 Getting There.......................................................................................................................................231 Function...............................................................................................................................................231 VivoQuant Configuration..............................................................................................................................232 Configuration Panels............................................................................................................................232 Getting There.......................................................................................................................................232 Display..............................................................................................................................................................233 General.................................................................................................................................................233 Maximum Intensity Projection............................................................................................................234 Color Palettes.......................................................................................................................................234 Data..................................................................................................................................................................235 Data Loading........................................................................................................................................235 Quantification Options.........................................................................................................................237 Data Manager.......................................................................................................................................238 viii VivoQuant Manual Table of Contents DICOM Settings..............................................................................................................................................239 Getting There.......................................................................................................................................239 Configuration Dialog...........................................................................................................................239 DICOM Settings............................................................................................................................240 DICOM Cache...............................................................................................................................241 Captures.........................................................................................................................................241 Data Browser Repository Panel...........................................................................................................241 DICOM Editor...............................................................................................................................242 iPACS Projects..............................................................................................................................243 How to configure the NanoSPECT's DICOM Servers........................................................................245 Adding VQ as a DICOM Client....................................................................................................247 Troubleshooting.............................................................................................................................248 Network............................................................................................................................................................250 Registration.....................................................................................................................................................251 Getting There.......................................................................................................................................251 Contents...............................................................................................................................................251 AdvancedModules...........................................................................................................................................252 Plug-In Modules..............................................................................................................................................253 Whole Body Atlas............................................................................................................................................254 Overview..............................................................................................................................................254 Getting There.......................................................................................................................................254 Adding to Reference Library...............................................................................................................255 Segmenting With The Tool..................................................................................................................256 Settings..........................................................................................................................................256 Select Images.................................................................................................................................257 Run Tool and View Log................................................................................................................257 Downloading Sample Library..............................................................................................................258 3D Brain Atlas Tool........................................................................................................................................259 Overview..............................................................................................................................................259 fMRI Brain Atlas Segmentation Tool...........................................................................................................260 Overview..............................................................................................................................................260 Install Atlas..........................................................................................................................................260 Getting There.......................................................................................................................................260 Load Data into the Tool......................................................................................................................261 Select an Output Repository................................................................................................................262 Customize Analysis Pipeline...............................................................................................................262 Motion Correction.........................................................................................................................263 Smoothing.....................................................................................................................................263 ix VivoQuant Manual Table of Contents fMRI Brain Atlas Segmentation Tool Anatomical Registration................................................................................................................264 Brain Mask....................................................................................................................................264 Atlas Registration..........................................................................................................................265 General Linear Modeling..............................................................................................................266 Run the Tool........................................................................................................................................267 Tumor Segmentation Tool.............................................................................................................................268 Overview..............................................................................................................................................268 LumiQuant....................................................................................................................................................269 Overview..............................................................................................................................................269 SPECT Tools...................................................................................................................................................270 QuantiCalc.......................................................................................................................................................271 Getting There.......................................................................................................................................271 Function...............................................................................................................................................271 Quantification Database................................................................................................................272 Specific Activity Calculator...........................................................................................................................273 Getting There.......................................................................................................................................273 Function...............................................................................................................................................273 SUV Calculator...............................................................................................................................................275 Getting There.......................................................................................................................................275 Function...............................................................................................................................................275 Crosstalk Removal..........................................................................................................................................277 Getting There.......................................................................................................................................277 Function...............................................................................................................................................277 Biodist. Visualization......................................................................................................................................278 Getting There.......................................................................................................................................278 Function...............................................................................................................................................278 Split Projections..............................................................................................................................................280 Getting There.......................................................................................................................................280 Function...............................................................................................................................................280 CT Tools...........................................................................................................................................................282 CT Reconstruction..........................................................................................................................................283 Getting There.......................................................................................................................................283 Function...............................................................................................................................................284 x VivoQuant Manual Table of Contents CT Reconstruction Reconstruction Parameters............................................................................................................285 Study Details, Progress, and Controls...........................................................................................285 Preview and Color Panel...............................................................................................................287 File Menu......................................................................................................................................288 Settings Menu................................................................................................................................289 Help Menu.....................................................................................................................................289 BatchCT Tool......................................................................................................................................291 Job List..........................................................................................................................................292 Status.............................................................................................................................................293 Log file..........................................................................................................................................293 File Menu......................................................................................................................................293 Jobs Menu......................................................................................................................................293 Hounsfield Calibration...................................................................................................................................295 CT Reconstruction..........................................................................................................................................299 Getting There.......................................................................................................................................299 Function...............................................................................................................................................300 Reconstruction Parameters............................................................................................................301 Study Details, Progress, and Controls...........................................................................................301 Preview and Color Panel...............................................................................................................303 File Menu......................................................................................................................................304 Settings Menu................................................................................................................................305 Help Menu.....................................................................................................................................305 BatchCT Tool......................................................................................................................................307 Job List..........................................................................................................................................308 Status.............................................................................................................................................309 Log file..........................................................................................................................................309 File Menu......................................................................................................................................309 Jobs Menu......................................................................................................................................309 Calibration.......................................................................................................................................................311 Getting There.......................................................................................................................................311 Function...............................................................................................................................................311 CT Geometrical Calibration..........................................................................................................................312 Getting There.......................................................................................................................................312 Function...............................................................................................................................................312 Calibration - MMP SPECT............................................................................................................................317 Getting There.......................................................................................................................................317 Function...............................................................................................................................................317 Templates.....................................................................................................................................319 xi VivoQuant Manual Table of Contents Near-Field Uniformity....................................................................................................................................325 Getting There.......................................................................................................................................325 Function...............................................................................................................................................325 Dosimetry Calc................................................................................................................................................329 Getting There.......................................................................................................................................329 Function...............................................................................................................................................329 Getting Started...............................................................................................................................329 Using the AUC Calculation...........................................................................................................330 File Management.............................................................................................................................................333 Opening Data...................................................................................................................................................334 Getting There.......................................................................................................................................334 Function...............................................................................................................................................334 Repository.....................................................................................................................................335 Filter..............................................................................................................................................336 Data...............................................................................................................................................338 Study Browser...............................................................................................................................339 Right-Click function............................................................................................................................340 Within Database or iPACS Server................................................................................................340 Within a Local Repository...........................................................................................................341 Open Data........................................................................................................................................................342 Getting There.......................................................................................................................................342 Function...............................................................................................................................................342 File Formats...................................................................................................................................343 Append Data....................................................................................................................................................344 Getting There.......................................................................................................................................344 Function...............................................................................................................................................344 File Formats...................................................................................................................................345 Open Raw Data...............................................................................................................................................346 Getting There.......................................................................................................................................346 Function...............................................................................................................................................346 Sessions.............................................................................................................................................................348 Getting There.......................................................................................................................................348 Session Manager..................................................................................................................................349 Help..................................................................................................................................................................351 xii VivoQuant Manual Table of Contents Debug...............................................................................................................................................................352 Getting There.......................................................................................................................................352 Function...............................................................................................................................................352 Manual.............................................................................................................................................................353 Getting There.......................................................................................................................................353 Function...............................................................................................................................................353 About................................................................................................................................................................355 Getting There.......................................................................................................................................355 Function...............................................................................................................................................355 VQ Reporter....................................................................................................................................................356 How to use the VQ Reporter Tool.......................................................................................................356 iPACS Sync......................................................................................................................................................362 Batch Transfer Data to and from the iPACS.......................................................................................362 Download WebDisk files in batch using iPACS Sync........................................................................362 Download individual files from the iPACS via iPACS sync...............................................................362 Configure a Sync Job......................................................................................................................................363 Create a Sync Job using the Wizard....................................................................................................363 Configuring Additional Settings..........................................................................................................364 iPACS Setup........................................................................................................................................365 Directory Setup....................................................................................................................................365 Scheduler..............................................................................................................................................366 Notifications.........................................................................................................................................366 Advanced.............................................................................................................................................367 Store Job..............................................................................................................................................368 iPACS Sync GUI.............................................................................................................................................369 Run a Sync Job....................................................................................................................................369 Icon Descriptions.................................................................................................................................369 Quick Sync...........................................................................................................................................369 Troubleshooting..............................................................................................................................................371 Trouble shooting categories.................................................................................................................371 Service Reporter...................................................................................................................................371 Memory configuration....................................................................................................................................372 Windows 32-bit....................................................................................................................................372 Windows 64-bit....................................................................................................................................372 Mac OS X............................................................................................................................................372 xiii VivoQuant Manual Table of Contents Debug...............................................................................................................................................................373 Getting There.......................................................................................................................................373 Function...............................................................................................................................................373 Saving 3D ROI Images/Movies......................................................................................................................374 Known issues with graphics card.........................................................................................................374 VQ Keywords..................................................................................................................................................375 .............................................................................................................................................................375 / 2 3 A B C D E F G H I J K L M N O P Q R S T U V W Z..............................................................375 /............................................................................................................................................................375 2...........................................................................................................................................................375 3...........................................................................................................................................................375 A...........................................................................................................................................................375 B...........................................................................................................................................................375 C...........................................................................................................................................................376 D...........................................................................................................................................................376 E...........................................................................................................................................................377 F...........................................................................................................................................................377 G...........................................................................................................................................................377 H...........................................................................................................................................................378 I............................................................................................................................................................378 J............................................................................................................................................................378 K...........................................................................................................................................................378 L...........................................................................................................................................................378 M..........................................................................................................................................................379 N...........................................................................................................................................................379 O...........................................................................................................................................................379 P...........................................................................................................................................................379 Q...........................................................................................................................................................380 R...........................................................................................................................................................380 S...........................................................................................................................................................380 T...........................................................................................................................................................381 U...........................................................................................................................................................381 V...........................................................................................................................................................381 W..........................................................................................................................................................382 Z...........................................................................................................................................................382 xiv VivoQuant Manual VivoQuant supports the processing and analysis of image data across multiple modalities including PET, SPECT, CT, MR, and Optical. Up to 3 modalities can be displayed simultaneously, and any number can be co-registered. DICOM, NifTi, and 15+ native data formats (Bruker, Inveon/Siemens, etc.) can be imported for processing. Images and quantification results can be easily exported in a variety of formats (image, movie, spreadsheet). Communicate with any DICOM client including seamless integration with inviCRO's iPACS® data management platform for bi-directional data transfers. VivoQuant Manual 1 VivoQuant Installation • Installation Quick Guide • Installation Details • Configuration • Memory Configuration VivoQuant Installation 2 Installation Quick Guide This document should guide you through the first steps to get VivoQuant running on your system: 1. Downloading 2. Installing 3. License Registration 4. Installing License Key 1. Downloading Please point your favorite web browser to the VivoQuant Download Page for access to the latest stable release. Development releases are available for download here listed in the Download section on the left side. Versions (alpha, beta, rc, stable, patch) Alpha version Beta version Release candidate Stable version Besides the last couple of stable releases, the web page may also offer preview and test versions. For a production system you should use either stable or if available patch releases. These versions are divided in four classes: Class stable release Installation Quick Guide Description 3 VivoQuant Manual patch release release candidates beta versions alpha versions 11/12/2015 These versions are the officially released and fully tested versions of VivoQuant. They have undergone intensive testing by our software developers, service engineers as well as selected expert users. Unless you require a special feature only available in a newer version, or want to participate in the software testing process, we recommend to only use these stable releases in productive environments. Subsequent changes to stable versions are released as patched versions. Such releases only contain few and significant bug fixes established after the release of the original stable version and no other updates. Further stable releases will, unless noted otherwise, also contain such patches. At the end of the development cycle, multiple release candidates (rc) are released, which allow users to sneak a peek on upcoming versions. These versions have undergone testing by inviCRO and are send to our partnering expert users for evaluation. Depending on the feedback of actual users release candidates are modified to fix last bugs and finally reissued as a stable release. Consequently, rc versions are often already stable with only minor problems to be fixed, thus allow you to use new features early. However, rc versions are not officially supported. Release candidates have a limited life time of 90 days. These test versions are mainly intended for software testers. They have not undergone the testing cycle required for a release candidate. You can use these versions are your own risk. Beta versions have a limited life time of 30 days. These versions are mainly used for testing within inviCRO and associated partners. Alpha versions have a limited life time of 15 days. 2. Installing A. Windows Double-click the VivoQuant install icon to start the installer. Follow the sequence of set-up steps carried out by the Installer. Please accept the default settings, or change the options according to your needs. A detailed description of the install options can be found in Installation Details. B. Mac OS X Double-click and unzip the VivoQuant zip archive. 1. Downloading 4 VivoQuant Manual 11/12/2015 Double-click the VivoQuant installer package to start the installer. The only step necessary to complete the installation is to select the disk VQ will be installed on. VivoQuant will then be located in the Applications folder. C. Linux Double-click and unzip the VivoQuant zip archive, then move the VivoQuant folder to the desired location. To run VQ, double-click the VivoQuant script contained in this folder. 3. License Registration I. Active Accounts VivoQuant License Management Site - manages all licenses allocated to an account. An on-site license manager login credential will be provided to each account to access the VivoQuant License Management Site. For detailed information on how to manage your acount's VivoQant licenses Click Here. II. Trail Accounts Methods for Obtaining a Trial License If you are a current end-user and have an active software account, contact your account representative for a trial license of a plugin module. Your account representative will pre-approve the trial license and you should follow section II.b. below. If you do not have an active account, please follow the below steps. a. Requesting a Trial License • Download the latest stable version of VivoQuant. Once you have successfully installed VivoQuant, you will be prompted to register your computer. Click 'Yes'. • Make sure the company code is 'DEMO'. Use the email address you wish to have the license key file sent to. B. Mac OS X 5 VivoQuant Manual 11/12/2015 • After clicking 'Register', your Internet Browser will load and navigate to the license registration confirmation page. Click 'Submit' and a trial license will be sent to you shortly. b. Pre-approved Licenses • An account manager can issue a license to an end-user. Upon issuing a license, an email notification will be sent to your email with instructions for downloading the VivoQuant software and installing II. Trail Accounts 6 VivoQuant Manual 11/12/2015 the license key. After the software has been successfully installed, you will be prompted to register your computer for a license. Click 'Yes'. • Enter the company code provided in the email along with the email address to which the registration email was sent. • After clicking 'Register', your Internet Browser will load and navigate to the license registration confirmation page. You will need to enter the password provided in your email to finalize the process. II. Trail Accounts 7 VivoQuant Manual 11/12/2015 • After you click 'Submit', the system will validate the request. If successful, the below page will appear. 4. Installing License Key If the end-user's computer has internet access, VivoQuant will automaticaly detect and install a pre-approved license key. If the end-user's computer does not have internet access, he or she will need to download the license provided in the link and install manually. To install a license key file manually, go to Help -> Registration within VivoQuant and click on 'Install key'. Your VQ is now registered and fully operational. If you experience any problems, please contact [email protected]. 4. Installing License Key 8 Installation Details After accepting the VivoQuant license, you have the option to choose components which allows you to tailor the installation to your specific needs. Please note, that it is typically safe to accepts the default settings, though. Choose Components Component Description Unless you already have Qt installed on your system, it is highly Qt4 libraries recommended that you use the version coming with VQ. Installs the IM programs mpeg2encode (required for generation of ImageMagick MPEG movies) and convert (general tool to convert image formats, binaries not required by VQ). After installation, the manual is available by pressing <F1> on the main VQ screen, or using the Help|Manual menu. Manual Alternatively, you can also find the manual online at http://www.vivoquant.com/manual/index.html. BatchCT Install the BatchCT service, allowing reconstruction of CT data sets service without further user interaction. Experimental options to allow VQ to be used in an 21 CFR part 11 21 CFR part 11 environment (FDA's electronic record keeping regulations). Installation Details 9 VivoQuant Manual 11/12/2015 Shortcut on desktop Options CT Disable options Debugging Install an VQ icon on Windows desktop. Place a quick start icon for the CT CTReco shortcut on reconstruction module on desktop. CT desktop Reconstruction DicomBrowser Allows starting of VQ with opened shortcut on desktop DicomBrowser quickly. Open DICOM data Add local DICOM Adds an example DICOM folder to the list of folder repositories. Allows access to an online PACS system to Add DEMO iPACS download example data and share your data with other users. Adds a write-only online PACS system (reading requires password) to allow you to comfortably Add Service iPACS send data to our service engineers. Please see iPACS Service Repository for details. When enabled, VQ regularily checks for the availability of new versions and offers you to Enable update check download and install them. Please see Update Check for details. Exports data required by VQ Run BatchTool-Dump BatchFileGenerator from HiSPECT database. BatchTool Generator These options should be reserved for advanced users. Reduces the amount of memory required Disable use of normalization in CT reconstruction, however, matrix invalidates HU calibration for helical acquisition orbits. Forces VQ to use only a single thread Disable multi-threaded (i.e. utility only single CPU or core) for reconstructions reconstruction, thus reducing efficiency on SMP systems. Disable Hounsfield Turns off application of Hounsfield calibration calibration data. Hounsfield Calibration. These options allow us to debug problems in VQ. Choose Install Location For the destination folder, it is recommended to keep the default settings. However, if you would like to install multiple versions of VivoQuant on your system, you can choose a different install location here. Choose Components 10 VivoQuant Manual Choose Install Location 11/12/2015 11 VivoQuant Configuration The VivoQuant Configuration window has several panels, providing access to customizable features as well as important registration and set-up information. Configuration Panels The Configuration window consists of six panels, including: • Display • Data • DICOM Settings • Network • Registration • VivoScript Getting There The Configuration window is available in the Tools Menu on the PC. On the Mac, it is available in the VivoQuant menu under Preferences. Another method for reaching the Configuration window to use the keyboard shortcut "Ctrl+Shift+C". For more on keyboard shortcuts in VivoQuant, please see Keyboard Shortcuts. VivoQuant Configuration 12 Display Several appearance features of VivoQuant may be customized in the Display panel, including General display information, Maximum Intensity Projection attributes, and Color Palette defaults. General Option Description Several font styles are available for display in the Font Style Main Window. Controls the size of the displayed text in the Main Font Size Window Cross-hair A variety of cross-hair styles are available for use in style the Main Window. Cross-hair Cross-hair color options include red, yellow, color magenta, white, green, and blue. Pal files hold the color map information for the Pal Path different Color Palettes available in the VQ. Preview Displays a preview of the font and cross-hair Panel selections. Provides option to view the data in the Radiologist Orientation View (face to face) or Neurologist View (mirror). Diagrams are used to show the difference. Display 13 VivoQuant Manual 11/12/2015 Maximum Intensity Projection Option Frame Time Display Frame Delay Movie No. of views Description Sets the amount of time for which each MIP projection image is displayed in a saved movie. Sets the delay time between MIP frames in a saved movie. Sets the number of projection angles computed to construct the MIP. With sync mode enabled, only completed MIP frames will be displayed. With sync mode disabled, the MIP Sync mode will freely rotate at all times but will display a message in place of the MIP for uncompleted frames. Color Palettes The default Color Palettes for the Reference and Input data sets can be changed using the drop-down menus. Maximum Intensity Projection 14 Data The Data panel contains options for data handling, including data loading and quantification. Data Loading Use the 'Data Loading' panel to set loading options. Option Description Check the box to disable the MIP viewer upon Disable MIP loading. For large datasets, this can improve the viewer loading speed. Check the box to enable VivoQuant to ask for Ask Disable your permission to initialize the MIP viewer upon MIP loading. For large datasets, this can improve the loading speed. Choose 'yes' to allow the addition of zero-padding to a reference image to match the volume of an input image, or 'no' to keep the reference image size static (and Grow reference to potentially crop the input image, if it is larger input volume than the reference). Choose 'ask' to allow a window to appear upon loading in an input 1 data set that is larger than the image in the reference position. Max voxsize Specify the maximum pixel ratio (largest pixel ratio for vol. dimension / smallest pixel dimension) by which a Data 15 VivoQuant Manual 11/12/2015 data set is interpolated as a volume image file. Specify the minumum allowed voxel width. Data will be resampled upon loading if their voxel MinVoxSize width is less than the specified minimum. The voxel width will be doubled until it exceeds the minimum. Specify where to anchor the input data. Data can Anchor input be anchored at the following options: center, data head, or foot. In the above image, LD represents the out-of-plane resolution and the X and Y represent the in-plane resolution. If the pixel ratio of the loaded image exceeds the given threshold, i.e. MaxVoxSizeRatio < LD/X, the data set will be loaded as a planar 2D by n file. Below is an example MR** image loaded as a planar 2D by n file. Data Loading 16 VivoQuant Manual 11/12/2015 If the pixel ratio of the loaded image is less than the given threshold, i.e. MaxVoxSizeRatio > LD/X, the data set will be loaded as an interpolated volume image with isotropic voxels. Below is an example MR** image loaded as an interpolated volume file. **Other modalities besides MR can be loaded into VQ as planar or interpolated volume files based on the Max voxsize ratio for volume setting specified in the configuration window. Note: As described on the Open DICOM Data help page, • If the 'Force Planar' check box is checked in the Data Browser, then the image will load in planar mode regardless of the value set for MaxVoxSizeRatio. • If the 'Force Planar' check box is unchecked in the Data Browser, then the image will load in the appropriate mode according to the value set for MaxVoxSizeRatio. Quantification Options Use the 'Quantification Options' panel to set options used by the Quantification++ Operator and the 3D ROI Operator. Option Description Select the unit to be used for quantifying SPECT data. Options include MBq, kBq, mCi, and µCi. Note: Concentration units (e.g. nCi/cc) will not be Units of converted to the unit of activity specified. The Tumor Activity Segmentation and NM/CT Brain analysis plugin modules do support converting from concentration units to units of µCi. CSV Choose the CSV file delimiter of their choice, applied Separator when saving Quantification data. Quantification Options 17 VivoQuant Manual 11/12/2015 Data Manager In the "Data Manager" panel, there is a checkbox to enable or disable a confirmation message when moving data. Option confirm moving Show seconds in Browser Apply default shift Data Manager Description Check to enable a confirmation message when rearranging data in the Data Manager Check to display the seconds in the study date column in the DICOM browser. VQ has to be restarted to configure this change. Check to apply a default reorientation to data being loaded into VQ. The default shift can be defined in the Reorientation/Registration operator. For more on this, please see the Reorientation/Registration page 18 DICOM Settings The DICOM configuration allows the user to add/edit DICOM repositories. These repositories can be local folders containing DICOM files or DICOM network servers located on the local or a remote computer. The DICOM Dictionary is used by the DICOM Dump to identify information in the DICOM header. A How-To on configuring the NanoSPECT's DICOM Servers in the VQ is provided. Getting There There are three methods available to access the DICOM Repositry. First, the repository index is accessible via the Repository panel in the Data Browser. The second method is to select the Configuration option in the Tools menu and to then click on the DICOM panel. The third method is to reach the Configuration panel using the "Ctrl+Shift+C" shortcut. For more on keyboard shortcuts in VQ, please see Keyboard Shortcuts. Configuration Dialog The DICOM panel in the Configuration Tool provides the most in-depth DICOM information available in VQ. The DICOM panel consists of three sections: DICOM Settings, DICOM Cache, and Capture. DICOM Settings 19 VivoQuant Manual 11/12/2015 DICOM Settings Option Description Location of local DICOM database. Allows optimized internal access to the DB path Mediso DICOM database. See Optimized local access for details. List of available repositories. The bank of buttons immediately beneath the Repositories pulldown menu operate on the selected repository in this field Check connection to DICOM repository. Local folders are verified to exist and a C-ECHO is sent to DICOM servers. Add a new repository Delete selected repository Open the DICOM Editor Shows list of additional dictionaries used by the DICOM library. Please set Dictionary environment variable DCMDICTPATH to set this value. For more on the DICOM dictionary, see DICOM Dump Port over which the DICOM peer sends Rcv Port data. When this box is checked, the palette window will be loaded in accordance load palette with the image data. When this box is not checked, the palette window will be % set to whatever the window was set to last. Checking this box enables support for DICOMDIR DICOMDIR files. Folder Filter Allows users to dictate the type of dicom files loaded into VQ. Users can configure loading extensionless dicom data by adding a space and * to the end of the default settings: DICOM Settings 20 VivoQuant Manual 11/12/2015 DICOM Cache The DICOM cache allows the storage of frequently used data sets locally, thus improving load time into VQ. Every time the VQ is started, it checks the current size of the cache against the maximum cache size. If the currect cache size exceeds the maximum cache size, then older files (those opened least recently in the VQ) are removed. Option Description Size in Mb of the data currently stored in the Current DICOM Cache. The percentage to the right Size of the field indicates how close the cache is to capacity. Maximum amount of memory that can be Max made available for the DICOM Cache size (default = 1000.0 MB). Length of time over which data will be Life stored in the DICOM Cache (default = 14 Time days). Clear Empties the DICOM Cache Captures Not yet implemented -- please check back soon! Data Browser Repository Panel The DICOM Repository panel in the Data Browser is the most convenient location for adding and editing repositories, including DICOM Servers, local folders, and PACS Servers. DICOM Cache 21 VivoQuant Manual 11/12/2015 Option Description List of available repositories. The bank of buttons immediately beneath the pulldown menu operate on the selected Repositories repository in this field. Please click here to learn more about the DICOM repository section of the DICOM browser. Check connection to DICOM repository. Local folders are verified to exist and a C-ECHO is sent to DICOM servers. Add a new repository. edit: Open the DICOM Editor. Opens a Windows Browser that can be used to select a local folder as a repository. Fetch all DICOM meta data. Remove repository from list. DICOM Editor The DICOM Editor is used to add repositories, including DICOM Servers, PACS Servers, or local folders. Option Description Name as shown in the repository selection Displayed box. Can contain any alphanumeric Name character. Data Browser Repository Panel 22 VivoQuant Manual 11/12/2015 Repository Local folders are simple directories Type available on the local computer (also via a shared network). Such directories with many files take rather long to scan. in this case the performance of a DICOM server is superior. Such DICOM servers are network services on the local or a remote computer. They provide a database to efficiently browser study data. An iPACS server is an online PACS server, a regularly used picture archiving and retrieval system for medical images. Local Select a local directory. All sub-folders DICOM will be displayed as projects in the second folder repository drop-down window. DICOM server Username and password are specific to the user for their site's iPACS system. Hostname will be the site of the server for iPACS the iPACS and Port is the communication server channel through which the iPACS server communicates. DICOM server A DICOM server is specified by a calling AET (application entity title), a called AET as well as a TCP address (consisting of a host name and a port, the default settings are localhost:104). The AETs have to be configured on the DICOM server, too. For VivoQuant use port 23104 on the remote server. iPACS server An iPACS server is specified by setting the appropriate Hostname and Port and by entering user-specific Username and Password. A DEMO iPACS server may be registered by using Hostname: demo.ipacs.invicro.com, Port 80 and leaving Username and Password blank. iPACS servers also enable the use of Projects, a useful tool for organizing DICOM data. Optimized local access To use the optimized local DICOM access (much faster) use 'localhost' (all lower case, otherwise a normal DICOM connection is used) as the host name. Additionally, you have to define the 'DB path' (see above). iPACS Projects The iPACS repositories permit the use of projects. Projects represent a directory structure for DICOM repositories. Data may be stored and accessed via different projects, aiding organization of DICOM data. In DICOM Editor 23 VivoQuant Manual 11/12/2015 this example, an iPACS repository for "bioscan/demo" is being configured. The "bioscan/demo" repository contains three projects. If any projects are present within a configured iPACS repository, a second pulldown menu will appear in the Repository panel of the DICOM browser. All projects within that repository are available via the second pulldown menu. The three projects associated with the "bioscan/demo" repository are shown in the screenshot below. Select any project to view only data associated with that project. By default, data will only be displayed when the project to which it belongs is selected from the second pulldown menu. For example, in this screenshot, no data appears in the "bioscan/demo" repository because all data within the larger repository belongs to individual projects. To simultaneously view all data belonging to a repository AND its projects, place a * at the end of the iPACS Projects 24 VivoQuant Manual 11/12/2015 hostname during respository configuration. The * will cause all data within the repository and its projects to be displayed recursively. This behvavior applies across all repository and project levels. How to configure the NanoSPECT's DICOM Servers First, open the Data Browser. Find the Repository panel and either select the pre-existing repository from the pulldown menu or select "new" to create a new repository. For the standard access on the NS Workstation (WS), use: Option Displayed Name Type Calling AET Called AET Description NSxxWS_DCMSRV (or customer's preference) DICOM Server INVIVOSCOPE NSxxWS_DCMSRV How to configure the NanoSPECT's DICOM Servers 25 VivoQuant Manual Hostname Port 11/12/2015 localhost 104 where xx is replaced with the NanoSPECT number, typically no leading 0 for numbers < 10. The local access VQ is able to access the DICOM Server directly, so there is no need to add the VQ as a client on the DICOM Server. However, it does not hurt and is necessary when configuring an VQ for which access is not locally on the workstation. See Adding VQ as a DICOM Client for more information. The above table described configuring VQ to access the Workstation DICOM Server. VQ may also be configured to access the Acquisition computer's DICOM Server. The procedure is similar, but there is no WS in the naming convention. Options Displayed Name Type Calling AET Called AET Hostname Port Description ACQ_NSxx_DCMSRV (or customer's preference) DICOM Server INVIVOSCOPE NSxx_DCMSRV nanospectxx 104 where xx is replaced with the NanoSPECT number, typically no leading 0 for numbers < 10. In place of hostname (i.e., nanospectxx), it is also possible to use IP addresses (i.e., 192.168.1.1 for local WS-ACQ computer connections). Please verify that the hostname resolves by using 'ping hostname' in a Command window. Also, in order to access the ACQ computer from the WS computer, you must configure the DICOM Server on the ACQ computer. How to configure the NanoSPECT's DICOM Servers 26 VivoQuant Manual 11/12/2015 Adding VQ as a DICOM Client Start C:\Program Files\Mediso\DICOM Server\DICOMServerMgr.exe On the main panel, you see the name of the database (NSxx(WS)_DCMSRV where xx is the NS number and WS is present on the workstation) which should be used as the Called AET. Click on the "Clients" button. On the WS, you should already see listed there the HiSPECT and InterviewXP entries. To add the VivoQuant, add the line at the bottom of the following list. Application Entity Title (AET) HiSPECT HiSPECT_BATCH INTERVIEWXP INVIVOSCOPE Host Port LOCALHOST 3104 LOCALHOST 3105 LOCALHOST 11112 HOSTNAME 23104 In place of HOSTNAME in the VQ entry, use LOCALHOST on the WS Computer and NANOSPECTxxWS or the workstation IP address on the ACQ computer. Example Computer Calling AET Hostname Port Number Example NS5 ACQ INVIVOSCOPE NANOSPECT5WS 23104 #1 Computer Example NS13 WS INVIVOSCOPE LOCALHOST 23104 #2 Computer NS13 2nd IP Address or 2nd Example WS VQ-WS2 WS Computer 23104 #3 Computer Name Adding VQ as a DICOM Client 27 VivoQuant Manual 11/12/2015 What is of importance in this configuration is not the specific name "INVIVOSCOPE" but the fact that the same name "INVIVOSCOPE" was used in the DICOM Client Configuration and at the "Calling AET" in the VQ Repository Configuration. To illustrate this point, note the client in the image above with the name "VQ_anyname". Also, separate names must be used for each configuration. In other words, to configure the VQ on a 2nd workstation, would require changing "INVIVOSCOPE" to something different, like "VQ-WS2". For example, let's say a 2nd workstation was being set up for the NS13. In the Client Panel of the DICOM Server Manager, a client would be added as in Example #3 in the above table. In the VQ on the 2nd workstation, a new repository would be created with the following settings. Option Displayed Name Type Calling AET Called AET Hostname Port Description NS13WS_DCMSRV (or customer's preference) DICOM Server VQ-WS2 NS13WS_DCMSRV nanospect13ws (or IP) 104 Troubleshooting • Double-check the settings in VQ and the DICOM Server Manager. Remember that they may be running on the same computer (VQ on the WS computer talking to the WS DICOM Server) or different computers (VQ on the WS computer talking to the ACQ DICOM Server). • Check the network connection between the two computers. Can you ping the "hostname" configured in VQ from the computer running VQ? Can you ping the "hostname" configured in the DICOM Server Manager from the computer running the DICOM Server? If not, try switching the "hostname" from the computer's name (i.e., nanospect13ws) to the computer's IP address. • Check the DICOM Server logfiles (on the computer that you want to access), located in C:\Program Files\Mediso\DICOM Server\logs. Troubleshooting 28 VivoQuant Manual 11/12/2015 • Enable debugging in the VQ and collect output while trying to access the DICOM Server. Troubleshooting 29 Network The Network panel consists of two sections: Network Settings and Auto Import. The Network Settings section includes an option for enabling a proxy server for use with the VQ. There are fields for entering a proxy and a port number associated with that proxy. The "Enable Online Check" checkbox will automatically detect any available proxy servers. If you believe a proxy server is needed, please speak with your local IT representative. The Auto Import settings may be used to designate a folder through which files may be automatically transferred into a Repository. According to the setup in the above screenshot, DICOM files placed in the VQ-AutoImport directly will be automatically imported into the NS00WS_DCMSRV repository upon the next restart of the VivoQuant. Network 30 Registration Getting There The registration panel may be reached from the Configuration Panel or it may be reached directly via the Help menu. Contents The Registration panel includes VQ user information. The panel includes fields for Institution, Department, Contact email address, enabled VQ options, license status, and license expiration date. The panel is also used for registering the VQ upon start-up. Three buttons -- Install key, HW Keys, Register -- assist the user in registering the VQ. Registration of the VQ is required to unlock most of the VQ features. Please see the Registration Quick Guide for details on registering the VQ. Registration 31 Operators VivoQuant offers several operators for performing a wide range of image processing tasks. • Navigation • 3D ROI Tool • Quantification++ • Reorientation/Registration • Time Series • Distance/Annotation • Checkerboard • Cropping • Arithmetics • Filtering • Modeling Operators 32 Navigation The Navigation operator is automatically selected when VivoQuant is opened. This tool enables you to manually scroll through the image slices and rotate the Maximum intensity Projection (MIP). Similar functionality is available via the Viewer Control tool. Note: this page is concerned with Navigation in Slice View. While navigation is similar in other view modes, the keystrokes and movements described below may not produce identical behavior. For information regarding navigation in other view modes, see the Tile View, Multi View, or MPR View pages. Getting There To enter the panel, select Navigation via the tool pull-down menu on the VQ front panel. Several methods exist for operating the slice control Navigator. Manual manipulation using a mouse is described below. Another tool, the Viewer Control offers a wider array of options for controlling the Navigator window. Function Navigation through the viewports includes scrolling through slices, zooming and panning. Navigation 33 VivoQuant Manual 11/12/2015 Scrolling To scroll through the individual slices, move the mouse cursor up and down or to the side on the different viewports (sagittal, coronal or transverse). A mouse wheel may also be used to scroll through slices or to rotate the MIP. When in Slice View or in Multi View with "Link Views" checked, scrolling is not independent across viewports; scrolling in one viewport will affect the other viewports. Zooming To zoom in or out within a viewport, hold the "Shift" key and move the mouse wheel forward or backward, respectively. Zooming is independent across viewports; zooming in one viewport has no affect on others, and all viewports may be zoomed to different amounts. Panning To pan within a viewport, hold the "Shift key and click and drag the mouse. Panning is independent across viewports; panning in one viewport has no affect on others, an all viewports may panned to different amounts. Resetting Viewport At any time, the zoom and pan within viewports may be reset to their default positions. To do this, click the icon located on the toolbar MIP-Specific Function The functions for controlling the MIP are slightly different than functions for controlling the slices. VTK MIP To freely rotate the VTK MIP, click and drag the mouse across the MIP. To zoom in and out, scroll the mouse wheel forward and backward. To pan around the MIP, hold the Shift key and drag the mouse across the MIP. To rotate the MIP about a fixed axis of rotation, hold the Ctrl key and drag the mouse in a circular motion across the MIP. Scrolling 34 VivoQuant Manual 11/12/2015 Classic (non-VTK) MIP The Classic MIP cannot be freely rotated, panned or zoomed in/out on like the VTK MIP. The only navigation available is changing the View Angle (i.e. rotation about the transverse axis). This can be accomplished by scrolling with the mouse wheel, or by dragging the View Angle progress bar in the MIP Control window. Tooltip The tooltip feature is available by briefly holding a mouse click on any of the three slice views (transverse, sagittal, coronal) in the Navigator window. The tooltip feature displays (x,y,z) coordinate locations, and voxel values for each displayed data set for that (x,y,z) position. VTK MIP 35 VivoQuant Manual 11/12/2015 This information is also found in the Viewer Control. For more on using the Viewer Control, see the Viewer Control page. Tooltip 36 3D ROIs 1. Getting There 2. ROI Creation and Deletion 1. Add an ROI 2. Edit an ROI 3. Delete an ROI 4. Reset an ROI 5. Hide an ROI 3. ROI Loading, Saving, and Quantification Tools 1. Load an ROI from disk 2. Save an ROI to disk 3. Render ROIs in the MIP view 4. Reset the camera view 5. Reset all ROIs 6. Show the image histogram 7. Load an ROI from an iPACS 8. Save an ROI to an iPACS 9. Merge ROIs from an iPACS or disk 10. Show the quantification table 11. Save the quantification table to disk 12. Perform a cut on an image using an ROI 13. Show/hide the MIP data with the rendered ROI 14. Show/hide the 3D ROI table 15. Perform a copy/paste on an image using an ROI 4. Painting Tools 1. Sync position while painting 2. Erode/dilate an ROI 5. 2D Drawing Tools 1. Spline tool 2. Bully tool 3. Freehand tool 4. 2D thresholding tool 5. Delete a 2D ROI 6. Submit 2D ROI 6. 3D Segmentation Tools 7. Expert Settings 8. Undo/Redo Functionality Overview The 3D ROI operator provides advanced tools for drawing, visualizing, saving, and quanitfying both 2- and 3-dimensional regions. The acronym "ROI" stands for "region of interest" and is used to describe a particular area or volume within an image for which the user wishes to characterize some quantity or quality. 3D ROIs 37 VivoQuant Manual 11/12/2015 Getting There The 3D ROI tool can be accessed via the tool pull-down menu on the VQ front panel. When the 3D ROI Tool is selected a 3D ROI Tool operator window is displayed. Each panel of the 3D ROI Operator window provides a grouped set of functionalities. Use the tabs to move between panels. Tab Description ROI Loading, Saving, and Quantification Tools Painting Tools 2D Drawing Tools 3D Segmentation Tools Getting There 38 VivoQuant Manual 11/12/2015 Expert Settings ROI Creation and Deletion ROIs can be created and deleted from the strip of icons at the bottom of the 3D ROI Operator. Icon Description Add an ROI Edit an ROI Delete an ROI Reset an ROI Hide an ROI Add an ROI. To add an ROI, click on the plus-sign "Add ROI" button. Use the interface that appears to specify a name and color for the ROI. To alter the transparency of the ROI in the slice and MIP views, respectively, increase or decrease the alpha values (a lower percentage will increase the transparency of an ROI). Check "Hidden" to turn the ROI off in all views. Check "Immutable" to prevent edits to an ROI. Another option is to select any one or shift select more than one of the ROIs in the operator, right click, and select Add ROI. This will append a new ROI to the end of the list, regardless of which ROI is selected. ROI Creation and Deletion 39 VivoQuant Manual 11/12/2015 Edit an ROI. To edit an ROI, click on the pencil "Edit ROI" button. Use the interface that appears to change the name, color, transparency, visibility, or state of immutability. This will edit whichever ROI is selected in the ROI dropdown menu. Another option is to right click on any ROI in the operator and select Edit ROI. Delete an ROI. To delete an ROI, click on the red X "Delete ROI" button. Use the interface that appears to move the pixels of the selected ROI to either the background or another selected ROI. The ROI will no longer appear in the drop-down menu of ROIs after being deleted. This will only delete the ROI that is selected in the ROI dropdown menu. ROI Creation and Deletion 40 VivoQuant Manual 11/12/2015 Another option is to select any one or shift select more than one of the ROIs in the operator, right click, and select Delete ROI(s). Reset an ROI. To reset an ROI, click on the broom "Reset ROI" button. Use the interface that appears to move the pixels of the selected ROI to either the background or another selected ROI. The ROI will still exist after it has been reset, but it will no longer have any voxels associated with it. This will only reset the ROI that is selected in the ROI dropdown menu. Another option is to select any one or shift select more than one of the ROIs in the operator, right click, and select Reset ROI(s). ROI Creation and Deletion 41 VivoQuant Manual 11/12/2015 Hide an ROI. To make an ROI invisible in the slice and MIP views without deleting the ROI, click on the Nazarm "Hide ROI" button. If the ROI is not immutable, it will be possible to edit the ROI even if it is hidden. This will only hide the ROI that is selected in the ROI dropdown menu Another option is to select any one or all of the desired ROIs, right click, and select Toggle Hide ROI(s). ROI Creation and Deletion 42 VivoQuant Manual 11/12/2015 All selected ROIs will become hidden. ROI Loading, Saving, and Quantification Tools The left-most panel in the 3D ROI Operator presents the interface for basic input/output operations, quantification, and viewing functionality. To freely naviagate through the slices with the cursor, it is necessary for this panel to be active. The buttons at the top of the operator window perform various functions within the operator. Load or save an ROI from disk or iPACS Render ROIs in the MIP view Reset the camera view Reset all ROIs ROI Loading, Saving, and Quantification Tools 43 VivoQuant Manual 11/12/2015 Show the image histogram Show the quantification table Save the quantification table to disk Perform a cut on an image using an ROI Perform a copy or paste on an image using an ROI Load an ROI from disk. The 3D ROI tool supports file formats of VQ 3D ROI (.rmha) and vtkStructuredPoints (.vtk). To load an ROI from disk, click the "Load ROI" button and select the desired ROI. Save an ROI to disk. To save an ROI to disk, click the "Save ROI" button and specify a name and location for the file. The ROI will be written as an VQ 3D ROI (.rmha) file. All existing regions will be written to the same ROI file. Load an ROI from an iPACS. To load an ROI from an iPACS, click the "Load from iPACS" button. The image data currently loaded must have been retrieved from an iPACS, and there must be an ROI associated with that particular image already stored on the iPACS. If only one ROI exists for the image, that ROI will automatically be loaded. If multiple ROIs exist, the user will be given a drop-down menu of available ROIs to choose from. The choices can be distinguished by the ROI creator's iPACS username, the date and time of creation, and the region names for that file. Save an ROI to an iPACS. To save an ROI to an iPACS, click the "Save to iPACS" button. The ROI will be automatically associated with the current image. Unique filenames will be generated based on the creator's username and the patient name from the image header. Previously saved ROIs will never be overwritten. The files will be saved to a subdirectory of the current project on the WebDisk, named "roi". Merge ROIs from an iPACS or disk. If you wish to append previously stored ROIs to a set of ROIs currently open in the 3D ROI tool, the merge ROIs function can be utilized as follows: ROI Loading, Saving, and Quantification Tools 44 VivoQuant Manual 11/12/2015 Click the "3D ROI options" button and select either "Merge from iPACS" or "Merge from disk" depending on where the additional ROIs are stored. The additional ROIs associated with that particular image will be appended to the currently open ROI set in the 3D ROI viewer. Note: Previously saved ROIs will not be overwritten. If there is any overlap of existing and merged ROIs, a new ROI will be created and named a combination of the two ROIs listed names. For example, if a portion of a "Heart" and "Liver" ROI overlap after a merge, the new combined ROI created would be named "Heart/Liver" and consist of only the specific volume of Heart and Liver that overlap. To associate the combined ROI with the proper ROI, right-click the combined ROI and select "delete ROI". The option to move pixels to either "background" or other ROIs will be presented for your selection. Selecting "background" will delete the ROI all together. Render ROIs in the MIP view. To trigger a new rendering of the current viewed ROIs in the MIP view, click the "VTK" button. Reset the camera view. To reset the MIP view to the original orientation and size, click the "Reset Camera" button. Reset all ROIs. To clear only the contents of all existing ROIs, click the X then the "Reset All" button. Empty ROIs will still exist under the same naming and coloring scheme. To delete all ROIs completely, click the X then the "Delete All" button. The background will be the only thing left in the ROI menu. Show the image histogram. To view a histogram of the image or any subset of the image determined by an ROI, click the "Histogram" button. Choose the Image used to generate the histogram by selecting from the "Data set" drop-down menu. The portion of the image contributing to the histogram can be set under the ROI Controls by selecting an ROI from the drop-down menu. ROI Loading, Saving, and Quantification Tools 45 VivoQuant Manual 11/12/2015 Show the quantification table. To display the quantification table including all existing ROIs, click the "Show Table" button. Save the quantification table to disk. To save the quantification table to disk as a comma-separated values (.csv) file, click the "Save Table" button. Perform a cut on an image using an ROI. To remove voxels from image data based on an ROI, choose the desired ROI from the ROI selector and click the "Perform Cut" button. All visible images will be cut; the ROI remains unchanged. The cut tool is useful for eliminating undesired features in images, such as metal instrumentation that may appear in some CTs. Show/hide the 3D ROI table. Click the "Show/hide ROI Table" button to turn the ROI table on or off. ROI names can be edited within the ROI table by clicking on the desired field to set the cursor. Check the boxes in the 'H' column to hide ROIs. Check the boxes in the 'I' column to make ROIs immutable. ROI Loading, Saving, and Quantification Tools 46 VivoQuant Manual 11/12/2015 Copy/paste the 3D ROI. Click the "Copy or Paste ROI" button to copy and/or paste ROIs between instances of VivoQuant. Painting Tools There are a variety of paintbrushes to choose from when creating an ROI. The sphere, cylinder, or cube paintbrush can be selected by clicking the corresponding radiobutton on the Painting tab. The radius of the paintbrush can be set by changing the number of pixels shown in the numerical spin box. These 3D paintbrushes extend across multiple slices; to activate 2D mode, mark the '2D only' checkbox. In 2D mode, the paintbrush will only paint on the current slice. Note: an ROI must be added before utilizing the painting tools. Painting Tools 47 VivoQuant Manual 11/12/2015 ROIs can be drawn freely on any of the three slice views. The view currently being drawn in will be denoted "Active" in the upper left corner. Each voxel can only belong to a single ROI. Painting over an existing ROI with a new ROI will place the painted voxels in the new ROI unless the existing ROI is immutable. (See Editing an ROI to learn how to make an ROI immutable.) To erase voxels from an existing ROI, paint over the existing ROI with the ROI selector set to Background. Alternatively, set the ROI selector to the existing ROI (from which to erase voxels) and hold down the Shift key while drawing. The Shift key activates the background ROI for the painting tool, even if another ROI is set in the ROI selector. Sync Pos. If "Sync Pos" is checked, then the non-Active slice views will be updated in real time to match the position of the drawing tool on the Active slice. When this box is checked, drawing times will typically be slower. Erode/Dilate. The Erode/Dilate tool can be used to remove or add up to 5 layers of voxels from the input ROI. The erosion or dilation will be applied to the currently selected ROI in the 'ROIs' drop-down menu near the bottom of the window. If you would like the voxels that are being added or removed from the ROI to be put in an ROI other than the one currently selected, mark the 'Map to' checkbox and choose the ROI to put the new voxels in from the drop-down menu to the right. To perform the erosion or dilation, click the green checkmark button. Painting Tools 48 VivoQuant Manual 11/12/2015 2D Drawing Tools The 2D drawing tools match the options available within the Quantification++ Tool. 2D Drawing Tools 49 VivoQuant Manual 11/12/2015 Choose the desired tool from the drop-down menu to begin drawing. Use the red X button to delete a contour (this will not delete the ROI). Use the green checkmark button to add the voxels within a drawn contour to the currently selected ROI. Spline tool Bully tool Freehand tool 2D Thresholding tool Apply Spline Path to ROI and move to next slice Apply Spline Path to ROI Clear Spline Path Spline tool. Use the spline tool to define points between which smooth curves will be filled in. The base points can be moved by using the left mouse button to drag them. Additionally, points can be deleted (middle click point) or added (double click position on curve). Once a shape has been closed (right mouse button), it can be re-opened by using Shift + middle click on a point. Bully tool. Use the bully tool to nudge the drawn boundary inward or outward with a circle-shaped cursor. The cursor size can be changed using the paintbrush size selector in the Painting Tools panel. This mode provides an efficient way to fine-tune an ROI made in Spline or Freehand mode. You may select which image data you want to use as the input ("Ref" is the first image loaded in the Data Manager, "Inp1" is the second, etc.) and the thickness of the tool, in the bully tool and for the following three tools as well. Freehand tool. A freehand region may be drawn by moving the mouse while holding down the left mouse button. The region may be drawn in segments through a series of L-clicks and closed with a right click. 2D Thresholding tool. Use the Percentage selector field to set a threshold for the ROI. Specify the image on which to base the thresholding using the drop-down menu. Apply Spline Path to ROI and move to next slice. Creates 2D ROI within spline path and moves to next slice. Apply Spline Path to ROI Creates 2D ROI within spline path Clear Spline Path Clears spline path and all points 3D Segmentation Tools The 3D Segmentation Tools, located in the tab denoted by the magic wand icon, can be used to apply different thresholding techniques across input images and user-defined ROIs, as well as advanced ROI processing. Note: an ROI must be added before utilizing the segmentation tools. 3D Segmentation Tools 50 VivoQuant Manual 11/12/2015 Setting the Input and Output ROI. The Input ROI must be selected from the 'Input' drop-down menu before applying thresholding. If an ROI other than the background is selected, only image pixels within the chosen ROI will be considered when thresholding is performed. The Output ROI is the ROI specified in the ROI drop-down menu located at the bottom of the 3D ROI Operator window. If the Output ROI is not empty prior to thresholding, the result of the thresholding will be added to the existing voxels of the Output ROI. Keep in mind that other ROIs may be overwritten if the result of a thresholding technique intersects them. To prevent other ROIs from being altered, set them to immutable. (See Editing an ROI to learn how to make an ROI immutable.) Choosing the Image Data. The segmentation algorithm will work on the data from the image specified in the Image drop-down (where Ref is the first image loaded according to the data manager, Inp1 is the second image, etc.). Setting the Seed Point. For methods that require a seed, the cursor location at the time the thresholding is performed will be used. 3D Segmentation Tools 51 VivoQuant Manual 11/12/2015 Setting the Thresholds. For methods that require thresholds, use the number fields beneath the Image Selection drop-down. Click the 'Min' and 'Max' buttons to the left of each threshold field to fill in the minimum and maximum values, respectively, from the selected image. The unit is assumed to match that specified in the header. Available Thresholding Methods. The thresholding methods available are in the Segmentation Algorithm drop down menu. After selecting a seed and thresholds as necessary, click 'Apply' to perform the segmentation. It may be necessary to wait approximately a minute for the thresholding to complete. Requires Seed? No Yes Requires Thresholds? Yes Yes Global Thresholding Connected Thresholding Neighborhood Yes Yes Thresholding Otsu Thresholding No Yes Confidence Connected Yes No ROI Connected Yes No Interpolate Slices No No Connected Components No No ROI Max Size. The ROI Max Size filter can be used to fill holes in existing ROIs. Any connected components in the Input ROI that are comprised of fewer voxels than the 'Max size' specified will be mapped to the output ROI. 3D Segmentation Tools 52 VivoQuant Manual 11/12/2015 Low-pass Smoothing. Use the Low-pass Smoothing filter to remove jagged surfaces from manually created ROIs. The amount of smoothing can be controlled with the Low-pass radius parameter. Smaller radii will result in smoother ROIs. 3D Segmentation Tools 53 VivoQuant Manual 11/12/2015 NOTE: Smoothing ROIs contained in images with large dimensions can take upwards of 30 seconds. Modal Smoothing. Use modal smoothing to reassign every voxel's ROI value to the mode of the surrounding region specified by the given radius. The amount of smoothing can be controlled by the Mode Radius and Iterations parameters. 3D Segmentation Tools 54 VivoQuant Manual 11/12/2015 Bounding Cylinders. The Bounding Cylinders tool can be used to generate cylindrical ROIs that encompass each animal of a multi-animal image. The number of animals is automatically determined, and the cylinder radius can be configured. This algorithm works best on NM images, but may also work on some CT images. If there are any ROIs present prior to using this tool, they will be deleted. 3D Segmentation Tools 55 VivoQuant Manual 11/12/2015 Expert Settings The Expert tab, denoted by "Exp" presents the advanced settings of the 3D ROI Operator. For the typical user, these settings will not need to be changed. Expert Settings 56 VivoQuant Manual 11/12/2015 Data. By default, VQ ROIs are written in a compressed format. To extend compatibility with other tools (e.g., ITK), uncheck "compressed." If the ROI files will only be used within VQ, leave the "compressed" box checked. Importing and Exporting ROIs.To import an ROI loaded in the Data Manager from an image file, click the 'I' button and select the corresponding dataset to import. To export a 3D ROI as an image to allow manipulations outside of the 3D ROI tool, click the 'X' button. Rendering. If "auto" is checked, ROIs will be re-rendered in the MIP view automatically upon certain triggers. When unchecked, rendering will only occur when the VTK button is used. For systems with less speed and memory, it may be helpful to select a less demanding setting from the rendering quality combo box. Segmentation. To add a curvature flow smoothing preprocessing step to the segmentation methods, check the "Smoothing" box. Use the fields beside Segmentation to tune the parameters of the smoothing and various segmentation methods (mouse over the each field to view the field name). The Smoothing filter will use the Iterations and TimeStep settings; the Confidence Connected Thresholding will use the Multiplier and NeighborRad (neighborhood radius) settings; the Neighborhoood Thresholding will use the NeighborRad setting. Crop Range. To perform any of the thresholding segmentation methods on only a sub-region of the input image, follow these steps: 1. Open the Cropping operator from the Operators drop-down menu. 2. Use the red sliders to select the desired region of the image. 3. Do NOT click 'OK.' Instead, go directly to the 3D ROI tool by selecting the 3D ROI operator from the Operators drop-down menu (see Getting There). Clicking 'Cancel' or the 'X' in the upper right-hand corner of the Cropping operator before opening the 3D ROI tool is also acceptable. 4. In the Expert panel of the 3D ROI Operator, mark the checkbox for Crop Range. Expert Settings 57 VivoQuant Manual 11/12/2015 Dashed red lines will appear on the image, indicating the boundaries of the selected region. 5. When the desired thresholding method is performed (see Segmentation Tools to learn how to use the Segmentation panel of the 3D ROI Operator), only the region within the crop range will be segmented. Expert Settings 58 VivoQuant Manual 11/12/2015 Undo/Redo Functionality To undo/redo operations performed in the 3D ROI tool go to View->Undo or View->Redo. The operation being undone or redone will appear in the View drop down menu (as seen in the image below). Keyboard shortcuts are also available for undoing or redoing an operation. The undo/redo function is applicable to all functions performed on 3D ROI data itself, i.e. operations performed to actual volume image data cannot be undone or redone. For example, performing a cut on an image using an ROI cannot be undone since it is applied to actual volume data and not just 3D ROI data. Important Notes: • The input ROI will be set to background whenever the undo function is applied. • To undo/redo filling a contour in the Spline Tool the user must navigate away from the spine tool window. Undo/Redo Functionality 59 Quantification++ The Quantification Tool provides a means to quantify density and activity parameters in CT and NM, MR, PET, or SPECT images, respectively. The tool provides several options for generating quantification data. There are multiple methods for setting the region of interest, flexibility in selection of the quantification view direction, easy-to-read presentation of data found in the Quantification Table, and options for saving and loading ROIs or plotting data. Getting There Quantification++ can be accessed via the tool pull-down menu on the VQ front panel. Using the tool Upon selection of the Quantification++ Tool, the Quantification Panel appears. The first step in using the quantification tool is the definition of a Region-of-interest (ROI). Quantification++ 60 VivoQuant Manual 11/12/2015 Choosing the View Direction The ROI may be drawn in either the transverse (default), coronal, or sagittal plane. To toggle between these options, use the "View" menu in the Quantification panel. Using the tool 61 VivoQuant Manual 11/12/2015 In this example using the default settings, the axial sliders determine the extent of the ROI in the axial direction. The region or pre-defined shape described below determines the bounds of the ROI in the transverse plane. By using the "View" pulldown menu, it is also possible to draw ROI boundaries in the sagittal plane: Choosing the View Direction 62 VivoQuant Manual 11/12/2015 or coronal plane: Choosing the View Direction 63 VivoQuant Manual 11/12/2015 Choosing the ROI type Four ROI types (labeled as Modes) are available. • Spline : Points are defined and smooth curves are drawn in between. The base points can be moved by using the left mouse button to drag them. Additionally, points can be deleted (middle click point) or added (double click position on curve). Once a shape has been closed (right mouse button), it can be re-opened by using Shift + middle click on a point. • Freehand: A freehand region may be drawn by moving the mouse while holding down the left mouse button. The region may be drawn in segments through a series of L-clicks. • Bully: Push lines out or into the object with a circle-shaped cursor. The size of the cursor is defined by the Bully Rad field in the quantification table's Options section. This mode provides an efficient way to fine-tune an ROI made in Spline or Freehand mode. • Threshold: A reference voxel is determined with a L-click in the transverse window. The ROI is determined by finding the region of voxels surrounding the reference voxels that share similar values to the reference voxels. The threshold value establishes how near in value the boundary voxels must be to the reference voxel. ROIs can be rotated by using Shift + the mouse wheel, scaled by using Alt + the mouse wheel, or moved by using Shift + the left mouse button. Choosing the ROI type 64 VivoQuant Manual 11/12/2015 Once the desired ROI has been defined, a right-click may be used to fill in an entry in the main table of the Quantification Table. This table contains a wide range of information, as described below. Note that the unit used for measuring CT attenuation is the Hounsfield Unit (HU) while the unit used for measuring activity in the NM, MR, PET, and SPECT images is Mega-Becquerel (MBq), kilo-Becquerel (kBq), or micro-Curie (uCi). Click the Clear ( ) button in the Options section of the quantification table in order to clear the current ROI and begin drawing another. VQ maintains the most recent ROI until a new ROI is defined. Each ROI for which data is collected is assigned a new color. Note, for example, that editing a ROI following data calculation results in a change to the color of the ROI. Also, the MIP reflects the currently selected ROI by shading the region encompassed by the ROI according to the appropriate color. The Quantification Table After defining the ROI and R-clicking, the quantification table will fill the following fields. Field Description Field available for comments/ROI names. A ROI L-click in the field will activate and allow comments to be entered. Patient The patient Name for this particular study. The specific data set in the Study from which this Series data was calculated. Displays the modality from which the data values Modality for that row were calculated. Color The color of the ROI as drawn in the display. Total number of voxels contained in the selected Voxels ROI. Volume The volume of the selected ROI in units of cubic 3 [mm ] millimeters. The total amount of attenuation/activity in the Sum selected ROI for CT and NM, MR, PET, or SPECT data sets, respectively. Hounsfield units (HU) are used for CT data. The SPECT units used by the Quantification++ panel Unit may be specified in the Data Panel of the Configuration Tool. Options include MBq, kBq, mCi, and µCi. Concentration The total amount of attenuation/activity in the selected ROI for CT and NM, MR, PET, or SPECT data sets, respectively, divided by the ROI The Quantification Table 65 VivoQuant Manual Unit Mean StdDev Min Max ZRange 11/12/2015 volume. Hounsfield units (HU/mm^3) are used for CT data. The SPECT units used by the Quantification++ panel may be specified in the Data Panel of the Configuration Tool. Options include MBq/mm3, kBq/mm3, mCi/mm3, and µCi/mm3. The average amount of attenuation/activity in the selected ROI. The standard deviation is a measurement of the variability in attenuation/activity in the selected ROI from voxel-to-voxel. The smaller this value, the more uniform the distribution of attenuation/activity in the ROI. The minimum attenuation/activity value of the voxels in the selected ROI. The maximum attenuation/activity value of the voxels in the selected ROI. Specifies via slice numbers the distance spanned by the axial sliders Quantification Table Options Right click on any one or any number of entries in the Quantification Table to view the following various options: Menu Item Description Plot data Plots the selected data on a line graph. Quantification Table Options 66 VivoQuant Manual Data to Quanti Calc Data to SpecAct Calc Data to SUV Calc Submit ROI #* to iPACS Remove line Clear table 11/12/2015 Calculates the Quantification factor with the acquired data. Calculates the specific activity with the acquired data. Calculates the standarized uptake value with the acquired data. Submits #* ROI (the selected ROI) to the iPACS. Deletes the entire row of the corresponding selected cell. Deletes all information from the table, but not permanently. The table can be reopened by right-clicking and the data for the corresponding selection will reappear. Plot data It is possible to plot the quantified data. This function is useful to look at changes in activity, concentration, volume, etc., particularly in gated, dynamic, and longitudinal studies. To plot data from the quantification tool, select the column of interest (i.e., Sum, Mean, etc.), right-click on any element in the column, and select "Plot Data". The plotted data will open in a new window and may be saved into an output PDF file. Data to Quanti Calc The calculator will automatically import the associated data. Quantification Table Options 67 VivoQuant Manual 11/12/2015 Data to SpectAct Calc The calculator will automatically import the associated data. Data to SUV Calc The calculator will automatically import the associated data. File Menu The Quantification++ package also provides several options for saving quantification and ROI information. Quantification Table Options 68 VivoQuant Manual Menu Item 11/12/2015 Description Saves the current Quantification table. Accepted Save table formats include .csv, .txt, and .xls. Note: For opening data in Microsoft Excel, save it in .xls format. Append to Appends the current Quantification table to a table previously saved table. Load ROI Loads a previously saved ROI. Save ROI Saves the current ROI as a .roi file. Copy Copies the data in the Quantification table to the table clipboard. Clear Clears the current Quantification table. table Submit to Submit the quantification data as a Data Point to the iPACS associated image on the iPACS. Closes the Quantification panel and returns the VQ to Close the Navigation screen. The View Menu See Choosing the View Direction. Cutting and Quantification Table Control The Options menu of the Quantification Panel provides a Cutting option and miscellaneous ROI functions. File Menu 69 VivoQuant Manual Menu Item 11/12/2015 Description Clears all voxels outside the ROI within the currently Cut outside selected slices, and all voxels outside the currently ALL selected slices. Slices outside the set axial range will be cleared entirely. Clears all voxels inside/outside the ROI within the currently selected slices, depending on which Cut direction (inside/outside) is selected. Slices outside the set axial range will not be affected. Apply ROI Applies the ROI to every slice in the image. to all slices Creates a new ROI entry representing the Select field-of-view (the entire volume of the image). The FOV quantification table will be populated with this entry, and labelled as 'FOV.' Cutting and Quantification Table Control 70 Reorientation/Registration Tool The Reorientation/Registration Tool enables manual and automatic realignment of image data via translation, rotation, or flipping. Reference and input data may be manipulated separately and specific translation settings may be saved/loaded for future studies, including the option for setting automatically applied default image shifts. 1. Manual Registration Options 2. Automatic Registration Options 3. Landmark Based Registration Options Getting There The Reorientation/Registration Tool can be accessed via the tool pull-down menu on the VQ front panel. Using the Tool When the Reorientation/Registration tool is selected a Reorientation/Registration operator window is displayed. Reorientation/Registration Tool 71 VivoQuant Manual 11/12/2015 At the top of the operator window there are options to select which images and/or ROIs will be subject to reorientation. Checking Ref, Inp1 or Inp2 will select the Reference, Input 1 and Input 2, respectively. To select all inputs beyond Input 2 in the Data Manager, check Inp *. ROIs can be selected by checking the ROI box. By default, all ROIs will be subject to reorientation when the ROI box is checked. If you wish to select only specific ROIs, click the icon and select the desired ROIs from the menu. You may also choose to simply view the ROIs while performing a reorientation, without performing the reorientation on the ROIs themselves, by selecting "View Only" from the menu. The buttons at the top of the operator window perform various functions within the operator. Using the Tool 72 VivoQuant Manual 11/12/2015 Option Description Force re-render of VTK Viewer Reset VTK Viewer position Toggle ability to perform reorientation in VTK Viewer Resets current reorientation operation Apply current reorientation operation The Interpolator drop down menu designates which interpolator will be used during the transformation. Linear is the default interpolator. When manipulating atlases and other integer-only datasets, linear interpolation may be detrimental. The Nearest-Neighbor (NNB) interpolator is recommended to preserve integer values upon transformation. The Quick Preview option enables VQ to generate a low resolution preview of an automatic registration and require the user to press the Apply Registration button to apply it. 3D and 2D Manual Options 3D and 2D manual registration options can be found in the first two tabs of the operator. Images/ROIs can be rotated up to 360 degrees around their X, Y and Z axis, translated in any direction along their X, Y and Z axis and scaled in any dimension. Note that the reorientation will be performed on all images/ROIs selected at the top of the operator window. 1. Rotation is completed by either using the up and down buttons next to the box or by typing in the number of degrees you wish to rotate the image. Once the desired positioning has been achieved, click 'OK' to apply the transformation. 2. Translation is achieved by scrolling the bar to the left or the right or typing in the number of mm to be moved in the box below. Translation can also be achieved by holding the "Ctl" button on the keyboard and dragging images in the Viewports. 3D and 2D Manual Options 73 VivoQuant Manual 11/12/2015 3. Scaling can be enabled in the Operator menu. When enabled, images and ROIs can be scaled during reorientation by scrolling the bar to the left or right or typing in the % by which to scale. To scale uniformly in all three dimensions, check the "Uniform" box. NOTE: WHEN SCALING DATA, PLEASE USE CAUTION AS SCALING CAN LEAD TO ERRORS IN QUANTITATION. FOR MORE REFER TO THE TREATMENT OF QUANTITATIVE DATA PAGE. 3D and 2D Automatic Options 3D and 2D automatic registration options can be found in the third and fourth tabs of the operator. There are Basic Settings (default) and Expert Settings available in each. The default options for registering data include "Translation", "Rigid" and "Affine". The "Translation" registration is a rigid registration which will shift the input data set in the (x,y,z) directions. The "Rigid" registration will rotate and translate the input data set. The "Affine" registration is a linear transformation which will rotate, translate, shear and scale the input data set. The expert settings are intended for experienced users only and provide access to a variety of transform, optimization, interpolation, and metric (figure-of-merit) schemes. User-configurable fields are also provided for the number of sampling bins, minimum and maximum step length, maximum number of iterations, percentage of voxels to be used for registration, and a relaxation factor. A crop range can also be defined which, when enabled, will perform the registration optimization calculations based solely on the voxels within the crop range. This can be useful when images have noise, regions of little to no signal, or other artifacts that may affect optimization calculations. For information about setting a crop range, see "Crop Range" under Expert Settings on the 3D ROI Tool page 3D and 2D Automatic Options 74 VivoQuant Manual 11/12/2015 To begin the registration, select either "Inp1 to Ref" or "All to Ref". "Inp1 to Ref" will register Input 1 to the Reference and require the user to click the "Accept" button to apply the registration. "All to Ref" will register each image to the Reference individually and automatically apply the registration. A window will appear that shows information about the progress of the optimization, including a live plot of the Metric Value vs. Iteration. 3D and 2D Automatic Options 75 VivoQuant Manual 11/12/2015 NOTE: WHEN SCALING DATA, PLEASE USE CAUTION AS SCALING CAN LEAD TO ERRORS IN QUANTITATION. FOR MORE REFER TO THE TREATMENT OF QUANTITATIVE DATA PAGE. Menu Options The Reorientation/Registration Operator menu can be used for storing transformations, setting a default image transformation, and controlling the behavior of the operator. Applies a pre-defined Load Ctrl+Shift+L transformation to the active data Transformation... set. Saves the current transformation Save Ctrl+Shift+S settings (rotation, translation, Transformation... flips) into a .xml file. Saves the current transformation settings (rotation, translation, flips) as default settings for image data. If the "Apply Default Shift" checkbox is Save as default selected, these settings will be automatically applied to any image data that then gets loaded. See the How To Guide for more on setting a default image shift. Resets all transformation Reset Ctrl+R settings (rotation, translation, flips) back to the default values. Apply Ctrl+Return Applies the current transformation settings (rotation, translation, flips) to the active Menu Options 76 VivoQuant Manual Flips Resample Pre-compose Post-compose Reorient ROI around center Enable scaling 11/12/2015 data set. Provides the option of flipping the data in any of three directions, described as Head/Feet, Left/Right, and Anterior/Posterior. Directs the user to the Resample Data tool. The Resample Data tool allows rebinning of reconstructed data into an arbitrary voxel size. Transformation which applies T1 to the source, and then applies T2 to that result to obtain the target. Transformation which applies T2 to the source, and then applies T1 to that result to obtain the target. Sets reference point for transformation as center of ROI instead of center of image. Toggles appearance of Scaling under 3D and 2D manual registration panels. Automatic Non-Linear Registration The 3D Automatic Non-Linear Registration tool provides deformable registration of the data by computing a unique transformation matrix for all voxels of data represented. After selecting your preference from the dropdown, the number of iterations for each resolution level can be adjusted. Drop-down preferences include: Fast Symmetrical Demons, Symmetric Demons, Diffeomorphic Demons, and Demons. To show the deformed grid overlaid or a heatmap of the Deformable vector field over of the image, use the toggle buttons. To learn more about the Non-Linear Registration techniques please visit the link below: • http://www.insight-journal.org/browse/publication/154 Automatic Non-Linear Registration 77 VivoQuant Manual 11/12/2015 Automatic Slice-by-Slice Non-Linear Registration The 2D Automatic Slice-by-Slice Non-Linear Registration tool provides deformable registration of the data by computing individual transformation matrices for each voxel of data represented. After selecting your preference from the dropdown, the number of iterations for each resolution level can be adjusted. To learn more about the Non-Linear Registration techniques please visit the link below: • http://www.insight-journal.org/browse/publication/154 Automatic Slice-by-Slice Non-Linear Registration 78 VivoQuant Manual 11/12/2015 How to Set a Default Image Shift One of the most powerful features of the NanoSPECT is its ability to automatically register SPECT and CT data to create anatomically and functionally valuable fused images. Imaging without the application of any transformation typically results in data that are fused well within 1.5mm in any direction. However, taking the time to set up a default image shift can help insure that all image acquisitions are perfectly fused. Make a simple phantom, but one that breaks symmetry along multiple directions. A syringe with an air bubble, placed in the bed at an angle works well. Collect an image/CT of the phantom. It is recommended that standard reconstructions (or better) are used for both the image and the CT to enable more precise transformation settings. Uncheck the "Apply Default Shift" box located in the DICOM browser. Load the data into the VQ. How to Set a Default Image Shift 79 VivoQuant Manual 11/12/2015 Use the reorientation tool to shift and/or rotate the image data set (Input 1) so that the image and CT data are perfectly aligned. Typically, only shifts are needed for this operation. If rotations are needed, they should be only plus/minus 1 degree. Before clicking "Apply", go to File | Save As Default and save the transformation Return to the Data Browser or go to the Tools Menu and re-check the "Apply Default Shift" box. How to Set a Default Image Shift 80 VivoQuant Manual 11/12/2015 Reload the image/CT phantom data that were just acquired. They -- and all other data sets -- will now be perfectly fused NOTE: This same formalism may be used to generate other Transformation files. Instead of choosing "Save as Default" in the Reorientation File Menu, choose "Save Transformation." Then it is possible to later load that transformation (using the "Load Transformation" option in the Reorientation File menu). These saved transformations are useful when fusing data from other modalities with NanoSPECT CT data, for example. How to Set a Default Image Shift 81 Time Series The Time Series operator provides an easy way to visualize sets of dynamic data as a time series. This operator can be used to play slice views of each image of a collection in sequence. Getting There The Time Series operator can be accessed via the tool pull-down menu on the VQ front panel. Using the Tool Data should be loaded into VQ in correct time-order, with the reference image (if any) loaded first. Use the Data Manager to sort the datasets as necessary. If there is a reference image loaded, check 'Lock Ref' to keep the reference image visible with all other images of the series; check 'Lock Inp1' to keep the image in the 'Input 1' position visible with all other images of the series. The Time Series operator also enables users to set a global min/max value, which will apply to all loaded images. To set, simply check the Global box and enter a minimum and maximum into the respective boxes. Use the slider or image index field to manually scroll through the datasets of the series. Click 'Play' to run the sequence in a loop. Saving a Movie To save a Time Series movie, open the Save Movie dialog with the Time Series operator open.This can be done by clicking the Save Movie icon in the toolbar, navigating to File -> Save Movie, or by the keyboard shortcut Ctrl + M. Time Series 82 VivoQuant Manual 11/12/2015 The options for the output movie are similar to those in the regular Save Movie dialog box. The only difference is the options in the Movie Type drop-down box reflect the Time Series movie types. Once the desired options are set, select "Save" to save the movie file. Saving a Movie 83 Distance/Annotation Tool The Distance/Annotation tool enables you to measure the distance between two points in any image. For example, it can be used to measure the size of a tumor by measuring its length, depth and width. One of the most powerful options available with the distance measure is the capability to perform landmark co-registration. Getting There The Distance/Annotation Tool can be accessed via the tool pull-down menu on the VQ front panel. Using the tool Upon selection of the distance/annotation tool, the Distance/Annotation operator is displayed. The physical distance between two points can be measured by clicking on the green plus symbol to add an object. To measure distance, left click on two points of the image. A line is displayed between the two points to show what is being measured. In the Distance/Annotation operator, each line is identified by a unique color tag. For each line, the 3D start and end points of the line are displayed as well as the length of the line (in mm). Multiple distances can be measured on the same image and are easily distinguished by their unique color. The results can be saved into an Excel file by clicking Save. The Profile function enables a graphic plot of the distance to be displayed for both the reference and the input data. Distance/Annotation Tool 84 VivoQuant Manual 11/12/2015 Goto with-in the object Since a single left click sets a new point, you have to use a single middle mouse button click to go to the given position in the two respective other slices. Removing Distance Measures Right-click on any of the distance measures and click 'Remove' to delete the distance measure completely. Profile The Profile tool, available in the Distance/Annotation operator, plots the values in each voxel through which the line passes. Values are displayed for both Reference and input data sets and, given proper calibration, the plot values will be in Houndsfield units and MBq for CT and NM data sets, respectively. The File menu provides an option to save the Profile data as a PDF. Goto with-in the object 85 VivoQuant Manual 11/12/2015 Landmark-based Co-Registration One of the most powerful features of the distance/annotation tool is the built-in capability of performing landmark-based co-registration. With two data sets loaded, use the distance/annotation tool to draw at least one line that connects corresponding locations (i.e., locations which should be registered) between the reference and input data sets. The line should start on the reference image and be dragged to the input image. For example, if using a CT image as a reference and a SPECT image as input 1, left click on the CT, drag to the corresponding location in the SPECT image, and left click again to end the line. It may be useful to use the arrow line type to make clear the direction the input image will be reoriented. The user should perform landmark-based co-registration on one view at a time to optimize registration results. Profile 86 VivoQuant Manual 11/12/2015 Click on the Landmark-based Co-registration icon, , to perform the registration. Once registration is complete, the shifted input data set will appear in the Main Window as Input 2. Landmark-based Co-Registration 87 Checkerboard In Checkerboard mode, the reference and input data set(s) are arrayed in a pattern of alternating squares, resembling a checkerboard. This mode is especially useful when checking image registration. Getting There The Checkerboard Tool can be accessed via the tool pull-down menu on the VQ front panel. Using the tool Upon selection of the Checkerboard Tool, the display of the coronal, sagittal, and transverse windows is automatically updated. In these windows, the reference and input data set(s) are displayed in an alternating grid pattern resembling a checkerboard. Both the Input 1 and Input 2 data sets (if present) are displayed in the same squares of the checkerboard. To return to normal viewing, select Navigation in the Tools menu. To adjust the size of the tiles, hold Shift and use the mouse wheel. All other keyboard shortcuts should work the same as in Navigation operator Checkerboard 88 VivoQuant Manual Using the tool 11/12/2015 89 Cropping tool The Cropping Tool allows images to be made smaller by removing any unwanted areas. For example, if an image has been cut, then the cropping function can be used to trim away the blank areas of the image. Getting There The Cropping Tool can be accessed via the tool pull-down menu on the VQ front panel. Using the tool Upon selection of the Cropping tool, the standard view options disappear and red sliders are displayed in their place. Two red sliders appear for each view direction (i.e., coronal, sagittal, and transversal). The red sliders may be moved using the mouse (click and hold on a slider and then move the mouse to move the slider) or by using Cropping tool 90 VivoQuant Manual 11/12/2015 the arrow keys in the cropping dialog. Manipulation of the red sliders creates a three-dimensional rectangangular cropping volume. The current voxel position of the red sliders is displayed in the Cropped/Area section of the operator window. To apply the crop, once the red sliders are in the desired positions, click the To reset the crop range sliders to their original positions, click the button. button. The Cropping dialog provides information about the pixel location of each red slider (x, y, z), and current and cropped image size information in both voxels and mm. The embed function will pad background slices to increase the dimensions of the image. The auto-crop feature starts its search the end slices of the image and adjusts the sliders towards the center of the image until a non-background voxel is detected from all 6 faces. Example of an image before it has been cropped Example of image after it has been cropped Using the tool 91 Arithmetics The Arithmetics operator can be used to add, subtract, multiply, divide, average or merge multiple images. Additionally, a scalar multiplier or addend can be applied to all voxels of an image with the Arithmetic operator. Getting There The Arithmetics operator can be accessed via the tool pull-down menu on the VQ front panel. Using the tool Upon selection of the Arithmetics operator, the Arithmetics operator window is displayed. The drop-down menu under Options contains a selection of the available operators: • Add, Subtract, Multiply, Divide, and Average each operate on the two images loaded in the 'Ref' and 'Inp1' positions. These operations are performed voxel-wise. • Scalar Multiplication and Scalar Addition can be applied to any of the first three images loaded by checking Ref, Inp1, Inp2, or to all images beyond the first three by checking Inp*. Set the factor or addend by increasing or decreasing the scalar value. • Merge whole integer value phantoms to load into the 3D ROI tool. Can be applied to any of the first three images loaded by checking Ref, Inp1, Inp2, or to all datasets beyond the first three by checking Inp*. This is very useful for fixed-volume ROI analysis. Arithmetics 92 VivoQuant Manual 11/12/2015 Click OK to perform the chosen operation. A dialog will appear to indicate successful application of the chosen addend or factor. For scalar operations, the result replaces the original image and no new image will be loaded. For all other arithmetic operations, the result is appended as a new image at the end of the Data Manager, distinguished by a modality set to 'OT' and a description of the operation in the 'Desc' field. Units are not considered by the Arithmetics operator, and a warning will be displayed if an attempt is made to add, subtract, multiply, divide or average two images of differing units (though the operation will still be carried out). Using the tool 93 Filtering Tool The Filtering Tool offers a variety of smoothing filters with configurable input parameters and can be applied to either the Reference or input images or both. Getting There The Filtering Tool can be accessed via the tool pull-down menu on the VQ front panel. Using the tool Upon selection of the Filtering Tool, the Filtering Operator window is displayed. Using this tool, any loaded data can be selected for smoothing by checking the appropriate Data boxes: Reference, Input 1 and Input 2 select the first three datasets loaded, and Input * selects the remaining datasets beyond those (see Data Manager for more information on manipulating more than three data sets simultaneously). Select the desired smoothing algorithm from the available options in the Smoothing drop-down menu. Use the parameter fields to set appropriate values. The effect of the chosen smoothing filter will be previewed in 2D in the slice views; to remove the 2D preview, go back to 'None' in the drop-down menu of smoothing filters. Currently available filters include: • Gaussian Smoothing Filtering Tool 94 VivoQuant Manual 11/12/2015 • Curvature Flow • Gradient Anisotropic Diffusion • Curvature Anisotropic Diffusion • Positivity Smoothing (to remove negativity from FBP reconstructions) • Zero Crossing Edge Detection • Bilateral Smoothing • Bias Field Correction Each filter uses a different subset of the configurable parameters; consult the table below if parameters other than the default settings are desired. Parameter Description Used by Full-width Gauss, Zero half-maximum kernel Crossing Edge size Detection Gradient Anisotropic Parameter governing Diffusion, Conductance sensitivity to edge Curvature contrast Anisotropic Diffusion Curvature Flow, Gradient Anisotropic Diffusion, Iter Number of iterations Curvature Anisotropic Diffusion, Positivity Smoothing If the fraction of voxels that are negative falls below Positivity CutOffFrac this value, further Smoothing iterations of the filter will not be performed. Curvature Flow, Gradient Stepsize, effectively Anisotropic Time Step analogous to kernel Diffusion, width Curvature Anisotropic Diffusion Max Error Difference between Zero Crossing the area under the Edge Detection discrete Gaussian FWHM Using the tool Default Value 1.00mm 1.00 5 0.005 0.125 0.5 95 VivoQuant Manual 11/12/2015 curve and the area under the continuous Gaussian The standard deviation of the gaussian Bilateral Range Sigma blurring kernel in the 50.0 Smoothing image range. Units are intensity. The standard deviation of the gaussian Domain blurring kernel in each Bilateral 4.00 Sigma dimensional direction. Smoothing Units match image spacing units. After a left-click on OK, the smoothing function is executed; depending on the image size and filter selected this could take several seconds or more. Once the smoothing function is applied, any subsequent operations will be based on the smoothed images. Each filter will have different edge-preserving and noise-reduction properties; choose the one that suits your application best. No Smoothing Gauss Curvature Flow Gradient Anisotropic Diffusion Curvature Anisotropic Diffusion The bilateral smoothing filter could take several minutes for large images in 3D, especially for greater values of domain sigma. Check the 'Force 2D' option to speed up this filter. No Filtering Applied Using the tool Various Bilateral Smoothing 96 VivoQuant Manual 11/12/2015 The positivity smoothing filter will also typically take longer to run than the other smoothing filters, up to several minutes for larger images. This filter was specially designed to redistribute the activity across neighboring voxels such that the total sum of the image is preserved but the number of voxels with negative values is reduced. It is intended to be used to correct images reconstructed with FBP. Bias Field Correction Intensity gradient artifacts in magnetic resonance imaging can often cause difficulties with automated segmentation and analysis tools that rely on intensity contrasts, not to mention the detriment to qualtitative appearance. The Bias Field Correction filter implements the N3 bias correction algorithm (Tustison 2010) to estimate the gradient field present in the image and uses this filter to normalize each voxel of the image. Due to the higher performance cost, a preview of its filtering is not available but the filtering can be applied via the filtering operator. The user may optionally adjust the field smoothness to avoid or allow high spatial frequency corrections and also append the estimated bias field as an image to the data manager. Bias Field Correction 97 VivoQuant Manual Bias Field Correction 11/12/2015 98 Modeling 1. Getting There 2. Function 3. Models 1. Two-Tissue Compartment Model (2TCM) 2. One-Tissue Compartment Model (1TCM) 3. Logan Graphical Method (Logan Plot) 4. Simplified Reference Tissue Model (SRTM) 5. Simplified Reference Tissue Model 2 (SRTM2) 6. Logan Non-Invasive Graphical Method 7. Patlak Analysis The Modeling operator provides an integrated solution for representing the loaded data set with one of the following relevant mathematical models to allow for predictions and analysis. Getting There The Modeling operator can be accessed via the tool pull-down menu on the VQ front panel. Function Upon selection of the Modeling Tool, the Modeling operator window is display Modeling 99 VivoQuant Manual 11/12/2015 Appropriate data should be loaded into VQ in correct order, with the reference image (if any) loaded first. Use the Data Manager to sort the datasets as necessary. From within the Modeling operator drop-down, the specific mathematical model applicable to your analysis may be chosen. Once chosen, the operator window will fill with the model's parameters and settings. Descriptions of each model, as well as model-specific instructions for usage, are given below. Note: Access to models is dependent on your specific VivoQuant license key. Models Two-Tissue Compartment Model (2TCM) The 2TCM is a three-compartment model that includes two tissue compartments: one tissue compartment represents free and nonspecifically bound tracer within the tissue (referred to as "nondisplaceable"), and the other tissue compartment represents specifically bound tracer within the tissue. The third compartment represents tracer within the arterial plasma. Parameter CND(t) Function Description Concentration in F + NS compartment, nodisplaceable tracer 100 VivoQuant Manual 11/12/2015 Concentration in specifically bound (S) compartment CP(t) Concentration in plasma (P) compartment Transfer of ligand from arterial plasma to K1 (mL*cm3*min-1) tissue Transfer of ligand from tissue to arterial k2 (min-1) plasma Transfer of ligand into specifically bound k3 (min-1) compartment Transfer of ligand out of specifically bound k4 (min-1) compartment For tracers for which a compartmental model is appropriate, estimation of the rate constants provides valuable information about tracer uptake and binding [1]. Due to the difficulty of reliably estimating all four parameters of the 2TCM, lumped or macroparameters are often employed. Macroparameters are rate constants which are functions of individual microparameters (e.g. K1, k2, k3 and k4). One such macroparameter that is estimated by the 2TCM is the total volume of distribution, VT. CS(t) When the 2TCM is applied to image data with a reference region, the distribution volume ratio (DVR) can be calculated: DVR = VT/VND, where VND is the estimated distribution volume in a region that is devoid of the target site or receptor (often called the reference region or nondisplaceable region). Binding potential (BPND) can then be calculated by BPND = DVR - 1. Model Assumptions This model makes the following assumptions • The tracer binds reversibly. • Nonspecifically bound ligand equilibrates rapidly with free tissue ligand. • Compartmental model assumptions: ♦ The tracer kinetics or behavior can be represented by a compartmental model. ♦ Tracer concentration within each compartment is well-mixed and does not vary spatially. ♦ First-order kinetics can describe exchange of ligand between compartments *Note: Violation of any of these assumptions may produce biased parameter estimates. While the model will still run in VivoQuant, the estimated parameters may not accurately reflect the true tracer kinetics. The 2TCM is currently implemented in VivoQuant using a basis function method approach [2] and unweighted fitting. In this basis function method, Required Inputs This model requires the following inputs • Metabolite-corrected arterial plasma input curve • ROI(s) or voxels Two-Tissue Compartment Model (2TCM) 101 VivoQuant Manual 11/12/2015 Outputs Region-level analysis: • Plot of data from each ROI with 2TCM fit. • VT, K1, k2, k3, k4, mean-squared error (MSE) of fit, /Θ1, and /Θ2 are shown when the cursor is hovered over the model fit plot. • VT, K1, k2, k3, k4, mean-squared error (MSE), data and 2TCM fit for each ROI can be saved out to .csv References [1] "A quantitative model for the in vivo assessment of drug binding sites with positron emission tomography". Mintun, et al. Ann Neurol, 1984. Link. [2] "Kinetic modelling using basis functions derived from two-tissue compartmental models with a plasma input function: general principle and application to [18F]fluorodeoxyglucose positron emission tomography". Hong, et al. NeuroImage, 2010. Link. Additional Resources "Compartmental Models", Vesa Oikonen. Turku PET Center website. Link One-Tissue Compartment Model (1TCM) The 1TCM is a two-compartment model that includes one compartment representing tracer within the tissue (free and nonspecifically bound tracer which together are referred to as "nondisplaceable" tracer) and one compartment representing tracer within the arterial plasma [1]. Parameter Description Concentration in F + NS compartment, CND(t) nondisplaceable tracer CP(t) Concentration in plasma (P) compartment Transfer of ligand from arterial plasma to K1 (mL*cm3*min-1) tissue Transfer of ligand from tissue to arterial k2 (min-1) plasma VT = K1/k2 Total volume of distribution For tracers for which a compartmental model is appropriate, estimation of the rate constants provides valuable information about tracer uptake [1]. The 1TCM is generally easier and less computationally intensive to solve than the 2TCM because it is a simpler model and has fewer parameters. Additionally, 1TCM model parameters can generally be estimated with better identifiability than 2TCM model parameters. Two-Tissue Compartment Model (2TCM) 102 VivoQuant Manual 11/12/2015 In some cases, the exchange of tracer between the nondisplaceable and bound tissue is sufficiently fast that the two cannot be distinguished kinetically. In these cases, the nondisplaceable and bound tissue compartments may be collapsed into one compartment that represents both the nondisplaceable and specifically bound tracer within the tissue [2]. In these cases, apparent transfer of ligand from tissue to arterial plasma is represented by the parameter k2a and VT = K1/K2a. When a tracer that specifically binds to a target can be represented by a 1TCM as above, and has a reference region the distribution volume ratio (DVR) can be calculated: DVR = VT/VND, where VND is the estimated distribution volume in the reference region. Binding potential (BPND) can then be calculated by BPND = DVR - 1. Model Assumptions This model makes the following assumptions • The tracer binds reversibly. • Nonspecifically bound ligand equilibrates rapidly with free tissue ligand. • Compartmental model assumptions: ♦ The tracer kinetics or behavior can be represented by a compartmental model. ♦ Tracer concentration within each compartment is well-mixed and does not vary spatially. ♦ First-order kinetics may be used to describe exchange of ligand between compartments *Note: Violation of any of these assumptions may produce biased parameter estimates. While the model will still run in VivoQuant, the estimated parameters may not accurately reflect the true tracer kinetics. Required Inputs This model requires the following inputs • Metabolite-corrected arterial plasma input curve • ROI(s) or voxels Outputs Region-level analysis • Plot of data from each ROI with 1TCM fit. • VT, K1, k2, and mean-squared error (MSE) of fit are shown when the cursor is hovered over the model fit plot • VT, K1, k2, and mean-squared error (MSE) of fit, data, and 1TCM fit for each ROI can be saved out to .csv. Voxel-level analysis One-Tissue Compartment Model (1TCM) 103 VivoQuant Manual 11/12/2015 • Plot of data for each voxel with 1TCM fit. Select the voxel for which you'd like to see the model fit by clicking on it with the image viewer. • VT, K1, k2, and mean-squared error (MSE) of fit are shown when the cursor is hovered over the model fit plot. • Parameter maps for VT, K1, k2, and mean-squared error (MSE). References [1] "Kinetic modeling in positron emission tomography". Morris, et al. In: Emission Tomography: The Fundamentals of PET and SPECT (Eds: wermick MN, Aarsvold JN). 2004. [2] "Comparison of methods for analysis of lcinical [11C]raclopride studies". Lammerstsma, et al. JCBFM, 1996. Link [3] "Kinetic modelling using basis functions derived from two-tissue compartmental models with a plasma input function: general principle and application to [18F]fluorodeoxyglucose positron emission tomography". Hong, et al. NeuroImage, 2010. Link. Additional Resources "Compartmental Models", Vesa Oikonen. Turku PET Center website. Link Logan Graphical Method (Logan Plot) The Logan graphical method [1] was developed for reversibly bound tracers based on the Patlak method for irreversibly bound tracers [2]. The Logan method proposes that after some time t*, the plot of vs. where CT is the concentration of the tracer in the tissue and Cp is the concentration of the tracer in the metabolite-corrected arterial plasma, becomes linear with slope equal to the total volume of distribution, VT. One-Tissue Compartment Model (1TCM) 104 VivoQuant Manual 11/12/2015 When the Logan Plot is applied to image data with a reference region, the distribution volume ratio (DVR) can be calculated: DVR = VT/VND, where VND is the estimated disctribution volume in the reference region. BPND is related to DVR by BPND = DVR - 1 The Logan plot is a rearrangement of tracer kinetic equations to yield a useful linear equation. However, the mapping of transformed variables is nonlinear in CT(t), and this results in an underestimation of VT which becomes more pronounced with larger true VT and increased noise [1,3]. Therefore, the Logan graphical method may not be the best method to use when data are noisy and other methods should be considered. Model Assumptions This model makes the following assumptions • The tracer binds reversibly • After some time t* the slope of the plot of vs. approaches linearity. *Note: Violation of any of these assumptions may produce biased parameter estimates. While the model will still run in VivoQuant, the estimated parameters may not accurately reflect the true tracer kinetics. Required Inputs This model requires the following inputs • Metabolite-corrected arterial plasma input curve • ROI(s) or voxels • t* (in scan time) ♦ Selection of t*: The Logan plot as implemented in VivoQuant requires that the user inputs the t* which defines the time at which the plotted data become linear. In VivoQuant the default t* value is 0. This is likely not the appropriate value for your experiment. t* values are tracer dependent. For characterized tracers, we suggest reviewing the literature to see which t* values have been used in Logan method. The simplest way to select a reasonable t* value for your data is to run the model once with the default t* value, review the Logan plots to find the point at which they become linear (t*), then re-run the model with the appropriate t* (in scan time) value. Outputs Region-level analysis • Logan plot with line fit for each voxel. Select the voxel for which you'd like to see the Logan plot by clicking on it within the image viewer. • VT, fitted line intercept, and mean-squared error (MSE) of fit are shown when the cursor is hovered over the Logan plot. • Parameter maps for VT, fitted line intercept, and MSE. Logan Graphical Method (Logan Plot) 105 VivoQuant Manual 11/12/2015 References [1] "Kinetic modeling in positron emission tomography". Morris, et al. In: Emission Tomography: The Fundamentals of PET and SPECT (Eds: wermick MN, Aarsvold JN). 2004. [2] "Comparison of methods for analysis of lcinical [11C]raclopride studies". Lammerstsma, et al. JCBFM, 1996. Link [3] "Effects of Statistical Noise on Graphic Analysis of PET Neuroreceptor Studies". Slifstein and Laruelle. JNM, 2000. Link Additional Resources "Multiple Time Graphical Analysis (MTGA)", Vesa Oikonen. Turku PET Center website. Link Simplified Reference Tissue Model (SRTM) The simplified reference tissue model (SRTM) [1] allows for quanitification of tracer kinetics without requiring an arterial input function. SRTM is a numerically robust model which assumes that the tracer can be represented by 1-tissue compartment models in both the ROIs and the reference region. ROI Reference Region Parameter CT(t) Description Concentration in F + NS + S compartment Concentration in F + NS compartment, CND(t) nondisplaceable tracer CP(t) Concentration in plasma (P) compartment Transfer of ligand from arterial plasma to K1 (mL*cm3*min-1) tissue Apparent transfer of ligand from tissue to k2a (min-1) arterial plasma Transfer of ligand from arterial plasma to K1'' (mL*cm3*min-1) reference tissue Transfer of ligand from reference tissue to k2a'' (min-1) arterial plasma Logan Graphical Method (Logan Plot) 106 VivoQuant Manual 11/12/2015 Model Assumptions This model makes the following assumptions • The tracer binds reversibly • Tracer concentration in all regions or voxels-of-interest as well as the reference region (see below) can be represented by a 1-tissue compartment model • A region/tissue exists which is devoid of the target site/receptor. We call this region the reference region. It represents the concentration of the tracer which is free in tissue and/or bound to off-target sites (non-specific binding). An ideal reference region is a) devoid of the target site/receptor, and b) has the same concentration of tracer free in tissue and nonspecifically bound as the ROI. *Note: Violation of any of these assumptions may produce biased parameter estimates. While the model will still run in VivoQuant, the estimated parameters may not accurately reflect the true tracer kinetics [2]. SRTM is currently implement in VivoQuant using a basis functio nmethod approach and unweighted fitting [3]. Required Inputs This model requires the following inputs • Reference tissue curve • ROI(s) or voxels Outputs Region-level analysis • Plot of data from each ROI with SRTM fit • BPND, R1,k2,k2', and mean-squared error (MSE) of fit are shown when the cursor is hovered over the model fit plot. • BPND, R1,k2,k2', and mean-squared error (MSE), data and SRTM fit for each ROI can be saved out to .csv. Voxel-level analysis • Plot of data for each voxel with SRTM fit. Select the voxel for which you'd like to see the model fit by clicking on it with the image viewer. • BPND, R1,k2,k2', and mean-squared error (MSE) of fit are shown when the cursor is hovered over the model fit plot. • Parameter maps for BPND, R1,k2,k2' and MSE. References [1] "Simplified reference tissue model for PET receptor studies", Lammerstma and Hume. NeuroImage, 1996. Link [2] "The simplified reference tissue model: model assumption violations and their impact on binding potential", Salinas, et al. JCBFM, 2015. Link Simplified Reference Tissue Model (SRTM) 107 VivoQuant Manual 11/12/2015 [3] "Kinetic modelling using basis functions derived from two-tissue compartmental models with a plasma input function: general principle and application to [18F]fluorodeoxyglucose positron emission tomography". Hong, et al. NeuroImage, 2010. Link. Additional Resources "Reference region input compartmental models", Vesa Oikonen. Turku PET Center website. Link. Simplified Reference Tissue Model 2 (SRTM2) SRTM2 is a two-pass version of SRTM that attempts to reduce noise in parametric images by fitting all voxels with a fixed, global k2' [1]. In practice, SRTM estimates k2' for every voxel or region, but since there is only one reference region, in principle there is only one true k2' value [1]. Fixing k2' reduces the number of parameters estimated and thus reduces noise in parametric images [1]. However, this improvement in precision may come at the price of an increase in bias [1]. Note: SRTM2 can be used on both the region- and voxel-level but generally shows greatest advantage over SRTM when used at the voxel-level. Model Assumptions This model makes the following assumptions • The tracer binds reversibly • Tracer concentration in all regions or voxels-of-interest as well as the reference region (see below) can be represented by a 1-tissue compartment model • A region/tissue exists which is devoid of the target site/receptor. We call this region the reference region. It represents the concentration of the tracer which is free in tissue and/or bound to off-target sites (non-specific binding). An ideal reference region is a) devoid of the target site/receptor, and b) has the same concentration of tracer free in tissue and nonspecifically bound as the ROI • There is only one true k2' value. k2' is the rate of tracer efflux from the reference region to the plasma. *Note: Violation of any of these assumptions will invalidate the model and may produce biased parameter estimates. While the model will still run in VivoQuant, the estimated parameters may not accurately reflect the true tracer kinetics. SRTM2 is currently implemented in VivoQuant using a basis function method approach and unweighted fitting [2]. Required Inputs This model requires the following inputs • Reference tissue curve • ROI(s) or voxels • A fixed k2' ♦ Selection of a fixed k2': The value to which to fix k2' should be selected based on the tracer and the experiment. For characterized tracers, we suggest reviewing the literature to see how the fixed k2' has been selected in different studies and the effect of the method to fix k2' on SRTM2 parameter estimates. Generally, k2' can be fixed to the median value estimated by a Simplified Reference Tissue Model 2 (SRTM2) 108 VivoQuant Manual 11/12/2015 first-pass of SRTM from all voxels with a BPND value > a set minimum [3,4] or all voxels with a BPND value within a given range [5]. The idea behind using BPND values to select voxels for inclusion in the median is to exclude voxels which maybe represent noise or have poor SRTM fit. For most tracers there is a range of physiologically-relevant BPND values. Values outside of that range may be non-physiological. Other studies have fixed k2' to the population average value estimated from a 1-tissue compartment model fit to the reference region [3] or estimated k2' for each subject by a simultaneous SRTM fit including all target regions with coupled k2' [3,6]. SRTM fit with coupled k2' is not currently available in VivoQuant. Outputs Region-level analysis • Plot of data from each ROI with SRTM2 fit • BPND, R1,k2a, and mean-squared error (MSE) of fit are shown when the cursor is hovered over the model fit plot. • BPND, R1,k2a, and mean-squared error (MSE), data and SRTM2 fit for each ROI can be saved out to .csv. Voxel-level analysis • Plot of data for each voxel with SRTM2 fit. Select the voxel for which you'd like to see the model fit by clicking on it with the image viewer. • BPND, R1,k2a, and mean-squared error (MSE) of fit are shown when the cursor is hovered over the model fit plot. • Parameter maps for BPND, R1,k2a, and MSE. References [1] "Noise reduction in the simplified reference tissue model for neuroreceptor functional imaging.", Wu and Carson. JCBFM, 2002. Link [2] "Kinetic modelling using basis functions derived from two-tissue compartmental models with a plasma input function: general principle and application to [18F]fluorodeoxyglucose positron emission tomography". Hong, et al. NeuroImage, 2010. Link. [3] "Tracer kinetic modeling of [(11)C]AFM, a new PET imaging agent for the serotonin transporter". Naganawa, et al. JCBFM, 2013. Link [4] "Parametric Imaging and Test-Retest Variability of 11C-(+)-PHNO Binding to D2/D3 Dopamine Receptors in Humans on the High-Resolution Research Tomograph PET Scanner", Gallezot, et al. JNM, 2014. Link [5] "Kinetic modeling of the serotonin 5-HT1B receptor radioligand [11C]P943 in humans". Gallezot, et al. JCBFM, 2010 Link Simplified Reference Tissue Model 2 (SRTM2) 109 VivoQuant Manual 11/12/2015 [6] "Assessment of striatal dopamine D2/D3 receptor availability with PET and 18F-desmethoxyfallypride: comparison of imaging protocols suited for clinical routine". Amtage, et al. JNM, 2012. Link Additional Resources "reference region input compartmental models", Vesa Oikonen. Turku PET Center website. Link. Logan Non-Invasive Graphical Method (Logan reference plot) The Logan non-invasive graphical method [1] was developed for reversibly bound traceres based on the Logan graphical method and Patlak method for irreversibly bound tracers [2,3]. The Logan reference method proposes that after some time t*, the plot of vs. (where CT is the concentration of the tracer in the tissue and CR is the concentration of the tracer in the reference region) becomes linear with slope equal to the distribution volume ratio (DVR). Binding potential (BPND) is related to DVR by BPND = DVR - 1. The Logan plot is a rearrangement of tracer kinetic equations to yield a useful linear equation. However, the mapping of transformed variables is nonlinear in CT(t), and this results in an underestimation of DVR which becomes more pronounced with larger true DVR and increased noise [1,4]. Therefore, the Logan graphical method may not be the best method to use when data are noisy and other methods should be considered. Method Assumptions This model makes the following assumptions • The tracer binds reversibly • A region/tissue exists which is devoid of the target site/receptor. We call this region the reference region. It represents the concentration of the tracer which is free in tissue and/or bound to off-target sites (non-specific binding). An ideal reference region is a) devoid of the target site/receptor, and b) has the same concentration of tracer free in tissue and nonspecifically bound as the ROI Logan Non-Invasive Graphical Method (Logan reference plot) 110 VivoQuant Manual • After some time t* the slope of the plot of vs 11/12/2015 approaches linearity *Note: Violation of any of these assumptions may produce biased parameter estimates. While the model will still run in VivoQuant, the estimated parameters may not accurately reflect the true tracer kinetics. Required Inputs This model requires the following inputs • Reference tissue curve • ROI(s) or voxels • t* (in scan time) ♦ Selection of t*: The Logan reference plot as implemented in VivoQuant requires that the user inputs the t* which defines the time at which the plotted data become linear. In VivoQuant, the default t* value is 0. This is likely not be the appropriate value for your experiment. t* values are tracer dependent. For characterized tracers, we suggest reviewing the literature to see which t* values have been used in Logan reference method. The simplest way to select a reasonable t* value for your data is to run the model once with the default t* value, review the Logan reference plots to find the point at which they become linear (t*), then re-run the model with the appropriate t* (in scan time) value. Outputs Region-level analysis • Logan plot with line fit for each ROI. • DVR, fitted line intercept, and mean-squared error (MSE) of fit are shown when the cursor is hovered over the Logan plot. • DVR, fitted line intercept, and transformed Logan space data for each ROI can be saved out to .csv Voxel-level analysis • Logan plot with line fit for each voxel. Select the voxel for which you'd like to see the Logan plot by clicking on it within the image viewer. • DVR, fitted line intercept, and MSE of fit are shown when the cursor is hovered over the Logan plot. • Parameter maps for DVR, fitted line intercept, and MSE. References [1] "Distribution volume ratios without blood sampling from graphical analysis of PET data". Logan, et al. JCBFM, 1996. Link [2] "Graphical analysis of reversible radioligand binding from time-activity measurements applied to [N-11C-methyl]-(-)-cocaine PET studies in human subjects". Logan, et al. JCBFM, 1990. Link [3] "Graphical evaluation of blood-to-brain transfer constants from multiple-time uptake data". Patlak, et al. JCBFM, 1983. Link Logan Non-Invasive Graphical Method (Logan reference plot) 111 VivoQuant Manual 11/12/2015 [4] "Effects of Statistical Noise on Graphic Analysis of PET Neuroreceptor Studies". Slifstein and Laruelle. JNM, 2000. Link Additional Resources "Multiple Time Graphical Analysis (MTGA)", Vesa Oikonen. Turku PET Center website. Link Patlak Analysis (Patlak Plot) Patlak analysis is rearrangement of tracer kinetic equations to yield a useful linear equation [1]. Patlak analysis proposes that after some time t*, the plot of vs. where CT is the concentration of the tracer in the tissue and CP is the concentration of the tracer in the metabolite-corrected arterial plasma, becomes linear with slope equal to the net influx rate constant, Ki. The rate constant Ki represents influx and trapping of the tracer into the tissue [1,2]. In terms of a two-tissue comparment model where k4 = 0 because the tracer is irreversibly trapped, Ki = Model Assumptions This model makes the following assumptions Patlak Analysis (Patlak Plot) 112 VivoQuant Manual • The tracer binds irreversibly • After some time t*, the slope of the plot of vs. 11/12/2015 approaches linearity *Note: Violation of any of these assumptions may produce biased parameter estimates. While the model will still run in VivoQuant, the estimated parameters may not accurately reflect the true tracer kinetics. Required Inputs This model requires the following inputs • Metabolite-corrected arterial plasma input curve • ROI(s) or voxels • t* (in scan time) ♦ Selection of t*: The Patlak plot as implemented in VivoQuant requires that the user inputs the t* which defines the time at which the plotted data become linear. In VivoQuant the default t* value is 0. This is likely not be the appropriate value for your experiment. t* values are tracer dependent. For characterized tracers, we suggest reviewing the literature to see which t* values have been used in Patlak analysis. The simplest way to select a reasonable t* value for your data is to run the model once with the default t* value, review the Patlak plots to find the point at which they become linear (t*), then re-run the model with the appropriate t* (in scan time) value. Outputs Region-level analysis • Patlak plot with line fit for each ROI. • Ki, fitted line intercept (V), and mean-squared error (MSE) of fit are shown when the cursor is hovered over the Patlak plot. • Ki and transformed Patlak space data for each ROI can be saved out to .csv Voxel-level analysis • Patlak plot with line fit for each voxel. Select the voxel for which you'd like to see the Patlak plot by clicking on it within the image viewer. • Ki, fitted line intercept (V), and mean-squared error (MSE) of fit are shown when the cursor is hovered over the Patlak plot. • Parameter maps for Ki, fitted line intercept (V), and MSE. References [1] "Graphical evaluation of blood-to-brain transfer constants from multiple-time uptake data". Patlak, et al. JCBFM, 1983. Link. [2] "Net Influx Rate, (Ki)", Vesa Oikonen. Turku PET Center website. Link. Additional Resources Patlak Analysis (Patlak Plot) 113 VivoQuant Manual 11/12/2015 "Multiple Time Graphical Analysis (MTGA)", Vesa Oikonen. Turku PET Center website. Link. Patlak Analysis (Patlak Plot) 114 Main Window Upon starting the VivoQuant, the VQ Main Window appears. The Main Window contains the primary VQ display and also serves as the focal point for reaching all other VQ functions. Menus Five Menus are arrayed across the top of the Main Window. These include: Menu File View Tools Advanced Modules Main Window Function Used for file manipulation and includes options for opening, saving, printing, and publishing files. Used to control the display of data already loaded into the VQ. Entire data sets may be toggled as may a variety of display options, including layout and zoom. Provides access to several VQ image processing tools, including data control, reconstruction, calibration, and configuration features. Provides access to more advanced VQ image processing tools, including data control, 115 VivoQuant Manual Help 11/12/2015 reconstruction, calibration, and configuration features. Help content, including registration information and the manual, are available in this menu. Docks The Viewer Control, MIP Control, Data Manager, and Operators are automatically placed into Docks upon opening. Docks may be dragged and dropped into and out of the Main Window display and multiple controllers/operators are dockable at any given time. Thumbnails A bank of thumbnail icons is located below the Menus. These icons provide fast access to features. Thumbnail Function Icon Opens the Data Browser Opens a browser that will unload currently loaded data and replace it with the data selected in the browser. Opens a browser that will append data to currently loaded data. Opens the Save Image window. Opens the Save Movie window. Changes the display layout to a 2 x 2 grid layout. Changes the display layout to a 1 x 1 grid layout. Changes the display layout to show the sagittal, coronal, and transverse data slices but not the MIP. Changes the display layout to show only the transverse data slices. Changes the display layout to show only the MIP. Resets the zoom and pan within each viewport in the display Zooms in 25%. Zooms out 25%. Auto-zooms to fit data to screen. Opens RGB color options. Opens the Viewer Control panel. Opens the MIP Control panel. Opens the Data Manager panel. Opens the Min Max Tool panel. Menus 116 VivoQuant Manual 11/12/2015 Opens the VivoScript Evaluation window. Edits the VivoScript file selected in the Quick Scripts menu Evaluates the VivoScript file selected in the Quick Scripts menu Aborts the VivoScript in execution Activates the Peek tool, used to reveal names of operator widgets for use in VivoScripts. See the VivoScript page for more. View Modes Four viewing modes are available via a pull-down menu located next to the thumbnail icons. View Mode Slice View Tile View Multi View MPR View Function The Slice View (default) simultaneously displays images of single slices for the MIP, sagittal, coronal, and transversal views of the loaded data sets. The Tile View displays an array of slices for either, sagittal, coronal, or transversal view of the loaded data sets. The Multi View displays sagittal, coronal, or transversal slices of each data set adjacent to one another simultaneously. The Multi Planar Reconstruction View simultaneously displays sagittal, coronal, and transversal slices in a single window. Operators The operators are available in a pull-down menu located next to the thumbnail icons. Thumbnails 117 VivoQuant Manual 11/12/2015 Operator Function Enables manually scrolling through Navigation the image slices and rotation of the Maximum intensity Projection (MIP). Provides advanced tools for drawing, 3D ROI Tool visualizing, saving, and quantifying both 2- and 3-dimensional regions. Provides a mean to quantify density Quantification++ and activity parameters in CT and NM scans, respectively. Enables realignment of image data via translation, rotation, or flipping. In registration mode, a variety of Reorientation/Registration registration algorithms are available to automatically register data from a wide variety of modalities. Allows sagittal, coronal, and transverse slices of datasets from a Time Series time series to be played sequentially in a loop or easily scrolled through manually. Allows you to measure the distance Distance/Annotation between two points in any image. In checkerboard mode, the reference and input data set(s) are arrayed in a Checkerboard pattern of alternating squares, resembling a checkerboard. Allows images to be made smaller by Cropping removing any unwanted areas. Allows voxel-wise arimethic operations on two input images, or Arithmetics scalar operations on any number of input images. Uses a selection of built-in smoothing Filtering filters with configurable parameters. Provides an integrated solution for representing the loaded data set with Modeling one of several mathematical models to allow for predictions and analysis. Display The Display field comprises the principal component of the Main Window. The first three images loaded in the Data Manager are visible in the Display field. Many tools and image-processing steps are visible in the display of the data sets in the Display field. Operators 118 VivoQuant Manual 11/12/2015 Projections vs. Reconstructions The Display window recognizes whether a loaded data set is projection data or reconstructed data. The default viewing scheme, known as Slice View, for reconstructed data (presented almost exclusively throughout this manual) includes a MIP and three separate viewing directions (sagittal, coronal, and transversal). When viewing projection data or sinograms (sets of CT projection data), the VQ displays the data accordingly. For example, transverse slices of projection data are displayed with a 'P' in the top-left corner. For CT data, selecting the correct layout will display the relevant sinogram data. For the corresponding windows, the data are labeled as "sinogr.", denoting sinogram. NOTE: It is not possible to view projection (non-volumetric) and reconstruction (volumetric) data simultaneously. Attempting to append reconstruction data to projection data, or vice versa, will result in an error message. Projections vs. Reconstructions 119 VivoQuant Manual Projections vs. Reconstructions 11/12/2015 120 Save Image Data This function enables the images to be saved as picture files. The slices can be saved individually (sagittal, coronal or transversal) or all in one image. A Maximum intensity Projection (MIP) picture can also be saved using this feature (MIP viewer must be active). Images will appear exactly as they do in the viewer. Getting There Four different methods exist for saving images. The first method is to go to "Save Image" under the File menu. The second method is to use the keyboard shortcut "Ctrl+I". For more on keyboard shortcuts in VQ, please see Keyboard Shortcuts. The third method to save image slices is to use the thumbnail in the Main Window. The fourth method is through the MIP Control, which can be opened via the Window. There is an option here to save the image. thumbnail in the Main Function Selection of the "Save Image" option opens the Save Image window. Save Image Data 121 VivoQuant Manual 11/12/2015 There are several options for the output images. Option File name Files of type Image type Colorbar options Description Set name of image file. Set type of image file. Images can be saved as 1. .png 2. .jpeg 3. .bmp 4. .gif 5. .tif Set type of image. Image types can be 1. Maximum intensity projection (MIP) 2. Sagittal slice 3. Coronal slice 4. Transversal slice 5. All views in one image 6. All images separately Set colorbar and label options for the image. Options include 1. None - no colorbars or labels 2. No labels - colorbars with no labels 3. Simple labels - colorbars with one set of evenly distributed gradations placed across all Function 122 VivoQuant Manual 11/12/2015 color bars. 4. Smart labels - colorbars with separate sets of gradations for each color bar incremented with respect to the units of each color bar. Set whether the image file will be Storage type stored as a local image file or as a DICOM via Secondary Capture. Set a scalar magnification factor will be applied to the resulting image. Note this does not affect the magnification Magnification of the viewports, only the magnification of the image file being generated. Function 123 Save Movie This function enables the images to be saved as movie files. The slices can be saved individually (sagittal, coronal or transversal) or all in one image. A Maximum intensity Projection (MIP) picture can also be saved using this feature. Getting There Four different methods exist for saving movies. The first method is to go to "Save Movie" under the File menu. The second method is to use the keyboard shortcut "Ctrl+M". For more on keyboard shortcuts in VQ, please see Keyboard Shortcuts. The third method to save image slices is to use the thumbnail in the Main Window. The fourth method is through the MIP Control, which can be opened via the Window. There is an option here to save the movie. thumbnail in the Main Function Selection of the "Save Movie" option opens the Save Movie window. Save Movie 124 VivoQuant Manual 11/12/2015 There are several options for the output movies. Option Description File name Set name of movie file Set type of movie file. Movies can be saved as Files of type Movie type Colorbar options 1. .gif 2. .mng 3. .mpg 4. .mpeg Set type of movie. Movie types can be 1. Maximum intensity projection (MIP) 2. Sagittal slice 3. Coronal slice 4. Transversal slice 5. All movies separately Set colorbar and label options for the image. Options include 1. None - no colorbars or labels 2. No labels - colorbars with no labels 3. Simple labels - colorbars with one set of evenly distributed gradations placed across all color bars. 4. Smart labels - colorbars with separate sets of gradations for each color bar incremented with respect Function 125 VivoQuant Manual Storage type Function 11/12/2015 to the units of each color bar. Set whether the image file will be stored as a local image file or as a DICOM via Secondary Capture. 126 Docks The Viewer Control, MIP Control, Data Manager, and Operators are automatically placed into docks upon opening. Docks may be dragged and dropped into and out of the Main Window display and multiple Controllers are dockable at any given time. Using docks The three controllers (MIP, Viewer, and Data Manager) are opened into docks automatically when used. Also, any individual operator (i.e., reorientation, cropping, etc.) is opened into a dock upon use. Any controller or operator displayed in a dock may be "popped out" into its own window via a drag-and-drop procedure with the mouse. Similary, any controller or operator can be re-docked by dragging it back into a docking area (the left, right, or bottom of the main window). Docks 127 VivoQuant Manual 11/12/2015 Docks may even be placed on either side of the main window, allowing immediate access to many VQ tools without changing windows. And if more main window space is needed for image viewing, simply close or re-arrange the docks to your liking. Using docks 128 Displays VivoQuant offers various display styles to enhance viewing and aid image analysis. • Slice View: Showing orthogonal slices. • Tile View: Showing a matrix of slices of one type. • Multi View: Showing side by side slices of one type. • MPR View: Showing side by side slices of one type. Displays 129 Slice View The Slice View (default) simultaneously displays images of single slices for the MIP, sagittal, coronal, and transversal views of the loaded data sets. Getting There The Slice View is available via a pull-down menu on the Main Window. Using the Slice View Display Scrolling through slices in the Slice View may be achieved using the scroll wheel on a mouse or by using the arrows and PageUp/PageDown keys on your keyboard. To learn how these keys control scrolling in the Tile View, click here.. The keys control different views (i.e., coronal, sagittal, or transversal) depending on the current "active" view. Click on a view to make it the active view. In general, the active view will be controlled by the Slice View 130 VivoQuant Manual 11/12/2015 PageUp/PageDn keys while scrolling of the other two views is controlled by the arrow keys. Scrolling Example The arrow (→,←,↑,↓) and paging (PageUp,PageDn) keys may be used to scroll through slices in the Slice View. The relationship of the keys with respect to scrolling is described by this example and further illustrated in the table below. The crosshairs help to illustrate the scrolling properties of the arrow keys. In the example image (below), the transversal view is the active view. The ← and → keys move the cross hairs towards the L and R in the transversal slice, respectively. L and R have a physical representation as the left side and right side of the object. Moving through the object to the left or right is equivalent to stepping through the sagittal plane of the object and, thus, the sagittal slice changes. Continuing with this example, the ↑ and ↓ will move the crosshair towards P and A, respectivly. P and A represent the posterior and anterior of the object and are also visible in the sagittal slice of the object (rotated 90-degrees). Therefore, using the ↑,↓ in the transversal plane will shift the vertical crosshair in the sagittal plane (identically to using the ←,→ when the sagittal plane is the active view) and correspond to stepping through the coronal views of the object. Using the Slice View Display 131 VivoQuant Manual 11/12/2015 Scrolling Shortcuts Table This table illustrates the points made in the above example with a table, displaying the function of the arrow and paging keys for each active view. Active View ← → Previous Next Coronal sagittal sagittal slice slice Previous Next Sagittal coronal coronal slice slice Previous Next Transversal sagittal sagittal slice slice Scrolling Example ↑ ↓ PageUp PageDn Previous transversal slice Previous transversal slice Previous coronal slice Next transversal slice Next transversal slice Next coronal slice Previous coronal slice Previous sagittal slice Previous transversal slice Next coronal slice Next sagittal slice Next transversal slice 132 VivoQuant Manual 11/12/2015 Other Slice View Tools Scrolling through slices is also possible through the Viewer Control panel using the sliders and their associated spin boxes. The Layout and Zoom options are also intended for manipulating the appearance of the Slice View. Other Slice View Tools 133 Tile View The Tile View displays an array of slices for either sagittal, coronal, or transversal view of the loaded data sets. The number of slices displayed depends on the size of the VivoQuant window. Getting There The Tile View is available via a pull-down menu on the Main Window. Using the Tile View Display Scrolling through slices in the Tile View may be achieved using the scroll wheel on a mouse or by using the arrows and PageUp/PageDn keys on your keyboard. The keys control the rate at which you scroll through the Tile View 134 VivoQuant Manual 11/12/2015 tiles. To learn how these keys control scrolling in the Slice View, click here.. ← Previous slice → Next slice ↑ Previous row ↓ Next row PageUp Previous screen PageDn Next screen To switch between views (i.e., coronal, sagittal, transversal) in the Tile View, right-click on a tile and choose the desired view. Two operators are available in Tile View. The first is the Time Series operator, which enables dynamic data to be viewed as a time series. For more information on this operator, see the Time Series page. The other available operator is the 3D ROI View operator, which enables ROIs to be displayed in Tile View. Note: ROIs may not be edited in Tile View. For information on editing ROIs, see the 3D ROI Tool page. Using the Tile View Display 135 VivoQuant Manual Using the Tile View Display 11/12/2015 136 Multi View The Multi View offers users the ability to create a fully customized Display for data. Users may select how many Viewports will be displayed, in what orientation they will be displayed and which datasets will be rendered in them. This is especially useful for users who work with data across multiple image modalities. Getting There The Multi View is available via a pull-down menu on the Main Window. Setting Up the Multi View Display Selecting Multi View brings up the Multi View display and activates the Multi View-specific Layout operator. Multi View 137 VivoQuant Manual 11/12/2015 The Layout operator is where users may customize the Multi View display. Users first select the number of rows and columns of Viewports. Then, for each Viewport, users select the datasets and slices that will be displayed in them. To set the number of Viewports, set the 'rows' and 'cols' scrollboxes to the desired amounts. The 5x5 grid in the Operator window, in addition to the Display, will populate with the number of rows and columns of Viewports. The 5x5 grid in the Operator window is used to control both the datasets displayed in each Viewport and the slice type. To load data into a particular Viewport, click on the corresponding box in the grid and in the three menus labelled 'Data' in the Operator window, select the Reference, Input 1 and Input 2 dataset(s) for the Viewport. The dataset(s) will be loaded automatically. Setting Up the Multi View Display 138 VivoQuant Manual 11/12/2015 In the 5x5 grid itself, the boxes will read either 'Cor', 'Sag', or 'Tra' which corresponds to the type of slices displayed in the Viewports. To change the type of slices in a particular Viewport, simply double click on the corresponding box in the grid and select the desired slice type. Setting Up the Multi View Display 139 VivoQuant Manual 11/12/2015 ROIs may also be displayed in Viewports. To show ROIs in a Viewport, simply select the desired Viewport, by either clicking on it in the Display or clicking on its box in the 5x5 grid, and check the Show ROIs checkbox. ROIs will then be displayed. To show ROIs in all viewports, simply click the Show ROIs All button. ROIs will then be visible in all viewports. Setting Up the Multi View Display 140 VivoQuant Manual 11/12/2015 Using the Multi View Display Navigation To use the Multi View as you would other Displays, simply close out of the Layout operator and select the "Navigation" operator from the drop down menu. The functionality of the Navigation operator in Multi View is identical to its functionality in Slice View. Mouse and keyboard functions, including Keyboard Shortcuts, are preserved. Viewer Control in Multi View The functionality of the Viewer Control is extended in Multi View to cover the new viewport layout. This extended functionality includes the ability to view voxel and color information for each viewport in the Display, as well as the ability to unlink the viewports, enabling them to be navigated independently of one another. Using the Multi View Display 141 VivoQuant Manual 11/12/2015 For more information on using the Viewer Control in Multi View, see the Viewer Control in Multi View section of the Viewer Control page. Viewer Control in Multi View 142 MPR View The MPR (Multi-Planar Reconstruction) View simultaneously displays a sagittal, coronal, and transversal slice of the reconstruction. The Viewer Control is used to change the active planes while the sliders and checkboxes across the top of the window may be used to rotate the view, display the bounding box, reset the view, and turn on/off individual planes. Getting There The MPR View is available via a pull-down menu on the Main Window. Using the MPR View Display The image in MPR View may be rotated by using a left-click and dragging the mouse. Similarly, panning may be controlled by holding the 'Shift' key, using a left-click, and dragging the mouse. The zoom may be changed by using the mouse's scroll wheel. To change the active planes in the MPR View, use the (X,Y,Z) sliders in the Viewer Control MPR View 143 VivoQuant Manual 11/12/2015 Several other options for manipulating the MPR View are available in the top of the display window. These checkboxes and sliders may be used to rotate the view, display the bounding box, reset the view, or turn on/off individual planes. Reset (X,Y,Z) Sliders BB Checkbox XY,XZ,YZ Checkboxes Using the MPR View Display Resets the MPR View display to the default settings Rotates the MPR View around the (X,Y,Z) axis. Toggles the display of the MPR View Bounding Box. Toggles the display of the coronal, sagittal, and transveral slices. 144 Capture Viewer The Capture Viewer enables editing of image and movie files prior to saving. Getting There When saving an image or movie, the second option in the "DICOM Repository" drop-down menu is "DICOM Secondary Capture". Selecting this option and clicking "Save" will load the image/movie into the Capture Viewer. Function The Capture Viewer panel is split into four fields: Info, Convert, Edit, and Image. Capture Viewer 145 VivoQuant Manual 11/12/2015 Info The Info field includes many boxes and buttons that affect the output image. Option Series Description Function Description Pull-down menu to choose image. Image selected here will be reflected in the "Series Desc" field 146 VivoQuant Manual PatientsName Study Desc Series Desc Capture Desc Content Data Data Size Image Size DICOM Close orig and 11/12/2015 Patient name as stored in the DICOM header Protocol used to collect the data Series description including modality Name of image/movie to be saved. Manually entered by user. Date and time at which the image/movie was loaded into the Capture Viewer. Size of the original data referred to in the Series Description pull-down menu. Size of image currently being displayed. When pressed, displays the DICOM Header for the data When pressed, closes the Capture Viewer without saving image When checked, maintains, or returns to, the original image size. Increases or decreases image size, respectively Convert The Convert field includes several options that affect the output image. Option Description Save Image Opens the Save Image screen. Save Movie Opens the Save Movie screen. Play Movie Plays the movie. Click again to stop the movie Save Saves image/movie into the repository specified in Capture the pull-down menu. There are also several radio buttons that enable the user to select the level of compression of the output images. If selecting "Lossy JPEG", the "quality" spin-box becomes active and the user can specify how much quality to preserve in the output image. Edit Info 147 VivoQuant Manual 11/12/2015 The Edit field includes several buttons Option Description Annotate Creates a text box in the image space Creates a circle in the image space that can be moved Circle and resized to highlight an ROI. Arrow Creates a movable arrow in the image space Image View The Image field displays the image/movie that is currently being edited. Edit 148 View Menu The View Menu is useful for modifying the information about a data set that appears in the Main Window. • Show Reference/Input 1/Input 2 • Slice Number • Crosshairs • Position Labels • Patient Name • Active Indicator • Layout • Zoom View Menu 149 Slice Number Highlighting the slice number function displays the slice number of the image being viewed. This is useful if you are want to compare the same slice of a subject at different time points. Getting There To view the slice number on the image go to view under the view menu and select Slice number. Function The slice number can be seen on the bottom right hand corner of each cross-sectional image; sagittal, transversal and coronal. To display the slice number in the images go to view and highlight Slice Number, a tick will appear beside it to show that it has been enabled. To conceal the slice number from view, unselect Slice number by left-clicking on it. Slice Number 150 Cross-hairs This function enables you to display cross hairs on the images to assist navigation through the slices. Getting There To display the cross hairs on the image go to view under the view menu and select Cross hair. Function The cross hairs can be are displayed over each cross-sectional image; sagittal, transversal and coronal. To display the cross hairs in the images go to view and highlight Cross Hair, a tick will appear beside it to show that it has been enabled. To conceal the cross hairs from view, unselect Cross hair by left-clicking on it. Cross-hairs 151 Position Labels The position labels are displayed on each image plane and MIP. They clearly indicate which side of the mouse is being viewed. Getting There To display the position labels on the image go to view under the view menu and select position Labels. Function The labels indicate the plane of view, i.e. sagittal, coronal and transversal and also the left/right and anterior/posterior side of the mouse. There is a "S" on the top left corner of the Sagittal image to indicate that it is the Sagittal plane. There is Sagittal also a "P" to indicate the posterior side of the mouse and an "A" to indicate the anterior side of the mouse. There is a "C" on the top left corner of the Coronal image to indicate that it is the Coronal plane. There is Coronal also a "H" to indicate the head of the mouse and a "F" to indicate the feet of the mouse. There is a "T" on the top left corner of the Transversal image to indicate that is it the Transversal Transversal plane. There is also a "L" to indicate the left side of the mouse and a "R" to indicate the right side of the mouse. Position Labels 152 Patient Name This feature enables you to include the patient labels in the image. Getting There To display the patient labels on the image go to view under the View menu and select patient Labels. Function Once this option is selected the patient labels are displayed on the bottom of all the images (sagittal, coronal and transversal) and also on the MIP. Patient Name 153 VivoQuant Manual Function 11/12/2015 154 Active Indicator The Active Indicator option places icons in the viewports that indicate which datasets are active in the Display. Getting There To turn on the Active Indicator, go to the View menu and select the Active Indicator option Function The Active Indicators appear in the upper right corner of the viewports. The top, middle and bottom indicators correspond to the Reference, Input 1 and Input 2, respectively. If the indicator is a solid circle, the corresponding input is on. If the indicator is a hollow circle, the corresponding input is off. Reference and Input 1 ON. Input 2 OFF. Active Indicator 155 VivoQuant Manual 11/12/2015 Reference and Input 2 ON. Input 1 OFF. Function 156 Layout This feature offers a variety of layouts for viewing your studies. You can view all the slices and the MIP together simultaneously or you can view them individually. Getting There To view the various layout options for the images go to view under the view menu and select layout. Alternatively you can click on the layout thumbnails in the Main Window. Thumbnail Description Grid 2x2 Grid 1x4 MIP only Slices only Transversal only Layout Options Grid 2x2 In the Grid 2x2 layout, the MIP and the coronal slice are located on the upper half of the screen and the sagittal and transversal slices are located on the bottom half of the screen. Layout 157 VivoQuant Manual 11/12/2015 Grid 1x4 In the Grid 1x4 layout the MIP and all three slices are laid out in a single row. Grid 2x2 158 VivoQuant Manual 11/12/2015 MIP only In the MIP only layout, only the MIP is visible; the slices are not in view. Grid 1x4 159 VivoQuant Manual 11/12/2015 Slices only In the Slices only layout, only the slices are visible; the MIP is not in view. MIP only 160 VivoQuant Manual 11/12/2015 Transverse only In the Transverse only layout, only the transverse slice is in view. Slices only 161 VivoQuant Manual Transverse only 11/12/2015 162 Zoom The zoom function allows you to alter your viewpoint of the images by zooming in and out and also provides the option of a full screen view. Getting There Three different methods exist for operating the Zoom function. The first method to view the various zoom options for the images is to go to View under the View menu and select Zoom. The second method to execute the different zoom options is to use keyboard shortcuts. Function Shortcut Zoom in (25%) Cntrl + + Zoom out (25%) Cntrl + Normal size Cntrl + 0 Full screen Cntrl + F Auto zoom Cntrl + Z For more on keyboard shortcuts in VQ, please see Keyboard Shortcuts. The third method is to click on the zoom thumbnails in the Main Window. Zoom In Zoom 163 VivoQuant Manual 11/12/2015 Zoom Out Function Zoom In The zoom in option allows you to zoom in by 25% increments. Zoom Out The zoom out option allows you to zoom out by 25% increments. Getting There 164 VivoQuant Manual 11/12/2015 Normal Size This is the default angle, selecting this option will bring the images back to their original viewing angle. Full Screen This options displays VivoQuant in full screen mode. Re-highlighting the full screen option will revert VivoQuant back to its original size. Auto Zoom Autozoom is a useful function which automatically increases the viewing angle of the images if the size of the VivoQuant window is increased. Zoom Out 165 VivoQuant Manual 11/12/2015 If this function is not selected and the size of the VivoQuant window is increased the image slices will stay the same viewing angle and will not automatically fit the larger window size. Auto Zoom 166 Tools The Tools Menu contains a wide range of tools available for a variety of post-processing applications. • VivoScript • View Control • MIP Control • Data Manager • Min/Max Tool • Workflow Assistant • Histogram • Preprocessing • Resample • Image & Movie ♦ How To Make Dynamic Movies ♦ Split Movie into Frames ♦ Join Frames to Movie ♦ Change Delay ♦ Image to Poster ♦ Image to Capture • DICOM • Update Check • Configuration ♦ Display Configuration ♦ Data Configuration ♦ DICOM Configuration ♦ Network Configuration ♦ Registration Configuration Tools 167 VQScript VQScript, or VivoScript, is an implementation of ECMAScript (aka JavaScript) that allows you to access large parts of VivoQuant. JavaScript structures VQScript syntax is identical to JavaScript syntax. Loop for (var i=0; i<10; ++i) { ... } Function function blub() { ... } function bar(p1, p2, p3) { return p1+p2+p2; } var res = bar(1,2,3); Array var array = new Array(); array[0] = 'foo'; array[1] = 'bar'; var array2 = new Array('foo', 'bar'); var array3 = [ 'foo', 'bar' ]; var last = array2.pop(); // remove and get last element array2.push('burp'); // add element Other array functions are for instance concat, join, reverse, sort, unshift, shift. Hash ... The VQScript Toolbar Adding Script Shortcuts to the Toolbar Shortcuts for commonly executed VQScripts can be added to the Quick Scripts menu on the VQScript Toolbar To add a Quick Script shortcut: • Go to 'Tools->Configuration' and click on the 'VivoScript' tab. VQScript 168 VivoQuant Manual 11/12/2015 • Select a script for which quick access is desired by clicking the button and navigating to the directory where the script is saved. • Add a nickname for the script in the dialog box that appears. • The script will now appear in the configuration window as well as in the Quick Scripts menu on the VQScript Toolbar. • Quick Scripts can be edited directly from the VQScript Toolbar by clicking on the pencil button window will appear in which the user can edit the script. Adding Script Shortcuts to the Toolbar .A 169 VivoQuant Manual 11/12/2015 Using the Peek Tool The Peek tool is used to reveal the names of elements (called widgets) in the operator GUIs for use in scripts. The command VQ.getWidget("widgetName") can then be used to interact with these elements. For example, to determine the name of the button in the 3D ROI Tool that resets all ROIs, click on the peek icon, then click on the button in the 3D ROI Tool. A yellow box containing the class and name of the selected button will be displayed. One can then use the command VQ.getWidget("buttonResetROIs").click() to click the button and reset all ROIs. VQScript Examples Included with VivoQuant are 30 VQScript example scripts to help you get started working with VQScript. These scripts illustrate some of the many ways VQScript may be used to streamline workflows in VivoQuant. To learn more about each files, see the VQScript Example Scripts page. Adding Script Shortcuts to the Toolbar 170 VQScript Objects and Object Methods VQ Object Function debug(text) mainWin() dataManager() dataList() sliceViewer() mipViewer() controler() mipControler() vtkController() vtkViewer() quit() counter(c, s) showMessage(text) askYesNoQuestion(const QString &msg) Description Writes text to VQ's debug console (e.g. the Windows debugger, a Unix termin The text looks like: Script: 1234 text with 1234 being the time (in ms) since the script started. Returns VQ's Main Window object (see below) Returns VQ's Data Manager object (see below) Returns VQ's Slice Viewer object (see below) Returns VQ's MIP Viewer object (see below) Returns VQ's View Contoller object (see below) Returns VQ's MIP controler object (see below) Returns VQ's VTK controller object (see below) Returns VQ's VTK viewer object (see below) Asks VQ to quit (in an interactive session, the user is asked for confirmation, wh terminates without further ado. Convenience function (e.g. used for fileNames) that returns a 0-padded counter counter(3,5) would return 00003. Shows text to the user. Please note that the user has to confirm the message an Shows QString to user in Yes/No dialog box. Returns a boolean value (1 = yes, Returns a progress dialog, which can be used to show the current state of a longe var progress = VQ.progressDialog("Saving Images", "Cancel", 0, for(var x=0; x<dm.getDimX(); x++) { // set posit progress.setValue(x); ... } progress.hide(); progressDialog(label, cancel, min, max) Shows input window to ask for a floating point number, e.g. getDouble(title, label, value=0, var radius = VQ.getDouble("Smoothing", "Radius", 3.141, 1.0, 5 min=-214748364, max=2147483647, decimals=1) Defaults are shown above, and these parameters are optional, e.g. this will also w VQ.getDouble("Some", "Value"); getInt(title, label, value=0, min=2147483647, max=2147483647, See getDouble(...), however, returns an integer value. step=1) Lets a user pick an item out of a list, e.g. VQScript Objects and Object Methods 171 VivoQuant Manual 11/12/2015 var item = VQ.getItem("Some", "Item", [ "item 1", âitem two" getItem(title, label, value, items, current=0) getText(title, label, text="", Allows user to input a line of text, returned by this function. mode=normal) getLocalPath(caption, startdir=".") Allows the user to select a local directory after being presented with the message getSavePath(const QString &caption = QString getLocalFiles(const QString &caption = "Select files:", const QString &startDir = QString getVivoScriptDir() Returns VivoScript directory mkdir(path, subdir) Creates the subdirectory subdir at the path specified by path. fileExists(path) If the file specified by path exists, returns true; otherwise returns false. minMaxTool() Returns the VQ Min/Max Tool object (see below) Returns whether the script is started interactively, or non-interactively by using isInteractive(); command line switch. See also setInteractive() and quit(). setInteractive(b); Sets interactive or non-interactive mode. isTestMode() setTestMode(bool b = true) lumiQuantMaster() dicomBrowser(DicomRepository *rep) Creates and returns a DICOM repository object, e.g.: dcmRep(repURL) var var var var var folderUnix = VQ.dcmRep("folder:///path/to/dir"); folderWin = VQ.dcmRep("folder://c:/path/to/dir"); ipacs = VQ.dcmRep("ipacs://username:[email protected] ipacss = VQ.dcmRep("ipacss://username:[email protected] dicom = VQ.dcmRep("dicom://calling:[email protected]:port" See queryStudies(...) for more examples. loadRepository(const QString &name) etListOfRepositories(const QString &type = QString abort() queryStudies(rep, patName, patID, dRange, studyDesc) Stops execution of the script, returning to VQ. Performs query of DICOM repository rep for studies matching argument criter dRange, studyDesc are strings Performs query of DICOM repository rep for series matching argument criterio querySeries(rep, studyInstanceUID) string queryImages(rep, studyInstanceUID, Performs query of DICOM repository rep for images matching argument criter seriesInstanceUID) seriesInstanceUID are strings downloadImages(rep, Downloads a full series (sopInstanceUID empty) or individual image. Retu studyInstanceUID, DICOM cache). seriesInstanceUID, VQ Object 172 VivoQuant Manual 11/12/2015 sopInstanceUID="") queryDataPoints(rep, type, UID, formname) Returns the data point associated with rep, type, UID and formname. fo iPACS, such as quantification, metadata, SubjectInformation or tumor_analysis. point, such as images or project. submitDataPoint(DicomRepository *rep, const QString &uid, const QScriptValue &data) dicomBrowserLoad(DicomRepository *rep, const QString &studyInstanceUID, const QString &seriesInstanceUID, bool append = false) queryStudyPlan(DicomRepository *rep, const QString &plan, const QString &cohort, const QString &group, const QString &animal, const QString &modality, const QString &date, const QString &event = "$0") getWidget(name)" Access widget with given name of current operator's dialog currentOp() Allows access to current operator currentView() Allows access to current view mode stripCredentials(const QString &url_string) stringMatch(const QString &ret, const QString &text) stringMatchList(const QString &ret, const QString &text) setConfig(const QString &entry, const QVariant &val) getConfig(const QString &entry, const QString &defaultValue) getHome() Returns VQ home directory getCache() Returns cache directory deleteFile(const QString &filepath) Delets file at filepath rmDir(const QString &dirpath) Deletes directory at dirpath Calls VQ menu, use | as separator triggerAction(name) OA preProcess(protocol) storeAsRaw(fileName, idx) storeAsDICOM(const QString &fileName, int i, int format = -1) saveDataViaITK4D(const QString &fileName) VQ Object VQ.triggerAction("Tools|CT|Bed removal"); Performs preprocessing given a specified protocol. Store data at index idx as a raw/mhd file locally with filename fileName Store data as DICOM file locally with filename fileName 173 VivoQuant Manual 11/12/2015 writeFile(fileName, text) Writes or appends text to a file with name fileName. appendFile appendFile(const QString &fileName, const QString &text) brukerImporter() Returns a BrukerImporter object. See examples/loadBruker.vqs for an e imgInfImporter() gelImporter() rawImporter() imgHdrImporter() centerCursor() Centers the crosshair in the field of view. webDisk(rep) Returns an IPACSWebDisk object for the repository specified by rep. (See bel hexColorToList(hex) saveScreenshot(fileName) Saves a .png of the loaded image to the path specified by fileName. unloadData(int startIndex, int Unloads data from num sequential indicies, starting at index from. Using num= numberToUnload) applicationName() Returns 'VivoQuant' + versionNumber buildID() Returns VQ Build ID zipTool() Returns a ZipArchive object (see below). evalDialog(const QString &text = QString mergeROIs(const QString &out, const QScriptValue &map) splitROI2DICOM(int id) lsDir(const QString &dir, const QString &filter = QString frand() Suspends execution of current script and generates dialog box. User must select suspend() script. getHash(const QString &key, const QString &def = QString getHashKeys() setHash(const QString &key, const QString &val) clearHash() storeHash(const QString &fileName) loadHash(const QString &fileName) ipacs() translateUnit(const QString &type, float value, const QString &input, const QString &output) repairSlice(int dataset, int pos, int off=0, int thick=1) getEnv(const QString &key, const QString &defaultValue = QString VQ Object 174 VivoQuant Manual 11/12/2015 startTool(const QString &tool, const QString &baseDir = ".", QStringList args = QStringList bedRemoval(const QString &bedName = QString getROIStats(int datID, int roiID) combineFrames(QStringList pngFiles, const QString &outfile, int delay = 40, bool deleteAfter = false) getNMCTWidget(const QString &name) openNMCT() setNMCTQuietModeOn() runNMCT() getMPRWidget() loadRGB(int i, QStringList imgFiles, float voxX, float voxY, float voxZ, int rgbRep=4 /* sum */, bool forcePlanar=true) resume(QAbstractButton *button) mainWin Object Function Description Opens view and op, e.g. setViewMode(view, op) VQ.mainWin().setViewMode("Tile View", "Navigation"); VQ.mainWin().setViewMode("Slice View", "3D ROI Tool"); type saveImage(fileName, type) saveMovie(fileName, type) dDataFromCommandLine(const QStringList &arguments) openZIPACS(fileName) loadScript() executeScript(const QString &file, bool interactive = false) stopScript() evalScript() openReference() openInput1() appendData() openRaw() mainWin Object • Slice Viewer: 0=MIP, 1=S, 2=C, 3=T, 4=All, 5=Everything • Tile Viewer: 0=S, 1=C, 2=T, 3=Screen, 4=All See saveImage() Opens the ZIPACS file at filename Terminates script Evaluates script Open data for Reference via dialog box Open data for Input 1 via dialog box Append data via dialog box Open raw images via dialog box 175 VivoQuant Manual importBrukerMR(const QString &directory = QString importMultiMHD() openRGBSliceViewer() openDICOM() openDICOMLocal() print() zoomIn() zoomOut zoomOut() normalSize() toggleFullScreen() setGlobalMinMax(b) toggleShowRGB(bool b) setRGBChannel() about() showManual() requestHelp() registration() saveImage(fileName, type) saveMovie(fileName, type) scaleImage(float f) enableOpt(int mod, bool b) showImagePreview(int idx) checkForUpdate(bool verbose = false) forceCheckForUpdate() loadDicomFromBrowser() artCTRecoFromBrowser() crosstalkRemoval() showMinMaxTool() showHistogram() bedRemoval() activeChanged(int selection) bioDistVis() updateWindowTitle() unloadedData() loadedData(int idx) showHints() mainWin Object 11/12/2015 Open BrukerMR file via dialog box Open MultiMHD file via dialog box Opens Data Browser to load data from DICOM repository Opens dialog box to load data from local DICOM repository Print images Instead of zoomIn(), please use VQ.currentView().setScaleFactor(x) Instead of zoomOut(), please use VQ.currentView().setScaleFactor(x) Auto zooms to original size Toggles Full Screen mode Opens 'About VivoQuant' Opens VivoQuant Manual Opens 'Request Help' tool Opens Registration tab of Configuration menu Saves image with fileName. types are listed below type • Slice Viewer: 0=MIP, 1=S, 2=C, 3=T, 4=All, 5=Everything • Tile Viewer: 0=S, 1=C, 2=T, 3=Screen, 4=All See saveImage() Scales image by factor of f Checks for available VivoQuant update Forces check for available VivoQuant update Runs Crosstalk removal NanoSPECT module Opens Min/Max Tool Shows histogram from Min/Max Tool Runs Bed Removal module 176 VivoQuant Manual showStartupDialogs() setupLayout2x2() setupLayout1x4() setupLayoutMIP() setupLayoutTrans() setupLayoutSlice() toggleCrosshair() setViewMode(view, op) finishedCTReco() tartCTReconstruction(const QStringList &files = QStringList startBatchCT() startIPACSSync() startAppHomepage() startOrgHomepage() showConfig() owCalibCTGeometrical() showCalibMMP() saveCalibrationTxt() showUserData() showNFFUniformity() showNFFEnergy() switchPatientName(b) switchPosLabel switchPosLabels(bool b) switchCrosshair(bool b) switchSliceNumber(bool b) switchAutoZoom(bool b) autoZoom() showDICOMDump() renameDICOM() relabelDICOMStudies() anonymizeDICOM() getDataName(int type) operatorHasChanged() updateViewPort() updatePaletteHeight() enableLogfile(bool b) startDbgView() imageToCapture() mainWin Object 11/12/2015 Sets Main Display to Grid 2x2 view Sets Main Display to Grid 1x4 view Sets Main Display to MIP only view Sets Main Display to Transversal only view Sets Main Display to Slices only layout Toggles appearance of crosshairs Opens view and op, e.g. VQ.mainWin().setViewMode("Tile View", "Navigation"); VQ.mainWin().setViewMode("Slice View", "3D ROI Tool"); Opens Configuration window 177 VivoQuant Manual logout() saveSession() loadSession(name) exportSession() updateGUIFromOptions() handleLockScreen() toggleVCView() toggleMCView toggleMCView() toggleDMView() toggleMinMaxTool() toggleWorkflowWidget() minimizeFloatingDock(bool topLevel) 11/12/2015 Forgets all passwords in memory (does not change DICOM Rep configuration) Opens Save Session dialog box Opens Load Session dialog box Opens Export Session dialog box Toggles Visual Control Toggles MIP Control Toggles Data Manager Toggles Min/Max Tool Toggles Workflow Widget dataManager Object Function openDat(id, [files]) getMinMax(int i, float &min, float &max) getMin(int i) getMax(int i) getMinMaxCached(int i, float &min, float &max) getMinCached(int i) getMaxCached(int i) setMinMaxCache(id, min, max) getDataTypeString(int i=0) voxelSize(id=0) voxelSizeXY voxelSizeX(int i=0) voxelSizeY(int i=0) voxelSizeXY(int i=0) voxelSizeZ(int i=0) getDesc(id, key) setDesc(id, key, value) Description Opens data id (0=Ref, 1=Inp1, ...) contained in list of files [files]. Returns minimum value of image at index i Returns maximum value of image at index i Returns cached minimum value of image at index i Returns cached maximum value of image at index i Sets cached minimum and maximum values of image at index i Returns dimension of voxel along X axis Returns dimension of voxel along Y axis Returns dimension of voxel along Z axis Returns key meta-information for data at index id Updates meta-information for data at index id, e.g. dm.setDesc(0, "__repository_url", dcmRepURL); dm.setDesc(0, "__project", projectName); // set source (to be a // such as 3D ROIs, an getDcmString(int i, const QString &key) dataManager Object 178 VivoQuant Manual 11/12/2015 fillDICOMFromDesc() Fills DICOM header with meta-information getSOPUID(int i) Returns SOPInstanceUID string for image at index i getSeriesUID(int i) Returns SeriesUID as string for image at index i getStudyUID(int i) Returns StudyUID as string for image at index i setUniqueStudyID(int i) Sets setDataTypeAll(int type) getDataDetailsString(int i=0) getHeaderSummary(int i=0) isEmpty() Returns boolean; true if Data Manager is empty hasData(int i=0) Returns boolean; true if index i has data unloadData(from, num) Unloads data from num sequential indicies, starting at index from. Using num= -1 unload swapData(int a, int b) Swaps data at index a and b moveData(QList<int> list, int dst) toggleDefaultShift(bool on) signalDataChange(int i) signalDataUpdated(int i) signalOptEnabled(int i, bool b) nalDataAboutToChange(int i) SliceViewer Object Function setMinMaxCache(id, min, cutOff) setOperator(AbstractOperator *op) updateDisplay() forceUpdateDisplay() updateDisplay() changedData(int i) updatedData(int i) unloadedData() changedActive() setupLayout(int type=0) resetLayout() linkControls(bool on) paletteRangeUpdate0(float from, float to) paletteRangeUpdate1(float from, float to) paletteRangeUpdate2(float from, float to) paletteNameUpdate0(const QString &name) SliceViewer Object Description Sets Reference palette range Sets Input 1 palette range Sets Input 2 palette range Sets Reference color palette to name 179 VivoQuant Manual paletteNameUpdate1(const QString &name) paletteNameUpdate2(const QString &name) paletteInverted0() paletteInverted1() paletteInverted2() toggleShowReference() toggleShowInput1() toggleShowInput2() newDataComing(int type) newDataLoaded(int type) iewerConcurrentTasks() callQuantiCalc(int mod, float activity, QString actUnit) callSpecActCalc(int mod, float activity, float volume, const QString &actUnit) callSUVCalc(int mod, float activity, const QString &actUnit, float volume) renderVTK() enableVTK(bool toEnable) 11/12/2015 Sets Input 1 color palette to name Sets Input 2 color palette to name Inverts Reference color palette Inverts Input 1 color palette Inverts Input 2 color palette Toggles display of Reference Toggles display of Input 1 Toggles display of Input 2 Opens SPECT Act. Calculator module and inputs activity, volume, and actUnit Opens SUV Calculator module and inputs activity, actUnit and volume Forces re-render of VTK Viewer Enables VTK Viewer Controler Object Function getRange(int i) getAlpha() setAlpha(f) getDim() setDim(f) getBalance() setBalance(f) getIntensity(i) setIntensity(i,f) isActive(i) setActive(i, on) getFrom(i) getTo(i) setFrom(i, f) setTo(i, f) Controler Object Description Get the intensity value of the image at Input 1. Set the intensity of the image at Input 1 to f, a value between 0 and 1. Get the intensity value of the Input 1 image. Set the intensity of the Input 1 image to f, a value between 0 and 1. Get the intensity value of the Input 2 image Set the intensity of the Input 2 image to f, a value between 0 and 1. Get the intensity value for the image at the ith position. Set the intensity value for the image at the ith position to f, where f is a value between 0 and 1. Check whether the image at the ith position is active (returns true or false). If on is true, makes the image at the ith position active; otherwise makes the image inactive. Get the current lower bound on the color palette range for the image at the ith position. Get the current upper bound on the color palette range for the image at the ith position. Set the lower bound on the color palette range for the image at the ith position to f, where f is a value between 0 and 1. Set the upper bound on the color palette range for the image at the ith position to f, where f is a value between 0 and 1. 180 VivoQuant Manual setPos(i, val) setRange(i, from, to) setPal(i, palname) invertPalette(i) updateImage() adjustActiveState() palChange0() palChange1() palChange2() 11/12/2015 Sets slice number in i view to val ; For i, 0 = X, 1 = Y, 2 = Z Set the lower and upper bounds on the color palette range for the image at the ith position to the specified from and to values, respectively, where from and to are values between 0 and 1. Set the color palette for the image loaded in the ith position, where palname is the name of an available color palette (e.g. "gray" or "nih_fire2"). Invert the color palette for the image loaded in the ith position. Better to use setActive (see above) MinMaxTool Object Function putePercentileCutoff(int imageIdx, double percent) clipMin0() clipMax0() clipMinMin() clipMaxMax() applyValues() resetValues() recalcValues() PercentileToImageVal() centileButtonEnabled(int imageIdx) copyToMax() aveNewPercentilesCSV() appendPercentilesCSV() showTable(bool) appendRow() removeRow() updateEnabledImages(int imgIdx) show() updateMIP() updateDisplay() updateAll() showHistogram() updateROIList() MinMaxTool Object Description Sets all values below minimum to 0 Sets all values above maximum to 0 Sets all values below minimum to minimum Sets all values above maximum to maximum Applies current values Restores values from cache Recalculates actual minimum and maximum values Opens dialog box that allows user to save percentiles to .csv file Opens dialog box that allows user to append percentiles to existing .csv file Updates MIP Updates Main Display Updates MIP, Main Display, etc. Opens Histogram Tool Updates ROI List 181 VivoQuant Manual 11/12/2015 IPACSWebDisk Object Function lsDir(path) put(src, dest) put(src, dest) mkdir(path) rm(path, recursive=false) get(src, dest) Description Returns a list of files/directories. Saves a file from the local path specified by src and stores it on the WebDisk at the path specified by dest Saves a file from the local path specified by src and stores it on the WebDisk at the path specified by dest Creates a WebDisk directory Deletes a WebDisk directory Retrieves the file specified by the path in src and places it locally in the path specified by dest getPublicLink(const QString &file) setExtraTimeout(int t) getStoreFile() printProgress(int done, int total) ZipArchive Object Function Description createZip(fileName, srcdir) Zips the contents of the directory srcdir into a zip file named fileName. unzip(zipfile, outdir) Unzips the zip file specified by zipfile to the directory outdir. cancel() DataList Object Function Description annotate(int idx) annotate(int idx) updateData(int i) showForm() toggleForm() mipViewer Object Function loadedSlice(int i) updateDisplay() scaleImage(float factor) IPACSWebDisk Object Description 182 VivoQuant Manual 11/12/2015 updateCacheStat() setActive(QList<int> a) setSync(bool s) isSync() parameterChanged() invalidateImageCache() mipControler Object Function setNumber(int val) sliderPos(int i) getAlpha() getDim() getBalance() getIntensity(int i) setPal(int i, QString name) changeParam() playMovie(bool checked) saveMovie() saveImage() speedChanged(int val) setEnabled(bool) Description Sets number of frames in MIP; default = 60 Sets View Angle slider to value i Returns the intensity of the image at Input 1; Better to use getAlpha(), setAlpha() in VQ.controler() object Returns the intensity of the image at Reference; Better to use getDim(), setDim() in VQ.controler() object Returns the intensity of the image at Input 2; Better to use getBalance(), setBalance() in VQ.controler() object Returns Intensity of image at ndex i Sets color palette of index i to name Plays MIP movie Use saveImage() in VQ.mainWin() object Changes speed of MIP movie VTKController Object Function Description getMIPEnabled() getMPREnabled() getAnnotationEnabled() setAnnotationEnabled(bool toEnable) getOrientEnabled() setOrientEnabled(bool toEnable) getRenderSpeed() setInteractiveDelay(int msec) setUseRenderDelay(bool toEnable) getUseRenderDelay() orceVolumeMapperMode(int mode) mipViewer Object 183 VivoQuant Manual 11/12/2015 setStillUpdateRate(double factor) getAutoUpdate() tSmoothingIterations(int iter) setFeatureAngle(double angle) setPassBand(double passBand) disableAxes(bool b = true) setPatientsName(const QString &text) setMPRPlanes(int planes) setOpacityPoints(int imgIdx, QList<QVariant> imgRange, QList<QVariant> opacityRange) changeRenderSpeed(QString speed) renderSpeedUpdated(QAction *action) handleModified() handleEnabledChanged() updateVTK() Forces re-rendering of VTK forceRender() resetCamera() setMPRImage(int i, double offset, QImage *image, int min=0) updateMIPPointers() imageLoaded(int i) imageUnloaded() imageUpdated(int i) updateVolumeColors() interactive() startInteractive() endInteractive() transform(const vtkMatrix4x4 *mat) VTKViewer Object Function Description setEnableGradient(bool toEnable) renderingProgress(vtkObject *obj) setAzimuthAngle(int ang) renderUpdate() resetCamera() resetPosition() vtkUserEventsHandler(vtkObject *obj) VTKController Object 184 VivoQuant Manual 11/12/2015 DicomRepository Object Function Description get(const QString &key) set(const QString &key, const QString &val) setUsername(const QString &u) setPassword(const QString &p) username() password() wasCanceled() project() stop() DicomRepository Object 185 Viewer Control The Viewer Control palette is a powerful tool for manipulating image appearance in the main window Getting There Three different methods exist for reaching the Viewer Control window. The first method is to use the Viewer Control thumbnail in the Main Window. The second method is to go to "Slice Control" under the Tools menu. The third method is to use the keyboard shortcut "F5". For more on keyboard shortcuts in VQ, please see Keyboard Shortcuts. Function The Viewer Control window provides a variety of options for manipulating the appearance of open data sets in the main window of the VQ. Options include Sliders (for slice selection), Color Controls and Voxel Values. Viewer Control 186 VivoQuant Manual 11/12/2015 Sliders Adjustment of the x, y, and z sliders in the Sliders section changes the sagittal , coronal, and transverse slices, respectively, that are displayed in the main window. The slice numbers and crosshairs displayed on the main window also reflect the x, y, and z slider values. Please see the view options for more on the display settings for the main window. Color Controls The Color Controls display information about the datasets loaded at the Reference, Input 1 and Input 2 positions. The checkboxes on the left toggle the visibility of the datasets in the Display. Next to these, the voxel values of each dataset at the current slice are displayed along with their respective units. (Note: if given proper Hounsfield or quantification calibration, the voxel values will be given in Hounsfield units or MBq). On the far right are spinboxes labelled "Intensity", which control the relative transparency of the dataset; decreasing the intensity value increases the transparency of the image. Viewer Control in Multi-View Multi View enables users to customize the layout of viewports in the Display. When in Multi View, additional controls become available in the Viewer Control which extend its normal functionality to the Multi View Display. Users may also select whether navigation is linked across viewports, or if viewports may be navigated independently of one another. Function 187 VivoQuant Manual 11/12/2015 For more on setting up the Display in Multi View, see the Multi View page. The general functionality of the Viewer Control does not change in Multi View. However, in Multi View, information in the Sliders and Color Controls is automatically updated to reflect information from the viewport through which the user is navigating. To update these with information from another viewport, there is a drop down menu in the upper left hand corner where the desired viewport may be selected. Alternatively, simply clicking on or navigating through another viewport in the Display will update the Viewer Control. By default, the Viewer Control links all viewports in Multi View together. This means any navigation through the slices in one viewport is reflected in all other viewports automatically. Viewports may be unlinked by unchecking the "Link Views" checkbox in the upper right corner of the Viewer Control. Unchecking this box will succesfully unlink the viewports, and allow viewports to be navigated independently of one another. Viewer Control in Multi-View 188 VivoQuant Manual If at any point you wish to reset all viewports to the same slice again, simply click the to the "Link Views" box. 11/12/2015 button located next It is important to note that "Link Views" only affects the slice-by-slice navigation between viewports. Regardless of whether "Link Views" is checked, zooming and panning within each viewport will remain independent. To reset the zoom and pan in a specific viewport, select the viewport you wish to reset (either by selecting it from the drop down menu or by clicking on the viewport) and click the button in the Viewer Control. This will reset only the viewport selected. To reset all viewports at once, click the button on the toolbar. Viewer Control in Multi-View 189 MIP Controls The MIP (Maximum Intensity Projection) control can be used to automatically rotate the MIP and also allows for manipulation of active data sets in the main window. See MIP Explained for a more detailed description of how the MIP is generated. Getting There Three different methods exist for reaching the MIP Control window. The first method is to use the MIP Control thumbnail in the Main Window. The second method is to go to "MIP Control" under the Tools menu. The third method is to use the keyboard shortcut "F6". For more on keyboard shortcuts in VQ, please see Keyboard Shortcuts. Function The MIP Control window provides a variety of options for manipulating the MIP and the appearance of open data sets in the main window of the VQ. Options include Playing a MIP Movie, MIP Rotation Speed, Color Maps, Color Scaling, Color Intensity, and VTK Viewer. MIP Controls 190 VivoQuant Manual 11/12/2015 Playing a MIP Movie The MIP movie is automatically generated upon the loading of a data set. Using the mouse, it can be manually rotated in the main window. Hitting Play in the MIP Control enables automatic rotation of the MIP movie. The slider bar marks the rotation progress of the MIP movie. For large data sets, it can sometimes take several moments for the MIP movie to be generated. The progress bar in the MIP Control indicates how much of the MIP movie has been successfully calculated. MIP Rotation Speed The Rotation slider in the MIP Control allows fine control of the MIP rotation speed. VTK Viewer Each operator will have default VTK viewer settings and will be refreshed upon opening an operator window. The VTK viewer can be enabled or disabled by checking or unchecking the box in the top left corner of the VTK viewer section in the MIP Control operater window. The following options are availabe for adjusting the VTK viewer: Function 191 VivoQuant Manual 11/12/2015 Icon Description Force re-rendering of the VTK viewer. Hold this button down to toggle MIP auto-rendering. Reset the camera of the VTK viewer to its initial position. Replace black background with VTK background. Toggle Multi-planar reconstruction (MPR) view in VTK viewer. Hold down to toggle background transparency. Toggle the classic MIP in the VTK viewer. Toggle orientation cube in the VTK viewer. Toggle visible annotations in the VTK viewer. Change performance of VTK viewer by optionally downsampling the VTK image. Hold this button down to specify the resolution of the image. VTK Viewer 192 Data Manager The Data Manager presents information about the datasets loaded into VQ. While VivoQuant only displays up to three datasets in the Display at a time, post-processing operations may be performed on any number of datasets in the Data Manager. The system memory is the only limiting factor in the number of simultaneously loaded datasets. Getting There There are three methods to open the Data Manager. The first method is using the "DM" thumbnail in the controls palette of the Main Window. The Data Manager may also be reached via the Tools Menu. Finally, the Data Manager is also available by using the keyboard shortcut F7. Using the Data Manager Data Manager 193 VivoQuant Manual 11/12/2015 The Data Manager displays a list of all datasets loaded into VivoQuant, along with information about each. The Data Manager can hold as many datasets as the system memory allows, however the first, second and third datasets in the Data Manager are the only three that appear in the Display. These datasets are the Reference, Input 1, and Input 2, respectively. The information displayed by the Data Manager includes the image type, name, dimensions and voxel size. For DICOM data, the Study Date, Series Date, and Series Description will also be included when available. Below this information is a color bar specific to each dataset. The color bar defines the colors that will be used to represent the dataset in the Display. The colors can be changed by right clicking the color bar and selecting the desired color palette. VivoQuant selects color palettes for datasets by default based on modality (CT, PT, MR, etc.). Default color palette options may be changed in the Display tab of the Configuration window. Featured on the colorbar are the minimum and maximum intensity values the data is subject to in the Display. These can be adjusted by clicking on the black markers at either end of the colorbar and dragging them to the desired location. Note that this does not affect the minimum and maximum values stored in the Min/Max Tool. For more on changing the minimum and maximum values, see the Min/Max Tool page. The color palettes for a single frame of data can be edited in the Data Manager by right-clicking on the color palette. To edit multiple at once, use ctrl or shift to select multiple frames, then right click on one of the palettes, and all will be edited together. This technique can also be used for editing the Min/Max for the palettes of multiple frames at once. Using the Data Manager 194 VivoQuant Manual 11/12/2015 Ordering Data Data may be rearranged into any order in the Data Manager. A convenient "drag and drop" function allows users to quickly move data between positions. Simply click on a dataset and drag it to the desired position. A prompt will appear confirming the move. Click 'OK' to complete the move. Data can also be quickly "swapped" with data in the Reference, Input 1, or Input 2 positions. Right click on a dataset and select Use as Reference/Input 1/Input 2 to perform a swap (see image below). Options Right clicking on a dataset brings up a menu, with several data manipulation options. Ordering Data 195 VivoQuant Manual Option Use as Reference/Input 1/Input 2 Annotate Copy Details DICOM Dump Save Data as Unload Data 11/12/2015 Description If one data set has been selected in the Data Manager, it may be moved to either the Reference/Input 1/Input 2. Allows an annotation to be added to the data details Copes data set details to the clipboard from where they may be pasted into other files (i.e. Word documents). Opens the DICOM header information for the selected data sets Allows data to be saved as DICOM, TRaster, Raw, 4D or ITK image file. Unloads data from VivoQuant. More Information Many of the functions in VivoQuant are directed to specific images loaded in the Data manager, so it is important to pay attention to the order in which data has been loaded into the Data Manager. See How To Make a Dynamic Movie for a practical example that makes use of the Data Manager. Options 196 Min/Max Tool The Min/Max Tool allows you to see and adjust the minimum and maximum values of all loaded studies. Getting There The Min/Max Tool is available via the Tools menu. The Min/Max Tool can also be accessed by clicking on the Min/Max Tool thumbnail in the Main Window. Function The Min/Max Tool displays the minimum and maximum values with units for the Reference, Input 1 and Input 2. The minimum and maximum values are used to calculate the colors for each voxel in the Display, by way of a mapping from voxel values to the colors in the color palette. Any values below the minimum will return the "lowest" color (e.g. black in the gray palette) while any values above the maximum will return the "highest" color (e.g. white in the gray palette). The Min/Max tool makes use of a 'cache' feature, whereby minimum and maximum values for inputs are stored in a cache and used by the color mapping until the user forces the tool to recalculate them. The advantage to this is it enables users working with multiple datasets to, if they wish, keep the color scale Min/Max Tool 197 VivoQuant Manual 11/12/2015 consistent across multiple datasets. Option Description Recalculates the min/max values for all data sets from Re-calc the original data. Min/max value will be min/max voxel values in dataset. Resets the min/max values to the values stored in the Reset cache. Stores min/max values in cache and applies values to the Apply datasets. The buttons with the icon will clip the data based on values in the tool. This can be useful when trying to clip dense bone from a CT scan, for instance, or background noise from a PT scan. Option (Max) Description (Min) Sets all values below the minimum to 0. Sets all values above the maximum to 0. Sets all values below the minimum to the minimum. Sets all values above the maximum to the maximum. Histogram The Histogram button opens the Histogram Tool. This tool generates a histogram of voxel values in the loaded datasets. For more on this, visit the Histogram Tool page. Percentile Tool The Percentile button brings up the Percentile Tool, which calculates the pixel value associated with the Xth percentile from the histogram of the image. Function 198 VivoQuant Manual 11/12/2015 Calculate the percentile value for selected image in the drop down list to the right Copy to Copy computed pecentile value to the Max value above Max Show percentile value with Patient Name, Paitent ID, Acquisition Time, Percentile, Cutoff Value, and Units information from image metadata Load calculated percentile value into table Highlight the row to delete from table with left-click and click the red X button Percentile Tool 199 Histogram The Histogram tool is used to plot a histogram of the voxel values in a loaded data set. Getting There The Histogram tool may be reached via the Tools Menu or by using the keyboard shortcut "Ctrl+Shift+H". See VQ Keyboard Shortcuts for a complete list. Function The Histogram Tool is operated via two control panels: Data Controls and File Controls. Histogram 200 VivoQuant Manual 11/12/2015 Data Controls Option Description This pulldown menu allows the selection of the data set Data Set to be histogrammed. No. bins Sets the number of bins into which to divide the data. Sets the minimum value for which data will be Min displayed. The Set button, , automatically loads this field with the minimum value in the object. Sets the maximum value for which data will be Max displayed. The Set button, , automatically loads this field with the maximum value in the object. File Controls Option Data Controls Description Saves the existing plot into a PDF file. Writes the data into a text file. The format is in two columns with the first column representing bin center points (x-axis values) and the second column representing the number of voxels in each bin (y-axis values). Refreshes the histogram plot. Use this button after changing the No. bins, Min., or Max. values. Exits the Histogram Tool. 201 Preprocessing Tool The Preprocessing Tool lets you specify a unique pre-processing protocol and execute it in one step. There are many preprocessing operations included in the Preprocessing tool that may be added to the protocol. Getting There The Preprocessing Tool is available via Tools -> Pre-processing. Function The Preprocessing Tool is divided into three sections. The first section is the Preprocessing Options section, which includes the preprocessing operations that may be included in the protocol Preprocessing Tool 202 VivoQuant Manual 11/12/2015 Automatically detects the bed position within the image and removes the CT voxels which constitute the animal bed. (Only supports Minerve beds). Performs automatic image co-registration of all inputs to the Reference. If 'Fast' or 'Full 3D' are not Co-register checked, then 'Standard' and 'Translation' are used respectively. Performs automatic cropping. Search for boundaries starts at the end slices of the image and Autocrop moves towards the center of the image until a non-background voxel is detected from all 6 faces. Apply a scalar multipication to NM data (PET/SPECT). Please pay attention to the formatting of the input cell. Note: Calibration Calibration factors per modality [comma separated] in format Factor "Mod=1.0 Unit". Example: PT=13456.7 BQML. The case of the unit should match what is listed in the 'Information window'. Up/Downsamples voxels to the specified pixel Resample dimensions. Convert supported units to/from uptake and/or concentration units. If converting to/from SUV, NM/PT please provide Weight and Injected Dose Convert unit information (note: units must be specified, defaults are [g] and [kBq] respectively). Series Appends text to end of series description for all Description datasets. Quality Generates and stores quality control image of Control preprocessed image. Results stored in the project Image webdisk of the repository specified below. Save image data being preprocessed to specified Store Data iPACS repository below. Specifies formats in which the data will be saved. The numbers 0, 1, and 2 correspond to multi-frame (MF module), multi-frame (MF function groups), and single frames (one Z slice per file) formats, respectively. For multiple data sets, formats are Format separated by a comma, as seen in image above. The current formats of the loaded data sets will be displayed in this section upon opening the tool as well as in the Information section. CT Bed Removal The second section is Storage Options, where users may designate the iPACS repository and Project folder where preprocessed datasets will be saved (note: Store data must be checked). Repository Specify the repository. Repositories can be configured in the 'DICOM' tab of 'Configuration' window. Function 203 VivoQuant Manual Project Protocol Store 11/12/2015 Consult the DICOM settings page in the help guide for more information. Specify the sub-project (iPACS) or sub-folder (local path) to which data will be saved. Copy and paste preprocessing protocol settings to be used at a later time. Modifications can be made directly within the 'Protocol' window. Store Image data to the specified location. The final section is the Information section, which features information about the current state of datasets loaded in VQ. Included in this information is the image dimensions and voxel size for the datasets as a whole, as well as basic header metadata about each dataset specifically. To execute the pre-processing protocol, click OK. Function 204 Resample Data The Resample Data tool allows rebinning of reconstructed data into an arbitrary voxel size. This tool may be useful when attempting to fuse multiple large data sets, especially when dealing with high-resolution modalities like MRI and CT. Getting There The Resample Data option is available within the Reorientation / Registration Tool via Operations -> Resample or by navigating to Tools -> Resample data. Using the tool When Resample data is selected, a small dialog box will appear, displaying the current voxel size and dimensions of the image. Uncheck the box next to Isotropic Voxels to adjust the slice spacing. Similarly, uncheck the box next to Auto-compute Dimensions to adjust the dimensions of the image. Enter a new voxel size next to In-plane Voxel Size and hit OK to resample the data to have voxels at the new (typically larger) size. Resample Data 205 DICOM The DICOM Tools Submenu contains features to aid in the management of DICOM data. • DICOM Dump • Anonymizer • Rename DICOM • Relabel Study DICOM Dump The DICOM Dump tool provides the information contained in the DICOM headers for DICOM files currently loaded in the Main Window. The DICOM Dump is now also compatible with .img and .hdr files. Getting There There are three ways to access the DICOM Dump. The first method is via the Tools Menu in the Main Window. The second method for reaching the DICOM Dump is to use the keyboard shortcut "Ctrl+Shift+D". For more on keyboard shortcuts in VQ, please see Keyboard Shortcuts. The third method is via the Data Browser. Right click on a dataset and click "Dump Header". DICOM 206 VivoQuant Manual 11/12/2015 The fourth method is via the Data Manager. Right click on a dataset and click "DICOM Dump". Function Activating the DICOM Dump tool opens a new DICOM dump window. Information from the DICOM headers for any active datasets is displayed in this window. In the top-left corner is a pull-down menu where you can choose which set of DICOM header information to display. Getting There 207 VivoQuant Manual 11/12/2015 In the upper right portion of the DICOM dump window is a Find option. A search string may be entered in the "Find" field. The DICOM dump tool uses the DICOM dictionary listed in Configuration - DICOM to read the DICOM header. Each row in the DICOM dump represents a DICOM header data entry. The list below uses a dummy DICOM entry to illustrate the meaning of each field in the DICOM Dump. Consider the following dummy entry: (0000,FFFF) AZ [12\18] # 4,2 VQ DICOM Example • (0000,FFFF) is a hexadecimal DICOM address where 0000 represents the group number for that data entry. Even group numbers correspond to DICOM defined groups while odd numbers are reserved for private groups. The FFFF half of the address specifies the element number for that particular entry in the group indicated by the first half of the address. • A two-character item of the form 'AZ' identifies the Value Representation (VR) for that data entry. Several VR types are specified in the DICOM standard. For example, a Value Representation of US indicates that the data entry will be in the form "Unsigned Short". • The actual data values for the data entry (12,18) are displayed next in the Value Field (VF). The values are shown inside square brackets. • After the hash mark (#), the Value Length (VL) for the data entry is displayed. The VL depends on the VR type and the number of values in the data entry. • Some data entries contain multiple subsets as indicated by the Value Multiplicity (VM). Subsets are indicated by the backslash character in the data value field. In the example shown above, there are two subsets -- 12 and 18. • The final element of the DICOM entry is the description of the data entry. For DICOM-defined tags, this field will display relevant information regarding the content of the data entry (i.e., VQ DICOM Example). For private tags, this field will display, "Unknown Tag and Data." Function 208 VivoQuant Manual 11/12/2015 Anonymizer The Anonymizer anonymizes the data to the user. Getting There Go to the Tools Menu in the Main Window then DICOM. Function Upon selecting the Anonymizer, a dialog box appears prompting the user to decide whether to anonymize each loaded dataset individually (Yes) or anonymize them all together (No). In the Anonymizer, header fields can be edited to remove sensitive information, such as the imaging dates, or identifying text fields. The fields can be edited manually or by setting the text to the label of the field and the dates to a new date, such as today. The buttons 'Text to Label' and 'Dates to Today' will fill in these sections as described. Selecting OK will apply the changes. Now, the DICOM Dump will reveal no identifying information. Rename DICOM Files The "Rename DICOM" function can be used to rename locally stored DICOM files according to information from selected fields of the headers. Anonymizer 209 VivoQuant Manual 11/12/2015 Getting There DICOM files can be renamed by selecting "Rename DICOM" under the Tools -> DICOM menu Function Choose which files to rename by using the "Add Files" button in the "Rename DICOM Files" dialog. Construct new image names by typing into the "Template" text box, using the key beneath the text box for reference. Each token represents a particular field of the DICOM header. The new names of the selected files will be displayed in the "Examples" window as they are entered. Names must be unique, or else the files will not be renamed. Renaming will also fail if illegal characters (e.g., backwards or forwards slashes) are used. To execute renaming, click "OK." Relabel Study The Relabel Study tool allows the following fields to be edited or renamed: (Patient Name, Patient ID, Study Description, Series Description, Patients Birthday, Protocol Name). Getting There 210 VivoQuant Manual 11/12/2015 Getting There Go to the Tools Menu in the Main Window then DICOM. Function Upon selecting the Anonymizer, a dialog box appears prompting the user to decide whether to anonymize each loaded dataset individually (Yes) or anonymize them all together (No). Enter the desired Data fields to change. Select the desired Repository and Project to store then click OK, or Open if no data are already loaded. Getting There 211 Rename DICOM Files The "Rename DICOM" function can be used to rename locally stored DICOM files according to information from selected fields of the headers. Getting There DICOM files can be renamed by selecting "Rename DICOM" under the Tools menu Function Choose which files to rename by using the "Add Files" button in the "Rename DICOM Files" dialog. Construct new image names by typing into the "Template" text box, using the key beneath the text box for reference. Each token represents a particular field of the DICOM header. The new names of the selected files will be displayed in the "Examples" window as they are entered. Names must be unique, or else the files will not be renamed. Renaming will also fail if illegal characters (e.g., backwards or forwards slashes) are used. To execute renaming, click "OK." Rename DICOM Files 212 Keyboard Shortcuts A list of the keyboard shortcuts which are available for many basic operations. Windows / Linux Shortcut Ctrl + O Ctrl + N Ctrl + Shift + N Ctrl + D Ctrl + I Ctrl + M Ctrl + S Ctrl + P F1 F2 F3 F4 F5 F6 F7 Ctrl + + Ctrl + Ctrl + 0 Ctrl + F Ctrl + U Ctrl + Z Ctrl + Shift + Z Ctrl + I Ctrl + Shift + D Ctrl + Shift + H Ctrl + Shift + U Ctrl + Shift + C Keyboard Shortcuts Mac Shortcut ⌘+O ⌘+N ⌘ + Shift + N ⌘+D ⌘+I ⌘+M ⌘+S ⌘+P fn + F1 fn + F2 fn + F3 fn + F4 fn + F5 fn + F6 fn + F7 ⌘++ ⌘+⌘+0 ⌘+F ⌘+U ⌘+Z ⌘ + Shift + Z ⌘+I ⌘ + Shift + D ⌘ + Shift + H ⌘ + Shift + U ⌘+, ⌘+H Ctrl + B ⌘+B Ctrl + Q Ctrl + T ⌘+Q ⌘+T Shortcut Function Open Reference Open input 1 Open input 2 Open DICOM Data Save Image Save Movie Save Data (DICOM format) Print Manual Show Reference Show input 1 Show input 2 Slice Control MIP Control Data Manager zoom in zoom out Normal Size Full Screen Auto Zoom Undo Operation Redo Operation Save Image DICOM Dump Histogram Update Check Configuration Panel Hide VivoQuant Base NanoSPECT Configuration Quit MMP Calibration Tool 213 VivoQuant Manual ←,→,↑,↓ PageUp,PageDn 11/12/2015 Toggle between pre- and post-correction images in the Near-Field Uniformity panel Scroll through slices in either ←,→,↑,↓ the Slice View or Tile View. fn + ↑, fn + Scroll through slices in either ↓ the Slice View or Tile View. 3D ROI Tool Specific Keyboard Shortcuts N P S M X Shift + = E R Right Click of Mouse T H Enter Shift + Enter Space C Keyboard Shortcuts Naviagate to the Navigation tab in the 3D ROI Operator Naviagate to the Manual P Painting tab in the 3D ROI Operator Naviagate to the Spline Tool S tab in the 3D ROI Operator Naviagate to the Magic M Segmentation tab in the 3D ROI Operator Naviagate to the Expert tab in X the 3D ROI Operator Shift + = Add a ROI Reset the active ROI E Edit the active ROI Rotate through the ROI list in R the active ROI drop down menu Rotate through the ROI list in Right Click the active ROI drop down of Mouse menu T Display quantification table Display 3D ROI Histogram H Tool Within the Spline tool, confirm Return or classification of voxels within Enter contour to active ROI Within the Spline tool, confirm Shift + classification of voxels within Return or contour to active ROI and Enter move to next slice Within the Spline tool, scroll Space through Spline, Freehand, Bully and Thresholding tools C Within the Spline tool, clear N 214 VivoQuant Manual 11/12/2015 the currently drawn contour Keyboard Shortcuts 215 Autoradiography Calibration Autoradiography data can be loaded, viewed, analyzed, and saved using the same tools VivoQuant uses for in vivo image data. Once loaded into VivoQuant, data can be reoriented, cropped, rescaled, and quantified. The Autoradiography Calibration tool allows a user to calibrate autoradiography data based on known calibration standards in the image. This tool is available only with a CiQuant Module license. If you are unable to use the tool and would like to, please contact [email protected]. Getting There To access the tool, go to the 3D ROI Tool, then Operator -> Autoradiography Calibration. Function Getting Started Once the tool starts, it will ask questions to establish how it will be used. The first prompt asks for the number of calibration standards being used. This will determine the number of ROIs that populate the 3D ROI Tool. The second prompt asks if there will be a background ROI used. This influences the calibration curve. In most cases a background ROI is recommended. Autoradiography Calibration 216 VivoQuant Manual 11/12/2015 Based on the answers to the previous questions, the ROIs will be populated. Now they need to be manually placed in the correct locations in the image. Use the 3D Paint Mode tools to perform this task. Regions should appear similar to the image below. Image Calibration Once the calibration standards have been segmented, click "Read Values from Image." The table will display the mean value of each region. Provide the true value of each standard as well as the correct output unit. Also, choose from the available Error Weight techniques. Once the settings are established, click Run. The plot will populate with the values of the standards and provided values along with the calculated fit line. Changing the settings, particularly the Error Weights, will change the output calibration curve. To see how the curve changes with different settings, change them and again click "Run." Once the curve fits as desired, click "Apply" to apply the calibration to the data. Getting Started 217 VivoQuant Manual Image Calibration 11/12/2015 218 Image Magick The Image Magick suite is used to manipulate image frames and movies within the VQ. These options are particularly useful for generating appealing and informative dynamic movies for use in conferences and presentations. Getting There Image Magick may be reached via the Tools menu. Function The Image Magick options available in VQ provide an excellent tool for generating informative movies for dynamic and gated data acquisitions. These tools allow the user to combine data sets in meaningful ways to reflect the dynamic nature of the physiological processes taking place. Five options are provided in the Image Magick suite, Split Movie into Frames, Join Frames to Movie, Change Movie Delay, Image to Poster, and Image to Capture. A short How To for generating dynamic movies is provided below. Split Movie Into Frames This option takes a movie (options include .gif, mpg, .mng, and .mpeg) and splits it into individual frames (options include .png, .bmp, .jpeg, .jpg, and .tif). Join Frames to Movie This tool provides the opposite function of the previous tool, allowing the user to take individual images (options include .png, .bmp, .jpeg, .jpg, and .tif) and combine them into a movie (options include .gif, .mng, .mpg, and .mpeg). Image Magick 219 VivoQuant Manual 11/12/2015 Change Delay Depending upon the size and style of movie made, the default frame time may be too fast or too slow. This tools allows the user to select a pre-existing movie and change the frame time (given in milliseconds). Image to Poster The ImageMagick suite enables the creation of high-quality images; the kind of images often used at conferences and in presentations. To help facilitate the ease of use of such images, this option automatically allows the user to place an image into a poster. This function is not yet implemented. Please check back soon. Image to Capture The Image to Capture feature allows an image or movie to be loaded from a file on the local machine, edited, and then re-saved. The Capture Viewer also supports importation of the image/movie into a DICOM/iPACS repository by using the "Save Capture" button. How to make a dynamic movie NOTE: See the BatchTool Generator to learn how to quickly generate reconstructions for use in dynamic movies! Dynamic and cardiac-gated images and movies are a useful tool for illustrating the changing distribution of radioactivity governed by a dynamic physiological process. This guide provides step-by-step instructions on the proper generation of such files. Use the links to visit the VQ Manual for more details on any particular feature. Before using this guide, it is important to understand how to process images so that they are color-comparable across multiple frames. Matching color scales between two images is not enough to ensure that they are directly color-comparable. Instead, it is necessary to ensure that the colors in each image correspond to the same physical voxel values. It is possible to achieve this relationship using the Min/Max tool to define the range of voxel values spanned across the color bar. Load all relevant data sets. These data sets may be only SPECT images (as in this example) or a reference CT image in addition to multiple SPECT images. Change Delay 220 VivoQuant Manual 11/12/2015 Adjust the Zoom and Color Palettes to your liking. How to make a dynamic movie 221 VivoQuant Manual 11/12/2015 Use the Cropping Tool to select only the region of interest. How to make a dynamic movie 222 VivoQuant Manual 11/12/2015 If desired, now is a good time to employ the Filtering Operator. Note that if the Input* box is checked, then smoothing will be applied to loaded data sets not displayed in the Main Window, but visible in the Data Manager. How to make a dynamic movie 223 VivoQuant Manual 11/12/2015 One of the most critical steps is the application of the Min/Max Tool. To begin with the tool, use the Re-Calc button to display the current minimum and maximum values being used for color scaling. Choose common Min/Max values across all three data sets. Use the Apply button to adjust the color scaling accordingly. The three visible data sets are now color-consistent. In other words, the same colors represent the same voxel values across each data set. How to make a dynamic movie 224 VivoQuant Manual 11/12/2015 Save images for each data set using the Save Image option. The "All images separately" option automatically saves five images (sagittal, coronal, transverse, MIP, all-in-one) simultaneously. How to make a dynamic movie 225 VivoQuant Manual 11/12/2015 Use the Slice Control or appropriate Keyboard Shortcuts to toggle between visible data sets and save the appropriate images. After collecting the images for the first three frames, use the Data Manager to save these processed frames (if desired) and then unload these data sets so that the next three frames in the queue will become visible data sets. All operations (Cropping, Quantification, Smoothing, etc.) that were applied to the original three data sets have also been applied to the queued data sets, with the exception of the Min/Max tool. How to make a dynamic movie 226 VivoQuant Manual 11/12/2015 Ensure again that the minimum and maximum values are consistent across datasets. How to make a dynamic movie 227 VivoQuant Manual 11/12/2015 The newly loaded data sets are now properly prepared. Save the images and data as in Steps 9-11. After saving all desired images, generate the dynamic movie using the Image Magick "Join Frames to Movie" option. 15) Select the images that you wish to be included in the movie. In this example, we use the all-in-one images to generate the movie. How to make a dynamic movie 228 VivoQuant Manual 11/12/2015 16) Type in a name for the movie file. The default file format is .gif. 17) Use the Image Magick "Change Movie Delay" option to speed up or slow down the movie frame rate. How to make a dynamic movie 229 VivoQuant Manual 11/12/2015 18) Congratulations! Just double-click to open and watch the new movie. How to make a dynamic movie 230 Update Check VQ is frequently updated to provide users with more and better tools for all of their post-processing needs. Therefore, periodic Update Checks are recommended to insure that you have the latest and greatest software available. Getting There Update Check may be reached via two methods. The first method is through the Tools menu. The second method is to press "Ctrl+Shift+u" on the keyboard. For more information on Keyboard Shortcuts, see Keyboard Shortcuts. Function If an update is available, the Update Check will present a window providing an option for downloading the new version. You may either choose to download (Yes), not to download (No), or to ignore entirely (Ignore). If the new version is downloaded, you will be prompted to follow several straightforward installation steps. For more on installation, see the Install Guide. Update Check 231 VivoQuant Configuration The VivoQuant Configuration window has several panels, providing access to customizable features as well as important registration and set-up information. Configuration Panels The Configuration window consists of six panels, including: • Display • Data • DICOM Settings • Network • Registration • VivoScript Getting There The Configuration window is available in the Tools Menu on the PC. On the Mac, it is available in the VivoQuant menu under Preferences. Another method for reaching the Configuration window to use the keyboard shortcut "Ctrl+Shift+C". For more on keyboard shortcuts in VivoQuant, please see Keyboard Shortcuts. VivoQuant Configuration 232 Display Several appearance features of VivoQuant may be customized in the Display panel, including General display information, Maximum Intensity Projection attributes, and Color Palette defaults. General Option Description Several font styles are available for display in the Font Style Main Window. Controls the size of the displayed text in the Main Font Size Window Cross-hair A variety of cross-hair styles are available for use in style the Main Window. Cross-hair Cross-hair color options include red, yellow, color magenta, white, green, and blue. Pal files hold the color map information for the Pal Path different Color Palettes available in the VQ. Preview Displays a preview of the font and cross-hair Panel selections. Provides option to view the data in the Radiologist Orientation View (face to face) or Neurologist View (mirror). Diagrams are used to show the difference. Display 233 VivoQuant Manual 11/12/2015 Maximum Intensity Projection Option Frame Time Display Frame Delay Movie No. of views Description Sets the amount of time for which each MIP projection image is displayed in a saved movie. Sets the delay time between MIP frames in a saved movie. Sets the number of projection angles computed to construct the MIP. With sync mode enabled, only completed MIP frames will be displayed. With sync mode disabled, the MIP Sync mode will freely rotate at all times but will display a message in place of the MIP for uncompleted frames. Color Palettes The default Color Palettes for the Reference and Input data sets can be changed using the drop-down menus. Maximum Intensity Projection 234 Data The Data panel contains options for data handling, including data loading and quantification. Data Loading Use the 'Data Loading' panel to set loading options. Option Description Check the box to disable the MIP viewer upon Disable MIP loading. For large datasets, this can improve the viewer loading speed. Check the box to enable VivoQuant to ask for Ask Disable your permission to initialize the MIP viewer upon MIP loading. For large datasets, this can improve the loading speed. Choose 'yes' to allow the addition of zero-padding to a reference image to match the volume of an input image, or 'no' to keep the reference image size static (and Grow reference to potentially crop the input image, if it is larger input volume than the reference). Choose 'ask' to allow a window to appear upon loading in an input 1 data set that is larger than the image in the reference position. Max voxsize Specify the maximum pixel ratio (largest pixel ratio for vol. dimension / smallest pixel dimension) by which a Data 235 VivoQuant Manual 11/12/2015 data set is interpolated as a volume image file. Specify the minumum allowed voxel width. Data will be resampled upon loading if their voxel MinVoxSize width is less than the specified minimum. The voxel width will be doubled until it exceeds the minimum. Specify where to anchor the input data. Data can Anchor input be anchored at the following options: center, data head, or foot. In the above image, LD represents the out-of-plane resolution and the X and Y represent the in-plane resolution. If the pixel ratio of the loaded image exceeds the given threshold, i.e. MaxVoxSizeRatio < LD/X, the data set will be loaded as a planar 2D by n file. Below is an example MR** image loaded as a planar 2D by n file. Data Loading 236 VivoQuant Manual 11/12/2015 If the pixel ratio of the loaded image is less than the given threshold, i.e. MaxVoxSizeRatio > LD/X, the data set will be loaded as an interpolated volume image with isotropic voxels. Below is an example MR** image loaded as an interpolated volume file. **Other modalities besides MR can be loaded into VQ as planar or interpolated volume files based on the Max voxsize ratio for volume setting specified in the configuration window. Note: As described on the Open DICOM Data help page, • If the 'Force Planar' check box is checked in the Data Browser, then the image will load in planar mode regardless of the value set for MaxVoxSizeRatio. • If the 'Force Planar' check box is unchecked in the Data Browser, then the image will load in the appropriate mode according to the value set for MaxVoxSizeRatio. Quantification Options Use the 'Quantification Options' panel to set options used by the Quantification++ Operator and the 3D ROI Operator. Option Description Select the unit to be used for quantifying SPECT data. Options include MBq, kBq, mCi, and µCi. Note: Concentration units (e.g. nCi/cc) will not be Units of converted to the unit of activity specified. The Tumor Activity Segmentation and NM/CT Brain analysis plugin modules do support converting from concentration units to units of µCi. CSV Choose the CSV file delimiter of their choice, applied Separator when saving Quantification data. Quantification Options 237 VivoQuant Manual 11/12/2015 Data Manager In the "Data Manager" panel, there is a checkbox to enable or disable a confirmation message when moving data. Option confirm moving Show seconds in Browser Apply default shift Data Manager Description Check to enable a confirmation message when rearranging data in the Data Manager Check to display the seconds in the study date column in the DICOM browser. VQ has to be restarted to configure this change. Check to apply a default reorientation to data being loaded into VQ. The default shift can be defined in the Reorientation/Registration operator. For more on this, please see the Reorientation/Registration page 238 DICOM Settings The DICOM configuration allows the user to add/edit DICOM repositories. These repositories can be local folders containing DICOM files or DICOM network servers located on the local or a remote computer. The DICOM Dictionary is used by the DICOM Dump to identify information in the DICOM header. A How-To on configuring the NanoSPECT's DICOM Servers in the VQ is provided. Getting There There are three methods available to access the DICOM Repositry. First, the repository index is accessible via the Repository panel in the Data Browser. The second method is to select the Configuration option in the Tools menu and to then click on the DICOM panel. The third method is to reach the Configuration panel using the "Ctrl+Shift+C" shortcut. For more on keyboard shortcuts in VQ, please see Keyboard Shortcuts. Configuration Dialog The DICOM panel in the Configuration Tool provides the most in-depth DICOM information available in VQ. The DICOM panel consists of three sections: DICOM Settings, DICOM Cache, and Capture. DICOM Settings 239 VivoQuant Manual 11/12/2015 DICOM Settings Option Description Location of local DICOM database. Allows optimized internal access to the DB path Mediso DICOM database. See Optimized local access for details. List of available repositories. The bank of buttons immediately beneath the Repositories pulldown menu operate on the selected repository in this field Check connection to DICOM repository. Local folders are verified to exist and a C-ECHO is sent to DICOM servers. Add a new repository Delete selected repository Open the DICOM Editor Shows list of additional dictionaries used by the DICOM library. Please set Dictionary environment variable DCMDICTPATH to set this value. For more on the DICOM dictionary, see DICOM Dump Port over which the DICOM peer sends Rcv Port data. When this box is checked, the palette window will be loaded in accordance load palette with the image data. When this box is not checked, the palette window will be % set to whatever the window was set to last. Checking this box enables support for DICOMDIR DICOMDIR files. Folder Filter Allows users to dictate the type of dicom files loaded into VQ. Users can configure loading extensionless dicom data by adding a space and * to the end of the default settings: DICOM Settings 240 VivoQuant Manual 11/12/2015 DICOM Cache The DICOM cache allows the storage of frequently used data sets locally, thus improving load time into VQ. Every time the VQ is started, it checks the current size of the cache against the maximum cache size. If the currect cache size exceeds the maximum cache size, then older files (those opened least recently in the VQ) are removed. Option Description Size in Mb of the data currently stored in the Current DICOM Cache. The percentage to the right Size of the field indicates how close the cache is to capacity. Maximum amount of memory that can be Max made available for the DICOM Cache size (default = 1000.0 MB). Length of time over which data will be Life stored in the DICOM Cache (default = 14 Time days). Clear Empties the DICOM Cache Captures Not yet implemented -- please check back soon! Data Browser Repository Panel The DICOM Repository panel in the Data Browser is the most convenient location for adding and editing repositories, including DICOM Servers, local folders, and PACS Servers. DICOM Cache 241 VivoQuant Manual 11/12/2015 Option Description List of available repositories. The bank of buttons immediately beneath the pulldown menu operate on the selected Repositories repository in this field. Please click here to learn more about the DICOM repository section of the DICOM browser. Check connection to DICOM repository. Local folders are verified to exist and a C-ECHO is sent to DICOM servers. Add a new repository. edit: Open the DICOM Editor. Opens a Windows Browser that can be used to select a local folder as a repository. Fetch all DICOM meta data. Remove repository from list. DICOM Editor The DICOM Editor is used to add repositories, including DICOM Servers, PACS Servers, or local folders. Option Description Name as shown in the repository selection Displayed box. Can contain any alphanumeric Name character. Data Browser Repository Panel 242 VivoQuant Manual 11/12/2015 Repository Local folders are simple directories Type available on the local computer (also via a shared network). Such directories with many files take rather long to scan. in this case the performance of a DICOM server is superior. Such DICOM servers are network services on the local or a remote computer. They provide a database to efficiently browser study data. An iPACS server is an online PACS server, a regularly used picture archiving and retrieval system for medical images. Local Select a local directory. All sub-folders DICOM will be displayed as projects in the second folder repository drop-down window. DICOM server Username and password are specific to the user for their site's iPACS system. Hostname will be the site of the server for iPACS the iPACS and Port is the communication server channel through which the iPACS server communicates. DICOM server A DICOM server is specified by a calling AET (application entity title), a called AET as well as a TCP address (consisting of a host name and a port, the default settings are localhost:104). The AETs have to be configured on the DICOM server, too. For VivoQuant use port 23104 on the remote server. iPACS server An iPACS server is specified by setting the appropriate Hostname and Port and by entering user-specific Username and Password. A DEMO iPACS server may be registered by using Hostname: demo.ipacs.invicro.com, Port 80 and leaving Username and Password blank. iPACS servers also enable the use of Projects, a useful tool for organizing DICOM data. Optimized local access To use the optimized local DICOM access (much faster) use 'localhost' (all lower case, otherwise a normal DICOM connection is used) as the host name. Additionally, you have to define the 'DB path' (see above). iPACS Projects The iPACS repositories permit the use of projects. Projects represent a directory structure for DICOM repositories. Data may be stored and accessed via different projects, aiding organization of DICOM data. In DICOM Editor 243 VivoQuant Manual 11/12/2015 this example, an iPACS repository for "bioscan/demo" is being configured. The "bioscan/demo" repository contains three projects. If any projects are present within a configured iPACS repository, a second pulldown menu will appear in the Repository panel of the DICOM browser. All projects within that repository are available via the second pulldown menu. The three projects associated with the "bioscan/demo" repository are shown in the screenshot below. Select any project to view only data associated with that project. By default, data will only be displayed when the project to which it belongs is selected from the second pulldown menu. For example, in this screenshot, no data appears in the "bioscan/demo" repository because all data within the larger repository belongs to individual projects. To simultaneously view all data belonging to a repository AND its projects, place a * at the end of the iPACS Projects 244 VivoQuant Manual 11/12/2015 hostname during respository configuration. The * will cause all data within the repository and its projects to be displayed recursively. This behvavior applies across all repository and project levels. How to configure the NanoSPECT's DICOM Servers First, open the Data Browser. Find the Repository panel and either select the pre-existing repository from the pulldown menu or select "new" to create a new repository. For the standard access on the NS Workstation (WS), use: Option Displayed Name Type Calling AET Called AET Description NSxxWS_DCMSRV (or customer's preference) DICOM Server INVIVOSCOPE NSxxWS_DCMSRV How to configure the NanoSPECT's DICOM Servers 245 VivoQuant Manual Hostname Port 11/12/2015 localhost 104 where xx is replaced with the NanoSPECT number, typically no leading 0 for numbers < 10. The local access VQ is able to access the DICOM Server directly, so there is no need to add the VQ as a client on the DICOM Server. However, it does not hurt and is necessary when configuring an VQ for which access is not locally on the workstation. See Adding VQ as a DICOM Client for more information. The above table described configuring VQ to access the Workstation DICOM Server. VQ may also be configured to access the Acquisition computer's DICOM Server. The procedure is similar, but there is no WS in the naming convention. Options Displayed Name Type Calling AET Called AET Hostname Port Description ACQ_NSxx_DCMSRV (or customer's preference) DICOM Server INVIVOSCOPE NSxx_DCMSRV nanospectxx 104 where xx is replaced with the NanoSPECT number, typically no leading 0 for numbers < 10. In place of hostname (i.e., nanospectxx), it is also possible to use IP addresses (i.e., 192.168.1.1 for local WS-ACQ computer connections). Please verify that the hostname resolves by using 'ping hostname' in a Command window. Also, in order to access the ACQ computer from the WS computer, you must configure the DICOM Server on the ACQ computer. How to configure the NanoSPECT's DICOM Servers 246 VivoQuant Manual 11/12/2015 Adding VQ as a DICOM Client Start C:\Program Files\Mediso\DICOM Server\DICOMServerMgr.exe On the main panel, you see the name of the database (NSxx(WS)_DCMSRV where xx is the NS number and WS is present on the workstation) which should be used as the Called AET. Click on the "Clients" button. On the WS, you should already see listed there the HiSPECT and InterviewXP entries. To add the VivoQuant, add the line at the bottom of the following list. Application Entity Title (AET) HiSPECT HiSPECT_BATCH INTERVIEWXP INVIVOSCOPE Host Port LOCALHOST 3104 LOCALHOST 3105 LOCALHOST 11112 HOSTNAME 23104 In place of HOSTNAME in the VQ entry, use LOCALHOST on the WS Computer and NANOSPECTxxWS or the workstation IP address on the ACQ computer. Example Computer Calling AET Hostname Port Number Example NS5 ACQ INVIVOSCOPE NANOSPECT5WS 23104 #1 Computer Example NS13 WS INVIVOSCOPE LOCALHOST 23104 #2 Computer NS13 2nd IP Address or 2nd Example WS VQ-WS2 WS Computer 23104 #3 Computer Name Adding VQ as a DICOM Client 247 VivoQuant Manual 11/12/2015 What is of importance in this configuration is not the specific name "INVIVOSCOPE" but the fact that the same name "INVIVOSCOPE" was used in the DICOM Client Configuration and at the "Calling AET" in the VQ Repository Configuration. To illustrate this point, note the client in the image above with the name "VQ_anyname". Also, separate names must be used for each configuration. In other words, to configure the VQ on a 2nd workstation, would require changing "INVIVOSCOPE" to something different, like "VQ-WS2". For example, let's say a 2nd workstation was being set up for the NS13. In the Client Panel of the DICOM Server Manager, a client would be added as in Example #3 in the above table. In the VQ on the 2nd workstation, a new repository would be created with the following settings. Option Displayed Name Type Calling AET Called AET Hostname Port Description NS13WS_DCMSRV (or customer's preference) DICOM Server VQ-WS2 NS13WS_DCMSRV nanospect13ws (or IP) 104 Troubleshooting • Double-check the settings in VQ and the DICOM Server Manager. Remember that they may be running on the same computer (VQ on the WS computer talking to the WS DICOM Server) or different computers (VQ on the WS computer talking to the ACQ DICOM Server). • Check the network connection between the two computers. Can you ping the "hostname" configured in VQ from the computer running VQ? Can you ping the "hostname" configured in the DICOM Server Manager from the computer running the DICOM Server? If not, try switching the "hostname" from the computer's name (i.e., nanospect13ws) to the computer's IP address. • Check the DICOM Server logfiles (on the computer that you want to access), located in C:\Program Files\Mediso\DICOM Server\logs. Troubleshooting 248 VivoQuant Manual 11/12/2015 • Enable debugging in the VQ and collect output while trying to access the DICOM Server. Troubleshooting 249 Network The Network panel consists of two sections: Network Settings and Auto Import. The Network Settings section includes an option for enabling a proxy server for use with the VQ. There are fields for entering a proxy and a port number associated with that proxy. The "Enable Online Check" checkbox will automatically detect any available proxy servers. If you believe a proxy server is needed, please speak with your local IT representative. The Auto Import settings may be used to designate a folder through which files may be automatically transferred into a Repository. According to the setup in the above screenshot, DICOM files placed in the VQ-AutoImport directly will be automatically imported into the NS00WS_DCMSRV repository upon the next restart of the VivoQuant. Network 250 Registration Getting There The registration panel may be reached from the Configuration Panel or it may be reached directly via the Help menu. Contents The Registration panel includes VQ user information. The panel includes fields for Institution, Department, Contact email address, enabled VQ options, license status, and license expiration date. The panel is also used for registering the VQ upon start-up. Three buttons -- Install key, HW Keys, Register -- assist the user in registering the VQ. Registration of the VQ is required to unlock most of the VQ features. Please see the Registration Quick Guide for details on registering the VQ. Registration 251 AdvancedModules The Advanced Modules Menu contains a wide range of tools available for a variety of post-processing applications. • SPECT Tools ♦ QuantiCalc ♦ Specific Activity Calculator ♦ NanoSPECT ◊ MMP SPECT Calibration ◊ Near-Field Uniformity QC ◊ Reconstruction ◊ Batch Mode ◊ BatchTool Generator ◊ PSF Manager ◊ Quantification Tables ◊ ECG Split ◊ Save Calibration.txt ◊ Crosstalk Removal • CT Tools ♦ CT Reconstruction ◊ BatchCT ◊ Hounsfield Calibration ◊ CT Geometrical Calibration • Bed Removal • Plug-In Modules ♦ Whole Body Atlas Tool ♦ NM/CT Brain Atlas Segmentation Tool> ♦ fMRI Brain Atlas Segmentation Tool ♦ Tumor Segmentation Tool ♦ LumiQuant 3D BLI Reconstruction Tool • TumorPK Model • Dosimetry Calc AdvancedModules 252 Plug-In Modules VivoQuant offers a variety of additional Plug-in Modules in addition to the base license. These are accessed through the Advanced Modules Menu. • Whole Body Atlas Tool • 3D Brain Atlas Tool> • fMRI Tool • Tumor Segmentation Tool • LumiQuant 3D BLI Reconstruction Tool For more information on the inviCRO's Advanced Segmentation Tool Kit, please contact your inviCRO representative or email [email protected]. You can also access a helpful 'How To' illustrating the main features of the 3D Brain Atlas Tool by going to Tools -> Workflow and selecting the '3D Brain Atlas Analysis Tool' workflow. Plug-In Modules 253 Whole Body Atlas 1. Overview 2. Getting There 3. Adding to Reference Library 4. Segementing With The Tool 1. Settings 2. Select Images 3. Run Tool and View Log 5. Downloading Sample Library Overview The Whole Body Atlas Tool generates ROIs by registering a series of images in a Reference Library to the image that has been loaded in the Data Manager. The Reference Images must each have a corresponding ROI. The tool registers the images in the Reference Library to the loaded data, and applies the same transform to the corresponding ROI. The tool then works on a voxel-by-voxel basis, classifying a voxel to the new ROI if a greater percentage of the reference sets classified that voxel as within the ROI than the threshold percentage set by the user. Important factors that influence performance include image contrast, animal positioning consitancy, and the size of the reference library. Getting There The Whole Body Atlas Tool is accessed by navigating to Tools -> Advanced Analysis -> Whole Body Atlas. Here there are three options: Whole Body Segmentation Tool, Add to Library, and Download Sample Library. Whole Body Atlas 254 VivoQuant Manual 11/12/2015 Adding to Reference Library The Reference Library is the basis of the efficacy of the Whole Body Tool. The Reference Library is stored Locally, and is built one data set at a time. The first step in adding a data set to the Reference Library is to open the data and ROI. In order to add to the Library, there must be an active ROI in the 3D ROI tool. There can be multiple ROIs, but it is important when building the Reference Library to keep the naming of ROIs consistent; that is, if the organ of interest is the Left Kidney, always call it "Left Kidney", do not vary between "L. Kidney", "Left Kid", and "Left Kidney," as that will not be recognized as all the same organ (however, capitalization does not have an affect). With the data and ROI loaded simply navigate to and click "Add to Library" as described above. And the GUI will appear. The GUI offers four editable fields: Image to This option allows you to select which of the loaded Submit images to submit to the Reference Library. The Patient ID can be anything that is unique and will Patient help you identify this data set when selecting which ID scans to use from your Reference Library. The Protocol should include information as to how the image was acquired, the field of view, modality, etc. Protocol This will be used as a filter to determine which scans from the Reference Library will be used by the tool.. Species Getting There 255 VivoQuant Manual 11/12/2015 The Species dropdown list contains frequently imaged species. If you wish to have additions made to the options provided please contact your Account Manager or [email protected]. Segmenting With The Tool With the image on which the new ROI is to be drawn loaded in the Data Manager, navigate to and click on "Whole Body Segmentation Tool." This will open the Whole Body Atlas Tool GUI, from which the user can apply the segmentation settings and run the tool. Settings The tool relies on settings selected by the user. There are two levels of settings, the "Basic Settings," explained below, and "Advanced Settings," which should not need to be modified. Basic Settings For the majority of users, the Basic Settings tab contains all the settings that will need to be changed. This is where the user can select the appropriate Reference Images, appropriate Test Image, ROIs to segment, and probablilty threshold to use. Adding to Reference Library 256 VivoQuant Manual 11/12/2015 Reference List Selection Selecting the proper Reference scan is imperitive to the proper functionality of the tool. The settings selected by the users that factor into the images used are outlined in the table below: This the the image in the Data Manager that will be the basis of the ROIs generated. The species of the animal being segmented. This is Species based on the available options in the Reference Library. The Low and High parameters for the voxel size of the Reference Images available. The default low is 0.00 mm and the default high is the voxel size of the data Voxel loaded. It is not recommended to use Reference Data Size with a lower resolution than the data that has been loaded as this will compromise the quality of the Reference ROI. This list will display the protocols present in the Reference Library. Changing the protocols included Protocols will narrow the Reference List. It is suggested to only include Reference Images with the same protocol as the image loaded in the Data Manager. This list will display the possible ROIs to generate ROIs based on those present in the Reference Library. Only those selected will be generated by the Tool. Image Other Basic Settings The other setting that can be edited by the user is the Probability Threshold. Following the registration of each Reference Image to the image in the Data Manager, each voxel is assigned a probability that it belongs in the ROI. Only voxels with a probability greater than the threshold set by the user will be mapped to the ROI. The default for this setting is 0.5 and typically, the ROI will become larger as the threshold is lowered. Select Images The middle pane of the GUI allows the user to select which images to use for the final Reference List. These should already have been narrowed down by the user's previous selections in the Settings pane. It is up to the user how many Reference Images to use, however the time the tool takes to run is largly influenced by how many Reference Images are selected. On the other hand, performance is often influenced positively by increasing the number of Reference Images. Run Tool and View Log Once the settings and Reference Images have been selected, clicking "Run" in the lower right corner of the GUI will run the tool. The Log will outline the steps being taken by the tool. At its completion, the tool will remain open, but VivoQuant will navigate to the 3D ROI Tool, where the new ROIs can be viewed and modified. Settings 257 VivoQuant Manual 11/12/2015 Downloading Sample Library A sample Reference Library is available depending on the user's VivoQuant license. This is to be used for testing and learning how to operate the tool. It can be downloaded from Tools->Advanced Analysis->Whole Body Atlas->Download Sample Library. Downloading Sample Library 258 3D Brain Atlas Tool Overview The 3D Brain Atlas tool is used to perform brain region analysis. The tool can handle CT or MR data as the input and MR, PET, or SPECT for the input functional data. Instructions for the use of the tool are available through the Workflow Assistant. NOTE: PLEASE USE CAUTION WHEN SCALING DATA IN THIS TOOL AS THIS CAN LEAD TO ERRORS IN QUANTITATION. FOR MORE REFER TO THE TREATMENT OF QUANTITATIVE DATA PAGE. 3D Brain Atlas Tool 259 fMRI Brain Atlas Segmentation Tool 1. Install Atlas 2. Getting There 3. Load Data into the Tool 4. Select an Output Repository 5. Customize Analysis Pipeline 6. Run the Tool Overview The fMRI Brain Atlas Segmentation Tool uses a species-specific atlas to evaluate functional or structural MRI, fMRI, or phMRI data. Several pre-processing and analysis options are available to enable accurate characterization of signal change for a variety of acquisition paradigms. Install Atlas Before using the fMRI tool, the user should download and install the available atlases by going to Tools -> Advanced Analysis -> Install Atlas -> Mouse & Rat. To change where the atlases are automatically stored, go to Tools-> Advanced Analysis -> Install Atlas -> Change Atlas directory and re-install the atlases to this location. Getting There The fMRI Tool is accessed by navigating to Tools -> Advanced Analysis -> fMRI Tool. fMRI Brain Atlas Segmentation Tool 260 VivoQuant Manual 11/12/2015 Load Data into the Tool The 'Load Data' section in the upper left corner of the GUI window allows the user to load in a data set from a local folder or import a data set that is already loaded into the software. For Bruker MR data, the user can select the 2dseq file from the appropriate folder or use the Bruker Loader to load the data into VQ prior to running the tool. The folder location and file name will be displayed Input Data in this window when a data set is loaded in from a local folder. Click on the ellipsis button to open a window from which the user can locate and load in a locally stored data set. The repetition time in seconds should be entered TR here. The user should either type the correct value or use the up and down arrows to adjust the TR. Number of The number of time points will automatically Time Points update upon loading a data set. Import from Click on this button to import data into the fMRI DM Tool that has already been loaded into VQ. Click on this button to unload data from the tool Reset and reset the pipeline settings back to the default Settings settings. Getting There 261 VivoQuant Manual 11/12/2015 Select an Output Repository The 'Output' section in the upper right corner of the GUI window allows the user to select an output folder and manage the format and number of output files. Output Folder The output folder location will be displayed in this window once a local folder is selected by the user. Click on the ellipsis button to open a window from which the user can select a local output folder. Provide a prefix (optional) to be added to all output file names. Adding a prefix is useful when prefix performing multiple analyses that are being saved to the same output folder. Keep Data Check this box to save intermediate analysis results Steps including the original data set. Correlation Check this box to save a region of interest Matrix correlation matrix spreadsheet. Check this box to save before and after motion correction, smoothing, anatomical registration, Save QC brain mask, and/or atlas registration QC movies and images. Customize Analysis Pipeline The pipeline section of the fMRI tool allows the user to fully customize their data analysis workflow. The user can choose to enable or disable any of the following processing modules: Select an Output Repository 262 VivoQuant Manual 11/12/2015 • Motion Correction • Smoothing • Anatomical Registration • Brain Mask • Atlas Registration • General Linear Modeling Depending on which processes are enabled, the analysis workflow will go in order of the display tabs. Motion Correction Check the 'Enable' box to perform a motion correction of the input data. The user can choose to have the tool perform either a slice-by-slice or 3D motion correction. The user must also choose to register each time point to a single time point or to the mean of all the time points. If 'Keep Data Steps' is checked in the Output section of the tool, then the motion corrected data will be stored to the output directory with suffix '-mc'. Similarly, if the 'Save QC' box is checked, then before and after motion correction QC movies will be stored to the output directory. Smoothing Check the 'Enable' box to smooth the input data. The user can choose to have the tool perform either a slice-by-slice or 3D spatial smoothing. The user can also edit the full width at half maximum (FWHM) setting to adjust the level of smoothing. If 'Keep Data Steps' is checked in the Output section of the tool, then the smoothed data will be stored to the output directory with suffix '-sm'. Similarly, if the 'Save QC' box is checked, then before and after smoothing Customize Analysis Pipeline 263 VivoQuant Manual 11/12/2015 QC images will be stored to the output directory as well as displayed under the smoothing tab (as seen in image above). The mean of the functional data set will be used for the QC images. Anatomical Registration Check the 'Enabled' box to co-register the input data to an anatomical reference data set. The user can choose from the following references: • Anatomical: Register to a reference anatomical data set. Click on the ellipsis button ( ) to open a window from which the locally stored anatomical file can be located. The user can either provide a manual transformation or have the tool perform an automatic registration. For the automated registration, the user can choose to use the entire field of view (Use Full) or only the brain (Use BBox). The 'Use BBox' setting will use a bounding box around the brain to limit what is used for registration. If the manual box is checked, the user needs to provide a locally stored XML transformation for the registration of the functional to the reference anatomical. • Mean Functional: Register to the mean of the functional time series. • Time Point: Register to a single time point. Either type a specific time point in the box or use the up and down arrows to edit the time point. If 'Keep Data Steps' is checked in the Output section of the tool, then the registered data will be stored to the output directory with suffix '-anatreg'. Similarly, if the 'Save QC' box is checked, then before and after registration QC images will be stored to the output directory as well as displayed under the anatomical registration tab (as seen in image above). Since the mean of the registered functional will be used for the QC images, no QC images will be stored if the mean functional is used as the reference. Brain Mask The brain mask tab provides options for skull stripping the input data. Smoothing 264 VivoQuant Manual 11/12/2015 The user can choose from the following masking options: • None: Does not perform any brain masking. • Manual: Pauses the processing and prompts the user to manually segment the brain in the 3D ROI tool using automatic spline tool thresholding. • Provided: The user must provide brain segmentation (RMHA file). • Automatic: Performs an Otsu thresholding on the brain. If 'Keep Data Steps' is checked in the Output section of the tool, then the masked data will be stored to the output directory with suffix '-masked'. Similarly, if the 'Save QC' box is checked, then before and after masking QC images will be stored to the output directory as well as displayed under the brain mask tab (as seen in image above). Atlas Registration Check the 'Enabled' box to co-register the input data to an atlas. The user can customize the atlas registration by adjusting the following settings: • Data to Atlas/Atlas to Data: Choose to register the atlas to the data or vice versa. Brain Mask 265 VivoQuant Manual 11/12/2015 • Atlas: This should populate with the correct provided atlas based on the header information from the loaded data set. • Key: Choose to perform hemisphere (Left/Right) or whole brain analysis using all regions in the provided atlas or using a mapping of all regions to a smaller number of larger regions. • H/F Flip: Check this box to flip the data (or atlas) in the head/foot direction before registration. • Affine: Check this box to allow the tool to scale and shear the data (or atlas) during registration, if necessary. • Allow Inter-Slice Interp: Check this box to allow the tool to interpolate the data (or atlas) between slices. • Cutsom Atlas:: Check this box to provide custom atlas RMHA and anatomical files. If 'Keep Data Steps' is checked in the Output section of the tool, then the registered data will be stored to the output directory with suffix '-atlasreg'. Similarly, if the 'Save QC' box is checked, then before and after atlas registration QC images will be stored to the output directory as well as displayed under the atlas registration tab. General Linear Modeling Check the 'Enable' box to perform modeling analysis. Choose from pre-defined 'Ramp', 'Bolus', 'Boxcar', or 'Region' ideal functions or import a custom design. Customize the analysis and output materials with the following settings: • Save Residuals: Check this box to save a map of the residuals to the output folder. The name of the map will be 'residuals'. • Voxel Maps: Check this box to save parameter maps for the chosen regressors. These files will be stores with suffix '-paramMap'. • ROI Plots: Check this box to store all ROI plots in a folder within the specified output folder. The name of this folder will be 'plots'. • Add Regressor: Click on this button to add a regressor to the design matrix. A window will appear from which the user can select an available regressor from the drop down menu (as seen in image below). Atlas Registration 266 VivoQuant Manual 11/12/2015 Each ideal function can be customized for the specific study paradigm. For example, the 'Bolus' option allows the user to set the shape and center (both in units of TR). • Remove Last: Click on this button to remove the last regressor column of the design matrix. • Import Design: Click on this button to load in a custom design matrix that is stored locally in CSV format. Run the Tool Click on the Run button at the bottom of the window to run the tool. If the tool pauses due to a missing settings field, the user can click on the Continue button to resume processing. To close the tool window, click on the Close button. The progress bar in the bottom left corner of the GUI window will display the progress for each step of the pipeline including loading the data set. The total processing time will be displayed next to the progress bar once the analysis is complete. A description of what process the tool is working on will also be displayed. General Linear Modeling 267 Tumor Segmentation Tool Overview The NMPT Tumor Segmentation tool is used in conjunction with the iPACS to display the results of processed job groups whose jobs constitute a longitudinal study, particularly those utilizing a xenograft tumor model. For more information on this module, download the quickguide. Tumor Segmentation Tool 268 LumiQuant Overview LumiQuant is a hardware and software solution from Aspect Imaging to improve spatial localization and quantification of luminescent signal along with providing 3D anatomical co-registration with compact MRI. For more information on this module, visit Aspect Imaging. LumiQuant 269 SPECT Tools The SPECT Tools sub-menu contains features primarily associated with improving SPECT quantification. • QuantiCalc • Specific Activity Calculator • SUV Calculator • Crosstalk Removal • Biodist. Visualization • Split Projections SPECT Tools 270 QuantiCalc The Quantification Calculator enables a feature unique to the NanoSPECT/CT imaging system -- the ability to perform absolute quantification in small-animal SPECT imaging. Getting There The QuantiCalc tool is available via the Tools Menu Function The Quantification Calculator is used to calculate a Quantification Factor. To perform absolute quantification, Quantification Factors must be calculated for each isotope and aperture combination used in the NanoSPECT/CT. The Quantification Factors are stored in the Quantification Database. For information on collecting the data necessary to calculate Quantification Factors, please see the NanoSPECT/CT documentation. The procedure for collecting Quantification Factor data involves performing a highly-specified SPECT measurement on a syringe filled with isotope. The fields of the QuantiCalc window may then be filled in according to: QuantiCalc 271 VivoQuant Manual 11/12/2015 • Dose meter: Record the amount of activity in the syringe in MBq,kBq, mCi or uCi as measured by a dose calibrator. Include the time of the measurement. • NanoSPECT: Record the activity value measured by the NanoSPECT from reconstructed data. Include the time of data collection. • Isotope: Select the isotope present in the syringe. Isotopes offered include Ga-67, I-123, I-125, Lu-177, Tc-99, Tl-201, In-111, and Xe-133. The half-life of the selected isotope will be entered automatically in units of hours. • Decay factor The information from the Dose Meter, NanoSPECT, and Isotope fields will be used to calculate a decay factor between the time of Dose Meter measurement and data collection. • Quantification Factor The information from the above fields is all combined to determine a Quantification Factor for that particular isotope and aperture. This Quantification Factor can then be entered in the Quantification Database. Quantification Database The Quantification Database stores all of the Quantification Factors calculated for any isotope and aperture combination measured with the NanoSPECT/CT. These factors are then used by the HiSPECT reconstruction software to produce SPECT reconstructions with physically meaningful voxel values. For more on setting Quantification Factors for the NanoSPECT/CT, please see this guide. Function 272 Specific Activity Calculator The Specific Activity Calculator accepts an input volume, activity, specific activity for a given isotope and calculates the amount of isotope present in the sample both in moles and moles/volume. Getting There The Specific Activity Calculator is available in the Tools Menu. Function The Specific Activity Calculator requires several values to make its calculations. An activity, volume, isotope, and specific activity are used to calculate the number of excited molecules and molarity of a given sample. Value Units Description Activity MBq, kBq, mCi, Amount of isotope as measured in a or µCi and dosimeter or with the NanoSPECT. measurement Specific Activity Calculator 273 VivoQuant Manual Volume Isotope Specific Activity Amount Molarity Function 11/12/2015 time cm3, mm3, ml, µl The volume containing the activity. The isotope of interest and its Hours associated half-life. Several pre-defined options are available. The specific activity of the isotope being used as measured by a specific MBq/pmol, activity calibration. Specific activity kBq/pmol and describes the number of excited measurement atoms out of the total atoms present time in a given sample, i.e., the amount of the activity that has not yet decayed to a ground state. The calculated amount, or number, of pmol, nmol, or # excited molecules in the sample. The calculated molarity, or pmol/ml, concentration, of excited molecules in nmol/ml a sample of activity. 274 SUV Calculator The SUV Calculator may be used to calculate a specific uptake value (SUV), given the appropriate entries of injected dose, subject weight, and activity concentration. Getting There The SUV Calculator is available in the Tools Menu. Function The SUV Calculator requires several values to make its calculations. An activity and volume are used to calculate an activity concentration. The subject weight and injected dose are used in conjunction with the activity concentration to calculate the SUV. Units for these entries are user-selectable. Value Description Amount of isotope as measured MBq, kBq, mCi, Activity in a dosimeter or with the or µCi NanoSPECT. The volume containing the Volume cm3, mm3, ml, µl activity. Concentration kBq/ml, The ratio of activity to volume. MBq/ml, SUV Calculator Units 275 VivoQuant Manual 11/12/2015 mCi/ml, kBq/mm3, MBq/mm3 Patient Weight The weight of the animal or object of interest. The amount of isotope MBq, kBq, mCi, Injected Dose successfully injected into the or µCi subject. The specific uptake value (SUV) mg/ml, g/ml, given the patient weight, activity SUV kg/ml, g/l, concentration, and injected dose g/mm3, kg/mm3 specified in the other fields. Function g, kg 276 Crosstalk Removal The Crosstalk Removal tool is used to remove crosstalk photons in dual-isotope SPECT images. The limits in energy resolution inherent to SPECT imaging result in some overlap between the energy spectra of isotopes with relatively similar peak energies. For example, in dual-isotope I-123 and Tc-99m imaging, some I-123 photons will spill over into the Tc-99m window and vice versa. The Crosstalk Removal tool is applied to projection data to remove these "spill over" photons or crosstalk. This function will soon be implemented into the HiSPECT reconstruction software solution. Getting There Crosstalk Removal is available in the Tools Menu in SPECT Tools Function Please visit How To Guides on the VivoQuant website to download a stand-alone PDF guide for performing Crosstalk Removal. Crosstalk Removal 277 Biodist. Visualization The Biodistribution Visualization tool creates an atlas representation of measured mouse biodistribution values. Getting There Biodistribution Visualization is available in the Advanced Modules Menu in SPECT Tools. Function To use the Biodistribution Visualization function, enter the total measured activity for each region-of-interest available in the atlas list. Biodist. Visualization 278 VivoQuant Manual 11/12/2015 After entering the appropriate values, select one of the buttons at the end of the list. Button Description New Clears all fields Load Load a previously saved biodistribution text file. Save Save the current biodistribution data into a text file. Cancel Closes the Biodist. Visualization window Prepares the atlas with the entered biodistribution OK information. Function 279 Split Projections The Split Projections tool may be used to split a single SPECT projection data DICOM file into multiple projection data files along one of several DICOM fields. Getting There The Split Projections tool is available in the Tools Menu under SPECT Tools. One specialized application for the Split Projections tool is the splitting of gated data. In this case, the data may be split directly from inside the Data Browser. Function Upon selection of the Split Projections tool, the Data Browser opens. Select an appropriate SPECT projection data set. A pulldown menu of split options is presented. After splitting, a confirmation message is presented to verify successful saving of the new data sets. Split Projections 280 VivoQuant Manual Function 11/12/2015 281 CT Tools The CT Tools Submenu contains features to aid in the preparation of CT data for analysis and display. • CT Reconstruction • Bed Removal • Resample Data CT Window Presets can also be selected from within this window. CT Tools 282 CT Reconstruction The CT Reconstruction tool offers a variety of algorithms and filters for generating 3D images from x-ray projection data. Also included is a tool for performing Batch CT jobs. Getting There There are multiple ways to reach the CT Reconstruction panel. First, it is available in the Tools Menu It can also be reached via the Data Browser by selecting "Open" when a set of CT Projection data is highlighted and the "Auto-Start Reconstruction" box is checked. Right clicking on an appropriate data set in the Data Browser will also present the CT Reconstruction (and Batch CT) programs. CT Reconstruction 283 VivoQuant Manual 11/12/2015 Finally, using the keyboard shortcut "Ctrl+L" will open the Reconstruction panel. For more on keyboard shortcuts in VQ, please see Keyboard Shortcuts. Function The CT Reconstruction panel controls the parameters available for generating tailored CT reconstructions. Getting There 284 VivoQuant Manual 11/12/2015 Reconstruction Parameters Reconstruction parameters consist of resolution, algorithm, and filter (if filtered back projection (FBP) is selected). Resolution choices include Fast, Standard, and Fine with typical reconstructed voxel sizes ranging from 50-200 µm, depending on the pixel size of the projection data. Algorithm choices include Exact or Fast Cone Beam FBP and available filters include RamLak, SheppLogan, Hamming, Hanning, Cosine, and Blackman. The slider bar below the filter choice allows selection of a filter cutoff frequency. Study Details, Progress, and Controls Function 285 VivoQuant Manual 11/12/2015 The Study Details panel provides information about the particular study and reconstruction such as patient Name, Object Volume, Voxel Size, Pixel Size, and Memory. The Memory setting provides information on how much memory is needed to reconstruct the volume with the selected settings. Memory values that are too large will be displayed in red. Several options exist for reducing memory usage, including changing reconstruction settings (i.e., use "Fast" instead of "Fine"), disabling the use of normalization (see Settings menu below), using "Fast Cone Beam FBP" instead of "Exact Cone Beam FBP" to reconstruct, reconstructing only a portion of the total volume (see Expert Settings in the Help menu below), or re-acquiring data with smaller projection data (i.e., Fast instead of Ultra-Fine in Nucline). The exact memory requirements are as such: Algorithm Bytes per Voxel Exact cone beam 2*4 per thread Fast cone beam 4 When using the normalization matrix this adds two more bytes per voxel. This matrix is requires to adjust the sampling for helical acquisition orbits. For circular scans the normalization matrix can be disabled without side-effects. Typical dimensions and their memory requirements (using matrix normalization): Setup Requirements Fast cone beam: 6 bpv bytes per voxel (bpv) Exact cone beam 1 thread: 10 bpv Exact cone beam 2 threads: 18 bpv Voxels = 9,720,000 Fast cone beam: 55 MB Mouse, 36x36x60 mm, 200µm voxels Exact cone beam 1 thread: 93 MB Exact cone beam 2 threads: 167 MB Mouse, 36x36x37 mm, 100µm voxels Voxels = 47,952,000 Study Details, Progress, and Controls 286 VivoQuant Manual Mouse, 36x36x20 mm, 50µm voxels Rat, 62x62x90 mm, 400µm voxels Rat, 62x62x60 mm, 200µm voxels Rat, 62x62x20 mm, 100µm voxels 11/12/2015 Fast cone beam: 274 MB Exact cone beam 1 thread: 457 MB Exact cone beam 2 threads: 823 MB Voxels = 207,360,000 Fast cone beam: 1187 MB Exact cone beam 1 thread: 1977 MB Exact cone beam 2 threads: 3560 MB Voxels = 5,405,625 Fast cone beam: 31 MB Exact cone beam 1 thread: 52 MB Exact cone beam 2 threads: 92 MB Voxels = 28,830,000 Fast cone beam: 164 MB Exact cone beam 1 thread: 275 MB Exact cone beam 2 threads: 495 MB Voxels = 76,880,000 Fast cone beam: 440 MB Exact cone beam 1 thread: 733 MB Exact cone beam 2 threads: 1320 MB The Progress panel gives feedback on the progress of a reconstruction. Before beginning the reconstruction, a plot of the selected filter, including cutoff frequency, is displayed. Once the reconstruction has begun, projection data are displayed as they are used by the reconstruction algorithm. A progress bar indicates the estimated time remaining in the reconstruction. The Controls panel contains two checkboxes and the Start button. The Start button begins the reconstruction. As the reconstruction is running, it can also be used to stop the reconstruction. The first checkbox, "autostart", will automatically begin a reconstruction when the CT panel is called from the Data Browser. The second checkbox, "autosave", will automatically save a reconstruction once completed. Preview and Color Panel Preview and Color Panel 287 VivoQuant Manual 11/12/2015 The Preview panel displays the CT reconstruction as it is being calculated. The Color Panel provides several color map options. File Menu Option Load DICOM Data... Load Local Data... File Menu Description Identical to the function of 'Ctrl+D', this option opens the Data Browser window from where a set of CT projection data may be loaded. Note that the Browser opens with the 'CT Projection' data filter set. Identical to the function of 'Ctrl+L', this option opens a Windows Explorer browser window. A properly chosen CT projection data set is then loaded into the CT Reconstruction tool. 288 VivoQuant Manual 11/12/2015 Allows the user to save the data in DICOM format both into the selected repository and a local folder. The reconstruction is opened in the VQ. If the Transfer to reconstruction is allowed to finish, this transfer occurs VQ automatically. Save... Settings Menu Option Description Save Settings Saves the current CT Reconstruction Settings The Hounsfield Calibration uses the linear response of the detector at each of the x-ray Hounsfield... operating voltage to calculate dose to an object in terms of Hounsfield units. For more information, please see Hounsfield Calibration. Allows user to enable multiple threads (1, 2, 3, 4, 6, or 8) for performing the CT Reconstruction. Threads Note that it only makes sense to enable as many threads as there are cores available in the computer's processor. Defines the priority given to the CT Thread Reconstruction with respect to other tasks being Priority performed by the CPU. Allows the user to disable the use of normalization in the reconstruction. Disabling normalization Advanced prevents the use of Hounsfield Calibration, but reduces the memory usage required for the reconstruction. For users imaging with the Minerve bed system, Auto Bed this option will automatically remove the Minerve Removal bed from the CT during reconstruction. Help Menu Settings Menu 289 VivoQuant Manual 11/12/2015 The primary feature of the Help Menu is the Expert Settings panel. This panel is only for advanced users and allows several key parameters in the CT reconstruction to be overwritten, including voxel size, voxel volume (both axially and transaxially), Z offset, sampling, threads, and Up scaling. Option Description Allows the user to choose a voxel size in either the X/Y (transverse) or Z (axial) directions that differs Voxel Size from the 3 options (Fast, Standard, Fine) offered in the main CT Reconstruction panel. NOTE: Changing the voxel size may slightly alter the voxel volume. Allows the user to modify the reconstructed volume Voxel either in terms of voxel number or total reconstructed Volume size (in mm). Modifications may be made in either the X/Y (transverse) or Z (axial) directions. Allows the user to shift and restrict the reconstructed Z offset volume to better center features of interest, enabling (disabled) more reasonable resolution times for high-resolution images. Sets the number of rays used by the Exact Cone Sampling Beam Algorithm during the reconstruction. Sets the number of threads used during reconstruction. The optimal value is determined by Threads the number of cores or processors in that particular machine's CPU. Up scaling may be used to reduce an image size by a Up scaling factor 2^N. Smaller image sizes are often more manageable. Help Menu 290 VivoQuant Manual 11/12/2015 BatchCT Tool The BatchCT tool is a useful application which enables the user to select a number of X-ray projection data studies and order them for reconstruction at a later stage. The CT scans are saved in an appropriate batch file and can be left to reconstruct automatically. The parameter settings and file names can be predefined. The BatchCT tool is reached via the Data Browser by right clicking on the CT scan of interest and selecting "send to BatchCT". The BatchCT reconstruction panel is then displayed. This panel provides options for Reconstruction Parameters, Study Details and Repository. The user can define which reconstruction parameters to use (see CT reconstruction above) and can enter details about the study. It is important to label the Study Description box in the Study Details section because this will be the name assigned to the reconstructed data. The repository location is also displayed. To continue with the batching function press OK. BatchCT Tool 291 VivoQuant Manual 11/12/2015 Once the X-ray projection data has been sent to BatchCT, the BatchCT window can be opened by clicking the small white BatchCT icon on the bottom right hand corner of the screen. This window displays all the projection data previously sent for batching and contains various functions to control the process. The BatchCT window is divided into 3 main sections; Job List, Status and Log File. There are icons along the left side of the window for manipulating the batching process. Job List The job list provides a list of the X-ray projection data to be reconstructed. Information about each individual scan is divided into a number of sections. Option Mod Details Patient Description Provides information on the modality used i.e. CT. Displays the batch number ID, the number of projections used and the name of the reconstruction as it will appear when loaded into VQ. This is the name of the folder from which the X-ray projection data was taken. Parameter Status Job List Provides information on the status of the reconstruction. If the status is Running then the reconstruction is underway, if it is Waiting then the reconstruction has yet to begin. The status section will also indicate when it is storing a completed reconstruction and when it is about to start a new reconstruction. 292 VivoQuant Manual 11/12/2015 Status The status of the current reconstruction job along with the total number of scans to be reconstructed is displayed in the Status bar and indicates the percentage of data remaining to be reconstructed. Log file File Menu The file menu in the main window offers the following functions in the BatchCT application. Option Hide Quit Stop Service Start Service Description Hides the Batch CT window from the desktop. Also reached using the Ctrl+H keyboard shortcut. Quits the Batch CT application. Also reached using the Ctrl+Q keyboard shortcut. Stops the Batch CT application. Also reached using the Ctrl+T keyboard shortcut. Starts the Batch CT application. Jobs Menu The batch file can be altered using the icons to the left of the window or via the Jobs menu in the main window. The job icons are located on the left side of the window. Option Pause Status Description Pauses the current reconstruction job. 293 VivoQuant Manual 11/12/2015 StopJob Stops the reconstruction job. Moves the selected projection data up the list of MoveUp studies to be reconstructed. Moves the selected projection data down the list of MoveDown studies to be reconstructed. EditJob Allows you to edit the reconstruction parameters. Deletes the projection data from the reconstruction DeleteJob list. These functions can also be accessed under the Jobs menu in the main window. Additional functions available here include Thread Number, Thread Priority and Show Bubbles. Option Description Thread Sets the number of threads used during reconstruction. Number The BatchCT tool may be given different priority levels. Lower priority means that the tool will run only Thread when the computer is completely idle. A higher Priority priority means that the tool will continue to run even when other processes are occurring. Information bubbles pop up in the task bar as jobs are Show added, completed, etc. This switch controls whether or bubbles not these bubbles appear. Jobs Menu 294 Hounsfield Calibration Hounsfield Units are a powerful tool for assessing attenuation of biological materials. The following calibration procedure will result in NanoSPECT/CT reconstructions generated with VQ to consist of voxels having proper Hounsfield units. Open the Hounsfield unit panel found in CT Reconstruction Reset the HU values in the panel so that each Slope = 1.0 and each Intercept = 0.0. Hounsfield Calibration 295 VivoQuant Manual 11/12/2015 Fill a large (>2.5cm) diameter syringe with water and collect CT data at 45 kVp with standard settings. It is not necessary to image the entire syringe -- just the section that is full of water. Repeat the acquisition at 55 kVp and 65 kVp. Reconstruct each CT. Using the Quantification Tool, select a region of the reconstruction consisting entirely of water inside the syringe. Hounsfield Calibration 296 VivoQuant Manual 11/12/2015 Set the Slope = 1000/Mean. In the screenshot above, Slope = 1000/1.4527 = 687.15. Typical slopes are near 650. Be sure to set the Slope for each energy to correspond to the value from the reconstruction of the data collected at that energy. Set each Intercept = -1000. Ensure that the "enable calibration" box (Shown in the Hounsfield panel above) is checked. Reconstruct the CT a second time. Select a region of the syringe encompassing both water and air. Values in water should be near 0 while those in air should be near -1000. Hounsfield Calibration 297 VivoQuant Manual Hounsfield Calibration 11/12/2015 298 CT Reconstruction The CT Reconstruction tool offers a variety of algorithms and filters for generating 3D images from x-ray projection data. Also included is a tool for performing Batch CT jobs. Getting There There are multiple ways to reach the CT Reconstruction panel. First, it is available in the Tools Menu It can also be reached via the Data Browser by selecting "Open" when a set of CT Projection data is highlighted and the "Auto-Start Reconstruction" box is checked. Right clicking on an appropriate data set in the Data Browser will also present the CT Reconstruction (and Batch CT) programs. CT Reconstruction 299 VivoQuant Manual 11/12/2015 Finally, using the keyboard shortcut "Ctrl+L" will open the Reconstruction panel. For more on keyboard shortcuts in VQ, please see Keyboard Shortcuts. Function The CT Reconstruction panel controls the parameters available for generating tailored CT reconstructions. Getting There 300 VivoQuant Manual 11/12/2015 Reconstruction Parameters Reconstruction parameters consist of resolution, algorithm, and filter (if filtered back projection (FBP) is selected). Resolution choices include Fast, Standard, and Fine with typical reconstructed voxel sizes ranging from 50-200 µm, depending on the pixel size of the projection data. Algorithm choices include Exact or Fast Cone Beam FBP and available filters include RamLak, SheppLogan, Hamming, Hanning, Cosine, and Blackman. The slider bar below the filter choice allows selection of a filter cutoff frequency. Study Details, Progress, and Controls Function 301 VivoQuant Manual 11/12/2015 The Study Details panel provides information about the particular study and reconstruction such as patient Name, Object Volume, Voxel Size, Pixel Size, and Memory. The Memory setting provides information on how much memory is needed to reconstruct the volume with the selected settings. Memory values that are too large will be displayed in red. Several options exist for reducing memory usage, including changing reconstruction settings (i.e., use "Fast" instead of "Fine"), disabling the use of normalization (see Settings menu below), using "Fast Cone Beam FBP" instead of "Exact Cone Beam FBP" to reconstruct, reconstructing only a portion of the total volume (see Expert Settings in the Help menu below), or re-acquiring data with smaller projection data (i.e., Fast instead of Ultra-Fine in Nucline). The exact memory requirements are as such: Algorithm Bytes per Voxel Exact cone beam 2*4 per thread Fast cone beam 4 When using the normalization matrix this adds two more bytes per voxel. This matrix is requires to adjust the sampling for helical acquisition orbits. For circular scans the normalization matrix can be disabled without side-effects. Typical dimensions and their memory requirements (using matrix normalization): Setup Requirements Fast cone beam: 6 bpv bytes per voxel (bpv) Exact cone beam 1 thread: 10 bpv Exact cone beam 2 threads: 18 bpv Voxels = 9,720,000 Fast cone beam: 55 MB Mouse, 36x36x60 mm, 200µm voxels Exact cone beam 1 thread: 93 MB Exact cone beam 2 threads: 167 MB Mouse, 36x36x37 mm, 100µm voxels Voxels = 47,952,000 Study Details, Progress, and Controls 302 VivoQuant Manual Mouse, 36x36x20 mm, 50µm voxels Rat, 62x62x90 mm, 400µm voxels Rat, 62x62x60 mm, 200µm voxels Rat, 62x62x20 mm, 100µm voxels 11/12/2015 Fast cone beam: 274 MB Exact cone beam 1 thread: 457 MB Exact cone beam 2 threads: 823 MB Voxels = 207,360,000 Fast cone beam: 1187 MB Exact cone beam 1 thread: 1977 MB Exact cone beam 2 threads: 3560 MB Voxels = 5,405,625 Fast cone beam: 31 MB Exact cone beam 1 thread: 52 MB Exact cone beam 2 threads: 92 MB Voxels = 28,830,000 Fast cone beam: 164 MB Exact cone beam 1 thread: 275 MB Exact cone beam 2 threads: 495 MB Voxels = 76,880,000 Fast cone beam: 440 MB Exact cone beam 1 thread: 733 MB Exact cone beam 2 threads: 1320 MB The Progress panel gives feedback on the progress of a reconstruction. Before beginning the reconstruction, a plot of the selected filter, including cutoff frequency, is displayed. Once the reconstruction has begun, projection data are displayed as they are used by the reconstruction algorithm. A progress bar indicates the estimated time remaining in the reconstruction. The Controls panel contains two checkboxes and the Start button. The Start button begins the reconstruction. As the reconstruction is running, it can also be used to stop the reconstruction. The first checkbox, "autostart", will automatically begin a reconstruction when the CT panel is called from the Data Browser. The second checkbox, "autosave", will automatically save a reconstruction once completed. Preview and Color Panel Preview and Color Panel 303 VivoQuant Manual 11/12/2015 The Preview panel displays the CT reconstruction as it is being calculated. The Color Panel provides several color map options. File Menu Option Load DICOM Data... Load Local Data... File Menu Description Identical to the function of 'Ctrl+D', this option opens the Data Browser window from where a set of CT projection data may be loaded. Note that the Browser opens with the 'CT Projection' data filter set. Identical to the function of 'Ctrl+L', this option opens a Windows Explorer browser window. A properly chosen CT projection data set is then loaded into the CT Reconstruction tool. 304 VivoQuant Manual 11/12/2015 Allows the user to save the data in DICOM format both into the selected repository and a local folder. The reconstruction is opened in the VQ. If the Transfer to reconstruction is allowed to finish, this transfer occurs VQ automatically. Save... Settings Menu Option Description Save Settings Saves the current CT Reconstruction Settings The Hounsfield Calibration uses the linear response of the detector at each of the x-ray Hounsfield... operating voltage to calculate dose to an object in terms of Hounsfield units. For more information, please see Hounsfield Calibration. Allows user to enable multiple threads (1, 2, 3, 4, 6, or 8) for performing the CT Reconstruction. Threads Note that it only makes sense to enable as many threads as there are cores available in the computer's processor. Defines the priority given to the CT Thread Reconstruction with respect to other tasks being Priority performed by the CPU. Allows the user to disable the use of normalization in the reconstruction. Disabling normalization Advanced prevents the use of Hounsfield Calibration, but reduces the memory usage required for the reconstruction. For users imaging with the Minerve bed system, Auto Bed this option will automatically remove the Minerve Removal bed from the CT during reconstruction. Help Menu Settings Menu 305 VivoQuant Manual 11/12/2015 The primary feature of the Help Menu is the Expert Settings panel. This panel is only for advanced users and allows several key parameters in the CT reconstruction to be overwritten, including voxel size, voxel volume (both axially and transaxially), Z offset, sampling, threads, and Up scaling. Option Description Allows the user to choose a voxel size in either the X/Y (transverse) or Z (axial) directions that differs Voxel Size from the 3 options (Fast, Standard, Fine) offered in the main CT Reconstruction panel. NOTE: Changing the voxel size may slightly alter the voxel volume. Allows the user to modify the reconstructed volume Voxel either in terms of voxel number or total reconstructed Volume size (in mm). Modifications may be made in either the X/Y (transverse) or Z (axial) directions. Allows the user to shift and restrict the reconstructed Z offset volume to better center features of interest, enabling (disabled) more reasonable resolution times for high-resolution images. Sets the number of rays used by the Exact Cone Sampling Beam Algorithm during the reconstruction. Sets the number of threads used during reconstruction. The optimal value is determined by Threads the number of cores or processors in that particular machine's CPU. Up scaling may be used to reduce an image size by a Up scaling factor 2^N. Smaller image sizes are often more manageable. Help Menu 306 VivoQuant Manual 11/12/2015 BatchCT Tool The BatchCT tool is a useful application which enables the user to select a number of X-ray projection data studies and order them for reconstruction at a later stage. The CT scans are saved in an appropriate batch file and can be left to reconstruct automatically. The parameter settings and file names can be predefined. The BatchCT tool is reached via the Data Browser by right clicking on the CT scan of interest and selecting "send to BatchCT". The BatchCT reconstruction panel is then displayed. This panel provides options for Reconstruction Parameters, Study Details and Repository. The user can define which reconstruction parameters to use (see CT reconstruction above) and can enter details about the study. It is important to label the Study Description box in the Study Details section because this will be the name assigned to the reconstructed data. The repository location is also displayed. To continue with the batching function press OK. BatchCT Tool 307 VivoQuant Manual 11/12/2015 Once the X-ray projection data has been sent to BatchCT, the BatchCT window can be opened by clicking the small white BatchCT icon on the bottom right hand corner of the screen. This window displays all the projection data previously sent for batching and contains various functions to control the process. The BatchCT window is divided into 3 main sections; Job List, Status and Log File. There are icons along the left side of the window for manipulating the batching process. Job List The job list provides a list of the X-ray projection data to be reconstructed. Information about each individual scan is divided into a number of sections. Option Mod Details Patient Description Provides information on the modality used i.e. CT. Displays the batch number ID, the number of projections used and the name of the reconstruction as it will appear when loaded into VQ. This is the name of the folder from which the X-ray projection data was taken. Parameter Status Job List Provides information on the status of the reconstruction. If the status is Running then the reconstruction is underway, if it is Waiting then the reconstruction has yet to begin. The status section will also indicate when it is storing a completed reconstruction and when it is about to start a new reconstruction. 308 VivoQuant Manual 11/12/2015 Status The status of the current reconstruction job along with the total number of scans to be reconstructed is displayed in the Status bar and indicates the percentage of data remaining to be reconstructed. Log file File Menu The file menu in the main window offers the following functions in the BatchCT application. Option Hide Quit Stop Service Start Service Description Hides the Batch CT window from the desktop. Also reached using the Ctrl+H keyboard shortcut. Quits the Batch CT application. Also reached using the Ctrl+Q keyboard shortcut. Stops the Batch CT application. Also reached using the Ctrl+T keyboard shortcut. Starts the Batch CT application. Jobs Menu The batch file can be altered using the icons to the left of the window or via the Jobs menu in the main window. The job icons are located on the left side of the window. Option Pause Status Description Pauses the current reconstruction job. 309 VivoQuant Manual 11/12/2015 StopJob Stops the reconstruction job. Moves the selected projection data up the list of MoveUp studies to be reconstructed. Moves the selected projection data down the list of MoveDown studies to be reconstructed. EditJob Allows you to edit the reconstruction parameters. Deletes the projection data from the reconstruction DeleteJob list. These functions can also be accessed under the Jobs menu in the main window. Additional functions available here include Thread Number, Thread Priority and Show Bubbles. Option Description Thread Sets the number of threads used during reconstruction. Number The BatchCT tool may be given different priority levels. Lower priority means that the tool will run only Thread when the computer is completely idle. A higher Priority priority means that the tool will continue to run even when other processes are occurring. Information bubbles pop up in the task bar as jobs are Show added, completed, etc. This switch controls whether or bubbles not these bubbles appear. Jobs Menu 310 Calibration This tool can be used to evaluate data from several different NanoSPECT calibration measurements, including CT Geometrical, Multi-Pinhole SPECT, and Near Field Flood. It also points to a separate VQ Calibration application. Getting There The Calibration menu is available in the Tools Menu. Function Several calibration measurements are required to calibrate and maintain the NanoSPECT/CT imaging system. The Calibration menu provides options for analyzing: • CT Geometrical Calibrations • Multi-Pinhole SPECT Calibrations • Near Field Flood QC Measurements • Access to the VQ Calibration Application Calibration 311 CT Geometrical Calibration This tool can be used to evaluate CT Geometrical Calibration data. Getting There The CT Geometrical Calibration menu is available in the Tools Menu. If running the VQ Calibration Application, enter the tool by pressing "CT Geometrical Calibration." Function The gantry of the NanoSPECT has a reproducible wobble as it rotates around its axis. The CT Geometrical calibration measures this wobble and generates a file that is used to correct for the wobble in the reconstruction. The calibration data is also used to assess the severity of the wobble and to insure that it does not exceed +/-0.5mm. CT Geometrical Calibration 312 VivoQuant Manual 11/12/2015 A CT Geometrical measurement consists of a set of projection data collected in a circular CT measurement of the Geometrical CT phantom. The orbits of the three metal balls embedded in the Plexiglas of the phantom are used to assess the wobble in the gantry. Example settings for this measurement include 55kVp, 360 projections, 1000ms. The protocol needed to run this measurement is called CT Geometrical and can be found in the Service Protocols section of the Nucline. After collecting the measurement data, it may be loaded into the CT Geometrical calibration panel using the "Open" button described below. The CT Geometrical calibration panel is divided into five sections -- Projections, Orbits, 2nd Order Corrections, Results, and Control. The Projections panel displays the projections collected in the calibration measurement as they are being analyzed. Each of the three metal fiducials is marked by a red, green, or blue circle. The progress of the measurement is also noted in this panel. Function 313 VivoQuant Manual 11/12/2015 The Orbits panel displays the trajectory of the three metal fiducials as the projections are analyzed. The trajectories appear flat in the primary view; however, by drawing a box around a given trajectory it may be expanded to fill the entire panel, providing a more illustrative view. To zoom in on a particular orbit, draw a box by holding down the left mouse button and dragging. Function 314 VivoQuant Manual 11/12/2015 Upon release of the button, the display will show only the selected orbit. To return to the full view, just right-click. The 2nd Order Corrections panel displays an important result of the calibration. This panel plots the axial and transaxial wobble of the gantry as it rotates. It is critical that these values be less than +/-0.5mm to enable successful correction of the gantry motion in the CT reconstruction. The Results panel provides further calibration results, including a mean-square error (MSE) value that represents the deviation of the fiducials from their ideal trajectories. A one-word Quality assessment is provided as well as numerical values for other parameters including the radius of the source (Rs), radius of the detector (Rd), offsets of the source axially (Sz) and transaxially (Sy), and offsets of the detector axially (Dz) and transaxially (Dy). Function 315 VivoQuant Manual 11/12/2015 The Control panel houses four buttons, including • Open -- Opens the Data Browser where a CT Geometrical data set may be selected for analysis. • Close -- Closes the CT Geometrical panel. • Save Calib -- Saves the existing calibration in the format used by the NanoSPECT/CT. • Show Calib Function 316 Calibration - MMP SPECT This tool can be used to evaluate SPECT geometrical calibration data. Getting There The MMP SPECT Calibration tool is available in the Tools Menu. If running the VQ Calibration Application, enter the tool by pressing "Multiplexing Multi-Pinhole SPECT Calibration." Function Several calibrations are necessary to successfully implement multiplexed multiple-pinhole methods in small-animal SPECT. The MMP SPECT panel may be used to analyze four different small-animal SPECT calibrations, including linearity, collimator depth, pinhole offset, and geometrical. The panel is split into eight sections -- Templates, Control, Preview, Output, and a section for each of the four calibrations. There are also several helpful tools in the Menus. To run the tool, hit the "Open" button and select all of the relevant data (should be titled Service^SPECT_0*_CalibName and will consist of 64 Intrinsic Reoslution data sets, 4 Collimated Beam data Calibration - MMP SPECT 317 VivoQuant Manual 11/12/2015 sets, and 1 4-point data set) from the Data Browser. The MMP Tool will read in the calibration data, recognizing which data corresponds to which calibration. The panels for the individual calibrations (see below) display the completeness of the data. Once all necessary data is present, the "Run" buttons are used in succession from the top calibration (Aluminum Grid) to the bottom calibration (Four-Point). Results for each calibration are presented in their respective panels; a description of possible errors is listed in Calibration Failures. After successfully completing the analysis, the result CalibrationData_YYYYMMDD.txt file can be copied into C:\Nucline\Calibrations\CalibrationData.txt to update the calibration information used by the NanoSPECT. Function 318 VivoQuant Manual 11/12/2015 Templates The Templates section controls the input and output files used/generated by the calibration analysis. • Input Template: A previously-generated CalibrationData.txt file may be used as an input template for the data. This feature is particularly useful if partial calibrations (i.e., only a 4-point measurement) have been performed. • Empty Template: As a default, an empty template, designed for use with the Nucline software, is used to generate the CalibrationData.txt file. • Output File: Any name may be specified for the Output file of the calibration analysis. The default name is CalibrationData_YYYYMMDD.txt. • Use Input File: This feature is not yet implemented in the VivoQuant. Please check back soon! Control The Control panel has four buttons for manipulating the MMP Calibration window. Templates 319 VivoQuant Manual 11/12/2015 • Show Calib: Opens the current CalibrationData_YYYYMMDD.txt file for viewing. • Open... : Opens a browser that is to be used for loading MMP Calibration data (DICOM format). • Clear: Clears the Output panel of the MMP Calibration window • Close: Closes the MMP Calibration window. The Calibrations Four different MMP calibrations may be analyzed with this tool. For each calibration, Preview, Details, and Run buttons are provided. Preview allows the user to view the images for that particular calibration in the Preview panel. Details provides information about each calibration. Run performs the analysis of that measurement. Additionally, the orbits from the 4-point calibration may be displayed using the Orbits button. Aluminum Grid Measurement / Linearity Check Data for the Aluminum Grid Measurement is collected with a device containing 16 carefully-positioned holes. The collimated beam source holder (see NanoSPECT/CT documentation) is placed in each hole. The resulting 16 point images are used to analyze the linearity of the detector. Collimator Depth The collimator depth phantom is used to collect data for the collimator depth calibration. This calibration was once used to determine the distance from the detector plane to the pinhole plane, however, it is now out-of-date and is turned off by default. It may be turned back on using the "Enable ColDepth" option found in the MMP Menus. Pinhole Offset (Collimated Beam) The Pinhole Offset calibration evaluates the deviation between the center of the pinhole plane and the center of the detector plane. Templates 320 VivoQuant Manual 11/12/2015 Geometrical Calibration (4-point) The 4-point calibration provides a wealth of geometrical information for the NanoSPECT/CT. This geometrical information is then used by special algorithms to determine the forward model necessary for successful SPECT reconstruction. Calibration failures! In each calibration panel, there are also fields relaying information about the completeness of the data for each head and some quality measure (either Resolution, Linearity, or Quality). The table below includes information about the limits for passing a particular calibration and how to interpret error messages. In each case, "x" designates a head number. For example, in the 4-point calibration, a R1 (as shown in the screen shot) would indicate that the Radius of Rotation for Head 1 was outside the acceptable limits. Calibration Intrinsic Resolution Intrinsic Resolution Intrinsic Resolution Collimator Depth Templates Error Interpretation Message Intrinsic detector Rx resolution Limits >2.4 mm Px Pixel Size <0.97mm or >1.03mm Lx Quality of linearity >30 (A.U.) Detector plane to aperture plane distance Absolute distance between aperture center and detector center (y or z) Absolute aperture offset (transaxial or axial) Absolute detector offset (transaxial or axial) >130.1mm or <134.1mm Hx Collimated Beam Hx 4-Point Ax 4-Point Dx 4-Point Rx 4-Point Q 4-Point B Radius of rotation Overall quality of the calibration Horizontal bed offset >1.5mm >1.0mm >1.5mm >45.9mm or <43.9mm >3.0 (A.U.) >3.0mm 321 VivoQuant Manual 11/12/2015 Preview The Preview panel displays calibration data for a particular calibration (selected using that calibration's Preview button). This panel is useful for checking head order in the 4-point calibration or determining a missing point in the Linearity Check calibration. The slider bar at the bottom allows movement between heads. Aluminum Grid Preview Collimated Beam Preview Four-Point Preview Templates 322 VivoQuant Manual 11/12/2015 Output The Output panel provides a log of the steps being performed. For example, the Output section will inform the user that files have been found, provide the numerical results from the analysis, and help identify potential errors. MMP Menus Several useful fixes and features may be found in the MMP Menus of File, Tools, and Help. MMP Item Menu File File File Templates Function Keyboard Shortcut Identical to the "Open" button in the Control panel, Open Data... this opens a browser to allow Ctrl-O the loading of calibration data files. The ID of the NanoSPECT Basic and # of heads (typically 2 or Ctrl-B Configuration 4) are set in this panel, pictured below. Enable By default, the collimator ColDepth depth phantom is not used in the MMP Calibration 323 VivoQuant Manual File File Tools Tools Templates 11/12/2015 analysis. However, it may be enabled with this checkbox. Used to exit the MMP Exit Ctrl+Q Calibration tool. By default, the collimator depth phantom is not used in Enable the MMP Calibration ColDepth analysis. However, it may be enabled with this checkbox. In the presence of only one single-pinhole aperture, Merge 4-point 4-point data are collected one files head at a time. This tool merges those data into a single file. On some Nucline versions, a slightly modified version of Convert Calib the calibration data is needed. This tool converts File the calibration file accordingly. 324 Near-Field Uniformity The Near-Field Flood Uniformity (NFF QC) is a quality control procedure for monitoring the stability of the PMT gains for each head in the NanoSPECT/CT. To collect NFF QC data, please run the QC SPECT Near-Field Flood (NFF) protocol in the Configuration/QC Protocols panel of the Nucline software. Getting There The Near-Field Uniformity analysis panel may be reached via Tools/Calibration. Function The Near-Field Uniformity tool is meant to analyze NFF QC data for monitoring detector uniformity. To begin the procedure, use the QC SPECT Near-Field Flood (NFF) protocol to collect NFF QC data. Place ~0.5MBq of Tc-99m in as small a volume as possible in a PCR (Eppendorf) tube. Place this tube in the NFF phantom, a specially-designed holder for the Minerve bed. Center the point source in the object space as well as possible (using the images and countrates as a guide). Run the NFF Protocol, rotate 90-degrees, and run the NFF Protocol a 2nd time. Now that data are collected, they may be analyzed using the Near-Field Uniformity tool. The initial NFF panel shows gray areas for each head and an array of buttons. To load the data, press the "Open" button. Near-Field Uniformity 325 VivoQuant Manual 11/12/2015 The data for each head will appear in the appropriate box. To run the analysis, press "Calculate". As the data are analyzed, the screen is grayed out. Progress can be monitored in the "Results" panel shown on the left. Function 326 VivoQuant Manual 11/12/2015 Once the data are analyzed, the (x,y,z) calculated source position will be displayed in the lower-left corner of each "Raw" image. These images are indicated by the appearance of the word "raw" in the upper-right corner. Also, the raw images are displayed when the "All Pre" push-button is selected. The red plus sign on each image indicates the source position with respect to the detector. The corrected images may be viewed by clicking the All-Post button. Ctrl+T may also be used to toggle between the two sets of images. The FOM for each data set is displayed in the lower left corner. A green checkmark in the Results section indicates that the head passed the calibration. A red FOM in the Results section means that the data are questionable and should be sent to a service engineer for further analysis. Finally, to create a PDF containing the pre- and post-correction images, press "Report." Function 327 VivoQuant Manual Function 11/12/2015 328 Dosimetry Calc Whole body dosimetry data can be estimated using VivoQuant's Dosimetry Calc tool in conjunction with the third party application OLINDA (Organ Level INternal Dose Assessment). The Dosimetry Calc tool calculates the cumulative activity per unit activity administered (units in uCi-hr/uCi) which is the required input to the OLINDA application for dosimetry calculations. The cumulative activity per unit activity administered is estimated using the following area under the curve (AUC) method. The tool uses a curve fitting algorithm which fits the experimental isotope's exponential decay curve to the percent injected dose per gram (% ID/g) vs time curve of the experimental data. The AUC is calculated using trapezoidal approximations for experimental measurements, and the remaining AUC is calculated using the analytical solution to the definite integral. The data is then stored in a .CSV file that can be copied into the OLINDA application. NOTE: Before continuing ensure that a "Remainder Body ROI" has been created. This is a required data point for the OLINDA application. Getting There To access the Dosimetry Calc tool the 3D ROI Tool must be active. Go to the Advanced Modules tab, then move down to Dosimetry Calc Function Getting Started Start the tool by selecting 'Export Quantification'. Dosimetry Calc 329 VivoQuant Manual 11/12/2015 Once the tool starts, a spreadsheet will appear and request for you to fill in missing information from the study. This can either be done in VivoQuant or in another spreadsheet software. Tip: It is likely easier to make changes in batch in a spreadsheet software. The column labeled 'Group' asks for the group number. This allows for multiple groups to be used at once. The column labeled 'Time Point' asks for the time point of the study for each frame. The time units can be manipulated using the drop down menu on the bottom left of the window or manually in another spreadsheet software. The column labeled 'Injected Dose' asks for the initial injected dose. Once the spreadsheet is complete, save the information as an easily accessible .CSV file. In VivoQuant you may append an existing .CSV file or start a new one. Using the AUC Calculation Go to the Advanced Modules tab, then select Dosimetry Calc -> AUC Calculation. Getting Started 330 VivoQuant Manual 11/12/2015 Click "Load Spreadsheet" in the top left corner of the dialog box, and call the spreadsheet you created in the last section. In the 'Dosimetry Isotope' drop down menu, select the isotope that was used in the experiment. If the isotope used is not listed, open the file 'isotopes.txt' located in the VivoQuant install directory (default is C:\Program Files\inviCRO\VivoQuant\) and add the isotope information. It is important to ensure you select the correct isotope because the Dosimetry Calc tool uses a curve fit algorithm and extrapolates using only isotope-specific radioactive decay information. Next click "Update Plot" and enter in the initial percent injected doses assumed for each of the ROIs. The Plot should now appear next to the table in the window Using the AUC Calculation 331 VivoQuant Manual 11/12/2015 Click "OK" button at the bottom of the window and save as another .CSV file This data is now ready to be used in the OLINDA software Using the AUC Calculation 332 File Management The Data Browser contains a variety of options for loading, saving, publishing, and printing data. Options include: • Data Manager • Open Data • Append Data • Open raw dat • Open from iPACS • Import ♦ Bruker MR ♦ Multiple Images ♦ RAW ♦ Capture Viewer • Save Data • Sessions onload="javascript:loadFrame()"> File Management 333 Opening Data The Data Browser provides convenient access to files in a DICOM server or any other specified iPACS Browser. Reconstructions can be started from the data browser and files may also be exported. • Getting There • Function ♦ Repository ♦ Filter ♦ Data ♦ Study Browser Getting There Three different methods exist for reaching the Data Browser. The first method is to use the Data Browser thumbnail in the Main Window. The second method is to go to "Data Browser" under the File menu. The third method is to use the keyboard shortcut "Ctrl+D". For more on keyboard shortcuts in VQ, please see Keyboard Shortcuts. Function The Data Browser's main window is split into four regions -- Repository, Filter, Data, and Study Browser. Opening Data 334 VivoQuant Manual 11/12/2015 Repository The repository displays the Data Browser or local folder from which data files are currently being displayed in the Study Browser. See DICOM Configuration for more information on configuring your Data Browser, including the use of projects in an iPACS repository. There is a projects filter within the repository that allows the user to reduce the projects list in order to more easily search for a desired project. There are three ways to filter the project list as described in the following table Filter Option Description Reduces project list to all projects that word contain the given word in their path. !word Function Example Type 'exampledata' in the projects filter to reduce the projects list to all projects with the word 'exampledata' in their path. 335 VivoQuant Manual Reduces project list to all projects that do not contain the given word in their path. 11/12/2015 Type '!exampledata' in the projects filter to reduce the projects list to all projects that do not contain 'exampledata' in their path. An example of a commonly used regular expression** is the choice Reduces project operator, |, which matches either the list to all expression before or the expression projects that after the operator. For example, if the ®exp match the given user types '&exampledata|test' in the regular projects filter, the projects list will expression. reduce to all projects that have the word 'exampledata' and all projects with the word 'test' in their path. Press enter on keyboard to apply the filter. The filtered number of projects over the total number of projects is displayed. For example, the image below displays 2 out of 198 projects with the word 'exampledata' in their path. **For more examples of regular expressions supported by the projects filter, click here. Filter As the database grows, the Filter tool becomes useful for sifting through studies to find just the right one. Options for filtering** include Patient's Name, Patient ID, Study Description, and Study Date. After entering values in these available fields, simply hit the refresh filter settings button to refresh the Study Browser. Want to view all of the data again? Simply hit the clear filter button to empty the fields and hit again to refresh the Study Browser. **Note that filtering uses a Unix-like naming structure. Therefore, if you want to find all studies that begin with Mouse, enter Mouse* in the filter for Patient's Name. In addition, if you wanted to find any study containing I123, enter *I123* in the filter for Patient's Name. Also available in the filter options is the '+' function, used to expand or collapse the entries currently displayed in the Data Browser. The first click will expand all data at the patient/study level; the second click will then expand at the series level; the third click will collapse the series level; the fourth click will collapse patients/studies. Repository 336 VivoQuant Manual 11/12/2015 Before expansion: After one click of the "X button": After the second click of the "X" button: Filter 337 VivoQuant Manual 11/12/2015 Expanding large numbers of datasets can take several minutes. Data The Data section provides several functions for manipulating data, including sorting, finding, and opening. This pull-down menu can limit the data displayed in the Study Browser to a single modality (i.e., CT) or data type (i.e., reconstructions). This button is used to open the data highlighted in the Study Browser. If a single data file is highlighted, it will be opened as the Reference image. If an entire Study is highlighted, the Open button recognizes which data file is the CT and Open sets it as the Reference. Use of the Open button unloads data currently in VQ and replaces it with the highlighted data. More information on the relationship between the Study Browser and the Open button can be found in the Study Browser documentation. This button is used to append the data highlighted in the Study Browser to the data sets already loaded into VivoQuant. For example, if two data sets are selected in the Data Browser and three data sets are already loaded into VQ, Append then appending the two highlighted data sets will cause them to appear as data sets 4 and 5 in the Data Manager. Use the Open button to unload data currently loaded in VQ and replace it with the highlighted data. Enables a search of the Study Browser by looking for user-defined text in one of the Find available columns (Patient's Name, Study Date, Study Description, or patient ID). Allows data from a local folder to be imported into another local folder, database, or iPACS Import repository. Allows data to be copied to a local folder. Export If checked, a pre-defined shift will be applied to Apply default reconstructed SPECT data when it is opened. See shift Reorientation for more details on setting default shift values. If checked, CT and NM reconstructions will Auto-start begin automatically when the Open button is reconstruction applied to projection data in the Study Browser. Force planar By default, data with voxel widths greater in the Show data type: Data 338 VivoQuant Manual 11/12/2015 z-dimension than in the x and y dimensions will be interpolated to have isotropic voxels when the Open button is applied. To prevent interpolation from being performed on data with non-isotropic voxels, check 'Force planar.' Data Formats Data with *.dcm, *.dc3 or *.dicom extensions are supported in the Data Browser by default. To edit this setting and to configure loading in extension-less data from the Data Browser navigate to the DICOM Settings page. Study Browser The Study Browser displays the data found in the selected Repository. The Filter, Show Data Type, and Find options can be used to limit the data displayed in the Study Browser. In all cases, the data is opened with either the Open button or the Append button. The Open button will unload data currently open in VQ and load the highlighted data as Reference, Input 1, Input 2, etc. The Append button will leave the currently loaded data unchanged and append the highlighted data. This appended data may be accessed via the Data Manager. At the top level, multiple files may be opened into the Main Window simultaneously. The Data Browser recognizes the files in the study and opens them accordingly, setting the CT image as the Reference. If extra data is found, the Data Browser provides the message, "Ignoring extra data sets." At the next level, single data sets from a study may be selected for viewing. This nested structure continues, depending on the format in which the data is saved. For example, for CT data saved in Single Frame format, single slices may be selected for viewing. Data 339 VivoQuant Manual 11/12/2015 "Ctrl-click" and "Shift-click" options are also implemented to simplify data selection. This feature is useful both for selecting subsets of studies to load into the Main Window and also for selecting large groups of studies to Export. Right-Click function The right-click function of the Data Browser is used as a shortcut for opening/exporting CT or NM data and sending it to a batch job (HiSPECT or BatchCT for SPECT and CT data, respectively), reconstruction or DICOM dump. Finally, when working in a local repository (i.e., a local folder as opposed to data from a database or iPACS server), the right-click option may be used to delete data. To use this function, highlight either the CT or NM data and right-click. A box with a number of functions is then displayed. The options vary depending on the type of projection data selected. Within Database or iPACS Server Right-click on the Helical CT or Helical SPECT scan of interest There are various options depending on the data type available with this tool. Option Description Opens the selected data set in VQ and loads it as the Open data reference (see Open Reference). Export Allows data to be copied to a local folder or to to... another data browser or iPACS repository. Study Browser 340 VivoQuant Manual Open in... Dump Header 11/12/2015 Allows the data to be opened in an external Application. Sends the file to the DICOM dump tool, which displays the information contained in the DICOM headers. Within a Local Repository When working in a local repository (i.e., a local folder as opposed to data from a database or iPACS server), the right-click button may also be used to delete data. Within Database or iPACS Server 341 Open Data The first data set loaded into VQ is termed the Reference and is so named because it is often a CT image used for anatomical reference. When loading multiple data sets into VQ (i.e., from the Data browser), VQ recognizes CT data and automatically sets it as the Reference. VQ is capable of handling several file formats. Getting There Three different methods exist for opening data. The first method is to use the "Replace Data" or the "Append Data" thumbnails in the Main Window. The second method is to go to "Open Data" under the File menu. The third method is to use the keyboard shortcut "Ctrl+O". For more on keyboard shortcuts in VQ, please see Keyboard Shortcuts. Function Selection of the "Open Data..." option opens a navigation window from which the Reference data set may be selected. Open Data 342 VivoQuant Manual 11/12/2015 File Formats VQ can handle a variety of file formats. The default options include 1. DICOM: *.dcm, *.dicom, 1.* 2. TRaster: *.ras, *.res., *.bin 3. Raw: *.raw 4. Image Files: *.png, *.tif, *.tiff, *.jpg, *.jpeg, *.bmp 5. Other: *.img, *.nii, *.mhd, *.mha, *.fdf, *.dc3, *.vol There also exists an option for displaying "All Files" and not just those with the above formats. Function 343 Append Data The second data set loaded into VQ is termed the input data and refers to the SPECT data. When loading multiple data sets into VQ (i.e., from the Data browser), VQ recognizes SPECT/PET data and automatically sets it as the input file. For dual isotope imaging, two input data sets can be added simultaneously. The VivoQuant software is capable of handling several file formats. Getting There Three different methods exist for appending data. Please note: An initial data set must be loaded into the Data Manager prior to Appending Data. The first method is to use the Open input thumbnail in the Main Window. The second method is to go to "Append Data" under the File menu. The third method is to use the keyboard shortcut "Ctrl+N" to load input 1 and "Ctrl+Shift+N" to load additional inputs. For more on keyboard shortcuts in VQ, please see Keyboard Shortcuts. Function Selection of the "append data" option opens a navigation window from which the input data set may be selected. Append Data 344 VivoQuant Manual 11/12/2015 File Formats VivoQuant is capable of handling a variety of file formats. The default options include: 1. DICOM: *.dcm, *.dicom, 1.* 2. TRaster: *.ras, *.res., *.bin 3. Raw: *.raw 4. Image Files: *.png, *.tif, *.tiff, *.jpg, *.jpeg, *.bmp 5. Other: *.img, *.nii, *.mhd, *.mha, *.fdf, *.dc3, *.vol There also exists an option for displaying "All Files" and not just those with the above formats. Function 345 Open Raw Data This option is used to load the raw data from studies. Getting There To load raw data go to "Open raw data..." under the File menu." Function Selection of the "Open raw data" option opens a navigation window from which the raw data may be selected. Open Raw Data 346 VivoQuant Manual 11/12/2015 Once the raw data has been highlighted a Raw Data Importer window appears which contains information about the data. The dimensions, voxel size, data type and file information are all included. The raw data is imported to VivoQuant by clicking Load Function 347 Sessions Sessions allow the user to save the current working environment of VivoQuant. The exact location in the software is saved along with the image data that is currently loaded in the Data Manager. The operator or tool and parameters being used are saved as well. A session can be saved to the local cache or exported as a compressed zipacs folder structure that can be used to share with colleagues. Getting There A session can be saved, loaded, or exported by selecting the appropriate option under "Session" in the File menu Sessions 348 VivoQuant Manual 11/12/2015 Session Manager The Session Manager allows users to load previously saved sessions, save new open sessions and export sessions to save locally and/or on any iPACS available. When saving a session, users can specify the desired repository and session name for easy sorting later. In addition to saving sessions locally or to a desired repository, users may also associate that saved session with a specific project from within their desired iPACS repository. This allows for more efficient access and organization of various sessions across multiple projects. If exporting the session, specify a location on the local where the compressed zipacs folder will be saved. Session Manager 349 VivoQuant Manual 11/12/2015 To load the compressed zipacs folder later, go to File -> Open Reference. The session GUI displays the name and date of each study and allows for easy sorting of files when loading a previously saved session. Users can click on any session to see a Preview of that session in the window. Right-clicking on a session in the Session Manager allows the user to delete that session, export it as a compressed zipacs folder to a local storage location, or create a Public Link to the session. Public Links can be copied to the user's cliboard and pasted into a report, email etc. Session Manager 350 Help The Help Menu provides access to important information like registration and the manual. • Registration • Debug • Manual • About Help 351 Debug At the time of installation, the "Debugging" option may be selected. This option allows the maintenance of a logfile that may be used to help troubleshoot problems that occur while using VQ. Getting There To enable debugging, go to the "Enable Logfile" option under the Help Menu. Function After selecting "Enable Logfile", a dialog box will appear, prompting you to restart VQ and providing the location of a new vivoquant.log file Upon the next restart of the VQ, this logfile will record all of the operations performed. This record is useful when attempting to troubleshoot or debug problems that arise in the software. Debug 352 Manual A VivoQuant manual has been created to guide the user through all the post-processing functions in a clear and step-by-step manner. Getting There To open the manual go to "Manual" under the Help menu. The keyboard shortcut of F1 can also be used to open the manual. Function Once the Manual is open the user can browse through the different chapters which provide an in depth explanation of all of the post-processing functions and instructions on their use. The different sections covered in the manual are as follows: • Installation • File Management • View • Post-Processing • Tools • Help • Keyboard Shortcuts Manual 353 VivoQuant Manual 11/12/2015 The sections on the left can be viewed in detail by left-clicking on them. This will open up sub sections which can be viewed on the right. Function 354 About Getting There To open the About section go to "About" under the Help menu. Function The About feature provides information about VQ. It informs the user what version of VQ is installed and it provides the contact information for the creator of VQ. It also displays who the VQ program is registered to. It also supplies the web links to the DICOM toolkit and the Qwt project used to help make this program. About 355 VQ Reporter The VQ Reporter Tool is available to users and was designed to assist the user in submitting service and applications reports for review by the inviCRO service team. The tool offers a variety of pre-defined report sequences as well as an option for a manual report. Reports are bundled into zip files and automatically submitted to the appropriate personnel. NOTE: Only information visible in the VQ Reporter window is uploaded when a report is submitted. No personal, confidential, or otherwise hidden information is collected. How to use the VQ Reporter Tool The VivoQuant may be downloaded at VivoQuant.com. To install the software, double-click on the installer icon on the Desktop and follow the default install instructions. To open the VivoQuant double-click on the VQ icon, the option to place the VQ icon on the Desktop is presented during installation. The VQ Help Reporter can be selected from the help menu in the taskbar on the top of the VivoQuant window under "Request Help". Initializing the VQ Help Reporter will save a copy of the session currently in-progress. VQ Reporter 356 VivoQuant Manual 11/12/2015 Most reports will first request a written description of the problem to be included in a text file attached to the report. For all reports, it is possible to add additional files and images using the four "Add" buttons arrayed across the left-hand side of the tool. The "Add Files" button opens a window that can be used to manually select files. Note that multiple files may be selected simultaneously for inclusion in the report. How to use the VQ Reporter Tool 357 VivoQuant Manual 11/12/2015 The "Add DICOM" button opens the Data browser where files may be selected. To load into the Reporter, either press the "Open" button or right-click and choose "Load into Reporter". The "Add Comment" button opens a text dialogue that may be used to add additional written comments to the report. How to use the VQ Reporter Tool 358 VivoQuant Manual 11/12/2015 The "Add Screenshot" button opens a screenshot acquisition dialogue. The dialogue has a capture delay to allow files to be opened or procedures begun prior to acquisition of the screenshot. In addition to the manual "Add"-button options, the pre-defined report options will automatically gather certain files. If we again look at CT Image Quality as an example, we can see that certain X-Ray configuration and calibration files were automatically added to the report. In this example report, we can see these files as well as the description.txt file, system registry files (automatically gathered), example DICOM files, a screenshot, a comment file, and a manually selected "User file". How to use the VQ Reporter Tool 359 VivoQuant Manual 11/12/2015 It is possible to review some low-level items in the Content section by double-clicking on them. For example, in the screenshot above, all System Information collected for the report has been displayed. Images with common extensions (i.e., .png, .jpg, .gif) may also be previewed. Double-clicking on DICOM data will preview the DICOM header using the DICOM Dump tool. It is also possible to rename entries in the Contect section by double-clicking on the top-level element. How to use the VQ Reporter Tool 360 VivoQuant Manual 11/12/2015 Once all of the necessary files, screenshots, comments, and images have been loaded into the report, press "Send" to zip the file and submit it for review by the appropriate inviCRO team member. We also recommend use of the "Save" button to save a copy of the report for internal use. If there are difficulties in sending the file from within the Reporter, please save the zip file to a local machine and then, please email [email protected] with a link to your report. NOTE: A contact email must be included to "Save" or "Send" the report. Please contact [email protected] should you have any questions. How to use the VQ Reporter Tool 361 iPACS Sync The iPACS Sync application is designed for batch two-way data transfers between the WebDisk of a specific iPACS project and a local storage location. Directories and files are synchronized between the source and destination locations and data transfers are authorized by an iPACS user's account permissions. Batch Transfer Data to and from the iPACS Browse the following links to learn more about using iPACS Sync to batch transfer data. • Download latest iPACS Sync Application • Run a Sync Job • Configure a Sync Job Download WebDisk files in batch using iPACS Sync To execute a one time download of all WebDisk data for a particular project, locate the project on the WebDisk and click on iPACS Sync URL located under the Other Links header on the right side of the page. Copy the URL that is provided and open the iPACS Sync client. Go to Jobs->Quick Sync and paste the URL into the window that appears and click OK. The user will be prompted to select a folder to which the data can be downloaded to and stored. Once the folder is selected, click OK to run the job. Download individual files from the iPACS via iPACS sync Downloading individual files using iPACS sync is advantageous for large data sets. To do this, follow the steps described here. iPACS Sync 362 Configure a Sync Job This page contains information on the various steps and options available for configuring an iPACS Sync job: • Create a Sync Job using the Wizard • Configuring Additional Settings • iPACS Setup • Directory Setup • Scheduler • Notifications • Advanced • Store Job Create a Sync Job using the Wizard To create a new job, click Create New Job at the top of the iPACS Sync application window. This will launch the iPACS Sync Job Wizard, which will guide you through the process of setting up a Sync job. 1. Specify the iPACS URL or IP address in the iPACS Address field. Previously used addresses are available by clicking the arrow at the right of the text field. 2. Enter the username and password to use for the Sync. Data transfers adhere to the roles associated with an iPACS user's account. 3. After entering the required information, click Next. 4. The wizard will attempt to download and install the sync key file for the specified iPACS. If for some reason the wizard is not able to download the key, it can be accessed via a web browser on the home admin page. The admin page is only available to users with the admin role. 5. Once the Sync Key is installed, click Next. 6. Specify the direction of the Sync. 7. Provide the complete path to the local directory to use in the Sync. 8. Select the project on the iPACS to use for the Sync. Configure a Sync Job 363 VivoQuant Manual 11/12/2015 ♦ The button will retrieve a list of projects on the iPACS, which can be selected by clicking the arrow to the right of the text field. ♦ The path of the iPACS project can also be manually entered in the iPACS Project field (e.g. /project/testing_wc). 9. The WebDisk folder for the selected project will automatically be entered into the WebDisk Folder field. Subfolders can be selected by clicking the arrow to the right of the text field. 10. After entering the required information, click Next. 11. A summary page shows all the selected settings for the new Sync job. 12. Enter a name for the Sync job, then click Finish. The Sync job is now created, and will be run immediately. Further settings can be configured, as described in the following sections. Configuring Additional Settings The iPACS Sync Config window allows you to manually create new Sync jobs and edit the configuration settings of existing jobs. To access the iPACS Sync Config window, click on the wrench icon on the left side of the main window. Create a Sync Job using the Wizard 364 VivoQuant Manual 11/12/2015 Select the job to configure from the Open drop-down, or enter a name and click Create to create a new Sync job. iPACS Setup Make a job active or inactive. Specify the iPACS URL or IP address in the Hostname field. Data transfers adhere to the roles associated with an iPACS user's account. If the username and password information are not provided here, the application will prompt for a username and password before every data transfer iteration. Click the configuration button to automatically obtain the sync key file from the iPACS if necessary. Directory Setup Specify the direction of the Sync. Provide the complete path to the local directory to use in the Sync. Select the project on the iPACS to use for the Sync; the button will retrieve a list of projects on the iPACS, which can be selected by clicking the arrow to the right of the text field. The WebDisk folder for the selected project will automatically be entered into the WebDisk field. Subfolders can be selected by clicking the arrow to the right of the text field. Configuring Additional Settings 365 VivoQuant Manual Setting Delete local files after transfer Delete after 11/12/2015 Description Files that have been successfully transferred to the server are deleted locally. This feature is potentialy dangerous and could lead to LOSS OF DATA if not used properly. Schedule when files are removed from source location. Scheduler Create a schedule for when a Sync job will run. Setting Description Specify how often a Sync job runs while the Scan interval application is open. A Sync job will automatically start whenever a new Autosync changes folder is added to the top level folder. Only during scheduled A Sync job will automatically start at the time scan interval specified on the days selected. Notifications Directory Setup 366 VivoQuant Manual Setting Message Notifications SMTP Server Port Username Password From Recipients 11/12/2015 Description Turn on Message Notifcations and specify what type of messages are sent. Contact your IT department for the server address. Normally can be found in the settings tab of your Email Client. Contact your IT department for the server address. Normally can be found in the settings tab of your Email Client. Username used associate with your email account. Authorization to access your email account. Email account from which the notification will be sent. Notifcaitons will be sent to the provided email addressess. Advanced Include or exclude files by specifying their extension. (e.g. *.dcm *.img *.hdr *.txt *.png). Filter is applied recursively through the subfolders of the top-level folder. The user can also provide files containing which file names, file extensions, and/or folders to include or exclude. Example text files would include the following: Include: + 2009*/ + *.csv Exclude: -* In this example, all folders beginning with 2009 and all csv files within those folders would be included in the transfer. All other files would be excluded. Notifications 367 VivoQuant Manual Setting Verbose Compression Filename charset Sync deleted files Keep newer files CVS Exclude Always Prompt for download destination (global setting) 11/12/2015 Description Print more detailed log messages. Data is compressed before sending. Specify as US-ACII, ISO-8859-1, UTF-8 or disable this feature. Remove remote files that are no longer available locally. This feature is potential dangerous and could lead to LOSS OF DATA if not used properly. Modified files at destination end will not be overwritten. Ignore all version control hidden files (.svn folder) when resotring files via iPACS sync. User will be asked to specify download destination for each file downloaded via iPACS sync from the iPACS. Store Job Click Save at the bottom of the window to save any changes to the Sync configuration. Click Cancel to discard all changes since the last time the configuration was saved. Return to the Top . Advanced 368 iPACS Sync GUI The following sections describe how to run an iPACS Sync job: • Run a Sync Job • Icon Descriptions • Quick Sync Run a Sync Job Sync jobs are created / modified in the configuration window. To run a job, select the appropiate job and click Run. Icon Descriptions Icon Description Pause a Sync Job Run all active Sync Jobs Stop a Sync Job Open the configuration page Open the help guide Quick Sync This feature is a simple way to quickly download all files from a WebDisk folder, or it can facilitate the transfer of large amounts of data from the iPACS to a local location. To download all files and folders in a WebDisk folder, follow these steps: 1. Navigate to the desired WebDisk folder on the iPACS. 2. Click iPACS Sync URL under Other Links on the right side of the page. 3. Copy the URL to the clipboard. iPACS Sync GUI 369 VivoQuant Manual 11/12/2015 4. In the iPACS Sync client, go to Jobs -> Quick Sync, then paste the URL. 5. Select a folder where the iPACS files will be saved. 6. The iPACS Sync client will run a job to transfer all files and folders from that WebDisk folder to the specified location. To download select files from the iPACS, follow these steps: 1. Select the desired files from the Browser or WebDisk, then right-click one of them and select iPACS Sync. 2. A 'browser.irsync' file will be downloaded. 3. In the iPACS Sync client, open the 'browser.irsync' file by going to Jobs -> Quick Sync File, then selecting the file. 4. Select a folder where the iPACS files will be saved. 5. The iPACS Sync client will run a job to transfer the selected files to the specified location. Quick Sync 370 Troubleshooting Should you run into any issues with VivoQuant, please contact us at <[email protected]>, consider using our Service Reporter, and check out the list of trouble shooting categories below: Trouble shooting categories • Service Reporter: Gather information (automatically and manually selected) to send a service/support report. • Memory: Solve memory issues on Windows 32-bit systems • Debugging: View VQ debug messages and/or activate log file • Saving images/movies: Solve issues saving images or movies • Logfile: Where to find the VQ logfile • Mac OS X stability: Solve stability issues, especially during the upload of ROIs, due to the limit on file descriptors allowed by a program Service Reporter The VivoQuant Service Reporter is the easiest and most efficient way to report issues you run into: Troubleshooting 371 Memory configuration Windows 32-bit Please consider using a 64-bit operating system to avoid memory problems To allow VivoQuant to access the entire Windows memory, please add a /3GB switch to your local C:\boot.ini start-up file as shown below: [boot loader] timeout=30 default=multi(0)disk(0)rdisk(0)partition(1)\WINDOWS [operating systems] multi(0)disk(0)rdisk(0)partition(1)\WINDOWS="MS WinXP Prof." /noexecute=optin /fastdetect /3GB Please note, the file is a Windows system file and might be hidden. Please use the Windows folder settings to remove this filter or ask your local administrator for assistance. To open and change the boot.ini file please follow these instructions: 1. On the Desktop, right-click on My Computer and then Properties 2. Go to the Advanced tab 3. Click on Settings under the Startup and Recovery panel 4. Where it says, To edit the startup options file manually, click Edit, click Edit 5. Add /3GB (slash 3 G B) to the end of the line as shown above After this change, the system has to be restarted. For a detailed description of the /3GB switch see Microsoft's knowledge base: A description of the 4 GB RAM Tuning feature and the Physical Address Extension switch. Windows 64-bit The memory available to VQ is only limited by the physically available RAM in your PC. Mac OS X The Mac OS X version of VQ is also making use of 64-bit wide addressing, and thus the limit available is only limited by the physically available RAM in your Mac. Memory configuration 372 Debug At the time of installation, the "Debugging" option may be selected. This option allows the maintenance of a logfile that may be used to help troubleshoot problems that occur while using VQ. Getting There To enable debugging, go to the "Enable Logfile" option under the Help Menu. Function After selecting "Enable Logfile", a dialog box will appear, prompting you to restart VQ and providing the location of a new vivoquant.log file Upon the next restart of the VQ, this logfile will record all of the operations performed. This record is useful when attempting to troubleshoot or debug problems that arise in the software. Debug 373 Saving 3D ROI Images/Movies Known issues with graphics card On Windows 64-bit, there is a known issue with the Intel G45/43 Express Chipset graphics card. 3D ROI renderings will save as blank images or movies. To download the fix, please download the driver here. Saving 3D ROI Images/Movies 374 VQ Keywords /23ABCDEFGHIJKLMNOPQRSTUVWZ • Patlak Analysis (Patlak Plot) / • /3GB 2 • 2D Drawing Tools • 2nd Capture 3 • 3D and 2D Automatic Options • 3D and 2D Manual Options • 3D Segmentation Tools A • About • ACQ_NSxx_DCMSRV • Adding to Reference Library • Adding VQ as a DICOM Client • Alpha version • Anonymizer • Append • Append Projections • Apply default shift • Automatic Non-Linear Registration • Automatic Slice-by-Slice Non-Linear Registration • Axial Sliders B • Batch Mode Reconstruction • BatchCT Tool • BatchTool Generator • Beta version • Bias Field Correction VQ Keywords 375 VivoQuant Manual 11/12/2015 • boot.ini C • Cache • Calibration failures! • Calibration failures! • Capture Viewer • Captures • Change Delay • Choosing the ROI type • Choosing the View Direction • Color Controls • Color Maps • Configuration • Confirm Configuration • Control • Control • Controls • Convert • Coronal • Cross-hairs • CT Geometrical • Customize Analysis Pipeline • Cutting and Quantification Table Control D • Data • Data • Data Browser • Data Browser Repository Panel • Data Formats • Data Loading • Data Manager • Data to Quanti Calc • Data to SpectAct Calc • Data to SUV Calc • DataList Object • DataManager Object • DB path • DCMDICTPATH • Debug • Delete an ROI. • DICOM • DICOM • DICOM B 376 VivoQuant Manual 11/12/2015 • DICOM Cache • DICOM Dump • DICOM Editor • DICOM Peers • DICOM Repository • DICOM Repository • DICOM Secondary Capture • DICOM server • DICOM server • DICOM Settings • DICOM Settings • DicomRepository Object • Dictionary • Display • Displayed Name • Displays • Downloading Sample Library E • ECG Split • ECMAScript • Edit • Edit an ROI. • Enable Logfile • Expert Settings F • File Formats • File Drop Down Menu • File Formats • File Menu • Filter • Find • Folder Filter • Function • Function G • Getting There • Getting There • Getting There • Getting There • Getting There D 377 VivoQuant Manual 11/12/2015 H • Help Menu • Hide an ROI. • HiSPECT • HiSPECT • HiSPECT Reconstruction • HiSPECT_BATCH • How to configure the NanoSPECT's DICOM Servers • How to make a dynamic movie • How to Set a Default Image Shift I • Image to Capture • Image to Poster • Image View • Info • Install Atlas • INTERVIEWXP • INVIVOSCOPE • iPACS Projects • iPACS server • iPACS server • iPACS Servers • IPACSWebDisk Object J • JavaScript • Join Frames to Movie K • Known issues with graphics card L • Landmark-based Co-Registration • Load Data into the Tool • Local DICOM folder • Logan Graphical Method (Logan Plot) • Logan Non-Invasive Graphical Method (Logan reference plot) H 378 VivoQuant Manual 11/12/2015 M • Mac OS X • MainWin Object • Memory configuration • MinMaxTool Object • MIP Rotation Speed • MIPController Object • MIPViewer Object • MMP Menus • MMP Menus • Models • MPR View • MPR View • Multi View • Multi View • Multi-Pinhole SPECT • Multi-Planar Reconstruction N • Network • nih_fire color map • Noise Suppression • NSxxWS_DCMSRV O • One-Tissue Compartment Model (1TCM) • Open • Optimized local access • Output • Output • Overview P • Painting Tools • Placeholders • Playing a MIP Movie • Plot data • Preprocessing Tool • Preview • Preview • prism color map • Profile M 379 VivoQuant Manual 11/12/2015 • Projects • PSF Manager Q • Quantification Database • Quantification Options • Quantification Table Options • Quantification Tables R • Raw • Reconstruction Parameters • Registration • Relabel Study • Release candidate • Rename DICOM Files • Repositories • Repository • Repository Type • Reset an ROI. • Right-Click function • ROI Creation and Deletion • ROI Loading, Saving, and Quantification Tools • Run DicomProxy • Run the Tool • Run Tool and View Log • Running a Batch Job S • Sagittal • Save as default • Save Calibration.txt • Saving • Saving 3D ROI Images/Movies • Secondary Capture • Segmenting With The Tool • Select an Output Repository • Select Images • Server Options • Settings • Settings Menu • Show data type: • Simplified Reference Tissue Model (SRTM) P 380 VivoQuant Manual 11/12/2015 • Simplified Reference Tissue Model 2 (SRTM2) • Slice View • Slice View • SliceViewer Object • sliceViewer Object • sliceViewer Object • sliceViewer Object • sliceViewer Object • sliceViewer Object • sliceViewer Object • sliceViewer Object • sliceViewer Object • Sliders • SPECT • SPECT reconstruction • Split Movie Into Frames • Stable version • Study Browser • Sum Projections • Sync Pos. T • Templates • Templates • The Calibrations • The Calibrations • The Quantification Table • The VQScript Toolbar • Tile View • Transversal • TRaster • Troubleshoot • Troubleshooting • Troubleshooting • Two-Tissue Compartment Model (2TCM) U • Undo/Redo Functionality • Using the Tool V • Versions (alpha, beta, rc, stable, patch) • Via ITK S 381 VivoQuant Manual 11/12/2015 • ViewControl Object • Volume Rendered Image • Volume Rendering Controls • Volume Rendering Parameters • VQ Object • VQScript • VQScript Example Scripts • VTK Viewer • VTKController Object • VTKViewer Object W • Windows 32-bit • Windows 64-bit • Windows XP Z • ZipArchive Object Last updated: Thu Nov 12 17:17:28 2015 V 382