Download USER GUIDE - Wisdom Associates

Transcript
USER GUIDE
CONTENTS...
Thuraya XT 01 Before you start
Certification information (SAR) 1
Precautions for Thuraya XT
8
FCC Compliance Statement
2
Unpacking your Thuraya XT
11
For your safety
4
Thuraya XT
11
Battery Information 6
The function of the keys
12
Taking care of your Thuraya XT 6
Certification information (IP54, IK03)
7
Thuraya XT 02 Getting started
Introduction
15
HPA (High-Penetration Alerting) 16
Initial steps
Inserting SIM card Connect the charger and charge the battery Switch the Thuraya XT On/Off Enter your PIN
Emergency call (SOS) Setup wizard
Lock/Unlock the keypad
17
17
18
18
18
19
19
Display
Display layout
Display symbols
Key action
Default shortcuts
Useful shortcuts Making and receiving calls
1. Making a call
2. Receiving a call
High-Penetration alerting
Options during a call Handling more than one call simultaneously
(Conference calls)
20
20
21
22
22
24
24
25
25
26
Thuraya XT 02 Getting started
Write a new Message
Traditional text input
Predictive text input
Change language
Dictionary
27
28
29
29
Thuraya XT 03 Using the menu
1. Contacts
1.1
1.2
1.3
1.4
1.5
1.6
1.7
Search Add Contact
Group
Speed dial Copy Delete Memory Status 2. Navigation
2.1
2.2
2.3
2.4
2.5
2.6
2.7
Current position Continuous position Waypoints Location tracking
Setting Helper
Qiblah & Prayer
33
33
34
35
36
36
36
37
38
39
40
40
41
42
3. Call logs
3.1 Call logs 3.2 Delete
3.3 Call Duration 4. Organizer
4.1
4.2
4.3
4.4
4.5
Alarm Calendar
Calculator Stopwatch World time
5. Messaging
5.1
5.2
5.3
5.4
5.5
5.6
New message
Inbox Draft Sent messages Outbox Templates
43
43
43
44
46
47
47
48
48
50
51
51
51
51
Thuraya XT 03 Using the menu
5.7 Settings 5.8 Info message
5.9 Memory status 5.10 Delete messages 6. Sound settings 7. Settings
7.1
7.2
7.3
7.4
7.5
7.6
7.7
7.8
Phone
Call
GmPRS
Language
Time/Date
Data connection Setup wizard
My numbers
52
53
54
55
55
56
57
62
63
64
65
65
66
8. Network
8.1 Network mode
8.2 SAT Registration
8.3 Preference
9. Security
9.1
9.2
9.3
9.4
9.5
9.6
9.7
9.8
9.9
PIN1 code
Security code
Change codes
Fixed dialing
Closed User Group
IMEI Number Software version
Soft reset
Factory reset
66
67
67
68
68
69
69
70
71
71
71
71
Thuraya XT 04 Additional Information
Troubleshooting
75
PIN & PUK
86
Quick access codes 76
PIN2 & PUK2
86
Access codes
86
86
Security code 86
Barring code 01 Before you start
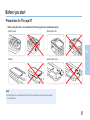
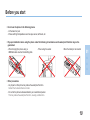
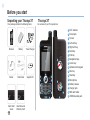
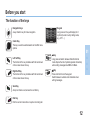
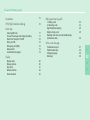
Thuraya XT I 01 Before you start
Certification information (SAR) 1
Precautions for Thuraya XT
8
FCC Compliance Statement
2
Unpacking your Thuraya XT
11
For your safety
4
Thuraya XT
11
Battery Information 6
The function of the keys
12
Taking care of your Thuraya XT 6
Certification information (IP54, IK03)
7
01
02
03
04
01
Before you start
Certification information (SAR)
THIS DEVICE MEETS INTERNATIONAL GUIDELINES FOR EXPOSURE TO RADIO WAVES
Your wireless Thuraya XT phone is a radio transmitter and receiver. It is designed and manufactured not to exceed the limits for
exposure to radio frequency (RF) recommended by international guidelines (ICNIRP). These limits are part of comprehensive guidelines
and establish permitted levels of RF energy for the general population. The guidelines include a substantial safety margin designed to
assure the safety of all persons, regardless of age and health.
The exposure guidelines for mobile devices employ a unit of measurement known as the Specific Absorption Rate or SAR. The SAR
limit stated in the ICNIRP guidelines is 2.0 watts/kilogram (W/kg) averaged over ten grams of tissue. Tests for SAR are conducted using
standard operating positions with the device transmitting at its highest certified power level in all tested frequency bands. The actual SAR
level of an operating device can be below the maximum value because the device is designed to use only the power required to reach the
network. That amount changes depending on a number of factors such as how close you are to a network base station. The highest SAR
value under the ICNIRP guidelines for use of the device at the ear is 0.291W/kg
Use of device accessories and enhancements may result in different SAR values. SAR values may vary depending on national
reporting and testing requirements and the network band. Additional SAR information may be provided under product information at
www.apsat.co.kr
1
Before you start
FCC Compliance Statement
Your mobile device is also designed to meet the requirements for exposure to radio waves established by the Federal Communications
Commission (USA) and Industry Canada. These requirements set a SAR limit of 1.6W/kg averaged over one gram of tissue.
The Highest SAR value reported under this standard during product certification for use at the ear is 0.457W/kg
01
02
03
04
2
01
Before you start
Caution
This equipment generates or uses radio frequency energy. Changes or modifications to this equipment may cause
harmful interference unless the modifications are expressly approved in the instruction manual.The user could lose
the authority to operate this equipment if an unauthorized change or modification is made.
RoHS
This product is in compliance with EU RoHS Directives and manufactured using lead-free solder paste and parts.
3
Before you start
Please read carefully and make yourself familiar with the safety measures and user instructions in this manual before you start using
your Thuraya XT. This will help you to get the most out of your Thuraya XT.
For your safety
01
The following guidelines will help you to use your Thuraya XT safely.
SWITCH ON SAFELY
Do not switch on the phone where wireless phone use
is prohibited or when it may cause interference or
danger.
SWITCH OFF IN AIRCRAFT
SWITCH OFF IN HOSPITALS
SWITCH OFF WHEN REFUELING
Follow any restrictions that are advised in a
hospital Switch off the phone near medical equipment.
03
Obey all local laws. Always keep your hands free to
operate the vehicle while driving. Your first
consideration while driving should be road safety.
INTERFERENCE
All wireless devices may be susceptible to
interference, which could affect performance.
02
ROAD SAFETY COMES FIRST
04
Follow any restrictions.
Wireless devices can cause harmful interference to
aircraft’s navigation and communication systems.
Do not use the phone at a refueling point.
Do not use near fuel or chemicals.
4
01
Before you start
SWITCH OFF NEAR BLASTING
USE SENSIBLY
QUALIFIED SERVICE
ENHANCEMENTS AND BATTERIES
BACK-UP COPIES
CONNECTING TO OTHER DEVICES
Follow any restrictions.
Do not use the phone where blasting is in progress.
Only qualified personnel may install or repair this
product.
Remember to make back-up copies or keep a written
record of all important information.
EMERGENCY CALLS
Use only in the normal position as explained in the
product documentation.
Do not touch the antenna unnecessarily.
Use only approved enhancements and batteries.
Do not connect incompatible products.
When connecting to any other device, read its user
guide for detailed safety instructions.
Do not connect incompatible products.
Ensure the phone function of the device is switched on and in service. Press the end key as many times as needed to clear
the display and return to the start screen. Enter the emergency number, then press the send key. Give your location to an
emergency call center. Do not end the call until given permission to do so.
5
Before you start
Battery Information
Use only the Thuraya approved battery pack and Thuraya approved chargers for your phone.
• Do not short-circuit the battery. Short-circuiting the terminals may damage the battery or the connecting object.
• Do not expose to temperatures exceeding 90 degrees Celsius.
• Please dispose of the battery in accordance with local regulations.
Taking care of your Thuraya XT
01
Your device is a product of superior design and craftsmanship and should be treated with care.
The suggestions below will help you protect your warranty coverage.
02
• Keep the device dry. Liquids or moisture can contain minerals that will damage electronic circuits. If your device does get wet,
remove the battery immediately and allow the device to dry completely before replacing it.
• Do not use or store the device in dusty or dirty areas. Its moving parts and electronic components can be damaged.
• Do not store the device in hot areas exceeding 90 degrees Celsius. High temperatures can shorten the life of the device and
damage batteries.
• Do not store the device in cold areas. When the device returns to its normal temperature, moisture can form inside the device and
damage electronic circuit boards.
• Do not attempt to open the device other than as instructed in this guide.
• Use only the supplied or an approved replacement antenna. Unauthorized antennas, modifications, or attachments could damage
the device and may violate regulations governing radio devices.
• Always create a backup of data you want to keep (such as contacts and calendar notes) before sending your device to a service
facility.
03
04
6
01
Before you start
Certification information (IP54, IK03)
Your Thuraya XT has acquired the dust protection certification (IP5x), waterproof certification (IPx4)
and impact protection certification (IK03) to give you the most rugged Thuraya phone ever.
• Dust Protection (IP5x)
This unit is graded at the dust protection level 5 which contributes to the phone reliability in dusty environments.
• Waterproof (IPx4)
This unit is graded at the waterproof level 4 protecting against splashing waters.
• Impact Protection (IK03)
This unit is graded at the impact protection level 3 ensuring your Thuraya XT phone can withstand impacts of up to 0.35 joule.
7
Before you start
Precautions for Thuraya XT
• Before using this phone, check whether the following parts are assembled properly.
- Bottom cover
- Earset jack cover
01
- Battery
02
- Antenna jack cover
03
04
Note
●● If these parts are not attached properly, this may cause water or dust ingress resulting
in a malfunction.
8
01
Before you start
• Before using this product, make sure the following parts are clean. If there is a foreign substance (such as dust or hair)
on a part, it may reduce the waterproof function or cause a malfunction.
- Bottom cover
- Earset jack cover
- Antenna jack cover
Note
●● If the rubber part of the above parts is damaged, contact the Customer Service Center.
• Do not use this phone under the following circumstances.
- Exposed to rain for a while
This may cause a malfunction.
- Sunk under water or used in water
This may cause a malfunction.
- Open, close, attach or disassemble a cap or battery with wet hands
This may cause a malfunction.
- Use in a sandy beach
Sand may get inside the phone, causing a malfunction
9
Before you start
• Do not use the phone in the following places.
- At the beach or pool
- Places with high temperatures such as spa, sauna, bathroom, etc.
• Pay special attention when using the phone under the following circumstances as the waterproof function may not be
guaranteed.
- When charging the phone using a
USB/Data cable or when transmitting data
- When using the earset
- When the battery is not inserted
01
02
03
04
• Other precautions
- Any impact on this phone may reduce the waterproof function.
Contact the Customer Service Center.
- Do not let the phone be disassembled by an unauthorized person.
This may reduce the waterproof function, causing a malfunction.
10
01
Before you start
Unpacking your Thuraya XT
Your package contains the following items:
Thuraya XT
An overview of your Thuraya phone:
1
1
2
3
4
2
Handset
Battery
5
Travel Charger
6
7
8
14
3
9
10
11
Earset
Data Cable
Support-CD
4
6
8
12
5
9
7
13
16
14
10
15
11
13
Quick Start
Guide
11
User Manual &
Warranty Card
16
12
15
17
17
SAT antenna
Earset jack
Screen
Left soft key
Right soft key
Send key
End key
Navigation keys
Center key
Alphanumeric keypad
Star key
Hash key
Microphone
Battery release
Charger jack
SIM card holder
USB/Data cable jack
Before you start
The function of the keys
Navigation Keys
4-way direction key for menu navigation.
Center Key
This key is used to select/unselect and confirm menu
options.
Left Soft Key
The function of the key correlates with the text shown
on the screen above the key.
Right Soft Key
The function of the key correlates with the text shown
on the screen above the key.
Keypad
Long press on 0 key will display the ‘+’
symbol (to enter country calling codes,
e.g. +971…)
Key
Long press will switch between Silent & Normal
mode. Opens the list of symbols (special characters)
when writing messages like SMS or E-Mails.
Key
Press and hold to lock the keypad.
Switch between numbers and characters when
writing messages.
Send Key
Accept or initiate a call, access the call history.
End Key
End the current connection or reject an incoming call.
12
01
02
03
04
02 Getting started
Thuraya XT I 02 Getting started
Introduction
15
HPA (High-Penetration Alerting) 16
Initial steps
Inserting SIM card Connect the charger and charge the battery Switch the Thuraya XT On/Off Enter your PIN
Emergency call (SOS) Setup wizard
Lock/Unlock the keypad
Display
Display layout
Display symbols
Key action
Default shortcuts
Useful shortcuts 17
17
18
18
18
19
19
20
20
21
22
22
Making and receiving calls
1. Making a call
2. Receiving a call
High-Penetration alerting
Options during a call Handling more than one call simultaneously
(Conference calls)
Write a new Message
Traditional text input
Predictive text input
Change language
Dictionary
24
24
25
25
26
27
28
29
29
01
02
03
04
02
Getting started
Introduction
Your Thuraya XT Satellite Phone is a powerful and compact phone offering total convenience and mobility across Thuraya’s coverage
area. Its superiority is reflected in the integration of two technologies in one handset: satellite (SAT) and GPS, offering you an
unmatched combination of quality and performance.
To achieve the best connection in SAT mode, please consider the following:
- The antenna should be fully extended during incoming and outgoing calls.
- The SAT signal indicator reflects the strength of the connection with the Thuraya satellites.
- SAT communication requires clear space without obstructions such as buildings, trees and mountains.
Please check the actual Thuraya coverage map at www.thuraya.com.
15
Getting started
HPA (High-Penetration Alerting)
The Thuraya system features a ‘High-Penetration Alerting’ capability that allows you to be notified of incoming calls even when your
Thuraya XT has poor signal coverage. When the Thuraya XT receives a High-Penetration Alerting signal it will alert you with an ‘early
ring’ and a special display message (see page 25).
To answer the call, you must immediately extend the antenna and move the Thuraya XT into a position that has a clear ‘line of sight’
to the satellite. When this has occurred the Thuraya XT display will change, prompting you to answer the call and proceed with the
conversation. If the call is not answered promptly after the High-Penetration Alerting signal is received, the calling party will be diverted
to voice mail and/or an announcement stating that you are not available to answer.
Similar to GSM, the satellite coverage area is divided into many different regions. The phone searches the network automatically (see
page 67) and determines which service region is active by registering its presence with the Thuraya system. If the Thuraya XT has not
been able to update this registration due to a weak signal, the registration information will become out of date or ‘stale’. This is indicated
on the display by a blinking SAT icon in the left of the signal strength indicator. This condition will clear automatically once signal
conditions improve and a call is made or a period of time elapses. You also have the option to speed up that procedure by manually
having the Thuraya XT register with the Thuraya system. This is accomplished with the function SAT Registration in the Thuraya XT’s
menu (see page 68). Make sure you have good SAT signal strength before using this function.
16
01
02
03
04
02
Getting started
Initial steps
Inserting SIM card
To insert the SIM card:
• Switch off the Thuraya XT and remove the battery.
• Insert the SIM card as shown below.
17
Connect the charger and charge the battery
You should charge the battery supplied with your Thuraya XT as
soon as possible to obtain full battery charge.
To charge the battery:
• Fit the correct country specific adapter into the charger.
• Open the cover on the bottom of your phone.
• Plug the charger into the charger jack.
• Connect the charger to an AC source.
While the battery is charging you can observe the
symbol
changing to
cyclically. The battery is fully charged after
approximately 2 hours and 30 minutes. The charger stops charging
automatically when the battery is full. As long as the charger is not
disconnected it restarts charging after a while to keep the battery fully
charged.
You may still use the Thuraya XT while charging the battery.
The internal clock for time, date (see page 65) and alarms (see page
46) will still keep running for about two hours if neither the battery nor
the charger is connected, but no alarm will sound unless a charged
battery is connected.
Getting started
Switch the Thuraya XT On/Off
Emergency call (SOS)
• Press
for 3 seconds to switch the Thuraya XT on.
Emergency calls are permitted without entering a PIN code.
• Press
for 3 seconds again to switch the Thuraya XT off.
Enter your PIN
The PIN (Personal Identification Number; 4 to 8 digits) is initially
supplied together with the SIM card by your service provider and
can be changed at a later stage (see page 69).
• Enter the PIN code using the keypad.
Each digit entered is displayed as an ( ).
• Press the center key to confirm the PIN.
To make an emergency call before having entered the PIN
Press the left soft key
(SOS) and dial the emergency number.
Or:
Enter a specific emergency number and press the center key .
The soft key SOS is available even:
●● When the SIM card in your Thuraya XT is not valid.
●● When you have a valid SIM card but no roaming with the
selected service provider is possible.
After entering the correct PIN code, you can make an emergency
call in the same way as you make a ‘normal’ call.
Note
●● If more than 3 wrong PIN codes were entered the phone will be
locked and can only be accessed with the PUK code.
18
01
02
03
04
02
Getting started
Note
Lock/Unlock the keypad
●● Emergency calls may not be possible on all cellular telephone
The keypad may be locked so that a number cannot be
accidentally dialed.
Calls can be received while the phone is locked.
networks or when certain network services are in use.
●● In uneven terrain or close to large buildings, the operating range
can be limited, affecting the connection.
Emergency numbers normally are: 112, 118, 119, 911, 999
Check with your network service provider for local emergency
numbers in your area.
To lock the keypad
• Long press the hash (#)
key
.
Setup wizard
Use the Setup wizard to set the basic details of the phone when you
initially switch on your Thuraya XT phone.
If you decide to skip the Setup wizard you can access it later in
the Settings menu.
For more details, refer to Setup wizard menu in Settings.
(see page 57)
19
To unlock the keypad
1. Press the right soft key
.
2. Press the hash (#) key
within 3 seconds.
3. If press the hash (#) key
is not pressed
within 3 seconds, the keypad will remain
locked.
Getting started
Display
Display layout
Display symbols
Indicator line
Network information
Signal type
SAT
HPA
Roaming
Time & Date line
Available soft key functions
The structure of the display areas is as follows:
•The indicator line shows mainly symbols which inform you about
the operating conditions of the Thuraya XT.
•The main area shows data relating to calls, menu and their
submenus and displays the editors for the contacts and SMS.
In idle mode (standby), the network name, time and date are displayed.
•The soft key line operates together with the left soft key
, the
right soft key
and the center key beneath this line.
The functions of the soft keys will change according to the menu
where you are using them (see page 21).
01
Battery strength
Battery almost discharged
Low battery
02
Battery good
Battery full
03
04
HPA strength (High-Penetration Alerting, see page 25)
–
HPA Low signal - HPA High signal
Signal strength
SAT signal 1
SAT signal 2
SAT signal 3
SAT signal 4
SAT signal 5
20
02
Getting started
Call status
Active call
Mute
Key action
The actions on the screen for each keypad input are as follows:
Ciphering (call encryption) is off
(This icon appears when the encryption function
between the phone and the network does not work,
and users can be more cautious.)
GmPRS Paused
Left / Right direction
GmPRS Connecting
(blinking icon during a GmPRS connection)
While sending to and receiving data from an external device
Up / Down direction
Phone status
Unread SMS
Silent
Schedule
Voice mail + SMS
Voice mail
Alarm
SMS inbox full
Call divert
Soft key commands
21
Select, Menu, Option
OK, Save, View, Search…
Back, Clear
Ok
List
Speed dial
Edit
Save
Search
Undo
View
To go back to idle screen while
in another menu
Getting started
Default shortcuts
Useful shortcuts
There are four basic shortcuts to the following menus from the
idle screen.
Use shortcuts to quickly get the most from your device. Refer to
the relevant sections in this user guide for further details of the
functions.
Organizer: In the idle screen, press the
up navigation key
Navigation: In the idle screen, press the
left navigation key
Contact search: In the idle screen, press the
down navigation key
Messaging: In the idle screen, press the
right navigation key
Add contact
•Enter the number from the idle screen and press the
center key (
).
Select Save location and generate Contacts by following the menu.
Delete contact
•Menu > 1. Contact > 1. Search > Select Contact to delete >
Option > 6. Delete > 1. Yes
Current position (My GPS information)
•Menu > 2. Navigation > 1. Current position
The information will be displayed within five to ten seconds.
•To save the current GPS information: Option > 1. Save >
Enter Name > OK
•To send the current GPS information via SMS: Option >
3. Send via SMS > Enter Name > Enter Recipients > Send
22
01
02
03
04
02
Getting started
Setting Alarm
•Menu > 4. Organizer > 1. Alarm > 2. Alarm1 > Select Day,
press the center key > Enter Time > Select AM/PM > Select
Ringtone > Select On/Off > Save
Setting Ringtone
•Menu > 6. Sound setting > 1. Ringtone > Select Ringtone >
press the center key
•However, the ringtone configured at Menu > 1. Contacts >
3. Group > Option > 3. Group ringtone overrides the basic ringtone for the incoming calls to the numbers included in Contacts.
23
Setup wizard
•The basic phone settings can be done at once.
•Menu > 7. Settings > 7. Setup wizard > Time > Date >
Auto update > Select location > Language, and eZiText choose
whether to copy the contacts in the SIM to the Phone.
Setting Network
•Auto searching (Search for network with strongest signal and register):
Menu > 8. Network > 1. Network mode > 1. Automatic > Return
to the idle screen and network searching will be performed.
•Manual searching (display all searched networks and the user
selects the preferred network): Menu > 8. Network >
1. Network mode > 2. Manual > Requesting pop-up >
Select preferred network > Requesting pop-up > idle screen
Getting started
Making and receiving calls
In order to make a call, you must be connected to a network and
have an adequate SAT signal.
1. Making a call
1. Enter a phone number using the keypad.
2. Press
.
3. To end the call press
.
To make an international call, press
until the + symbol
appears. Once it is displayed, enter the country code without the
leading 0’s. When entering a number, press
once to input *
symbol, press
twice to input P and press
three times to
input W.
Note
Definition of the function P and W
●● P (pause) 2.5 - 3.0 seconds:
P function automatically sends DTMF tones without user intervention about three
seconds after connecting to the ARS number entered by the user for the convenience
of the use of ARS frequently used by the user. (Example) Dialing 150P123 connects
to the number 150, and selects 1, 2, and 3 of ARS options automatically.
●● W (wait) (Wait for specific user events):
(Example) The key sequence “114w1 w 2 w 5 =>Send” will dial the number
114, and sends DTMF tones corresponding to 1, 2, and 5 sequentially
each time the user press
after connecting to number 114.
2. Receiving a call
An incoming call is indicated as follows:
●● You will hear the selected ringtone.
●● A flashing
is displayed.
●● The number of the caller will be displayed on the screen
(if the number is transmitted). If the number is stored in the
contact list the corresponding name will be displayed.
01
Accept a call
Press
.
02
03
Reject a call
Press
or
04
.
Mute the ringing
Press
.
Note
●● To reject an incoming call during another call press
.
●● Sound volume during a call can be increased/decreased by using
.
24
02
Getting started
High-Penetration alerting
Options during a call
You cannot receive an incoming call if the SAT signal in your
Thuraya XT is not sufficient. In this situation, a message box with
“SAT call find improved reception” and a special ringtone will be
heard and signal indicator on the left top of the screen will be
changed from HPA to SAT signal.
Your Thuraya XT offers a number of options which are only
available during a call. You cannot use all of these features
at all times, because they vary depending on the individual call
situation.
You cannot receive calls in High-Penetration
Alerting mode.
Please move to a place of better SAT signal
to accept the call.
To receive calls in HPA mode:
1. Move to a place with an improved signal.
2. Fully extend the antenna of your Thuraya XT.
3. As soon as the signal strength is strong enough the HPA
warnings disappear from the display.
Now you can accept the call as usual by using
.
25
Put a call on Hold:
You can interrupt a call temporarily without
shutting down the connection.
Muting/Unmuting the microphone:
You can switch off the microphone so that
the caller is not able to hear you.
Getting started
Handling more than one call simultaneously
(Conference calls)
Incoming call:
When Party1 is receiving a call from Party3, while talking with Party2,
Party1 can ‘accept; or ‘reject’ the call from Party3. If the call is rejected,
the conversation between Party1 and Party2 is not affected. If the call is
accepted, Party2 is put on hold and Party1 is connected to the call from
Party3. Using the option menu, Party1 can swap over Party2 and Party3,
or operate a multi-party call up to 6 users including Party1.
Outgoing call:
If Party1 wants to make a call to Party3, while talking with Party2,
using the option menu puts Party2 on hold and enters Party3’s phone
number.
To include Party2 in the conversation with Party3, select Multiparty call
from the option menu. Party2 and Party3 can be swapped over. Up to
6 users including Party1 can have a conversation simultaneously.
Connect a private call:
You can isolate a party from the multiparty call and talk
exclusively with this ‘private call’. The other parties of the
conference will be put on hold and will not hear what you are
speaking with the private party. You can only have up to two
active calls at one time. Therefore you can select Private only if
your second line is not busy with another call.
01
02
End one call:
You can selectively end only one of the connections during a
multiparty call.
03
04
End all calls at once:
Ending all calls in one step terminates the multiparty call.
All parties will be disconnected from each other and they will hear
the tone for ‘line busy’.
Main Menu:
During a call you can use most of the functions of the Main menu
such as sending DTMF signals, reading/writing SMS.
However, some functions may not be available.
26
02
Getting started
Write a new Message
Press Menu and select Messaging > New message.
ABC , abc , and Abc
indicate the selected character
mode. 123
indicates number mode. The available text input
formats in your Thuraya XT phone are:
Capital
Small
Number
Special Character
Arabic , Farsi, Urdu , Hindi Number
Traditional text input
•Press a number key (1- 9) repeatedly until the
desired character appears. There are more
characters available for a number key than are
printed on the key.
•To insert a number, press and hold the number key.
•To switch between the different character
modes, press
.
•If the next letter is located on the same key as
the present one.
27
Capital + Small
eZiText On
wait until the cursor moves to the right of the character,
(or press
to move the cursor to the right of the character) and
continue to enter the text.
•To erase a character, press
(Clear). Press and
hold
(Clear) to clear all characters.
•To insert a space, press
.
•The most common symbols are available
under the number 1 key.
To insert a symbol, press
and use
to
choose the required symbol.
Getting started
The complete lists of available symbols are shown below.
Predictive text input
You can enter any letter with a single keypress by using predictive
text input (eZiText).
eZiText is based on a built-in dictionary to which you can also add
new words.
You can add up to 60 new words to the dictionary.
●● To activate predictive text input, press
and hold.
●● To write the desired word, press the keys 2 – 9. Press each
Note
●● Differentiating capital and small character is supported only with
Latin languages.
●● When using eZiText capital/small character status is not shown.
●● To switch eZiText on or off press (for a few seconds).
key only once for one letter. For example, to write “Phone”,
press 7 for P, 4 for h, 6 for o, 6 for n and 3 for e.
The word suggestion changes after each keypress.
The suggested word can be changed to upper or lower case by
pressing
.
28
01
02
03
04
02
Getting started
Change language
Your Thuraya XT supports 12 system and input languages.
Supported languages are:
1. English
2. French
4. Italian
5. Spanish
7. Turkish
8. Russian
10. Arabic
11. Hindi
3. German
6. Portuguese
9. Farsi
12. Urdu
●● To change the input language, press Option
and select Input Language.
The input language can be switched to another
language by pressing and holding
.
However switching between English and
another language is possible only when a
language other than English is configured as an
input language from Settings > Language >
Input language.
29
Dictionary
You can add up to 60 new words into the eZiText engine, and the
added words will become part of the vocabulary of eZiText to be
searched and suggested.
You can find Dictionary in the Option of the following menus: Add
contact, New message, Add calendar.
To register a new word
●Option > Add: Add a word to the dictionary
by using traditional text input. You can enter
up to 30 characters.
Getting started
To change the registered word
●● Option > Edit: Edit the word using traditional
text input.
To delete the registered word
●● Option > Delete: To delete the registered
words.
01
02
Note
03
●● When you press Option, the following options appear:
04
Input Language, 123, Symbol
30
03 Using the menu
Thuraya XT I 03 Using the menu
1. Contacts
1.1
1.2
1.3
1.4
1.5
1.6
1.7
Search Add Contact
Group
Speed dial Copy Delete Memory Status 2. Navigation
2.1
2.2
2.3
2.4
2.5
2.6
2.7
Current position Continuous position Waypoints Location tracking
Setting Helper
Qiblah & Prayer
3. Call logs
3.1 Call logs 3.2 Delete
3.3 Call Duration 4. Organizer
4.1
4.2
4.3
4.4
4.5
Alarm Calendar
Calculator Stopwatch World time
33
33
34
35
36
36
36
37
38
39
40
40
41
42
43
43
43
44
46
47
47
48
5. Messaging
5.1 New message
5.2 Inbox 5.3 Draft 5.4 Sent messages 5.5 Outbox 5.6 Templates
5.7 Settings 5.8 Info message
5.9 Memory status 5.10 Delete messages 6. Sound settings 7. Settings
7.1
7.2
7.3
7.4
7.5
7.6
7.7
7.8
Phone
Call
GmPRS
Language
Time/Date
Data connection Setup wizard
My numbers
8. Network
8.1 Network mode
8.2 SAT Registration
8.3 Preference
48
50
51
51
51
51
52
53
54
55
55
56
57
62
63
64
65
65
66
66
67
67
9. Security
9.1
9.2
9.3
9.4
9.5
9.6
9.7
9.8
9.9
PIN1 code
Security code
Change codes
Fixed dialing
Closed User Group
IMEI Number Software version
Soft reset
Factory reset
68
68
69
69
70
71
71
71
71
01
02
03
04
03
Using the menu
1. Contacts
Use this menu to save and configure contacts
in your address book.
1.1 Search
Use the search function to look up names in your contact list.
You can either
●● Scroll the contact list with the up or down navigation keys
.
or
●● Enter the name using the keypad (like writing a message):
mostly you only need to enter the first couple of letters.
33
1.2 Add Contact
There are different ways to add new contacts:
Option 1
1.First enter a number while being in idle screen and then save
the number in your contact list by pressing the center key .
2.Choose whether to save the contact on the phone or on the
SIM card.
3.Select the type of the entered number .
4.Enter Name.
5.Select Group.
6.After entering all necessary contents, press the center key to
save.
Option 2
1.In idle screen press the left soft key
to access Menu.
2.Scroll to Contacts and select.
3.Scroll to Add contact and select
4.Enter Name and Number, E-mail and Group.
5.After entering all necessary contents press the center key
save.
to Using the menu
1.3 Group
Option 3
In SMS viewer, Option > Save as a contact
In Missed calls list, Option > Save to contacts
In Received calls list, Option > Save to contacts
In Outgoing calls list, Option > Save to contacts
An easy way to manage contacts in your
contact list is using the Group function. This
will allow you to set specific Ringtones for
every Group and to send SMS to all Group
members.
01
02
Functions supported in Group:
1.To change the Group name use
Option > Edit Group Name
2.To view the contacts included in a specific Group use
Option > Group Member
3.To change the Ringtone of the selected Group use
Option > Group ringtone
4.To send an SMS to all members of a Group use
Option > Send SMS
03
04
34
03
Using the menu
1.4 Speed dial
You can use the number keys
for speed dialing, and a
phone number needs to be assigned to each number key for this
purpose.
1. Press the left soft key
from the standby mode, select
Contacts, and then select Speed dial.
2. Move to the desired speed dial key 2 - 9, and assign the key
by pressing Option or OK.
Assign
Select > Assign
3.Search the name or phone number using the menu navigation
keys, and press OK.
4.If more than one number is stored, select the desired name
using the menu navigation keys.
5.After assigning the numbers to the speed dial keys, you can
call the number, change the number, or reset its assignment to
the speed dial keys.
35
To make a call using a speed dial key:
There are two ways of making a call when numbers are assigned
to the speed dial keys.
1.Press the Speed dial key and press
if you are in the Speed dial menu mode.
2.Press the Speed dial key for at least 2 seconds in the idle screen mode.
Using the menu
1.5 Copy
Every time you save a contact you can choose whether to save the
number directly on the phone or on the SIM card. If you want to copy
entries from one location to the other use the Copy function.
Select if you want to use
●● SIM to Phone
●● Phone to SIM
1.6 Delete
Deletes contacts saved on the phone or the SIM card.
Choose whether to delete all contacts at once or individually.
●● Phone
●● SIM
●● Phone & SIM
01
02
After that you can choose if you want to copy
●● Only one contact
●● All contacts
03
04
1.7 Memory Status
Shows the total space used and the number
of contacts saved in your phone and your SIM
card.
Up to 255 contacts can be saved in the
phone. The number of contacts that can be
saved in the SIM card varies depending on
the type of SIM card and the service provider.
36
03
Using the menu
2. Navigation
Use the Navigation function to determine your
current position, the direction and distance to
a destination or track your position by sending
GPS data to a PC or laptop.
2.1 Current position
You can determine your current position using
the GPS (Global Positioning System) of your
Thuraya XT.
Menu > 2. Navigation > 1. Current position
After receiving your current GPS data you can use the
following options:
1.To save your current position as a Waypoint (see page 39) use.
Option > Save
2.To compare your current position with a previously saved
Waypoint (which will give you the relative position) use
Option > Relative position
3.To transmit your current position via SMS use
Option > Send via SMS
4.To transmit your current position to a PC or laptop
(while being connected via data cable) use
Option > Connect to PC
Note
●● The connection settings and the data cable should be connected
before selecting start.
37
Using the menu
2.2 Continuous position
While moving with your Thuraya XT you can use the function
Continuous Position to continuously update your GPS position.
This includes latitude, longitude, altitude, UTC, satellite count, your
current speed PDOP (Position Dilution of Precision) and your current
compass direction.
By using the left or right navigation keys
you can switch
between the data view and the compass view.
Menu > 2. Navigation > 2. Continuous position
While retrieving your Continuous Position you can use the
following options:
1.To save your current position as a Waypoint use
Option > Save
2.To compare your current position with a previously saved
Waypoint (which will give you the relative position) use
Option > Relative position
01
02
3.To transmit your current position via SMS use
Option > Send via SMS
4.To transmit your current position to a PC or laptop
(while being connected via data cable) use
Option > Connect to PC
03
04
Note
●● The connection settings and the data cable should be connected
before starting.
38
03
Using the menu
2.3 Waypoints
You can create waypoints in order to save the GPS data of your
current position or you also can enter a waypoint manually if you
know the GPS data of a particular position.
These waypoints can be used for searching the reference point in
physical space. Up to 200 waypoints can be saved.
1.To show the information of the selected waypoint
Option > View
2.To Search the waypoints
Option > Search
3.To generate a new waypoint by specifying the latitude and
longitude information
Option > New
4.To changes the name of the selected waypoint
Option > Rename
5.To delete the selected waypoint
Option > Delete
6.The waypoint and the current location will be compared when
one waypoint is selected.
Two waypoints will be compared when two waypoints are
selected.
Option > Relative position
39
7.To start the navigation to the selected waypoint as the
destination.
Option > Start navigation
8.To transmit the selected waypoint via SMS.
Option > Send via SMS
9.To transmit the selected waypoint to a PC or laptop
(while being connected via data cable)
Option > Connect to PC
Using the menu
2.4 Location tracking
The function of location tracking shows waypoints in your phone
or sends them to a PC at regular intervals as configured in
Tracking time (2.5.2).
2.5 Setting
●● 2.5.1 Format
The GPS information can be shown in six formats: DD.ddddd,
DD/MM/SS.ss, DD/MM/SS, DD/MM.mm, MGRS, and UTM.
01
●● 2.5.2 Tracking time
Functions supported in Location tracking:
1.To show the tracked waypoints in your phone
Start > ON (Phone)
You can select tracking intervals from 1 Second to 1 Hour.
02
Please note that only 200 waypoints can be saved. (If you select 1
Second interval, the tracking will stop after 200 seconds.)
03
04
1.1 Start
Starts tracking the location of the phone.
1.2 View
Shows the information of saved tracks (up to 10 tracks).
1.3 Delete
Deletes information of saved tracks.
2.To send the tracked way points to a PC
Start > ON (PC)
40
03
Using the menu
2.6 Helper
In case of an emergency you can send an SMS with your current
GPS position to predefined receivers.
To deactivate the Helper, short press the right soft key
●● 2.6.1 How to use the Helper
Long press the right soft key
●● 2.6.2 Edit
Set the list of predefined receivers by entering their phone
numbers. You can enter a number manually or you can select
from your contact list (if you already saved numbers there).
again.
to activate the Helper.
If you select a name from the phonebook and save it, the name is
displayed in the list.
41
Using the menu
2.7 Qiblah & Prayer
●● 2.6.3 Emergency SMS
Activate or deactivate the Emergency SMS.
Provides information about the Islamic prayer direction (Qiblah)
and prayer timings.
01
●● 2.6.4 Message setup
Write your predefined message that will be sent in
case of an emergency.
●● 2.6.5 Timer setup
Choose the frequency of outgoing messages in case of an emergency
(every 3 minutes to every 2 hours).
02
03
Qiblah & Prayer supports the following sub-functions:
1.Receive prayer timings in your area.
Option > Update time
2.Receive prayer direction in your area.
Option > Muslim faith
3.Set Qiblah & Prayer alarm
Option > Prayer reminder
4.Get a new Qiblah position
Option > Find Qiblah
04
42
03
Using the menu
3. Call logs
In the Call logs the history of your phone calls
can be shown.
3.2 Delete
Choose whether to delete
●● Missed calls
●● Received calls
●● Outgoing calls
●● All
3.1 Call logs
Choose whether you want to view
●● Missed calls
●● Received calls
●● Outgoing calls
Each log can store up to 20 records and shows
call duration and time of call.
43
3.3 Call Duration
Choose whether to show the call duration for
●● Last call
●● Received calls
●● Outgoing calls
●● All calls
Using the menu
4. Organizer
Contains the applications Alarm, Calendar,
Calculator and Stopwatch.
●● 3.3.1 GmPRS volume
Choose whether to view the data volume for
●● Last session
●● Sent data
●● Received data
●● All data
01
4.1 Alarm
●● 3.3.2 Reset
To delete the entries press Reset and choose if you want to
delete
●● Voice entries
●● GmPRS entries
●● All entries
With your Thuraya XT, you can set a Wake-up call, Alarm 1 and
Alarm 2.
●● 4.1.1 Wake up call
Current Time
Alarm Sound
Alarm Time
Shows the status of Alarm
Shows the status of Auto Power
44
02
03
04
03
Using the menu
4. Turn On/Off the alarm with the navigation
keys
.
Alarm settings
1. Select a day of the week with the
navigation keys
.
(Multiple selection possible)
2. Enter the time with the navigation keys
3. Select an alarm sound with the
navigation keys
.
45
.
5.Turn On/Off the Auto Power with the
navigation keys
.
Note
●● If the Auto Power is activated, the phone will turn on at the alarm time automatically to produce the alarm sound even when the phone is turned off.
Using the menu
4.2 Calendar
6. Press Save to apply the change
●● 4.1.2 Alarm 1 and Alarm 2
To set Alarm 1 or Alarm 2 follow the same instructions.
Please note that for Alarm 1 and Alarm 2, the Auto power On/Off
function is not available.
To switch off Alarm:
1.Press the left soft key
(Stop) to end the alarm.
2.Press the right soft key
(Snooze) if you want the alarm
to repeat. The alarm repeat function remains as previously
configured.
Day with an entry
Currently selected date
Currently selected date with content
Today
01
02
1.Add an entry at the selected date
Option > Add
2. View the entry on a selected date
Option > View or press the center key
03
04
3. Delete all entries
Option > Delete All
To delete entries by date, please use the Delete in calendar view
4. Go to a specific date
Option > Go to date
Press
to go back one month before today
or press
to jump to the next month.
Press
to go back one year before today
or press
to jump to the next year.
5.Set the first day of the week in your region.
Option > Settings Week starts on
46
03
Using the menu
4.3 Calculator
4.4 Stopwatch
Add
The Stopwatch can store up to 20 lap times.
Start/Stop/Resume
Subtract
Back/Lap/Reset
Multiply
Divide
Show result
Delete entered figure
Short-press for Dot (decimal point)
Long-press for % Operation
Press for - (Minus) Operation
47
Jump to previous lap time
(if there is any)
Jump to next lap time
(if there is any)
Using the menu
5. Messaging
4.5 World time
Selecting Organizer > World time will show the
world time in reference to the selected city. Select
your city with the navigation keys
and press
the center key to save it. You will see that the
world time is aligned in reference to the selected
city next time you enter the world time menu.
You can access the messaging menu from the
idle screen with the right navigation key
.
Choose whether to send a message as SMS,
Fax, E-mail or ERMES.
01
5.1 New message
Note
●● World time is calculated based on the set local time.
Therefore incorrect local time will result in incorrect world time.
Single page SMS is limited to 70 (Arabic Group languages) or
160 (Latin Group languages). Your Thuraya XT supports
multi-page SMS.
The message sent with multi-page SMS will be shown as a single
message, but it might be split into multiple messages in some
terminals that do not support the concatenated message.
48
02
03
04
03
Using the menu
Sending messages
You can compose a text message, and send the message to
more than one recipient at the same time.
1.Enter the message.
You can compose a message with one of 12 input languages,
symbols and numbers from the Option menu.
Note
●● Press the (*) key for symbol entry, (#) key for
switching between number and text, and Option > 9. eZiText
automatic word completion function for the convenience of text
input (see page 27).
2.Select the transmission option.
By default, the message will be sent
with the options configured in Menu >
5. Messaging > 7. Settings.
The sending option for the current message can be changed in the Option >
5. Sending options of the message
editor.
49
3.Add the numbers of the recipients.
Select Option > 2. Add recipients. The composed message
can be sent to up to 20 recipients simultaneously.
4.Select Option > 1. Send to transmit the message.
Using the menu
5.2 Inbox
Your inbox can store up to 150 messages on the phone and
around 150+ messages on SIM card (depending on the type of
SIM card). New SMS or voicemail messages are indicated in the
status bar with a
or
icon (the latter showing the number of
messages). If both phone storage and SIM storage are full
will
appear on the idle screen (to receive further messages please
delete saved messages first).
Message status in your Inbox:
Unread SMS on SIM
Read SMS on SIM
Unread SMS in your phone
Read SMS in your phone
To open a message press the center key
Voicemail message
A message that indicates the arrival of a new voicemail.
To connect to voice mailbox to check voice mail, enter 1# and
press
from the idle screen, or press
(speed dial number)
for a long period.
The voice mail box number can be saved or changed in Menu >
7. Settings > 2. Call > 4. Voice mail.
Speed dial can be configured in Menu > 1. Contacts >
4. Speed dial to assign the number 1 key
to voice mail.
Message details
Use this menu to check
- Time and date
- Sender's number
- Delivery status of your message.
01
02
03
04
.
50
03
Using the menu
5.3 Draft
If you don't want to send a message immediately you can save it
in the Draft folder:
Press Save after writing your message.
Menu > 5. Messaging > 3. Draft
5.4 Sent messages
Successfully transmitted messages are saved in the Sent
messages folder.
You can save up to 150 sent messages on the phone. The
number of sent messages that can be stored on the SIM card
varies depending on the type of SIM card.
Menu > 5. Messaging > 4. Sent messages
51
5.5 Outbox
Messages that are currently sent or were not yet delivered
successfully will be shown in the Outbox. After sending, they will
be moved to the Sent messages folder. With the Outbox auto
resend function, your Thuraya XT automatically resends
messages in your Outbox. Up to 50 messages can be stored in
your Outbox.
Menu > 5. Messaging > 5. Outbox
5.6 Templates
If you are frequently sending messages using the same text you
can predefine message-templates.
Your Thuraya XT comes with 15 default templates. You can
predefine additional 10 own templates.
Menu > 5. Messaging > 6. Templates
Using the menu
5.7 Settings
●● 5.7.3 Delivery report
●● 5.7.1 Service center
The service center number provided by the service provider must
be stored in order to send the message. The phone is configured
to use the service center number stored in the SIM card by
default. Up to five service center numbers can be stored and only
one of these numbers can be configured to be used.
To set the service center numbers
1. Menu > 5. Messaging > 7. Settings > 1. Service center.
2.Select the location to store the number and press the center key to enter into Edit screen.
3.Enter the number provided by the service provider.
4.Press the left soft key
to save the number.
5.Move the cursor to the number to be used and press the left soft key
to complete the setting.
You can request a delivery report from the network for the sent
SMS (network service).
Menu > 5. Messaging > 7. Settings > 3. Delivery report
●● 5.7.4 Validity
If the receiver's phone is switched off or in an area out of coverage, the message will be stored at the SMS server and resent
according to the validity settings:
1 hour to Maximum storage time
Menu > 5. Messaging > 7. Settings > 4. Validity
●● 5.7.2 Format
SMS can be sent through Text, Fax, E-mail, or ERMES service
provided by the service provider by changing the SMS format.
Menu > 5. Messaging > 7. Settings > 4. Format
52
01
02
03
04
03
Using the menu
5.8 Info message
●● 5.7.5 Request reply
Request a reply from the receiver.
Menu > 5. Messaging > 7. Settings > 5. Request reply
●● 5.7.6 Bearer selection
Your Thuraya XT supports two different transmission modes.
The transmission mode is set to SMS server by default. Big SMS
can be sent more efficiently by selecting GmPRS mode in the
network that supports GmPRS.
Menu > 5. Messaging > 7. Settings > 6. Bearer selection
53
Info message is a network service. It offers wide topics such as
weather, traffic, news flash etc. in text message form. You can
choose specific topics according to your interest.
To save a Topic
Info messages can be received by setting Topic.
1. Menu > 5. Messaging > 8. Info message > 4. Topics.
2.Option > Insert.
3.Enter the channel ID (topic category identifier) provided by the
service provider, and press the left soft key
.
4.Enter topic title and select Option > 1. Save to save the topic.
Using the menu
5.9 Memory status
To receive Info message
In Info message menu:
1.Status is set to Off by default. Set the Status to On.
2.Select Language and move the cursor over
the language to receive from the configured
Topic, and press the left soft key
to make
a selection.
3.Select Topics, enter the channel ID and
title to receive, and save.
4.Select the list of generated list of Topics, and perform Mark by
selecting Option > 5. Mark/unmark.
Shows the total and the used memory of the phone and the SIM
card.
- The maximum storage space available in the phone is 450 (Inbox: 150, Draft: 100, Sent: 150, Outbox: 50).
- The maximum number of messages on the
SIM card depends on your SIM type.
Menu > 5. Messaging > 9. Memory status
01
02
03
04
54
03
Using the menu
6. Sound settings
5.10 Delete messages
Deletes all the messages in a selected folder. All messages can
be easily deleted by pressing the center key .
Menu > 5. Messaging > 7. Settings > 10. Delete messages
Configuration of all sound settings in your
Thuraya XT.
1.Choose your Ringtone and select it with the center key
2.Adjust the volume with the left of right navigation key
3.Choose the ringing type of your Ringtone.
4.Set the keypad tone.
5.Set the keypad volume.
55
.
.
Using the menu
7. Settings
Configuration of the basic settings of your
Thuraya XT.
7.1 Phone
●● 7.1.1 Wallpaper
To choose the background of your idle screen choose your favorite
Wallpaper. Navigate with the left or right navigation key
and
select your desired Wallpaper with the center key .
●● 7.1.2 Greeting message
Set the Greeting message that will appear on the screen every
time you switch on your Thuraya XT.
Menu > 7. Settings > 1. Phone > 2. Greeting message
●● 7.1.3 Backlight
The backlight of your Thuraya XT can be configured to be
- Always On
- On for 15 or 30 seconds
●● Please consider that the backlight configuration affects the
battery lifetime.
01
●● 7.1.4 Brightness sensor
02
The brightness of the LCD changes in three levels depending on
the brightness level of your current environment. If the Brightness
sensor is switched off you can manually set the brightness of the
display.
Menu > 7. Settings > 1. Phone > 4. Brightness sensor > Off or On
●● 7.1.5 LCD contrast
Manually set the backlight of your LCD in five
steps. Press the navigation keys
to choose
the proper brightness and save with the center
key .
56
03
04
03
Using the menu
7.2 Call
You can set the basic configuration for incoming and outgoing
calls.
●● 7.2.1 Call waiting
Call waiting allows you to receive an incoming call during an
active call by either holding or ending the active call to get the
waiting call. If you want to use this function, you must subscribe
to the corresponding service provided by the service provider.
57
●● 7.2.2 Call divert
This function diverts incoming
- voice calls
- data calls
- fax calls
to a specific number.
7.2.2.1 Voice
Set voice call diversions
7.2.2.1.1 All Voice:
This function diverts all voice calls to a specific
number.
Menu > 7. Settings > 2. Call > 2. Call diverting >
1. Voice > 1. All voice
Using the menu
7.2.2.1.2 Busy:
Incoming calls will be diverted while engaging in another call.
Choose whether to divert the call to your voice mailbox or set a
specific number.
Menu > 7. Settings > 2. Call > 2. Call diverting > 1. Voice > 2. Busy
7.2.2.1.4 Unreachable:
Incoming calls will be diverted when your Thuraya XT is switched
off or outside of the coverage area. Choose whether to divert the
call to your voice mailbox or set a specific number.
Menu > 7. Settings > 2. Call > 2. Call diverting > 1. Voice >
4. Unreachable
7.2.2.1.5 Clear divert:
Deactivates all divert functions for incoming calls.
Menu > 7. Settings > 2. Call > 2. Call diverting > 1. Voice >
5. Clear divert
7.2.2.1.3 No reply:
Incoming calls will be diverted when you don't answer the call.
Select how long you want to wait until the call will be diverted
(5, 15 or 30 sec.). Choose whether to divert the call to your voice
mailbox or set a specific number.
Menu > 7. Settings > 2. Call > 2. Call diverting > 1. Voice >
3. No reply
7.2.2.2 All fax:
It diverts all incoming fax calls.
Menu > 7. Settings > 2. Call > 2. Call diverting > 2. All fax
7.2.2.3 All data:
Diverts all incoming data.
Menu > 7. Settings > 2. Call > 2. Call diverting > 3. All data
01
7.2.2.4 Deactivates all:
Clear all divert functions.
Menu > 7. Settings > 2. Call > 2. Call diverting > 4. Deactivates all
58
02
03
04
03
Using the menu
●● 7.2.3 Call barring
To use the barring service, you must know the barring password
for the corresponding SIM and you must be subscribed to the
corresponding service provided by the service provider.
7.2.3.1 Outgoing calls
This function is used to restrict all
outgoing calls.
Menu > 7. Settings > 2. Call > 3. Call barring >
1. Outgoing calls
7.2.3.2 International calls
This function is used to restrict international outgoing calls. To activate or deactivate the
function, enter the four-digit barring code, and press the center
key
to connect to the network to complete the setting.
Menu > 7. Settings > 2. Call > 3. Call barring > 2. International calls
59
7.2.3.3 International calls except to home country
This function restricts international calls except to an assigned home country.
Menu > 7. Settings > 2. Call > 3. Call barring >
3. International calls except to home country
7.2.3.4 Incoming calls
This function prevents all incoming calls.
To activate or deactivate the function, enter the four-digit Barring
code, and press the center key
to connect to the network to
complete the setting.
Menu > 7. Settings > 2. Call > 3. Call barring > 4. Incoming calls
Using the menu
7.2.3.5 Incoming calls when abroad
This function prevents incoming calls from foreign countries.
Menu > 7. Settings > 2. Call > 3. Call barring >
5. Incoming calls when abroad
7.2.3.6 Clear barring
Clears call restriction functions.
Menu > 7. Settings > 2. Call > 3. Call barring > 6. Clear barring
●● 7.2.4 Voice mail
Set a new voice mail number
Menu > 7. Settings > 2. Call > 4. Voice mail
●● 7.2.5 Call answering
Set your required answering method when there is an incoming
call.
- Choose if you want to automatically accept a call after 5 or
10 seconds.
- Choose if you want to accept a call either with the center key
(default) or by pressing any key.
Menu > 7. Settings > 2. Call > 5. Call answering
●● 7.2.6 DTMF tone
Set the DTMF tone for ARS call. To enable the function, select
On and press the center key to complete the setting.
Menu > 7. Settings > 2. Call > 6. DTMF tone
60
01
02
03
04
03
Using the menu
●● 7.2.7 Auto redial
If the number you are trying to call is busy you can activate to
automatically redial the number.
Menu > 7. Settings > 2. Call > 7. Auto redial
●● 7.2.8 Send own number
●● 7.2.9 Cost
This service allows you to have cost control of your outgoing
calls.
Please note that the actual cost could be different from the
calculated costs. For accurate cost information please refer to
your operator.
Choose whether you want to send your own number to the
receiver when making a call.
Menu > 7. Settings > 2. Call > 8. Send own number
Note
●● Please note that these settings cannot be changed with some
Service Providers.
61
Note
●● The cost control is a function supported by the SIM card.
Some SIM cards may not have this function.
7.2.9.1 Charge rate
You can set the price per minute according to your price plan.
To enter the price you need your PIN2 code included with your
SIM card packagings.
Press the left soft key
or the center key
and enter your
four-digit SIM PIN2 code to use the corresponding function.
Using the menu
7.3 GmPRS
7.2.9.2 Cost limit
Allow you to set a maximum cost limit. Once this limit is reached no
further calls can be initiated.
Press the left soft key
or the center key
and enter your
four-digit SIM PIN2 code to use the corresponding function.
7.2.9.3 Display cost
Choose whether you want to display the cost information upon the conclusion of calls.
Select On or Off, and press the left soft key
or the
center key .
You can change the settings of your GmPRS connections.
●● 7.3.1 APN
Access point name is required when you
connect to the network service provider.
Access point name can be changed, added,
or deleted.
The default setting is get, and this access
point name can be changed.
Up to three access point name can be
configured. Select only one to use when there are more than one
access point name.
Menu > 7. Settings > 3. GmPRS > 1. APN
●● 7.3.2 Auto reject
This function determines whether to reject the incoming call when
GmPRS connection is active.
To activate this function, select the corresponding menu, select
On, and press the left soft key
or the center key to
complete the setting.
62
01
02
03
04
03
Using the menu
7.4 Language
You can set the
●● System language and the
●● Input Language
of your Thuraya XT. The System language affects the menus in
your phone, whereas the Input language allows you to enter Text
(e.g. when writing messages) in your preferred language style
and use the included dictionaries and the Predictive Text feature
eZiText.
Menu > 7. Settings > 4. Language
To change the language
Choose your desired language by navigating with the left or right
navigation keys
and select with the center key .
Menu > 7. Settings > 4. Laguage
System language
[English]
63
Input language
[French]
Using the menu
7.5 Time/Date
To set the time and date, you can either choose to use the Auto
Update function or you can set the time and date manually.
Menu > 7. Settings > 5. Time/Date
Auto update
The Auto update service uses the GPS information of your
Thuraya XT. For some areas with deviating time zones, the
correct time cannot be determined. In this case please use the
manual time setting. Please note that you need to have
connection to GPS satellites to use the Auto update service.
01
02
03
04
Select your desired date and time format that shall be used in
your phone. Press the navigation keys
to navigate through
the menu.
64
03
Using the menu
7.6 Data connection
Data connection port for using GPS data or software upgrade can
be configured. Port options are USB port and Serial port. When the
USB port is selected, the speed is set to the default value and cannot
be changed. The speed of the Serial port can be set to one of 10
available speeds, and the default value is Automatic speed.
Menu > 7. Settings > 6. Data connection
Press the navigation keys
to select Data port, and also Baud
rate when Serial port is selected. Press the left soft key
or the
center key to complete the setting.
65
7.7 Setup wizard
When the phone is switched on for the first time, the setup wizard
allows you to configure the basic phone settings like Time/Date,
Location, Language and gives you the possibility to copy the
contacts stored on the SIM card to the phone memory.
Menu > 7. Settings > 7. Setup wizard
Using the menu
8. Network
In order to make calls or send SMS using your
Thuraya XT, a satellite connection is required.
7.8 My numbers
My numbers function is to register the Voice number, Fax number
and Data number on your current SIM card.
Menu > 7. Settings > 8. My numbers
●● 7.8.1 Voice
To set the Voice number, enter the number in the editor and press
the left soft key
or the center key to complete the settings.
●● 7.8.2 Fax
To set the Fax number, enter the number in the editor and press
the left soft key
or the center key to complete the settings.
●● 7.8.3 Data
01
8.1 Network mode
Choose if you want to select the network
automatically from a preferred list on the
SIM card or manually from a list of available
networks.
Menu > 8. Network > 1. Network mode >
1. Automatic or > 2. Manual
02
03
04
To set the Data number, enter the number in the editor and press
the left soft key
or the center key to complete the settings.
Note
●● It is recommended to use the automatic mode.
66
03
Using the menu
8.2 SAT Registration
If the SAT icon
on your display is blinking you may not be
able to receive or make SAT calls. In this case you can update
the SAT registration manually in this menu.
Menu > 8. Network > 2. SAT registration
67
8.3 Preference
Display the preferred list of networks registered on your SIM card.
You can add or remove entries in this list.
Menu > 8. Network > 3. Preference
Using the menu
9. Security
This function organizes settings to prevent
unwanted disclosure of your personal
information and protects basic contents of your
phone calls.
9.1 PIN1 code
Choose whether the PIN code needs to be entered every time
the phone is switched on. If a wrong PIN code is entered three
times, the phone will be locked and the correct PUK code must
be entered to access the phone again.
You received your PIN and your PUK codes together with your
SIM card.
Menu > 9. Security > 1. PIN1 code >
Input PIN1 code after selecting On
9.2 Security code
In addition to the PIN code you can also use a personal Security
code to protect your phone.
To switch on the phone both codes (Security code and PIN code)
need to be entered.
Menu > 9. Security > 2. Security code >
Input Security code after selecting On
01
02
03
04
Note
●● The initial security code of your Thuraya XT is ‘0000’, and this
code can be changed in the Change codes menu.
68
03
Using the menu
9.3 Change codes
Choose whether to change:
●● PIN1 code
●● PIN2 code
●● Security code
●● Barring code
(used for call barring functions, please check with your operator)
9.4 Fixed dialing
Fixed dialing is a function where only the
predefined numbers can be called.
●● 9.4.1 Show list
Shows the numbers or names registered in the
Fixed dialing.
Menu > 9. Security > 4. Fixed dialing > 1. Show list
69
Using the menu
9.5 Closed User Group
●● 9.4.2 Add new
To add a new number in Fixed dialing:
1. Enter PIN2 code and confirm by pressing the
center key .
2. Enter the name or phone number.
3. Save by pressing the left soft key
.
Menu > 9. Security > 4. Fixed dialing >
2. Add new
Closed User Group is a function to form a
calling group.
To use the CUG function, please contact your
service provider for details.
Menu > 9. Security > 5. Closed user group
01
02
03
●● 9.4.3 On/Off
To set the Fixed dialing function on or off.
Menu > 9. Security > 4. Fixed dialing > 3. On/off
04
70
03
Using the menu
9.6 IMEI Number
Each Thuraya XT has its own unique IMEI
Number.
You can check the IMEI number of your
Thuraya XT by selecting
Menu > 9. Security > 6. IMEI number
9.7 Software version
You can check the Software version of your
Thuraya XT by selecting
Menu > 9. Security > 7. S/W version
71
9.8 Soft reset
You can reset your Thuraya XT without
losing your personal settings like contacts or
messages.
Menu > 9. Security > 8. Soft reset
9.9 Factory reset
The factory reset will restore the settings as
the phone was shipped. You will lose your
personal settings like contact and messages
saved on the phone.
Menu > 9. Security > 9. Factory reset
04 Additional Information
Thuraya XT 04 Additional Information
Troubleshooting
75
PIN & PUK
86
Quick access codes 76
PIN2 & PUK2
86
Access codes
86
86
Security code 86
Barring code 01
02
03
04
04
Additional Information
Troubleshooting
1. When your phone cannot be switched ON
●● Check whether the battery is properly attached.
●● Check whether the battery is charged.
●● If power cannot be switched ON even with a connected charger, contact the Customer Service Center.
2. When the message “Insert SIM” appears
●● Insert SIM card.
●● Try to remove and reattach the SIM card.
●● Is the SIM card still activated? The SIM card can be deactivated when the wrong PUK code is entered.
●● Check whether the connectors of the SIM card are clean and free of any foreign matter.
3. When your security code is lost
●● The factory setting of the Security code is 0000.
●● If you lost your individual Security code, please contact the Customer Service Center. Your warranty card will be needed.
4. When sending GPS data to PC is not working.
●● Is the data cable properly connected?
●● Check which data Port settings are selected. For detailed instructions (see page 65).
●● Check if the data baud setting is compatible with your PC or laptop.
5. When your Thuraya XT has been dropped in water
●● Separate battery and after drying take it to Customer Service Center.
75
Additional Information
Quick access codes
1.2 Add contact
1. Contacts
1.1 Search
1.2.1 Phone
1.2 Add contact
1.5 Copy
1.3 Group
1.4 Speed dial
1.5 Copy
1.6 Delete
1.7 Memory status
1.5.1 SIM to Phone
1.5.1.1 One by one
1.5.1.2 All
1.2.2 SIM
1.5.2 Phone to SIM
1.5.2.1 One by one
1.5.2.2 All
01
1.6 Delete
1.6.1 One by one
1.6.2 All
02
1.6.2.1 Phone
1.6.2.2 SIM
1.6.2.3 Phone & SIM
03
04
76
04
Additional Information
2.5 Settings
2. Navigation
2.1 Current position
2.2 Continuous position
2.3 Waypoints
2.4 Location track
2.5 Settings
2.5.1 Format
2.5.1.1
2.5.1.2
2.5.1.3
2.5.1.4
2.5.1.5
2.5.1.6
DD.ddddd
DD/MM/SS.ss
DD/MM/SS
DD/MM.mm
MGRS
UTM
2.6 Helper
2.7 Qiblah & Prayer
2.5.2 Tracking time
2.5.2.1 1 Second
2.5.2.2 3 Seconds
2.5.2.3 10 Seconds
2.5.2.4 30 Seconds
2.5.2.5 1 Minute
2.5.2.6 3 Minutes
2.5.2.7 5 Minutes
2.5.2.8 10 Minutes
2.5.2.9 15 Minutes
2.5.2.10 30 Minutes
2.5.2.11 1 Hour
2.6 Helper
77
2.6.1 Edit
2.6.2 Emergency SMS
2.6.4 Setup timer
2.6.5 Delete
2.6.3 Setup message
Additional Information
3.4 Delete
3. Call logs
3.1 Missed calls
3.4.1 Missed calls
3.2 Received calls
3.4.4 All
3.4.2 Received calls
3.4.3 Outgoing calls
3.3 Outgoing calls
3.5 Call duration
3.4 Delete
3.5.1 Last call
3.5.2 Received calls
3.5.3 Outgoing calls
3.5 Call duration
3.5.4 All calls
3.5.5 GmPRS Volume
3.5.6 Reset
3.5.5.1
3.5.5.2
3.5.5.3
3.5.5.4
Last session
Sent
Received
All
01
3.5.6.1 Voice
3.5.6.1.1 Outgoing calls
3.5.6.1.2 Received calls
3.5.6.1.3 All
3.5.6.2 GmPRS
3.5.6.2.1 Sent
3.5.6.2.2 Received
3.5.6.2.3 All
3.5.6.3 All
4.1 Alarm
4. Organizer
4.1 Alarm
4.1.1 Wake-up call
4.1.2 Alarm 1
4.1.3 Alarm 2
4.2 Calendar
4.3 Calculator
4.4 Stopwatch
4.5 World time
78
02
03
04
04
Additional Information
5.7 Settings
5. Messaging
5.1 New message
5.7.1 Service center
5.3 Draft
5.4 Sent messages
5.5 Outbox
5.6 Templates
5.7 Settings
5.8 Info message
5.9 Memory status
5.10 Delete messages
5.7.2 Format
5.7.2.1
5.7.2.2
5.7.2.3
5.7.2.4
5.2 Inbox
5.7.4 Validity
5.7.4.1
5.7.4.2
5.7.4.3
5.7.4.4
5.7.4.5
5.7.4.6
Maximum
1 Hour
6 Hours
1 Day
3 Days
1 Week
Text
Fax
E-mail
ERMES
5.7.5 Request reply
5.7.5.1 On
5.7.5.2 Off
5.7.3 Delivery report
5.7.3.1 On
5.7.3.2 Off
5.7.6 Bearer selection
5.7.6.1 SMS Server
5.7.6.2 GmPRS Server
5.8 Info message
5.8.1 Status
5.8.2 Inbox
5.8.3 Language
5.10.1 Inbox
5.10.2 Draft
5.10.3 Sent messages
5.10.4 Outbox
5.10.5 Template
5.10.6 Phone
5.10.7 SIM
5.10.8 All
5.8.1.1 On
5.8.1.2 Off
5.8.4 Topics
5.10 Delete messages
79
Additional Information
6.1 Ringtone
6. Sound Setting
6.1 Ringtone
6.1.1 Thuraya
6.1.2 Esperanza
6.1.3 Funky
6.2 Ringtone volume
6.1.4 Jazz
6.1.5 Arabia
6.1.6 Crescendo
6.3 Ringing type
6.1.7 For you
6.1.8 Magic
6.1.9 Too far
6.4 Keypad tone
6.1.10 Maestro
6.1.11 Ring 1
6.1.12 Ring 2
6.5 Keypad volume
6.1.13 Ring 3
6.1.14 Ring 4
6.1.15 Ring 5
6.3.1 Ringing
6.3.2 Ascending
6.3.3 Ring once
6.3.4 Beep once
6.3.5 Off
01
02
6.3 Ringing type
03
04
6.4 Keypad tone
6.4.1 DTMF tone
6.4.2 Tree tone
6.4.3 Off
80
04
Additional Information
7.1 Phone
7. Settings
7.1 Phone
7.1.1 Wallpaper
7.1.2 Greeting message
7.1.3.1 15 Seconds
7.1.3.2 30 Seconds
7.1.3.3 Always on
7.2 Call
7.3 GmPRS
7.4 Language
7.5 Time/Date
7.6 Data connection
7.7 Setup wizard
7.8 My numbers
7.1.4 Brightness sensor
7.1.5 LCD contrast
7.1.4.1 Off
7.1.4.2 On
7.2 Call
7.2.1 Call waiting
7.2.1.1 Activate
7.2.1.2 Status
7.2.1.3 Deactivate
7.2.2 Call divert
7.2.2.1 Voice
7.2.2.1.1 All voice
7.2.2.1.1.1 Activate
7.2.2.1.1.1.1 Voicemail
7.2.2.1.1.1.2 Number
7.2.2.1.1.2 Status
7.2.2.1.1.3 Deactivate
7.2.2.1.2 Busy
7.2.2.1.2.1 Activate
7.2.2.1.2.1.1 Voicemail
7.2.2.1.2.1.2 Number
7.2.2.1.2.2 Status
7.2.2.1.2.3 Deactivate
7.2.2.1.3 No reply
81
7.1.3 Backlight
7.2.3 Call barring
7.2.3.1 Outgoing calls
7.2.3.1.1 Activate
7.2.3.1.2 Status
7.2.3.1.3 Deactivate
7.2.3.2 International Calls
7.2.3.2.1 Activate
7.2.3.2.2 Status
7.2.3.2.3 Deactivate
7.2.3.3 International calls except to home
7.2.3.3.1 Activate
7.2.3.3.2 Status
7.2.3.3.3 Deactivate
7.2.2.1.3.0 5seconds, 15seconds, 30seconds 7.2.3.4 Incoming calls
7.2.2.1.3.1 Activate
7.2.3.4.1 Activate
7.2.2.1.3.1.1 Voicemail
7.2.3.4.2 Status
7.2.2.1.3.1.2 Number
7.2.3.4.3 Deactivate
7.2.2.1.3.2 Status
7.2.2.1.3.3 Deactivate
Additional Information
7. Settings
7.2.2.1.4 Unreachable
7.1 Phone
7.2.2.1.4.1 Activate
7.2.2.1.4.1.1 Voicemail
7.2.2.1.4.1.2 Number
7.2.2.1.4.2 Status
7.2.2.1.4.3 Deactivate
7.2 Call
7.3 GmPRS
7.2.2.1.5 Clear divert
7.4 Language
7.2.2.2 All fax
7.2.2.2.1 Activate
7.2.2.2.2 Status
7.2.2.2.3 Deactivate
7.5 Time/Date
7.6 Data connection
7.2.3.5 Incoming calls When abroad
7.2.3.5.1 Activate
7.2.3.5.2 Status
7.2.3.5.3 Deactivate
7.2.3.6 Clear barring
7.2.3.6.1 All
7.2.3.6.2 Outgoing
7.2.3.6.3 Incoming
02
7.2.2.3 All data
7.7 Setup wizard
03
7.2.2.3.1 Activate
7.2.2.3.2 Status
7.2.2.3.3 Deactivate
7.8 My numbers
04
7.2.2.4 Deactivate all
7.2.4 Voice mail
7.2.5 Call answering
7.2.5.1 Auto answer
7.2.5.1.1 5 Seconds
7.2.5.1.2 10 Seconds
7.2.5.1.3 Off
01
7.2.6 DTMF tone
7.2.6.1 On
7.2.6.2 Off
7.2.5.2 Any key
7.2.5.2.1 On
7.2.5.2.2 Off
82
04
Additional Information
7. Settings
7.1 Phone
7.2 Call
7.3 GmPRS
7.4 Language
7.5 Time/Date
7.6 Data connection
7.7 Setup wizard
7.8 My numbers
83
7.2.7 Auto redial
7.2.7.1 On
7.2.7.2 Off
7.2.8 Send own number
7.2.8.1 Preset
7.2.8.2 Off
7.2.8.3 On
7.2.9 Cost
7.2.9.1 Charge rate
7.2.9.2 Cost limit
7.2.9.3 Display cost
7.3 GmPRS
7.3.1 APN
7.3.1.1 Select
7.3.1.2 Insert
7.3.1.3 Edit
7.3.2 Auto reject
7.3.2.1 On
7.3.2.2 Off
7.8 My numbers
7.8.1 Voice
7.8.2 Fax
7.8.3 Data
Additional Information
8.1 Network mode
8. Network
8.1 Network mode
8.2 SAT registration
8.3 Preference
8.1.1 Automatic
8.1.2 Manual
8.3 Preference
8.3.1 Preference > Option > View
8.3.2 Preference > Option > New
8.3.3 Preference > Option > Edit
8.3.4 Preference > Option > Delete
01
02
9.1 PIN1 code
9. Security
9.1 PIN1 code
9.2 Security code
9.3 Change codes
9.1.1 On
03
04
9.2 Security code
9.2.1 On
9.4 Fixed dialing
9.3 Change codes
9.5 Closed user group
9.3.1 Change PIN1
9.6 IMEI number
9.3.4 Barring code
9.7 S/W version
9.4 Fixed dialing
9.8 Soft reset
9.4.1 Show list
9.9 Factory reset
9.1.2 Off
9.2.2 Off
9.3.2 Change PIN2
9.3.3 Security code
9.4.2 Add new
9.4.3 On/Off
9.4.3.1 On
9.4.3.2 Off
84
04
Additional Information
9.5 Closed user group
9. Security
9.1 PIN1 code
9.5.1 Preset
9.2 Security code
9.8 Soft reset
9.3 Change codes
9.8.1 Yes
9.4 Fixed dialing
9.5 Closed user group
9.6 IMEI number
9.7 S/W version
9.8 Soft reset
9.9 Factory reset
85
9.5.2 On
9.8.2 No
9.9 Factory reset
9.9.1 Yes
9.9.2 No
9.5.3 Off
Additional Information
Access codes
PIN & PUK
There are several access codes that are used in your Thuraya
XT and your SIM card. These codes help you protect the phone
against unauthorized use.
Important! Avoid using access codes resembling emergency
numbers, such as 112, so that you do not accidentally dial an
emergency number.
The PIN (Personal Identification Number) is 4 to 8 digits. It
protects your SIM card against unauthorized use. It is usually
supplied with the SIM card. Entering wrong PIN code 3 times
will lock the SIM card and to unlock, PUK code must be entered.
Your PUK code is normally supplied with the SIM card.
(see page 68)
Security code
PIN2 & PUK2
The phone lock feature uses the security code to protect your
phone against unauthorized use. The phone password is supplied
with the phone and is preset to “0000” at the factory.
Security code: Security code (4-8 digits) is to lock the phone,
and the phone will be locked automatically after reboot when the
security is set to ON. You can use the phone after entering the
security code (see page 68).
Pin code: After Pin1 code (4-8 digits) is set to ON, Pin code lock
is set automatically after reboot. You can use the phone after
entering the Pin code (see page 68).
01
These codes are required with settings related to PIN2 Network.
PIN2 must be entered for Fixed dialing. As with PIN code,
entering wrong PIN2 code 3 times will lock the SIM card and to
unlock, PUK2 code must be entered. The PUK2 code is normally
supplied with SIM card.
Barring code
It is a network code for call restriction functions. Barring code
varies with different service providers and should be supplied by
your service provider when you start using the phone. When the
barring code is lost, please contact your service provider.
86
02
03
04
LIMITED WARRANTY
Thuraya XT SATELLITE HANDHELD PHONE
This Limited Warranty is provided to the original end-user purchaser (the ’Buyer’) of any new Thuraya XT Satellite Handheld Phone.
This Limited Warranty is non-transferable.
Warranty Coverage and Service
Thuraya warrants all new Thuraya XT Satellite Handheld Phones (the ’Product’) under normal use and wear to be free from defects in material
and workmanship for a period of one (1) year from the date of purchase by the original Buyer (the ’Warranty Period’). If, under normal use and
wear, the Product becomes defective in materials or workmanship and is returned at Buyer’s expense to a Thuraya Authorized Service Center
during the Warranty Period, the Product will be repaired or replaced, at Thuraya’ sole and exclusive option, and at no charge to Buyer. Buyer will
be required to provide reasonable proof of date of purchase. Reconditioned replacement components, parts, units or materials may be used if
the Product is repaired or replaced. Costs incurred in the removal, de-installation or reinstallation of the Product are not covered.
THIS LIMITED WARRANTY DOES NOT COVER AND THURAYA WILL NOT BE RESPONSIBLE FOR THE FOLLOWING:
This Limited Warranty will be void in its entirety if the Product is serviced by anyone other than Thuraya or a Thuraya Authorized Service Centre. Buyer’s sole
and exclusive remedy shall be the repair or replacement of the defective Product, as specifically described above. Thuraya neither assumes nor authorizes any
Authorized Service Centre or any other person or entity to assume any other obligation or liability beyond that which is provided for in this Limited Warranty.
This Limited Warranty does not cover the following:
products or accessory equipment not manufactured or provided by Thuraya
failures or defects caused by misuse, abuse, accident, alteration or neglect
unauthorized installation, removal or repair
failure to follow instructions
fire, flood or other nature caused accidents
spills of food or liquids
normal wear and tear
improper installation, maintenance
operation or repair; performance of the Product when used in combination with other products or equipment not manufactured or
provided by Thuraya
payments for labor or service to representatives or service centers not authorized by Thuraya.
This limited Warranty of the Product does not cover the operation, availability, coverage, range or grade of service provided by the satellite systems.
Limitation of Liability
THIS LIMITED WARRANTY IS IN LIEU OF ALL OTHER WARRANTIES, WHETHER EXPRESSED, IMPLIED OR STATUTORY,
INCLUDING, WITHOUT LIMITATION, THE IMPLIED WARRANTIES OF MERCHANTABILITY AND FITNESS FOR A
PARTICULAR PURPOSE. THURAYA SHALL NOT BE LIABLE FOR DAMAGES IN EXCESS OF THE PURCHASE PRICE OF
THE PRODUCT, LESS REASONABLE AMOUNT FOR USE AND WEAR, OR FOR ANY INCIDENTAL, SPECIAL, PUNITIVE OR
CONSEQUENTIAL DAMAGES OF ANY NATURE WHATSOEVER, OR FOR ANY DELAYS, LOSS OF USE, TIME, PROFITS,
REVENUE OR SAVINGS, ANY COMMERCIAL LOSS, INCONVENIENCE, MILEAGE, DAMAGE TO BUYER’S OR TO OTHER
PERSON’S VEHICLE OR ANY OTHER PROPERTY, ARISING FROM THE USE OR INABILITY TO USE THE PRODUCT, OR
OTHERWISE FOR ANY FAILURE TO PERFORM.
All liability and obligations of Thuraya under this Limited Warranty shall terminate upon the expiration of the applicable Warranty
Period provided herein. This Limited Warranty sets forth the entire responsibility of Thuraya with respect to the Product. There are
no other liabilities of Thuraya arising from the sale of the Product whether based on warranty, contract, negligence or other theories
of liability. In no event shall Thuraya liability exceed the cost of correcting defects as provided herein.
This Limited Warranty gives specific legal rights to Buyer, and Buyer also may have other rights which may vary from jurisdiction to
jurisdiction.
0983 Asia Pacific Satellite Industries (APSI) hereby declares that Thuraya XT is in compliance with the essential
requirements and other relevant provisions of Directive 1999/5/EC and EU RoHS Directives.
The crossed-out wheeled bin means that within the European Union the product must be taken to separate collection
at the product end-of-life. Do not dispose of these products as unsorted municipal waste.
THURAYA trademark is the sole and exclusive property of Thuraya Telecommunications Company.
Copyright © 2008 Thuraya Telecommunications Company. All rights reserved.
This manual is published by Thuraya Telecommunications Company without any warranty. Thuraya Telecommunications Company
reserves the right to make changes and improvements to any of the products described in this manual without prior notice.
Printed in Korea
Copyright ©2008. All rights reserved. Thuraya is a registered trademark of Thuraya Telecommunications Company.