1
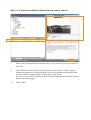
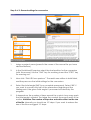
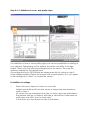
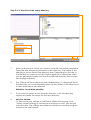
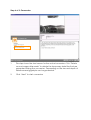
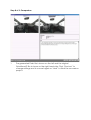
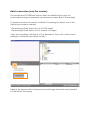
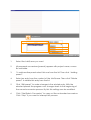
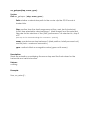
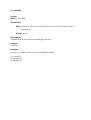
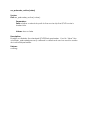
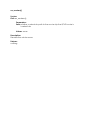
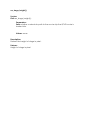
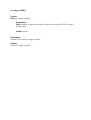
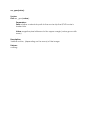
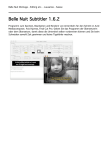
Virtual! Köln
www.virtualkoeln.de
[email protected]
QTVR2Flash user manual
Content
Introduction
3
System requirements
3
Converting Quicktime VR Panorama to Flash
4
Preparation: Selection of conversion mode
Step 1 of 9: Selection of QtVR Panorama that you want to convert
Step 2 of 9: General settings for conversion
Step 3 of 9: Output settings
Step 4 of 9: Definition of zoom- and quality steps
Step 5 of 9: Selection of the output directory
Step 6 of 9: Conversion
Step 7 of 9: Cutting
Step 8 of 9: Comparison
Step 9 of 9: Finishing conversion
4
5
6
8
10
13
15
17
18
19
Generating objectmovies out of image series
20
Step 1 of 9: Selection of image series you want to convert
22
Interrupting conversions
23
Resuming conversions
24
Batch-conversion (only Pro-version)
25
Programming interactions with Actionskript
28
Overall view of Actionscript commands for converted movies
ex_anim(step, zoom, ypos)
ex_enable_callback(value)
ex_get_fps()
29
31
32
33
ex_getstep()
ex_getzoom()
ex_gotopos(step, zoom, ypos)
ex_hideqtvrmouse(value)
ex_mousecontrol(mvisible,menabled,mloopenabled)
ex_nowait()
ex_preloader_active(value)
ex_rendern()
ex_renderhigh()
ex_rotation()
ex_set_fps(value)
ex_stage_height()
ex_stage_width()
ex_turn(degree)
ex_ypos(value)
ex_zoom(value)
34
35
36
37
38
39
40
41
42
43
44
45
46
47
48
49
Overview QTVR2Flash Callbacks
qtvr2flash_callback(movie_name, step, y_pos, zoom)
anim_ready()
qtvr2flash_loadstatus(status)
qtvr2flash_preloader(percent)
50
50
50
50
50
Note of thanks
51
Introduction
QTVR2Flash serves the conversion of finished QuicktimeVR Panoramas,
objectmovies or image series into Flash5 files.
After conversion the generated Flashfiles can be used without the Quicktime
plugin.
If the user attempts to show high resolution Quicktime VR Panoramas or
objectmovies QTVR2Flash can automatically generate files that can reload
(stream) details.
This happens exclusively on client’s side within the Flash plugin. There is no
need to install further programs or server sided plugins.
The generated Flashmovies can be controlled by various commands and can
be integrated in other Flash presentations.
With two examples this manual explains how to convert high resolution
panoramas and image series.
All screenshots in this manual show the Pro-Version of QTVR2Flash.
The presentation can differ in other versions.
System requirements
System:
min. Pentium3/450 MHZ,128MB memory,
20MB free hard disk storage capacity for QTVR2Flash
and 1 Gbyte free hard disk storage capacity for
temporary files
suggested: Pentium 4/2,4GHZ, 512MB memory, 20MB
free hard disc storage capacity for QTVR2Flash and 2
Gbyte free hard disk storage capacity for temporary
files
Operating system:
Windows NT4/2000/XP
Windows 98/ME, due to the system with a limited
resolution (1600×1200) for conversion
Converting Quicktime VR Panorama to Flash
In this part of the user’s guide you will be leaded through QTVR2Flash step by
step. By this you will be able to convert a QicktimeVR Panorama into a Flash5
movie.
It is the same course for cylindrical and cubical panoramas.
Depending on the “Field of View”-settings the upper and lower part of the
panorama is cut off within the cubical panoramas.
The used Screenshots show the professional version of QTVR2Flash.
The presentation can differ in other versions.
Preparation: Selection of conversion mode
1.
Select ”Generating a Flash-Object out of a QTVR-Object”
2.
Click “Next”. Click “Cancel” if the dialoque opens that starts a Dial-upconnection. You do not need an internet connection.
Step 1 of 9: Selection of QtVR Panorama that you want to convert
2
1
1.
Select the QuicktimeVR Panorama (e.g. clio_04.mov) that you want to
convert
2.
Click the file name once with the left mouse button in order to get a
panorama preview. In this preview you find information refering to the
current rotation angle on the x-(Tilt) and y-axis (Pan).
As soon as you move within the film (with the pressed left mouse button)
these values change.
3.
Click “Next”
Step 2 of 9: General settings for conversion
2
1
4+5
3
6
1.
Assign a project name (preset is the name of the source file you have
selected before)
2.
In the QuicktimeVR preview select the start position for the conversion
(with the mouse). Use the ”Shift” key for zooming in and the “STRG” key
for zooming out.
3.
Now click “PAN+Tilt from preview”. The results are written in both fields,
and they are now the initial settings for the conversion.
4.
Select the total angle (360° for a complete panorama). Select 180° if
you want to convert only half of the panorama. Beginning at the
starting point, the given total angle is processed clockwise by the
program.
5.
It depends on the number of steps around the y-axis in how many parts
the total angle is divided. The larger the number the more fluently is the
motion. Attention: The number of steps has a decisive effect on the size
of the file. Normally you should use 10°-steps. If you want to reduce the
size of the file we suggest 15°-steps.
6.
For special applications it is possible to define an initial zoom (initial
zoom factor) not equal 1 (standard factor). Therefore use the STRG- and
SHIFT-keys for zooming in and out. After that click “initial zoom from
preview”, to apply the zoom factor. Changing the initial zoom factor
has an effect on the size (pixel) of the movie you want to export (zoom
step “normal”) (pay also attention to step 4). This is because the output
size is multiplied to gain an appropriate quality.
7.
The user can interrupt the current conversion project at any time. Later
he can continue again. Click “Finish” to interrupt the project.
All settings are stored. With the next start you find the interrupted project
in the start dialoque under the assigned project name (see also
“Continuing conversions”).
8.
Click “Next”
Step 3 of 9: Output settings
1
2
3
1.
The output setting determines the dimension of the generated
flashmovies in pixel. Select width and height of the film you want to
generate.
Startresolution
2.
Maximum zoom
The maximum zoom shows how large (in pixel) the maximum zoomable
detail presentation of a certain part is. The higher you select this value
the longer you need for conversion and the closer you can zoom in the
details. In the example above the same lateral proportion of output size
(400×300) and maximum zoom (3600×2700) was selected. Therefore you
need a high resolving QuicktimeVR Panorama.
3.
All conversions are based on the Master-Flash. It puts all control
elements for the converted Quicktime VR movies at your disposal. If you
want to use another Master-Flash (e.g. updates by Virtual!) select it
here.
Attention: Master-Flashmovies have to fulfill special conditions. So
please use only Master-Flashmovies created by Virtual! All MasterFlashes you want to use have to be in the subdirectory “Master” of the
QTVR2Flash directory.
4.
Click “Next”
Step 4 of 9: Definition of zoom- and quality steps
The definition of zoom- and quality steps puts various possibilities for setting at
your disposal. Depending on the settings the results can differ to a large
extent. That is why the following settings are just an advice. They are the
optimum settings for the demoscene.
The settings shown by QTVR2Flash are determined by the values in step 3.
These settings realize a fluent movement with a good quality. So if you agree
to the settings click “Next”, or modify the values.
Possibilities for settings:
1.
Select the zoom steps you want to use or edit.
Height and width result from the values of output size and maximum
zoom in step 3.
All values can be changed in this step. All zoom steps are activated in
the general settings. In order to activate or disactivate a step select a
zoom step and click “Use this zoom step”.
A tick shows you that the zoom step is activated.
2.
While the converted Flash-movie (zoom step “Normal”) is loaded the
step “Preview” shows you a preview. The preview can be a (completely
moving) movie or a single image.
If you only want to see a preview image click the zoom step “Preview”
and tick the field “Use image as preview”. After that, select in the field
to the right that step you want to use for the preview image.
If you want to see a completely moving variant you can apply the
given values or you define a new width or height for the preview.
3.
There is a linear size calculation between zoom step “Normal” and
“Zoom5”. While zooming in the converted movie, this calculation
ensures that the appropriate zoom step is loaded.
You can fit width and height of every zoom step individually.
Attention: This can cause unwelcome grafic effects.
If you want to change the settings, first click “Normal” and fit width and
height to the step. Then click “Zoom5” and fit width and height. After
that click “Linear calculation of zoom steps” to calculate the values for
all the other zoom steps. According to the system, the maximum
resolution for zoom level 5 is 3600×2800 pixel in the Pro-Version and
2000×1000 pixel in the standard version.
Within maximum resolution (3600×
×2800) the number of columns must be
1.
Attention: Within Windows 98/ME there can be system related resolution
problems from 1600×1200 pixel upwards.
4.
For zoom steps 1 to 5 you can additionally determine the division of
images in rows and columns. These figures define in how many parts the
zoom step is cut. The more cuts (parts) you give the faster the user can
see something from the loaded details. At the same time the file size of
the cutted zoom step grows. We recommend a division in height/10
rows with one column. Additionally it can be useful to let the JPEG
quality of the zoom step increase from “Normal” to “Zoom5”. If you you
have done the settings (except width and height) for one zoom step
and you want to apply them to all steps, click “Apply to all zoom steps”.
5.
QTVR2Flash supports individual grafic filters (sharpen, soften) for each
zoom step including “Preview” and “Normal”.
6.
For each zoom step QTVR2Flash automatically calculates an offset on
the x-axis. By this the defined part of the image is deleted, the loading
times of the zoom steps are optimated and only necessary data are
saved. Tick “Indicate values via grid” in order to see this offset and the
selected cut settings of the image.
7.
If you have changed the initial zoom in step 2, select zoom step
“Normal” and click “Apply to initial zoom”. Width and height are fit.
After that there must be done a linear calculation between “Normal”
and “Zoom5” again.
8.
Click “Next” if you want to apply all changes or the general settings.
Step 5 of 9: Selection of the output directory
1
2
4
3
1.
Select a directory in which you want to save the converted panorama.
There are also temporary files saved in this directory. The name of the
directory is shown above the directory tree. Depending on the size of
the file that you want to convert several gigabyte of temporary data
can be generated. Make sure that the selected directory has enough
free storage capacity.
2.
Tick “Delete all files in directory and subdirectories”, to delete all files in
the directory you have selected before. By this all files of this directory or
of directories below are deleted!
Attention: Loss of data possible!
3.
If you want to create a new (empty) directory, click the directory
symbol and enter the name for the new directory.
4.
only Pro-Version:
To add conversion settings to JobQueue (Batch Processing), click
“Apply current settings to JobQueue and return to start” with the left
mouse button. The settings are added to JobQueue and the program
returns to the start screen.
In the same way, prepare all conversions that you want to convert
automated. After that select the button “Batch-Conversion” in the start
menu.
5.
Click “Next”
Step 6 of 9: Conversion
1
1.
This step shows the start screen for the actual conversion. Tick “Delete
source images afterwards” to delete the temporary data files that are
generated during the conversion. Depending on the size and depth of
details several gigabyte can be generated.
2.
Click “Next” to start conversion
Status display during conversion
Step 7 of 9: Cutting
1
1.
Tick “Delete source images afterwards” to delete the temporary files
that are generated during the cutting again. Depending on size and
depth of details several gigabyte can be generated.
2.
Click “Next” to start cutting.
Step 8 of 9: Comparison
1.
The generated Flash file is shown on the left and the original
QuicktimeVR file is shown on the right hand side. Click “Previous” to
change settings and to convert again or “Next” to finish the conversion
project.
Step 9 of 9: Finishing conversion
1
2
1.
Click “Save” to save the project settings under the fixed project name.
Settings are saved in the directory “presets”
2.
Click ”Finish” to finish QTVR2Flash
3.
If you want to make another conversion click “I want to edit another
movie”.
4.
In order to use the generated Flash Panorama in your own projects,
please copy all files from the indicated directory into a subdirectory of
your Flash project.
Generating objectmovies out of image series
QTVR2Flash can convert QuicktimeVRs to Flash5. But there is also the possibility
to generate object movies out of image series. There are also zoom steps
available for generated movies.
A JPG image series numbered from 1 to n is required. The file name must have
the following structure:
Myimageseries_001.jpg
Myimageseries_002.jpg
Myimageseries_003.jpg
…
Myimageseries_036.jpg
The number of images within a page can be defined freely. However, the
number of the wanted output degree should always have a factor of a whole
number – e.g. 36 or 24 images can be distributed within 360°. Within object
movies that have more than 360 images the degree number has to be
increased.
The number of the used images has a strong effect on the fluent motion but
also on the need for harddisc space of the generated object movies.
Attention: QTVR2Flash cannot read certain JPG formats. In this case open the
images in your picture editing tool and save them again in the JPG format.
QTVR2Flash is not able to generate a Flash Panorama out of a single
panorama image. The panorama image has to be converted into Quicktime
VR before.
In order to produce a Flash5 movie out of an image series go on like this:
Preparation: Selection of conversion mode
1.
Select the point “Generating a Flash object out of a series of images“.
2.
Click “Next“
Step 1 of 9: Selection of image series you want to convert
2
1
1.
Select the first file of the image series (e.g. myseries_001.jpg), that you
want to convert.
2.
With the left mouse button, click a file name to open a preview of the
image.
3.
Click ,,next”
The following steps correspond with the ones already described before. That is
why see:
Step 2 of 9: General settings for conversion
Interrupting conversions
There can be long render times depending on the size of the file you want to
convert.
The user can interrupt his current conversion project at any time and can
resume later.
Therefore click “Finish”
Resuming conversions
If you have interrupted a conversion, with every new start of QTVR2Flash you
can decide whether you want to resume an interrupted program.
Therefore go on like this:
1.
Select “Resume previous conversion project”
2.
Click “Next“ – conversion project resumes
Batch-conversion (only Pro-version)
The professional QTVR2Flash version offers an additional function: an
automated running of prepared conversion processes (Batch Processing).
To perform several conversions via Batch Processing first select one of the
following conversion variants:
“Generating a Flash object out of a QTVR objekt”
“Generating a Flash object out of a series of images“
Carry out all settings until step 5 of 9 as described. Then click “Add current
settings to JobQueue and back to start”.
Repeat the process with all panoramas and image series that are intended
for the Batch Processing.
Then go back to the start menu and select the point “Batch-Conversion”.
1
2
3
4
5
6
1.
Select the JobQueue you want
2
All prepared conversions (presets) appear with project name, source
file and date.
3
To add another preset select this one from the list. Then click “Adding
preset”.
4.
Select an entry from the content of the JobQueue. Then click “Delete
preset” to delete this entry from the list.
5.
Click “Edit preset” to make changes in the selcted entry. With the
selected presets the program now changes back to the beginning of
the normal conversion process. By this this settings can be modified.
6.
Click “Start Batch-Conversion” to carry out the automated conversion.
Click “Stop” if you want to interrupt this process.
Programming interactions with Actionskript
In order to communicate with the converted Flash5 movies, QTVR2Flash
provides an extensive set of functions and callbacks.
There is an explanation of this communication under www.virtualkoeln.de.
You will find a tutorialpack (tutorial.zip) with a Fla file integrating a QTVR2Flash
movie.
Open the Fla file im Macromedia Flash (from version 5) and start it. Open the
output window to read all status messages of the movie.
Advanced Actionscript knowledge is required in order to understand the
example.
Overall view of Actionscript commands for converted movies
Listing and short description of all functions and features predefined in the
mastermovie:
ex_anim(step,zoom,ypos)
faciliates the animation to a certain point
ex_enable_callback(value)
activates (true) and disactivates (false) the callback function
ex_get_fps()
returns the current frames per second
ex_getstep()
returns the current step position around the y-axis
ex_getzoom()
returns the current zoom step
ex_gotopos(step,zoom,ypos)
faciliates skipping to a wanted point
ex_hideqtvrmouse(value)
hides (true) or shows (false) the qtvr mouse. QTVR function of the mouse
pointer is fully enabled.
ex_mousecontrol(mvisible,menabled,mloopenabled)
activates (true, true, true) or disactivates (false, false, false)the QTVR function
of the mouse
ex_nowait()
disables the wait sequence for the renderhigh loop
ex_preloader_active(value)
shows (true) or hides (false) the preloader. If set to “false” the
qtvr2flash_preloader callback is used.
ex_rendern()
renders the whole scene
ex_renderhigh()
orders reloading of the details
ex_rotation(value)
faciliates a skip of the step position by (value)
ex_set_fps(value)
sets the current frames per second by value (standard value is 13)
ex_stage_height()
returns the stage height of the Flash movie
ex_stage_width()
returns the stage width of the Flash movie
ex_turn(degree)
animation by a wanted degree
ex_ypos(value)
faciliates a vertical motion by value
ex_zoom(value)
faciliates zooming by value
ex_anim(step, zoom, ypos)
Syntax:
Path.ex_anim(step, zoom, ypos );
Parameters:
Path: relative or absolute path to the movie clip the QTVR movie is
loaded into
step: postion from the start image around the y-axis (counter-clockwise)
[note: free selectable value between 1 (start image) and the selected
step size for the devision of the (360°) panorama – as selected in ”step 2
of 9”
(see step 2 of 9: General settings for conversion – point 5)
zoom: wanted zoom step between 0 (start position, totally zoomed out)
and 19 (tele – maximum zoomed in)
ypos: vertical offset as a negative value (grows with zoom)
Description:
Starts an animation considering the zoom step and the final values for the
horizontal and verticlal motion.
Returns:
nothing
ex_enable_callback(value)
Syntax:
Path.ex_enable_callback(value);
Parameters:
Path: relative or absolute path to the movie clip the QTVR movie is
loaded into
Value: true or false
Description:
-true, activates the transmission of the 5 values (movie_name, step position,
y_pos and zoom step)to the qtvr2flash_callback function.
-false, disactivates the transmission.
Returns:
nothing
ex_get_fps()
Syntax:
Path.ex_get_fps(value);
Parameters:
Path: relative or absolute path to the movie clip the QTVR movie is
loaded into
Values: nothing
Description:
Returns the fps (frames per second) of the actual QTVR movie. Standard
value is 13.
Returns:
fps (frames per second) of the actual QTVR movie. Standard value is 13.
ex_getstep()
Syntax:
Path.ex_getstep();
Parameters:
Path: relative or absolute path to the movie clip the QTVR movie is
loaded into
Values:
none
Description:
Returns the postion value around the y-axis. (Size between 1 and the selected
step size for the devision of the (360°) panorama – as selected in ,,step 2 of 9”
Returns:
Position value around the y-axis
ex_getzoom()
Syntax:
Path.ex_getzoom();
Parameters:
Path: relative or absolute path to the movie clip the QTVR movie is
loaded into
Values: none
Decription:
Returns the current zoom step
(0 (wide-angle completely zoomed out) to 24 (tele-maximum zoomed in)
Returns:
Current zoom step
ex_gotopos(step, zoom, ypos)
Syntax:
Path.ex_gotopos ( step, zoom, ypos );
Path: relative or absolutee path to the movie clip the QTVR movie is
loaded into
Step: postion from the start image around the y-axis (anti-clockwise)
[note: free selectable value between 1 (start image) and the selected
step size for the devision of the (360°) panorama – as selected in ,,step 2
of 9”
(see step 2 of 9: General settings for conversion – point 5)]
zoom: wanted zoom step between 0 (start position, totally zoomed out)
and 24 (tele – maximum zoomed in)
ypos: vertical offset as a negative value (grows with zoom)
Description:
Starts an animation considering the zoom step and the final values for the
horizontal and verticlal motion.
Returns:
nothing
Example:
See ,,ex_anim()“;
ex_hideqtvrmouse(value)
Syntax:
Path.ex_hideqtvrmouse ( value );
Path: relative or absolute path to the movie clip the QTVR movie is
loaded into
value: true hides the qtvr mouse and false shows the qtvr mouse
pointer. All qtvr control functions are fully enabled.
Description:
Shows or hides the qtvr mouse pointer without affecting its control features.
Returns:
nothing
ex_mousecontrol(mvisible,menabled,mloopenabled)
Syntax:
Path.ex_mousecontrol(mvisible, menabled, mloopenabled);
Parameters:
Path: relative or absolute path to the movie clip the QTVR movie is
loaded into
mvisible: true or false
menabled: true or false
mloopenabled: true or false
Description:
Skips between system mouse without QTVR support (false, false, false) and the
movie’s own QTVR mouse (true, true, true)
mvisible disactivates the system mouse (true= Mouse.hide(); ) or activates it
(false= Mouse.show();)
menabled activates the QTVR mouse (movie loop)(true) or disactivates it
(false)
mloopenabled activates the possibility of panorama control (true) or
disactivates it (false)
Returns:
nothing
ex_nowait()
Syntax:
Path.ex_nowait();
Parameters:
Path: relative or absolute path to the movie clip the QTVR movie is
loaded into
Values: none
Description:
Disables the wait cycle for renderhigh function.
Returns:
nothing
Example:
Sets up a rotation function with renderhigh ability:
ex_nowait();
ex_rotation(1);
ex_rendern() ;
ex_preloader_active(value)
Syntax:
Path.ex_preloader_active (value);
Parameters:
Path: relative or absolute path to the movie clip the QTVR movie is
loaded into
Values: true or false
Description:
Enables or disables the standard QTVR2Flash preloader. If set to “false” the
qtvr2flash_preloader(percent) callback is called and can be used to create
an individual preloader.
Returns:
nothing
ex_rendern()
Syntax:
Path.ex_rendern();
Parameters:
Path: relative or absolute path to the movie clip the QTVR movie is
loaded into
Values: none
Description:
Renders the whole scene
Returns:
nothing
ex_renderhigh()
Syntax:
Path.ex_renderhigh ();
Parameters:
Path: relative or absolute path to the movie clip the QTVR movie is
loaded into
Values: none
Description:
Leads to the loading of the details
Returns:
nothing
ex_rotation()
Syntax:
Path.ex_rotation (value);
Parameters:
Path: relative or absolute path to the movie clip the QTVR movie is
loaded into
Value: number of steps the QTVR movie is to rotate around (positive
value= steps to the left, negative value= steps to the right)
Description:
Skip by a certain number of steps (Step size is defined here:
Step 2 of 9: General settings for the conversion – point 5)
Returns:
Position value around the y-axis.
(During the movie conversion: there is a fixed position figure assigned to every
step, from 1 (start image) to the selected value for the division of the
panorama step sizes (,,Step 2 of 9”).
ex_set_fps(value)
Syntax:
Path.ex_set_fps(value);
Parameters:
Path: relative or absolute path to the movie clip the QTVR movie is
loaded into
Values: fps (frames per second)
Description:
Sets the frames per second for the actual playing QTVR movie. Changes to
this value effect the QTVR movie immediately.
Returns:
nothing
ex_stage_height()
Syntax:
Path.ex_stage_height();
Parameters:
Path: relative or absolute path to the movie clip the QTVR movie is
loaded into
Values: none
Description:
Returns the height of stage in pixel.
Returns:
Height of stage in pixel
ex_stage_width()
Syntax:
Path.ex_stage_width();
Parameters:
Path: relative or absolute path to the movie clip the QTVR movie is
loaded into
Values: none
Description:
Returns the width of stage in pixel.
Returns:
Width of stage in pixel
ex_turn(degree)
Syntax:
Path.ex _turn(degree);
Parameters:
Path: relative or absolute path to the movie clip the QTVR movie is
loaded into
degree: degree number the QTVR movie is to rotate around
Description:
Animation of a rotation around a free selectable value in degrees (e.g. 180
for a half turn). The sign defines the direction of rotation.
(Negative values= rotation to the right, positive values =rotation to the left).
Returns:
nothing
ex_ypos(value)
Syntax:
Path.ex _ypos(value);
Parameters:
Path: relative or absolute path to the movie clip the QTVR movie is
loaded into
Value: negative pixel distance to the upper margin (value grows with
zoom)
Description:
Vertikal motion, (depending on the zoom) of the image.
Returns:
nothing
ex_zoom(value)
Syntax:
Path.ex__zoom(value);
Parameters:
Path: relative or absolute path to the movie clip the QTVR movie is
loaded into
Value: wanted zoom step between 0 (start position, totally zoomed out)
and 24 (totally zoomed in)
Description:
Zooming to a wanted zoom step
Returns:
nothing
Overview QTVR2Flash Callbacks
All movies converted by QTVR2Flash have several Callback routines that are
activated as soon as different events occur.
Within his own actionscript programming the user can use these functions to
analyse the results.
The following callback functions can be used:
- qtvr2flash_callback(movie_name, step, y_pos, zoom)
With every render cycle, this function is activated (by a Flash movie
converted by QTVR2Flash) and sends the current postion- and orientation
data as well as the movie name. This is the most important callback. Only by
this callback you can reach a synchronization between the QTVR2Flash
movie and your own flash presentation.
Parameters:
movie_name – the name of the QTVR2 flash movie you have activated
step – shows the current rotation around the y-axis of the roundshot
y_pos – shows the value of the vertical moving as a negative value
zoom – indicates the current zoom step
- anim_ready()
is activated as soon as an animation is finished that was started with the
command ex_anim.
- qtvr2flash_loadstatus(status)
Transmittes the current loading status of the QTVR2Flash movie to a movie
above.
Parameters:
status – the following values can be indicated:
1 = configuration file loaded
2 = preview (single image) loaded
3 = preview (completey moving preview) loaded
4 = normal view loaded
- qtvr2flash_preloader(percent)
Use this function to build your own preloader. In “percent” the current
preloading status is shown in percent. Before you can use this callback make
sure you called ex_preloader_active(false);
Note of thanks
For their collaboration on QTVR2Flash Virtual! especially thanks:
-
Michael Albers (www.michaelalbers.com) (Quicktime Movies)
Chris Wieschalla (Flash programming)
QTVR2Flash, the logo and this manual are copyrighted.
Subject to alterations.