1
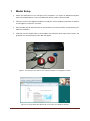
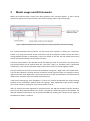
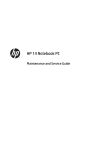
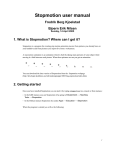
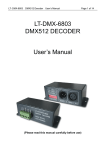
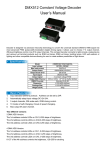
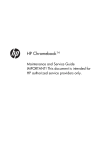
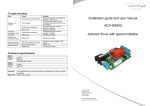
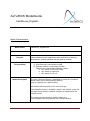
AsTeRICS ModelGuide CamMouse_DigitalIn Model Characteristics: Model Name Model file location Purpose Requirements Model Description CamMouse_DigitalIn.acs ACS\models\useCaseDemos\mouseControl\ Camera based mouse replacement with dwell-time for clicking. Alternatively, external switches can be used for clicking. 1) Web-Camera is connected via USB 2) DigitalIn module is connected via USB Switches are connected to DigitalIn module: a. In1: switch for left click / drag b. In2: switch for right click c. In5: switch for on / off The user’s head movement is translated to mouse X/Y positions. Mouse clicks can be performed by dwelling (stay at a position for a defined time) GUI buttons allow selection of the next click type. If the DigitalIn module is available, switch1 and switch2 control left and right mouse buttons. Switch5 activates and deactivates the camera mouse. The camera mouse sensitivity and the dwell time can be adjusted via the graphical user interface sliders. AsTeRICS Model Guide Page 1 1 Model Setup Attach the webcamera to an USB port of the computer. If a Laptop or Netbook Computer with internal Webcamera is used, no additional camera needs to be connected. If desired, connect the DigitalIn module to a USB port of the computer and attach 3 switches to the Digital In connectors 1,2 and 5. Start the ARE and the ACS (the ACS can be started on the same machine or alternatively on a different computer) Load and start the model (refer to the AsTeRICS user manual if these steps are not clear). The graphical user interface (GUI) of the ARE will appear. Figure 1: Connection of the switches to a Laptop Computer via the DigitalIn module Figure 2: Running model with ARE GUI for click control, Live Webcam window AsTeRICS Model Guide Page 2 2 Model usage and GUI elements When the model has been started, the above graphical user interface appears. It offers control elements to adjust the mouse sensitivity, the camera settings and the mouse click types: Figure 3: ARE GUI window with control options for model parameters and camera settings The camera-controlled mouse function can be started and stopped by clicking the “start/stop” button or by using the external switch connected to In5 of the DigitalIn module. Please note that a missing DigitalIn module is indicated by a red error marker in the ACS, but the model will work (of course no external switches can be used in this case). The white click window in the ARE GUI shows the dwell click time. If the mouse is not moved for a time period (which can be selected with the “click time” slider), an automatic click is performed. Additionally, a click can be performed using a switch connected to In1 of the DigitalIn module. The type of the next click can be chosen via the buttons “Drag click”, “Right click” and “Double click”. If one of these buttons is clicked, the next click will be of the respective type. For example to issue a right mouse click: click “Right Click”, then move the cursor to the desired location and wait until the dwell time is reached or press the switch connected to In1. If the camera settings (eg. zoom, brightness / contrast etc.) need to be adjusted, the camera settings window can be activated by clicking “show cam settings”. After adjustment of the camera settings, they can be stored by clicking the “save camera profile” button. After all settings have been adjusted to the desired level, the ARE GUI window could be resized so that only the Click Selection buttons are visible – this gives the maximum space on the desktop. The ARE GUI window can be kept on top of all other windows by choosing the “always on top” option in the ARE menu (About -> Options). AsTeRICS Model Guide Page 3