1
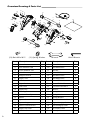
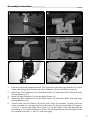
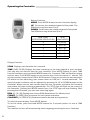
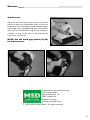
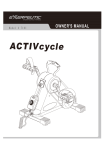
Table of Contents
Safety Precautions........................................2
Electrical Safety.............................................3
Overview Drawing......................................4
Parts List..........................................................4
Assembly Instructions.................................5
Operating the Controller...........................6
Workout............................................7
Safety Precautions
Read all instructions carefully before operating this product. Retain this owner’s manual
and keep all original transaction receipts for future reference.
•
•
•
•
•
•
•
•
•
•
•
•
•
•
•
Consult your physician before beginning this or any other exercise program.
If you experience any irregular physical conditions such as dizziness, severe muscle
or joint pain or pain in the chest, stop exercising and consult with your physician
immediately.
Keep children and pets away from the machine while in use.
Do not operate this or any exercise equipment if it is damaged.
Set up Pedal Exerciser as directed in Assembly Instructions and place unit on a level,
non-slip surface.
Keep hands and feet away from any moving parts. Do not insert any objects into
any openings.
Perform 3 to 5 minutes of warm-up and stretching before beginning your exercise.
Never exercise to exhaustion.
Do not stand on the Pedal Exerciser, only exercise in seated position.
Keep a minimum safety clearance during operation. The Pedal Exerciser is designed
as a home use exercise device. User must have full control of their muscles to operate
this unit. It may not be suitable for people who are quadriplegic or paraplegic. Please
consult your doctor or physician.
Exercise equipment is to be regularly inspected for maintenance for loose or broken
parts.
This product is for consumer use only.
Wear comfortable and suitable clothing when using Pedal Exerciser.
Each exercise should be performed in a controlled manner. Always start exercising
slowly.
Have the unit serviced by a qualified service technician. Do not attempt to service
the unit yourself.
Warning: The Pedal Exerciser is designed for seated position use on a
flat and stable surface.
4
Electrical Safety
When using an electrical appliance, basic precautions should always be followed,
including the following:
Read all instructions before using this unit.
WARNING - To reduce the risk of burns, fire, electric shock, or injury to persons:
•
•
•
•
•
•
•
•
•
•
•
•
•
•
•
An appliance should never be left unattended when plugged in. Unplug from outlet
when not in use and before putting on or taking off parts.
Do not operate under blanket or pillow. Excessive heating may occur and cause fire,
electric shock, or injury to persons.
Close supervision is necessary when this unit is used by or near children, physically
challenged or disabled persons.
Use this unit only for its intended use as described in this manual. Do not use
attachments not recommended by the manufacturer.
Never operate this unit if it has a damaged cord or plug. If it is not working properly,
if it has been dropped or damaged or dropped into water. Return the appliance to
a service center for examination and repair.
Do not carry this appliance by supply cord or use cord as a handle.
Keep the cord away from heated surface.
Never operate the unit with the air openings blocked; keep the air openings free
of lint.
Never drop or insert any objects into any openings.
Do not use outdoors.
Do not operate where aerosol (spray) products are being used or where oxygen is
being administered.
To disconnect, turn the speed and resistance knobs to the off position, then remove
plug from outlet.
Always unplug this appliance from the electrical outlet immediately after using and
before cleaning.
For Household Use Only.
Power requirement: 220VAC
Storage Precautions:
Do not store the unit in any place where it will be subjected to high or low temperatures.
Do not expose to direct sunlight for extended periods of time. Do not store the unit in a
humid or dusty area.
5
Overview Drawing & Parts List
10
18
20
9
12
19
2
13
21
34
26
12
27
21
30
1
16
36
35
23 30
23
22
29
28
25
14
15
26
7
31 5
24
8
4
11
17
32
31
24
19
20
10
12
3
33
6
12
(24) Bolt M8 x M12
(31) Spring Washer
Part # Description
6
Wrench
Allen Wrench
Q’ty Part # Description
Q’ty
1
Controller
1
19
Bolt M5x40mm
2
2
Rear Stabilizer 380
1
20
Bolt M8x20mm
2
3
Front Stabilizer 220
1
21
Nut M5
2
4
Main Frame
1
22
Bolt M5x10mm
2
5
Magnet Bracket
1
23
Bolt M6x12mm
6
6
Right Cover
1
24
Bolt M8x12mm
6
7
Left Cover
1
25
Screw ST2.9x10
2
8
Right Crank
1
26
Screw ST4.2x15
11
9
Left Crank
1
27
Controller Bracket A
1
10
Plastic Cap
2
28
Washer
2
11
PCB Support
6
29
Spring Washer
2
12
Stabilizer End Cap
4
30
Spring Washer
6
13
Motor
1
31
Spring Washer
6
14
Square Sensor
1
32
Controller Bracket B
1
15
Square Magnet
1
33
Right Handgrip Pedal
1
16
Power Control Board
1
34
Left Handgrip Pedal
1
17
Right Foot Pedal
1
35
AC Power Cable
1
18
Left Foot Pedal
1
36
Non-slip Mat
1
Assembly Instructions
1
2
3
4
5
6
1. Hold the unit in an upright position. The Controller side facing up and the AC Power
Cable side facing down. Insert the Front Stabilizer (3) into the Main Frame (4).
2. Attach the Front Stabilizer (3) to the Main Frame (4) with three Bolts (24) and three
Spring Washers (31).
3. Insert the Rear Stabilizer (2) into the Main Frame (4).
4. Attach the Rear Stabilizer (2) to the Main Frame (4) with three Bolts (24) and three
Spring Washers (31).
5. Connect the Left Foot Pedal (18) to the Left Crank (9) assembly. Thread it into the
crank assembly in a counter-clockwise direction by the tool provided. (See figures
5 and 6). Connect the Right Foot Pedal (17) to the Right Crank (8) assembly by
threading it in a clockwise direction. Note: The left/right pedals and left/right cranks
are marked with with “L” and “R” (left and right).
7
Operating the Controller
Button Function:
MODE: Press MODE button to select function display.
UP: To increase the rotational speed of the pedal. The
RPM levels vary from level 0 to 5.
DOWN: To decrease the rotational speed of the pedal.
The RPM levels vary from level 5 to 0.
RPM LEVEL
RPM
(ROTATION SPEED LEVEL) (UNLOADED)
0
0 (STOP)
1
20 ~ 25
2
30 ~ 35
3
40 ~ 45
4
50 ~ 55
5
60 ~ 65
Display Function:
SCAN: Displays each function for 6 seconds.
TIME: [0:00~99:59] Displays the time remaining or the time elapsed in your workout.
You may also set exercise time for your workout. Press MODE button to select TIME
function and then press and hold MODE button for 2 seconds. TIME will flash for setting
exercise time. Press MODE button to set exercise time. Each increment is 1 minute. The
set exercise time ranges from 5:00 to 30:00 minutes. Once you set exercise time and press
UP button to start exercising, time counts down to 0:00 per 1 second backward. The
speed of pedal revolution can be adjusted by pressing the UP or DOWN button on the
controller. When exercise time counts down to zero, controller will alarm for 8 seconds
and pedals will stop revolving automatically. The STOP sign will flash on the screen of
the controller. Pressing the MODE button once, the STOP sign will stop flashing. After
pressing the UP button, you can start exercising again.
RPM: [0~10~99] Displays the current RPM (Revolutions Per Minute) level.
COUNT: [0~9999] One increment for each pedal revolution.
CALORIES: [0~9999 KCAL] Estimated calories burned during exercise.
To select function display: Press MODE button.
To rest all values, press and hold MODE button for 2 seconds (when it is not in TIME
function).
The monitor will turn off automatically when stopping exercising for over 4 minutes.
8
Workout
Workout Pricipal
1. Personal goals can include shaping, strengthening, improving present fitness level,
rehabilitation of previous injuries, cardiovascular exercising, etc... By using the Pedal
Exerciser correctly and on a regular basis, you can achieve your goals.
2. Available time is a major element in determining what we do in our daily lives. If
you can only exercise for 15 minutes, develop a 15 minute program with the Pedal
Exerciser.
3. Exercising and working out on the Pedal Exerciser should be an enjoyable part of your
daily life.
4. Focus on the exercises. No matter what your present level of fitness, you can complete
each exercise in a short range of time and sense the increased level of strength and
endurance.
5. Always start exercising slowly, to warm up muscles.
6. The design of the Pedal Exerciser allows you to exercise your muscles with natural and
efficient movements.
The Overload Principal
In order for you to strengthen your body, you must develop a series of exercise workouts
each day. When you work out on a regular basis, your body (specifically your muscles),
adjust to the new level of workout. This is called “increasing local metabolic efficiency”.
As a result, your muscles work better and you get stronger. If you keep working at the
same level of metabolic efficiency, you can’t improve muscle efficiency. So from time to
time, you need to increase the frequency and/or duration of the exercise. Thus, in order
to improve your fitness level, you must progressively increase your work load to reach
your personal goal.
How to use your Deluxe II Pedal Exerciser.
The Deluxe II Pedal Exerciser can only be used after the power cord is plugged into the
electrical outlet. Do NOT use the Deluxe II Pedal Exerciser without the power plugged in
as this will damage the equipment. When using the Deluxe II Pedal Exerciser, the proper
way to exercise is to set the desired rotational speed of the pedal (RPM level) by pressing
the UP or DOWN button on the controller, and then following that speed to get the best
results. Pedaling at excessive speed or applying excessive force will activate the overload
protection circuitry to stop the motor, allowing the user to retract feet/hands. The motor
will turn off for 2-3 seconds and then turn on again automatically. If the motor overload
situation persists (motor turns off and then turns on) for 10 times, the motor will stop
working completely, which may cause motor damage. The STOP sign will flash on the
controller and the controller will alarm for 8 seconds. Press the DOWN button until the
RPM level reaches 0. Then you may press the UP button to start exercising again.
9
Workout
Range of motion and flexibility
This device can be used for both upper and lower body. As a lower body device, it
works with passive motion to increase tone of the quadriceps muscles (muscles in the
thigh) and circulate blood flow to the entire lower leg and foot. For upper body use, it is
used as a resistance device, allowing the user to exercise the muscles of the arm (biceps,
triceps, deltoids and the smaller muscles of the forearms).
Routine
People vary in how they adapt to repetitive exercise. In developing an exercise routine,
pay attention to how you feel, especially after an exercise is completed. You may feel
tired but you should not feel exhausted. When you first start exercising, the principal
muscles you use will ache slightly, especially the next day. However, they should not hurt
to cramp. No matter what the recommended exercise routine, never exercise beyond
the point of discomfort.
For the first two weeks, you should begin with 5-10 minutes once a day at a low speed.
After the first two weeks, you can increase the time on the device to 15-20 minutes as
you become more accustomed to the exercise. The speed can also be increased once
you have adapted to the device. Longer periods of exercise will result in greater gains.
Leg Exercise
Place the Pedal Exerciser on a non-slip mat and
sit comfortably in a chair, the device directly
in front of you. The knee joint should not be
flexed less than 90 degrees. Wear rubber soled
shoes and adjust foot pedal straps to the proper
length. Barefooted use of the Pedal Exerciser is
not recommended.
WARNING
Do not stand on the unit to exercise. Only
exercise in a seated position. Make sure the seat
does not move or pivot. Do not sit in a chair
with casters.
10
NOTE: Use the foot pedals
(17/18) for leg exercises.
Workout
Arm Exercise
Place the unit directly in front of you on a table
top. Be seated in a comfortable chair, so you can
easily reach the hand grip pedals without hyper
extending (over straightening) the elbow joint.
This can be accomplished by either placing a
cushion on top of the seat or by moving the
unit closer to the user.
NOTE: Use the hand grip pedals (33/34)
for arm exercises.
Produced for and distributed by:
MSD Europe bvba
Nijverheidsstraat 18
1840 Londerzeel
Belgium - Europe
www.msd-europe.com
© 2009, MSD Europe bvba. All rights reserved.
11