1
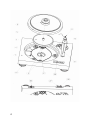
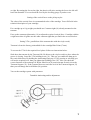
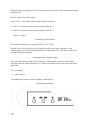
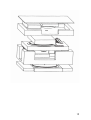
EuroAudioteam, s.r.o.
INSTRUCTIONS FOR USE
EAT E-Flat
Dear Music Lover,
Welcome! Congratulations on your purchase of our EAT E-Flat turntable. Your EAT E-Flat
was hand-crafted by our team of skilled technicians. It has been tested rigorously and is ready
for your enjoyment.
Please take the time to read this manual carefully, to ensure that you obtain the ultimate
performance from your EAT E-Flat turntable. The tips contained within will ensure that your
Forte will remain as-new condition for many years to come!
Your EAT Consultant is:
Serial Number:
2
EAT E-Flat
Your contribution to environmental protection.
Disposal of packaging material:
Packaging protects the device from damage during the transportation. The packaging
materials were chosen with the regard to the environmental protection and they are therefore
recyclable.
Disposal of old equipment:
For the disposal of old equipment use a junk place appointed for that purpose.
3
Controls, features, connections and parts of the turntable:
1 Sub Platter
2 Sub Platter shaft
3 Pulleys of the motors
4 Drive belt
5 Platter
6 Tightening disk – or record clamp
7 Plinth or chassis of the turntable
8 Tonearm
9 Cartridge
10 Tonearm pivot point
11 Isolation connector
12 Plug for the isolating connector
13 Antiscating disc
14 Antiscating rider
15 Hang up of the antiscating
16 Fixng screw for the antiscating hair
17 Adjustable feet
18 Counterweight
19 Cunterweight matrix – or nut
20 Tonearm lift
21 VTA building screw
22 Lift lever
23 Tonearm support
24 Jack holder
25 Antiscating weight
26 Turntable power connection
27 Signal output
28 Grounding terminal for signal cable
29 User panel
4
The device is shipped partially disassembled in order to avoid
damage to sensitive parts.
Please, double-check immediately after receiving it if the packaging and the device were not
damaged during the transportation.
If damaged please do not operate.
Compare the data for the electrical connection on the type plate of the turntable
with your network data. Data must be compatible to prevent damage to the turntable.
!
Warning of a hazard for the user, the unit or possible misuse.
5
6
7
Before Using
Assembly the turntable from the parts that are inside of the package!
Remove the cover protection from the Sub Platter Shaft (2) and check if there is enough
grease. You will find the additional grease in the accessories if the shaft is not enough
lubricated. Place the Sub Platter (1) on the Shaft (2). Place the Drive Belt (4) on the Pulley
of both Motors (3). You need to install the Tightening Disc (6) to the Platter (5) by screwing
it to the thread of the platter pin. After you successfully installed the Tightening disc to the
platter and disc is holding firmly on the platter you can install the platter. Hold the Tightening
disc while centering the Platter (5) into the hole of the turntable chassis (7) and install the
Platter (5) on the Sub Pletter (1). In the next step assembly the Tonearm (8) that you find in
the accessories box inside of the packaging.
Mounting of the Cartridge (9) to the Tonearm (8):
If you purchased one of our EAT cartridges please install it to the flat carbon tonearm now.
Install screws that are part of the cartridge box into the oval holes of the tonearm and fix it
into the cartridge holes from the bottom side of the carbon tonearm. Connect the cartridge
system with the Tonearm cables:
- White Left channel L+
- Red
Right channel R+
- Green Right channel R- Blue
left channel LNow the tonearm is prepared. Install prepared tonearm on the tip of the Tonearm pivot
point (10). Install the Isolation connector (11) of the tonearm output to the Plug of the
isolating connector(12). Be sure that it is properly inserted. The locating pin of the
connector is facing to the counterweight of the tonearm. After inserting secure the
isolation connector by fully tightening of the union nut. It remains to complete the
Antiscating disc(13)with hanging nylon hair that is ended by a small eye on one end.
Antiscating disc (13) set on the pin of the antiscating rider (14). Belt up the antiscating
hair in the groove around the perimeter of the Hang up (15) and the eye of the antiscating
hair hook to the Fixing screw (16). You tighten fixing screw (16) in to the thread of the
suspention.
Operation and adjusting of the turntable
Turntable unit must be in the perfect straight position. This we will achieve by Adjustable
feet (17). Set up the height and the levelling of the chassis by turning the feet to the left side
8
or right. By turning the feet to the right, the chassis will raise; turning the feet to the left will
lower the turntable. You can check the level by the levelling gauge if you have one.
Setting of the vertical force on the pickup stylus.
The value of the vertical force is recommended value of the cartridge. You will find it in the
technical description of your cartridge.
For cartridge up to 10g weight you should use Counterweight (18) already mounted on the
tonearm.
Ease up the counterweight matrix (19) to adjust the required vertical force. Cartridge with the
weight more than 10 grams use the other counterweight that you find in the accessories box.
Setting VTA ( parallelism of the tonearm tube with the vinyl record)
Tonearm is from the factory preinstalled for the cartridge Blue Point (17mm).
To correct the VTA for the required level please follow our instruction below:
Sink down the tonearm by the Tonearm lift (20) direct to the vinyl record in a place where the
groove is closing. Loose the VTA building screw (21). This way you enable the hang up in
the vertical direction. By holding the Antiscating Hang up (15), by pressing or releasing you
will set the required level, than you tighten the building screw (21). Now you check the
correct function of the tonearm lift. By the lifted lever(22) must tonearm securely sit on the
Tonearm Support (23). If the Tonearm does not reach the level of the Tonearm support( 23)
than you can change the Jack Holder (24) position.
You set the cartridge system with protractor.
Turntable Antiscating and its adjustment.
9
With help of the Antiscating rider (14) you can adjust the position of the tonearm antiscating
weight cca 45°
For the vertical force of the stylus:
up to 13mN - use position of the counterweight in Stuck Nr. 1
13-18mN – use position of the counterweight in Suck Nr. 2
18-25mN- use position of the counterweight in Stuck Nr. 3
*Stuck = Zápich
Connecting of the turntable
We use the switching power supply 90-246V AC, 47-63Hz
Plug the flex cord into the power plug. Input from the source that is ended by 4 –pin
connector plug into the Grounding terminal of the signal cable (28). On the user panel (29)
will light up the green button.
Connecting of the turntable output
The signal cable that you find in the accessories of the turntable connect by the Chinch
connectors into the Signal output box (27). Make sure that the colours are connected on the
right place:
-R
red channel
- L white channel
Grounding cable connect to the Grounding Terminal (28).
Operating the turntable
10
If your turntable is connected to the power, than on the User Panel (29) will light the green
light – button STBY-STOP.
By pressing the button 33 or 45 you will choose the required speed to reproduction of the
record vinyl. The button will start to blink and after the reaching the right speed will light
constantly.
To stop the turntable you press button STNBY-STOP.
!
As a safety precaution, always disconnect the record player from the mains power
supply before maintenance!
Technical specifications EAT E-Flat
* Electronic speed change
* 33.33/* 45.11
Speed variance
±0.09%
Wow and flutter
±0.01%
Signal-to-noise ratio
-73dB
Dimensions of the turntable
500x400x100mm (WxHxD)
Dimensions of the transport
710x365x590mm
box
Turntable weight
18,7kg
Weight
42kg - turntable including the wooden transport box
Chassis material
MDF
Belt Material
silicone rubber
Motor
2x synchronized controlled by microprocessor
Drive: belt
Speed changer
electronically, illuminating buttons
Platter
Aluminium-Magnesium, diameter 340mm, weight 6,9kg, damped
Input:
20W DC
Outboard power supply
switching power supply, (100-240VAC, 50-60Hz)
Tonearm
Flat, carbon
Effective length
254mm, 10 inch
Effective mass
4mm
19.5g
3mm
12.5g
Mounting distance
238mm
Overhang
16mm
Range of adjustment for vertical force on stylus
0-3g
Angel
24°
11
Useful tips
The base and the record player should be positioned on a low-resonance surface, such as
wood or multiple-layer ply board, to avoid structural vibrations disturbing replay.
Mains power connection
The turntable is supplied with a power supply suitable for your country's mains supply. Check
the label before connecting to ensure compliance with the mains rating in your home.
If the player is not used over a long period of time, the drive belt can be removed to prevent
undesired stretching.
Service
Should you encounter a problem which you are not able to correct or identify despite the above
information, please contact your dealer for further advice. Only when the problem cannot be
resolved there should the unit be sent to the distributor in your country.
Guarantee repairs will only be affected if the unit is returned correctly packaged. For this reason
we recommend keeping the original packaging. Transport of the originally packed unit is
possible only on the additional palette.
Never return a record player without making sure that is it safely disassembled and correctly
packaged in the original packaging. Please remove these parts and pack them separately: feet,
counterweight, platter, cartridge and belt. Fit the cartridge protection cap. Insert the transport
lock for the tonearm prior to carefully packaging the record player.
Warranty
The manufacturer accepts no responsibility for damage caused by not adhering to these
instructions for use and/or by transportation without the original packaging.
Modification or change to any part of the product by unauthorised persons release the
manufacturer from any liability over and above the lawful rights of the customer.
EAT EuroAudioTeam is a Registered
Trademark of Jozefina Lichtenegger.
Copyright © 2010. All rights reserved.
12
The information was correct at the time of
going to press. The manufacturer reserves the
right to make changes to the technical
specification without prior notice as deemed
necessary to uphold the ongoing process of
technical development.
13