1
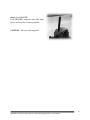
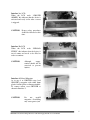
Homework 12: User Manual
Due: Thursday, April 21, at Classtime
Team Code Name: ___GROVER________________________________ Group No. __7___
NOTE: This is one of the last sections needed to finish the Final Report. This homework will
count for 4% of each team member’s grade, and therefore all team members should participate
equally in completing it. The User Manual should be about 5 pages in length (one page per bullet).
User Manual Outline:
Brief (marketing-style) product description
Product illustration annotated with callouts for each control/display
Product setup instructions
Product use instructions
Product troubleshooting instructions
Evaluation:
Component/Criterion
Score
Multiplier
Product description
0 1 2 3 4 5 6 7 8 9 10
X2
Product illustration with callouts
0 1 2 3 4 5 6 7 8 9 10
X2
Product setup instructions
0 1 2 3 4 5 6 7 8 9 10
X2
Product use instructions
0 1 2 3 4 5 6 7 8 9 10
X2
Product troubleshooting instructions
0 1 2 3 4 5 6 7 8 9 10
X2
TOTAL
Points
GROVER:
Ground-Roaming Offensive Vehicular Engagement Robot
USER MANUAL
Revision 1
04/21/2005
© ECE477 Group 7 Spring 2005
All Rights Reserved
Table of Contents
Product Description .................................................................................................................... 2
Product Illustration...................................................................................................................... 3
Product Setup .............................................................................................................................. 5
Product Use................................................................................................................................. 7
Troubleshooting .......................................................................................................................... 9
Product Support Information ................................................................................................... 11
1
GROVER: Ground–Roaming Offensive Vehicular Engagement Robot User Manual
GROVER Description
GROVER is the first robot ever to be used as an autonomous rogue agent in a paintball
arena. GROVER is designed to randomly patrol any sized area. This battery powered robot
travels on two rotating treads, similar to those of a tank, and includes a rotating turret that detects
heat-emitting targets by the use of PIR (Passive Infrared) sensors. The robot is capable of
obstacle avoidance using ultrasonic sensors and will travel in a straight obstacle free path until a
target is detected. Upon obstacle detection, the robot will halt, randomly face a new direction
and continue forward on its destruction path. Upon target detection, GROVER will stop and fire
an automatic weapon in the direction of the detected heat. An LCD screen will display the
number of engagements that GROVER has encountered during play. As a safety feature, the
referee of the game will be able to control a remote RF emergency shut-off switch. This can be
used after GROVER wipes out the entire floor of players and starts coming after the referees.
GROVER will provide a huge twist to the game of paintball and will keep everybody on the
move.
2
GROVER: Ground–Roaming Offensive Vehicular Engagement Robot User Manual
GROVER Illustration
GROVER was designed to be a very highly autonomous vehicle. Therefore, there are
few controls in the system. As seen in Figure 1 below, a standard ON/OFF toggle switch is
located behind the gun. This can be used to keep GROVER out of trouble when game play is not
desired. There is also an RF remote shut-off switch that can be used in emergencies or to keep
GROVER stable while trying to find him. The RF receiver is connected to the power supply
system and will completely disable GROVER when the larger button is held down.
The
ammunition magazine is located at the very top of GROVER and can hold approximately 100
rounds of ammo.
Figure 1: GROVER
There is an LCD screen on the back end of GROVER for the display of the engagement
count. There are also 4 PIR sensors located on GROVER. One sensor is located on the front,
3
GROVER: Ground–Roaming Offensive Vehicular Engagement Robot User Manual
one is located on each side, and one narrow beam sensor is located just above the gun barrel.
The obstacle detection ultrasonic sensor is located on the front of GROVER as well. There are
also several batteries located on the robot. There is a 7.2V rechargeable RC battery located on
both sides of GROVER. There are also three 9V batteries located on the top tank deck for
powering the three lower PIR sensors. One 9V battery is also located in the turret for powering
the PIR sensor located in the gun. Each battery is easily accessible for changing or charging.
4
GROVER: Ground–Roaming Offensive Vehicular Engagement Robot User Manual
GROVER Setup
CAUTION: Failure to follow the instructions contained in this manual may result in injury to
the user or to other persons.
SAFETY GLASSES: Always wear safety glasses when operating GROVER.
Step 1: Unpack GROVER
Carefully remove all items from the box. Remove all packaging material.
Step 2: Install the NiMH Batteries
Insert one (1) 7.2V NiMH battery into each of the battery docking bays with the battery
cables facing rearward. Once
the batteries are secure,
connect the battery cables to
the battery receptacles at the
rear of the robot.
NOTE:
Charge the batteries
for 14-16 hours
before initial use.
Warning: Always check that GROVER’s power switch is in the downward position
(OFF) before connecting the batteries.
Step 3: Install the 9V Batteries
Connect 9V batteries to each of GROVER’s four (4) sensors.
5
GROVER: Ground–Roaming Offensive Vehicular Engagement Robot User Manual
Step 4: Load GROVER
Load GROVER’s magazine with either 6mm
plastic AirSoft pellets or 6mm paintballs.
CAUTION: Do not overfill magazine.
6
GROVER: Ground–Roaming Offensive Vehicular Engagement Robot User Manual
GROVER Use
Once you have followed the GROVER setup instructions on page 5, you are ready to go.
Due to the autonomous nature of GROVER, the user-interface is simple to understand and very
easy to use.
Interface 1: On/Off Switch
To turn the device on, press the
switch forward. To turn the device
off, pull the switch back.
NOTE:
Switch is shown in the
off position in the
picture at the right.
Interface 2: Remote Control
To reset the device, press and release
the top button (bigger button).
To shut the device down, press and
hold the top button (bigger button).
7
GROVER: Ground–Roaming Offensive Vehicular Engagement Robot User Manual
Interface 3a: LCD
When the LCD reads “GROVER
ARMED” this indicates that the device is
activated and ready to fire after a sensor
is triggered.
CAUTION: Proper safety procedures
should be followed at this
time.
Interface 3b: LCD
When the LCD reads “RELOAD
STNBY” this indicates that the device is
out of ammo and needs to be filled in
order to continue.
CAUTION:
Although
empty,
caution should still be
exercised to prevent
injuries.
Interface 4: Reload Magazine
As in step 4 or GROVER setup, load
GROVER’s magazine with either 6mm
plastic AirSoft pellets or 6mm paintballs.
To resume action, reset GROVER as
shown in Interface 2.
CAUTION:
Do
not
overfill
magazine. Overfilling
may cause gun to jam.
8
GROVER: Ground–Roaming Offensive Vehicular Engagement Robot User Manual
Troubleshooting
The following section contains troubleshooting tips. If the problem persists, contact our customer
service. See the Product Support Information section of this user manual for our customer
service department contact information.
GROVER does not turn on:
•
Make sure the batteries are properly connected and fully charged.
•
Make sure there is power to the main board by checking the two power indicator LEDs
found in the mid section of GROVER. If they are off and the batteries are properly
connected and charged, contact technical support.
•
Make sure the remote RF switch button is not being held down.
The LCD is not displaying anything:
•
Make sure there is power to the main board by checking the two power indicator LEDs
found in the mid section of GROVER. If they are off and the batteries are properly
connected and charged, contact technical support.
•
Make sure the LCD is properly and tightly connected to the main board.
LCD contrast is too bright or too dark:
Adjust the LCD contrast by adjusting the potentiometer in the main board using a small flat-head
screwdriver. Make sure there is no power to the main board when you are doing this by setting
the main power switch to “OFF”.
LCD is displaying foreign or incorrect characters:
There is some problem with the LCD or microcontroller. Contact technical support. This
problem can only be serviced by a certified technician.
LCD is not displaying the correct number of engagements:
There is some problem with the microcontroller. Contact technical support. This problem can
only be serviced by a certified technician.
GROVER does not detect target:
•
Make sure the batteries of the PIRs are properly connected and fully charged.
•
The PIRs need a warm up period of about 2 minutes after the batteries are connected to
properly detect targets.
GROVER does not align gun:
There is some problem with the servo or microcontroller. Contact technical support. This
problem can only be serviced by a certified technician.
GROVER does not align gun properly with the target:
•
Make sure the battery of the gun PIR is properly connected and fully charged.
•
The PIR needs a warm up period of about 2 minutes after the battery is connected to
properly detect targets.
9
GROVER: Ground–Roaming Offensive Vehicular Engagement Robot User Manual
GROVER suddenly stops moving:
•
Check the LCD and see if it is displaying “PWR: ON->RELOAD STNBY”. This means
that GROVER is out of ammunition and needs to be reloaded. After the ammunition has
been reloaded, reset GROVER.
•
Make sure the remote RF switch button is not being held down.
•
Make sure the batteries are properly connected and fully charged.
GROVER does not move:
There is some problem with the H-bridge or microcontroller. Contact technical support. This
problem can only be serviced by a certified technician.
GROVER does not turn or drive forward properly:
Check the treads to make sure they are not loose. If they are, refit the treads.
The RF remote does not disconnect power:
•
Make sure you are in the RF remote’s range.
•
Replace the RF remote’s battery.
•
Make sure you are pressing the larger button on the remote.
GROVER does not detect and avoid obstacles:
There is some problem with the ultrasonic sensor or microcontroller. Contact technical support.
This problem can only be serviced by a certified technician.
10
GROVER: Ground–Roaming Offensive Vehicular Engagement Robot User Manual
Product Support Information
If you have read the operation manual and require further product support you can contact us
using the information below.
GROVER Product Support
Mail:
GROVER Support Centre
465 Northwestern Ave.
West Lafayette, IN 47907-2035
United States of America
URL: shay.ecn.purdue.edu/~477grp7
E-Mail: [email protected]
Phone: 1-800-SHOOT-ME (1-800-746-6863)
Fax: 1-765-743-0484
11
GROVER: Ground–Roaming Offensive Vehicular Engagement Robot User Manual