1
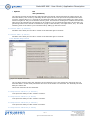
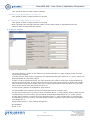
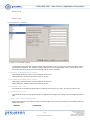
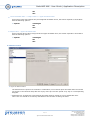
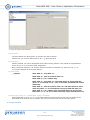
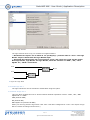
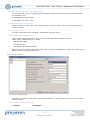
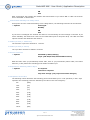
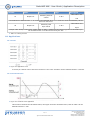
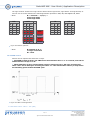
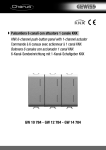
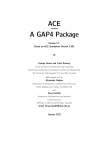
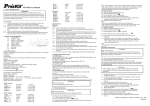
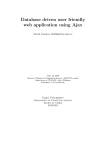
SwitchME KNX Switch actuator User handbook Application Description SwitchME KNX · User Guide | Application Description 1. Contents 1. Contents ·2 2. Product overview ·4 3. System information ·4 4. Functions ·4 4.1 General ·4 4.2 Functional overview ·5 5. Hardware ·6 5.1 Technical data ·6 5.2 Dimensions ·9 5.3 Connection diagram ·9 6. Installation ·10 6.1 Installation instructions ·10 6.2 Service and maintenance guidelines ·10 6.3 Start-up ·11 7. Software ·11 8. Application Description ·12 8.1 General ·12 8.2 Channels "N" functional parameters ·13 8.3 Functions 8.3.1 "Time" function 8.3.2 "Flash" function 8.3.3 "Staircase" function 8.3.4 ON/OFF delay function · · · · 8.4 "Scene" function ·19 8.5 "Threshold " function ·20 8.6 Blind function ·21 ·14 15 16 17 18 8.7 Logic function ·22 8.8 Heating actuator ·24 9. Description of the communication objects· 26 9.1 Objects in general and output N ·26 9.2 All objects of channel "N" 9.2.1 Object – switch status response 9.2.2 Object – Statistics for ON switch 9.2.3 Object - staircase light 9.2.4 Object – warning staircase light 9.2.5 Scene object 9.2.6 Threshold value object 9.2.7 Blind object 9.2.8 Logic object 9.2.9 Heating actuator object ·26 10. Applications · · · · · · · · · 27 27 27 28 28 28 29 29 29 ·30 10.1 Scene ·30 10.2 Threshold value ·30 10.3 Blind ·31 10.4 Logic function ·31 2 | 40 ©preussen automation GmbH 2011 preussen automation GmbH Am Grundwassersee 1 82402 Seeshaupt [email protected] www.preussen-automation.eu SwitchME KNX · User Guide | Application Description 10.5 PWM control 11. Safety instructions ·32 ·33 12. Warranty ·33 13. Declaration of Conformity ·35 14. Contact ·35 15. Index ·36 15.1 List of figures 15.2 List of tables ·36 ·36 16. Technical data sheet ·37 3 | 40 ©preussen automation GmbH 2011 preussen automation GmbH Am Grundwassersee 1 82402 Seeshaupt [email protected] www.preussen-automation.eu SwitchME KNX · User Guide | Application Description 2. Product overview This guide is for the following SwitchME KNX models from preussen automation: SwitchME4 KNX Switch actuator 4-ch, 4 SU, 230 VAC, 16 A SwitchME8 KNX Switch actuator 8-ch, 8 SU, 230 VAC, 16 A SwitchME12 KNX Switch actuator 12-ch, 12 SU, 230 VAC, 16 A 3. System information The SwitchME KNX is a product from Instabus KNX Systems and satisfies international standards (ISO/ IEC 14543-3). It is assumed that readers will already have acquired specialist knowledge in the form of KNX trainings. The SwitchME KNX operation is software-dependent. Detailed information on software releases and the respective functional scope as well as the actual software itself can be found on the product database. preussen automation has English and German versions of its database available online for download as a .vd4 file at www.preussen-automation.eu. preussen automation products comply with the international EMC standard (electromagnetic compatibility / elektromagnetische Kompatibilität). 4. Functions 4.1 General The SwitchME series of KNX actuators is ideally suited to control lighting, window blinds (for example) or other switch functions in a professional KNX bus installation. 4, 8 or 12 channels can be switched simultaneously. The outputs switch a maximum of 16 A and can also be manually operated. The SwitchME KNX generally requires no additional power supply. The SwitchME 8 and 12 KNX only need an additional 24V DC power supply if synchronous (RTS - real time systems) switching of several channels is necessary. The autonomous switching of up to twelve devices is enabled by shutter contacts. 4 | 40 ©preussen automation GmbH 2011 preussen automation GmbH Am Grundwassersee 1 82402 Seeshaupt [email protected] www.preussen-automation.eu SwitchME KNX · User Guide | Application Description 4.2 Functional overview Szenenfunktion SwitchME KNX Logikfunktion Ausgang zuordnen zu (Szene 1...64oder ohne Zuordnung) Logik Verknüpfung 1 aktivieren Schaltaktor Heizaktor Logik Verknüpfung 2 aktivieren Aktivierung Schwellenwert 1 über BUS Aktivierung Schwellenwert 2 über BUS Schwellenwert Nicht aktiviert Verzögerung nach Busspannungswiederkehr (2...200s) Objektwert< unterer Schwellenwert Unterer Schwellenwert <= Objektwert<= oberer Schwellenwert Zyklisch „In Betrieb“ Telegramm senden Resetverhalten Schaltaktor AN Objektwert > oberer Schwellenwert AUS Schaltzustand beim Busspannungsausfall unverändert Schaltzustand nach Busspannungswiederkehr AN Jalousie geöffnet AUS Jalousie geschlossen unverändert Jalousie Jalousie kontrollieren Kanalauswahl Ruhezustand Laufzeit Verzögerungszeit für Einschaltung AN/AUS Verzögerung Verzögerungszeit für Abschaltung Verzögerungszeit für Leuchtenschutz Kontrolle Treppenlicht Treppenlichtdauer über BUS Zeitfunktion Treppenlicht Warnung Treppenlicht Zeit für AUS Resetverhalten Zustand des Blinkens PWM Zykluszeit Zeit für AN Rückmeldung bei Objekt „Status schalten“ Heizaktor Blinken (Warnfunktion) „AN“ Position des Ventils Automatische Aktivierung bei Stromerkennung Zeit für AUS Anzahl der Blinkzyklen 1 Bit pwm (AN-Start / AUS-Stop) Zustand nach dem Blinken Ansteuerung empfangen als 1 Byte (255-AN/0AUS/ anderes Ventil) ccFigure 1: Functional overview SwitchME KNX 5 | 40 ©preussen automation GmbH 2011 preussen automation GmbH Am Grundwassersee 1 82402 Seeshaupt [email protected] www.preussen-automation.eu SwitchME KNX · User Guide | Application Description 5. Hardware 5.1 Technical data dd Power supply Operating voltage (bus) Electrical consumption KNX (active) Electrical consumption KNX (inactive) Power consumption KNX (active) Power consumption KNX (inactive) 21 - 30 V DC < 15 mA < 5 mA < 450 mW < 150 mW dd Output ratings Device type SwitchME4 KNX SwitchME8 KNX SwitchME12 KNX Number of outputs 4 8 12 I max. power 16A 16A 16A P max. heat dissipation 2.7 W 5.4 W 8W U max. voltage 250/440 V AC 50/60 Hz 250/440 V AC 50/60 Hz 250/440 V AC 50/60 Hz ccTable 1: Output ratings dd Output switching values AC operation (cosФ=0.8) 12 A / 230 V Fluorescent lamp load 16 A / 250 V (150 µF) minimum switching capacity DC switching capacity (resistive load) min. switching cycles (mechanical) electrical service life 0.1 mA / 1 V 16 A / 12 V DC > 1,000,000.00 > 100,000.00 dd Output switch delay without additional power supply max. delay time per switch change (capacity load time) with every SwitchME KNX 400 ms !! Note: Voltage overload protection is integrated into the device. This halts active switch proce- dures and retains the last relay position in the device memory. If a power drop falls into the cut-off range, this function may prevent the deactivation of a non-switched relay. If the voltage (capacity of the relay driver) again climbs into the active range, the relay can be reactivated again in the memory after the interrupted state. If the load capacity is insufficient the delay time for the switch change is approx. 0.4 s. dd Output switch delay with additional power supply max. delay time upon switch change (capacity load time) SwitchME 8 KNX SwitchME 12 KNX 100 ms 100 ms !! Note: With some applications a synchronous on/off relay switch is required, because exces- sive delays are not permissible. In such cases an additional 24-30 V DC power supply can be connected. The maximum anticipated power with an active relay is 24 mA, and 4 mA with an inactive relay. If there is insufficient switching capacity, the switch delay for a status change is approx. 100 ms. dd Connections 6 | 40 ©preussen automation GmbH 2011 preussen automation GmbH Am Grundwassersee 1 82402 Seeshaupt [email protected] www.preussen-automation.eu SwitchME KNX · User Guide | Application Description Input 24V DC (KNX bus voltage) KNX connection KNX bus clamp (red/grey) Supply and outputs screw clamps up to 2.5 mm² Outputs bistable relay with isolated contacts (230V 50/60Hz) Cable lugs12 mm Tightening torque max. 0.8 Nm dd Display red LED and KNX button for relay of physical address Note on contact position position lever relay dd Temperature range Operating temperature -5°C Storage temperature -25°C ~ +55°C ~ +45°C Transport temperature -25°C ~ +70°C dd Ambient impacts rel. humidity max. 95% (no condensation) dd External characteristics Characteristics SwitchME4 KNX SwitchME8 KNX SwitchME12 KNX Modular according to DIN REG 35 mm rail REG 35 mm rail REG 35 mm rail Dimensions LxHxD 72x90x64 mm 144x90x64 mm 216x90x64 mm Sub-units 4 SU 8 SU 12 SU Device weight 257 g 480 g 700 g Transport weight 300 g 580 g 825 g Installation Fuse box Fuse box Fuse box Material/colour plastic/black plastic/black plastic/black ccTable 2: External characteristics dd Safety standards LVD StandardEN60669-2-1, EN60669-1 EMC StandardEN50090-2-2 dd CE certificate In accordance with EMC and Low Voltage Directives dd Hazardous substances In accordance with RoHS (Restriction of (the use of certain) hazardous substances); German: "Beschränkung (der Verwendung bestimmter) gefährlicher Stoffe") 7 | 40 ©preussen automation GmbH 2011 preussen automation GmbH Am Grundwassersee 1 82402 Seeshaupt [email protected] www.preussen-automation.eu SwitchME KNX · User Guide | Application Description dd Maximum lamp load Lamps Incandescent lamps3500 W Low-voltage halogen lamps Inductive transformer1800 W Electronic transformer2000 W 3500 W Halogen lamps 230 V Mercury-vapour lamps Uncompensated2800 W Parallel compensated2800 W Fluorescent lamp T5/T8 Uncompensated3500 W Parallel compensated2000 W DUO lamp2000 W Dulux lamp uncompensated1500 W Parallel compensated1500 W Switching characteristic (contact) max. short-circuit current Ip (120 µs) 600 A max. short-circuit current Ip (240 µs) 480 A max. short-circuit current Ip (480 µs) 300 A max. short-circuit current Ip (1000 µs) 170 A dd Application table Type max. number of communication objects max. number of group addresses max. number of connections SwitchME4 KNX SwitchME8 KNX SwitchME12 KNX 90 170 250 254 254 254 254 254 254 ccTable 3: Application table !! Note: Programming requires the use of the KNX software ETS2 V1.3 or ETS3.0. If using ETS2 V1.3, it is recommended that the *.vd2 release be imported. And if using ETS3.0, it is recommended you import the file with the *.vd4 suffix. 8 | 40 ©preussen automation GmbH 2011 preussen automation GmbH Am Grundwassersee 1 82402 Seeshaupt [email protected] www.preussen-automation.eu SwitchME KNX · User Guide | Application Description 5.2 Dimensions ccFigure 2: Dimensions SwitchME4 KNX x= SwitchME8 KNX 72 mm SwitchME12 KNX 144 mm 216 mm 5.3 Connection diagram 1. Label sector 2. Programme button & LED 3. KNX bus connection 4. Pole connector 5. Note on contact position and manual operation 6. Additional 24V power supply (max. 24 mA in operation, min. 4 mA in standby) ccFigure 3: Connection diagram SwitchME4 KNX 9 | 40 ©preussen automation GmbH 2011 preussen automation GmbH Am Grundwassersee 1 82402 Seeshaupt [email protected] www.preussen-automation.eu SwitchME KNX · User Guide | Application Description ccFigure 4: Connection diagram SwitchME8 KNX ccFigure 5: Connection diagram SwitchME12 KNX 6. Installation 6.1 Installation instructions During installation please observe the following: a. Sufficient space for the installation of the actuator b. suitable tool for installation and for repairs at place of installation c. Minimum distance between actuator and other devices in close proximity d. Minimum distance and suitable position for proper ventilation e. The requisite safety devices (e.g. fuses, automatic safety devices, etc.) must be connected in order to prevent excessive voltage. 6.2 Service and maintenance guidelines Electrical devices may only be installed and assembled by specialist technicians The applicable accident 10 | 40 ©preussen automation GmbH 2011 preussen automation GmbH Am Grundwassersee 1 82402 Seeshaupt [email protected] www.preussen-automation.eu SwitchME KNX · User Guide | Application Description prevention regulations must be observed. Failure to follow the instructions could result in damage to the device, fire or other hazards. Opening the device will render the warranty null and void. Motors up to 4 PS (no three-phase motors!) The place of installation should be well cooled with ambient air. Please ensure the device is adequately protected from moisture, strong vibration and dust. Avoid contact with rainwater and other liquids as well as with corrosive gases. Clean dust away regularly but do not use any liquids such as alcohol, petrol, etc. and make sure not to touch connected contacts. If damage occurs due to moisture or liquid, shut the device off immediately. Regularly check the connected wires and all other connected cables and replace these in good time. For your own safety make sure every connection is made via a fuse or an MCB (Main Control Block). 6.3 Start-up Once the device has been wired up, the physical addresses can be assigned and the channels parametrised. 1. Connect the interfaces to the bus 2. Connect bus voltage 3. Press the programme button on the device (red programme LED illuminates) 4. Load the physical address from the ETS software via the interface (red LED voltages off once this has been completed successfully) Load the application with the required parametrisation 5. Connect the power supply 6. The required function can be tested once the device is operationally ready (also possibly with the aid of the ETS software) 7. Software The databases of the SwitchME KNX from preussen automation enables the ETS3.0 software to perform the requisite configurations on the device. The device types are SwitchME 4 KNX, SwitchME 8 KNX and SwitchME 12 KNX, the associated database name is: SwitchME KNX preussen.vd4. All interfaces and their functions require parameters which you can take from the following descriptions. Each channel output of the switch actuator is independent from and identical to the others. The following section describes the following channel output in detail. Note: If you are using ETS2V1.3, import the database version "VD2", if you are using ETS3.0 then import the versions "VD3" to "VD5". 11 | 40 ©preussen automation GmbH 2011 preussen automation GmbH Am Grundwassersee 1 82402 Seeshaupt [email protected] www.preussen-automation.eu SwitchME KNX · User Guide | Application Description 8. Application Description 8.1 General ccFigure 6: "general" parameters Two parameters can be configured in the general parameter configuration window: Delay following bus voltage recovery Send "in operation" telegram cyclically dd Delay following bus voltage return The relay switches with a delay time of 2...200 s after switching on. The preconfigured selection is 2 seconds. The delay time is min. 2 s and max. 200 s. `` Options2…200 s If the device is set to start the timer counting and once the delay time has expired, the switch will respond. dd Send "in operation" telegram cyclically The range of the parameter is 0 to 65535 s. With zero as the parameter the function will be blocked, all other parameters activate it. `` Options0…65535 s If the parameter is not set to zero, the device will send a periodical telegram at regular intervals once the time is expire. The values 0 and 1 will be sent alternately. 12 | 40 ©preussen automation GmbH 2011 preussen automation GmbH Am Grundwassersee 1 82402 Seeshaupt [email protected] www.preussen-automation.eu SwitchME KNX · User Guide | Application Description 8.2 Channels "N" functional parameters ccFigure 7: "Channel N“ parameter (N=A,B,C…) dd Channel A operating mode The function of the output "N" can accept 3 operating states. `` OptionsSwitch actuator Heating actuator deactivated If "deactivated" is selected, the channel "N" function will then be invalid, and one of the other two options can be employed. dd Channel as switch actuator Under "Channel A operating mode" please select the switch actuator if you want to use the device as a switch actuator. dd Response of the ON/OFF switch status This parameter decides the working mode by way of a response. `` Optionsno response continuous response only after change If the "no response" option is selected, the switch status will not be communicated. If "continuous response" is selected, the switch status will be continuously sent and with "only after change" the status will only be reported following performance of a change. dd Save statistics for ON mode Saving statistics is useful for controlling and monitoring. `` Optionsactivate deactivate 13 | 40 ©preussen automation GmbH 2011 preussen automation GmbH Am Grundwassersee 1 82402 Seeshaupt [email protected] www.preussen-automation.eu SwitchME KNX · User Guide | Application Description dd Switch status with bus power drop You can decide what happens in the event of a bus power drop. In such a case the device still has the required capacity to set the following options. `` Optionsunchanged ON OFF With "unchanged" the actuator will maintain the switch status. If you select "ON" or "OFF" the channel will be activated or deactivated. dd Switch status following bus voltage return If the power returns following a bus power drop, the following options can be selected: `` Optionsunchanged Standby ON OFF If you select "unchanged" the channel will retain the current switch setting once bus voltage is returned. If you select "Standby" the channel will return to the initial status prior to the power drop. The "ON" and "OFF" options activate and deactivate the channel upon return of the bus voltage. dd Display function page If this parameter the channel function page will be displayed. The function page contains the following functions: Time, scenes, threshold value, blind and logic. 8.3 Functions ccFigure 8: Channel functions !! Important info: A maximum of one function can be activated per channel! 14 | 40 ©preussen automation GmbH 2011 preussen automation GmbH Am Grundwassersee 1 82402 Seeshaupt [email protected] www.preussen-automation.eu SwitchME KNX · User Guide | Application Description dd Activating "Time" function `` Optionsdeactivate activate dd Activating "Scene" function `` Optionsdeactivate activate dd Activating "Threshold" function `` Optionsdeactivate activate dd Activating "Blind" function `` Optionsdeactivate activate dd Activating "Logic" function `` Optionsdeactivate activate 8.3.1 "Time" function ccFigure 9: Time function dd The time function contains three sub-functions available for selection. `` OptionsFlash Staircase light ON/OFF delay 15 | 40 ©preussen automation GmbH 2011 preussen automation GmbH Am Grundwassersee 1 82402 Seeshaupt [email protected] www.preussen-automation.eu SwitchME KNX · User Guide | Application Description 8.3.2 "Flash" function ccFigure 10: Flash dd Flash status (Start/Stop) `` Options Start with ON, stop with OFF (ON-> flash starts, OFF->flash stops) Start with OFF, stop with ON (OFF-> flash starts, ON->flash stops) Constant flashing, Start with ON/OFF (ON or OFF -> flashing starts) dd Time for "ON": (0…255 min.) Length in minutes for "ON" status dd Time for "ON": (0…59 sec) Length in seconds for "ON" status dd Time for "OFF": (0…255 min.) Length in minutes for "OFF" status dd Time for "OFF": (0…59 sec) Length in seconds for "OFF" status dd Number of flash cycles (0…100, 0-infinity) Number of flash cycles in the range from 0 to 100. "0" means unlimited. dd Status following flashing Switch position following flashing once counter overflow ends. `` Options unchanged (after the counter overflow the position remains unchanged) 16 | 40 ©preussen automation GmbH 2011 preussen automation GmbH Am Grundwassersee 1 82402 Seeshaupt [email protected] www.preussen-automation.eu SwitchME KNX · User Guide | Application Description ON (switches to "ON" after counter overflow) OFF (switches to "OFF" after counter overflow) 8.3.3 "Staircase" function ccFigure 11: "Staircase" function The staircase function causes the automatic switch-off of the switching procedure after a pre-set time. The staircase time can be parametrised without restriction. There are other optional functions that can be combined with the staircase function; these are described below. `` Options Start with "ON", stop with "OFF" Start with "ON", without "OFF" function Start with "ON/OFF", without stop If the Start with "ON", stop with "OFF" function is selected, and the switch is activated, the light will be turned on and the timer begins counting until the pre-set set point is achieved after which the light will be turned off. The light can be turned off earlier by manually operating the switch. If the Start with "ON", without "OFF" function is selected, and the switch is activated, the light will be turned on and the timer begins counting until the pre-set set point is achieved after which the light will be turned off. The light cannot be turned off by manually operating the switch. If the Start with "ON/OFF", without stop function is selected, and the switch is activated or turned off, the light will be turned on and the timer begins counting until the pre-set set point is achieved after which the light will be turned off. The light cannot be turned off by manually operating the switch. dd Staircase light duration with bus `` OptionsNO Changing the staircase light "OUT" delay not possible via bus, this is auto matically controlled by database. YES Allows staircase light "OUT" delay to be performed by user via bus. dd Warning staircase light 17 | 40 ©preussen automation GmbH 2011 preussen automation GmbH Am Grundwassersee 1 82402 Seeshaupt [email protected] www.preussen-automation.eu SwitchME KNX · User Guide | Application Description `` OptionsNO YES (activated) The warning function shows that the staircase light has almost expired and that the output will be deactivated shortly. This occurs by switching off the output for the time period of the parametrised warning time. A small value of 1-3 seconds is recommended. Once the warning has abated, the light will be turned on again for the pre-set advance warning time. This advance warning time enables the staircase light time to be extended or the staircase to be vacated. It is recommended that there be dynamic programming based on the actual circumstances (length of the staircase, next light switch, etc.). The total switching time of the switch cycle is determined by adding up the three times. dd Time for "OFF": (0…255 min.) Duration of the delay for the "OUT" switch of the staircase light in minutes. dd Time for "OFF": (0…59 sec) Duration of the delay for the "OUT" switch of the staircase light in seconds. 8.3.4 ON/OFF delay function ccFigure 12: "On/Off" time delay The on-delay will time delay the activation of the switching cycle. This means the output will only be activated after a certain time period after the issue of the switch-on command. The off-delay will time delay the switch-off. These two functions can be combined. dd Delay time for switch-on: (0…255 min.) Time period for delay of "On" switch in minutes. dd Delay time for switch-on: (0…59 sec) Time period for delay of "On" switch in seconds. dd Delay time for switch-off: (0…255 min.) Time period for delay of "Off" switch in minutes. dd Delay time for switch-off: (0…59 sec) 18 | 40 ©preussen automation GmbH 2011 preussen automation GmbH Am Grundwassersee 1 82402 Seeshaupt [email protected] www.preussen-automation.eu SwitchME KNX · User Guide | Application Description Time period for delay of "Off" switch in seconds. dd Delay time for light protection: (0…255 min.) Time period for delay of light protection in minutes. dd Delay time for light protection: (0…59 sec) Time period for delay of light protection in seconds. !! Note: The delay time for light protection starts once the "OFF" switch is activated and will only switch to "ON" once this time has expired. 8.4 "Scene" function ccFigure 13: "Scene" function The scene function is useful if room functions of various elements (e.g. light, heating, blind) are to be synchronously changed. To enable this the value must be assigned to the appropriate disk space (Scene A…L). Up to 5 scenes can be programmed on each switch output. In order to call-up a particular scene, the value for that scene must be sent to the communications object for the scene function. In this context the value of the scene call-up however is always one number lower than the pre-set scene number. The scene numbers can therefore have the values 1-64, but the values of the call-up of the scene may only be 0-63. 5 scene memory options are available for each channel. The 64 available scene numbers can be freely assigned to these 5 memory sets. A scene will be called up if it receives a binary command (bit0-6 -> scene number, bit7=0) from the bus, corresponding to a scene number. The seventh bit of the dataset must always be "0" in this context. A scene will be stored if it receives a binary command (bit0-6 -> scene number, bit7=1) from the bus, corresponding to a scene number. The scene status remains unchanged. The seventh bit of the dataset must always be "1". Assign output (Scene 1…64 or without assignment) No application Scene no. 01 19 | 40 ©preussen automation GmbH 2011 preussen automation GmbH Am Grundwassersee 1 82402 Seeshaupt [email protected] www.preussen-automation.eu SwitchME KNX · User Guide | Application Description Scene no. 02 . . Scene no. 64 8.5 "Threshold " function ccFigure 14: "Threshold" function The threshold value function enables two threshold values to be set. These two threshold values can be set between 0 and 255. The switching status changes once a corresponding value is received from the bus. There are three ways in which threshold values can be activated. dd Activation of threshold value 1 via bus: YES enables threshold value 1 to be changed via the bus. NO prohibits the change of threshold value 1 via bus. dd Activation of threshold value 2 via bus: YES enables threshold value 2 to be changed via the bus. NO prohibits the change of threshold value 2 via bus. dd Threshold 1 is (0…255) The selection of the first threshold value is between the range of [0…255]. The pre-set value is 80. dd Threshold 2 is (0…255) The selection of the second threshold value is between the range of [0…255]. The preconfigured value is 180. dd Object value < lower threshold value If the object value is less than the lower threshold value, the switch will respond in accordance with the following options: `` Optionsunchanged 20 | 40 ©preussen automation GmbH 2011 preussen automation GmbH Am Grundwassersee 1 82402 Seeshaupt [email protected] www.preussen-automation.eu SwitchME KNX · User Guide | Application Description ON OFF dd lower threshold value <= object value <= upper threshold value If the object value lies between the preconfigured threshold values, the switch responds in accordance with the following options: `` Optionsunchanged ON OFF dd Object value < upper threshold value If the received object value is larger that the upper threshold value, the switch responds in accordance with the following options: `` Optionsunchanged ON OFF 8.6 Blind function ccFigure 15: Blind function The blind function requires two channels in combination, one of which opens the blind while the second one closes it. The blind will stop after the expiry of the pre-set time period or by way of a corresponding telegram. !! Important info: If channel A is activated as the blind channel, please be sure to deactivate channel B. This one should be exclusively activated for the function of closing the blind. 21 | 40 ©preussen automation GmbH 2011 preussen automation GmbH Am Grundwassersee 1 82402 Seeshaupt [email protected] www.preussen-automation.eu SwitchME KNX · User Guide | Application Description ccFigure 16: Note on blind function dd Blind opens The first channel for "blind opens" is currently the active channel. Channel "N" (N= current channel (N=A, B, C..)) opens the blind dd Blind closes Another channel can now be designated for the blind closing function. This should be deactivated as shown in Fig. 11 to prevent any dual assignment. !! Note: If the first channel is "A" and the maximum number of channels is 4, then only "B", "C" or "D" may be selected as the second channel. dd Control blind `` Options: Start with "1", stop with "0" Start with "1", with no function with "0" Start with "1"/"0", without stop Start with "1", stop with "0": The blind starts to move when the value "1" is received. If "0" - zero is received, the blind will remain stationary. Start with "1", with no function with "0": The blind starts to move when the value "1" is received and only stops with the time-out. Start with "1"/"0", without stop: The blind starts to move when the values "1" or "0" are received and only stops with the time-out. dd Blind running time (0-1 s deactivated, 2-250 s activated): If the parameter is set to "0" or "1", the blind continues moving unless a stop value is achieved. The blind stops once the time-out is reached. The time for the time-out can be set in this option. 8.7 Logic function 22 | 40 ©preussen automation GmbH 2011 preussen automation GmbH Am Grundwassersee 1 82402 Seeshaupt [email protected] www.preussen-automation.eu SwitchME KNX · User Guide | Application Description ccFigure 17: Logic function The logic function block in Fig. 13 contains two logistical blocks. `` Block1 has two inputs: one of which is "N" (N=A,B,C,D,..) and the other is "Con1". The logic Block1 output is linked with the logic Block2 input. `` Alongside this, Block2 also has a second input "Con2" and relays the result via the output. Both logic blocks, logic Block1 and logic Block2, allow the selection of "AND“, "OR", "NOT EQUAL TO", "GATE" connections. Con2 AND, OR, XOR, GATE Out Block 2 Con1 AND, OR, XOR, GATE N Block 1 ccFigure 18: Logic block dd Activate logic link 1 The logic link Block1 can be activated or deactivated using this option. dd Function of logic link 1 This logic block enables the user to choose between Boolean operations such as: "AND", "OR", "NOT EQUAL TO" or "GATE". AND (Boolean AND) OR (Boolean OR) NOT EQUAL TO (Boolean OR NOT) GATE ("N" can only pass the logic block if the value 1 has been configured for "Con1". The output of logic Block1 remains unchanged for this time.) 23 | 40 ©preussen automation GmbH 2011 preussen automation GmbH Am Grundwassersee 1 82402 Seeshaupt [email protected] www.preussen-automation.eu SwitchME KNX · User Guide | Application Description dd Object value for logic link 1 with voltage return The selection of the value is triggered by the restoration of the bus power supply; the following options are available to you: O: Initialisation of "Con1" with 0 1: Initialisation of "Con1" with 1 dd Inverting the result of logic link 1 If this parameter is set to "YES", the output from link 1 will be inverted. "No" on the other hand will result in no change. dd Activate logic link 2 The logic link Block2 can be activated or deactivated using this option. dd Functional method of logic block2 This logic block again enables the user to choose between Boolean operations such as: "AND", "OR", "NOT EQUAL TO" or "GATE". - AND (Boolean AND) - OR (Boolean OR) - NOT EQUAL TO (Boolean OR NOT) GATE ("N" can only pass the logic block if the value 1 has been configured for "Con2". The output of logic Block2 remains unchanged for this time.) 8.8 Heating actuator ccFigure 19: Heating actuator This channel operates in PWM mode (pulse width modulation, 1 bit or 1byte) and can be used to control a heating valve. dd Switch status with bus power drop `` Optionsunchanged 24 | 40 ©preussen automation GmbH 2011 preussen automation GmbH Am Grundwassersee 1 82402 Seeshaupt [email protected] www.preussen-automation.eu SwitchME KNX · User Guide | Application Description ON OFF With "unchanged" the actuator will maintain the switch status. If you select "ON" or "OFF" the channel will be activated or deactivated. dd Switch status following bus voltage return If the power is to be returned following a bus voltage failure, the following functions can be selected: `` Optionsunchanged Standby ON OFF If you select "unchanged" the channel will retain its current setting once bus voltage is returned. If you select "Standby" the channel will return to the initial status prior to the power drop. The "ON" and "OFF" options activate and deactivate the channel. dd PWM cycle time (1..65535 min) The minimum cycle time amounts to 1 minute. dd PWM cycle time (0…59 sec) The cycle time can also be stated in seconds dd Receive control as `` Options 1bit PWM (1-Start/0-Stop) 1byte (255-ON/0-OFF/Intermediate values) With the value "255" you permanently switch "ON", with "0" you permanently switch "OFF", the values between (1-254) define the switching points within the PWM cycle. dd Response on "Switching status" object `` Optionsno response continuous response only after change (only respond if status changes) dd ON position of the valve The following values determine the switching points of the PWM cycle in 1-bit operation (in the 1-byte operation the switching points are defined by the value of the sent telegram): 0% (OFF) 10% (26) 20% (51) 30% (77) 40% (102) 50% (128) 60% (153) 70% (179) 80% (204) 90% (230) 100% (ON) 25 | 40 ©preussen automation GmbH 2011 preussen automation GmbH Am Grundwassersee 1 82402 Seeshaupt [email protected] www.preussen-automation.eu SwitchME KNX · User Guide | Application Description dd Automatic activating when current is detected The PWM starts automatically when switched on when set to "YES". With "NO" only when requested (manual). 9. Description of the communication objects In this section we explain the communication objects. You will be able to see these objects if you have activated the function. Depending on the function selected, the relevant communication objects will be displayed for each of the channels. The communication objects can be subsequently used for the assignment of group addresses. !! Note: In the following section N=A, B, C, D,…. `` Key to Flags C: Communication R: Read W: Write A: Assign U: Update 9.1 Objects in general and output N ccFigure 20: Objects in general and output N Number Name Function Flags Data types EIS1 0 General Send cycles C R W DPT 1.003 1bit This object is always active and valid. If a value changes, the next run will be assigned to the bus, e.g. the most recently assigned value was "1" the next will therefore be "0"-zero. ccTable 4: General objects Number Name Function Flags Data types EIS1 10,30,… Output "N" Channel output C T U DPT 1.001 1bit This channel output objects enable a channel "N" to be turned ON/OFF. A channel output is turned ON/OFF if the object contains the value "1/0". ccTable 5: Output objects 9.2 All objects of channel "N" 26 | 40 ©preussen automation GmbH 2011 preussen automation GmbH Am Grundwassersee 1 82402 Seeshaupt [email protected] www.preussen-automation.eu SwitchME KNX · User Guide | Application Description ccFigure 21: All objects of channel "N" 9.2.1 Object – switch status response Number 11 Name Output "N" Function Flags Data types EIS1 DPT 1.001 Switch status response CRA 1bit This object is used to respond to the switch status of channel "N", channel on ON the response is "1", otherwise a "0"-zero is returned. ccTable 6: Switch status response 9.2.2 Object – Statistics for ON switch Number 12 Name Output "N" Function Statistics for ON mode Flags Data types EIS10 DPT 7.007 CRWAU 2byte This object creates statistics for channel "N". It can be read/written via the bus if this function has been activated. ccTable 7: Statistics for ON mode 9.2.3 Object - staircase light Number 13 Name Output "N" Function Staircase light duration Flags Data types EIS10 DPT 7.005 CWU 2byte This object can be used to regulate the staircase light time; when this function is activated control is permitted via the data bus. ccTable 8: Staircase light duration 27 | 40 ©preussen automation GmbH 2011 preussen automation GmbH Am Grundwassersee 1 82402 Seeshaupt [email protected] www.preussen-automation.eu SwitchME KNX · User Guide | Application Description 9.2.4 Object – warning staircase light Number Name 14 Function Output "N" Flags Data types EIS1 DPT 1.005 Warning staircase light CRA 1bit This object is a safety against unwanted ON/OFF switching; if the staircase light goes On or Off, the object sends a warning via the bus: Channel "N" is ON -> a "1", other a "0"-zero ccTable 9: Warning staircase light 9.2.5 Scene object Number Name 15 Function Output "N" Flags Scene (8bit) Data types CWU EIS14 DPT 18.001 1byte The purpose of this object is to control scenes. See the following explanation: Telegram value (8-bit): C7 R6 N5 N4 N3 N2 N1 N0 C: By setting the 7th bit to "0" the scene will be called up, "1" continue scene (if scene has been assigned and is valid) R: Reserved N: Scene No. (binary: 050403020100…151413121110=1…64) e.g.: Hexadecimal 00h 01h 3Fh 80h 81h BFh Call up scene1 (if scene assigned) Call up scene2 (if scene assigned) Call up scene64 (if scene assigned) Load scene1 (if scene assigned) Load scene2 (if scene assigned) Load scene64 (if scene assigned) ccTable 10: Scene (8bit) 9.2.6 Threshold value object Number 16 Name Function Output "N" Flags Data types EIS14 DPT 5.004 Threshold value input CWU Change threshold value 1 CWU 1byte If this object is activated, the input value will be compared with threshold values 1 and 2 and the switch status will be determined in accordance with the configuration. EIS14 17 Output "N" DPT 5.004 1byte Changing the threshold value1 via the bus only. 28 | 40 ©preussen automation GmbH 2011 preussen automation GmbH Am Grundwassersee 1 82402 Seeshaupt [email protected] www.preussen-automation.eu SwitchME KNX · User Guide | Application Description EIS14 18 Output "N" Change threshold value 2 CWU DPT 5.004 1byte Changing the threshold value2 via the bus only. ccTable 11: Threshold value 9.2.7 Blind object Number Name Function Flags Data types EIS1 DPT 1.010 19 Output "N" Open blind CWU 1bit This object opens the blind. EIS1 DPT 1.010 20 Output "N" Close blind CWU 1bit This object closes the blind. ccTable 12: Blind 9.2.8 Logic object Number Name Function Flags Data types EIS1 DPT 1.002 21 Output "N" Logic link 1 CWU 1bit If this function is activated, the object will be visible and the logic function has validity. The logic function contains: AND, OR, XOR, GATE. EIS1 DPT 1.002 22 Output "N" Logic link 2 CWU 1bit If this function is activated, the object will be visible and the logic function has validity. The logic function contains: AND, OR, XOR, GATE. ccTable 13: Logic 9.2.9 Heating actuator object ccFigure 22: Heating actuator object with bit control ccFigure 23: Heating actuator object with byte control 29 | 40 ©preussen automation GmbH 2011 preussen automation GmbH Am Grundwassersee 1 82402 Seeshaupt [email protected] www.preussen-automation.eu SwitchME KNX · User Guide | Application Description Number Name 10 Output "N" Function Switching with bit control Flags Data types EIS1 DPT 1.001 CWU 1bit The PWM will be started when "1" is received and stopped when "0" is received. Runs automatically via the ETS once turned on. EIS1 DPT 5.004 Switching with 22 Output "N" CWU byte control 1byte Output "ON" always if value 255, output "OFF" if value 0. Otherwise the switching points of the PWM cycle will be determined via a value delivered by the bus. ccTable 14: Heating actuator 10. Applications 10.1 Scene ccFigure 24: Application scene 5 scenes per channel can be stored in the device. The scene numbers can be selected between 1 and 64. 10.2 Threshold value ccFigure 25: Threshold value application This function contains two threshold values, the upper and lower threshold value, both of which can be defined between 0…255. 30 | 40 ©preussen automation GmbH 2011 preussen automation GmbH Am Grundwassersee 1 82402 Seeshaupt [email protected] www.preussen-automation.eu SwitchME KNX · User Guide | Application Description 10.3 Blind This function requires two channel outputs, the first of which opens the blind while the second one closes it. ccFigure 26: Blind application If the blind/the curtain is to be opened, channel A switches to ON and channel B to OFF. If the blind/the curtain is to be closed, channel B switches to ON and channel A to OFF. With time-out or a stop command, both channels will be switched to OFF. 10.4 Logic function Con2 AND, OR, XOR, GATE Out Block 2 Con1 AND, OR, XOR, GATE N Block 1 ccFigure 27: Logic function application 31 | 40 ©preussen automation GmbH 2011 preussen automation GmbH Am Grundwassersee 1 82402 Seeshaupt [email protected] www.preussen-automation.eu SwitchME KNX · User Guide | Application Description The logic function contains two logic blocks. Both of these logic blocks, logic Block1 and logic Block2, allow the user to choose between the following Boolean operations: AND, OR, NOT EQUAL TO, GATE. !! Note: N = "channel" – "A, B, C,.." Con1=logic link1 Con2=logic link2 AND GATE OR XOR N L R N L R N L R N L R 0 0 0 0 1 0 0 0 0 0 0 0 0 1 0 1 1 1 0 1 1 0 1 1 1 0 0 1 0 1 1 0 1 1 0 1 1 1 1 0 0 1 1 1 1 1 1 0 0 1 0 0 0 0 1 0 0 1 1 1 Lock Unlock Lock Unlock ccFigure 28: Boolean operation !! Note: N=channel A, B. C… L=Logic connection R= result 10.5 PWM control Control can be implemented with 1bit or 1byte. `` 1bit PWM(1-Start/0-Stop) The PWM starts and switches ON if a "1" is received, and will be ended with the receipt of a "0". `` 1Byte(255-Start, 0-Stop, Intermediate values): Switch moves to ON upon receiving the value "255" and to OFF upon receiving the value "0". The intermediate values (1-254) define the switching points within the PWM cycle. ccFigure 29: PWM control application dd 1Bit PWM control: Value = 0% (OFF) 32 | 40 ©preussen automation GmbH 2011 preussen automation GmbH Am Grundwassersee 1 82402 Seeshaupt [email protected] www.preussen-automation.eu SwitchME KNX · User Guide | Application Description 10% (26) 20% (51) 30% (77) 40% (102) 50% (128) 60% (153) 70% (179) 80% (204) 90% (230) 100% (ON) dd 1Byte PWM control: Value = x (x:0…255), x=0 -> OFF 1..25 (0%) 26..50 (10%) 51..76 (20%) 77..101 (30%) 102..127 (40%) 128..152 (50%) 153..178 (60%) 179..203 (70%) 204..229 (80%) 230..254 (90%) 255 (ON) 11. Safety instructions 1. Please read these instructions carefully before starting to work with the product. 2. Keep the device out of the range of sources of disruption. 3. Please ensure to maintain the proper ambient temperature for the device 4. Avoid moisture, strong vibration and dust 5. Never allow liquid of any kind (from petrol to water) to come in contact with the device. 6. If any faults occur or for servicing you should contact preussen automation 7. Clean the device regularly. Do not use any alcohol, petrol or petroleum-based cleaners. If the device nevertheless comes into contact with moisture or other liquids, dry it 8. completely before using again. 9. Check the cables regularly and replace damaged cables in good time. 12. Warranty Limited warranty General terms and conditions Your statutory rights as a consumer are not affected by the contents of this Limited Product Warranty. The Limited Product Warranty described here is provided by preussen automation GmbH (hereinafter: "preussen"). This Limited Product Warranty is only valid if the purchase of the product can be proven. If demanded by preussen this warranty certificate must also be presented. UNLESS EXPLICITLY SET OUT HEREIN, PREUSSEN DOES NOT MAKE ANY OTHER WARRANTY, BE IT EXPRESSLY OR IMPLICITLY. IN PARTICULAR NO IMPLICIT ASSURANCE IS GIVEN IN RELATION TO GENERAL USABILIY OR FITNESS FOR A PARTICULAR PURPOSE. PREUSSEN EXPRESSLY REPUDIATES ANY WARRANTY THAT EXTENDS OVER AND BEYOND THE PROVISIONS OF THIS LIMITED WARRANTY. ALL STATUTORILY PRESCRIBED WARRANTY RIGHTS ARE LIMITED TO THE TERM OF THIS RESTRICTED WARRANTY. WHERE PERMITTED ACCORDING TO LOCALLY APPLICABLE LAWS, THE LEGAL REMEDIES SET OUT IN THIS WARRANTY DECLARATION CONSTITUTE THE SOLE AND EXCLUSIVE LEGAL REMEDIES AVAILABLE TO THE CUSTOMER. PREUSSEN IN NO CIRCUMSTANCES WILL BE LIABLE FOR THE LOSS OF DATA OR FOR INDIRECT, SPECIFIC, INCIDENTAL AND CONSEQUENT DAMAGE OR OTHER DAMAGE (INCLUDING LOST PROFITS OR LOST DATA), IRRESPECTIVE OF WHETHER OR NOT THIS RELATES TO THE CONTRACT, TORTIOUS ACT OR OTHER REASONS. THE LIABILITY OF PREUSSEN (I) IN THE EVENT OF DEATH OR PERSOAL INJURY RESULTING FROM NEGLIGENCE ON THE PART OF PREUSSEN OR (II) DUE TO FRAUDULENT CONCEALMENT ON THE PART OF PREUSSEN REMAINS UNAFFECTED BY THE CONTENTS OF THIS AGREEMENT. IN SOME STATES OR COUNTRIES THE FOLLOWING IS NOT PERMITTED: (1) AN EXCLUSION OF AN IMPLICIT WARRANTY, (2) A LIMITATION OF THE DURATION OF THE IMPLIED WARRANTY OR ITS EXCLUSION OR (3) A LIMITATION OF INCIDENTAL DAMAGE OR CONSEQUENTIAL DAMAGE IN RELATION TO PRODUCTS FOR CONSUMERS. IF YOU ARE RESIDENT IN SUCH A STATE OR COUNTRY, IT 33 | 40 ©preussen automation GmbH 2011 preussen automation GmbH Am Grundwassersee 1 82402 Seeshaupt [email protected] www.preussen-automation.eu SwitchME KNX · User Guide | Application Description MAY BE THE CASE THAT SOME DISCLAIMERS OR LIMITATIONS CONTAINED IN THIS LIMITED WARRANTY WILL NOT APPLY FOR YOU. THIS LIMITED WARRANTY AFFORDS YOU CERTAIN RIGHTS. IT MAY BE THE CASE THAT YOU ARE ENTITLED TO OTHER ADDITIONAL RIGHTS, BUT WHICH MAY VARY FROM STATE TO STATE OR COUNTRY TO COUNTRY. IN ORDER TO DETERMINE THE EXTENT OF YOUR RIGHTS, IT IS RECOMMENDED THAT YOU OBTAIN ADVICE REGARDING THE LAWS APPLICABLE IN THE PARTICULAR STATE OR COUNTRY. This Limited Product Warranty applies for preussen automation hardware products (hereinafter commonly known as: "preussen hardware products"), which are sold by preussen automation GmbH or its worldwide branches, partners, wholesalers or national distributors (hereinafter commonly known as: "preussen dealers") with the following Limited Product Warranty. The phrase "preussen hardware products" only relates to hardware components and their components, including firmware. The phrase "preussen hardware products" does NOT encompass any software applications or programmes. Geographical scope of the Limited Product Warranty This Limited Product Warranty applies to hardware products sold by preussen dealers in European States in according with the Annex "Limited warranty of preussen in European States". Within the terms of this Limited Product Warranty from preussen, the phrase "European States" only relates to those states listed in the Annex. The Limited Product Warranty is universally applicable wherever preussen or its authorised service partners deliver warranty services within the terms of this Limited Warranty. The availability of services and the implementation time may however vary from country to country and may depend on registration requirements. Under the Limited Product Warranty preussen warrants that the products listed below, when used normally, will not contain significant workmanship faults or material defects for the term of the Limited Warranty ("warranty term") as specified below. However this warranty requires that the product has been used and serviced in accordance with the user manual supplied to the customer at the time of purchase (or subsequently). preussen does not warrant that the products will function interruption or error-free or that all faults, errors, defects or non-conformities will be corrected. This warranty shall not apply to problems resulting from: (a) unauthorised opening, modifications or attachments, (b) negligence, abuse or misuse, including failure to operate the product in accordance with specifications or interface requirements, (c) improper operation, (d) failure of goods or services not obtained from preussen or not covered by a warranty or maintenance agreement at the relevant time, (e) improper use or storage or (f) fire, water, acts of God or other catastrophic events. This warranty shall also rendered invalid for any particular product, the preussen serial number of which has been removed or defaced in any way. PREUSSEN IS NOT RESPONSIBLE FOR DAMAGE THAT OCCURS AS A RESULT OF A FAILURE TO FOLLOW THE INSTRUCTIONS FOR THE PREUSSEN HARDWARE PRODUCT. Warranty period The Limited Product Warranty commences on the date that the product is purchased from preussen. The dated purchase or delivery note constitutes proof of this date. You may be required to provide proof of purchase as a condition of receiving warranty service. You are entitled to warranty service according to the terms and conditions of this document if a repair to your preussen hardware product is required within the Limited Product Warranty period. This Limited Product Warranty extends only to the original end user who purchased this preussen hardware product. It is not assignable. Product type warranty period (If a "product type" is cancelled during the following warranty period, the warranty period will continue for no longer than two (2) years following the date of cancellation.) •Devices in the Stage Automation, Facility Automation & Network series Two (2) years • All other products (exclusively external power supply components, internal fans and accessories) Two (2) years • External power supply components, internal fans and accessories One (1) year Limited warranty obligations If the event that a fault in the product arises, preussen's sole obligation to the original purchaser is to repair or replace the defective preussen hardware product free of charge. This is conditional on it being returned to an authorised preussen Service Centre within the Limited Warranty period. The repair or replacement will be performed by preussen at an authorised preussen. All parts or hardware products replaced by way of Limited Product Warranty will become the property of preussen. The replacement part or product will be covered by the remaining Limited Warranty Period of the replaced part or product. The replacement product need not necessarily be new nor be wholly or partly identical to the defective product. preussen may replace the defective product or any part thereof with any reconditioned product equivalent in all material respects to the defective product, or superior to it. Annex preussen automation Limited Warranty for European States Albania, Andorra, Austria, Belarus, Belgium, Bosnia Herzegovina, Bulgaria, Croatia, Cyprus, Czech Republic, Denmark, Estonia, Finland, France, Germany, Great Britain, Greece, Hungary, Iceland, Italy, Latvia, Liechtenstein, Lithuania, Luxembourg, Macedonia, Malta, San Marino, Moldavia, Monaco, the Netherlands, Norway, Poland, Portugal, Romania, Russia, Serbia and Montenegro, Slovakia, Spain, Sweden, Switzerland, Turkey, the Ukraine, the Vatican. 34 | 40 ©preussen automation GmbH 2011 preussen automation GmbH Am Grundwassersee 1 82402 Seeshaupt [email protected] www.preussen-automation.eu SwitchME KNX · User Guide | Application Description 13. Declaration of Conformity pursuant to the Directives 89/336 EEC and 92/31 EEC Name of manufacturer: preussen automation GmbH Address of manufacturer: Am Grundwassersee 1, 82402 Seeshaupt declares that the product Name of product: SwitchME KNX Type:KNX Switch Actuator satisfies the following standards Safety:EN60669-2-1, EN60669-1 EMC:EN50090-2-2 Florian Felsch Seeshaupt, 10.07.2011 14. Contact preussen automation GmbH Am Grundwassersee 1 82402 Seeshaupt Germany [email protected] 35 | 40 ©preussen automation GmbH 2011 preussen automation GmbH Am Grundwassersee 1 82402 Seeshaupt [email protected] www.preussen-automation.eu SwitchME KNX · User Guide | Application Description 15. Index 15.1 List of figures Figure 1: Functional overview SwitchME KNX · 5 Figure 2: Dimensions · 9 Figure 3: Connection diagram SwitchME4 KNX · 9 Figure 4: Connection diagram SwitchME8 KNX · 10 Figure 5: Connection diagram SwitchME12 KNX · 10 Figure 6: "general" parameters · 12 Figure 7: "Channel N“ parameter (N=A,B,C…) · 13 Figure 8: Channel functions · 14 Figure 9: Time function · 15 Figure 10: Flash · 16 Figure 11: "Staircase" function · 17 Figure 12: "On/Off" time delay · 18 Figure 13: "Scene" function · 19 Figure 14: "Threshold" function · 20 Figure 15: Blind function · 21 Figure 16: Note on blind function · 22 Figure 17: Logic function · 23 Figure 18: Logic block · 23 Figure 19: Heating actuator · 24 Figure 20: Objects in general and output N · 26 Figure 21: All objects of channel "N" · 27 Figure 22: Heating actuator object with bit control · 29 Figure 23: Heating actuator object with byte control · 29 Figure 24: Application scene · 30 Figure 25: Threshold value application · 30 Figure 26: Blind application · 31 Figure 27: Logic function application · 31 Figure 28: Boolean operation · 32 Figure 29: PWM control application · 32 Table 1: Output ratings · 6 Table 2: External characteristics · 7 Table 3: Application table · 8 Table 4: General objects · 26 Table 5: Output objects · 26 Table 6: Switch status response · 27 Table 7: Statistics for ON mode · 27 Table 8: Staircase light duration · 27 Table 9: Warning staircase light · 28 Table 10: Scene (8bit) · 28 Table 11: Threshold value · 29 Table 12: Blind · 29 Table 13: Logic · 29 Table 14: Heating actuator · 30 15.2 List of tables 36 | 40 ©preussen automation GmbH 2011 preussen automation GmbH Am Grundwassersee 1 82402 Seeshaupt [email protected] www.preussen-automation.eu SwitchME KNX · User Guide | Application Description 16. Technical data sheet Ausführung | Type SwitchME 4 KNX SwitchME 8 KNX SwitchME 12 KNX Bestellnr. | Order code 4260220541080 4260220541097 420220541103 8 12 Stromversorgung | power supply Bus Betriebsspannung | bus operating voltage 21-30 V DC KNX Stromverbrauch | electrical consumption 15 mA Anschlüsse | connections Kanäle | channels 4 Einspeisung | input 24V DC (KNX Busspannung) | 24V DC (KNX BUS power) KNX Anschluss | KNX connection KNX-Busklemme (rot/grau) 0,8 mm² | KNX bus clamp (red/grey) 0.8 mm² Zuleitung und Ausgänge | supply and outputs für Leitung bis 2,5 mm² | for cable up to 2.5 mm² Ausgänge | outputs bistabile Relais mit potenzialfreien Kontakten (230V, 50/60Hz) | bistable relay with isolated contacts (230V, 50/60Hz) Elektrische Sicherheit | electrical safety Schutzklasse | protection class IP 20 EN 60529 Relais Lebensdauer | relay service life mehr als 1.000.000 Schaltzyklen | more than 1,000,000 switching cycles Absicherung | fusing 16 A Leuchtstofflampenlast | fluorescent lighting load 16A/ 250 V (150 μF) Maximale Schaltleistung | maximum switch load Ohmsche Last | resistive load 16 A Maximale Lampenlast | maximum lamp load Lampen | lamps Glühlampen | incandescent lamp load 3500 W NV-Halogenlampen | low-voltage halogen lamps induktiver Transformator | inductive transformer 1800 W elektronischer Transformator | electronic transformer 2000 W Halogenlampe 230V | halogen lamp 230 V 3500 W Quecksilberdampflampe | mercury-vapour lamp unkompensiert | uncompensated luminaire 2800 W parallel kompensiert | parallel compensated 2800 W Leuchtstofflampe T5 / T8 | fluorescent lamp T5 / T8 unkompensiert | uncompensated luminaire 3500 W parallel kompensiert | parallel compensated 2000 W DUO Lampe | DUO lamp 2000 W Dulux Lampe | dulux lamp unkompensiert | uncompensated luminaire 1500 W parallel kompensiert | parallel compensated 1500 W Physische Eigenschaften | physical characteristics Gehäuse Material | housing material Kunststoff schwarz | plastic black Maße | dimensions 72 x 90 x 64 mm 144 x 90 x 64 mm Produkt Gewicht | product weight 257 g 480 g 700 g Teilungseinheiten | sub-units 4 fold 8 fold 12 fold 95 x 75 x 80 mm 170 x 105 x 120 mm 145 x 105 x 120 mm 300 g 580 g 825 g Verpackungsgröße | packing size Transportgewicht | shipping weight Montage | assembly 216 x 90 x 64 mm Hutschiene | 35mm rail mounting DIN EN 60715 Betriebstemperatur | operating temperature -5°C ~ +45°C Lagertemperatur | storage temperature -25°C ~ +55°C preussen automation GmbH Am Grundwassersee 1 82402 Seeshaupt Germany Informationen und Download der VD4 Datenbank unter www.preussen-automation.eu p:+49 (0)89 . 998 299 145-00 f:+49 (0)89 . 998 299 145-09 Product data and VD4 database at www.preussen-automation.eu [email protected] www.preussen-automation.eu 37 | 40 ©preussen automation GmbH 2011 preussen automation GmbH Am Grundwassersee 1 82402 Seeshaupt [email protected] www.preussen-automation.eu SwitchME KNX · User Guide | Application Description Notes 38 | 40 ©preussen automation GmbH 2011 preussen automation GmbH Am Grundwassersee 1 82402 Seeshaupt [email protected] www.preussen-automation.eu SwitchME KNX · User Guide | Application Description Notes 39 | 40 ©preussen automation GmbH 2011 preussen automation GmbH Am Grundwassersee 1 82402 Seeshaupt [email protected] www.preussen-automation.eu SwitchME KNX · User Guide | Application Description Notes 40 | 40 ©preussen automation GmbH 2011 preussen automation GmbH Am Grundwassersee 1 82402 Seeshaupt [email protected] www.preussen-automation.eu