1
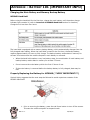
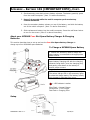
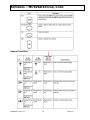
SYMBOL MC9060 HAND HELD TERMINAL USER MANUAL CORPORATE VERSION FEBRUARY 2007 TABLE OF CONTENTS Welcome..................................................................................... 3 Getting Started ........................................................................... 3 Equipment Setup ................................................................................... 3 Battery Installation................................................................................. 4 About the Stylus .................................................................................... 5 Aligning the Screen ................................................................................ 6 Configure Time Zones & Clock.................................................................. 7 Overview of Home Screen........................................................... 9 Appendix – Overview of Hand Held............................................. 10 Overview of MC9060 ..................................................................... 10 Appendix – Battery 101 (IMPORTANT INFO) .............................. 11 MC9060 ...................................................................................... 11 Charging the Main Battery and Memory Backup Battery ..................... 11 Properly Replacing the Battery (VERY IMPORTANT!) .......................... 11 About your Battery Charger and Charging Batteries ........................... 12 MC9060 ...................................................................................... 12 Appendix – Rebooting The Hand Held (MC9060) ........................ 14 Appendix – Keypad (MC9060) .................................................... 25 Support ...................................................................................... 17 Need Help? .................................................................................. 17 Need Accessories? ........................................................................ 17 SUPERVALU INC v3 .1 2 02/05/07 WELCOME Welcome to the next generation of hand held computing. Hand held computing has never been so easy and colorful! Please be sure to ready through this manual in its entirety so you can understand how to get your store up and running quickly. GETTING STARTED Equipment Setup 1. Unpack all equipment and lay each piece out on the workspace. You will need one electrical outlet for plugging the equipment in. It’s highly recommended that you save all packaging material and boxes in the event of a failure. a. Hooking up the equipment i. Attach the power supply cables and plug into an electrical outlet ii. Place the spare battery in the charging cradle. Verify that the light is flashing red. The battery usually fully charges in less than four hours. Please refer to the battery section of this manual for more specifics. SUPERVALU INC v3 .1 3 02/05/07 GETTING STARTED Battery Installation MC9060 Hand Held 2. Before using the MC9060 hand held, install a lithium-ion battery by sliding the battery into the unit as shown. Ensure the battery is fully inserted. Two audible clicks can be heard as the battery is fully inserted. A partially inserted battery may result in unintentional data loss. 3. When a battery is fully inserted in either hand held for the first time, the device boots and powers on automatically. The main battery can be charged before or after it is installed. Use one of the spare battery chargers to charge the main battery (out of the hand held), or one of the cradles to charge the main battery installed in the hand held. See the appendix for detailed battery information. It’s very important that you reference the section “Properly Replacing the Battery” sections on pages 14 and 15. Please take a second to review this information before continuing with the “Getting Started” instructions. 4. When the hand held is powered on for the first time, it initializes its system. The Symbol splash screen appears for a short period of time followed by the Microsoft® Windows® Powered Pocket PC window. SUPERVALU INC v3 .1 4 02/05/07 GETTING STARTED About the Stylus 5. Next, tap the screen to set up your Pocket PC using your stylus. MC9060 Stylus - It’s New to You! Use the hand held stylus for selecting items and entering information. The stylus functions as a mouse. Pull the stylus cord down and outward to remove the stylus. Tap - Touch the screen once with the stylus to press option buttons and open menu items. Tap and Hold - Tap and hold the stylus on an item to see a list of actions available for that item. On the pop-up menu that appears, tap the action you want to perform. Drag - Hold the stylus on the screen and drag across the screen to select text and images. Drag in a list to select multiple items. Do NOT use a pen, pencil or other sharp object to tap the screen! Doing so will ruin the unit. See the Appendix for information on ordering a replacement stylus. SUPERVALU INC v3 .1 5 02/05/07 GETTING STARTED, CONT. Aligning the Screen 6. The unit will automatically route to the align screen. Using the stylus, carefully press and briefly hold the tip of stylus on the center of each target that appears on the screen. It’s important when you first receive your new hand held to calibrate the screen. This will ensure that the cursor on the touch screen aligns properly with the tip of the stylus. To re-calibrate the screen at anytime for the MC9060, press FUNC (blue button) + Esc on the mobile computer to launch the calibration screen application. SUPERVALU INC v3 .1 6 02/05/07 GETTING STARTED Configure Time Zones and Clock 7. The time zone for your hand held must be designated when you first receive the hand held and after each cold boot. a. Using your stylus, choose the time zone that you are in from the drop down menu. The default is GMT – 8 Pacific US. b. Click Next when finished. c. The system will begin to install various files on the system – please refrain from using the hand held. You will see a window pop up stating “Copying Files”. Installation should take approximately 1 – 3 minutes. The Home Screen will appear on the screen when finished. d. It’s a good habit to verify that the date and time are correct. Click on the Clock icon on the Home screen. e. Go to the Home section of the Clock window and verify the date and time. If the date and/or time is incorrect: i. Using the drop down menu, choose the proper GMT time zone for your area (i.e. GMT – 6 Central US). ii. Go to the hour in the time section and click on it with your stylus (will be highlighted in blue). To change the hour, use the up and down arrow keys to the right of the field OR you can enter the time with using the keypad. iii. Repeat previous step for the minutes, seconds and AM/PM. iv. Go to the date field. Click on the drop down menu to bring up the calendar. Use the left or right arrow buttons on the display screen to navigate to the correct month. Choose a date with your stylus. SUPERVALU INC v3 .1 7 02/05/07 GETTING STARTED f. Click OK when finished. g. If needed, select Yes from the Settings dialog box stating “Save changes to the clock settings?” h. Users will then be returned to the Home screen for the Hand Held. Example of configured Settings screen SUPERVALU INC v3 .1 8 02/05/07 OVERVIEW OF HOME SCREEN Below is a screen shot of your Home screen for the Hand Held. Let’s take a moment to review the details and functionality. Starts the eOrder application. Users should refer to the eOrder User Manual for details on the application. Starts the Mobile Retail Manager (MRM) application. Starts the Calculator program. Allows hand held users to connect to remote systems for terminal emulation. This is primarily used for DSD Receiving. Starts the SweepTrax application. Routes users to the SUPERVALU Retail Handheld Local Menu. This is currently being using for the EA Tag Subscription application at Shoppers and Sentry. Users should refer to the Symbol EA Hand Held Quick Cards for the EA Tag Subscription detail. About displays the AppCenter software version. Central Support may ask you to check the version when trouble-shooting incidents This is your IP address for the Hand Held. An IP of 0.0.0.0 indicates that you are not connected to the wireless network. Displays the time. Displays the status of the signal strength, address and connection speed. A “X” (instead of bars) indicates that you are not connected to the wireless network. Controls the volume of the speaker and scanner. This section was covered under the topic Getting Started. Displays the battery level. This section will be covered in further in the manual. SUPERVALU INC v3 .1 9 02/05/07 APPENDIX – OVERVIEW OF HAND HELD Overview of MC9060 Hand Held SUPERVALU INC v3 .1 10 02/05/07 APPENDIX – BATTERY 101 (IMPORTANT INFO) Charging the Main Battery and Memory Backup Battery MC9060 Hand Held Before using the hand held for the first time, charge the main battery until the amber charge indicator light remains lit (refer to Overview of MC9060 Hand Held section for location.) Charge time is less than four hours. The hand held is equipped with a memory backup battery, which automatically charges from the fully charged main battery. When the hand held is used for the first time, the backup battery requires approximately 15 hours to fully charge. The backup battery retains data in memory for at least 30 minutes when the mobile computer's main battery is removed. When the hand held reaches a very low battery state, the combination of main battery and backup battery retains data in memory for at least 72 hours. Do not remove the main battery within the first 15 hours of use. If the main battery is removed before the backup battery is fully charged, data may be lost! Properly Replacing the Battery for MC9060 (**VERY IMPORTANT!**) Symbol highly suggests that the next steps be followed to avoid mysterious restarts of the MC9060 hand held. 1. Prior to removing the battery, press the red Power button to turn off the screen. This sets the mobile computer to suspend mode. SUPERVALU INC v3 .1 11 02/05/07 APPENDIX – BATTERY 101 (IMPORTANT INFO), CONT. 2. Simultaneously press both primary battery releases. The battery partially ejects from the mobile computer. (Item 1 in above illustration) 3. Pause 3-4 seconds while the mobile computer performs battery removal shutdown. 4. Press the secondary battery release, on top of the battery, and slide the battery out of the mobile computer. (Item 2 in above illustration) 5. Slide replacement battery into the mobile computer. Press the red Power button to turn on the screen. (Item 3 in above illustration) About your MC9060 Four Slot Spare Battery Charger & Charging Batteries This section describes how to set up and use the Four Slot Spare Battery Charger to charge up to four MC9060G spare batteries. To Charge a MC9060 Spare Battery 1. Ensure the accessory used to charge the spare battery is connected to the appropriate power source. 2. Insert the spare battery into the accessory’s spare battery charging slot with the charging contacts facing down (over the charging pins) and gently press down on the battery to ensure proper contact. 3. The battery starts to charge automatically. The amber charge LED on the accessory lights to show the charge status. The battery usually fully charges in less than four hours. = LED Indicator Location Slow Flash = Normal Charge Solid Amber = Full Charge Fast Flash = Charging Error Setup SUPERVALU INC v3 .1 12 02/05/07 APPENDIX – BATTERY 101 (IMPORTANT INFO), CONT. About your MC9060 Single Spare Battery Charger & Charging Batteries This section describes how to set up and use the Single Slot Serial Charger/USB Cable to charge your MC9060 battery and hand held. To Charge a MC9060 Spare Battery 1. Ensure the accessory used to charge the spare battery is connected to the appropriate power source. 2. Insert the spare battery into the accessory’s spare battery charging slot with the charging contacts facing down (over the charging pins) and gently press down on the battery to ensure proper contact. 3. The battery starts to charge automatically. The amber charge LED on the accessory lights to show the charge status. The battery usually fully charges in less than four hours. = LED Indicator Location Slow Flash = Normal Charge Solid Amber = Full Charge Fast Flash = Charging Error Setup SUPERVALU INC v3 .1 13 02/05/07 APPENDIX – REBOOTING THE MC9060 HAND HELD Every so often it may be necessary to reboot your MC9060 hand held. Performing a Warm Boot on the MC9060 Hold down the Power button for approximately five seconds. As soon as the hand held starts to perform a warm boot release the Power button. Performing a Cold Boot on the MC9060 A cold boot restarts the hand held and erases all user-stored records and entries that are not saved in flash memory (Application and Platform folders) or a memory card. Never perform a cold boot unless a warm boot does not solve the problem. Do not hold down any key, button or the trigger, other than the Power button during a reset. Performing a cold boot restores formats, preferences and other settings to the default settings. 1. Press the primary battery release on the hand held to partially eject the battery from the hand held. 2. While the battery is partially released, press and hold the Power button and push the battery to fully re-insert it in the hand held. One audible click can be heard as the battery is fully inserted. 3. Continue to hold the Power button for approximately 15 - 17 seconds. 4. As the unit cycles into a cold boot, }}} appears in the upper left corner of the display window, followed by the message ...Booting System.... 5. Release the Power button. 6. As the hand held initializes its system, the Symbol splash window appears for about 30 seconds. 7. Calibrate the screen and set the time zone. SUPERVALU INC v3 .1 14 02/05/07 APPENDIX – MC9060 KEYPAD About your 53-Key Keypad The 53-key keypad contains a Power button, application keys, scroll keys and function keys. The keypad is color-coded to indicate the alternate function key (blue) values. SUPERVALU INC v3 .1 15 02/05/07 APPENDIX – MC9060 KEYPAD, CONT. Special Functions SUPERVALU INC v3 .1 16 02/05/07 SUPPORT Need Support? If you experience any issues regarding your hand held, please call Central Support at 1-800-4268845. Choose option 1 Retail store, choose option 2 SVHarbor, choose 4 for all other requests. Need Accessories? Retailers should contact their regional Retail Technology department. SUPERVALU INC v3 .1 17 02/05/07