1
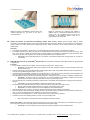
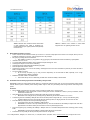
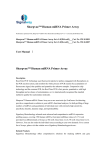
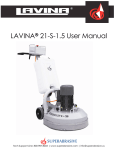
FOR RESEARCH USE ONLY!
DiaEasy™ Dialyzer (800 µl) MWCO 3.5 kDa
Rev 09/13
(Catalog # K1018-10, -25, -100;
Store at RT (15-25°C) Shelf Life: 12 months, for longer storage, store at 4°C at relative humidity of ≥35%)
I.
II.
Introduction:
Biovision’s DiaEasy™ dialyzer (3.5 kDa MWCO) can combines two modes of action, 1) dialysis or buffer exchange at sample volumes
between 50 and 800 µl and 2) electro-elution of macromolecules from polyacrylamide or agarose gel. They can also be used for several
other purposes as shown below. This device allows rapid and high performance at either mode and extracts the macromolecules without
any contamination. They are ideal for purification of very small quantities of proteins (up to 0.5 µg), for automated protein sequencing,
peptide mapping and amino acid analysis. The DiaEasy™ tube’s membrane is ultra-clean, sulfur and heavy metal free and EDTA-treated
which makes it suitable for molecular biology experiments. These tubes are autoclaved and bacteria free. The DiaEasy™ tubes allow
rapid, secure and simple loading and recovery. They are very high performance dialysis tubes and are the most convenient, user friendly
dialysis system on the market. The sample quality after dialysis can be checked by several assays commonly used for proteins and
nucleic acids.
Applications:
•
Dialysis or buffer exchange of small volumes (50-800 µl).
•
Extraction of proteins, RNA, DNA or oligonucleotides (>20 nt) from polyacrylamide, agarose or any gel matrix in any running buffer.
•
Extraction of protein-protein, DNA-protein or RNA-protein complexes.
•
Preparation of protein samples for MALDI-MS.
•
Samples concentration
•
High through put dialysis (using a single beaker with several DiaEasy™ tubes on one floating pad).
III.
Yield/Recovery:
DNA or RNA from Agarose gel
DNA or RNA from polyacrylamide gel
Protein from SDS-PAGE gel
IV.
90%
90%
70%
Kit Contents:
K1018-10
K1018-25
K1018-100
Part Number
DiaEasy™ Dialyzer Tubes
Components
10
25
100
K1018-xx(x)-1
DiaEasy™ Dialyzer Floating Rack
2
5
10
K1018-xx(x)-2
DiaEasy™ Dialyzer Supporting Tray
2
5
10
K1018-xx(x)-3
V.
User Supplied Reagents and Equipment:
Beakers and Buffers.
VI.
Storage and Handling:
Store all components of the kit at room temperature. Read the entire protocol before performing the experiment.
Dialysis by DiaEasy™ Dialyzer Tubes:
VII.
Procedure:
Fill the DiaEasy™ Dialyzer Tube with 800 µl of dH2O. Incubate for at least 5 min. Empty the tube.
•
IMPORTANT: Carefully check that no dH2O leaking from the tube. Water absorption, by the dry membrane, causes
decrease of water level.
•
Load sample into the DiaEasy™ Dialyzer Tube. Close the tube.
IMPORTANT: Sample volume should be in the range of 50-800 µl. If small volume is used, load the sample close to the
inner membrane.
•
Place the loaded DiaEasy™ Dialyzer Tube in the supplied floating rack in a stirred beaker containing large volume (usually 100 to
1000-fold that of the sample) of the desired buffer. The floating rack can hold 1-4 DiaEasy™ Dialyzer Tubes. Adjust the stir bar speed.
Allow at least 30 min for each 0.1 ml of sample. Low-molecular weight salts and buffers (e.g., Tris HCl and KPO4) equilibrate within 3
hours. Equilibration times for viscous samples will be longer.
IMPORTANT: User must determine exact equilibration times for the dialysis.
•
Change the dialysis buffer as necessary.
•
Pipette out the sample carefully from the DiaEasy™ Dialyzer tube to a clean microcentrifuge tube.
If sample volume has increased during dialysis, let your sample evaporate on the bench top (a fan increasing airflow across
the membrane will speed up the process), check every 10 min or less to prevent full evaporation and dryness.
•
155 S. Milpitas Blvd., Milpitas, CA 95035 USA | T: (408)493-1800 F: (408)493-1801 | www.biovision.com | [email protected]
FOR RESEARCH USE ONLY!
Figure 1: Insertion of the DiaEasy™ Dialyzer tubes in the
provided supporting tray. The arrow on the cap is
positioned face-up.
Sample concentration by evaporation with DiaEasyTM Dialyzer tubes: DiaEasy™ Dialyzer tubes are ideally suited for sample
concentration via evaporation because of their dual membranes and large surface area. Dialysis and concentration in the same device
reduces protein loss. Unlike closed-system centrifuge-type devices, sample concentration can be easily monitored in the DiaEasyTM
Dialysis tubes.
VIII.
•
•
IX.
Figure 2: Supporting tray containing three DiaEasy™
Dialyzer tubes in a horizontal electrophoresis tank. The
arrow on the cap is positioned face up and the two
membranes of the DiaEasy™ Dialyzer tubes are in
perpendicular to the electric field.
Procedure:
Place sample in the DiaEasy™ Dialyzer tubes or use already dialyzed sample and place it on the microtube rack stand.
Let samples evaporate on the bench top (using fan to increase airflow across the membrane speed up evaporation process), check
every 10 min or less to prevent full evaporation and dry sample condition. Concentrating by evaporation of water with sample, small
molecules (buffer salts, reducing agents, etc.) will also get concentrated because no diffusion occurs.
IMPORTANT: When evaporating water from your sample, small molecules (buffer salts, reducing agents, etc.) will also be
concentrated.
DNA RNA extraction from gel with DiaEasyTM Dialyzer tubes: This procedure is designed to extract DNA or RNA from polyacrylamide
or agarose gels.
Procedure:
•
Fill the DiaEasy™ Dialyzer tube with 800 µl of dH2O. Incubate for at least 5 min. Empty the tube.
•
IMPORTANT: Check carefully that no dH2O is leaking from the tube. Absorbent of water, by the dry membrane, cause to the
decrease in water level.
•
Excise the slice of gel containing the desirable DNA or RNA fragment with a clean, sharp scalpel. Minimize the size of the gel slice by
removing extra gel. Maximum gel slice size 1 cm x 0.5 cm.
•
Transfer the gel slice to a DiaEasy™ Dialyzer tube. Fill the tube with 0.7 – 0.8 ml dH2O. Close the tube gently. Avoid air bubbles in the
tube. Don’t fill the tube with several gel slices, for larger gel slices use more than one tube.
•
Place the DiaEasy™ Dialyzer tube in the provided tray (see Figure 1). The supporting tray can comprise 1-4 DiaEasy™ Dialyzer tubes.
•
IMPORTANT: The arrow on the cap is pointing face up. The two membranes of the DiaEasy™ Dialyzer tube must be in
perpendicular to the electric field to permit the electric current to pass through the tube.
•
Place the supporting tray containing the DiaEasy™ Dialyzer tubes in a horizontal electrophoresis tank containing running buffer (see
Figure 2)
•
IMPORTANT: Immerse fully the DiaEasy™ Dialyzer tube with the tray in the buffer.
•
Pass electric current (usually at 80-150 volt) until the nucleic acid exits from the gel slice (see Tables 1 and 2).
•
Optional: Follow the DNA or RNA eluted out of the gel with a hand-held UV lamp or table.
•
IMPORTANT: The electro-elution time need to be adjusted for each individual sample.
•
Reverse the polarity of the current for 120 seconds. This step will release the nucleic acid from the membrane.
•
Open the DiaEasy™ Dialyzer tube gently, pipetting the solution up and down carefully (at least 5 times) and transfer the solution to a
clean 1.5 ml microcentrifuge tube. Do the pipetting on the inner side of the membrane.
•
Centrifuge the microcentrifuge tube for 1 min at maximum speed. This step will remove gel residues.
•
Transfer the nucleic acid containing solution to a clean 1.5 ml microcentrifuge tube.
•
Note: Concentrate the extracted nucleic acid by standard concentration methods;
Elution Time Tables: In this method the elution time depends on the size of the nucleic acid fragment, the concentration of the gel, the
size of the gel slice, the ratio of the polyacrylamide: bisacrylamide and the applied voltage.
•
IMPORTANT: The electro-elution time at the elution step needs to be adjusted for each individual sample.
155 S. Milpitas Blvd., Milpitas, CA 95035 USA | T: (408)493-1800 F: (408)493-1801 | www.biovision.com | [email protected]
FOR RESEARCH USE ONLY!
Table 1: Minimum time needed to extract various DNA
or RNA fragments from native or denatured 4%
polyacrylamide gel (29:1 polyacrylamide: bisacrylamide)
at 100-150 volt.
X.
XI.
Table 2: Minimum time needed to extract DNA
fragments from 1% agarose gel at 80-110 volt.
DNA or RNA precipitation procedure
•
Add 0.1 volumes of 3 M Potassium acetate, pH-5.2 and 0.7-1 volumes of isopropanol to the solution. For example, add 70 µl of 3 M
Potassium acetate pH-5.2 and 500 – 700 µl isopropanol to a 700 µl sample.
•
Mix gently by inverting the tube several times.
Note: addition of carrier (e.g. 20 µg tRNA or 20 µg glycogen) to the solution will increase the efficiency of precipitation.
•
Incubate at -20°C for 10 min.
•
To increase DNA or RNA precipitation yield incubate the samples overnight at –20°C.
•
Centrifuge the sample at 4°C for 30 min at 20,000 g.
•
Carefully discard the supernatant without disturbing the pellet.
•
Wash the pellet with cold 70% ethanol.
•
Centrifuge the sample at 4°C for 30 min at 20,000 g. Centrifuge the tube in the same orientation as previously to recover the DNA or
RNA in a compact pellet.
•
Air-dry the pellet for 5-20 min.
Do not over-dry the pellet (e.g., by using a vacuum evaporator), as this will make the DNA, especially if it is of high
molecular weight, difficult to redissolve.
•
Redissolve the DNA or RNA in a suitable buffer.
Use a buffer with pH >8.0 for redissolving, as DNA does not dissolve readily in acidic buffers.
Protein Extraction from Polyacrylamide Gel with DiaEasy™ Dialyzer tubes
IMPORTANT: Fixation of proteins before electro elution (e.g. fixation with methanol, acetic acid, etc) is not recommended. Fixation greatly
reduces extraction yield. A sensitive protein staining solution may be used, as it permanently stains the gel without undue fixing of the
protein.
Procedure:
•
•
•
•
•
•
Fill the DiaEasy™ Dialyzer tube with 0.8 ml of dH2O. Incubate for at least 5 min. Empty the tube.
•
IMPORTANT: Check carefully that no dH2O is leaking from the tube. Absorbance of water, by the dry membrane, causes
the decrease in water level.
After staining the gel, excise the gel slice containing the protein with a clean, sharp scalpel.
•
Minimize the size of the gel slice by removing extra gel. Maximum gel slice size should be 1 cm x 0.5 cm.
Transfer the gel slice to a DiaEasy™ Dialyzer tube. Fill the tube with protein-running buffer (0.7 – 0.8 ml). Close the tube gently.
•
Avoid air bubbles in the tube. Do not fill the tube with several gel slices, for larger gel slices use more than one tube.
Place the DiaEasy™ Dialyzer tube in the provided supporting tray.
•
The supporting tray can hold 1-4 DiaEasy™ Dialyzer tubes
•
IMPORTANT: The arrow on the cap should point face up. The two membranes of the DiaEasy™ Dialyzer tube must be in
perpendicular to the electric field to permit the electric current to pass through the tube.
Place the supporting tray containing the DiaEasy™ Dialyzer tubes in a horizontal electrophoresis tank containing protein running
buffer
•
IMPORTANT: Immerse fully the DiaEasy™ Dialyzer tubes with the tray in the buffer.
Pass electric current (usually at 100 volt) until the protein exits from the gel slice.
155 S. Milpitas Blvd., Milpitas, CA 95035 USA | T: (408)493-1800 F: (408)493-1801 | www.biovision.com | [email protected]
FOR RESEARCH USE ONLY!
Electro-elution time is to be adjusted for each individual sample. It takes at least 85 min for BSA protein to be electro-eluted
from a 10% SDS-PAGE slice (see Table 3).
Reverse the polarity of the electric current for 120 seconds. This step will release the protein from the membrane.
Open the DiaEasy™ Dialyzer tubes gently, pipetting the protein-containing solution up and down carefully (at least 5 times) and
transfer the solution to a clean 1.5 ml microcentrifuge tube.
•
Do the pipetting on the inner side of the membrane.
Centrifuge the microcentrifuge tube for 1 min at maximum speed. This step will remove gel residues.
Transfer the protein-containing solution to a clean 1.5-ml microcentrifuge tube.
•
•
•
•
•
Important Notes:
•
Use the extracted protein directly.
•
Concentrate the extracted protein by standard concentration methods.
•
Precipitate the extracted protein by standard precipitation protocols.
•
Dialyze directly the extracted protein with a clean DiaEasy™ Dialyzer tubes.
Elution Time Table: The elution time depends on the size of the protein molecule to be eluted, the applied voltage, the size of gel slice, the ratio
of the polyacrylamide : bisacrylamide and the percentage of the polyacrylamide gel. Electro-elution time at the elution step was to be adjusted
for each individual sample.
Protein (kDa)
Time (Min)
Protein (kDa)
Time (min)
14
35-45
50
75-85
19-26
45-55
66
85-95
29
55-65
81
105-115
40
60-70
116
120-130
45
65-75
128
140-150
Table 3: Minimum time needed to extract different-sized
proteins from 10% SDS-polyacrylamide gel (29:1
polyacrylamide : bisacrylamide) at 100 V.
XII. Protein Extraction from polyacrylamide Gel compatible with MALDI-MS by DiaEasy™ Dialyzer Tubes
Procedure
Fill the DiaEasy™ Dialyzer tube with 0.8 ml of dH2O. Incubate for at least 5 min. Empty the tube.
•
IMPORTANT: Check carefully that no dH2O is leaking from the tube. Absorbance of water by the dry membrane causes
decrease in the water level.
•
After staining the gel, excise the gel slice containing the protein with a clean, sharp scalpel.
•
Minimize the size of the gel slice by removing extra gel. Maximum gel slice size should be 1 cm x 0.5 cm.
•
Transfer the gel slice to a DiaEasy™ Dialyzer Tubes. Fill the tube (0.7 to 0.8 ml) with protein running buffer containing 250 mM Tricine
pH 8.5, 0.025% SDS and 25 mM Tris-Base. Close the tube gently.
•
Avoid air bubbles in the tube. Do not fill the tube with several gel slices, for large gel slices use more than one tube.
•
Place the DiaEasy™ Dialyzer Tubes in the provided supporting tray.
•
The supporting tray can hold 1-4 DiaEasy™ Dialyzer Tubes
•
Place the supporting tray containing the DiaEasy™ Dialyzer Tubes in a horizontal electrophoresis tank filled with protein-running
buffer: 250 mM Tricine pH 8.5, 0.025% SDS and 25 mM Tris-Base.
•
IMPORTANT: Immerse fully the DiaEasy™ Dialyzer Tubes with the tray in the buffer.
•
Pass electric current at 150 volt until the protein exits from the gel slice.
•
The electro-elution time is to be adjusted for each individual sample. It takes at least 2 hours for BSA protein to be electroeluted from a 10% SDS-PAGE gel slice.
•
For other proteins from BSA, increase electro elution time presented in Table 3, by 30%.
•
Reverse the polarity of the electric current for 120 seconds. This step will release the protein from the membrane.
•
Open the DiaEasy™ Dialyzer Tubes gently, pipetting the protein-containing solution up and down carefully (at least 5 times) and
transfer the solution to a clean 1.5 ml microcentrifuge tube.
•
Do the pipetting on the inner side surface of the membrane.
•
Centrifuge the microcentrifuge tube for 1 min at maximum speed. This step will remove gel residues.
•
Transfer the protein-containing solution to a clean 1.5-ml microcentrifuge tube.
•
Protein precipitation protocol for analysis by MALDI-MS
•
•
•
•
•
•
Add 1:10 by volume of MS buffer of your choice to the protein containing solution and mix properly. For example, add 70 µl of MS
buffer to a 700 µl sample.
Incubate for 15 min at room temperature.
Add 1: 5 by volume of 50% Trichloroacetic acid (TCA) and mix properly. For example, add 154 µl of 50% TCA to a 770 µl sample.
Incubate for 1 hour at 4°C.
Centrifuge the sample at 4°C for 30 min at 20,000 g.
Carefully descent the supernatant without disturbing the pellet.
155 S. Milpitas Blvd., Milpitas, CA 95035 USA | T: (408)493-1800 F: (408)493-1801 | www.biovision.com | [email protected]
FOR RESEARCH USE ONLY!
•
•
•
•
•
Add 500 µl of ice-cold acetone.
Incubate at -20°C for 30 min and centrifuge the sample at 4°C for 30 min at 20,000 g.
To increase protein precipitation yield incubate the samples over night at –20°C.
Carefully descent the supernatant without disturbing the pellet. Air-dry the pellet.
For mass spectrometric analysis resuspend the pellet in appropriate solution compatible with MALDI-MS (protein characteristic is
important for determination the appropriate solution) followed by essential dilution step according to the protocols compatible with
MALDI-MS. Use at least 20 µl to perform resuspension.
XIII. Protein precipitation protocols used after isolation from the DiaEasy™ Dialyzer Tubes:
Trichloroacetic acid (TCA) precipitation procedure (for protein)
•
Add equal volume of 20% TCA to the microcentrifuge tube containing the extracted protein solution and mix properly. For example,
add 700 µl of 20% TCA to a 700 µl sample.
•
Incubate 60 min in 4°C.
•
Centrifuge at 4°C for 30 min at 20,000 g and carefully discard the supernatant.
•
Add 500 µl cold acetone and incubate at -20°C for 60 min.
•
Centrifuge the sample at 4°C for 30 min at 20,000 g.
•
To increase protein precipitation yield incubate the samples overnight at –20°C.
•
Discard supernatant and air-dry the pellet.
•
Resuspend the pellet in 0.1 M NaOH or dH2O (use at least 20 µl to perform resuspension). If dH2O is used for resuspension, incubate
the sample for 5 min in 60°C, resuspend the sample and incubate 5 min more at 60°C.
MS precipitation procedure (recommended when protein-bound SDS need to be removed)
•
Add 1:10 by volume of your choice of MS buffer to the protein containing solution and mix properly. For example, add 70 µl of MS
buffer to a 700 µl sample.
•
Incubate for 15 min at room temperature.
•
Add 1: 2 by volume of 20% TCA and mix properly. For example, add 385 µl of 20% TCA to a 770 µl sample.
•
Incubate for 1 hour at 4°C.
•
Centrifuge the sample at 4°C for 30 min at 20,000 g and carefully decant the supernatant without disturbing the pellet.
•
Add 500 µl of ice-cold acetone.
•
Incubate at -20°C for 30 min and centrifuge the sample at 4°C for 30 min at 20,000 g.
•
To increase protein precipitation yield incubate the samples overnight at -20°C.
•
Carefully decant the supernatant without disturbing the pellet. Air-dry the pellet.
•
Resuspend the pellet in a suitable buffer solution or 0.1 M NaOH (use at least 20 µl to perform resuspension).
XIV. Related Products
DiaEasy™ Dialyzer (800 µl) MWCO 1 kDa (K1017-10, -25, -100)
DiaEasy™ Dialyzer (3 ml) MWCO 3.5 kDa (K1012-10, -25, -100)
DiaEasy™ Dialyzer (3 ml) MWCO 12-14 kDa (K1014-10, -25, -100)
DiaEasy™ Dialyzer (20 ml) MWCO 3.5 kDa (K1000-10, -25, -100)
DiaEasy™ Dialyzer (20 ml) MWCO 6-8 kDa (K1003-10, -25, -100)
DiaEasy™ Dialyzer (10 ml) MWCO 3.5 kDa (K1002-10, -25, -100)
DiaEasy™ Dialyzer (15 ml) MWCO 12-14 kDa (K1007-10, -25, -100)
DiaEasy™ Dialyzer (20 ml) MWCO 1 kDa (K1009-10, -25, -100)
DiaEasy™ Dialyzer (10 ml) MWCO 12-14 kDa (K1008-10, -25, -100)
DiaEasy™ Dialyzer (800 µl) MWCO 6-8 kDa (K1019-10, -25, -100)
DiaEasy™ Dialyzer (3 ml) MWCO 6-8 kDa (K1013-10, -25, -100)
DiaEasy™ Dialyzer (3 ml) MWCO 25 kDa (K1015-10, -25, -100)
DiaEasy™ Dialyzer (15 ml) MWCO 3.5 kDa (K1001-10, -25, -100)
DiaEasy™ Dialyzer (15 ml) MWCO 6-8 kDa (K1004-10, -25, -100)
DiaEasy™ Dialyzer (20 ml) MWCO 12-14 kDa (K1006-10, -25, -100)
DiaEasy™ Dialyzer (10 ml) MWCO 6-8 kDa (K1005-10, -25, -100)
DiaEasy™ Dialyzer (15 ml) MWCO 1 kDa (K1010-10, -25, -100)
FOR RESEARCH USE ONLY! Not to be used on humans.
155 S. Milpitas Blvd., Milpitas, CA 95035 USA | T: (408)493-1800 F: (408)493-1801 | www.biovision.com | [email protected]