1
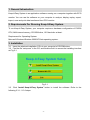
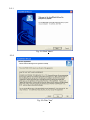
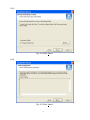
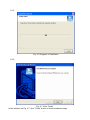
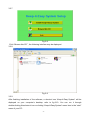
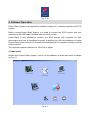
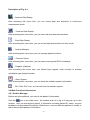
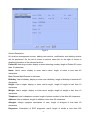
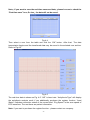
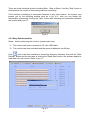
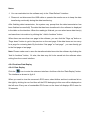
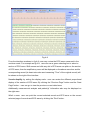
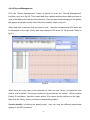
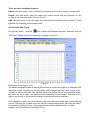
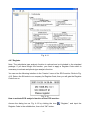
Keep-it-Easy System User Manual Version Ver1.0 Content 1. General Introduction............................................................................. - 4 2. Requirements For Running Keep-it-Easy System ............................. - 4 3. Installation ............................................................................................. - 4 4. Software Operation ............................................................................... - 4 4.1 Main menu ............................................................................................ - 9 4.2 Main Functions Introduction ................................................................ - 10 4.2.1 Archive Manager ................................................................... - 10 4.2.2 Continue Data Display........................................................... - 12 4.2.3 Easy Data Acquisition............................................................ - 14 4.2.4 Continue Data Replay ........................................................... - 15 4.2.5 Easy Data Replay.................................................................. - 19 4.2.6 Common Sense .................................................................... - 19 4.2.7 Register................................................................................. - 20 4.2.8 Software Information ............................................................. - 21 4.2.9 Exit ........................................................................................ - 21 5. Uninstall ............................................................................................... - 22 - -2- Notice Thanks for your purchasing software Keep-it-Easy System which is a data management software for our ECG monitor. Before use,please read this manual carefully. Or else,there will be damage and adverse consequences to user or monitors. Beijing Choice Electronic Technology Co., Ltd. (hereinafter called Beijing Choice) owns all rights to this unpublished work and intends to maintain this work as confidential. Beijing Choice may also seek to maintain this work as an unpublished copyright. No part of this can be disseminated for other purposes. In the event of inadvertent or deliberate publication, Beijing Choice intends to enforce its right to this work under copyright laws as a published work. Anyone who is not authorized by Beijing Choice can not copy, use, or disclose the information in this manual. Content of the manual is subject to changes without prior notice. All rights reserved. Declare All information contained in this publication is believed to be correct. Choice shall not be liable for errors contained herein nor for incidental or consequential damages in connection with the furnishing, performance, or use of this material. This publication may refer to information and protected by copyrights or patents and does not attorn any license under the patent rights of Beijing Choice, nor the rights of others. Beijing Choice does not assume any liability arising out of any infringements of patents or other rights of third parties. -3- 1. General Introduction Keep-it-Easy System is an application software running on a computer together with ECG monitor. You can use the software on your computer to analyze, display, replay, export, import, save and print data transferred from ECG monitor. 2. Requirements For Running Keep-it-Easy System To run Keep-it-Easy System, your computer requires a hardware configuration of PIII500 CPU, 64M internal memory, CD-ROM drive, 10G hard disc at least . Requirement for Operating System: Microsoft Windows Windows 2000/XP/Vista operating system . 3. Installation 3.1 Insert the attached installation CD into your computer’s CD-ROM driver. 3.2 Find the file “setup.exe” in the CD, and double-click it to access the installing interface as Fig.3-1. Fig.3-1 3.3 Click “Install Keep-it-Easy System” button to install the software. Refer to the following 3.3.1 ~3.3.6 steps: -4- 3.3.1 Fig. 3-2 Click “Next>” 3.3.2 Fig. 3-3 Click “Yes” -5- 3.3.3 Fig. 3-4 Click “Next>” 3.3.4 Fig. 3-5 Click “Next>” -6- 3.3.5 Fig. 3-6 Progress of Installation 3.3.6 Fig. 3-7 Click “Finish” In the interface as Fig. 3-7, click “Finish” button to finish installation steps. -7- 3.3.7 Fig.3-8 Click “Browse this CD” , the following interface may be displayed. 3.3.8 Fig.3-9 3.3.9 After finishing installation of the software, a shortcut icon “Keep-it-Easy System” will be displayed on your computer’s desktop, refer to fig.3-10. You can run it through double-clicking this shortcut icon or clicking “Keep-it-Easy System” menu item in the “start” menu of your PC.. -8- Fig. 3-10 4. Software Operation Keep-it-Easy System is an application software running on a computer together with ECG monitor. Before running Keep-it-Easy System, you need to connect the ECG monitor with your computer by the USB cable. And then start the ECG monitor. Keep-it-Easy is only allowed to connect one ECG monitor with computer for data transmission at a time. If changing the monitor to another one, while the software is running, Keep-it-Easy System cannot run normally and indicates that it is needed to change another correct monitor. The required computer resolution is 1024*768 or higher. 4.1 Main menu Double-click “Keep-it-Easy System” icon to run the software, and the main menu is shown as Fig. 4-1. Fig. 4-1 -9- Description of Fig. 4-1: :Continue Data Replay After accessing this menu item, you can review data and waveform in continuous measurement mode. :Continue Data Display After accessing this menu item, you can view real-time data and waveform. :Easy Data Replay After accessing this menu item, you can review data and waveform in easy mode. :Archive Manager After accessing this menu item, you can manage patient’s archive. :Common Sense After accessing this menu item, you can learn some general ECG knowledge. :Register (Optional) After accessing this menu item, you should input register code correctly to activate arrhythmia type analysis function. :About System After accessing this menu item, you can know the software system information. :Exit :Click “Exit” icon, you will exit from the software system. 4.2 Main Functions Introduction 4.2.1 Archive Manager Before using the software, you need to set patient’s information. Click the icon in the main menu,the window such as in fig. 4-2 may pop up. In this window,user can manage the patient’ s information including patient ID, name, sex and birthday and other patient information. What’s more, user can add new patients or modify or delete any existent patient’s information. - 10 - Fig.4-2 Screen Description: On archives management screen, adding new archive, modification and deleting archive can be performed. On the left of screen is archive name list; on the right of screen is detailed information of the selected archive. Patient ID: detecting number; display or enter detecting number; length of Patient ID is less than 10 characters. Name: User’s name; display or enter user’s name; length of name is less than 40 characters. Sex: Choose Male/Female in submenu. Birthday: User’s birthday; display or enter user’s birthday; length of birthday is less than 40 characters. Height: User’s height; display or enter user’s height;length of height is less than 10 characters. Weight: User’s weight; display or enter user’s weight; length of weight is less than 10 characters. Telephone: User’s telephone number; length of phone number is less than 40 characters. Address: User’s address; length of address is less than 60 characters. Allergies: allergic symptom description of user; length of allergies is less than 60 characters. Diagnoses: Description of ECG diagnostic result; length of words is less than 200 - 11 - characters. (2)Functional buttons: Add: Add new archives button; if user needs to add a new archive, please click this button and then input user’s detailed data in blank. Delete: Delete the selected archive in archive list. Modify: Modify the selected archive in archive list. Note: Patient ID can not be modified. Return: Exit from archive management screen. 4.2.2 Continue Data Display Important: Please make sure to connect the monitor to PC well before activating this function. In this system,user can view the real-time data measured by the monitor and save them into the PC for reviewing and management. On the main menu,click the icon to enter the submenu interface,refer to fig. 4-3. Fig. 4-3 Click the “Start” button,the following window containing a table of existent Patient ID and other information may pop up. Refer to Fig.4-4. - 12 - Note:If you want to save the real-time measured data,please be sure to check the “Real-time save” box; Or else,the data will not be saved. Fig.4-4 Then select a user from the table and click the “OK” button. After that ,The data transmission begins and the transferred data may be saved in the selected user archive. Refer to Fig.4-5. Fig.4-5 The real-time data is shown as Fig. 4-5. “HR” is heart rate. “Arrhythmia Type” will display the arrhythmia analysis result if you additionally purchase the register function. “Lead Status” indicates connection status of the current lead. “Ecg Speed” is the scan speed of ECG waveform. The rest items are patient information. Note: if you want to purchase the register function,please contact our company. - 13 - There are three functional buttons including Start,Stop or Return. And the “Stop” button is functioned as the control of terminating real-time monitoring. If the real-time monitoring is interrupted because of any other reason,the system may prompt you by the following window such as in fig. 4-6 , then you can restart the transmission process by clicking the “Start” button after checking the connection between the monitor and your PC. Fig.4-6 4.2.3 Easy Data Acquisition Notes:before performing the function, please make sure: (1)The monitor has been connected to PC with USB cable. (2)The monitor has been activated and the power of batteries is sufficient. Click icon in the main interface to access the submenu interface. And click the “Data Refresh” button and the next step is clicking the “Read Data” button, the software begins to read data from the monitor. Refer to fig. 4-7. Fig. 4-7 - 14 - Notes: You can read data into the software only in the “Data Refresh” interface. Please do not disconnect the USB cable or operate the monitor so as to keep the data transferring continually during the data transferring. After finishing data transmission, the system may prompt that the data transmission has been finished successfully! The data that has been transferred in the software is displayed in the table on the interface. When the reading is finished, you can select some data item(s) and save them into archive by clicking the “ Add In Archives” button. When there are more than one page in the software, you can click the “Page up” button or “Page down” button to get to the previous or the next page if the data items are too many for a page for reviewing data. By the button “first page” or “last page” you can directly get to the first page or last page. Note: Please make sure to save the transferred data items into the software by clicking the “Add In Archives” button;Or else, the data may fail to be saved into the software when exiting from the current interface. 4.2.4 Continue Data Replay 4.2.4.1 Data Replay Click the “ ” icon to enter the submenu interface. And then click the “Data Replay” button. The interface as shown in fig.4-8. When you want to view the someone’s ECG wave, select his/her archive in archives list on the right by clicking its row. And then all the ECG belonging to this user will be displayed on the left area. Every row of contractible ECG wave on the lower left displays ECG wave for 30 seconds. - 15 - Fig.4-8 From the interface as shown in fig.4-8, user may review the ECG wave measured in the continue mode. For example as fig.4-8,user can use a green selecting box to select a section of ECG wave. Shift mouse and click any dot in ECG wave can pitch on the section of ECG wave, then its amplificatory wave will be displayed on the above wave box and its corresponding record (its heart rate value and measuring “Time” of the original record) will be shown on the right of the interface. V-scale Amplify: by setting the display scale,user can review the different proportional display of the section of ECG wave. By clicking the “Previous Page” button and the “Next Page” button,user can go to view the previous or next data items. Additionally, measurement analysis and patient(s)’ information also may be displayed on the right area. What’ s more,user can print the current selected record and ECG wave or the current selected page of records and ECG wave by clicking the “Print” button. - 16 - 4.2.4.2 Record Management Click the ‘Record Management” button to switch to enter the “Record Management” interface, such as in fig.4-9 .Then select and click a patient archive whose data you want to view in the table on the left top of the interface. Then the data items belonging to the patient will appear in the table on the lower left of the interface. Refer to fig.4-9. Select and click a data item that you want to view, then the corresponding ECG wave will be displayed on the right. Every data item displays ECG wave for 30 seconds. Refer to fig.4-9. Fig.4-9 When there are many users in the archives list. User can use “Query” to search the user archive that is wanted. Two query conditions are provided by the system,which contains Patient ID and Name. Input the correct patient ID or name into the edit-box on the right, then click the “Query” button to find the corresponding patient . V-scale Amplify: by setting the display scale,user can view the different proportional display of the ECG waveform. - 17 - There are three functional buttons: Delete: click this button,user can delete the current record or all records of current user. Export: click this button, user can export the current record with the extension of .dnt or .bmp or all records of current user to the PC. Add: click this button, user can import the record(s) that has been saved on the PC to the software for reviewing and managing data. 4.2.4.3 Heart Rate Trend On the main menu,click the icon to enter the submenu interface. And then click the “HR Trend” button to enter the interface as shown in fig. 4-10. Fig.4-10 Description of the Figure 4-10: The patient information table is above HR trend curve. Select the target in it, and then click “Measure” button, according to record number and average heart rate value a trend curve is drawn in trend curve area. The ordinate value of heart rate trend curve expresses heart rate value, its unit is “bpm”; the abscissa value expresses record number. The area on the right of trend curve is for parameter display and functional button operation. Click “Measure” button, then shift mouse in the heart rate trend graph area, a blue staff line occurs. Click this line in trend curve can view its corresponding record (its heart rate value and measuring “Record Time” of the original record which displays above “H-Scale Amplify”),then the staff line will become azury. - 18 - H-Scale Amplify : click this combo box , user can select the interval of steps which the abscissa value increase at. The trend curve may be compressed to display and the number value corresponding to the mark in abscissa will increase at the interval of 1 or 5 or 10 steps. Click the “Prev-page” or “Next page” button, you can reviewing the previous or next page of HR trend chart. 4.2.5 Easy Data Replay 4.2.5.1 Data Refresh For the information on “Data Refresh”, please refer to 4.2.3 Easy Data Acquisition. 4.2.5.2 Data Replay For the information on “Data Replay”, please refer to 4.2.4.1 Data Replay. 4.2.5.3 Record Management For the information on “Record Management”, please refer to 4.2.4.2 Record Management. 4.2.5.4 HR Trend For the information on “HR Trend”, please refer to 4.2.4.3 Heart Rate trend. 4.2.6 Common Sense You can obtain troubleshooting instructions and general knowledge about ECG, by clicking icon, refer to the following Fig. 4-11. Scroll down to view all the ECG help information one section by one section. - 19 - Fig. 4-11 4.2.7 Register Note: The arrhythmia type analysis function is optional and not included in the standard package. If you have bought the function, you need to apply a Register Code which is necessary to activate arrhythmia type analysis function. You can see the following interface in the “Version” menu of the ECG monitor. Refer to Fig. 4-12. Return the SN code to our company for Register Code, then you will gain the Register Code from us. Fig. 4-12 How to activate ECG analysis function of the ECG monitor: Access the dialog box as Fig. 4-13 by clicking the icon Register Code in the editable box, then click “OK” button. - 20 - “Register”, and input the Fig. 4-13 4.2.8 Software Information Click icon to access the information interface. 4.2.9 Exit Click icon to exit from the Keep-it-Easy System. - 21 - 5. Uninstall (1). Click “start” menu of Windows system to find Keep-it-Easy System program group, then click “Uninstall” item and then the following prompt may appear as in Fig. 5-1. Fig. 5-1 (2). Click “OK” button in fig.5-1. Fig. 5-2 (3). Select whether to restart your computer at once or later, and then click “Finish”. - 22 - Manufacturer address: Beijing Choice Electronic Technology Co.,Ltd. Bailangyuan Building B Rm. 1127-1128, Fuxing Road, A36 100039 Beijing PEOPLE’S REPUBLIC OF CHINA - 23 -