1
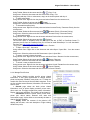
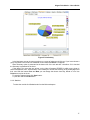
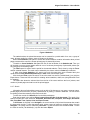
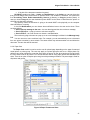
Alagus Print Admin 4.0
(build 1923)
Rule Like Never Before
User’s Guide
COPYRIGHT © 2007 Alagus Software Company. All rights reserved. All Alagus products are
trademarks or registered trademarks of Alagus Software Company. Other brand and product
names are trademarks or registered trademarks of their respective holders.
Alagus may have patents and/or pending patent applications covering subject matter in this
document. The furnishing of this document does not give you any license to these patents.
Fourth Edition
December 2007
Alagus Print Admin – User’s Guide
Table of Contents
1.
Introduction ..................................................................................................................................... 3
1.1
Overview.................................................................................................................................. 3
1.2
Who uses Alagus Print Admin................................................................................................. 3
1.3
Features .................................................................................................................................. 4
1.4
What’s new in Alagus Print Admin 4.0? .................................................................................. 4
2. Editions ........................................................................................................................................... 4
3. System requirements...................................................................................................................... 5
3.1
Hardware requirements........................................................................................................... 5
3.2
Software requirements ............................................................................................................ 6
4. Installation....................................................................................................................................... 6
4.1
Server installation .................................................................................................................... 6
4.2
Console installation ................................................................................................................. 6
5. Using Alagus Print Admin Server ................................................................................................... 6
5.1
Startup account configurator ................................................................................................... 7
5.2
Database Maintenance ........................................................................................................... 8
6. Using Alagus Print Admin Console................................................................................................. 8
6.1
Starting APAConsole............................................................................................................... 8
6.2
Configuration Wizard............................................................................................................... 9
6.3
Interface and Navigation ....................................................................................................... 10
6.3.1
Navigator ........................................................................................................................ 10
6.3.2
Main workspace ............................................................................................................. 11
6.3.3
Status Monitor ................................................................................................................ 11
6.4
Printers & Groups general tab............................................................................................... 12
6.4.1
Manage Printer Groups.................................................................................................. 12
6.4.2
Manage Printers............................................................................................................. 13
6.4.3
Manage Documents ....................................................................................................... 14
6.4.4
Manage Print Devices .................................................................................................... 15
6.4.5
Print Activity.................................................................................................................... 16
6.4.6
Statistics ......................................................................................................................... 17
6.4.7
Search ............................................................................................................................ 18
6.4.8
Print Rules...................................................................................................................... 19
6.4.9
Paper Cost ..................................................................................................................... 21
6.5
Users & Groups General Tab................................................................................................ 22
6.5.1
Manage User Groups..................................................................................................... 23
6.5.2
Manage Users ................................................................................................................ 23
6.5.3
General........................................................................................................................... 23
6.5.4
Print Quota ..................................................................................................................... 24
6.5.5
Print Activity.................................................................................................................... 25
6.5.6
Statistics ......................................................................................................................... 25
6.5.7
Search ............................................................................................................................ 25
6.6
Event Viewer ......................................................................................................................... 25
6.7
Options .................................................................................................................................. 26
6.7.1
Alagus Print Admin Console Options............................................................................. 26
6.7.2
Alagus Print Admin Server Options ............................................................................... 28
6.8
Editing Forms Style ............................................................................................................... 29
6.9
Short keys.............................................................................................................................. 30
7. Troubleshooting problems and FAQ............................................................................................. 31
7.1
Electronic Updates ................................................................................................................ 31
7.2
Alagus Direct News ............................................................................................................... 31
7.3
Alagus Print Adviser .............................................................................................................. 31
8. Contacts........................................................................................................................................ 32
2
Alagus Print Admin – User’s Guide
1. Introduction
1.1 Overview
Alagus Print Admin 4.0 is a complex software
system for managing the entire print process in your
organization. This product is the ultimate print-ruling
solution, which means no less then satisfying all
possible requirements of the print control software.
During the last few years Alagus
Software Co. has proven as one of the
leaders in developing print control
software. Our concept is to provide
maximum services for a competitive
price. Hundreds of clients all over the
world prove this to be successful.
Alagus Print Admin 4.0 offers you many solutions
in one product:
• Print Audit – Audits the customer’s print
activities and devices
• Print Quota – Limits printing by setting print quota for one user and a group of users.
• Printer & Printing Management – Full management of the printers and print documents
• Print Monitoring – Track, control and observation of the events in the print process
• Printing Analysis – Statistics and reports on the actual print activity of the users and the printers
Alagus Print Admin 4.0 is a server-based application, which allows system administrators to manage
print process centrally. The server part named Alagus Print Admin Server (APAServer) performs all
necessary operations to manage the print process and everything connected with it. The client part
named Alagus Print Admin Console (APAConsole) is the interface of the sever part. It can be stated on
any computer from the local network. APAServer processes all the tasks assigned from APAConsole.
Using this client-server mechanism, the system administrator or other authorized personnel can
manipulate the network printers from any computer in the local network.
1.2 Who uses Alagus Print Admin
Alagus Print Admin 4.0 is suitable for medium and large companies, schools, security organizations
and to all those who would like to control closely the printing process and reduce all expenses related to
printing. Here are some examples where our product is being used most efficiently.
Education organizations
Alagus Print Admin 4.0 is being used at many well-known prestigious universities, high schools,
secondary schools, and school boards. As we know, students use a lot of paper, whether they print out
multiple drafts of research papers or surf the web. Alagus Print Admin 4.0 enables academic personnel to
eliminate print waste. It can be used in a pay-what-you-print scheme, or students can be granted a limited
amount of pages each semester, month or week. Some organizations allow students to print as much as
they want, and just add the cost to their tuition bill.
Government/Military/Intelligence
Alagus Print Admin 4.0 is used by some government agencies worldwide for allocating and tracking
departmental printing costs as well as for ensuring print security.
Attorneys/Law firms
Attorneys are well known for billing clients for consumables, and the Alagus Print Admin 4.0 provides
this option for printing.
Engineering/Research/Architecture/Business
As said above about attorneys, Alagus Print Admin 4.0 is used for client billing for printing costs.
Higher cost print media is often used in research, and Alagus Print Admin 4.0 is a valuable tool in
recovering those costs.
Just think how much your organization spends on printing now? Hard task, isn’t it?
3
Alagus Print Admin – User’s Guide
Libraries, Internet cafes, and other print service public providers
Alagus Print Admin 4.0 will be of great help if you have to supervise and bill for hundreds of pages
printed by anonymous users every day.
If the cost can be recovered, then Alagus Print Admin 4.0 will easily pay for itself in a couple of
months.
1.3 Features
There are many ways to manage the print process by using Alagus Print Admin 4.0. This is only a
short description of them.
• Printer management. Management of the printer’s queues. Manipulates print devices and printer
environments.
• Document management (Pause, Resume, Cancel, Restart, Copy/Paste, Save/Load, Preview)
• Print quotas – Sets print quotas for one user or a group of users
• Print rules – Sets rules for printing. An example of this is printing prohibition depending on some
criteria (file size, number of pages, keyword from the document title or specific file extension)
• Print priority – Sets priority of the print documents depending on the owner
• Print activity – Shows the print activity for a certain period (day, month, year) in a chart. Print
activity may be shown for one user, a group of users, one printer or a group of printers or all of
them.
• Track and store into the database the information for every printed document (username, printer,
document title, data, time, pages, size, cost etc.)
• Statistics and reports – Makes cross reports about the number of pages printed per user/user
group/all as well as about printer/printer group/all.
• Searching – searches for a keyword from the title of a printed document. The search may be
done per user/user group/all as well as per printer/printer group/all.
• History – Shows Event history for everything concerning the printers, Print quotas, Print rules etc.
1.4 What’s new in Alagus Print Admin 4.0?
•
•
•
•
•
•
•
•
•
•
•
•
•
•
New flexible and intuitive interface
Easy to use Configuration Wizard
Wider statistics and reports
Status monitor (shows in real time the status of the printers, print servers, user’s quotas, etc.)
Wider type of quotas for the users and users groups
Possibility for setting a price for a printed page for a single printer or printer group
Wider possibilities in the Print activity module (different charts, 2D and 3D view)
Option to preview printing documents
Integration with the rest of the new products of Alagus Co.
Option for APAServer to run as service
Active Directory integration
Longer trial period – 45 days
Flexible choice between the tree modes/editions of Alagus Print Admin 4.0 depending on their
price and features
APAS Configurator - tool for easier setting of the APAServer startup account.
2. Editions
In order to satisfy different types of clients Alagus Print Admin 4.0 is divided into several modes –
Professional, Standard and Light.
4
Alagus Print Admin – User’s Guide
Alagus Print Admin Editions
Features
Light
Standard
Pro
Printer Management
Pause/Resume/Cancel All Documents
Printer Environments (Read/Write)
Unlimited Printer Count
*
Document Management
Pause / Resume / Restart / Cancel / Set Priority
Copy / Cut / Paste
Save / Load / Preview
Statistics & Reports Module
Generate / Print
Export
Search by keyword Module
Search / Print / Export
Users/Groups Management
Quotas / Notifications
Set Priority
Print Rules Module
View Events Module
Paper Formats and Cost Module
Print Activity Module
Configuration Wizard
* Unlimited printer count for one print server
3. System requirements
3.1 Hardware requirements
The hardware requirements depend on the number of printers and the print activity. However, there
are some advisable parameters:
• Common:
TCP/IP network printers for full program functionality.
• For Alagus Print Admin Server:
Intel Pentium III class system 1 GHz or compatible (Pentium 2 GHz or higher recommended);
Memory: 256 MB of RAM (512 MB or more recommended);
CD-ROM;
Install disk space: about 30 MB.
5
Alagus Print Admin – User’s Guide
• For Alagus Print Admin Console:
Intel Pentium III class system 500 MHz or compatible (Pentium 1 GHz or higher recommended);
Memory: 256 MB of RAM (512 MB or more recommended)
3.2 Software requirements
• Alagus Print Admin Server:
Microsoft Windows 2000 Professional,
Microsoft Windows 2000 Server/Advanced Server
Microsoft Windows Server 2003 Standard/Enterprise/Small Business
Microsoft Windows XP Professional
Administrative user rights.
• Alagus Print Admin Console:
Microsoft Windows 95/98/ME/NT/2000/2003/XP;
DCOM Support (only for Microsoft Windows 95).
4. Installation
4.1 Server installation
1.
2.
3.
4.
Login with administrative rights;
Run apacs4.exe;
Follow the installation instructions that appear on the screen;
After copying the program files, the program group is created and the installation is complete.
4.2 Console installation
To install APAConsole you just run the apac4setup.exe file, which automatically does all installations
and creates Icon group and shortcuts.
You can run APAConsole without installing. In this case there are two ways:
1. Copy APAC.EXE, MIDAS.DLL, APAC.SUI, APAC.CHM and QTINTF70.DLL to target computer
and start APAC.EXE from this computer;
2. Start APAC.EXE from the computer where the console and server parts are installed, via local
network (using shared directory).
5. Using Alagus Print Admin Server
The server part - APAServer represents the core of Alagus Print Admin. Its main purposes are:
communication with the network printers, control of the printer queues, processing and storage in
database of the received information and serving the console requests.
When APAServer is started the
icon appears on the taskbar on the right.
The available actions using this icon are as follows:
• Run APAConsole – Starts APAConsole on the APAServer computer
• Disconnect All – Disconnects all started APAConsole(s) and terminates all sessions to the
APAServer.
6
Alagus Print Admin – User’s Guide
•
Shut Down APAServer – Stops the APAServer
5.1 Startup account configurator
The APAS Configurator is a tool for easier setting of the APAServer startup account. It has 4 different
modes depending on the accesses to the printers and print spooler folders.
1. If you choose to run it as Application, the APAServer is started automatically when computer is
started. The permissions inherit the rights of the account that had been logged in. When the account is
logged off, APAServer stops.
2. If you choose to run it as SYSTEM service account, the APAServer will be started automatically but
it will be able to manipulate only local installed printers. This mode is advisable if you only one print server
and APAServer is installed on it.
3. If you choose to run it as APAServer account, the APAServer will be started automatically with the
account that will be created in Active Directory. It will have the permissions of Domain Admins and Print
Operators groups. This mode is used when more then one print server is used.
4. If you choose it to run as Existing account, the server will be started automatically, and it will have
rights accordingly a specified account. It is advisable the account to be a member of the Domain Admins
and Print Operators group.
Figure 0 Startup account configuration form
7
Alagus Print Admin – User’s Guide
5.2 Database Maintenance
APAServer uses Microsoft Access database. The file where database is stored is db.mdb and it can
be found in the install directory of Alagus Print Admin 4.0. In ODBC->System DSN->
AlagusPrintAdmin4.0 has registered a record for accessing the database.
An option “Automatic compact and repair database” is provided (see Options section 6.7.2). When it
is turned on (by default) the database does not need manual maintenance. If you wish to Compact and
Repair manually, you may do so from main menu: Tools->Repair and Compact the Database. The
other way to do this is to use the ODBC’s system options Compact and Repair for the above mentioned
Alagus Print Admin 4.0 ODBC record.
It is recommended to make backup of the db.mdb file regularly. This way if you reinstall APAServer
you can replace the new empty db.mdb with the last one that you did backup.
To speed up working with stored information in the database it is recommended to delete regularly all
old and unneeded records. You may do so from the main menu: Tools-> Clear Documents Older
Then… and choose the desired period.
It’s advisable to clean the contents of the APAS.log file periodically.
6. Using Alagus Print Admin Console
Alagus Print Admin Console is the interface of Alagus Print Admin Server.
APAConsole is designed to operate on any computer on the local network. You can even start two
different APAConsoles on two different computers. Single APAConsole may be used to connect to
several APAServers.
6.1 Starting APAConsole
When starting Alagus Print Admin Console, a server name and password are required (Figure 1).
The password supplies information to the server about the access rights of the connected console. The
password is either for administrative or custom access account. (See Section 6.7.2)
The APAServer field requires providing the computer name where APAServer is installed.
Default password is “admin” for the administrative account. It is strongly advisable after the first
configuration of Alagus Print Admin 4.0 to change the default password. (See Section 6.7.2). The
password for the custom accounts must be different from the administrative one.
Using Remember password option is not recommended due to security reasons.
Figure 1 Log On window of Alagus Print Admin Console
8
Alagus Print Admin – User’s Guide
6.2 Configuration Wizard
If you start Alagus Print Admin Console for the first time, the Configuration Wizard offers you quick
and easy way to configure the main settings of Alagus Print Admin 4.0. You just have to provide the
required information.
Figure 2 Configuration Wizard
The steps are as follows:
1. Welcome – Welcome note and Configuration Wizard steps description
2. Computer and Network – whether you have domain or peer to peer network
3. Scan your domain for users – Automatic scans the domain for users and adds them into the
Alagus Print Admin 4.0 database.
4. Scan your domain for printers – Automatically scans the domain for printers and adds them
into the Alagus Print Admin 4.0 database.
• The first option is to scan the whole domain for printers. Here you can choose to create a
folder for each print server. Additional option is to add to the database only the accessible
printers.
• The second option is to scan for printers in a chosen print server.
5. Final Recommendations – Advice for setting the rest of the modules. They are:
o Print Quota – Sets print quotas (See section 6.5.4)
o Print Rules – Sets rules for printing documents (See section 6.4.8)
o Paper Costs – Sets a price for a printed page (See section 6.4.9)
o General Options – Additional settings for APAServer and APAConsole for e-mail, SNMP
community name, PJL port, etc.
You can start the Configuration Wizard Module at any time from the main menu Tools ->
Configuration Wizard or by using the
icon from the Toolbar.
9
Alagus Print Admin – User’s Guide
6.3 Interface and Navigation
Figure 3 Alagus Print Admin Console
After successful authorization the main window of Alagus Print Admin Console is started.
The interface of Alagus Print Admin Console is intuitive, "user friendly" and looks like any other
Microsoft Windows application. The main window consists of menu, Toolbar, workspace and Status bar.
The left side of the workspace is a slide panel named Navigator. The right side of the workspace is a slide
panel named Status Monitor.
6.3.1 Navigator
The slide panel Navigator allows you to easily navigate and select printer groups, printers, users or
user groups depending on the chosen general tab - Printers & Groups or Users & Groups. The
Navigator has three possible statuses – visible, invisible and minimized.
When you select general tab - Printers & Groups you can see the tree with the printers groups and
their content. You can select All Printers, printer group or single printer. The main workspace
automatically changes to whatever you chose.
When you select general tab - Users & Groups, you can see the tree with the user groups and their
content. You can select user group or single user.
To facilitate manipulation of network printers, an icon is assigned to each printer, in correspondence
with the printer status, such as idle, printing, off-line, etc. The icons and their corresponding status are:
10
Alagus Print Admin – User’s Guide
The printer is off line or stopped;
The printer is idle;
The printer processes a document
The printer is paused
Warning event is received
The printer is down (power off or not responding)
6.3.2 Main workspace
Main workspace is the place where all the important things happen in Alagus Print Admin Console. It
changes depending on the chosen general tab in Navigator (Printers & Groups or Users & Groups).
Printers & Groups includes the following sub-tabs in the Main workspace:
•
•
•
•
•
•
•
Print Queue – Module for management and monitoring of the printer’s queues
Print Device – Module for management and monitoring of the print devices
Print Activity – Module for graphic visualization of the print activity for a certain period (day, month or
year)
Statistics – Module for counting the documents printed during a certain period
Search – Module for searching by keyword from the title of a printed document
Print Rules – Module for setting rules for printing
Paper Costs – Module for setting the cost for a printed page for all suitable formats
Print Queue and Print Device appear when a printer is selected. Otherwise when a printer group or
All Printers is selected the Printers sub-tab appears and Print Queue and Print Device are not
shown.
Users & Groups includes the following sub-tabs in the Main workspace:
•
•
•
•
•
General – Module for information and management of the print priorities and Print Rules acceptance
Print Quota – Module for management of the print quotas
Print Activity – Module for graphic visualization of the print activity for a certain period (day, month or
year)
Statistics – Module for counting the documents printed during a certain period
Search – Module for searching by keyword from the title of a printed document
6.3.3 Status Monitor
Status Monitor is a module for quick viewing the status of all the used printers, print servers, the
print quotas and all the events that concern the printing process.
It also has sub-slide panels:
o Printers – current status of all the printers
o Watched Total
o Currently used printer(s)
o Idle printers(s)
o Off line printer(s)
o Print Servers – current status of all print servers
o Watched Total
o Accessible spool folder(s)
11
Alagus Print Admin – User’s Guide
o Inaccessible spool folders
Users – current status of all the users
o Watched Total
o User(s) with print quota
o User(s) over print quota
o APAServer – current status of APAServer
o Console session(s)
o Estimated time to printer reconnect
o Server status
o Last Events – Last registered events, concerning the print process and the work of Alagus Print
Admin Server. When an event in the Event Details field is chosen, the module shows short
description of that event. It contains Owner, Date and Time and Description.
Status Monitor has three possible positions – visible, invisible and minimized.
o
6.4 Printers & Groups general tab
6.4.1 Manage Printer Groups
Alagus Print Admin allows you to create custom groups of printers. This way you can group your
printers using specific criteria such as departments, print servers, type of printers, etc.
When started, Alagus Print Admin Server scans for local printers and automatically adds them to the
group Server Local Printer(s). The group cannot be renamed and you can’t add printers to it manually.
If there are network printers not listed in Navigator, you can manually add them to a group.
Furthermore, you can remove printers from the custom defined groups, delete printers or groups of
printers or move printers from one group to another. All of these commands can be executed in three
ways:
• using context menu, by right click with the mouse or drag and drop the printer;
• using Toolbar;
• using the Main menu of Alagus Print Admin Console (the corresponding short keys are described
in Section 6.9).
If you want to use the context menu, click the right mouse button on the printer or group of printers
that you intend to manipulate. The context menu will appear.
Using Toolbar you must use the following buttons:
•
Add printer to selected group:
printer and press OK;
•
Add (create) group of printers:
•
Remove group of printers:
,
•
Rename group of printers:
.
. The dialog box Connect to Printer will appear. Select the
;
The third method, as mentioned above, is to use menus. First, you must select desired printer, group
of printers or All Printers from Navigator or from right side panel of workspace. Click on the following
menu:
• Add printer to selected group: Group->Add Printer;
• Add (create) group of printers: Group->Create Printer Group;
• Remove group of printers: Group->Delete Printer Group;
• Rename group of printers: Group->Rename Printer Group.
• Paste printer: Group->Paste Printer(s)
12
Alagus Print Admin – User’s Guide
6.4.2 Manage Printers
Using Navigator panel you can choose between group of printers or All Printers.
In both cases on the right side of workspace are shown the printers and different kind of printer
related information, such as the status of the printer, location, driver, used port etc. Available columns
are: Printer Name, Status, Device Display, Queue, Port, Driver, Location and Comment. The information
represented by these columns is:
• Printer Name;
• Look Up Status: The current status of the printer, such as Ready, Paused, Stopped, Off Line,
Warning, Down;
• Device Display: The message on the display (LCD or other kind of display) of the printer;
• Queue: Number of documents in the queue of the printer;
• Port: The port name being used by the printer;
• Driver: The name of the driver program used to operate the printer;
• Location: Manually written information by the administrator of the local network about the location
of the printer;
• Comment: Manually written comment by the administrator of the local network.
Alagus Print Admin Console offers you several ways to manipulate individual printer and manage the
currently printed documents. You can specify which printer to be monitored (or managed), you can pause
(resume) a printer, move print document from one printer to another, cancel printing a document, view
printer properties, etc.
Every operation may be executed in four ways:
• using context menu, by right click with the mouse or drag and drop the printer;
• using Toolbar;
• using the Main menu of Alagus Print Admin Console;
• using Short keys
The context menu is shown on the right. The corresponding Short keys are described in Section 6.9.
The other options are described below.
• To start / stop monitoring and managing a printer:
Using context menu: Right click on the chosen printer and then click Start Look Up / Stop Look Up
from the context menu;
(Start Look Up) /
(Stop Look Up);
Using Toolbar: Click
Using Main menu: Click Printer->Start Look Up / Printer->Stop Look Up.
• To pause / resume printer:
(Pause Printer) /
(Resume Printer);
Using Toolbar: Click
Using Main menu: Click Printer->Pause Printer / Printers->Resume Printer.
• Delete printer from selected group:
Using context menu: Right click on the chosen printer and then click Remove Printer(s);
(Remove Printer(s);
Using Toolbar: Click
Using Main menu: Click Printer-> Remove Printer(s)
• To change spool printer's directory:
Using context menu: Right click on the chosen printer and then click Spool Directory from the context
menu;
Note: When you use cluster server as print server, please have in mind that automatic detection of
the spool directory done by APAServer might be wrong. It is due to the fact that the print spool
directory is defined in the cluster resource and not as a parameter of the print spooler service. In this
case the print spool directory for every printer must be entered manually.
•
To cancel printing all documents:
13
Alagus Print Admin – User’s Guide
Using context menu: Right click on the chosen printer and then click Cancel All Documents from the
context menu;
Using Toolbar: Click ;
Using Main menu: Click Printer->Cancel All Documents.
• To show Printer properties dialog box/Print server properties dialog box:
Using context menu: Right click on the chosen printer and then click Open Printer / Printer Properties
/ Print Server Properties from the context menu;
/
Using Toolbar: Click
Using Main menu: Click Printer-> Properties / Printer -> Print Server Properties.
• To Move a printer from a group to another:
Using context menu: Right click on the chosen printer and then click Cut Printer(s) from the context
menu. Right click on a printer group and choose Paste Printer(s);
/ ;
Using Toolbar:
Using Main menu: Click Printer->Cut Printer(s) then choose target group and then choose Printer>Paste Printer(s);
Drag and drop the desired printer from a group to another one.
6.4.3 Manage Documents
To manage a document select it from the main workplace while a printer is chosen from the
Navigator.
Main workspace supplies information about the printer queue and documents - document name, user
name, computer name, number of the pages per document, used color for printing, number of copies, etc.
To learn how to show or hide given column see Section 6.7.1. The information represented by these
columns is:
• Document Name: The title of the document;
• Status: The current status of the document, such as Spooling, Paused, Resuming, Printing,
Deleting, Restarting;
• User name: The user name of the person who sends the document to the printer;
• Computer: The name of the computer from local network that is used to send the document to the
printer;
• Pages: The total number of pages in the document;
• Document Size: The size of the document (in Bytes, KB, MB);
• Paper Size: The size of the paper used for printing of the document (A4, A3, Letter, etc.);
• Submitted: The time and date when the document is sent to the printer;
• Copies: Number of copies in the document;
• Color: Color or grayscale mode of printing of the document.
You can perform operations related to the print documents, such as move or copy a document from
one printer to another, pause / resume printing documents, save print document from a printer and load it
on another.
• To save a document from a printer’s queue to a file:
Using context menu: Right click on the document and select Save to file from the context menu,
(Save to file);
Using Toolbar: Select the print document and click
Using menu: Select the print document and click Documents->Save to file.
• To load a document from a file into a printer’s queue:
Using context menu: Right click on the printer and select Load from a file from the context menu;
(Load from a file);
Using Toolbar: Select the document and click
Using menu: Select the printer and click Printer->Load Document from a file.
• To copy / cut a document:
Using context menu: Right click on the document and select Copy / Cut from the context menu;
14
Alagus Print Admin – User’s Guide
/
(Copy / Cut);
Using Toolbar: Select the document and click
Using menu: Select the document and click Documents->Copy / Cut.
Using drag and drop: Click on a document, drag it to the chosen printer and drop it.
• To paste a document:
Using context menu: Right click on the printer and select Paste from the context menu;
(Paste);
Using Toolbar: Select the printer and click
Using menu: Select the printer and click Printer->Paste Document.
• To increase/decrease priority:
Using context menu: Right click on the printer and select Increase Priority / Decrease Priority from the
context menu;
/
(Increase Priority / Decrease Priority);
Using Toolbar: Select the Document and click
Using menu: Select the printer and click Documents-> Increase Priority / Decrease Priority.
• To preview document:
Using context menu: Right click on the document and select Preview from the context menu;
(Preview);
Using Toolbar: Select the document and click
The Preview option is available when the print spool files are in EMF or PostScript format. To
generate preview from the PostScript files you will need to install GhostScript. You can download it
free from here: http://www.cs.wisc.edu/~ghost/
Using menu: Select the printer and click Documents-> Preview.
• To Open / Open with… document:
Using context menu: Right click on the document and select Open / Open With… from the context
menu;
Using menu: Select the printer and click Documents-> Open / Open With…
• To pause / resume a chosen document:
Using context menu: Right click on the document and select Pause / Resume from the context menu;
/
(Pause / Resume);
Using Toolbar: Select the document and click
Using menu: Select the document and click Document->Pause / Resume.
• To cancel / restart a chosen document:
Using context menu: Right click on the document and select Cancel / Restart from the context menu;
/
(Cancel / Restart);
Using Toolbar: Select the document and click
Using menu: Select the document and click Document->Cancel / Restart.
6.4.4 Manage Print Devices
Print Device Module provides specific printer related
information. It also gives opportunities to change several
printer environment variables, reset printer, etc. To show the
module click Print Device tab from the Main workplace. There
are four subtitles named General, Information, Environments,
Ask for more.
• General page shows the basic printer related
information, such as printer display contents, printer name,
driver name, etc. This page contains four panels: Information,
Display, Input trays and Reset. The meaning of each panel is:
Information shows the printer name, printer driver,
printer port, device status, detected error state and
consumable supply. It also allows to set manually the date of
change of printer supplies.
Display shows the contents of the printer’s LCD
display and the state, color and description of light emitting
diodes if they exist;
15
Alagus Print Admin – User’s Guide
Reset allow you to reset the printer (Cold Start, Warm Start or restoring of factory defaults);
Input trays shows the count, type, capacity and the state of the trays;
•
Information page provides detailed information about the printer and its features and settings.
This information is shown in several groups:
Print device: Detailed information about the printer – model, manufacturer, description, network
name, status, serial number, RAM, etc.;
Languages
shows
the
languages (PJL, PCL, PS, etc)
supported by the printer;
Network
card:
Detailed
information about the network card of
the printer – model, serial number,
status, MAC address, MFG ID, etc.;
Network
statistics:
Information about total, bad, received,
transmitted, unicast packets, etc.;
TCP/IP, IPX/SPX, Apple Talk,
DLC/LLC: Information for Network
protocols supported by the printer.
• Environments page allows
you to change the setting of the
printer (only for network printers
supporting PJL), such as language
interface, default tray, power save
mode ON/OFF, orientation of paper,
printing resolution, number of copies,
etc. There are three panels:
Variable – Shows printer environment variables;
Value - Shows Selected Variable, Current value and Value range;
Description – Provides information about the chosen Variable.
•
Ask for more tab allows you to ask for more information in case you think the information
provided by Alagus Print Admin 4.0 for the chosen printer is insufficient.
6.4.5 Print Activity
The Print Activity module is used to monitor the daily, monthly or yearly count of the printed pages
for one printer or a group of printers. This way you can monitor whether your paper expenses go up or
down for the chosen period.
To show the module click Print Activity tab from the Main workspace.
On the right side of the Chart you can find a toolbar where you can choose the type of the graph
and the view – 2D or 3D. The available types are: Line Chart, Area Chart, Pie Chart, Column Chart, Bar
Chart, Point Chart
Three sub tabs allow you to choose the period that you want to monitor – daily, monthly and yearly.
The chart shows number of printed pages for the chosen period. If Daily – the number is presented for
every hour, Monthly – for every day and Yearly – for every month.
16
Alagus Print Admin – User’s Guide
Figure 5 Print Activity
In the Navigator you can choose one printer or a group of printers or all of them. If you have chosen a
group of printers or All Printers an additional column named SUMMARY will appear.
Show Summary option is presented at the bottom left of the sub tab with a checkbox. If it’s checked
the Summary is presented in the chart.
If the chart is for more than one printer, on the right will appear LEGEND in which every printer is
shown with deferent color. At the bottom, in the toolbar you can see the summary of all printed pages and
their cost. With the buttons Prev and Next you can change the chosen view Day, Month or Year. Use
Print button to print the chart.
To save the chart as image click Save button.
To print the chart click Print button.
6.4.6 Statistics
To show the module click Statistics tab from the Main workspace.
17
Alagus Print Admin – User’s Guide
Figure 6 Statistics
The statistics about the printed documents can be created for a period and/or for a user, a group of
users, all users and/or for a printer, group of printers or all printers.
When Cross Statistic slide panel is closed the shown statistics contains information about printed
pages, name and the cost of the chosen printer/group of printers/All printers.
To switch on Cross Statistics slide panel left click on the left border of the Statistics tab. Then you
will be able to see the printed pages and their cost of a chosen printer/group of printers/All printers per
any user/group of users/All groups.
The Filters panel is used to set the period for the wanted statistics. This is done by using the From:
and To: calendar buttons. The result may be ordered by the chosen criteria in Order by: combo box.
If, while using Cross Statistics, you want to see only the users which have exceeded their print
quota check the Only Exceeded quota Users in View menu from the Main menu
Click the button Print to print the result. To save the result in a text file (Tab delimited) (*.txt) click the
Export button. These text files are useful for creating various statistics, charts, etc (using Microsoft Excel
for instance).
The Status bar shows the selected item from the list of the users and from the list of printers, total
number of printed pages and total cost of the printed pages.
6.4.7 Search
Information about all printed documents, such as title of the document, user name, computer name,
printed pages, document size (in bytes), and date/time of printing, is saved in database. You can search
for already printed documents by keyword from the title.
To show the module click Search tab from the Main workspace.
Enter the keyword in the edit box Enter keyword from the title of the document:. The result of the
search includes: title of the document, Username, Document title, Computer, Print Pages, Document
Size, Print Date Time, Copies, Color and Paper Format.
If All Printers is selected in the Navigator, the result consists of all printed documents that contain
the keyword in the title. To filter the search result, select a group of printers or a single printer, from the
Navigator. The search result is ordered by Username. To print the result click the button Print. To save
the result in text file (Tab delimited) (*.txt) click the button Export.
18
Alagus Print Admin – User’s Guide
Figure 7 Search
6.4.8 Print Rules
The Print Rules module is used to create rules for printing. Every rule contains condition, action and
notification. Every print rule can be activated for one printer, a group of printers or all printers. By default
all users and user groups accept the created print rules. However, you can switch off all of the print rules
for a chosen user or a group of users.
Figure 8 Print Rules
19
Alagus Print Admin – User’s Guide
To show the module click Print Rules tab from the Main workspace.
The Navigator shows the groups of printers for which the rules can be applied. The Print Rules tab
contains two tabs – Select Rules and Rule Editor. With Select Rules you can activate the rules for a
printer or a group of printers by checking the check boxes. You can do this after at least one rule is
created.
By default every printer accepts the rules that are activated for its group. If you want to change the
rules for a chosen printer you must first switch off the check box Inherit Group Rules and then change
the rules for the printer.
The Rule Editor does the management of the rules. With Rule Editor you can Add, Edit or Delete
a rule. You can set the priority of the rule by moving it up and down. The rules at the top are with higher
priority then the lower ones. With Rule Editor you can also Enable or Disable it. The disabled rules are
not executed.
These operations can be done by right-click on the context menu or with the panel on the right part
of the Print Rules sub tab.
The functions Add and Edit lead to a new window – Rule Definition
Figure 9 Rule Definition
If you have chosen Add the new window allows you to create a rule.
The window Rule Definition contains three fields - DETAILS, WHEN and DO WHAT.
DETAILS contain information about the name of the rule and its description.
WHEN contains the condition which triggers the activation of the rule.
Possible conditions are:
• If the page count of the document goes over a chosen number;
• If the size of the document is larger than a chosen size;
• If the title of the document contains a chosen file extension;
20
Alagus Print Admin – User’s Guide
• If the title of the document contains a keyword.
DO WHAT contains two fields – Action and Notifications. In the Action you can set the action
that you want Alagus Print Admin Server to perform when a rule condition is executed. The options are
five: Do nothing, Pause, Delete automatically, Save to (a directory) or Copy to (another printer). In
case you choose Copy to, the new destination printer MUST be the same or identical as the printer on
which the rule has been activated.
The directory where the document is going to be saved MUST exist physically on the computer
where APAServer is running.
In the field Notifications you can choose what notifications have to be sent and to whom. There
are three options:
• Send a pop-up message to the user – the user that triggered the rule receives a message;
• Send a pop-up to – a pop-up is sent to a chosen computer;
• Send e-mail to – an e-mail is sent to a chosen e-mail destination.
The text that is going to be sent as a pop-up or an e-mail message is defined in the Message body
field.
You can use two or more combined rules. For example, you can automatically move a document
from one printer to another by some criteria. The same criteria may activate another rule and delete the
document. The two rules will be executed.
6.4.9 Paper Cost
The Paper Cost module is used to set the cost for printed page depending on the paper format and
actual printer or printer group. The cost may apply to a printer group as well as to a single printer. By
default every printer inherits the costs that were set for its group. On the other hand every group inherits
the cost, which is set for all printers. You can set different cost for every paper format and color/black and
white. There is an option for duplex print cost given with percentage increase. This percentage is fixed for
all printers and groups.
Figure 10 Paper Formats and Cost
21
Alagus Print Admin – User’s Guide
To show the module click Paper Cost tab from the Main workspace.
To edit paper cost double click on a chosen paper format, use context menu when right-click or use
Edit button at the bottom of the panel.
The price for the black/white and color pages is set in the Grayscale and Color edit boxes. The
currency format used is automatically set to be the same as the one that is used in the Regional Settings
of MS Windows. These Regional Settings must be the same for the computer where APAServer is
running and the one that APAConsole is started.
An option Apply Cost for All Paper Formats is provided.
NOTE: The change of the price does not change the calculated cost of the already printed pages.
6.5 Users & Groups General Tab
Users & Groups is a main Part of Alagus Print Admin Console, through which you can manipulate
user groups and users. The General, Print Quota, Print Activity, Statistics and Search modules are
parts of Users & Groups general tab.
Figure 11 Users and Groups General Tab
22
Alagus Print Admin – User’s Guide
6.5.1 Manage User Groups
Alagus Print Admin allows you to create custom groups of users. That way you can group your users
depending on a criterion (department, floor, etc.) This grouping facilitates finding a certain user. The
criterion for grouping is important for the optimum uses of the print quota, statistics, search and activity
modules.
There are several ways to add, delete or rename the groups of users and move users from one group
to another.
If you want to use the context menu, click the right mouse button on the user or group of users that
you intend to manipulate. The context menu will appear:
•
Create User Group:
;
•
Delete User Group:
;
• Rename User Group: .
Using Toolbar you can use the same icons.
The third method as mentioned above is to use main menu. First, you must select desired user, group
of users or All Groups from Navigator. Click on the following menu:
• Group-> Create User Group;
• Group-> Delete User Group;
• Group-> Rename User Group;
To reset the print quota to the selected group choose Reset Print Quota from main menu Group or
from the context menu.
6.5.2 Manage Users
You can easily move the users from one group to another. This could be done in three ways. From
the context menu by right-click on a user and Cut User(s). Then choose a group and from the context
menu click Paste User(s). This way you can even cut several users and paste them in a group.
All the other manipulations that you can do to the users are shown in the next sections.
6.5.3 General
General tab contains information about the chosen user or group of users, print priority and applying
the Print Rules (Figure 11). This tab includes three sections:
• Information
Group name: The name of the parent group
Print Quota: The state of the quota (exceeded or not exceeded)
Full name: Full name of the user
Description: User description
Username: Login name
• Print Priority - Track bar to set the priority of the user. Minimum value is 0 (the default value) and
maximum value is 9. A document from user with the highest priority will be printed first. When Inherit
Group Priority option is checked the user inherits his group priority
• Print Rules - Here you choose if the user or user group will follow the rules that have been set in
Print Rules module.
Accept printer rules:
Do not accept printer rules:
When Accept Print Rules is checked all print rules created in the Print Rules module will be applied
to the selected user or user group.
When Inherit Group Rules Definitions option is checked the user inherits his group accepted
setting.
23
Alagus Print Admin – User’s Guide
6.5.4 Print Quota
The option for setting print quotas for users and user
groups is one of the most useful and important features
in Alagus Print Admin 4.0. When you define the quotas
you choose type, period, method, way of calculating,
manual quota reset, inheriting, etc.
•
Quota
In the Quota sub tab you can set how many pages a
certain user may print for a certain period. The second
option is to set the quota in currency and the user will be
allowed to print until he reaches it. The print quotas can be
daily, weekly and monthly.
The maximum number for printed pages per period is
999. For the currency quota there is no such limit.
•
Actions
• In the Action sub tab you can define what Alagus
Print Admin Server must do when the print quota is
exceeded. You also choose what notifications to
be sent.
• In the first section When the Quota is Exceeded
do what… action field you choose one of the
following:
Nothing – The print document will be printed
Pause print document - The print document will be
paused automatically
Delete print document automatically - The print
document will be deleted automatically
• In the second section When the Quota is
Exceeded do what… notification field you can
choose a combination from four options:
Notify the user who is printing – The user will receive
pop-up notification message for the exceeded quota
Send notification message to: - A chosen computer will
receive the notification
Send notification e-mail to: - The notification message
will be sent to an e-mail
Notify the user when % of the print quota was used –
The user will receive pop-up notification message when he
exceeds certain percent of the quota
• In the section Print Quota Exceeded Notification
Message you can choose what notification to be
sent to a user who has exceeded his quota. In the
message you can use several code letters to input
personal information:
%U displays the name of the user;
%P displays the Printer name;
%O displays how much the quota is exceeded;
%T displays the measurement of the quota (pages or
currency)
24
Alagus Print Admin – User’s Guide
•
Advanced
In the Advanced sub tab there are three sections which concern additional print quota:
How to calculate and check if the print document exceeds the Print Quota – There are two possible ways
to do that:
Calculate the number of every printed document using a period of 30, 7 or 1 day before the
document was printed (1)
Calculate the number of every printed document using the beginning of the current Month, Week
or Day (2)
Manual reset of Print Quota – When reset option is used the user or a group’s currently printed page
count is set to 0. If the quota is defined in currency with reset you set it to the max value, which has been
chosen in Quota sub tab.
How to apply the Print Quota – which printers will be affected by the print quota:
Apply the Print Quota to all printers
If Apply the Print Quota to selected printer(s) is checked all the unmentioned in the list printers may
print without limit.
6.5.5 Print Activity
Working with Print Activity sub tab from Users & Groups general tab is similar to the Print Activity
sub tab from the Printers & Groups general tab (See section 6.4.5). The main difference is that when
you are in Users & Groups general tab you choose user, group of users or all groups from the
Navigator.
The other features like periods, charts and buttons are the same for both sub tabs.
6.5.6 Statistics
Working with Statistics sub tab from Users & Groups general tab is similar to the Statistics sub tab
from the Printers & Groups general tab (See section 6.4.6). The main difference is that when you are in
Users & Groups general tab you choose user, group of users or all groups from the Navigator.
Another important difference is the cross statistics slide panel.
To switch on Cross Statistics slide panel left click on the left border of the Statistics tab. Then you
will be able to see the printed pages and their cost for a chosen user/group of users/All groups per
printer/group of printers/All printers.
The Filters panel is used to set the period for the wanted statistics. This is done by using the From:
and To: calendar buttons. The result may be ordered by the chosen criteria in Order by: combo box.
If, while using Cross Statistics, you want to see only the users which have exceeded their print
quota check the Only Exceeded quota Users in View menu from the Main menu
6.5.7 Search
To show the module click Search tab from the Main workspace.
Working with Search sub tab from Users & Groups general tab is similar to the Search sub tab from
the Printers & Groups general tab (See section 6.4.7). The main difference is that when you are in
Users & Groups general tab you choose user, group of users or all groups from the Navigator.
Here you can also search for already printed documents by keyword from the title.
6.6 Event Viewer
Alagus Print Admin Server collects information about all events that occur, such as "Unable to
connect", "Device connection restored", "APAConsole connected", etc. All events are stored in database,
including date, time, event type and the owner of the event. To view stored events start Event Viewer
(Figure 12) using the menu (click Tools->Events) or from the toolbar (click on ).
There are three kinds of events:
25
Alagus Print Admin – User’s Guide
•
Information
•
Warnings
: Information events
: Warning events such as “Out of paper”, “Unable to connect”, etc.
• Critical errors : These events refer to the critical errors.
To view filtered by type events, click on "Information", "Warnings" or "Critical Errors" on the left side of
the Event Viewer. To view all events, click on "All Events".
To view short description of every event stored in the database click on the record and the description
will appear in the bottom panel of the Events workspace. It contains Owner, Time and Description.
With Refresh button the records shown in the Events list are updated.
Using Clear Events button you can delete all stored event records. It’s advisable to do that
periodically.
Figure 12 Event Viewer
6.7 Options
The Options form allows you to configure the settings of Alagus Print Admin Console as well as the
Alagus Print Admin Server.
To view/edit the Alagus Print Admin options click on the menu Tools->Options or choose the icon
from the toolbar.
6.7.1 Alagus Print Admin Console Options
The form Options (Figure 13) consists of three tabs: General, View, Mail.
• General tab comprises general program options.
Set Refresh Rate: Time for refreshing of the display information (in sec.);
26
Alagus Print Admin – User’s Guide
Pause document after copy or cut: If checked, the program will pause the selected document
during "Copy" / "Cut" operation;
Resume document after paste: If checked, the program resumes the original document after
copying it;
Copy document after drag and drop (not move): when drag and drop is used the original file
chosen is copied and pasted at the new destination, while it also stays at the first location.
Otherwise its moved;
Automatically determinate undefined count of pages: If this is checked, Alagus Print Admin
will try automatically to determinate the count of pages of the print document, that are not
declared in the corresponding spool file (documents with title "Remote Downlevel Document",
"Local Downlevel Document" and documents sent from Microsoft Windows 95/98 computers).
This unique engine of Alagus Print Admin defines undeclared count of pages in the printer queue.
To accomplish this task, Alagus Print Admin reads and analyzes PCL, PS and TEXT information
from spool files (*.SPL). For this reason it is necessary to ensure share access to the spool
directory of the printer.
PJL connection port: The port ID of PJL session with chosen LAN printer (9100 is the default
value);
Simple Network Management Protocol (SNMP) is used for communication with LAN devices
(LAN printers) to receive detailed information about them. SNMP needs to get community and set
community. If your community is different, enter it in the edit box.
Get SNMP Community: This name is used for reading information from the network print
devices. By default it’s public.
Set SNMP Community: This name is used for writing permissions on the network print devices.
By default it’s private.
Figure 13 Options of Alagus Print Admin Console
•
•
View tab defines the view of the Alagus Print Admin Console. In the PRINTER COLUMNS and
DOCUMENTS COLUMNS select which columns to be shown in the main workspace of the Print
Queue of the Alagus Print Admin Console.
Mail tab defines the options, such as From address, From name, etc for sending e-mails to user
that have exceeded their limits for printing (see Section 6.5.4).
ο SMTP server (host): Name or IP address;
ο User ID (username): User name of the sender;
ο From address: E-mail address of the sender;
27
Alagus Print Admin – User’s Guide
ο
ο
ο
ο
From name: Name or network alias of the sender;
Subject: Subject of the message;
Body: Body of the message;
SMTP port: Enter the SMTP port of your mail server. The default value is 25.
6.7.2 Alagus Print Admin Server Options
Options page (Figure 14) consists of set of options concerning Alagus Print Admin Server behavior.
• If Send event messages to: is checked (the edit box below becomes enabled), Alagus Print
Admin Server will send pop-up messages for critical events to computer(s) on the local network
mentioned in the edit box below (Remark: if there are more than one, the names of the computers
must be separated by semicolon);
• If Optimize Print Rules Processing is checked the Alagus Print Admin Server automatically
pauses the printer until it determines if the job meets all the requirements set in Print Rules and
Print Quota. After that it resumes the printer.
• If Automatic delete APA temporary files is checked the temporary files .spl, .shd and .jpg are
deleted every time the APAServer starts.
• If Beep when document is printed is checked, Alagus Print Admin Server will make a sound
went document printing is complete;
Figure 14 Options page of Alagus Print Admin Server
• If Check box Automatic reconnect is checked (recommended), the Spin edit box to the right
becomes enabled. Alagus Print Admin Server will make automatic reconnect to all printers every
N minutes, where N is a number entered in the box.
28
Alagus Print Admin – User’s Guide
Figure 15 Restricted access permissions
•
•
•
•
Click button Change in section Administrative password to set the password for a client with
administrative access to Alagus Print Admin Server;
Click button Change in section Restricted access password to set the password for a client
with restricted access to Alagus Print Admin Server;
Click button Change in section Restricted access permissions to define the rights for the client
with restricted access to Alagus Print Admin Server. The window named Restricted access
permissions (Figure 15) will appear. Checked functions will be available to the client, unchecked
will be disabled.
Remark: Only for the administrative account all functions are checked by default.
Click button View in section Log file to see the log file with all last events.
6.8 Editing Forms Style
It is possible to change the form style according to your taste. There are six styles: Classic, Mac OS,
Deep Blue, XP Style, Protein and Blue Glass.
To change the Form Style choose View->Form Style->[desired style].
29
Alagus Print Admin – User’s Guide
6.9 Short keys
The Alagus Print Admin Console’s corresponding short keys are:
Short key
Function
Ctrl+A
Ctrl+S
Ctrl+P
Ctrl+R
Ctrl+Alt+T
Ctrl+D
Ctrl+T
Ctrl+H
Ctrl+Del
Shift+Ins
Shift+Enter
Shift+Del
Ctrl+O
Ctrl+E
Ctrl+C
Ctrl+X
Ctrl+V
Del
Ctrl+L
Ctrl+W
Ctrl+U
F5
F1
Start Look Up
Stop Look Up
Pause Printer
Resume Printer
Print Test Page
Print Device
Connect via Telnet
Connect via HTTP
Cancel All Documents
Add Printer
Open Printer
Remove Printer
Document Preview
Show Events
Copy Document
Cut Document
Paste Document
Cancel Document
Load Document from a file
Save Document to file
Owner Details
Refresh
Help
30
Alagus Print Admin – User’s Guide
7. Troubleshooting problems and FAQ
If you have any difficulties when working with Alagus Print Admin please refer to the official web page
www. Alagus.com
For Troubleshooting problems please visit: http://www.alagus.com/troubleshooting
For Frequently Asked Questions (FAQ) please visit: http://www.alagus.com/faq
All online information is not included in the User’s guide because it is being permanently updated and
expanded..
7.1 Electronic Updates
Updating Alagus Print Admin 4.0 is done online using a special option. You just have to choose
Check for Updates from the Help Menu in APAConsole. This way you will be notified if there are some
new updates for downloading.
If there are available updates for the APAServer, they must be downloaded from an APAConsole
running on the computer with APAServer. Updates may include APAServer and APAConsole patches as
well as help files and doc. files.
7.2 Alagus Direct News
Alagus Direct News is used to obtain and be aware of all news, new services and products of Alagus
Co. You can subscribe for receiving the news by email or just be informed online. You can use RSS feeds
(Really Simple Syndication). This is an XML-based format for sharing and distributing Web content, such
as news headlines. Using an RSS reader, you can view data feeds from various news sources, such as
Alagus.com, including headlines, summaries, links to new features, etc.
7.3 Alagus Print Adviser
At Alagus Co. web page http://adviser.alagus.com/ you can find wide and useful information about
printing and printers in general. The Print Adviser offers you the following sections:
•
•
•
•
•
•
•
•
•
•
Printers and Printing – Description of the printer types, consumables, options, etc.;
Printer Languages – The languages printers work with and standards for them;
Network Printing – The printer as part of the network environment, standards;
Choose a Printer – Third party web pages with useful information when choosing a printer;
Printer Drivers – Description of print drivers;
Print Control Software – Description and use of Print Control Software. Reasons to use it and how
to choose it;
Choose a print control software – List of competitive products of Alagus Print Admin 4.0;
Troubleshooting Printer Problems – List of most frequent problems with printers and how to solve
them.
Advanced Printer Information – Variable information about print settings;
Related sites – List of web sites with useful information about printers and printing;
31
Alagus Print Admin – User’s Guide
8. Contacts
Corporate Headquarters
Alagus Software
P. Box: 302, ZIP Code: 1100
Sofia, Bulgaria
www.alagus.com
[email protected]
Technical Support
For any questions, bugs noticed, suggestions and ideas, please contact our technical support via e-mail
at [email protected]
Sales
For any questions concerning payments, please contact our sales support team via e-mail at
[email protected]
Web support
For any problems, suggestions and bugs noticed in our site, please contact our web support team via email at [email protected]
We will use reasonable efforts to comply with your request.
32