1
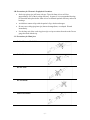
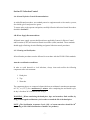
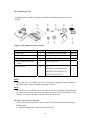
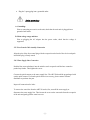
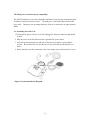
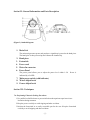
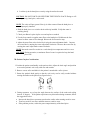
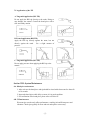
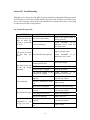
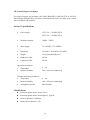
ART-P6 Piezoelectric Ultrasonic Scaler Directions for Use BONART CO., LTD. 4F-11, No.3, Wuquan 1st Rd., Xinzhuang City, Taipei County, Taiwan R.O.C. Tel: 886-2-22983980 Fax:886-2-22983981 Email: [email protected] Jorgen Kruuse A/S Havretoften Denmark 4, 0434 COPYRIGHT© 2011 BONART CO., LTD. DK-5550, Langeskov, BONART Co., Ltd. owns all rights to this publication. This publication shall be used solely as a reference for operation, maintenance, and repair of BONART equipment. No part of this document may be reproduced or distributed in any form for any other purpose. In the event of inadvertent or deliberate publication, BONART Co., Ltd. intends to enforce its rights to this manual under the copyright law. Reproduction of the materials presented in this manual without the express written permission of BONART Co., Ltd. is prohibited. The contents of this manual are subject to change without prior notice. PROPERTY OF BONART CO., LTD. ALL RIGHTS RESERVED ART is a registered trademark of BONART Co., Ltd. & its affiliates. Document No. P61001 Rev.1.3 (06/11) Printed in Taiwan, R.O.C. -1- Operator Safety Please read this manual before operating unit. The ART-P6 piezoelectric ultrasonic scaler should be operated, maintained and repaired by qualified and properly trained personnel. NOTE, CAUTION AND WARNING STATEMENTS NOTE:Provides tips and advice. CAUTION:Provides correct operating or maintenance procedures WARNING:Alerts user of danger that may cause severe injury when proper procedures are not followed. SYMBOLS Compliance with MDD 93/42/EEC Type BF equipment. Grounding terminal Attention, Please read instructions -2- Preface About the ART-P6 Piezoelectric Ultrasonic Scaler The ART-P6 Piezoelectric Ultrasonic Scaler is manufactured by Bonart Co., Ltd., an ISO 13485:2003 company. The ART-P6 is also CE 0434 certified in compliance with the applicable requirements of the Council Directive 93/42/EEC. The reviewing council also classifies the ART-P6 in accordance to EN60601-1 and EN60601-1-2 safety requirements. How it works The ART-P6 Piezoelectric Ultrasonic Scaler generates ultrasonic waves in the hand piece to vibrate the tip, which allows the ART-P6 to remove calculus and tartar easily. These ultrasonic waves are created by 4 ceramic piezoelectric plates subjected to high frequency alternating currents. The piezoelectric transducer operates at a frequency of 29khz with minimal noise and heat, and efficiently reduces the amount of cooling water required during treatment. This electric-mechanical feature provides greater efficiency than traditional magnetostrictive systems. Technical Support For technical support and repairs in the U.S., call 1-888-5-BONART Monday through Friday, 9:00 AM to 5:00 PM (Pacific Time). For other areas, contact your local Bonart representative. Supplies & Replacement Parts To order supplies or replacement parts in the U.S., contact your Bonart distributor or dealer. A list of Bonart distributors can be found on our website at www.bonartmed.com. -3- Table of Contents Copyrights ……………………………... 1 Operator Safety ..........………………………. 2 Preface ……..………………………. 3 Contents ..……………………………. 4 Section I. Indications for use ..……………………………. 5 Section II. Contraindications and Warnings …………………….. 5 Section III. Precautions .…………………………….. 5 Section IV. Infection Control ……………………………... 7 Section V. Installation …..………………………….. 9 Section VI. General Descriptions and Information of Parts ……………. 12 Section VII. Techniques ………………………………. 13 …………………………..… 15 Section IX. Troubleshooting ………………………………. 16 Section X. Specifications ………………………………. 17 Section XI. Disposal ..…………………………….. 18 Section VIII. System Maintenance -4- Section I: Indications for Use Ultrasonic procedures: Removal of calculus and plaque during dental prophylaxis. General supra and sub-gingival scaling applications. Periodontal debridement for all types of periodontal diseases. Endodontic procedures. Section II: Contraindications and Warnings Do not use the ART-P6 for restorative dental procedures. Do not use the ART-P6 if the patient or operator is wearing a pacemaker. Do not immerse the ART-P6 in water or liquid. If the ART-P6 has water damage, return the machine to Bonart for servicing. Do not modify the ART-P6. Modifications will invalidate the warranty on the machine as well as invalidate safety codes and endanger the patient and operator. Section III: Precautions 3-A: Precautions for all Ultrasonic Scaler Units and Systems Ensure sufficient water flow to the scaler tip during use to cool the hand piece and tips. Take precaution as all ultrasonic scalers produce aserosols that may transmit contagious diseases. Use tips manufactured by Bonart for optimal performance and result. Keep the unit away from intense heat. Excessive heat may damage the electronic components. Switch the water valve off when the ART-P6 is not in use. Avoid treating patients with pacemakers due to the magnetic filed produced by the ART-P6. The magnetic field may cause monitoring devices to malfunction and provide inaccurate readings. -5- 3-B: Precautions for Ultrasonic Prophylaxis Procedures Scaler tips (piezo tips) will wear with use. Tips with 2mm of wear will lose approximately 50% of their scaling efficiency. In general, it is recommended that tips be discarded and replaced after 2mm of wear to maintain optimal efficiency and avoid breakage. Avoid direct contact of tips with the patient’s lips, cheeks and tongue. Do not reuse scaling tips(piezo tips) that are damaged,bent, or reshaped. Discard immediately. Use the long axis of the scaler tip (piezo tip) to wipe accretions from the tooth. Do not gouge the tooth with the tip. 3-C: Precautions for Hand piece Do Not Twist And Pull Cable Do Not Bend Do Not Twist Do Not Bundle Pull To Disconnect -6- Section IV: Infection Control 4-A: General Infection Control Recommendations: As with all dental procedures, use standard protective equipment such as face masks, eyewear, face shields, gloves and protective gowns. To ensure safety to the operator and patient, carefully follow the Infection Control Procedures detailed in Section IV. 4-B: Water Supply Recommendations All dental water supply systems should conform to applicable Centers for Disease Control and Prevention (CDC) and American Dental Association (ADA) standards. These standards should apply to flushing, chemical flushing and general infection control procedures. 4-C: Cleaning and Sterilization: All sterilization procedures must be followed in accordance with the EN ISO17664 standards. Autoclave sterilization conditions: In order to avoid bacterial or viral infections, always clean and sterilize the following components after each treatment: 1. Hand piece 2. Tips 3. Wrenches The components above are composed of materials that can withstand a maximum temperature of 135℃ or (275℉) for a maximum of 3 minutes. After completing the sterilization cycle, air-dry it for about 20-30 minutes before using it. WARNING:When autoclaving the hand piece, tips, and wrenches; flash sterilize, by using an unwrapped sterilization cycle in order to extend the life of the hand piece. NOTE:The Sterilization Assurance Level (SAL) of steam autoclave should be 10-6 (According to ISO 13683:Sterilization of health Care products) -7- NOTE: Prior to cleaning and sterilizing your P6 unit, always remember to turn off the device by using the power switch and to disconnect the power plug from the outlet. Preparations for sterilizing the tip(s) 1. Remove the tip from the hand piece. 2. Clean and disinfect the surface of the outer casing, cords and connectors with a cloth and mild detergent or disinfectant solution with a neutral pH (pH7). 3. Allow the disinfectant solution to air dry before sterilizing 4. Seal the tip inside a sterilization pouch. If you are autoclaving more than 1 tip, place each tip in an individual bag. You may also use the tip holder that comes with the ART-P6 in place of the sterilization pouch. 5. Steam autoclave the tips for sterilization. WARNING:Before starting the sterilization cycle, make sure that the inside of the tip is completely dry by blowing air through the internal hole with the syringe. This will prevent stains and patches from appearing on the surface of the tip. WARNING: Do not use any other method of sterilization (dry heat, radiation, ethylene oxide, gas, low-temperature plasma, etc.)! Preparations for Autoclave sterilization of the hand piece 1. Take special care not to break the threading pin of the hand piece. where the tips are installed. The threading pin is 2 Disinfect the hand piece with a cloth and mild disinfectant containing a neutral pH. 3 Dry the electric contacts by blowing air onto them with the syringe. 4 Seal the hand piece in a sterilization pouch (without any tips). If you are short on sterilization pouches, you may use the surgical tray in place of the sterilization pouch. 5 Follow the instructions of your autoclave machine to sterilize the hand piece in the autoclave machine. Preparations for Autoclave sterilization of the wrench 1 Clean the wrench. 2 Disinfect the wrench with a cloth and mild disinfectant containing a neutral pH. 3 Seal the wrench in a sterilization pouch. You may also an autoclavable surgical tray in place of a sterilization pouch. 4 Autoclave the wrench. Section V: Installation -8- 5-A: General Information If the installation of your ART-P6 system is performed by non-Bonart distributor personnel, check to see that requirements below are followed. 5-B: Water Line Requirements Incoming water supply line pressure to the Scaler must be 25 psi (172 kPa minimum) to 60 psi (414Kpa maximum). If your dental water supply line pressure is above 60 psi, install a water regulator on the water supply line to your ART-P6 unit. After the above installation requirement is fulfilled, thoroughly flush the water prior to connecting to the scaler. Please use the manual shut-off valve on the dental water system supply line to shutoff when the office is unoccupied. 5-C: Electrical Requirements Refer to Section X: Specifications -9- 5-D: Unpacking the Unit Carefully unpack your ART-P6 unit and verify that all components and accessories are included: (Figure 1) All components and accessories Item Quantity Item Quantity (1) Main Unit 1 (2) Aluminum Sterilization Box Optional (3) Plastic Wrench 1 (4) Metal Torque-Limited Wrench Optional (5) Hand piece 1 (6) PU Water Tubing 1 (7) User Manual & Literature Packet 1 (8) AC Power Core 1 (9) Foot Switch 1 (10) ART-BS1 Universal Pointed Tip 2 ART-BS2 Chisel Head Flat Tip 1 ART-BS3 Round Flat Tip 1 NOTE: Other piezo tips are available and can be purchased separately through distributors. Included items are subject to change depending on location. NOTE: Upon receipt of your ART-P6, check your ART-P6 unit for any damages. If any damages are found, please contact your dealer immediately. Enter the unit serial number on your warranty card and mail it within 14 days from the date of purchase. 5-E: Power Cord / Power Connection Always make sure that the power switch is set to the OFF position before performing the following tasks: Plug the detachable AC cord into the back of the unit. - 10 - Plug the 3-prong plug into a grounded outlet. Safety Instructions A. Grounding: Prior to connecting accessories to the unit, check that the main unit is plugged into a grounded wall outlet. B. Main voltage range and fuse: Prior to plugging the AC adapter into the power outlet, check that the voltage is supported. 5-F: Foot Control Cable Assmbly Connection Align the pins of the foot control plug with the receptacle on the back of the device and push in until the plug is firmly seated. 5-G: Water Supply Line Connection Push the blue water tube(hose) into the stainless steel receptacle until the hose cannot be pushed any further. Then tighten the screw. Connect the quick connect to the water supply line. The ART-P6 should be prepackaged with a male quick connect. If a female quick connect is necessary, please contact a Bonart distributor to purchase the part. Inspect all connections for leaks. To remove the water line from the ART-P6 scaler, first, turn off the water supply or disconnect the water supply line. Then loosen the screw on the water tube from the receptacle of the unit and gently pull the water hose out. - 11 - 5-H: Hand piece connection and tip compatibility The ART-P6 hand piece is not only compatible with Bonart’s tips, but also with tips designed for Satelec Acteon piezoelectric scalers. The hand piece is also detachable from the hand piece cable. During use, the operating frequency of the tip is measured to be approximately 29khz. 5-I: Assembling the Scaler Unit 1 Ensure that the power switch is set to off. If plugged in, the power indicator light should be unlit. 2. Plug the power cord of the main unit into a grounded AC power outlet. 3. Insert the tip into the hand piece and lock it into place by using the enclosed plastic wrench. Be careful not to over turn the tip as it may cause the tip and hand piece to break. 4. Ensure that the water tube connection to the water supply source and main unit is secure. (Figure 2) System Installation Diagram - 12 - SectionVI: General Information and Parts Description (Figure 3) Outlook diagram 1. Main Unit The main unit generates power and produces a signal that is passed to the hand piece. The hand piece is then powered up and vibrates the installed tip. 2. 3. 4. 5. 6. Hand piece Footswitch Power cord Water-In connector Power Panel The power panel allows you to adjust the power level within 1~20. Power is indicated by a lit LED. 7. Main power switch (with indicator) 8. Water-Adjust knob 9. Power-Adjust knob Section VII: Techniques 7-A: Performing Ultrasonic Scaling Procedures 1.Use purified or distilled water to prevent infection when patients experience tissue laceration during treatment. 2.Keep the power cord tidy to avoid tripping and other accidents. 3.Position the footswitch in an easily accessible spot for the user. Keep the footswitch cord tidy to avoid tripping and other accidents. - 13 - 4. Lock the tip in the hand piece securely using the enclosed wrench CAUTION: DO NOT FORCE OR OVERTURN THE TIP INTO PLACE! Doing so will damage the tip, hand piece, and wrench. NOTE: The scaler will not operate if the tip is either removed from the hand piece or improperly installed. 6. Hold the hand piece over a sink or drain with a tip installed. Verify that water is reaching the tip. 7. Check your Bonart’s piezo tip for wear and replace as needed. 8. Use the foot control to regulate water flow to the hand piece. Hold down the foot control to allow water to flow through. Release the foot control to stop. 9. Adjust the water flow to the desired level using the water-adjustment knob. Increase the water flow by turning the water-adjust knob clockwise. Decrease the water flow by turning the water-adjust knob counter-clockwise. NOTE: Increased water flow results in a cooler hand piece temperature and vice versa. CAUTION: During operation, a continuous flow of water is required to keep the hand piece cool. 7-B: Patient Comfort Considerations 1.Position the patient comfortably on the patient chair. Adjust the chair angle and position to access the patient's oral cavity with ease and comfort. 2. Remove excess saliva and debris in the patient’s mouth with a saliva ejector. 3. Rotate the patient's head gently so that the oral cavity can be easily reached without causing discomfort to the patient (see figure below). 4. During treatment, try to keep the angle between the surface of the tooth and scaling insert at 15 degrees. If the patient experiences any discomfort during treatment, follow the suggestions below: Increase the hand piece movement speed on the surface when treating sensitive areas. Treat less sensitive area first, and then return to sensitive areas. If the problem persists, reduce the power output intensity of the hand piece. - 14 - 7-C: Applications of the TIP A. Tangential application (BS1 TIP) Do not apply the BS1 tip directly to the tooth. Doing so may damage the enamel. Control the hand piece with a slow and steady motion. B. Frontal application (BS2 TIP) Apply the BS2 tip directly against the tartar, but not directly against the tooth. Use a slight amount of pressure. C. Tangential application (BS3 TIP) Do not apply pressure when applying the BS3 tip to the enamel. Section VIII: System Maintenance 8-A. Hand piece maintenance 1. After each use the hand piece and tip should be rinsed with clean water for about 20 to 30 seconds. 2. Inspect the hand piece cable daily to ensure it is in good condition. 3. For sterilization of the hand piece please refer to Section IV. 8-B. TIP maintenance Worn out tips can adversely affect performance, resulting in insufficient power and vibration. Check tips regularly for wear and tear and replace as necessary. - 15 - 8-C. Main Unit Maintenance The housing of the ART-P6, as well as the hand piece cord, should be cleaned and disinfected (using alcohol or soap and warm water) on a daily basis. - 16 - Section IX: Troubleshooting Although service and repair of the ART-P6 system should be performed by Bonart personnel, the following are some basic trouble shooting procedures that will help avoid unnecessary service calls. Generally, check all lines and connections to and from the system; a loose plug or connection will often create problems. 9-A Troubleshooting Guide PROBLEM POSSIBLE CAUSE The device does not The power cord is faulty turn on when the switch is positioned Fuses are damaged to “ON” The device is turned on but does not The footswitch has gone out work. The water supply is not connected to the unit No liquid comes out The filter or may be clogged of the tip during The tip socket is clogged. operation The internal tubing of the hand piece is clogged SOLUTION Check if the power outlet is working properly. Contact BONART or an authorized service center for fuse replacement Replace the footswitch. Contact BONART or authorized service center. an Check water supply Clean or replace the filter Clean the tip socket Contact BONART or authorized service center an The tip does not thread Use a metal torque wrench to properly secure the tip in place No atomization The tip is deformed or worn Replace the tip out Water flow is inadequate No ultrasound output Check the water flow setting The tip does not thread Use a metal torque wrench to properly secure the tip in place The hand piece is broken Replace the hand piece The cord is damaged Replace the cord The tip does not thread Use a metal torque wrench to secure the tip in place Ultrasound is too properly strong or too weak The tip is deformed or worn Replace the tip out - 17 - 9-B Technical Support and Repairs For technical support and assistance call 1-888-5-BONART (1-888-526-6278) or 909-5948066 Monday through Friday, 9:00 AM to 5:00 PM (Pacific Time). For other areas, contact your local Bonart representative. Section X. Specifications Power supply 115V ±5% ~50/60Hz 28VA 230V ±5% ~50/60Hz 28VA Working frequency 26KHz ~ 32KHz Water supply 25~60 PSIG (172~414KPa) Dimension 19.5cm(L) x 16.2cm(W) x 8.3cm(H) Weight 1.6 Kg (include hand piece) Hand piece Cable 250 cm Footswitch Cable 250 cm Operation environment Temperature 0 ~60 Relative Humidity 10% ~ 90% (non-condensing) Transport and storage conditions Temperature 0 ~60 Relative Humidity 10% ~ 90% (non-condensing) Atmospheric pressure 860~1060 hPa Classifications Protection against electric shock: Class I Protection against electric shock (degree): Type BF Mode of operation: Continuous Medical device directive:IIa - 18 - Complied Directives and Standards ISO13485: Medical devices Quality Management Systems Requirements for regulatory purposes 93/42/EEC: MDD CE directive EN60601-1: Medical Electrical Equipment General Requirement for Safety EN60601-1-2: Medical Electrical Equipment Electromagnetic Compatibility Requirements and Tests Section XI: Disposal Please follow county and state regulations for disposal of the ART-P6. - 19 - - 20 -


![C.Denis.pptx [Sola lettura]](http://vs1.manualzilla.com/store/data/006367953_1-950b8b322875eb390d6955b8e09ed1ac-150x150.png)