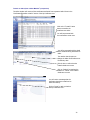
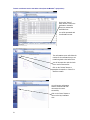
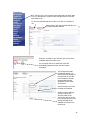
1
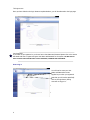
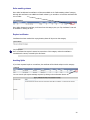
User Guide V2.1.4
Edition 2.1.4
Published by Sandbox
Copyright © 2006 by Sandbox
All rights reserved. No part of the contents of the User Manual may be reproduced or transmitted in
any form or by any means without the written permission of the publisher.
For further information about other editions, contact our office or visit our website at
www.silocerts.co.za
ESC, Sandbox, Microsoft, Windows, and Outlook are property of their owners.
For Sandbox
Writer:
Editor:
Technical Editor:
Sanet Donk
Cheryl Christie
Hennie Spies
ESC is developed by Sandbox, a Microsoft Certified Partner.
ESC Support Tel: (011) 797 5591 Fax: (011) 202 9508 E-mail: [email protected]
2
TABLE OF CONTENTS
Chapter 1 – Introduction ................................................................................................ 5
No Computerese! .................................................................................................. 5
A Quick Overview .................................................................................................. 5
Chapter 2 – Getting Started ........................................................................................... 6
Introducing ESC .................................................................................................... 6
Key benefits.......................................................................................................... 6
Accessing the system............................................................................................. 6
How to register to get a user ID on the system ........................................................ 6
Silocerts website ................................................................................................... 7
The login screen.................................................................................................... 9
How to log in .................................................................................................... 9
How to change your Password.......................................................................... 10
Forgot User Name and Password ?.................................................................... 10
PIN Code ........................................................................................................ 10
Login Warning................................................................................................. 11
Chapter 3 : My Certificates Dashboard......................................................................... 12
My Certificates Main Screen.................................................................................. 12
User Identification ............................................................................................... 13
Summary............................................................................................................ 13
Certificate Analyser.............................................................................................. 14
Certificate Details ................................................................................................ 16
My Certificates .................................................................................................... 16
Transfers Out...................................................................................................... 19
Certificates Encumbered ...................................................................................... 20
Transfers In........................................................................................................ 21
Encumbrances Held ............................................................................................. 22
Booked for cancellation / delivery ......................................................................... 23
Certificates available for viewing ........................................................................... 23
Safex awaiting release ......................................................................................... 24
Expired certificates .............................................................................................. 24
Awaiting Splits .................................................................................................... 24
Third party transactions to release ........................................................................ 25
Navigation Menu ................................................................................................. 26
Transfer Out ....................................................................................................... 27
Transferring ownership to another party............................................................ 28
Transfer to Safex (from a Safex Client’s perspective) .......................................... 29
Transfer to Safex (from a Safex Member’s perspective) ...................................... 30
Transfer certificates back to the Safex Client (from the Member’s perspective) ..... 31
Encumber certificate to another party ……………………………………………………………. 32
Deliver a certificate to the Silo Owner ............................................................... 33
Request a certificate Split................................................................................. 34
Modify Transfer................................................................................................... 35
Transfer In ......................................................................................................... 36
Release Encumbrance.......................................................................................... 38
Show Others ....................................................................................................... 39
Password Protected ......................................................................................... 39
Allow selected users to view certificates ............................................................ 40
E-mail a copy of the certificate to a user............................................................ 40
3
See Others.......................................................................................................... 41
History ............................................................................................................... 41
Silo List .............................................................................................................. 42
Export ................................................................................................................ 42
Export Sample in Microsoft Excel ............................................................... 43
Reporting ........................................................................................................... 44
My Notifications................................................................................................... 45
Portfolio ............................................................................................................. 46
Preferences......................................................................................................... 46
Afrikaans ............................................................................................................ 47
4
Chapter 1 – Introduction
IN THIS SECTION
No Computerese!
Let’s face it – when you are trying to do a task and can’t get it right or work it out, there’s nothing more
frustrating than having to read page after page of technical material. You want the information you
need – nothing more, nothing less – and you want it now! And it should be easy to find and
understand.
That is what this User Manual is all about. It is written in plain English, with no technical jargon or
computerese. Just look up the task in the index or the table of contents, turn to the page, and there’s
the information, laid out step-by-step and accompanied by a graphic image or two to add visual clarity.
Occasionally you might have to turn to another page if the procedure you’re working on has a “See
Also” in the left column. That’s because there are some tasks which overlap, and we didn’t want to
repeat ourselves and make this text any longer than absolutely necessary. We’ve also included some
useful tips here and there, but by and large we have tried to remain true to the heart and soul of this
book, which is that the information you need should be available to you at a glance.
A Quick Overview
This book is not meant to be read in any particular order. It’s designed so that you can jump in, get the
information you need, and then close the book and keep it nearby until the next time you need to know
how to get something done. But that doesn’t mean we have scattered the information about with wild
abandon. If you were to read this book from front to back, you’ll find a logical progression.
Enjoy!!
Chapter 2 – Getting Started
IN THIS SECTION
Introducing ESC
The local grain industry, has for many years, used a paper based silo certificate system. Since 2004, silo
owners have had the option, in addition to issuing paper certificates, to offer electronic silo certificates
which are managed in an industry ownership register, accessible to all through the internet or
telephonically.
Sponsored initially by Senwes and Afgri, there are now electronic silo certificates for wheat, maize, soya
and sunflower. Silo certificates can still be drawn in the traditional paper process (although this will be
phased out in the near future) or be requested in an electronic format. The electronic process will
automatically be written to an industry-wide register where each owner can manage his individual
certificates in a manner similar to Internet banking.
The register will be managed independently of any industry player and confidentiality is assured, with
only the owner having sight and management of their own certificates. This is not a trading platform, it
exists only to create a secure electronic environment for the ownership of silo certificates and managing
the change of ownership thereof!
Key benefits
Silo certificate ownership is moved instantly, securely and is always safe
Improved administrative efficiency
Time based delays removed
Improved control environment
Reduced risk of fraud
Improved delivery onto and off Safex
Manage splits, physical delivery requests, encumbrances for loan security – instantly
No transaction costs and no industry related costs such as courier fees
Real-time register reporting with slice-and-dice querying
Actual certificates, reconciled and reported on real-time are instantly available
Manage multiple staff with access, action and viewing rights
Full audit trails
The system is available for use by all industry participants, regardless of size. A phased process for other
issuers of certificates is on schedule. There are no system or joining fees, nor any transaction fees.
Accessing the system
How to register to get a user ID on the system
You need to register in order to create a user account in the electronic silo certificates system.
You can download an application form from www.silocerts.co.za or call the support centre on 011 797
5591. You will need Adobe acrobat reader (which is available from www.silocerts.co.za as a free
download) to open this form as the document is in PDF format.
Once you have filled in this form you can fax it to the call centre on 011 202 9508 and they will
process the application and allocate you a User ID, password and PIN.
6
Note
You will need a valid User ID to access this system, if you do not have a User ID, please
download the “User Registration” form from www.silocerts.co.za or call the support team on 011 797
5591 for instructions on how to register to obtain a User ID, password and PIN.
Silocerts website
User guides, Frequently Asked Questions and a “How To” series are available for download at
www.silocerts.co.za.
www.silocerts.co.za is also the gateway into the ESC system, when you connect to the site you will be
presented with the following screen.
7
If you click on the login screen you will find the entry point into the system.
8
The login screen
Once you have clicked on the login button as explained above, you will be redirected to the login page.
Very Important
If you have not yet registered or you do not have a User Name and Password please refer to the section
that deals with how to register and get a User Name and Password for the system. YOU WILL NOT BE
ABLE TO ACCESS THE SYSTEM WITHOUT A VALID USER NAME, PASSWORD AND PIN NUMBER.
How to log in
You will need to enter your User
Name and Password as it was
supplied to you when you registered.
Note that you will need to specifically
click on the login button, hitting
enter will not log you in.
How to change your Password
How to change your Password
9
How to change your Password
If you would like to change
your password you can
click on “Change
Password”. You will be
presented with a screen
that will ask you to input
your old password in the
Password space provided.
You will need to enter your
new password in the space
provided, please note that
the password standards
that we use are “Strong
Passwords” and must be a
minimum of 8 characters
long. This must include
letters and a special
character an example
would be P@$$word123
Forgot User Name and Password?
Should you forget your User ID, password or your pin, you will need to contact the support centre on
011 797 5591 and they will fax you a verification form for completion and you will need to fax it back to
them.
Once this process is completed ESC Support will issue you with your User Name and Password.
PIN Code
For security reasons we have included an additional security feature that uses a PIN code to allow
access to the system, this pin code will be issued when you have an account created and will need to be
entered before you are allowed to enter the ESC system.
The six digit code will randomly
turn require 4 out of the six
digits in the pin code to be
entered, in the example if your
pin code is 1 2 3 4 5 6, then you
would enter only 1 4 5 & 6.
Select the change your PIN
Code, a pop up screen will
appear that will require you to
input a new 6 digit PIN. Once
entered that will be your new
default PIN
Every time you access the site
you will be required to accept
the site Participant Agreement by
selecting the Participant
Agreement checkbox
10
Login Warning
If you are logged on somewhere
else, or if you did not logoff
when you exited the system, you
will get this warning message
when you login.
This will not cause any problems
in the way the system operates
and is primarily informational.
Very Important
For security reasons, ESC features an “Auto Timeout” feature that will automatically log you off should
there be 15 minutes of inactivity on your keyboard, should this happen you will be automatically
redirected to the login screen and required to login to the system before you can continue with your
transactions.
11
Chapter 3: My Certificates Dashboard
IN THIS SECTION
My Certificates Main Screen
Once you have logged on successfully you will be presented with your world of electronic certificates,
which will be discussed in detail in this section.
This is your home – all your transactions and queries revolve around this main screen.
12
User Identification
Once you login the
system will automatically
identify you and display
your name in the display
area as well as the last
time you logged into the
ESC System
Just above your details is
a “My Certificates” link
that will always bring
you back to this page no
matter where you are in
the system.
There is a “logout
button” that should be
used every time you exit
the system.
Should you not logout when you are finished your session, you will get the error message that is
explained in the last section of chapter 2 of this user guide.
Note
If you are part of a group of traders or if your account has multiple users, you will be identified as well
as group / company you belong to.
Summary
The summary bar will give you a quick overview of all the certificates that you currently own.
The summary section
gives you an overview of
your current certificates,
from the summary bar
you can see.
How many certificates
you own.
Total tonnage of all your
certificates.
Tonnage of each crop
you own.
13
Certificate Analyser
The certificate analyser is
a filter that will enable you
to filter the certificates in
the “my certificates” view
to match a certain criteria.
Once you have clicked on the Certificate Analyser button, it will open up the product analyser filter
window as shown below.
14
Once the product analyser
window has popped up on
your screen, you will be able
to filter the certificates based
on the following criteria:
All, Safex or non-Safex
certificates
Product Grade
Product Type
Silo Owner
Location of product
If you click the “advanced”
button you will have the
ability to further filter by:
From whom you acquired
the certificate.
The date you acquired it.
Storage type (daily or
monthly).
The submit button will let
the filter take effect.
The reset button will clear
the filter.
Please note that if a filter is active you will see “Filtered” in brackets next to the certificate classifications
as depicted in the graphic below.
The summary details
that are displayed
while a filter is active,
is for filtered
certificates.
In this example it
shows details for all
Safex certificates that
are owned.
As you can see, this
can be a very useful
tool to extract details
and reports on your
certificates
15
Very Important
Filters that have been turned on through certificate analyser will continue to show the last selected filter
in the “My Certificates” view until you click the “reset” button.
Note
Filters set in product analyser will not be saved if you log off or exit the system.
Certificate Details
This section will deal with the main area of the certificates screen, please note that this section will deal
with the various categories that your certificates are classified under and acts as a view / informational
portal to your certificates.
The next section in this chapter entitled “Main Navigation” will deal with the actual how and why
certificates are moved from category to category.
Your certificates are
broken up into sections
that will identify the
current status of your
certificates.
You can use the scroll
bar on the side of the
screen to scroll the
screen to the top and
bottom of the list.
My Certificates
All the certificates that belong to the user/viewer and all certificates that are open and transferable will
appear in this list.
1
2
3
4
5 0
6
7
8
9
10
11
16
1
The checkbox must be selected when you want to transact with this certificate, i.e. put the
certificate on offer to another user in the system.
2
The certificate number
3
Type of certificate, can be either a Safex Silo Certificate (tradable with Safex) or a Non-Safex
certificate
4
Silo
5
Silo location
6
Product Type
7
Product Grade
8
Certificate quantity in TONS
9
Can the certificate details be viewed by others (see “Show Others” section in Navigation Menu,
later in this chapter)
10
View Certificate
Clicking on the icon will bring up an
electronic view of the certificate. This
is strictly a non-transferable view of
the electronic certificate and may be
printed for your reference.
17
Clicking on the “History” button will bring up the
total history of ownership of the certificate.
11
Clicking on the “Terms” button will
display the terms and conditions
supplied by the Silo Owner for that
particular certificate.
This is a link to a Notes section that is specific to each certificate and available for your personal
annotations
Very Important
Once a certificate is transferred to another party, the note that was attached to the certificate will be
deleted and there will be no reference to that note anywhere in the system.
18
Transfers Out
This applies to all certificates that are currently on offer to 3rd parties and have/have not yet been
accepted and where the window period is still open.
1
2
3
4 00000
1
Who the offer is made to.
2
When the offer was made, you can see detailed time in the “Detail” section.
3
When the offer will expire, you can see detailed time in the “Detail” section.
4
The type of transaction, either a transfer or encumbrance.
5
View the offer detail
5
6
Clicking on “Detail” allows you to see the
transaction details.
If you would like to see the certificate
particulars and details then please refer to the
section “viewing a certificate”
The details screen will give you
information on the offer such as
certificate number, the buyers and
sellers name.
The tonnage for the certificate.
If it is a conditional transaction it will
also display who the releasing party
is for this transaction.
You can also see how long the offer
is valid for as well as the expiry time
for the offer
The type can either be a transfer or
an encumbrance.
6
19
If the offer is conditional and this user is the releasing party the “Release” option will be available, if
the offer is not conditional then this option will not be available.
The “Release” button will only be available on
offers that are conditional and you are selected
as the “Releasing Party”. Once both parties
have accepted the conditions, the releasing
party has to release the certificate.
Select “Confirm” by
clicking the check box
followed by the submit
button.
Once this is clicked the
ownership certificate is
released to the new owner
immediately.
Confirmation that the
certificate has been
released
Certificates Encumbered
All certificates that the user has encumbered to 3rd parties. Once a certificate has been encumbered
only the person who holds the encumbrance can release the encumbrance. See the section on “Release
Encumbrance” in the “Main Navigation” section of this chapter.
Very Important
Once a certificate is encumbered, it can only be released by the party who holds the encumbrance. The
party that holds the encumbrance can also take ownership of this certificate. Should ownership of the
certificate be taken by the encumbrance holder, the certificate will be removed from this list.
20
Transfers In
This is the category that shows all certificates that are on offer to the user by other parties
1
1
2
3
It is possible to create a “transfer in” before the other party has made it available to you. The details
do not appear in the list as can be seen above.
This is a manual entry and will be discussed fully in the “Transfer In” section of the “Main Navigation”
later in this chapter.
The Seller will need to put in a corresponding “transfer Out” order before the two will match up.
2
Reject
If a certificate is on offer to you, you will have
the ability to either accept or reject the offer.
Should you reject the offer, you will have to click
the “Confirm rejection” checkbox and then
“Submit” for the rejection to be successful.
You will see the note below once it is successfully
posted.
Note
Once an offer has been rejected it will be removed from your list immediately and you will no longer
have access to that offer.
Note
If the offer is conditional and this user is the releasing party the option to release will be available
otherwise it will not be available.
21
3
If a transaction is conditional and you are the releasing party, you will be presented with the release
option once the offer has been accepted.
Note
You will need to go through the process of accepting the transaction before the release option is
presented.
Encumbrances Held
All certificates that the current user/viewer has encumbrances over
1
2
3
1
Option to release encumbrances.
Should you wish to release an encumbrance you will need to select the certificate you wish to release
by selecting the check box and clicking on “Release Encumbrances” on the Main Navigation menu. This
is explained in detail in that section later on in this chapter.
2
The “From” list is the name of the person who encumbered this certificate to you.
3
As the encumbrance holder you have the ability to take ownership of a certificate that has been
encumbered to you by clicking on the “Take Ownership” button.
You will be presented with a screen that prompts you for a reason. Please also note that you need to
accept by checking the “Confirm” checkbox.
22
Booked for cancellation / delivery
All certificates that you have requested cancellation or delivery for are locked and placed in this
category.
You can view the reason for a certificate being placed in this category by looking at the reason code.
Once delivery has been taken of the product or once the product has been booked over to your Silo
Owner Storage Account, the certificate will be removed from this category.
Very Important
Once a certificate is booked for delivery it cannot be removed out of this category unless the certificate
is cancelled and re-issued by the Silo Owner.
Certificates available for viewing
All certificates that other parties have made available for viewing to this user for a selected period of
time will be available in this view.
When you select to show others and select the actual users that may view this certificate, the certificate
that you selected will become available to those users in this view.
Please note that if you have assigned a password to the certificate via the “Show Others” option then
the certificate will not be shown here, instead you will have to click on the “See Others” link on the left
hand menu.
To view the certificate click on the magnifying glass.
You will be asked for the account number of the person showing you this certificate.
Once you have typed in the correct account number, the certificate viewer will be loaded and you may
view the certificate.
23
Safex awaiting release
Once Safex has allocated a certificate it will become available in the “Safex awaiting release” category,
although this certificate is not tradable until Safex release it, you are able to re-book the certificate back
over to Safex.
Once Safex releases the certificate, it will move from this category into your “My Certificates” view and
be available for trading as usual.
Expired certificates
Certificates that have reached their expiry/maturity dates will be put into this category.
Very Important
Once a certificate has expired it cannot be removed out of this category unless the certificate is
cancelled and re-issued / renewed by the Silo Owner.
Awaiting Splits
If you have requested a split on a certificate, the certificate will be locked and put into this category.
You can view the split request message any time by clicking on the information button.
24
Very Important
Once a certificate has been put into this category it will not be removed out of this category until the
Silo Owner has affected the split. Once the split has been made the certificate will be removed from
this category and your system.
Third party transactions to release
IF you have been designated as a third party to release a transaction then any certificates awaiting
release by you will be in this category and will remain there until you release them.
Certificates will only appear in your list once both of the other parties have accepted the transaction.
You have the ability to either release of reject the transaction. If you release the transaction then the
certificate will change ownership. If you reject the transaction then the ownership will revert back to
the original owner.
25
Navigation Menu
This section will deal with the navigation menu on the left hand side of the window. This is the section
that allows you to transact with your certificates.
My Certificates
This is the link to your main screen, all your certificate
information is accessible from here.
If you need to get back to your main screen, then you
should click on “My Certificates” and it will take you to
the home page.
26
Transfer Out
This is the button that you select if you want to put certificates on offer,
deliver or credit storage account, split, transfer to Safex, or encumber.
Select the certificate or certificates that you want to transact on by clicking
the checkbox next to the certificate in the “My Certificates” section.
Note
If you do not select a certificate prior to clicking on “Transfer Out” you will get the following error
message.
27
Transferring ownership to another party
All the certificate numbers
selected on offer will be
populated automatically.
If the tonnage has not populated
automatically you can either type
the tonnage in yourself or select
the automated tonnage
calculation under “Preferences”
to activate the function. If the
tonnage does not match the
transaction will fail.
Select the maximum time the
transaction will be available to
the other party
Select to whom you want to offer the
certificate. Similar to internet banking
you have to know the account number of
the account you want to transfer to.
Accounts that you have already activated
will be in the drop list. Add this detail
If you select the “Conditional” checkbox then the details of the releasing party will be
displayed. You will need to select whom the releasing party will be from the radio buttons
marked “Me”, “Counter Party” or “Third Party”
Note
If an offer is conditional, then both parties have to accept the transaction before the nominated
releasing party releases the transaction and the ownership of the certificate.
Once you have filled in the details you
will have a last chance to review the
transaction details.
If you are not satisfied that the details
of the offer are correct you can press
the “Back” button to go back and
correct any mistakes.
If you are satisfied with the offer, click
on “Submit” and the offer will be
made.
You will get a confirmation screen. You
will also see the offer in the “Transfers
Out” section of my certificates view.
28
Transfer to Safex (from a Safex Client’s perspective)
If you wish to transfer a certificate to Safex you need to choose this option.
All the certificate numbers
selected on offer will be
populated automatically.
You will need to type the
tonnage for the transaction if
not populated automatically.
If the tonnage does not
match the transaction will
fail.
Select a date for delivery date onto Safex. The transfer procedure
will not complete unless a date is selected.
Clicking on “Next” will take you to the confirmation screen.
Select the client code for the
certificate owner and the
member you would like to
transfer the certificate to.
Similar to Internet banking
you need to know the
account number of that you
are transferring. Accounts
you have already activated
will be in the drop list.
Once you have filled in the details you will
have one last chance to review the transfer
details.
You will be prompted to accept the Terms
and Conditions of the certificate before the
transfer will complete
If you are satisfied with the transfer
details, click on “Submit” and the transfer
will complete.
If you are not satisfied that the details of
the offer are correct you can press the
“Back” button to go back and correct any
mistakes.
You will get a confirmation screen.
You will also see the transfer in the
“Certificates at Safex Member (Broker)
section of my certificates view.
Click on the “Home” button to take you
back to the My Certificates view.
29
Transfer to Safex (from a Safex Member’s perspective)
The Safex Member will receive all the certificates transferred from respective Safex Clients in the
“Certificates to transfer to Safex” section of the My Certificates view.
Click on the “Transfer” action
button to transfer the
certificate onto Safex.
You will be presented with
the confirmation screen next.
You will be presented with the detail
of the certificate being transferred to
Safex.
The member has the option to
change the Safex Client Reference or
the Delivery date.
Tick the box to confirm that the
transfer details are correct.
Click on “Submit” to complete the
transfer or “Cancel” if the transfer
details are incorrect.
You will receive a message that the
certificates have been transferred to
Safex successfully.
Click on “Home” to take you back to
the My Certificates view
30
Transfer certificates back to the Safex Client (from the Member’s perspective)
Click on the “Return”
action button to return the
certificate to the Safex
Client you received the
certificate from.
You will be presented with
a confirmation screen.
The confirmation screen will reflect the
number of the certificate that you are
transferring back to the Safex Client.
You will be required to tick the check
box to confirm the transfer.
Click on the “Submit” button to
complete the transfer or “Cancel” to
abort the transfer
You will receive confirmation
that the certificate has been
returned to the owner
successfully.
Click on the “Home” button to
return to the My Certificates
view
31
Encumber certificate to another party
All the certificate numbers
selected on offer will be
populated automatically.
You will need to type in the
tonnage for the transaction
in this box. If the tonnage
does not match the
transaction will fail.
If you select the “Conditional checkbox” then the details of the
releasing party will be displayed. You will need to select who
the releasing party will be from the radio buttons marked “Me”
or “Counter Party”. You can also select a third party to release
Select to whom you want to
offer the certificate.
Similar to Internet banking
you have to know the
account number of the
account you want to transfer
to. Accounts that you have
already activated will be in
the drop list.
Select the maximum time
you are allowing for the
transaction to be made
available to the other party.
Note
If an offer is conditional, then both parties have to accept the transaction before the nominated
releasing party releases the transaction and the encumbrance of the certificate.
Once you have filled in the details you
will have a last chance to review the
encumbrance details.
If you are not satisfied that the
encumbrance details are correct you
can press the “Back” button to go back
and correct any mistakes.
If you are satisfied with the details,
click on “Submit” and the offer will be
made.
You will get a confirmation screen. You
will also see the offer in the “Transfers
Out” section of the "my certificates"
view.
32
Deliver a certificate to the Silo Owner
All the certificate numbers
on offer will be populated
automatically.
Select “Deliver or credit
storage account” from the
list.
You need to put in the
correct total tonnage for the
transaction, if the tonnage is
incorrect then the
transaction will fail.
Once you have filled in the details
you will have a last chance to review
the transaction details.
If you are not satisfied that the
details of the offer are correct you
can press the “Back” button to go
back and correct any mistakes.
If you are satisfied with the offer,
click on “Submit” and the offer will
be made.
You will get a confirmation screen.
You will also see the offer in the
“Booked for cancellation/delivery”
section of the "my certificates" view.
Note
Once a certificate is booked for physical delivery, it is locked and no longer tradable. The only
way to release it is to get the silo owner to issue a new certificate and remove the locked certificate.
33
Request a certificate Split
The certificate numbers that
you have selected will be
populated automatically.
Select the split option.
The split request page will again
populate the certificate number that
you request to be split automatically.
You need to fill in the instructions on
how you want the certificate to be
split, this request will be sent to the
Silo Owner automatically.
You will get a confirmation screen. You
will also see the offer in the “Awaiting
Split” section of the "my certificates"
view.
Note
Once a certificate split request has been made, the certificate is locked and no longer tradable. As soon
as the Silo Owner has processed the split, your new certificates will be put in your “My Certificates” view
and the awaiting split certificate will be removed.
34
Modify Transfer
If you have put a certificate up for offer and the offer has not been
accepted, you will only be able to modify the time the offer is open for.
You will notice “Offers” in the top right hand corner, this is
a link that will show you all certificates that you currently
have on offer.
If there are multiple certificates that make up the same
offer, you can identify them as they will have the same
Batch Number.
Clicking on the “Batch Number” will populate the “modify
Transfer” form with all the relevant details and certificate
numbers. You can see in the example above that batch
number 205 was selected.
Once you have extended or reduced the time the offer will
be open for, you will get a confirmation screen.
Note
The other party has accepted once the transaction you will no longer see the transaction in this screen.
35
Transfer In
The “Transfers In” is used to either accept offers that have been made
to you or alternatively to create an offer to accept before an offer has
been made to you.
To view the certificates that are on offer to you click on “Transfers to
me”
“Manual Entry” will clear the fields and allow you
to input the details manually.
Clicking on “transfers to me” will show you a list of all the
certificates that are on offer to you.
You can simply click the “Transfer Ref” and it will
automatically populate the form with the relevant
information.
The tonnage field is NOT
populated by default; you
have to input the tonnage for
the total order for the offer
to be accepted or activate
the automated tonnage
calculation function under
“Preferences”.
Select from whom you want
to accept the certificate.
Similar to Internet banking
you have to know the
account number of the
account you want to receive
from. Accounts that you have
already activated will be
available for selection from
the drop list.
36
Once you have filled in the
tonnage and checked all the
other details are correct, you
can submit the transaction
and should the transaction
details all be accepted in the
system, the certificate will
become available in your “My
Certificates”.
A manual transaction will require that you input all the details in the field manually, and will mean that
you post an offer to accept before an offer to purchase has been put in the system. You will get a
notification screen when you place a manual transaction.
37
Release Encumbrance
If you hold an encumbrance and would like to release it, you need to
select the encumbrance that you would like to release, then click on
“Release Encumbrance”.
You have to check the
“Confirm” button for the
encumbrance to be released.
You will get a conformation
screen when the encumbrance
is released.
38
Show Others
Use this option if you want to make certificates available for others to view,
either temporarily or on an ongoing basis.
There are 3 ways to allow other users to view your certificates.
Select the certificate or certificates that you want to make available for
other to view by checking the check boxes that correspond to that
certificate.
Password Protected
Password protect allows you to set a passwords that other would need to input to view your
certificate. Any ESC System user that knows the password will be able to view the certificate if they
know both the certificate number and the password.
Passwords can be set as
follows:
Unique password per
certificate for a limited
period.
39
Allow selected users to view certificates
Allow only designated users to view your certificate or certificates, you can manage this user list and
only specified users will be allowed to view the certificate.
If the account that you
want to show a specific
certificate is not in the
list then you can add
them by typing their
account number in and
clicking on “Add”
The users that are in the list can be given access by selecting the check boxes. These
users can be further restricted to access the certificate within the selected time period.
E-mail a copy of the certificate to a user
A non-tradable copy of the certificate will be emailed to the user or users in the list.
Email a non-tradable copy
of a certificate to a user.
Select the e-mail address
from a drop down list, or
enter an e-mail address in
the box provided and click
on “Add”.
You can remove users from
the list by selecting their email address and clicking on
“Remove”.
Click on “Submit to send the
e-mails.
“Home” will take you back to
the My Certificates view.
40
See Others
If you have been given access to someone else’s certificates, you can
click on “See Others” to view the certificates.
You will need the certificate number and the password before you can
view the certificate.
History
The “History” screen will show you the details of all the certificates that you either
own or have had in your possession and now changed ownership.
41
Silo List
This is the list of Silo Owners that are currently registered on the system,
their contact details and physical address.
Export
Export allows you to select the information about your certificates,
based on criteria that you select from the selection screen and export
that information to Microsoft Excel format.
Select the information that you would like to export by checking the
check boxes.
42
The export creates an excel file on
the server, you have the option to
open the file from the server by
clicking on open, or alternatively
you can save it to your personal
computer and open the file at your
leisure by clicking Save.
Export Sample in Microsoft Excel
43
Reporting
The reporting section of the application is where you can draw all the reports
that are available to the users of the system. All the reports are specific to your
account or to the certificates you own.
The reports that are available
are self-explanatory and this
user guide will not go into
detail explaining what each
report is.
Note
You can only get reports on your account and certificates.
The reports are dynamic and can be based on criteria that you choose to filter your data, in this
example to can either choose by certificate number, date from, date to or the user that did the
transaction.
Very Important
You can either select a single criterion to filter the data or alternatively you can use multiple criteria
together. E.g. you may want to see a particular certificate traded in January, for this you would use both
the date and the certificate criteria.
44
My Notifications
The “My Notifications” button will open a new web page that will display
all the system-generated messages that have been sent either to or from
you.
These include all transaction messages on the status of an order and its
acceptance, as well as all the messages that may have been sent to the
silo owners for split requests and physical deliveries.
This report is dynamic and can be based on criteria that you choose to filter your data, in this example
to can either choose by certificate number, date from, date to or the user that did the transaction.
45
Portfolio
Enter the certificate numbers,
separated by commas, in the
block provided.
A new portfolio reference can
be allocated to the selected
certificates or an existing
reference can be selected from
the drop down list.
Click on “Submit” to allocate
the portfolio reference to the
certificates.
Preferences
Activate the functions to auto
calculate tonnage and/or show a
concurrent login alert by ticking
the selection boxes.
Indicate whether you would like
your register to reflect a summary
view or a detailed view of all your
certificates.
A default storage rate can be specified to calculate any storage
costs payable after the original storage period, as indicated on
the certificate, has expired.
46
Afrikaans
When you click the “Afrikaans” button on the navigation button, it will
pop up a notification screen to inform you that you have changes the
language to Afrikaans.
All the application screens will now default to Afrikaans from now on.
To change it back, simply click on “English” on the main navigation
menu
47