1
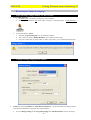
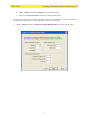
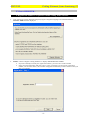
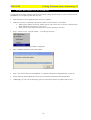
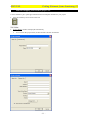
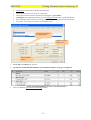
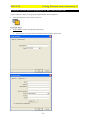
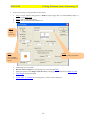
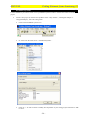
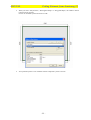
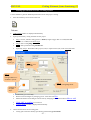
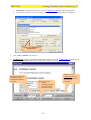
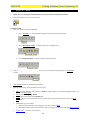
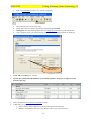
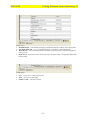
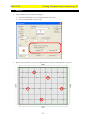
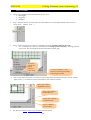
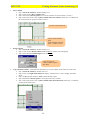
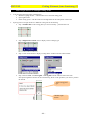
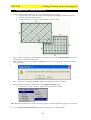
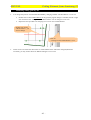
MANUAL
Ceiling Estimate from Armstrong 3.1
-1-
MANUAL
Ceiling Estimate from Armstrong 3.1
A. How to install the software
Page #
1. After downloading from the Internet ………………………………………………………….... 3
B. Selecting the Market & Language …………………………………………………... 4
1. When starting Ceiling Estimate for the first time ………………………………………………
2. Change existing Language and Market ……………………………………………………….... 4
4
C. How to REGISTER for database access & updates ……………………………. 6
1. Source Number – required to enable items selection from the database ………………………. 6
2. Product data update over the INTERNET ……………………………………………………..... 8
D. Main features of the Software …………………………………………………………..9
1. Material shopping list based on square metres only ……………………………………………. 11
Ceiling Items selection …………………………………………………………………... 13
2. Design ceiling grid lay out and material shopping list for a RECTANGULAR room …………..14
Ceiling Items selection ………………………………………………………………....... 13
3. Design ceiling grid lay out and material shopping list for a POLYGONAL room ……………...16
Ceiling Items selection …………………………………………………………………... 13
4. Predefined system……...................……….....…………………………………………………. 19
5. Calculating Reverberation Time ……………………………………………………………….. 22
6. Writing Ceiling Specification text ……………………………………………………………... 26
7. Manual Mode.…………………………………………………………………………….............28
Text results & Printed forms…..............………………………………………………… .30
Hangers ……….............................................……………………………………………. 33
Modify Grid angle and Grid Position …………………………………………………..... 35
Insert columns ………………………………………………………………………….… 36
Insert Lighting Fixture or Multiple ceiling items …………………………………….……38
Multiple rooms in one project ………………………………………………………….… 39
E. Other useful features
1. Adding dimensions in the drawing ……………………………………………………………...
2. Modifying the ceiling grid lay out …………………………………………………………….....41
3.Import DXF file from CAD software …………………………………………………………… 42
4.Software optionals settings................ ……………………………………………………………
40
43
System requirements
/
Hardware :
Minimum PC 486/33 MHz, 16 MB RAM, 2 MB free HD space, 3,5” FD, CD-ROM driver
Software platform :
WIN 95 / 98 / NT, Internet Explorer 4.0 or Netscape navigator 3.0
-2-
MANUAL
Ceiling Estimate from Armstrong 3.1
A. How to install the software
/…...…
After downloading from the Internet
T
•
To download the latest version of Ceiling Estimate visit our web site at http://ceilings-eu.armstrong.com
•
Find downloaded “Install.exe” file on your Hard Drive (HD) by using “Windows Explorer”
•
Run the Install.exe file (by double click) and follow instructions on your screen.
•
•
IMPORTANT NOTE: When typing your „Company name“ please enter minimum 4 letters
and avoid using special characters.
After successful installation start Ceiling Estimate
• By double click on software icon directly on your Desktop
• Choosing from Windows Start menu “Start – Programs – Ceiling Estimate – Ceiling Estimate …“.
-3-
MANUAL
Ceiling Estimate from Armstrong 3.1
B. Selecting the Market & Language
•
/…...…
When starting Ceiling Estimate for the first time
•
You will be asked to choose:
• Prefered „Program Language“ for operating the software
• The Country to specify „Market Database“ for available product range
• If you have a discount on panels and/or on other components, you can indicate them here also.
Change existing Language and Market
•
/
Start Ceiling Estimate
• By double click on software icon directly on your Desktop
• Choosing from Windows Start menu “Start – Programs – Ceiling Estimate – Ceiling Estimate… “.
NOTE: By selecting Poland from “Data File for Market in…” drop down menu, all ceiling products
available for Poland will be used with all program modules.
•
You can change settings for the Program Language and Market Database later by choosing:
-4-
/
MANUAL
•
Ceiling Estimate from Armstrong 3.1
•
“Tools – Options” and then ”Language” from the software menu.
•
You need to restart the software (not PC) for changes to take effect!
In this window you can put your labour cost (Rate per hour), you can modify your other settings and your
overhead and profit settings. You can change these values later by choosing :
•
“Tools – Options” and then ”Ceiling Cost Settings Default Values” from the software menu.
-5-
MANUAL
Ceiling Estimate from Armstrong 3.1
C. How to REGISTER…
/
A Registration number is required to enable Ceiling Items selection
/
•
After starting the Ceiling Estimate and specifying the “Program Language” and “Market Database”
Welcome window will be displayed.
•
STEP 1: Choose “Register Ceiling Estimate” to display REGISTRATION FORM
• If you have already received your registration number, you can write it in this window
• If not, leave the field empty and click “Next”. Once you will have received your registration
number you can insert it here ; this window will appear automatically at each connexion until you
enter your number.
-6-
MANUAL
Ceiling Estimate from Armstrong 3.1
•
STEP 2 : You have to fill all fields to successfully continue the registration process and click “Next”
•
NOTE: All information will be used only for providing you with regular product data updates and new
program version releases!!!
•
STEP 3 : Select the method you would you like to send your registration request
• You can send your registration info by internet
• Or print and fax your registration to your Armstrong “Internal Technical Sales or Market Service
Centre“.
• Or save your registration info and send it later
•
NOTE: you will receive your registration number shortly
-7-
MANUAL
Ceiling Estimate from Armstrong 3.1
Product Data Update over the INTERNET over the INTERNET
Ceiling Estimate contains information about the Armstrong ceilings product range. If you are connected to the
INTERNET you can update product data any time.
•
Data information can be updated anytime from every module!
•
Make sure your PC is connected to the Internet, either via local network or via modem.
• When using a modem connection, double click on your browser icon (or choose it from the Start
menu) and follow instructions on your screen.
• When you are connected to local network, no browser opening is necessary.
•
Step 1: Choose “Tools – Internet Update…” from the top bar menu.
Update Data File window is displayed.
•
Step 2: Estimate check for product data updates.
•
Step 3: If a new file with “DATA UPDATE” is available confirm OK to change data file on your PC.
•
Please check for DATA UPDATE at least once per month to maintain the latest product data.
•
Additionally you can visit the Armstrong web site to learn more about new products and services…
-8-
/
MANUAL
Ceiling Estimate from Armstrong 3.1
D. Main features of the software………………………………………………..;…...
Ceiling Estimate offers 5 tools for suspended ceiling design + Manual mode
•
After starting Ceiling Estimate a Start-up MENU is displayed for direct access into the required program
function - modules.
Tool 1 - to calculate
the quantity of all
items needed for the
ceiling without
drawing the room’s
shape.
Tool 2 - to calculate the
quantity of all items
needed for the ceiling of
a rectangular shaped
room.
Tool 4 - to create
a specification for
a suspended
ceiling system.
Tool 3 - to
calculate the
quantity of all
items needed for
the ceiling of a
polygonal shaped
room.
PROFI mode - to use
all the program’s
features without any
automatic assistance
Open project
file saved on
your PC
Tool 5 - to calculate
a room’s
reverberation time.
To use a Predefined
Exit Application
Check box - Skip
Start Up menu.
Update the
database (internet
access required)
•
You can also OPEN directly any previous project by selecting “Open Existing project” button.
•
In case you want to work in MANUAL mode all the time and skip Start-up Menu when opening the
program tick check box “Do not show this start-up dialog menu next time”.
•
See also icons and buttons description on the next page…
-9-
e
MANUAL
•
Ceiling Estimate from Armstrong 3.1
Program ICONS & BUTTONS descriptions
Specificati
on module
icon
Predefined
systems
Ceiling
Items
Acoustic
module
Undo
Shopping
List based
on m² only
module
icon
Rectangular
Ceiling
Design
module icon
Polygonal
Ceiling
Design
module
icon
Delete
Shape
module
icon
Grid
editing
icon
Switch between
Text and Drawing
results
About
Ceiling grid
drawing
in the room
Connection of Main
Runners MR
Items visibility
control icons
Main
Runners
Free
dimension
Hanger
Zoom functions:
• Best fit
• Zoom +
• Zoom –
• Zoom region
Create
columns
Cursor
coordinates
Project
•
Create
New grid
Armstrong
Web Site
Hotline
Additionally you can visit the Armstrong web site to learn more about new products and services…
•
Click on the icon
to open the site…
- 10 -
MANUAL
Ceiling Estimate from Armstrong 3.1
Material Shopping List based on project m²
Use this module to get a quick approximate material consumption estimate for your project.
•
Start the module by mouse click on the Icon
•
Project Details window is displayed automatically
•
You can enter the project name, the date and the customer information
- 11 -
/
MANUAL
Ceiling Estimate from Armstrong 3.1
•
Grid & Panel window is displayed automatically
•
Specify all necessary ceiling attributes for the project:
•
•
•
Step 1: Choose, whether ceiling panel is a Plank (Length is bigger than 2 x width) or a Tile
(Length<=2 x width) in the Panel Type.
Step 2: Select ceiling Edge Detail.
Step 3: Select preferred ceiling Module size.
•
Step 4: Enter size of the room in square metres (m2) in the Area (m2) field
Step 1
Choose
ceiling
panel
type
Step 2
Specify ceiling edge detail
Step 3
Specify
ceiling module
size
Example of
selected
edge detail
Step 4
Enter the room
size in M2
600
Example
of the
panel
shape
•
•
•
•
Additionally you can modify:
Distance between hangers by changing pre-set value 1200 mm Dist.
Maximum distance of the hanger from the wall by changing pre-set values 600 mm Max to wall.
Hangers next to MR connection or Hangers spaced evenly
•
Click “OK” to confirm your selection.
- 12 -
MANUAL
Ceiling Estimate from Armstrong 3.1
•
Ceiling Items window will be displayed automatically.
•
•
•
•
•
Choose desired items for all necessary ceiling parts:
Ceiling parts with items already specified are marked with a green button
Ceiling parts vary depending upon the selected Ceiling System (Panel Type & Edge Detail)
Only compatible items with selected ceiling system (Panel Type and Edge Detail) are displayed
If you want, you can put your Labour cost and Material cost
Ceiling item attributes
are displayed here
Labour cost and
Material cost
Restore Default
Values
•
Click “OK” to confirm your selection.
•
Spread sheet with detailed MATERIAL QUANTITIES needed for the project is displayed
•
NOTE: Only REGISTERED Users will see selected Material!!!
There are additional TEXT RESULT FORMS available:
- 13 -
MANUAL
Ceiling Estimate from Armstrong 3.1
« Detailed results » icon to display
shopping list with item numbers &
packaging of all ceiling items
Text or Graphic view
« Overhead and Profit »
icon - information about the
total installation cost.
« Waste result » icon information about the number of
full size panels, cut panels and
material waste per item.
« Order form » icon to display
ceiling material order form
« Global results » icon to ADD
together results from all (active)
projects
Back to MENU
- 14 -
MANUAL
Ceiling Estimate from Armstrong 3.1
Ceiling lay out and material shopping list for RECTANGULAR room
Use this module to design a ceiling layout and get detailed material quantities.
•
Start the module by a mouse click on the Icon
•
Project Details window is displayed automatically
•
You can enter the project name and the date and the customer information
- 15 -
/
MANUAL
Ceiling Estimate from Armstrong 3.1
•
Enter the length and width of the room in millimetres
•
Click “OK” to confirm
•
Grid & Panel window is displayed automatically
•
Specify all necessary ceiling attributes for the project:
•
•
•
Step 1: Choose, whether ceiling panel is a Plank (Length is bigger than 2 x width) or a Tile
(Length<=2 x width) in the Panel Type.
Step 2: Select ceiling Edge Detail.
Step 3: Select preferred ceiling Module size.
Step 1
Choose
ceiling
panel type
Step 2
Specify ceiling edge detail
Step 3
Specify
ceiling
module size
•
•
•
•
Additionally you can modify:
Distance between hangers by changing pre-set value 1200 mm Dist.
Maximum distance of the hanger from the wall by changing pre-set values 600 mm Max to wall.
Grid Angle and Plenum Depth
•
Click “OK” to confirm and “Ceiling Items” window will be displayed…
•
Proceed then as indicated page 12
- 16 -
MANUAL
Ceiling Estimate from Armstrong 3.1
Ceiling lay out and material shopping list for POLYGONAL room
Use this module to design ceiling lay out and get detailed material quantities.
•
Start the module by a mouse click on the Icon
•
Project Details window is displayed automatically
•
You can enter the project name and the date and the customer information
- 17 -
/
MANUAL
Ceiling Estimate from Armstrong 3.1
•
Enter X & Y co-ordinates for each corner of the room (as a distance from last previously created corner)
in millimetres or ANGLE & DISTANCE between the corners.
• Apply button serves as a control for moving cursor accordingly with co-ordinates entered.
• Click on Add point button to actually create new room corner.
•
Or you can more easily use the mouse and create room corners by left button click
• While moving the mouse, actual X & Y distances from the last corner are shown…
Room Corner
coordinates
control window.
1
3
Step size
2
•
•
•
Adjust STEP size when using mouse method to help to create the precise size & corner positions of
walls.
Select from program menu Tool – Options … and enter desired step value in millimetres.
Step is minimum distance, which you can draw by moving the mouse cursor.
Modify value for
step distance
•
•
•
After creating last room corner Click “Finish” to confirm or click right mouse button.
Grid & Panel window is displayed automatically
Proceed then as indicated page 12
- 18 -
MANUAL
•
Ceiling Estimate from Armstrong 3.1
Specify all necessary ceiling attributes for the project:
•
•
•
•
Step 1: Choose, whether ceiling panel is a Plank (Length is bigger then 2 x width) or Tile (Length<=2
x width) in the Panel Type.
Step 2: Select ceiling Edge Detail.
Step 3: Select preferred ceiling Module size.
Step 1
Choose
ceiling
panel type
Step 2
Specify ceiling edge detail
Step 3
Specify
ceiling module
size : standard or
special
•
•
•
•
Additionally you can modify:
Distance between hangers by changing pre-set value 1200 mm Dist.
Maximum distance of the hanger from the wall by changing pre-set values 600 mm Max to wall.
Grid Angle and Plenum Depth
•
Click “OK” to confirm and “Ceiling Items” window will be displayed…
- 19 -
MANUAL
Ceiling Estimate from Armstrong 3.1
Predefined systems
dule
Use this module if you want to create or use a predefined system in order to use the same items in another
project
•
Create a new project (in the fast start-up Menu select “Only Surface”, “Rectangular Shape” or
“Polygonal Shape”), select all ceiling items.
•
Click on the Predefined systems icon
•
Or select from the menu Tools – Predefined Systems…
•
Click on “+” in order to check or modify all components of your ceiling project and click on “OK”
to save it
- 20 -
MANUAL
Ceiling Estimate from Armstrong 3.1
•
Your predefined system is created. Change the name of the project and click on “OK“
•
Now, when you started a new project, all yours items selections are available. Click on Predefined
systems on the fast start-up Menu and select “Only Surface“, “Rectangular Shape“ or “Polygonal
Shape“
•
Some predefined systems that you can use are already entered by default. You can use them if you
needed.
- 21 -
MANUAL
Ceiling Estimate from Armstrong 3.1
•
When you select “Only Surface“, “Rectangular Shape“ or “Polygonal Shape“, the windows “Select
Ceiling System“ appears.
Choose an available system and click on “OK“
•
Your prefined system is now available with all components you have chosen
- 22 -
MANUAL
Ceiling Estimate from Armstrong 3.1
Calculating Reverberation Time
dule
Use this module to calculating room’s Reverberation Time (RT) in seconds.
•
Start the Module by mouse click on the Icon for using automatic guide
•
or in other mode
Icon to start Acoustic
Module
•
or select from the menu Tools – Acoustic …
•
Reverberation time (RT) for RECTANGULAR room shape only will be calculated when using automatic
guide (starting from MAIN MENU)
•
Reverberation time (RT) for POLYGONAL and RECTANGULAR room shapes can be calculated when
starting in Other - mode.
•
Step 1: Enter X and Y size for RECTANGULAR room shape (or enter PROFI mode to create
polygonal room shape)
•
Step 2: Acoustic window will be displayed:
Graphical
results
List of all
surfaces in
the room.
And list of
all rooms
in the
project.
Detailed
results
Recommended RT
based on selected
frequency and purpose
of the room.
ADD, Edit Treatment
- material for selected
room surface.
ADD, Edit or Modify Treatment
- material for selected room
surface.
- 23 -
RT time
without
treatment.
RT time
with treatment.
MANUAL
Ceiling Estimate from Armstrong 3.1
Assign materials for each room surface to prepare data for room’s reverberation time calculation.
•
Step 3: Assigning basic materials for all surfaces of the room (displayed in left window)
• Double click on the Folder „Building“ then on folder “Walls”
Double click on Walls
folder to show all the
room’s walls.
•
•
Select Wall Nr. 1 icon by mouse click
Click on “Add” to open a dialog window with list of basic materials to choose from.
Mouse click on «Add » to
open database of materials.
Select icon of
the surface
for which you
want to assign
Basic Material
Icons to add windows or multiple
materials on selected surface.
Choose material from the list
in Basic Surface drop down
window
•
•
•
•
•
Material selected for the Wall nr.1 is automatically assigned for all other walls.
You can change it afterwards by selecting the wall and choosing different material from
material database window.
Select the basic material also for Ceiling and Floor.
You can add windows, doors or multiple materials on each surface of the room.
Step 4: Click on the button „Without Treatm.“
• Reverberation Time (RT) “Without Treatment” is calculated and displayed
- 24 -
MANUAL
•
Ceiling Estimate from Armstrong 3.1
Step 5: Assigning TREATMENT materials for selected surfaces of the room (displayed in left
window)
• Select Ceiling icon from the left window by mouse click
• Click on “Add” to open a dialog window with list of treatment materials to choose
from.
Click on « Add » to
open list of treatment
materials .
•
•
Step 6: Click on the button “Without Treatment”
• Reverberation Time (RT) “Without Treatment” is calculated now
•
Step 7: Compare Reverberation Time With and Without Treatment to see improvement in
room’s acoustic performance. (0.42 is less then 2.30 seconds!!!)
•
Step 8: Compare Reverberation Time With and Without Treatment to see improvement in
room’s acoustic performance using the sound button (text result realised with a microphone).
NOTE: Compare calculated RT with RECOMMENDED Reverb. Time displayed for 500 Hz frequency in
order to determine quality of the RT improvement.
• Do not forget to select appropriate purpose of the room (speech, multipurpose, music)
• Too long but also too short RT results in difficulties to understand conversation in the room!!
- 25 -
MANUAL
Ceiling Estimate from Armstrong 3.1
•
Look in the Graphical results for more details in octave band frequencies in order to see the difference
between the room without and with treatment.
•
Detailed Results can be Printed, Saved or Copied to other applications (Word, Excel...)
•
Look in the Detailed Results for more details in octave band frequencies and result descriptions.
Please read the limitations
statement at the bottom of
the Detailed Results window
- 26 -
MANUAL
Ceiling Estimate from Armstrong 3.1
Writing Specification Text for a Ceiling System
/
Use this module to generate detailed specification text for the project’s ceiling.
•
Start the module by mouse click on the Icon
•
Grid & Panel window is displayed automatically
•
Specify all necessary ceiling attributes for the project:
•
•
•
Step 1: Choose, whether ceiling panel is a Plank (Length is bigger than 2 x width) or a Tile
(Length<=2 x width) in the Panel Type.
Step 2: Select ceiling Edge Detail.
Step 3: Select preferred ceiling Module size.
•
Optionally Step 4: Enter size of the project (room) in square metres (m2) in the Area (m2) field
Step 1
Choose
ceiling
panel type
Step 4
Enter the room
size in M2
Step 3
Specify
ceiling module size :
standard or special
Step 2
Specify ceiling Edge detail
Example of
the panel
shape
•
•
•
•
Additionally you can modify:
Distance between hangers by changing pre-set value 1200 mm Dist.
Maximum distance of the hanger from the wall by changing pre-set values 600 mm Max to wall.
•
•
Click “OK” to confirm your selection.
Ceiling Items window is displayed automatically
Choose desired items for all ceiling parts :
• Ceiling parts with items already specified are marked with green buttons
- 27 -
MANUAL
•
•
Ceiling Estimate from Armstrong 3.1
Ceiling parts vary depending upon the selected Ceiling System (Panel Type & Edge Detail)
Only compatible items with selected ceiling system (Panel Type and Edge Detail) are displayed
Ceiling Item attributes are
displayed here
•
Click “OK” to confirm your selection.
•
Ceiling Report window is displayed with detailed description of selected Ceiling System (Panel Type &
Edge Detail) with all items specified in Ceiling Item window (see above…)
Drop down menu with
SPECIFICATION
FORMS for different
countries
Spec. Form can be :
• Printed
• Copied & pasted to
other applications
• Saved as text file
- 28 -
Button to access
Ceiling Item selection
window to change any
item selected
previously
MANUAL
Ceiling Estimate from Armstrong 3.1
MANUAL – Mode
e
•
Allows access to all program MODULES in one project without automatic assistance.
•
Start the module by mouse click on the Icon
•
Now you can use all available modules:
•
Icon ‘‘Area m2‘‘ to create Material shopping list based on square metres only.
•
Icon ‘‘Rectangular Shape‘‘ to design ceiling in rectangular room.
•
Icon “Polygonal Shape” to design ceiling in polygonal room.
•
After creating project room (or choosing “Area m2) you can specify Ceiling System in “New Grid”
window.
•
Grid & Panel window is displayed automatically
•
Specify all necessary ceiling attributes for the project:
•
•
•
•
Step 1: Choose, whether ceiling panel is a Plank (Length is bigger a 2 x width) or a Tile (Length<=2 x
width) in the Panel Type.
Step 2: Select ceiling Edge Detail.
Step 3: Select preferred ceiling Module size.
Step 4: optional in case of Estimate based on square metres (m2) Enter size of the room in the Area
(m2) field.
•
Additionally you can modify:
• Distance between hangers by changing pre-set value 1200 mm Dist.
• Maximum distance of the hanger from the wall by changing pre-set values 600 mm Max to wall.
•
Click “OK” to confirm your selection.
- 29 -
MANUAL
Ceiling Estimate from Armstrong 3.1
- 30 -
MANUAL
Ceiling Estimate from Armstrong 3.1
•
Click on Ceiling Items window icon to specify ceiling items.
•
•
•
•
Choose desired items for all ceiling parts :
Ceiling parts with items already specified are marked with green button
Ceiling parts vary depending upon the selected Ceiling System (Panel Type & Edge Detail)
Only compatible items with selected ceiling system (Panel Type and Edge Detail) are displayed
Ceiling Item attributes are
displayed here
•
Click “OK” to confirm your selection.
•
Spread sheet with detailed MATERIAL QUANTITIES needed for the project is displayed on the
bottom of the page.
NOTE: Only REGISTERED Users will see selected Material!!!
•
•
There are additional TEXT RESULT FORMS available:
Additionally you can:
• Insert Columns, Insert Light Fixture, Modify Grid angle and Grid Position …
• Multiple ceiling items in the same room, Multiple rooms in one project and more…
- 31 -
MANUAL
Ceiling Estimate from Armstrong 3.1
Text Results & Printed forms
•
/
Text results available in SPREAD SHEET are partly visible in the window under room drawing.
• Use switch “Text Or Graphic View” icon to display only text results:
Text or Graphic View
•
Text Results can be selected and copied into other window applications (eg. Excel, Word …)!
• Highlight desired part of the spread sheet with mouse and choose COPY from Edit menu.
• Switch to Excel or Word… and choose PASTE from EDIT menu.
•
Estimate Program offers different result forms:
« Detailed results » icon to display
shopping list with item numbers &
packaging of all ceiling items
Text or Graphic view
« Overhead and Profit »
icon - information about the
total installation cost.
« Waste result » icon information about the number of
full size panels, cut panels and
material waste per item.
« Order form » icon to display
ceiling material order form
« Global results » icon to ADD
together results from all (active)
projects
•
•
•
•
•
Detailed Results – with material packaging information and item numbers of all ceiling items.
Waste Result – with information about the number of full size panels, cut panels and material
waste per item.
Order Form – summarises items used in the project in format ready to be printed and faxed for
material order
Global Results – adding together material quantities (results) from several projects currently open
(visible in Estimate Window menu ).
You can include PROJECT DETAILS on every printed result form to better identify project specific
documents.
• If not yet entered before you draw the shape, select from the menu Tools – Project Details… and
fill in required details about your client.
•
•
Additionally you can add details about your company:
Select from the menu Tools – Options… and fill in required details in User Address part.
- 32 -
MANUAL
•
•
•
•
•
•
•
Ceiling Estimate from Armstrong 3.1
Detailed Results – with material packaging information and item numbers of all ceiling items
Overhead and Profit – you can calculate the labour cost and the overhead and Profit
Waste Result – with information about the number of full size panels, cut panels and material
waste per item.
Order Form – summarises items used in the project in format ready to be printed and faxed for
material order
Save – export active results page into file
Print – print active results page
Send by e-mail – send active results
- 33 -
MANUAL
Ceiling Estimate from Armstrong 3.1
N.B: If you want to send a mail, click on
• click on “configure” (see the pictures below)
When you click on “configure”, this window appears :
. Put your Host name (i.e. :
In Server: Host Name / Address, modify the line
smtp.tiscali.fr) and click on “OK” (normally your internet supplier).
Do not hesitate to contact you internet supplier to have the right smtp parameters.
- 34 -
MANUAL
Ceiling Estimate from Armstrong 3.1
Hangers
•
Choose the best way to install yours hangers.
•
•
•
./
You can install hangers next to the Main Runner connection
You can install hangers spaced evenly
Hangers (represented by cross) next to Main Runners connection (represented by triangles)
- 35 -
MANUAL
•
Ceiling Estimate from Armstrong 3.1
Hangers (represented by cross) spaced evenly
- 36 -
MANUAL
Ceiling Estimate from Armstrong 3.1
Modify Grid Angle and Grid Position
/
•
Ceiling Grid Angle or Grid Position can be changed any time to conform to your design needs.
•
Start the function by mouse click on the Icon (or choose Tools – Ceiling Grid – Edit)
•
Options available:
• Moving all (available) parts of the ceiling grid Secondary grid, Main runners, Cross Sections
• Entering number of Modular Light Fixtures (in case you do not insert them in ceiling drawing)
• Rotating grid by modifying grid angle
• Modifying distance between hangers…
•
Click on Apply button for any change to take effect!
Enter the distance in millimeters for
moving Main Runners on the right or
on the left from the initial position
Enter the distance in millimetres
for moving Cross Sections on the
right or on the left from the initial
position
Enter the number of Modular
Lighting Fixtures in the project.
Enter the angle for
rotating the Grid
•
Modify distance between
hangers and from the wall
All changes are shown in the drawing in real time!
- 37 -
MANUAL
Ceiling Estimate from Armstrong 3.1
Insert Columns
/
•
Three type of Columns can be inserted in the project room:
• Rectangular
• Polygonal
• Rounded
•
Step 1: Start the function by mouse click on of the column icon on the right hand side of the screen (or
choose Tools – Column – New…)
•
Step 2: Look at mouse cursor X and Y co-ordinates to properly position column in the room.
• X, Y co-ordinates are relatives,( if needed) you can change position of [0,0] by choosing preferred
room corner, then click right mouse button and choose Adjust grid…
To set new
position for
[0,0] in
preferred
room corner.
•
« Cursor coordinates » to be
used for positioning the column
and sizing the column.
Step 3: Click left mouse button to insert first corner of the column and drag the mouse to size the column.
Again watch x, y co-ordinates on the screen bottom to size column accurately.
New active column
(highlithed corners)
Icon to start « Move »
column function
Icon to start « Rotate »
column function
Icon to « Delete »
active column
•
See also how to Move, Rotate, Copy and Paste selected column.
- 38 -
MANUAL
•
Ceiling Estimate from Armstrong 3.1
Move column
• Step 1: Select the column by double clicking on it
• Step 2: Click on the “Move column” icon
• Step 3: Select the reference point to move from (could be one of the column’s corners )
• Step 4: Move the mouse cursor to place column in the new location. Watch X,Y co-ordinates on
the screen bottom for proper movement control.
Previous column position.
Cursor on the reference
point.
In this example reference
point = column’s corner
•
Rotate column
• Step 1: Select the column by double clicking on it
• Step 2: Click on the “Rotate column” icon and Rotate window will be displayed.
• Step 3: Enter desired rotation angle and click on Apply.
Click on Apply for
column rotation angle to
take effect.
•
Copy and Paste column - useful function when there are several columns of the same size in the room.
• Step 1: Select the column by double click on it
• Step 2: Click with right mouse button to display “column menu” or select “Copy” from Edit
menu.
• Step 3: Copy selected column or Paste column already copied
• Step 4: Select the reference point to control position of new column
• Step 5: Move the mouse cursor to place column in the desired location. Watch X,Y co-ordinates
on the bottom of the screen.
- 39 -
MANUAL
Ceiling Estimate from Armstrong 3.1
Insert Light Fixture or Multiple ceiling items
/
•
You can insert following items in the drawing:
• Modular Lighingt Fixture – with the same size as selected ceiling panel
• Spot Light Fixture
• Other ceiling panel – with the same size and edge detail as the other panels in that room
•
Specify position of Light Fixtures or different ceiling tiles in the drawing:
• Step 1: Double click on the ceiling panel you want to modify – panel becomes red
•
Step 2: Right mouse button click to display “menu” Change type.
•
Step 3: Click on the menu to display “Ceiling Items” window and select desired item.
•
Step 4: Select Tools – Create Legend – New legend from the software menu and create
description legend for all items in the room drawing. Draw on the grid where you want to position
the legend.
Other ceiling panel
type
Modular Light
Fixture
- 40 -
MANUAL
Ceiling Estimate from Armstrong 3.1
Multiple rooms / ceilings in the project
•
You can insert another room next to (or over) the existing room in the project:
• To better design the ceiling area when combining different grid angle or different panel sizes.
• To design ceilings on different levels
• To keep whole project in one file (when number of rooms is small)
•
Step 1: After creating Room #1 (Rectangular or Polygonal) click on the Polygonal Shape icon (on the
menu bar) again and create another room.
Step 2: Program will warn you whether to ADD new room or replace existing one. Click OK to add (or
Cancel to replace)
•
/
•
•
Step 3: Create new room shape corner by corner, click right mouse button (or Finish )
•
When ceilings are laying over each other you can change the visibility order:
• Choose Tools – Shape – Move Up (Move Down) option from the menu.
N.B. : Make sure that the room you want to move up or down is selected (indicated by squares at each corner).
•
You can delete selected room shape at anytime by choosing Tools – Shape - Delete
- 41 -
MANUAL
Ceiling Estimate from Armstrong 3.1
E. Other useful features
s
Dimensions
/
•
Each room wall has its dimensions created automatically.
•
You can add more dimensions to specify:
•
size of room’s corner panels
• position of each hanger
• position of grid connections
•
Add dimensions for each corner tile in room.
•
Double click on desired corner tile of the room and choose the „Dim Shape parallel Icon (on the
left hand side of the screen) to create dimensions of the corner tile.
Double click on the
« room corner »
•
Click on
« Dim Shape Parallel » Icon to
create corner tile dimensions
Add dimensions for hangers (connections…) in room.
•
Click on desired dimension style icon: horizontal, vertical or slant (on the right side of the screen)
Click the Icon to move
selected dimension line
Click the Icon to delete
selected dimension line
Click the Icon to modify style of selected
dimension line
N.B.: This tool is active only if corner is selected (appears in red)
•
Watch mouse cursor to see where you can add dimensions (cursor is magnetic and changes its
design)
•
Add dimension line where needed …
•
NOTE: Do not forget to SWITCH OFF Step to allow magnetic cursors to work properly.
(Otherwise step dimensions will be related to step position)
- 42 -
MANUAL
Ceiling Estimate from Armstrong 3.1
Modifying ceiling grid lay out
•
/
You change the position of each MAIN RUNNER by changing FROM / TO Main Runner / Cross Tee.
•
•
Double click on desired Main Runner in the grid (only logical change is available) then do a right
click and choose the “Change From/To Main Runner” icon to change to Cross Tees.
Repeat the same procedure for changing row of Cross Tees to Main Runner.
Double click on the
« Main Runner » you
want to change
Click on
« Change From/To Main Runner » icon
•
NOTE: In the case where the main runner is within 600mm of the wall and is changed (dimension
increased), you may need to allow for additional hangers on cross tees
- 43 -
MANUAL
Ceiling Estimate from Armstrong 3.1
Import Drawing from CAD software in DXF format
/
A DXF file with the shape of the room’s ceiling in a special LAYER can be imported into Ceiling Estimate
and make room design easy.
•
Shape of the ceiling in the room can be created in any CAD program (AutoCAD, ArchiCAD, etc…)
supporting DXF format export.
•
Ceiling’s shape MUST be created in special Layer (for example called “Ceiling”) containing only the shape
of the ceiling created by using POLYLINE or LINE entities.
• NOTE: Curves or circles are not supported.
• Rooms have to be closed i.e. no doors, windows etc.
•
Step 1: Choose “Tools – DXF import…” from the top bar menu.
•
Step 2: Locate the DXF file with the ceiling’s shape on your PC and choose “Open” for import.
•
Step 3: Select name of the LAYER with the ceiling’s shape and specify the SCALE used in CAD drawing
(in case of doubt ask CAD file owner to provide you with these details).
•
Confirm “OK” to import ceiling’s shape into the Ceiling Estimate.
•
Now you can add New Grid and design the ceiling.
- 44 -
MANUAL
Ceiling Estimate from Armstrong 3.1
Software Optional Settings
s
•
You can CUSTOMISE your „Ceiling Estimate“ software in many ways.
•
Choose Tools – Options…from the menu bar.
•
Review and modify any PRESET values in 6 main groups:
• General (Units, steps…)
• Tax Settings (Tax default values)
• Path (Important files location…)
• Regional Settings ( Software language, available ceiling product range…)
• User Address (Address displayed on every printed form…)
• Ceiling Cost Settings Default Values (Labour cost, Others settings, Overhead and Profit Setting)
Click on TABS
to modify other
settings
- 45 -