1
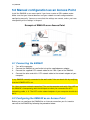
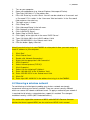
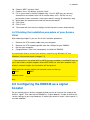
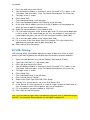
EM4542 - Wireless Router, Access Point and
Signal Booster
2 | ENGLISH
EM4542 - Wireless Router, Access Point and
Signal Booster
Warnings and points of attention
Due to laws, directives and regulations set out by the European Parliament, this
device could be subject to limitations concerning its use in certain European member
states. In certain European member states the use of this product could be prohibited.
More information regarding this warning can be found in the Declaration of Conformity
on the last page of this document!
Table of contents
1.0 Warranty conditions...............................................................................................3
2.0 Introduction ...........................................................................................................3
2.1 Functions and features ......................................................................................3
2.2 Package contents ..............................................................................................3
3.0 Using the installation wizard ..................................................................................4
4.0 Manually configure as wireless router....................................................................4
4.1 Connecting the EM4542 ....................................................................................5
4.2 Configuring the EM4542 for connection with the Internet ...................................5
4.3 Determining the connection method ..................................................................6
4.3.1 Configuring the EM4542 for a DHCP Internet connection ...............................6
4.3.2 Configuring the EM4542 for a Static Internet connection.................................7
4.3.3 Configuring the EM4542 for a PPPoE Internet connection ..............................7
4.4 Securing a wireless network ..............................................................................7
4.4.1 WPA security (recommended) ........................................................................8
4.4.2 WEP security..................................................................................................8
4.5 Finishing the installation procedure of your wireless router ................................9
5.0 Manual configuration as an Access Point ............................................................10
5.1 Connecting the EM4542 ..................................................................................10
5.2 Configuring the EM4542 as an Access Point ...................................................10
5.3 Securing a wireless network ............................................................................11
5.3.1 WPA security (recommended) ......................................................................12
5.3.2 WEP security................................................................................................12
5.4 Finishing the installation procedure of your Access Point.................................13
6.0 Configuring the EM4542 as a signal booster........................................................13
6.1 Connecting the EM4542 signal booster (2) ......................................................14
6.2 Configuring the EM4542 signal booster (2) ......................................................14
6.3 Securing your EM4542 signal booster (2) (WPA).............................................15
6.4 Configuring your wireless router (1) .................................................................16
6.5 Connecting your wireless router with the signal booster (2) .............................17
6.6 Completing the installation of the signal booster ..............................................18
3 | ENGLISH
7.0 Configuring the wireless network on your computer.............................................18
7.1 Configuring a wireless network using Windows XP ..........................................18
7.2 Configuring a wireless network using Windows Vista.......................................19
8.0 Firewall & QoS settings .......................................................................................19
8.1 Port Forwarding ...............................................................................................19
8.2 URL filtering.....................................................................................................20
8.3 Setting up QoS ................................................................................................21
9.0 Frequently asked questions.................................................................................22
10.0 Service and support...........................................................................................24
1.0 Warranty conditions
The five-year Eminent warranty applies for all Eminent products unless mentioned
otherwise before or during the moment of purchase. When having bought a secondhand Eminent product the remaining period of warranty is measured from the moment
of purchase by the product’s first owner. The Eminent warranty applies to all Eminent
products and parts inextricably connected to and/or mounted on the main product.
Power supply adapters, batteries, antennas and all other products not integrated in or
directly connected to the main product and/or products of which, without reasonable
doubt, can be assumed that wear and tear show a different pattern than the main
product are not covered by the Eminent warranty. Products are not covered by the
Eminent warranty when exposed to incorrect/improper use, external influences and/or
when opened by parties other than Eminent.
2.0 Introduction
Congratulations on your purchase of this high-quality Eminent product! This product
has undergone extensive testing by Eminent’s technical experts. Should you
experience any problems with this product, you are covered by a five-year Eminent
warranty. Please keep this manual and the receipt in a safe place.
Register this product now on www.eminent-online.com and receive product updates!
2.1 Functions and features
The EM4542 is ideal to create your own secured wireless network in an instant.
The EM4542 is a fast wireless router which can provide your entire house with a
wireless network. The EM4542 performances are of a high standard which allows you
to create a stable wireless network. Enjoy your wireless network and let the EM4542
do all the work!
2.2 Package contents
The following parts need to be present.
4 | ENGLISH
•
•
•
•
•
EM4542 Wireless router, Access Point and signal booster.
Power adapter.
UTP network cable.
CD-rom with installation wizard and manuals.
User manual.
3.0 Using the installation wizard
The easiest way to install the EM4542 is with the help of the installation wizard. In
case you do not want to use the wizard on the enclosed CD-rom, you can install the
EM4542 as a wireless router (chapter 4), an Access Point (chapter 5) or a signal
booster (chapter 6) manually.
1.
2.
3.
4.
Turn on your computer.
Place the CD-rom in the CD-rom or DVD drive of your computer.
The wizard will automatically start.
Follow the instructions on your screen until the installation has been finished. You
now have a working Internet connection.
Note! The CD-rom does not allow you to configure the EM4542 as a signal booster.
Would you like to install the EM4542 as a signal booster? Then continue with chapter
6.
4.0 Manually configure as wireless router
Install the EM4542 as a wireless router if you have a cable modem or ADSL modem
with a router function. Make sure that your Internet browser and your network are
correctly configured when configuring the wireless router manually. You can assume
that the settings are correct, unless you have changed any of the settings in the past.
5 | ENGLISH
Example of EM4542 as wireless router
4.1 Connecting the EM4542
1.
2.
3.
4.
5.
6.
Turn off your computer.
Connect the EM4542 to a wall outlet using the supplied power adapter.
Connect the supplied UTP network cable to the ‘WAN’ port of the EM4542.
Connect the other end of the UTP network cable to the ‘LAN’ port of your cable
modem.
Connect a UTP network cable to one of the four ‘LAN’ ports of your EM4542.
Connect the other end of the UTP network cable to the network adapter in your
computer.
Do I have a proper network connection? Turn on the computer and verify if the LED on
the EM4542, corresponding with the LAN-port to which you connected the UTP
networking cable, is lit. The LED on the network adapter of your computer should also
be lit.
4.2 Configuring the EM4542 for connection with the
Internet
Before you can configure the EM4542 for a connection with the Internet, you will first
need to connect to the EM4542. Follow the instructions below to connect to the
EM4542.
1.
2.
3.
4.
Turn on your computer.
Open your Internet browser (e.g. Internet Explorer, Netscape or Firefox).
Type ‘http://192.168.8.1’ in the address bar.
Press the enter key or click ‘Go to’.
6 | ENGLISH
5.
6.
You will now be asked for a ‘Username’ and a ‘Password’. Fill in ‘admin’ in the
‘Username’ field and ‘admin’ in the ‘Password’ field and press the enter key.
The login screen is shown.
4.3 Determining the connection method
To quickly configure the EM4542 for a connection to the Internet through your provider
you will first need to determine which connection method your provider is using
(‘DHCP’, ‘Static IP’, or ‘PPPoE’ ). Consult the information you received from your
provider or look at table 1.
Internet provider
Connection method
Caiway with Webstar modem
PPPoE
Compuserve with Sagem ADSL modem
DHCP
KPN ADSL with Thomson Speedtouch 546(i) ADSL modem
DHCP
OnsBrabantnet
DHCP+MAC address
Telfort with Zyxel modem
DHCP
Tiscali with Zyxel or Sagem modem
DHCP
UPC Chello
DHCP+MAC addres
Ziggo
DHCP+MAC addres
Belgian providers
Connection method
Telenet with Motorola modem
DHCP
Table 1.
4.3.1 Configuring the EM4542 for a DHCP Internet
connection
For an internet connection using ‘DHCP’ you can use the following steps.
1.
2.
3.
4.
5.
6.
7.
8.
9.
Click ‘Internet Wizard’.
Select ‘Manual Internet Configuration’.
Click ‘Next’.
Select ‘DHCP Method’.
Click ‘Next’.
Click ‘Next’.
Click ‘Save’ and ‘Close’.
The wizard will now save the settings en will close the screen automatically.
You now have a working internet connection.
7 | ENGLISH
Attention: When using Ziggo as ISP please refer to chapter 9 if you are not able to
establish an internet connection within 5 minutes.
In order to prevent losing your password, write down the altered password below:
Password:____________________________________________________________
4.3.2 Configuring the EM4542 for a Static Internet
connection
If your provider requires you to make a connection by using a Static IP-address, then
use the following steps. (e.g. Speedtouch Home).
1.
2.
3.
4.
5.
6.
7.
8.
9.
10.
Click ‘Internet Wizard’.
Select ‘Manual Internet Configuration’.
Click ‘Next’.
Select ‘Static IP’.
Click ‘Next’.
Fill in the data as provided by your Internet Service Provider.
Click ‘Next’.
Click Save and Close’.
The wizard will now save the settings and will close the screen automatically.
You now have a working internet connection.
4.3.3 Configuring the EM4542 for a PPPoE Internet
connection
If your provider requires you to make a connection by using PPPoE (with username
and password), then use the following steps.
1.
2.
3.
4.
5.
6.
7.
8.
9.
Click ‘Internet Wizard’.
Select ‘Manual Internet Configuration’.
Click ‘Next’.
Select ‘PPPoE’.
Click ‘Next’.
Fill in the data as provided by your Internet Service Provider.
Click ‘Next’.
Click ‘Save and Close’.
The wizard will now save the settings and will close the screen automatically.
4.4 Securing a wireless network
To avoid having uninvited guests probing your wireless network we strongly
recommend securing your wireless network. There are several security methods
which can secure the network at different levels. To apply a method to your network it
8 | ENGLISH
is required that all wireless network devices support this method. The strongest
method of security is WPA (WiFi Protected Access).
This router also support the successor of WPA, called WPA2. Because there are
devices that do not support WPA2, we do not discuss WPA2 in this manual.
If you wish to use WPA security, continue with paragraph 4.4.1 (recommended). If you
wish to use WEP security, continue with paragraph 4.4.2.
4.4.1 WPA security (recommended)
1.
2.
3.
4.
5.
6.
7.
8.
9.
10.
11.
12.
13.
14.
15.
16.
Click ‘Wireless Wizard’.
The wizard appears in a pop-up screen. Click ‘Next’.
Choose you country/region and click ‘Next’.
At the field ‘SSID’ fill in the name desired for your wireless network. (Use the
‘Check SSID’ option to ensure this name is not already in use.)
Click ‘Next’.
The EM4542 will automatically scan for a suitable wireless channel.
As a choice, the most suitable wireless channel will appear on your screen.
Click ‘Next’ to confirm this channel. (You can pick a wireless channel yourself if
you want).
You will see a brief summary with the settings you have made so far. Click ‘Next’
to continue.
Choose ‘WPAPSK’ and click ‘Next’.
Choose ‘TKIP’ and click ‘Next’.
Fill in a password in the ‘Network Key’ field (e.g. ‘yourname1’). Do not use any
punctuation marks and make sure the password is at least 8 characters long!
Write down the network name and the chosen password*.
Click ‘Next’.
Click ‘Finish’.
The wizard will now save the settings and will close the screen automatically.
Hint: WPA security is supported by Windows 2000 and up (with all updates installed).
This security method is not supported by Windows 98, unless your wireless network
adapter software supports WPA. In case you do not have Windows 2000, XP, Vista or
the required software, continue with section 4.4.2.
4.4.2 WEP security
1.
2.
3.
4.
5.
Click ‘Wireless Wizard’.
The wizard appears in a pop-up screen. Click ‘Next’.
Choose you country/region and click ‘Next’.
Fill in the desired name for your wireless network in the field ‘SSID’. (Use the
‘Check SSID’ option to ensure this name is not already in use.)
Click ‘Next’.
9 | ENGLISH
6.
7.
8.
9.
10.
11.
12.
13.
14.
15.
16.
The EM4542 will automatically scan for a suitable wireless channel.
As a choice, the most suitable wireless channel will appear on your screen.
Click ‘Next’ to confirm this channel. (You can pick a wireless channel yourself if
you want).
You will see a brief summary with the settings you have made so far. Click ‘Next’
to continue.
Choose ‘WEP’ and click ‘Next’.
Choose ‘Use a 128 bit key’ and click ‘Next’.
Fill in a password in the field ‘Network Key’. For this WEP key you are only
allowed to use numbers from 0 till 9 and the letters a till f. Do not use any
punctuation marks and make sure the password is exactly 26 characters long.
Write down the network name and the chosen password*.
Click ‘Next’.
Click ‘Finish’.
The wizard will now save the settings and will close the screen automatically.
4.5 Finishing the installation procedure of your wireless
router
After following chapter 4, you can finish the installation procedure by following the next
steps:
1.
2.
3.
4.
Remove the UTP network cable from your computer.
Remove the UTP networking cable from the LAN port of your EM4542.
Restart your computer.
Congratulations! You have properly installed the EM4542.
An explanation how to connect your wireless network using Windows XP and
Windows Vista can be found in chapter 7.0
* The connection is lost when WPA or WEP has been enabled in the EM4542 and not
yet in the wireless network adapter. When WEP/WPA has also been enabled in the
wireless network adapter, the connection will be repaired.
Write down the security method, the network name and the key:
WPA
WEP
Network name:
_____________________________________________________
Key:
_____________________________________________________
10 | ENGLISH
5.0 Manual configuration as an Access Point
Install the EM4542 as an access point if you have a router or DSL modem router.
Make sure that your Internet browser and your network are well configured when
configuring manually. You can assume that the settings are correct, unless you have
changed any of the settings in the past.
Example of EM4542 as an Access Point
5.1 Connecting the EM4542
1.
2.
3.
4.
Turn off the computer.
Connect the EM4542 to a wall outlet using the supplied power adapter.
Connect the supplied UTP network cable to the ‘LAN 4’ port of the EM4542.
Connect the other end of this UTP network cable to the network adapter of your
computer.
Is my EM4542 correctly connected to the wall outlet? You can check this by verifying
that the POWER LED is on.
Do I have a proper network connection? Turn on the computer and verify if the LED on
the EM4542, corresponding with the LAN-port to which you connected the UTP
networking cable, is lit. The LED on the network adapter of your computer should also
be lit..
5.2 Configuring the EM4542 as an Access Point
Before you can configure the EM4542 for an Internet connection you first need to
connect to the EM4542 by following the procedure below.
11 | ENGLISH
1.
2.
3.
4.
5.
6.
7.
8.
9.
10.
11.
12.
13.
14.
Turn on your computer.
Open your webbrowser (e.g. Internet Explorer, Netscape of Firefox).
Type ‘http://192.168.8.1’ in the address bar.
Press the ‘Enter key’ or click ‘Go to’. You will now be asked for a ‘Username’ and
a ‘Password’. Fill in ‘admin’ in the ‘Username’ field and ‘admin’ in the ‘Password’
field and press the enter key.
The login screen is shown.
Click ‘Setup Tool’.
Click ‘Advanced Setup’ in the left menu.
Click ‘Network’ in the left menu.
Click ‘LAN/DHCP Server’.
Select ‘Stop’ at ‘DHCP Server’.
Click ‘Apply’ at the right side in the menu ‘DHCP Server’.
Type ‘192.168.8.200’ in the ‘LAN IP address’ field.
Type ‘255.255.255.0’ in the ‘Subnet mask’ field.
Click the button ‘Apply & Restart’.
Note! If you wish to log in to your EM4542 at a later point in time, you must assign a
fixed IP- address to your computer.
1.
2.
3.
4.
5.
6.
7.
8.
9.
10.
11.
12.
Click ‘Start’.
Click ‘Control Panel’.
Double click ‘Network Connections’.
Right click the appropriate ’LAN Connection’.
Click ‘Properties’.
Select ‘Internet-protocol (TCP/IP)’.
Click ‘Properties’.
Select ‘Use the following IP Address’.
Enter ‘192.168.8.25’ in the ‘IP Address’ field.
Enter ‘255.255.255.0’ in the ‘Subnet mask’ field.
Click ‘OK’.
Enter ‘http://192.168.8.200’ in the address bar to log in to the EM4542.
5.3 Securing a wireless network
To avoid having uninvited guests probing your wireless network we strongly
recommend securing your wireless network. There are several security methods
which can secure the network at different levels. To apply a method to your network it
is required that all wireless network devices support this method. The strongest
method of security is WPA (WiFi Protected Access).
This router also support the successor of WPA, called WPA2. Because there are
devices that do not support WPA2, we do not discuss WPA2 in this manual.
12 | ENGLISH
If you wish to use WPA security, continue with paragraph 5.3.1 (recommended). If you
wish to use WEP security, continue with paragraph 5.3.2.
5.3.1 WPA security (recommended)
1.
2.
3.
4.
5.
6.
7.
8.
9.
10.
11.
12.
13.
14.
15.
16.
Click ‘Wireless Wizard’.
The wizard appears in a pop-up screen. Click ‘Next’.
Choose you country/region and click ‘Next’.
Fill in the desired name for your wireless network in the field ‘SSID’. (Use the
‘Check SSID’ option to ensure this name is not already in use.)
Click ‘Next’.
The EM4542 will automatically scan for a suitable wireless channel.
As a choice, the most suitable wireless channel will appear on your screen.
Click ‘Next’ to confirm this channel. (You can pick a wireless channel yourself if
you want).
You will see a brief summary with the settings you have made so far. Click ‘Next’
to continue.
Choose ‘WPAPSK’ and click ‘Next’.
Choose ‘TKIP’ and click ‘Next’.
Fill in a password in the ‘Network Key’ field (e.g. ‘yourname1’). Do not use any
punctuation marks and make sure the password is at least 8 characters long!
Write down the network name and the chosen password**.
Click ‘Next’.
Click ‘Finish’.
The wizard will now save the settings and will close the screen automatically.
Hint: WPA security is supported by Windows 2000 and up (with all updates installed).
This security method is not supported by Windows 98, unless your wireless network
adapter software supports WPA. In case you do not have Windows 2000, XP, Vista or
the required software, continue with section 5.3.2.
5.3.2 WEP security
1.
2.
3.
4.
5.
6.
7.
8.
9.
Click ‘Wireless Wizard’.
The wizard appears in a pop-up screen. Click ‘Next’.
Choose you country/region and click ‘Next’.
Fill in the desired name for your wireless network in the field ‘SSID’. (Use the
‘Check SSID’ option to ensure this name is not already in use.)
Click ‘Next’.
The EM4542 will automatically scan for a suitable wireless channel.
As a choice, the most suitable wireless channel will appear on your screen.
Click ‘Next’ to confirm this channel. (You can pick a wireless channel yourself if
you want).
You will see a brief summary with the settings you have made so far. Click ‘Next’
to continue.
13 | ENGLISH
10. Choose ‘WEP’ and click ‘Next’.
11. Choose ‘Use a 128 bit key’ and click ‘Next’.
12. Fill in a password in the field ‘Network Key’. For this WEP key you are only
allowed to use numbers from 0 till 9 and the letters a till f. Do not use any
punctuation marks and make sure the password is exactly 26 characters long.
13. Write down the network name and the chosen password**.
14. Click ‘Next’.
15. Click ‘Finish’.
16. The wizard will now save the settings and will close the screen automatically.
5.4 Finishing the installation procedure of your Access
Point
After following chapter 5, you can finish the installation procedure:
1.
2.
3.
4.
Remove the UTP network cable from your computer.
Remove the UTP networking cable from the LAN port of your EM4542.
Restart your computer.
Congratulations! You have now properly installed the EM4542.
An explanation how to connect your wireless network using Windows XP and
Windows Vista can be found in chapter 7.0
** The connection is lost when WPA or WEP has been enabled in the EM4542 and not
yet in the wireless network adapter. When WEP/WPA has also been enabled in the
wireless network adapter, the connection will be repaired.
Write down the security method, the network name and the key:
WPA
WEP
Network name:
_____________________________________________________
Key:
_____________________________________________________
6.0 Configuring the EM4542 as a signal
booster
Do you already have a wireless network and do you like to increase the range of the
wireless signal? Then connect the EM4542 as a signal booster. In order to realize this,
several settings of your signal booster (2) and of your wireless router / access point (1)
must be modified.
14 | ENGLISH
nd
A2
EM4542 as signal repeater
(2)
(1)
6.1 Connecting the EM4542 signal booster (2)
1.
2.
3.
4.
Turn off your computer.
Connect the EM4542 to a wall outlet using the supplied power adapter.
Connect the supplied UTP network cable to the ‘LAN 1’ port of the EM4542.
Connect the other end of the UTP network cable to the network adapter of your
computer.
Is my EM4542 correctly connected to the wall outlet? You can check this by verifying
that the POWER LED is on.
6.2 Configuring the EM4542 signal booster (2)
1.
2.
3.
4.
5.
Turn on your computer.
Open your internet browser (e.g. Internet Explorer, Netscape of Firefox).
Type ‘http://192.168.8.1’ in the address bar.
Press the ‘Enter key’ or click ‘Go to’.
You will now be asked for a ‘Username’ and a ‘Password’. Fill in ‘admin’ in the
‘Username’ field and ‘admin’ in the ‘Password’ field and press the enter key.
6. The login screen is shown.
7. Click ‘Setup Tool’.
8. Click ‘Advanced Setup’ in the left menu.
9. Click ‘Network’ in the left menu.
10. Click ‘LAN/DHCP Server’.
15 | ENGLISH
11.
12.
13.
14.
15.
Select ‘Stop’ at ‘DHCP Server’.
Click ‘Apply’ at the right side in the menu ‘DHCP Server’.
Type ‘192.168.8.200’ in the ‘LAN IP address’ field.
Type ‘255.255.255.0’ in the ‘Subnet mask’ field.
Click the button ‘Apply & Restart’.
Note! If you wish to log in to your EM4542 at a later point in time, you must assign a
fixed IP address to your computer.
1.
2.
3.
4.
5.
6.
7.
8.
9.
10.
11.
12.
Click ‘Start’.
Click ‘Control Panel’.
Double click ‘Network Connections’.
Right click the appropriate ’LAN Connection’.
Click ‘Properties’.
Select ‘Internet-protocol (TCP/IP)’.
Click ‘Properties’.
Select ‘Use the following IP Address’.
Enter ‘192.168.8.25’ in the ‘IP Address’ field.
Enter ‘255.255.255.0’ in the ‘Subnet mask’ field.
Click ‘OK’.
Enter ‘http://192.168.8.200’ in the address bar to log in to the EM4542.
6.3 Securing your EM4542 signal booster (2) (WPA)
If you use the EM4542 as a signal booster with another EM4542, WPA security is
supported. If you use another type of wireless router, WEP security is recommended.
To avoid having uninvited guests probing your wireless network we strongly
recommend securing your wireless network.
1.
2.
3.
4.
Click ‘Wireless Wizard’.
The wizard appears in a pop-up screen. Click ‘Next’.
Choose you country/region and click ‘Next’.
Fill in the desired name for your wireless network in the field ‘SSID’. (Use the
‘Check SSID’ option to ensure this name is not already in use.)
5. Click ‘Next’.
6. The EM4542 will automatically scan for a suitable wireless channel.
7. As a choice, the most suitable wireless channel will appear on your screen.
8. Click ‘Next’ to confirm this channel. (You can pick a wireless channel yourself if
you want). Write down the chosen channel***.
9. You will see a brief summary with the settings you have made so far. Click ‘Next’
to continue.
10. Choose ‘WPAPSK’ and click ‘Next’.
11. Choose ‘TKIP’ and click ‘Next’.
16 | ENGLISH
12. Fill in a password in the field ‘Network Key’. (e.g. ‘yourname01’). Do not use any
punctuation marks and make sure the password has e minimum length of 8
characters long.
13. Write down the network name and the chosen password***.
14. Click ‘Next’.
15. Click ‘Finish’.
16. The wizard will now save the settings and will close the screen automatically.
*** The connection is lost when WPA has been enabled in the EM4542 and not yet in
the wireless network adapter. When WPA has also been enabled in the wireless
network adapter, the connection will be repaired.
Write down the network name, the key and the channel:
WPA
Network name:
____________________________________________________
Key:
____________________________________________________
Channel:
____________________________________________________
6.4 Configuring your wireless router (1)
When configuring the router and its security (paragraph 6.5), we assume you will be
using the EM4542 as a wireless router. Make sure your wireless router is connected to
your computer using a UTP network cable.
1.
2.
3.
4.
5.
6.
7.
8.
9.
10.
11.
12.
13.
14.
15.
Open your web browser (e.g. Internet Explorer, Opera or Firefox).
Type ‘http://192.168.8.1’ in the address bar.
Press the ‘Enter’ key or click ‘Go to’.
You will now be asked for a ‘Username’ and a ‘Password’. Fill in ‘admin’ in the
‘Username’ field and ‘admin’ in the ‘Password’ field and press the enter key.
The login screen is shown.
Click ‘Wireless Wizard’.
The wizard appears in a pop-up screen. Click ‘Next’.
Choose you country/region and click ‘Next’.
Fill in the desired name for your wireless network in the field ‘SSID’. (Use the
‘Check SSID’ option to ensure this name is not already in use.)
Click ‘Next’.
The EM4542 will automatically scan for a suitable wireless channel.
As a choice, the most suitable wireless channel will appear on your screen.
Select the same channel you have chosen for your signal booster.
Click ‘Next’.
You will see a brief summary with the settings you have made so far. Click ‘Next’
to continue.
17 | ENGLISH
16. Choose ‘WPAPSK’ and click ‘Next’.
17. Choose ‘TKIP’ and click ‘Next’.
18. Fill in the same password in the field ‘Network Key’ you have chosen for your
signal booster.
19. Click ‘Next’.
20. Click ‘Finish’.
21. The wizard will now save the settings and will close the screen automatically.
6.5 Connecting your wireless router with the signal
booster (2)
If you have followed the previous steps, then you have filled in the following:
- The signal booster (2) has the following IP-address: ‘192.168.8.200’.
- The wireless router has the following IP-address: ‘192.168.8.1’.
- Both devices are using the WPA protocol and are both using the same security key.
- Both devices are using the same channel.
- The SSID does not need to be the same (e.g. ‘Upstairs’ and ‘Downstairs’).
Both devices must be set up in order to connect to each other. We will begin setting
up your wireless router (1).
1.
2.
3.
4.
5.
6.
7.
8.
9.
10.
11.
12.
13.
14.
15.
16.
17.
18.
Connect the wireless router and the signal booster to each other using the
following steps: Connect a network cable to LAN4 of the wireless router. Connect
the other end of the network cable to LAN4 of the signal booster.
Connect a computer using a network cable to LAN port 1 of the wireless router.
Turn on the your wireless router and the signal booster.
Turn on your computer.
Open your web browser (e.g. Internet Explorer, Netscape or Firefox).
Type ‘http://192.168.8.1’ in the address bar.
Click ‘Setup Tool’.
Click ‘Advanced Setup’ in the left menu.
Click ‘Wireless’ in the left menu.
Click ‘WDS Setup’ in the left menu.
Click ‘Search AP’ in the right screen.
A screen appears. A summary of found wireless networks will be displayed.
Double-click with the left mouse button on the name (SSID) of the signal booster.
Click ‘OK’.
Click ‘Add’ in the right screen.
Click ‘Save’ at the top of the right screen.
Click ‘OK’ to save the settings.
Close the window.
18 | ENGLISH
6.6 Completing the installation of the signal booster
1.
2.
3.
4.
5.
6.
7.
8.
9.
10.
11.
12.
13.
14.
Type ‘http://192.168.8.200’ in the address bar to connect to the signal booster.
Click ‘Setup Tool’.
Click ‘Advanced Setup’ in the left menu.
Click ‘Wireless’ I the left menu.
Click ‘WDS Setup’ in the left menu.
Click ‘Search AP’ in the right screen.
A screen appears. A summary of found wireless networks will be displayed.
Double-click with the left mouse button on the name (SSID) of your wireless
router.
Click ‘OK’.
Click ‘Add’ in the right screen.
Click ‘Save’ at the top of the right screen.
Click ‘OK’ to save the settings.
Now remove the network cable between both the wireless router and signal
booster.
You have now completed the settings. You can now place the signal booster to
the location where the wireless signal was weak.
Hint: To make sure there is a wireless connection between both devices, you can try
to connect to both devices with the still connected computer. If correct, you can still
access both devices on their web pages. If this does not work, you can repeat the
steps shown in chapter 6.
7.0 Configuring the wireless network on your
computer
Now that the router has been secured you will need to configure the computer itself so
it can recognize your secured wireless network and will be able to make a connection.
Windows XP and Windows Vista are at this moment the most commonly used
operating systems. We will now explain how to set up a wireless connection using
these operating systems.
7.1 Configuring a wireless network using Windows XP
To realize a wireless connection using Windows XP you will need to follow the steps
below:
1.
2.
3.
4.
5.
Turn on your computer.
Click ‘Start’.
Click ‘Control Panel’.
Click ’Network Connections’.
You should now be able to see your wireless adapter. Right click this adapter.
19 | ENGLISH
6.
Click ‘View available wireless networks’. A list of available networks will now be
shown.
7. Select your own wireless network from this list.
8. After clicking ‘Connect’ your computer will warn you that this network is secured
and that a network key is required.
9. Enter the network key and click ‘Connect’.
10. If the key was entered correctly, Windows will state that the network has been
connected. You are now online.
7.2 Configuring a wireless network using Windows Vista
To realize a wireless connection using Windows Vista you will need to follow the steps
below:
1.
2.
3.
4.
5.
6.
7.
8.
9.
10.
Click ‘Start’.
Click ‘Control Panel’.
Click ‘Network and Internet’.
Click ‘Network and Sharing Centre’.
Click ‘Manage wireless networks’ in the left menu.
Click ‘Add’.
Select ‘Add a network that is in range of this computer’ in the next screen.
Select your own network.
Click ‘Connect’.
Your computer will display the following message: ‘Type the network security key
or passphrase for your network’. Enter your security key.
11. Click ‘Connect’. If you have correctly entered your security key, your computer
will be wirelessly connected and you are online.
8.0 Firewall & QoS settings
The EM4542 is equipped with an advanced firewall. This firewall allows you to open
ports, allowing certain programs to gain access to the Internet. You can open these
ports using the function ‘Port Forwarding’.
In some cases you will want to block access to the Internet. If, for instance, you have
children, you may want to block some explicit websites. You can do this using the
built-in URL filtering method.
Hint! For your own security the Firewall is enabled by default. We do however advise
you to also use a virus scanner and always keep it up to date.
8.1 Port Forwarding
1.
2.
Open your web browser (e.g. Internet Explorer, Netscape or Firefox).
Type ‘http://192.168.8.1’ in the address bar.
20 | ENGLISH
3.
4.
5.
6.
7.
8.
9.
10.
11.
12.
13.
14.
Press the enter key or click ‘Go to’.
You will now be asked for a ‘Username’ and a ‘Password’. Fill in ‘admin’ in the
‘Username’ field and ‘admin’ in the ‘Password’ field and press the ‘Enter’ key.
The login screen is shown.
Click ‘Setup Tool’.
Click ‘Advanced Setup’ in the left menu.
Click ‘Port Forwarding’ bellow ‘NAT/Routing’ in the left menu.
In the field ‘LAN IP-address you can fill in the IP-address of the computer for
which you want to open the specific ports.
Select the correct protocol in the ‘Protocol’ field.
Fill in the necessary ports at the ‘External port’ field. Fill in the start or begin port
in the first field. In the second field you can fill in the end port. In case you only
need to open one ports, you can fill in the same port number in both fields.
Fill in the same port number in the ’Internal Port’ field.
Fill in a name in the ‘Rule Name’ field. For Example: Fill in the name of the
application or game you want to open these ports for.
Click ‘Add’ to save the settings.
8.2 URL filtering
‘URL filtering’ allows you to block websites by name or parts of a name. A useful
feature if you want to protect your children from the contents of certain websites.
1.
2.
3.
4.
5.
6.
7.
8.
9.
10.
11.
12.
13.
Open your web browser (e.g. Internet Explorer, Netscape of Firefox).
Type ‘http://192.168.8.1’ in the address bar.
Press the enter key or click ‘Go to’.
You will now be asked for a ‘Username’ and a ‘Password’. Fill in ‘admin’ in the
‘Username’ field and ‘admin’ in the ‘Password’ field and press the ‘Enter’ key.
The login screen is shown.
Click ‘Setup Tool’.
Click ‘Advanced Setup’ in the left menu.
Click ‘Internet Access Control’.
Select at the ‘Input Type’ field ‘URL Filter Setup’.
You can fill in a name for this rule in the ‘Rule Name’ field.
In the ‘Source IP’ fields you can fill in a from-till range, or place a check mark at
‘ALL IP’ to deny access to the specific site(s) for all computers.
Fill in the address you want to block at ‘Filter URL’.
Click ‘Add’ to save the settings.
Hint: You can select a large variety of predefined programs such as MSN Messenger
and ICQ. You can block these programs as described in chapter 8.2
21 | ENGLISH
8.3 Setting up QoS
Thanks to QoS (Quality Of Service) you can make sure that a specific program or
computer gets priority above other programs. By using this feature, you are certain
that you will not get ‘lag’ in games of hitches during video playback, in case one of the
computers starts to download.
Setting up Qos differs per situation. Therefore we will explain how to setup Qos in a
general way.
1.
2.
3.
4.
Open your internet browser (e.g. Internet Explorer, Netscape or Firefox).
Type ‘http://192.168.8.1’ in the address bar.
Press the enter key or click ‘Go to’.
You will now be asked for a ‘Username’ and a ‘Password’. Fill in ‘admin’ in the
‘Username’ field and ‘admin’ in the ‘Password’ field and press the ‘Enter’ key.
5. The login screen is shown
6. Click ‘Setup Tool’.
7. Click ‘Advanced Setup’ in the left menu.
8. Click ‘Traffic’.
9. Click ‘QoS Setup’.
10. Place a mark at the option ‘Start’ at the right screen.
11. Fill in the speeds of your internet connection at ‘Download and Upload’. If you do
not know these speeds look at the yellow ‘Hint’ field for a brief explanation.
12. Click ‘Apply’ to activate these basic settings.
Hint: If you do not exactly know the speed of your internet connection please contact
your Internet Service Provider. Your provider will usually speak in term of MB. This
value is in Mbits. 1 MB=1024 Kbit. You can use both values in the webpage of the
router.
To set up a rule, use the following steps:
1.
2.
3.
4.
5.
6.
7.
8.
Choose ‘User Defined’ at the ‘QoS Setup’ field’.
Choose ‘Max Limit’ to set the maximum speed limit.
Choose ‘Min Guarantee’ to set a minimal guaranteed speed.
Fill in the values a the ‘Download’ en ‘Upload’ field.
Fill in the IP-address or IP-area in the ‘IP’ field for which this rule is applied.
Fill in the protocol in the ‘Protocol’ field. (If unknown, leave this field empty.)
Fill in the port numbers at the ‘External Port’ field. (If unknown, leave this field
empty.)
Click ‘Apply’ to add this rule.
Example: 10Mbit / 1Mbit DSL connection.
Problem:
When PC1 starts to download, the internet connection gets
slow or sluggish.
22 | ENGLISH
Suggestion:
Problem:
Suggestion:
Set PC1 to ‘Max Limit’ and set a maximum of 5000 Kbit download
and 512 Kbit upload.
During online play with PC, PS3 or Xbox360 the screen freezes or
strange artifacts appear on screen. This is so called ‘lag’, caused
by others computers which are using the internet connection
intensively.
Set PC, PS3 or Xbox360 with ‘Min.Guarantee’. Use the values
3000 Kbit download and 640Kbit upload.
Hint: The QoS rules are handled by the router from the top of the list to the bottom of
the list.
9.0 Frequently asked questions
Q:
A:
Q:
A:
Q:
A:
Q:
A:
I receive the message ‘The IP address of the network adapter is incorrect’. What
can I do?
This message appears when the computer did not receive a correct IP address
from the router. Make sure all cables are correctly connected. If necessary, reset
the EM4542 and try again. It is recommended that you configure the router using
a cabled connection (not wireless). After the cabled connection is working
properly you can setup the wireless connection as explained in this manual.
The manual mentions ‘URL filtering’. Is it possible to block certain sites even if I
do not know the complete name of the site(s)?
This is possible. Enter a part of the site name. For instance, you could enter
‘adult’ and save these settings. Any site which address contains the word ‘adult’
can then not be visited. This also goes for sites which use this word in a normal
fashion.
I have configured the router. Everything seems fine but I cannot gain access to
the Internet. My provider is UPC Chelllo.
Make sure you have selected the correct MAC address during configuration. If
you have chosen the wrong MAC address, there is not connection to the Internet.
I would like to know the MAC address of my network adapter for use with my
Chello connection. How can I obtain this address?
To obtain the MAC address of your network adapter you need to follow the steps
below:
Steps for Windows XP/2000 and Windows Vista:
1. Click ‘Start’.
2. Go to ‘Run’.
3. Enter ‘cmd’
4. Press the enter key or click ‘OK’.
23 | ENGLISH
5.
6.
7.
Enter ‘ipconfig /all’.
Press the enter key.
You will see a ‘physical address’. This is the MAC address of your network
adapter.
Steps for Windows98/ME:
1. Click ‘Start’.
2. Go to ‘Run’.
3. Enter ‘winipcfg’.
4. Press the enter key or click ‘OK’.
5. You will see an ‘adapter address’ which is the MAC address of your network
adapter.
Q:
A:
I have configured the router. Everything seems fine but I cannot gain access to
the Internet. My provider is UPC Chello , Ziggo or another DHCP provider.
Sometimes the modem does not grant the router access to the Internet. Follow
the instructions below to gain access to the Internet:
1.
2.
3.
4.
Q:
A:
I tried the solution as explained above, but the internet connection is still not
working. What can I do?
Follow the steps below:
1.
2.
3.
4.
5.
6.
7.
8.
9.
Q:
A:
Turn off both the router and modem.
Wait for 10 minutes.
Turn on the modem, wait until it has booted completely, then turn on the
router and let it also boot completely.
The connection should now be working properly.
Log in to the webpage of the router with ‘http://192.168.8.1’
You will now be asked for a ‘Username’ and a ‘Password’. Fill in ‘admin’ in
the ‘Username’ field and ‘admin’ in the ‘Password’ field and press the ‘Enter’
key.
You are now logged in to the main page of the EM4542.
Disconnect the coax cable from your modem.
Click ‘Status Summary’ under ‘Basic Setup’.
An IP-address of the modem will appear on screen. Often this address is
something like: ‘192.168.100.x’
Reconnect the coax cable to your modem, and wait until the Online/Internet
LED is lit.
Click ‘Status Summary’ once again.
An IP address, given to you by your provider, should now appear on your
screen. If so, you are online.
How do I set the DHCP server to another IP-address?
Use the following method to set the DHCP server to another IP-address:
24 | ENGLISH
1.
2.
3.
4.
5.
Q:
A:
Log in to the webpage of the router with ‘http://192.168.8.1’
Go to ‘Network’ under ‘Advanced Setup’ and then click ‘LAN/DHCP Server’.
For example alter the IP-address to ‘192.168.6.1’
Click ‘Apply & Restart’ to save the settings.
From now on, the EM4542 is accessible on the following address:
‘http://192.168.6.1’
I would like to know my local (computer) IP address. How do I obtain this
address?
To obtain the IP address, follow the steps below.
Steps for Windows XP/2000 and Windows Vista:
1. Click ‘Start’.
2. Click ‘Run’.
3. Enter ‘cmd’.
4. Press the enter key or click ‘OK’.
5. Enter ‘ipconfig’.
6. Press the enter key.
7. You will now see the local IP address.
Steps for Windows98/ME:
1. Click ‘Start’.
2. Go to ‘Run’.
3. Enter ‘winipcfg’.
4. Press the enter key or click ‘OK’.
5. You will now see the IP address or Automatic personal address.
Q:
A:
How do I reset the EM4542?
On the back of the router you will find a small reset hole. Push it down and hold it
down for about 10 seconds. The RUN LED will start to blink rapidly. Soon after,
this led will stop blinking after which it will turn off. The router has now been reset
to factory default and will be restarted.
10.0 Service and support
This users manual has been carefully written by Eminent’s technical experts.
If you have problems installing or using the product, please fill out the support form at
the website www.eminent-online.com/support
Declaration of Conformity
To ensure your safety and compliance of the product with the directives and laws
created by the European Commission you can obtain a copy of the Declaration of
Conformity concerning your product by sending an e-mail message to: [email protected]. You can also send a letter to:
Eminent Computer Supplies
P.O. Box 276
6160 AG Geleen
The Netherlands
Clearly state ‘Declaration of Conformity’ and the article code of the product of which
you would like to obtain a copy of the Declaration of Conformity.
EM4542 | 06-2010