1
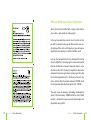
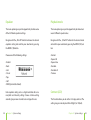
MP3 Chrome Edition
Instruction manual
Table of contents
5 Chapter 1 Intended use
28 Chapter 8 Voice mode („Voice”)
6 Symbols
28 Choosing a recorded file
28 Starting/pausing playback
7 Chapter 2 Safety information
9 Rechargeable battery information
1
1 MP3 and WMA music format information
30 Chapter 9 Record mode („Record”)
15 Chapter 3 Features
32
33
33
34
35
36
36
16 Chapter 4 The player
16 Controls and indicators
17 Connections and cable
18 Chapter 5 Basic operation
18 Turning ON/OFF
18 Choosing a mode
2
1 Volume regulation
22 Chapter 6 Connecting to a computer
22 General information
24 Windows XP, 2000, Vista
25 Chapter 7 Music mode („Music”)
25 Choosing a music file
25 Starting/pausing playback
26 A-B Repeat
31 Chapter 10 System settings
Equalizer
Playback mode
Contrast (LCD)
Backlight
Power (Auto-Power-Off )
Language
Exit 37 Chapter 11 Deleting files
39 Chapter 12 Memory information
40 Chapter 13 Handling
42 Chapter 14 Troubleshooting
43 Chapter 15 Maintenance and cleaning
43 Disposal
44 Chapter 16 Tips and information
46 Chapter 17 Technical data
47 Chapter 18 Delivery contents
Intended use
Dear customer,
this product is EMV-certified and fulfills all European and
National guideline requirements. A declaration of CE conformity has been established for this product. Certification
has been documented and entrusted to the manufacturer.
This instruction manual will explain and help you to understand how this MP3 player operates, as well as provide
you with information on maintenance, cleaning and safety
procedures. To maintain this products condition and ensure safe operation, we would like to request the owner to
take time to read and follow all instructions found in this
manual carefully! Retain this instruction manual for future
reference. Improvements on our equipment are continuously being made in both quality and performance, thus we
reserve the right to alter specifications and information
contained in this manual without notice.
Should setup and operation differ from this user manual,
or if any questions or suggestions arise, then please visit
our company website for the latest product information or
contract your local dealer fur further information.
All company names and product names are trademarks of
their respective owners. All rights reserved. We look forward
to you recommending us to others and wish you hours of
enjoyment with this MP3 player! Your X4-TECH team
1
This product is intended for music playback in either MP3
or WMA format. Choose between a memory capacity of
1024 MB or 2048 MB, depending on player version and
order number. This player also has a built-in microphone
for audio/voice recordings. Use the USB 2.0 connection to
copy music files to your MP3 player; during data transport
between two computers you will also be able to file other
data in memory as well. For further information on this
function, please refer to chapter 3.
Any unauthorized modification and/or change on the device is prohibited and will void the warranty and all warranty claims, including authorization (CE).
Never open the players casing. The labels found on the
device should never be removed or damaged in any way. Misuse or operating the device in any other way than described in this manual could lead or cause damage to the
device. Furthermore, there is the risk of short circuiting, fire,
electric shock, etc.
All company names and product names are trademarks of
their respective owners. All rights reserved.
Chapter 1 Intended use
Safety information
Symbols
An exclamation mark found within a triangle is
used to advise the user of important handling,
operation and maintenance instructions.
The symbol of a hand is used to draw special
attention to tips, helpful hints and operating information.
2
Neglecting or ignoring the instructions found in this manual can lead to damage occurred as a result of improper use,
which voids all warranty claims. We assume no liability for
consequential damage!
We assume no liability for personal or property damage
resulting from the failure to comply with the safety instructions, improper operation and handling. Under such circumstances, all claims under warranty will become void.
Please note
The following Safety and Hazard Warnings serve as a
general guideline for proper maintenance, safety and
operation. We recommend that you read the following
precautions listed below thoroughly.
› Complying with the essential requirements of the European health, safety and environmental protection legislation (CE), any unauthorized modification and/or change on
the device is prohibited and will void the warranty and all
warranty claims. For maintenance or repairs please contact
your dealer.
› This device is not a toy and is not intended or suitable for
Chapter 1 Intended use
Chapter 2 Safety information
children. Keep it away from children at all times to avoid
possible injury, as it contains small parts that could be
swallowed.
› This device should never come in contact with water or
moisture! Condensation can build up suddenly, when this
device is brought from a colder into a warmer area (e.g.
when transporting). Should this happen, allow the device
to warm up to room temperature first before using. Never
place containers filled with water, e.g. buckets, vases or
plants, near this device. Care should be taken that liquids
do not come in contact with the interior. This can not only
damage the device, but also become a fire hazard. › Never place any sources of fire on top of or near the device
(e.g. lighted candle).
› Operate this device in a moderate climate and never expose to extreme temperatures, such as high humidity.
to serious injury.
Rechargeable battery information
The X4-TECH SlimStyler uses a high quality built-in lithium
polymer rechargeable battery. The battery can be charged
via connection to a USB interface. Please wait until the battery has been completely charged. The battery indicator
will show a completely charged battery level on the display. Note: Battery charging time is up to 4 hours.
Please make sure the player is turned off, before connecting to a computer to charge. Otherwise the player will
start in USB mode.
› Do not bend or place any heavy objects on the cable.
› Never leave packaging material lying around unsupervised. For children it could become a hazardous toy and lead
Chapter 2 Safety information
Chapter 2 Safety information
MP3 and WMA music format information
Music, that we listen to either from a stereo system, kitchen
or car radio, is just actually an analog signal.
In the past one could buy records, music cassettes and tapes with a recorded analog signal. While records were usually damaged from dust and frequent use, tapes demagnetized themselves leading to a dull and muffled sound. Later on, the Compact Disc (CD) was developed for storing
music in digital form. An analog signal is measured at specific
intervals, transferred in numerical value and stored in a specific form on the CD. A CD player (or amplifier) evaluates the
computed value once again into an analog signal. An audio
CD can hold approximately 70 – 80 minutes of music. Its format is similar to that of a normal computer CD-ROM, which
has an equivalent data volume of approx. 650 – 700 MB.
The early stages of computer technology development,
where 1 MB user memory, 100 MB hard drives and a 28 kBit
modem, a standard thing were, usually also brought a lot
of problems along with it. 10
Chapter 2 Safety information
Chapter 2 Safety information
11
That’s why researchers started experimenting with new
ways of compressing an audio CDs amount of data. Contrary to the different compression programs
on computers, for instance WinZip, all initial information will be irretrievably lost when audio compressing.
Normally the difference between MP3 and audio
CD playback can not be heard; provided that a
„better” compression level is used. In this case, the playback quality offered in mobile
devices (e.g. the included MP3 player) or in cars is
satisfactory. The most common known compressed file format is “MP3”,
which offers a variety of quality levels (The principle is: the
better the format, the greater the amount of data).
Later on, other different compressed audio file formats
were developed; the second most important after „MP3” is
the „WMA” format. Meanwhile, there are both free of charge
and/or very expensive programs for almost all operating
12
Chapter 2 Safety information
systems available on the market that can be used with any
available audio CD (or other source), to help you create
compressed music files.
Please note:
A lot of audio CDs are copy protected to prevent
cloning. In some cases, complications could arise
when converting into a compressed music data
file.
Hi-fi CD players will normally not be affected by copy protected CDs; a lot of computer drives will although refuse
playback.
The industry is tending to gradually change back to CDs that
are not copy protected, due to the many problems that DVD
players, car radios and other portable playback units are having with this copy protection method.
This copy protection system was developed to prevent CD
cloning and circulation, which is why many record companies are trying to protect their CDs. Such trends threaten the
existence of artists, musicians and the music industry. The
development of the copy protection system has also led to
Chapter 2 Safety information
13
Features
an illegal circulation of music in the form of MP3 files via internet and online exchange.
What it comes down to, is that there are now quite a number
of various internet providers on the market offering compressed music files that can be legally purchased and downloaded. Being able to listen to different samples of music
and having the ability to download directly, one is only minutes away (granted you have DSL) from desired songs in
either MP3 or WMA format.
There are even special internet radio stations extra for recording, provided you have the proper software.
MP3 files (as well as WMA files) are nothing more
than a specific compression format designed to reduce the amount of space needed for saving and
storing compressed songs.
3
› Depending on player version/order number available
with 1024 or 2048 MB
› Operated with a lithium polymer rechargeable battery
› MP3 and WMA music file playback
› A maximum of 99 music files (MP3/WMA) per directory is
possible. Create even more directories via computer/USB.
› Various equalizer settings
› Voice recordings (permanent or voice/sound controlled
recordings)
› LC display (with a blue backlight)
› 3.5 mm audio output for earphones or for connecting to
an amplifier (line level)
› 2.0 USB connection (compatible to 1.1 USB) (power will be
supplied via USB when connected to a computer)
› No driver installation necessary for Windows XP, 2000 or
Vista
14
Chapter 2 Safety information
Chapter 3 Features
15
The player
Controls and indicators
4
Connections and cable
An USB cable and earphones are included in delivery. You
can also use an optional 3.5 mm stereo connection cable to
connect your MP3 player to a stereo system. The earphone
jack not only serves as an audio output connection, but
also as an earphone connection.
1. ON/OFF, PLAY/PAUSE/STOP button
2. Volume –
3. Volume +
4. 3.5 mm stereo jack for audio output
5. USB cable connection
6. Main ON/OFF switch
7. LC display
8. Next
9. Previous
10. Mode button
16
Chapter 4 The player
Chapter 4 The player
17
Basic operation
Turning ON/OFF
5
› Turn your MP3 player on by pressing the PLAY (1) button
on the left side of the LC display (for approx. 2 seconds) until the display has been activated and then release. Note:
Please make sure that the MAIN SWITCH (6) has been switched to „ON” first, before turning your player on.
› Turn the player off by pressing the PLAY/PAUSE/STOP (1)
button on the left side of the LC display (for approx. 2 seconds) until the display turns off.
tons to navigate within and view all files stored in the folder
/root.
Now you can:
› Begin file playback by pressing the MODE (10) button
down shortly. (You automatically enter into the music
mode.)
› Return to the main menu by pressing the MODE (10) button longer.
› Music
MP3/WMA file playback
› See chapter 7
Choosing a mode
18
The MP3 player has over 6 different modes to choose
from:
› Voice
Voice recording playback (for recordings previously recorded via the integrated microphone)
› See chapter 8
› Navigation
This mode lets you view, choose and organize files. In the
main menu, navigate to „Navigation” and press the MODE
(10) button to confirm. Use the VOL– (2) and VOL+ (3) but-
› Record
For recording with the integrated microphone
› See chapter 9
Chapter 5 Basic operation
Chapter 5 Basic operation
19
› Setting
System settings
› See chapter 10
› After the main menu has been displayed, navigate with
the PREVIOUS (9) and NEXT (8) buttons to choose the
desired mode.
› USB mode when connected to a computer
The USB mode is automatically activated when the MP3
player is connected, via USB cable, to a computer. The MP3
player will turn on automatically (power supply via USB).
› Confirm by pressing the MODE (10) button down shortly.
The buttons on the MP3 player will not function when
the player is in a USB mode. The MP3 player works like a
conventional USB memory flash drive or like an USB hard
drive.
Volume regulation
To choose either a „Music”, „Voice”, „Setting” or „Record”
mode please proceed as follows:
Keep the MODE (10) button pressed down long enough
(approx. 2 sec.) until the modes „Music”, „Voice”, „Setting”
and „Record” are displayed.
Use the VOL– (2) and VOL+ (3) buttons found on the left
hand side of the player to adjust the volume when listening
to music or when recording with the microphone.
There are a total of 32 different levels to choose from
(0 – 31).
In case the MP3 player has been turned off during
one of these operational modes, once turned on
again, this mode will automatically be restored. 20
Chapter 5 Basic operation
Chapter 5 Basic operation
21
6
Connecting to a computer
General information
The player’s memory is empty when delivered. This means
there are no existing music files found on the player that
can be played back.
In case you do not have any MP3 files, you can use any
available audio CD with one of the various programs
available on the market to create your on MP3 files. It’s also
possible to record radio or television programs with the appropriate programs; there are even special internet radio
stations that play in MP3 format. Each directory created on your MP3 player (or also
in the main directory) can hold only up to a maximum of 99 MP3/WMA files. The player will not play
any files exceeding this amount.
A MP3 player version with a memory capacity of for example 1024 MB, will allow you to create even more directories,
thus expanding for example the number of MP3 files that
you can have on your player (e.g. for each artist or for your
favorite songs and so on).
22
Chapter 6 Connecting to a computer
This limitation naturally does not apply to normal data
transmission (e.g. when pictures are to be transmitted between two computers)!
Before connecting your MP3 player to a computer,
please make sure that the USB cable is connected
to your player first, before connecting it to your
computer. Never disconnect an MP3 player from
a computer during data transmission! Improper
disconnection or operation can result in damaged
or lost files. We assume no liability for any damage
resulting from the failure to comply with the instructions (as described above).
After data transmission has taken place, wait for a few seconds before disconnecting the device. Disconnect your
player by clicking (for Windows) on the symbol „ ” in the
taskbar of your operating system. After clicking on „Safely
Remove Hardware” („Close” or similar), now you can detach
the USB cable from the computer port first, before detaching it from your MP3 player. Chapter 6 Connecting to a computer
23
Music mode („Music“)
Windows XP, 2000, Vista
These operating systems require no driver installation. The driver is already a part of these systems.
› Turn your computer on and wait until the boot sequence
has been fully completed.
› Connect your MP3 player to a USB port on your computer.
Windows will recognize the new hardware automatically
and the respective drivers will be installed.
› Once installed, you will find a new driver letter in My Computer/ Explorer. This extra driver can now be used for your
MP3 player (for copying and deleting files, creating new
folders, etc.).
7
The mode allows you to play back music files in an MP3 and
WMA format.
Transfer files to your MP3 player first, otherwise
an error message will appear on display after this
mode has been selected and no files can be found
on the player.
Choosing a music file
Press the „|| or }}“button to choose either the previous
or next music file.
Starting/pausing playback
› Press the PLAY (1) button down shortly on the left side of
the LC display to start playback.
24
Chapter 6 Connecting to a computer
Chapter 7 Music mode („Music“)
25
› Pressing the PLAY (1) button down shortly again will pause
playback. Press this button again to commence playback.
If you want to listen to a music file from the beginning again, pause playback, press the „|| “ button
and start playback as described above. of the range to be repeated. The endpoint has now been
established. The symbol „B” for the „A–B” repeat function
can be seen on the display.
The „A–B” symbol can be seen on the display.
The MP3 player will now play back the selected range.
A-B Repeat
During playback you have the opportunity to mark a range
in a music file that is to be repeated more than more. „A”
will mark the beginning and „B” the end of the range to be
repeated. Choose the title to be repeated and press the
PLAY (1) button to start playback.
› During playback press the MODE (10) button down shortly to mark the beginning of the range to be repeated. The
symbol „A” for the „A–B” repeat function can be seen on the
display.
› Press the MODE (10) button down again to mark the end
26
Chapter 7 Music mode („Music“)
Chapter 7 Music mode („Music“)
27
Voice mode („Voice“)
8
The voice mode lets you listen to voice recordings recorded
with the built-in microphone.
The MP3 player contains no recordings when delivered. If you want to test this mode for the first
time, make a few voice recordings first, as mentioned in chapter 9.
› Pressing the PLAY (1) button down shortly once more
pauses playback. Press this button again to resume playback.
› If you want to hear the recording from the beginning,
pause playback, press the „|| “ button and start playback
as described above. Choosing a recorded file
Navigate with the „|| or }}“ button to choose either the
previous or next recording. Starting/pausing playback
› Press the PLAY (1) button shortly once on the left side of
the LC display. The selected recording will then begin.
28
Chapter 8 Voice mode („Voice“)
Chapter 8 Voice mode („Voice“)
29
9
Record mode („Record“)
After entering the voice recording mode in the main menu,
you can start recording with the built-in microphone. Recordings with the built-in microphone can be started and
ended by pressing a button.
› Press the PLAY (1) button to start recording. › Press the PLAY (1) button down shortly to pause a recording. The pause symbol can be seen on the display. Press
the PLAY (1) button down once again to commence recording at any time.
› Press the PLAY (1) button down longer to stop and store
a recording as a WAV file on the player. Repeat this process
for further voice recordings.
The MP3 player stores recorded files as WAV files that can
be found in the „Voice” folder.
System settings
10
This mode gives you the opportunity to adjust or change
one the following settings listed below: Navigate with the „|| or }}“ button to the submenu „Setting” and press the MODE (10) button to confirm and enter
this submenu.
Now you have the opportunity to adjust or change one of
the following settings:
1. Equalizer
2. Playback
3. Contrast
4. Backlight
5. Power
6. Language
7. Exit
Navigate with the „|| or }}“ button to choose an option. Confirm your selection by pressing the MODE (10) button
down shortly.
30
Chapter 9 Record mode („Record“)
Chapter 10 System settings
31
Equalizer
Playback mode
This menu option gives you the opportunity to choose one
of the 8 different equalizer settings.
This menu option gives you the opportunity to choose between 6 different repeat modes.
Navigate with the „|| or }}“ button to choose the desired
equalizer setting and confirm your selection by pressing
the MODE (10) button.
Navigate with the „|| or }}“ button to the desired mode
and confirm your selection by pressing the MODE (10) button.
Choose one of the following settings:
› Normal
› Repeat all
› Repeat one
› Random
› Random all
› Preview
› Natural
› Rock
› Jazz
› Classic
› Pop
› Soft
› DBB (Dynamic Bass Boost)
Each equalizer setting acts as a digital substitute for a manual pitch and intensity setting. Choose a timbre setting
according to your own desired taste and type of music.
32
Chapter 10 System settings
Contrast (LCD)
This function allows you to set the LC display contrast. The
setting range can be adjusted from 0 (light) to 10 (dark).
Chapter 10 System settings
33
› Press the „|| und }}“ button to set the contrast.
}}“ button to set the backlight time.
› Press the MODE (10) button down shortly to confirm the
selected contrast setting. After confirmation the player automatically returns to the „System settings” mode.
› Press the MODE (10) button down shortly to confirm the
selected backlight setting. After confirmation the player
automatically returns to the „System settings” mode.
To save power, choose the shortest time possible
that the backlight will be activated.
Backlight
The LC display backlight will automatically light up as soon
as a button has been activated. The time that the backlight stays active, before it automatically goes off again, can be adjusted between 0 – 45 seconds.
Adjusting the backlight setting to „0” will shut the
backlight off completely and will ensure a longer
battery lifespan.
Power (Auto-Power-Off)
The MP3 player will shut itself off automatically after not
being in use for a certain amount of time, e.g. paused or
stopped playback/recording, to save power. Adjust the
time to either 2, 10 or 30 minutes.
If the „Disable” setting has been selected, the AutoPower-Off option will be deactivated. The MP3
player will then continually stay on until it is either
manually turned off or the batteries run low. › After entering the „Backlight” mode you can use the „|| or
34
Chapter 10 System settings
Chapter 10 System settings
35
Deleting files
Language
Choose the preferred menu language in this setting.
Many other system settings can be reached directly from
the main menu, which are not necessarily found as a submenu under the „System settings” mode.
Exit
To exit the „System settings” mode, navigate to „Exit” and
press the MODE (10) button to confirm and return to the
main menu.
11
Using your computers USB mode is the easiest way to organize, manage and delete all of your files. You also have the
alternative to delete files directly from your MP3 player. In
the main menu, navigate to „Delete” and press the MODE
(10) button to confirm and enter this menu. Now you can
select one of the following submenus:
Music files
› Deletes music files that have been transferred to the MP3
player via computer.
Voice files
› Deletes voice recordings stored as WAV files that have
been recorded with the integrated microphone.
Exit
› Exits the submenu.
Select one of the above options or exit this submenu by
navigating to „Exit” and confirming with the MODE (10)
button.
If one of the above options has been chosen, then each file
found on the player will be shown individually.
36
Chapter 10 System settings
Chapter 11 Deleting files
37
12
Memory information
1. Choose the file that is to be deleted.
2. Use the volume buttons (Vol + (3) and Vol – (2)) to choose
between „Yes” and „No”.
The menu option „About” informs you about the type of
firmware version that your MP3 player has. Should you
have any questions or need to contact a service hotline
number, you will be asked exactly what type of firmware
your MP3 player has. In addition to this, it will also show
you the player’s internal memory capacity and the capacity
which is not yet occupied.
e.g. Memory information
Ver: 2.611 › Firmware version
Int: 256 MB › Flash memory
Free: 33 MB › Available, unoccupied memory capacity
38
Chapter 11 Deleting files
Chapter 12 Memory information
39
Handling
13
Follow all operating instructions and safety warnings listed in the instruction manual.
This product is not a toy and should be kept away from
children.
Avoid the following adverse environmental conditions
when handling, operating or transporting:
› Moisture or high humidity
› Extreme low temperatures (<–10°C) or heat (>50°C), direct
sunlight
› Dust, inflammable gases, vapors and solvents
of an accident, insurance coverage might be denied and
you could be partially blamed for the accident respectively!
If your car radio has an audio input connection (Line level), then you can also connect and play this MP3 player
through your radio. Appropriate cables are available at
your local dealer.
Please refer to your car radios user manual for more information.
For safety reasons as mentioned above, only operate (turning the power on, starting playback, etc.)
this product while your car is parked!
› Strong vibrations, impacts, blows
Your full concentration and attention is required while
driving in traffic (as well as in many other surroundings). Using or listening to your MP3 player with earphones/
headphones can divert one’s attention and be just as distracting, as using your cell phone while driving. In the case
40
Chapter 13 Handling
Chapter 13 Handling
41
Troubleshooting
14
With this MP3 player you have purchased a product that
meets today’s standard of technology.
This is a maintenance-free product that should never be
disassembled.
Nevertheless, sometimes problems or malfunctions may
occur. That is why we would like to help you with the following possible solutions should any problems occur.
This product should only be repaired by qualified, authorized personnel or by an authorized dealer, otherwise any
damage caused by improper use or unauthorized modification will void the warranty/warranty claims and CE authorization.
Always pay special attention to the safety information! 42
15
Maintenance and cleaning
Problem
Solution
No display/Player
can not be turned
on.
Connect the player to a computer;
the battery probably needs to be
charged.
No sound can be
heard.
Make sure that the earphones are
connected properly.
Has the volume been regulated
properly?
MP3/WMA file playback not possible;
stuttered playback
It may have to do with an unusual
compressed format. In case you
have created files yourself, please
use some other type of software to
create MP3 or WMA files.
Chapter 14 Troubleshooting
Use a soft, dry, clean and fuzz-free cloth to clean. Never use
any cleaning agents as these could damage any markings,
labels or the exterior.
Dust can be easily removed with either a soft, clean brush
or a vacuum cleaner.
Disposal
After the lifespan of a device has expired it should
be collected and disposed of at appropriate sites. Check your local region for legal requirements and
guidelines as to a proper disposal of electronic
equipment in your area.
Chapter 15 Maintenance and cleaning
43
16
Tips and information
Each directory on your MP3 player can hold only up to a
maximum of 99 MP3/WMA files. Your MP3 player will not
play any files exceeding this amount. A MP3 player version
with more memory capacity (e.g. the 1024 MB version) will
allow you to create even more directories, thus expanding
the number of MP3/WMA files that you can have on your
player.
leads to poor quality and a higher to unnecessary memory
consumption.
Open up a directory on your computer for all of your favorite MP3/WMA files. Connecting your MP3 player to your
computers USB port will ensure an easy and quick transfer
of your MP3 files.
Any new known problems, drivers, software or firmware
will be released to the public when available and can be
seen under www.x4-tech.de.
Please do not carry out a firmware update if your player
is operating and functioning properly. An update will not
change the player’s technical functions, but (for example)
might only improve the menu.
There are numerous different programs available („Windows Media Player 10”, activated „Win amp” versions, „Freeware” programs) that help you to create MP3 or WMA files
from an audio CD or other audio sources. As already mentioned in chapter 6, complications could arise with audio
CDs that are copy protected. The bit rate should be set at
approximately 128, 160 or 192 kbit/s. A lower byte rate
44
Chapter 16 Tips and information
Chapter 16 Tips and information
45
Technical data
› Memory: 1024 MB or 2048 MB
17
Delivery contents
› MP3 player
› Supported file formats: MP3/WMA
› Stereo earphones with a neck strap
› Voice recordings: approx. 64 hours (1024 MB)
approx. 128 hours (2048 MB)
› USB connection cable
› Display: 96 x 26 pixels with a blue backlight
› Instruction manual
› WMA data rate: 8 kbps – 192 kbps
› Service data sheet
18
› Installation CD
› MP3 data rate: 8 kbps – 448 kbps
› Lithium polymer rechargeable battery
› USB 2.0
› Internal flash memory: 100.000 x rewriteable
›Operating systems: MS Windows XP/2000/VISTA, MAC,
SUSE, LINUX (starting with 10.2)
46
Chapter 17 Technical data
Service
Please contact us at the following service hotline should
any questions arise:
Hotline:
+49 (0) 53 02/8 06-450
Adresse:
x-services.eu gmbh
Service department X4-TECH
Brackestraße 3
38159 Vechelde
Germany
Chapter 18 Delivery contents
47
Version 2.0 –1/2008
48
www.x4-tech.de