1
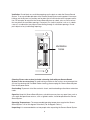
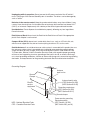
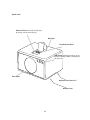
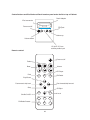
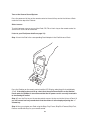
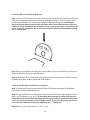
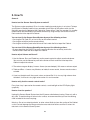
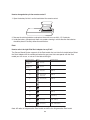
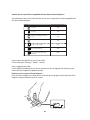
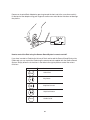
Geneva Sound System
(Model L & XL)
Notice
This User Manual is available in larger font size for easier reading.
You can download it from www.genevalab.com/support
Ce manuel d’utilisateur est disponible en français. Vous pouvez
le télécharger de www.genevalab.com/support
Este manual del usuario está disponible en español.
Usted puede descargarlo de www.genevalab.com/support
WARNING
TO PREVENT FIRE OR SHOCK HAZARD. DO NOT EXPOSE THIS APPLIANCE TO RAIN
OR MOISTURE.
Warning: To reduce the risk of electric shock, do not remove the cover (or back), no user
serviceable parts inside. Refer servicing to qualified service personnel.
This lightning flash with arrowhead symbol, within an equilateral triangle, is intended to
alert the user to the presence of uninsulated “dangerous voltage” within the product’s enclosure
that may be of sufficient magnitude to constitute a risk of electric shock.
The exclamation point within an equilateral triangle is intended to alert the user to the
presence of important operating and maintenance (servicing) instructions in the literature
accompanying the appliance.
IMPORTANT SAFETY INSTRUCTIONS
1) Read these instructions.
2) Keep these instructions.
3) Heed all warnings.
4) Follow all instructions.
5) Do not use this apparatus near water.
6) Clean only with dry cloth.
7) Do not block any ventilation openings. Install in accordance with the manufacturer’s
instructions.
8) Do not install near any heat sources such as radiators, heat registers, stoves, or other
apparatus (including amplifiers) that produce heat.
9) Do not defeat the safety purpose of the polarized or grounding-type plug. A polarized plug
has two blades with one wider than the other. A grounding type plug has two blades and a third
grounding prong. The wide blade or the third prong are provided for your safety. If the provided
plug does not fit into your outlet, consult an electrician for replacement of the obsolete outlet.
10) Protect the power cord from being walked on or pinched particularly at plugs,
convenience receptacles, and the point where they exit from the apparatus.
3
11) Only use attachments/accessories specified by the manufacturer.
12) Use only with the cart, stand, tripod, bracket, or table specified by the manufacturer, or
sold with the apparatus. When a cart is used, use caution when moving the cart/apparatus
combination to avoid injury from tip-over.
13) Unplug this apparatus during lightning storms or when unused for long periods of time.
14) Refer all servicing to qualified service personnel. Servicing is required when the apparatus has been damaged in any way, such as power-supply cord or plug is damaged, liquid has
been spilled or objects have fallen into the apparatus, the apparatus has been exposed to rain
or moisture, does not operate normally, or has been dropped.
15) This appliance shall not be exposed to dripping or splashing water and that no object
filled with liquids such as vases shall be placed on apparatus.
Caution: use of controls or adjustments or performance of procedures other than herein may
result in hazardous radiation exposure or other unsafe operation.
Compact Disk Drive: The compact disk (CD) drive contains a laser. The laser radiates visible
and invisible laser radiation. Do not open optical housing. Avoid direct exposure to the beam.
The compact disc player should not be adjusted or repaired by anyone except properly qualified service personnel.
Class 1 laser product: This CD player is classified as a CLASS 1 LASER PRODUCT according
to EN 60825- 1:1994+A1+A2, IEC 60825-1:1993+A1+A2. The CLASS 1 LASER PRODUCT label
is located on the bottom plate of the product. This product complies with 21 CFR Part 1040.10.
Technical details about the incorporated laser diode: Wavelength: 789 nm, max accessible
radiant power (during service): 0.491 µW, max total power: 189 µW.
Geneva Lab Corporation
10 First Ave East, PO Box 6
Mobridge, SD 57601, U.S.A.
http://genevalab.com
CLASS 1 LASER
PRODUCT
SERIAL NUMBER
CAUTION
Visible and invisible
laser radiation when open.
Avoid exposure to beam.
123456789
Manufactured: December 2005
Complies with 21 CFR Part 1040.10
4
1
POWER
STANDBY ON
50- 60 Hz
RIGHT
VENTILATION
CAUTION: Do not put anything over the ventilation holes.
Minimum distance to the floor is
1 inch ( 25 mm ). Otherwise the device might not perform according to the specifications.
AC 100- 240 V~
Ventilation
holes
75 OHM
LEFT
LINE IN
FM ANTENNA IN
AC IN
125W
POWER
FULL OFF
MAIN POWER
0
Ventilation: Do not block any ventilation openings on the back or under the Geneva Sound
System. To ensure reliable operation of the Geneva Sound System and to protect it from overheating, put the System in a position and location that will not interfere with its proper ventilation. For example, do not place the Geneva Sound System on a bed, sofa, or similar surface
that may block the ventilation openings. Do not put it in a built-in position, such as in a bookcase or in a cabinet that may keep air from flowing through its ventilation openings. Do not
push objects of any kind through openings.
Cleaning: Please note we have included a cleaning cloth with your Geneva Sound
System, in the accessory bag. To avoid making scratches to the surface, we recommend that
you use the cleaning cloth included. Before cleaning, please unplug this Geneva Sound System
from the AC power outlet.
Overloading: To prevent risk of fire or electric shock, avoid overloading wall outlets or extension
cords.
Open fire: Keep this Geneva Sound System a safe distance away from any open flame such as
a lit candle. No open flame sources, such as lighted candles, should be placed on the Geneva
Sound System.
Operating Temperatures: The recommended operating temperature range for the Geneva
Sound System is 41 to 104 degrees Fahrenheit (5 to 40 degrees Celsius).
Unpacking: It is recommended to use two people when unpacking the Geneva Sound System.
5
The Geneva Sound System model L weighs more than 30 Pounds and model XL more than
60 Pounds.
Front grille panel: Never remove front grille panel because the panel is non detachable and will
void the Limited Warranty.
Sitting or Leaning on Geneva Sound System: do not lean against the Geneva Sound System
and do not sit on it under any circumstances.
Avoid Hearing Damage: Playing very loud music for an extended period of time can result in
permanent hearing loss.
Operating Position: Use only with the attached rubber feet or the special floor stand that has
been designed for this product and sold by Geneva Lab Corporation.
Label location: The product labels and safety related markings are located on the Bottom
Panel of the Geneva Sound System.
Accessing the Bottom Panel: Be careful if you turn the Geneva Sound System over to access
the Bottom Panel on the bottom of the Geneva Sound System. Never rest the speaker on its
front side (the side with the metal grille panel) – the weight of the speaker will deform the grille.
For easier access to this Bottom Panel, place the Geneva Sound System on one of its short
sides. Ensure that the System is placed on a soft material (carpet or textile) that does not
scratch the surface.
6
Unplugging while in operation: Do not remove the AC power cord out of the AC outlet if
music is playing or if the Geneva Sound System is turned on. The drivers can be damaged by
such an action.
Batteries in the remote control: Keep the remote control battery away from children. It may
cause a fire or chemical burn if mishandled. Do not recharge, disassemble, heat above 212ºF
(100ºC), or incinerate. Replace only with a battery of the correct type and model number.
Used batteries: Please dispose of used batteries properly, following any local regulations.
Do not incinerate.
iPod Universal Dock: Never insert the iPod into the iPod Universal Dock if the appropriate
plastic Dock Adapter is not inserted.
Compact Disks (CD’s): do no insert smaller disks than 8 cm, such as a CD mini disk, etc.,
which are not supported. Also, do not insert anything else than a CD, such as coins.
Outside Antenna: If an outside antenna or cable system is connected to this product, be sure
the antenna or cable system is grounded so as to provide some protection against voltage
surges and built-up static charges. Article 810 of the National Electric Code, ANSI/NFP No.
70 information, Section 54 of the Canadian Electrical Code, with regard to proper grounding
of the mast and supporting structure, grounding of the lead-in wire to an antenna discharge
unit, size of grounding conductors, location of antenna/discharge unit, connection to grounding
electrodes, and requirements for the grounding electrode. See illustration below for details:
Grounding Diagram
Antenna
lead-in wire
Ground
Clamps
Antenna lead-in wire
(CEC Section 54-200)
(NEC Section 810-20)
Electric
service
equipment
Grounding conductors
(CEC Section 54-200)
(NEC Section 810-21)
Ground clamps
Power service grounding
Electrode system
(CEC Section 10-700)
(NEC Article 250, part H)
NEC - National Electrical Code
CEC - Canadian Electrical Code
7
Power Lines: An outside antenna should not be located in the vicinity of overhead power lines
or other electric light or power circuits, or where it can fall into such circuits.
Information about products that generate electrical noise: This equipment has been tested
and found to comply with the limits for a Class B digital device, pursuant to Part 15 of the FCC
rules. This Class B digital apparatus complies with Canadian ICES-003.
These limits are designed to provide reasonable protection against harmful interference in
a residential installation. This equipment generates, uses, and can radiate radio frequency
energy and, if not installed and used in accordance with the instructions, may cause harmful
interference to radio communications. However, this is no guarantee that interference will not
occur in a particular installation. If this equipment does cause harmful interference to radio or
television reception, which can be determined by turning the equipment off and on, you are
encouraged to try to correct the interference by one or more of the following measures:
- If using the external antenna provided with the equipment, reorient or relocate this external
antenna.
- Increase the separation between the equipment and other receiver.
- Connect the equipment to an outlet on a different circuit than the one to which the other
receiver is connected.
- Consult Geneva Lab Corporation or an experienced radio/TV technician for help.
Modification: Unauthorized modification of the receiver or radio remote control could void the
user’s authority to operate this equipment.
Note to CATV system installer: This reminder is provided to call the CATV system installer’s
attention to Article 820-40 of the NEC (of USA) that provides guidelines for proper grounding.
In particular, it specifies that the cable ground shall be connected to the grounding system of
the building, as close to the point of cable entry as is practical.
Removal of the Bottom Panel: by any unauthorized person also voids the Limited Warranty.
8
Contents
Chapter 1
10
10
14
16
17
17
Getting Started
Unpacking and setting up
Quick Start
Listen to your iPod
Listen to a CD
Listen to the FM radio
25 How to erase or overwrite a preset?
25 How to connect the External FM
Radio Antenna?
Line in:
26 How to connect a Computer, iPod
Shuffle or another MP3 player to
the Geneva Sound System using
the 1/8 inch (3.5 mm) input?
26 How to connect a Computer, VCR,
DVD player or a game console to
the Geneva Sound System using
the “Line in” input?
Chapter 2
18 How To?
General:
18 How to turn the Geneva Sound
System on and off?
18 How can to adjust Volume and
Sound?
18 How to verify that the remote
control works?
18 How to clean the speaker?
19 How to change battery in the
remote control?
iPod:
19 How to select the right iPod Dock
adapter for my iPod?
20 How to check if my iPod is
compatible with the Geneva Sound
System?
20 How to insert or remove a Dock
Adapter?
21 How to control the iPod using the
Geneva Sound System’s remote
control?
CD:
22 How to control the CD player using
the remote control?
23 How to play 3.1 inch (8 cm) CDs?
23 How to play CD’s with MP3 and
other formats?
23 How to play MP3 CD-R/W with
several Albums?
FM Radio:
24 How to control the FM Radio using
the remote control?
24 How to select a FM radio station?
25 How to store your favorite FM radio
station in a preset?
25 How to play a FM radio station that
is stored in the presets?
Chapter 3
27 Troubleshooting, Service and
Support
27 Troubleshooting and Support
27 Service and Repair
Chapter 4
28 Technology Partners &
Made for iPod
28 Made for iPod
28 Technology Partners
Chapter 5
29 Technical Specifications
9
1. Getting Started
Unpacking and setting up
Your Geneva Sound System is designed to be easy to operate and if you follow the steps below
you can quickly set it up and start enjoying it.
Step 1: Unpack all components from the shipping box. Please be aware that the Geneva Sound
System model L and XL are heavy, so it is better to have two people lift it out of the box.
Please save the original packaging material in case you ever need to return the System since the
Limited Warranty does not cover shipping damages. Geneva Lab Corporation’s 30-day return
policy only covers products returned in the original packaging in as new condition.
Cabinet - model L
Cabinet - model XL
10
Cabinet
The shipping box should contain the following System components:
X7
iPod dock adapters
AC power cord
Remote control
Line in cable
External antenna
MP3 player cable
Step 2: Insert the batteries into the remote control (see page 19). There are batteries included in
the package.
Step 3: place the Geneva Sound System on one of its short sides. Ensure that the System is
placed on a soft material (carpet or textile) that does not scratch the surface. Insert the AC
power cable into the AC connector on the Bottom Panel (see picture below) and then connect it
to an AC outlet.
11
Line in
Jacks
LINE IN
FM radio
antenna plug
Main power
switch
AC Connector
FM ANTENNA IN
AC IN
AC 100- 240 V ~ 50- 60 Hz
LEFT
MAIN POWER
125W
POWER
FULL OFF
75 OHM
POWER
STANDBY ON
0
1
RIGHT
VENTILATION
CAUTION: Do not put anything over the ventilation holes.
Minimum distance to the floor is
1 inch ( 25 mm ). Otherwise the device might not perform according to the specifications.
Ventilation holes
Please Note: if you have purchased a Floor Stand made for the Geneva Sound System,
assemble the Stand, remove the four rubber feet from the main Cabinet and attach the Stand
using the screws provided with the Stand. For detailed assembly, see Manual provided in the
Stand package.
Step 4: Turn the main power switch on.
Step 5: Return the system to an up-right position, so it stands on its four rubber feet.
Step 6: If you intend to use the System with an iPod, open the lid on top of the cabinet.
To open, please press carefully on the rear part of the lid.
12
Select the right iPod Dock Adapters that fits with the iPod model you intend to dock by following
the table on page 19, or try the enclosed Dock Adapters until you find the one that fits tightly
with your iPod. Attach the Dock Adapter to the iPod Universal Dock by pressing lightly on the
top of the Dock Adapter (see picture below) and it will snap in.
13
Quick start:
��������������������������������������
�������������������������������
���������
�������������������
�������������������������������������
�������������������������������������
��������������
������������
�������������������������
�������������
14
Control buttons and iPod Universal Dock found on panel under the lid on top of Cabinet:
Dock Adaptor
iPod connector
Power on/off
CD Eject
Volume up
Volume down
1/8 inch / 3.5 mm
auxiliary audio input
Remote control:
Power on/off
Treble
Bass
BA SS
TREBLE
VOLUME
Volume
CD Player
iPod
iPod
CD
FM
FM Radio
Play/Pause
Fast reverse/ skip back
Fast forward/skip forward
Stop
CD Eject
SHUFFLE
LINE IN
Shuffle On/Off
FM Radio Presets
P
R
E
S
E
T
15
Line in
Turn on the Geneva Sound System:
Press the power on/off key on the remote control or the on/off key next to the Universal Dock
under the lid on top of the Cabinet.
Select source:
To switch between sources, press either iPod, CD, FM or Line In key on the remote control to
select which source to be controlled.
Listen to your iPod (more details on page 19):
Step 1. Insert the iPod in the corresponding Dock Adapter in the iPod Universal Dock.
Press the iPod key on the remote control and the LED Display under the grille should display
“iPod”. If the display does not lit up, check that the main Power Switch on the Bottom
Panel under the Cabinet is turned on and that the AC power cord is correctly inserted in
to functioning AC outlet.
Step 2. Press the Play key on the remote control or press the key next to the Universal Dock. If
you still cannot hear any sound check that the volume is turned up by adjusting the “+”
volume key.
Step 3. You can navigate your iPod using the Stop, Play/Pause, Skip/Fast Forward, Skip/Fast,
Reverse and Shuffle keys on your remote control.
16
Listen to a CD (more details on page 22):
Step 1. Insert the CD into the slot – make sure the printed side of the CD is facing the front of the
Cabinet (see temporary label next to CD slot for loading instructions). The LED Display under
the grille should display “CD” and the CD should start playing automatically. If the display
does not light up then check that the main Power Switch on the Bottom Panel under the
Cabinet is turned on and that the AC power cord is correctly inserted in to functioning AC
outlet. If you still cannot hear any sound, check that the volume is turned up by adjusting
the “+” volume key.
CD
ti
tle
Step 2. You can navigate the CD player by using the Stop, Play/Pause, Skip/Fast Forward and
Skip/Fast Reverse keys on your remote control.
Step 3. To remove the CD, either press the Eject key on the remote control or the Eject key next
to the Universal Dock under the lid on top of the Cabinet.
Listen to the FM radio (more details on page 24):
Step 1. Connect the External Antenna to the External FM antenna connector on the Bottom
Panel under the Geneva Sound System.
Step 2. Press the FM button on the remote control and the LED Display under the grille should
display an FM frequency, e.g. “103.2”. If the display does not light up, check that the main
Power Switch on the Bottom Panel under the Cabinet is turned on and that the AC power
cord is correctly inserted into a functioning AC outlet. If you still cannot hear any sound,
check that the volume is turned up by adjusting the “+” volume key.
Step 3. Select an FM station with the << and >> keys.
17
2. How To
General:
How to turn the Geneva Sound System on and off?
The System can be completely Off, or it can be standing by ready to play in an instant. To keep
your System in Standby mode, always remember to turn the main AC power switch (on the
electronic panel on the bottom of the Cabinet) to “Power full on”. Now, the speaker is in standby
mode and can be controlled by the remote control or by using the keys next to the Universal
Dock under the lid on top of the Cabinet.
You can turn On the Geneva Sound System by any of the following actions:
- Pressing the FM, iPod, CD, or Line In keys on the remote control
- Pressing the on/off key on the remote control
- Pressing the on/off key next to the Universal Dock under the lid on top of the Cabinet.
You can turn Off the Geneva Sound System by any of the following actions:
- By pressing either the ON/OFF key on the remote control or the on/off key next to the
Universal Dock under the lid on top of the Cabinet.
How to adjust Volume and Sound?
1. Use the Volume, Bass and Treble keys on the remote control to adjust sound and volume.
You can also use the Volume key next to the Universal Dock under the lid on top of the
Cabinet to adjust the volume.
2. The volume range on display: 0 means silence (no sound output), 100 means maximum output
3. Treble and Bass: -6 means very little bass or treble, 0 means neutral, 6 means maximum bass
or treble.
4. If you turn the device off, the current values are stored. So if it is at a very high volume when
turned off, it will be at a very high volume when it is next turned on.
How to verify that the remote control works?
Every time a key is pressed on the remote control, a small red light on the LED Display lights
up quickly.
How to clean the speaker?
Unplug this Geneva Sound System from the AC power outlet before cleaning. Clean only with a
dry cloth. To avoid making scratches to the surface, we recommend that you use the cleaning
cloth included in the accessory bag.
Warning – Do not use cleaning alcohol, or other solvent fluids to clean the surface of the Cabinet
as this can both damage the lacquer and also cause electrical failures and fire if it enters the
electronics in the Geneva Sound System!
18
How to change battery in the remote control?
1. Open the battery lid that is on the backside of the remote control
+
+
-
+-
+
-
2. Remove the existing batteries and replace them with two new AAA, 1.5 V batteries.
3. Inside the battery compartment there are symbols showing in which direction the batteries
should be placed. Carefully follow these directions.
iPod:
How to select the right iPod Dock adapter for my iPod?
The Geneva Sound System supports all the iPod models that are listed in the table below. Select
the Dock Adapter with the number printed on the grey area that corresponds with the iPod
model you wish to use, as set out in the table to the right:
Dock Adapter number
Made for
Hard Disk Capacity
Included with the
purchase of your
iPod video
iPod video
Included with the
purchase of your
iPod nano
iPod nano
7
iPod with color
display (fat)
60GB only
6
iPod with color
display (thin)
20GB only
7
iPod photo (fat)
60GB only
6
iPod photo (thin)
30GB only
5
4G iPod (fat)
40GB only
4
4G iPod (thin)
20GB only
3
iPod mini
4GB, 6GB only
2
3G iPod (fat)
30GB, 40GB only
1
3G iPod (thin)
10GB, 15GB, 20GB only
Note: 3G refers to 3rd generation iPod models and 4G to the 4th generation iPod model
19
How to check if my iPod is compatible with the Geneva Sound System?
The table below sets out the iPod software version that is required for it to be compatible with
the Geneva Sound System:
Made for
Required iPod Software Version
iPod video
1.0
iPod nano
1.0
iPod with color display (20 GB, 60GB
only)
1.0
iPod photo (20GB, 30GB only)
1.0
4G iPod (20 GB, 40GB only)
3.0
iPod mini (4GB, 6GB only)
1.2
3G iPod (10GB, 15GB, 20GB, 30GB
40GB only)
2.3
How to check the software version of your iPod?
On the iPod select “Settings”, “About”, “Version”.
How to upgrade your iPod?
On the Apple iPod website you will find instructions on how to upgrade the software of your
iPod: http://www.apple.com/ipod/download/
How to insert or remove a Dock Adapter?
Insert the Dock Adapter to the iPod Universal Dock by pressing lightly on the top of the Dock
Adapter (see picture below) and it will snap in.
20
Remove an inserted Dock Adapter by pressing toward the front and at the same time carefully
lift the back of the adapter using your fingernail or other non-metal device that does not damage
the plastics.
How to control the iPod using the Geneva Sound System’s remote control?
If you have inserted an iPod into the Universal Dock and turned the Geneva Sound System into
iPod mode, you can control the iPod using the remote control supplied with the Geneva Sound
System. Simply follow the instructions in the table to the right to perform control the various
functions:
Key
Function
iPod
Select iPod
Play/Pause
Skip/Fast Forward
Skip/Fast Reverse
SHUFFLE
Shuffle On/Off
21
CD:
How to control the CD player using the remote control?
You can control the built-in CD player using the remote control supplied with the Geneva Sound
System. Simply follow the instructions in the table to the right to perform control the various
functions:
Key
Function
CD
Select CD player
Play/Pause
Skip/Fast Forward
Skip/Fast Reverse
Stop
SHUFFLE
Shuffle On/Off
Eject CD
22
How to play 3.1 inch (8 cm) CDs?
This CD player can play regular 4.7 inch (12 cm) CDs, as well as 3.1 inch (8 cm) CDs.
Warning – DO NOT INSERT mini CDs, non-circular CDs or any other CD’s that are not regular 4.7
inch (12 cm) or, 3.1 inch (8 cm) round CD disks into the disc player. These do not work with the
CD player, and might destroy the player mechanism or be impossible to Eject.
To insert a 3.1 inch (8 cm) CD, place the disc exactly in the middle of the slot and insert it. The
Geneva Sound System is delivered with a temporary label that shows exactly where to place
a 3.1 inch (8 cm) CD and in which direction the CD label should be facing. This label may be
removed after notice.
CD title
CD title
How to play CD’s with MP3 and other formats?
The built-in CD player supports CD-DA, CD-R, CD-RW, CD-ROM (both single and multi
session) and MP-3 formats. The CD player will play CD’s in these formats exactly as it plays a
regular audio CD.
How to play MP3 CD-R/W with several Albums?
It is possible to organize MP3 files with directories (folders) on a CD-R/W. The Geneva Sound
System will play such a hierarchy in a simplified way - all files are played as if they would be in
one large directory.
23
FM Radio:
How to control the FM Radio using the remote control?
You can control the built-in FM Radio using the remote control supplied with the Geneva Sound
System. Simply follow the instructions in the table to the right to perform control the various
functions:
Key
Function
Select FM Radio.
Functions even when
device is turned off.
FM
Press once to increase
the frequency by
0.5 MHz. Hold to start
the auto seek mode.
Press once to decrease
the frequency by
0.5 MHz. Hold to start
the auto seek mode.
P
R
E
S
E
T
Station preset keys.
Press to select a station.
Hold to store the
current station.
How to select a FM radio station?
1. Press ‘FM’ on the remote control
2. Use the << or >> keys to select a station: one click increases or decreases the frequency by
0.1 MHz.
3. The number on the LED display under the Grille indicates the current frequency (e.g. 88.7 means
88.7 MHz)
4. To scan through frequencies, hold down the << or the >> key for a few seconds and the
FM radio searches for the next station automatically. When a station has been found, the
automatic search stops. To keep scanning, repeat the action.
24
How to store your favorite FM radio station in a preset?
1. Select your favorite radio station using the << or >> keys on the remote control.
2. You have six presets (a preset memorizes the frequency of the station) available – these are
the following six keys on your remote control:
P
R
E
S
E
T
FM Radio Presets
3. Select one of the 6 preset keys on the remote control, and hold it down until ‘store’ appears
on the LED display in the Grille of the Geneva Sound System. The station has now been
stored and can be retrieved using the selected preset key.
How to play a FM radio station that is stored in the presets?
1. Press the FM key on the remote control.
2. Simply press one of the six preset keys once and the stored FM station will be received.
How to erase or overwrite a preset?
Stored presets do not need to be erased - just use the steps set out in 3.13 above to overwrite
an existing preset and to store a new radio station in a preset.
How to connect the FM Radio Antenna?
The Geneva Sound System is FM ready and it has a built-in FM tuner. To get radio reception you
need to connect the External Antenna that is enclosed with the accessory bag.
You find the External Antenna Connector under the Geneva Sound System on the
Bottom Panel.
Note: If you use the special Geneva aluminum floor stand with the Geneva Sound System, you
can fold the External Antenna and place it within the tube. The assembly manual provided with
the stand sets out the details on how to do this.
25
Line in:
How to connect a Computer, iPod Shuffle or another MP3 player to the Geneva Sound
System using the 1/8 inch (3.5 mm) input?
1. If there is an iPod in the dock of the Geneva Sound System, please remove it.
2. Use the enclosed MP3 Player cable to connect to a Computer, an iPod Shuffle or any other
type of MP3 player that can be connected with such cable. Insert MP3 Player cable plug into
the 1/8 inch (3.5 mm) auxiliary audio input located on the panel under the lid on top of the
cabinet, between the 4 keys.
3. Plug the cable into the headset output connector from the MP3 player.
4. Press the iPod key on the remote control and start playing the contents of the device you have
connected.
Note that you cannot control any such device using the Geneva Sound System remote control,
but instead using controls available for the connected device.
How to connect a TV, Computer, VCR, DVD player or a game console to the Geneva
Sound System using the “Line In” input?
Use the enclosed Line in (RCA) cable to connect the Geneva Sound System to any device
that has a RCA audio out connector. First connect the Line In cable to the device you want to
connect with the Geneva Sound System, and then connect the cable to the Line In connector
(RCA Jack input) located on the Bottom Panel under the Cabinet. Press the Line In key on the
remote control and start playing the content of the device you have connected. Note that you
cannot control any such device using the Geneva Sound System remote control, but instead use
the controls available for the connected device.
26
3. Troubleshooting, Service and Support
Troubleshooting and Support:
1. If the system does not function as expected, first carefully read this manual to ensure that it is
being correctly operated.
2. If the problem persists, you can access our troubleshooting database available on the web at
http://genevalab.com/support
3. If not successful, contact our customer support:
Tech Support Email:
[email protected]
Contact Phone:
Customer Service: 1-877-GENEVA9, 1-877-436-3829 (Toll free in U.S. only)
Service and Repair:
If the product is damaged and needs repair, please contact Geneva Lab Corporation to be
referred to an authorized service center. For repair under the 1-year Limited Warranty Period,
see terms in the enclosed Warranty Card.
Contact details:
Web Support: [email protected]
Contact Phone:
Customer Service: 1-877-GENEVA9, 1-877-436-3829 (Toll free in U.S. only)
27
4.Technology Partners
The “Made for iPod” logo indicates that this product has been designed specifically to work with
iPod. The manufacturer certifies that this accessory has been made in accordance with the high
standards of quality and performance that you expect from iPod and Apple.
Technology Partners:
Geneva Lab Corporation uses some of the world’s leading developers of audio technologies
to make the Geneva Sound System a very advanced product. Our engineering centre in
Switzerland works closely with the following suppliers:
D2Audio’s unique “Intelligent Digital Amplifiers” have impressed professionals and audiophiles
for years. Our patented amplifier technology constantly optimizes the audio signal to deliver the
best pure digital performance and the highest sound quality available. Now found in high quality
consumer products, look for the D2Audio logo where you want an awesome audio experience in
your life.
“EmbracingSound™ is the technology for consumers and professionals alike to experience
sound. As EmbracingSound™ is utilizing two very closely spaced speakers you will experience
what is really in the recording with better resolution and clarity than ever before. Just sit
back and experience all your music and you will most probably find new favorites as well as
making excursions in to music genres that you where totally unfamiliar with before. Just let the
experience guide you!
More details can be found on the www.genevalab.com website.
28
5. Technical Specifications:
Fore detailed technical specifications for this product, please go to our website www.genevalab.
com/support where you can download the detailed technical specifications for any of our
products.
© 2006 G-Lab GmbH. All rights reserved
Under the copyright laws, this manual may not be copied, in whole or in part, without the written
consent G-Lab GmbH.
Geneva™ is a trademark of G-Lab GmbH.
D2Audio and D2A are registered trademarks, while the D2Audio Digital Amplifier logo is a
trademark of D2Audio Corporation.
iPod is a trademark of Apple Computer, Inc. registered in the U.S. and other countries.
The trademark EmbracingSound™ and the Embracing Sound Experience logo are owned by
Embracing Sound Experience AB.
Geneva Sound System, User Manual, Version 1.0
29