1
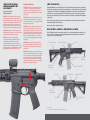
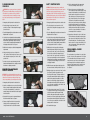
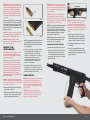
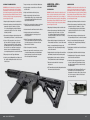
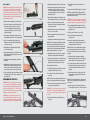
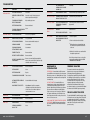
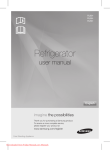
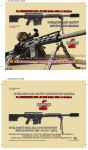
OPERATION,
MAINTENANCE &
TROUBLESHOOTING
IMPORTANT
This manual contains operating, care and maintenance instructions.
To assure safe operation, any user of this firearm must read and
understand this manual before using the firearm. Failure to follow the
instructions and heed the warnings of this manual can cause property
damage, personal injury, and/or death.
This manual should always accompany this firearm, and be transferred
with upon change of ownership.
WARNING! Keep this firearm out of the reach of children, unauthorized
individuals, and other unfamiliar with safe handling of firearms.
PART # 101269 Rev 2.0 Aug. 2012
THE TEN COMMANDMENTS OF FIREARM SAFETY
The Ten Commandments of Firearm Safety should
be etched in your memory forever. Let them govern
your action wherever and whenever you’re involved
with firearms, in the field, on the range, or in your
home. Please take the time to review and understand
these rules.
1st COMMANDMENT
ALWAYS KEEP THE MUZZLE POINTED IN
A SAFE DIRECTION.
This is the most important firearm safety rule. A safe
direction is one in which an accidental discharge will
not cause injury to yourself or others. Never allow
your firearm to point at anything you don’t intend to
shoot. Be especially careful when you’re loading or
unloading. Treat every firearm as if it were loaded.
Make it a habit to know where the muzzle is pointed
at all times, even when your firearm is un-loaded. No
one will be injured by an accidental discharge if you
keep your firearm pointed in a safe direction. It’s as
simple as that.
2nd COMMANDMENT
FIREARMS SHOULD BE UNLOADED WHEN NOT
ACTUALLY IN USE.
Load your firearm only when you’re in the field or on
the target range and ready to fire. Never let a loaded
firearm out of your sight or out of your hands. Unload
it as soon as you’re finished shooting - before you
bring it into your car, camp or home. Remember,
unloading your firearm means unloading it completely,
so there is no ammunition in the chamber or in the
magazine. Before handling a firearm or passing it to
someone else, visually check the chamber, receiver
and magazine to be certain they do not contain
ammunition. Always keep the firearm’s action open
when not in use. Never assume a firearm is unloaded
even if you were the last person to use it. Always check
for yourself.
• Let common sense rule when you carry a loaded
firearm. If you’re in a situation that could risk
accidental discharge - such as crossing a fence,
wading through a stream or climbing a tree - always
unload your firearm. Never pull or push a loaded
firearm toward yourself or another person. Never
carry a loaded firearm in a scabbard, detached
holster or gun case.
AAC — BLACK RIFLE MANUAL
• Certain firearms are equipped with internal security
devices to prevent unauthorized use. In addition,
some firearms owners use external devices, such as
cable locks and trigger blocks, for the same purpose.
Even if you use such a device, you should still keep
your firearm unloaded when stored or not in use. And
using internal or external devices cannot substitute,
however, for securing your firearms and ammunition
in a separate, locked location.
• Safe storage of firearms is just as critical as safe
handling. Never store firearms loaded. Be sure
to keep your firearms in a secure place where
unauthorized persons cannot get their hands on them
without your knowledge.
• Take special care if there are children around.
Children are fascinated by firearms. It’s a natural
curiosity that can have tragic consequences when not
properly supervised. Store your firearms in a locked
gun safe or some other location that physically bars a
child from gaining access.
• Ammunition should be stored and locked in a location
separate from your firearm. Never leave an unsecured
firearm or ammunition in a closet, dresser drawer
or under the bed. Remember, it is your responsibility
to make sure that children and others unfamiliar
with firearms cannot get access to your firearm and
ammunition.
3rd COMMANDMENT
DON’T RELY ON YOUR FIREARM’S SAFETY
Treat every Firearm as if it can fire at any time, whether
or not there’s pressure on the trigger. Your firearm
has been carefully designed to maximize performance
and safety. However, because a firearm’s safety is a
mechanical device, it could fail.
Human error is a more likely reason for a firearm safety
to fail. By mistake, you may think the safety is on when
it really isn’t, or the safety may have been disengaged
without your knowledge, or you could think your
firearm is unloaded when there’s actually a cartridge
or shell in it. A mechanical safety is not a substitute
for common sense. It’s merely a supplement to your
proper handling of a firearm.
Never touch the trigger on a firearm until you are ready
to shoot.Keep your fingers away from the trigger when
you’re loading or unloading. And don’t pull the trigger
when the safety is engaged or positioned between
safe and fire.
Before using your firearm, read this instruction book
to understand the exact location and operation of
your firearm’s safety. Even when the safety is on,
maintain control of your loaded firearm and control
the direction of the muzzle. In other words, don’t rely
on your safety to justify careless handling. If your
firearm’s internal mechanisms are broken or have been
altered, your firearm may fire even when the safety
is on. Remember, you and your safe firearm handling
practices are your firearm’s best safety.
4th COMMANDMENT
BE SURE OF YOUR TARGET AND WHAT’S BEYOND IT.
You can’t stop a shot in mid-air, so never fire unless you
know exactly where your shot is going and what it will
strike. Never fire at a sound, a movement or a patch of
color. A hunter in camouflage can easily be mistaken
for a target by an impulsive shooter. Before you pull
the trigger be absolutely sure of your target and what’s
behind it. Make sure the shot has a backstop such as a
hillside or dense material like sand. Remember, bullets
can travel great distances with tremendous velocity.
Know how far your shot will go if you miss your target or
the bullet ricochets.
5th COMMANDMENT
USE PROPER AMMUNITION
Every firearm is designed to use a certain caliber or
gauge of ammunition. Using the wrong ammunition,
mixing ammunition or using improperly reloaded
ammunition can cause serious personal injury or death.
It only takes one cartridge or shotshell of the incorrect
caliber or gauge, or which has been improperly
reloaded, to destroy your firearm.
It’s your responsibility to make sure the ammunition
you use exactly matches the caliber or gauge of your
firearm. Refer to this instruction book to find out the
specific requirements of your firearm. Always read and
heed the instructions on ammunition boxes. Confusing
shells or cartridges can cause serious personal injury
or death and destroy your firearm. Examine your shells
or cartridges closely and use only the precise caliber or
gauge for your specific firearm. For example, suppose
you accidentally loaded a 20 ga. shell into a 12 ga.
shotgun. Because the 20 ga. shell is too small for the
chamber, the 20 ga. shell could travel down the barrel
and get lodged in the bore.
If you then loaded a standard 12 ga. shell behind it and
fired, the 12 ga. shot will slam into the lodged 20 ga.
shell and may cause the barrel to explode right in your
hand. This is commonly called a 12/20 burst, and it can
kill you.
Check all ammunition before you load it to make
sure it matches your firearm’s requirements. Every
Remington® and Barnes Bullets cartridge and shell
is head-stamped with its caliber or gauge for easy
identification. Likewise, you’ll find the caliber or gauge
of your new AAC firearm imprinted on the barrel.
RELOADING REQUIRES EXTRA DILIGENCE.
If you’re an ammunition reloader, you are responsible
for personally assuring that the loads and components
of your reloaded ammunition meet your firearm’s
factory-tested standards. Never use ammunition, which
has been reloaded by someone else!
Many shooters handload as a hobby or to save money
on commercial, factory-made ammunition. However, it
requires a thorough knowledge of reloading procedures
and a deep respect for the explosive potential of
gunpowder.
Firearms are designed, manufactured and proof-tested
to standards based on factory-loaded ammunition.
Handloaded or reloaded ammunition that deviates,
either intentionally or accidentally, from load or
component recommendations can be very dangerous.
Reloaders must observe all possible safety precautions
and practices related to the proper handling of
explosives. Whether you’re a seasoned reloader or
just starting out, you should study the subject, watch
reloading demonstrations and talk to experienced
reloaders.
The first rule of reloading is to always follow the
manufacturer’s instructions for the components
you’re using. They’ll tell you to follow certain
guidelines. Namely:
1. Don’t mix or substitute powders or primers.
2. D
on’t use unknown or substandard components.
3. U
se only suitable components that have been
factory-tested by reputable ammunition, powder and
bullet manufacturers.
4. Always be sure to use the manufacturer’s
recommended recipe when reloading.
Not following these guidelines could result in severe
injury to yourself or severe damage to your firearm.
Dangerously high pressure and explosions can result
3
from an overcharge of powder or other deviations
from established reloading guidelines. Be very
careful. The process of reloading exposes you to
environmentally hazardous material. Lead, which is
known to cause cancer and birth defects, is the most
common substance in bullets and shot. It is important
to handle lead bullets and shot with extreme care.
Work only in a well-ventilated area and always wash
your hands after exposure and before eating. Never
smoke while reloading.
Also be sure to wear eye protection when you’re
disassembling or cleaning a firearm so that tensioned
parts (like springs) and cleaning solvents don’t come
in contact with your eyes. Continued exposure to
shooting noise can permanently damage your hearing.
On the range, where shooting volume is the loudest, be
sure to use the maximum protection of a headset. Learn
to use ear protection at all times.
Primers and powders are also highly toxic and
flammable. So after reloading be sure to clean up all
materials from your work area. Don’t leave primer
or powder spills anywhere on the floor or bench top.
Dispose of all waste material in accordance with the
manufacturer’s recommendations.
BE SURE THE BARREL IS CLEAR OF OBSTRUCTIONS
BEFORE SHOOTING.
Finally, when reloading or hand loading, concentrate on
what you’re doing at all times. Do not be distracted by
talking to others, listening to the radio or watching TV
while reloading. Never reload after consuming alcoholic
beverages or drugs of any kind. You are working with
extremely hazardous materials, and you can’t risk
even a few seconds of distraction. Remember, if you
reload, you are the ammunition manufacturer, and you
are responsible for the performance and safety of your
reloaded ammunition.
8th COMMANDMENT
Before loading your firearm, open the action and
make sure there’s no ammunition in the chamber or
magazine. Check the barrel for any obstructions or
debris. Even a small amount of snow, mud, excess
lubricant or grease in the bore can dangerously
increase pressure and cause the barrel to bulge or
burst when firing. Use a cleaning rod and patch to wipe
away anti-rust compounds or any other residues or
obstructions in the barrel. Never try to shoot out an
obstruction by loading another shell and firing!
6th COMMANDMENT
When firing, rely on your instincts. If the noise or recoil
of your firearm seems weak, stop everything, unload
your firearm and be sure nothing is lodged in the barrel.
Remember the 12/20 burst? That’s what can happen
when the barrel is obstructed.
IF YOUR FIREARM FAILS TO FIRE WHEN THE TRIGGER
IS PULLED, HANDLE WITH CARE.
Always be sure you’re using the correct ammunition in
your firearm and that it’s free of obstructions.
If for some reason the ammunition doesn’t fire when
you pull the trigger, stop and remember the 1st
Commandment of Firearm Safety - always keep the
muzzle pointed in a safe direction. Keep your face
away from the breech, then put the safety on, carefully
open the action, unload the firearm and dispose of the
cartridge safely. Remember that anytime there’s a shell
in the chamber, your firearm is loaded and ready to use.
Even if you tried to shoot and your firearm didn’t fire,
treat your firearm as if it could still discharge.
9th COMMANDMENT
7th COMMANDMENT
Like any mechanical device, a firearm is subject to
wear. It must be maintained and periodically serviced
to assure optimum safety and performance. Only
a qualified service facility should service, repair or
modify your AAC firearm. Consult your instruction
book for instructions on how to send your firearm
to the factory or for the location of the nearest AAC
authorized repair station.
ALWAYS WEAR EYE AND EAR PROTECTION
WHEN SHOOTING.
Your sight and hearing risk injury from shooting and
should be protected at all times. Wear protective
shooting glasses to guard against falling shot, clay
target chips, powder residue, ruptured cartridge
cases and even twigs and branches in the field.
AAC — BLACK RIFLE MANUAL
always make sure that your firearm is completely
unloaded. And always clean the barrel from the
chamber end to the muzzle when possible.
Make it a practice to clean your bore every time you’re
going to shoot. Be sure to clean your entire firearm
before and after long-term storage and no less than
once a year. It’s also important to clean your firearm
whenever it’s been exposed to adverse conditions such
as rain, dirt, mud, snow, sleet or saltwater.
Your firearm has been designed to operate according
to certain factory specifications. You’ll jeopardize
your safety and that of others around you by
attempting to alter its trigger, mechanical safety or
other mechanisms. So never alter or modify your
firearm in any way.
SHOOT SOBER!!
For safe and dependable operation of your firearm, all
parts of your firearm must be properly cleaned and
lubricated. Periodically inspect the internal workings of
your firearm to be sure they’re clean and free of rust,
unwanted dirt and debris.
There’s one other rule that must be followed
when handling firearms. In fact, respect for this
rule is necessary in order to effectively practice
the Ten Commandments of Firearm Safety. The
rule is: SHOOT SOBER! Firearms and alcohol or
drugs make a deadly combination. Never consume
anything that would mildly impair your judgment or
physical coordination when you’re using a firearm. A
staggering percentage of the shooting accidents that
occur every year involve alcohol or drugs. Be smart.
Always shoot sober and stay alive.
Use recommended lubricants on your firearm and
do not over-lubricate. Excessive use of a nonrecommended lubricant could adversely affect
the function and safe operation of your firearm.
Remember, you are responsible for the proper care
and maintenance of your firearm. Failure to properly
maintain your firearm cannot only damage or ruin your
firearm, it can expose you and others to unnecessary
risks of personal injury or death.
WARNING! Failure to follow any of these safety rules
may cause personal injury or death to the shooter
or bystander and damage to property. Do not use
a firearm until you fully understand and practice
the Ten Commandments of Firearm Safety. If you
have any questions about the safe use of a AAC
firearm, write to us at Remington Arms Company,
LLC, Consumer Service, P.O. Box 700, Madison, NC
27025-0700, or call us at 1-800-243-9700.
Remington® has a wide range of firearm care products
and resources for best results when cleaning your
firearm. Everything from solvents and lubricants
to rods and patches. They’re all available from your
Remington and AAC dealer.
DON’T KEEP THIS TO YOURSELF.
10th COMMANDMENT
DON’T ALTER OR MODIFY YOUR FIREARM AND HAVE
IT SERVICED REGULARLY.
serious physical injury. Have adequate ventilation at
all times. Wash hands thoroughly after exposure.
LEARN THE MECHANICS AND HANDLING
CHARACTERISTICS OF YOUR FIREARM.
Not all firearms are alike. They have different
mechanical characteristics that dictate how you should
carry and handle them. Anyone who plans to use a
firearm should first become totally familiar with the type
of firearm it is and the safe handling procedures for
loading, unloading, carrying, shooting and storing it.
Before you even unpack your new AAC firearm, read
this instruction book from cover to cover and familiarize
yourself with the different component parts of the
firearm. Then read, understand and follow the Ten
Commandments of Firearm Safety in this manual.
WARNING! Discharging firearms in poorly ventilated
areas, cleaning firearms or handling ammunition may
result in exposure to lead, a substance known to cause
birth defects, reproductive harm, cancer and other
Now that you’re a firearm owner you have the
obligation to help ensure that shooting sports are safe
for everyone, participants and bystanders alike. You
can do that by practicing these principles of firearm
safety and passing them on to others - especially new
shooters. Set an example for beginners. Be a guide
to their safe entry into the exciting world of shooting
sports. Invest your time and patience for the love of
the sport and for its future. After all, it’s your love of
the sport that led you to buy a new AAC firearm.
Firearm ownership is a right and privilege. It’s
a privilege, which carries with it a personal
responsibility to use your firearm in a way which
will ensure your safety and the safety of others. The
preservation of this right and privilege depends on the
personal commitment of you and your fellow shooters
to the safe and responsible use of firearms. Let the
Ten Commandments of Firearm Safety outlined in the
book guide you at all times. Teach and promote these
rules whenever you can. Remember, firearm safety
depends on you! That’s the only way to really enjoy
your new AAC firearm and to preserve sport shooting
as we know it today.
Proper cleaning and lubrication are also important
to firearm maintenance and are necessary to assure
accuracy, safety and reliability. Before cleaning,
5
Thank you for buying an
ADVANCED ARMAMENT CORP
(AAC) product.
PLEASE PRACTICE SAFE
FIREARMS HANDLING!
WARNING: It is very important that you read and
understand this manual before using the new rifle.
Warnings should be read and heeded carefully. Always
follow the “Ten Commandments of Firearm Safety,”
listed in this manual. Failure to follow these rules,
warnings, and other instructions in this manual, can
result in personal injury, property damage or death.
WARNING: If this firearm is carlessly or improperly
handled, inintentional discharge could result and could
cause injury, death, or damage to property.
WARNING: Use only clean, dry, high quality
commercially manufactured ammunition in good
condition which is appropriate to the caliber of
your firearm. AAC does not recommend the use of
remanufactured or hand loaded ammunition. The use of
improperly loaded or reloaded ammunition may cause
property damage, personal injury and/or death.
DANGEROUS PROCEDURES
ABOUT YOUR AAC RIFLE
WARNING! This firearm may inadvertently chamber
a cartridge if it is dropped or jarred with a loaded
magazine in place. An unententional discharge of a
firearm may cause property damage, personal injury
and/or death.
This Operating Manual covers all AAC AR15-style rifles. They are lightweight, gas operated, air-cooled, magazinefed rifles and carbines that are Semi-Automatic in operating mode (i.e., a single round will fire each time the trigger
is pulled). Note: For Law Enforcement and Military markets, AAC makes similar models in either Full-Automatic
(continuous fire as long as the trigger is pulled) or Three Round Burst (a group of 3 shots will fire as long as the
trigger is pulled) configurations. Sales of these models require special permits, are regulated by ATF and available
to Agency only.
WARNING! This firearm can fire without the cam pin
present. Firing the rifle without the cam pin properly
installed in the bolt group can cause property damage,
personal injury, and/or death.
WARNING! An unfired cartridge can discharge if left in
a hot barrel, this is often referred to as a “cook-off”.
Always keep the rifle pointed in a safe direction. If an
unfired cartridge cannot be cleared from a hot barrel
quickly, remove the magazine from the rifle and allow
the barrel and unfired cartridge to cool 15 minutes. A
cook-off can cause property damage, personal injury,
and/or death.
WARNING! Never discharge a firearm with water in
the barrel. Discharging the firearm with water in the
barrel can cause property damage, personal injury,
and/or death.
On all models, the Upper and Lower Receivers are easily opened for cleaning and inspection. Rifle models have
forged aluminum Upper and Lower Receivers
Specifications subject to change without notice.
RIFLE FEATURES & CONTROLS - IDENTIFICATION / LOCATION…
Note: ATF Regulations require a minimum barrel length of 16” on commercially available rifles and carbines. This
16” length can be a combination of barrel and permanently fixed (pinned & welded over) muzzle brake / flash
suppressor as long as total length equals 16”.
TELESCOPING STOCK
EJECTION PORT COVER
SIGHT*
WARNING! If you experience a change in sound report
and/or recoil while discharging the rifle, do not attempt
to discharge the rifle again. A change in sound report
and/or recoil are symptoms of a defective cartridge,
which could lead to an obstructed bore. Discharging
a firearm with an obstructed bore can cause property
damage, personal injury, and/or death.
magazine release
button
FORWARD
ASSIST KNOB
PISTOL GRIP
PIVOT PIN
Blackout ™
Flash Hider
30 round magazine**
Takedown pin
Charging handle
Free-float
railed forend
BOLT RELEASE
TRIGGER
Safety selector
level
*Not included
** rifle comes with ONE magazine, However upper does not
7
CLEARING/UNLOADING
YOUR RIFLE
WARNING! Never assume your firearm is unloaded
to justify careless handling. Always control the direction
of the muzzle of your firearm, even if you think it is
completely unloaded. Careless handling of a firearm
may cause property damage, personal injury and/or
death.
SAFETY FUNCTION CHECK
FIGURE 1
WARNING! If the firearm experiences a malfunction
during the Safety Function Check, the firearm is unsafe
and its use may cause property damage, personal
injury, and/or death. This firearm should be serviced by
an AAC authorized repair center. See the How to Obtain
Parts and Service From AAC section of the manual to
have your firearm repaired.
1. Always keep the rifle pointed in a safe direction.
1. A lways keep the firearm pointed in a safe direction.
2. Place the Safety Selector Lever in the “Safe”
position. See Figure 1. If the safety will not engage
proceed to step 3.
2. P lace the Safety Selector Lever in the “Safe”
position. If the safety will not engage proceed to
step 3.
3. P ress the Magazine Release button and remove the
Magazine Box. See Figure 2.
3. P ress the Magazine Release button and remove the
Magazine Box. See Figure 2.
4. Lock the bolt open by pulling the Charging Handle
fully to the rear and pressing the bottom of the Bolt
Release. While depressing the bottom of the bolt
release, slide the charging handle forward until the
bolt engages the bolt catch. See Figure 3.
FIGURE 2
5. With the bolt locked open, slide the Charging Handle
fully forward.
6. V erify the Safety Selector Lever is fully in the
“Safe” position. If the Safety Selector Lever could
not be engaged in step two, place it in the “Safe”
position now.
FIGURE 3
7. Look into the ejection port and visually check the
chamber and magazine well for cartridges, ensuring
the firearm is completely unloaded.
PREVENTATIVE MAINTENANCE
CHECKS & SERVICES
FIGURE 4
1. A lways keep the rifle pointed in a safe direction.
FIGURE 5
3. R
etract the Bolt to ensure free movement between
Bolt Carrier and Gas Tube. See Figure 4.
4. Perform a Safety Function Check to ensure that
Safety Selector Lever works properly. See the
“Safety Function Check” section of this manual.
11. R
elease the pressure on the trigger with a
slow continuous motion until the trigger is fully
forward. A slight audible click should be heard,
but the hammer should not be released and
strike the firing pin. For the purposes of this
step, the rate by which to release the trigger
is defined as one fourth the normal rate by
which you release the trigger after discharging
the firearm. If the hammer is released by the
trigger and strikes the firing pin, the firearm has
malfunctioned and failed this safety function
check. Do not proceed with the check and see
the warning below for instructions.
12. Repeat steps 9 through 11 a total of five times.
The firearm must not malfunction during these
steps to pass the Safety Function Check. If the
firearm malfunctions, it has failed this safety
function check. Do not proceed with the check
and see the warning at the beggining of this
section for instructions.
SERIAL NUMBER & CALIBER
IDENTIFICATION
The serial number of your firearm is located on the
shooter’s left side of the magazine well. See Figure
7. The intended caliber of the firearm can also be
found on the shooter’s left side of the magazine
well. Always check the cartridge designation on
the barrel of the firearm to insure it matches the
cartridge designation on the lower receiver.
See Figure 8.
ith the safety selector lever in the “Safe” position
7. W
(See Figure 5) and the rifle pointed in a safe
direction, pull the trigger. The trigger should not
release the hammer and the hammer should not
strike the firing pin with an audible click. If the
hammer is released by the trigger, the firearm
has malfunctioned and failed this safety function
check. Do not proceed with the check and see the
warning above for instructions.
8. Place the safety selector lever in “Fire” position.
See Figure 6. Pull the Trigger. The trigger should
release the hammer and the hammer should
strike the firing pin with an audible snap. If the
hammer is not released by the trigger, the firearm
has malfunctioned and failed this safety function
check. Do not proceed with the check and see the
warning above for instructions.
FIGURE 7
9. Pull and hold the trigger.
FIGURE 6
AAC — BLACK RIFLE MANUAL
5. With the bolt locked open, slide the Charging
Handle fully forward. Verify the Safety Selector
Lever is fully in the “Safe” position. If the Safety
Selector Lever could not be engaged in step 2,
place it in the “Safe” position now. Look into the
ejection port and visually check the chamber and
magazine well for cartridges, ensuring the firearm
is completely unloaded. Only proceed if the rifle is
completely unloaded.
6. With the firearm completely unloaded, press the
bolt release button, allowing the bolt to fully close.
WARNING! Before discharging the firearm, make sure
the inside of the barrel is free of dirt, oil, water, or other
obstructions. Discharging an obstructed barrel may
cause property damage, personal injury and/or death.
2. Check to see that there is no excessive oil in the bore.
If there is, swab it out with a patch and the cleaning
rod. See the “Cleaning the Bore” section of this
manual. Always clean a new rifle before discharging
it for the first time.
4. Lock the bolt open by pulling the Charging Handle
fully to the rear and pressing the bottom of the Bolt
Release. While depressing the bottom of the bolt
release, slide the charging handle forward until the
bolt engages the bolt catch. See Figure 3.
10. Pull the charging handle fully rearward and
release it, allowing the bolt to fully close.
FIGURE 8
9
WARNING! AR15 style firearms are modular and due to
the modularity, it is possible to affix an upper receiver
to a lower receiver with a differently designated caliber/
cartridge. Only use ammunition designated by the
barrel of the upper receiver with your firearm. Using
ammunition not designated by the barrel of the upper
receiver may cause property damage, personal injury
and/or death.
WARNING! The use of improperly loaded or handloaded ammunition can lead to barrel obstructions,
excessive pressure and/or inadvertent discharge of
a firearm, resulting in property damage, personal
injury and/or death.
FIGURE 9
Always check the cartridge for the correct designation
before loading the firearm. The caliber of a cartridge is
located on the case head of the cartridge. See Figure
9. To find additional ammunition information, see the
Remington Arms catalog or visit the Remington website
at www.remington.com.
NOTE: When closing the bolt with the charging handle,
never ride or push the charging handle forward.
Always allow the bolt to carry the charging handle
forward under its own power as it closes. Interfering
with the charging handle during bolt closing may
prevent the bolt from fully closing.
WARNING! Do not apply oil, grease or any lubricants to
cartridges. Appling lubricants to cartridges may cause
property damage, personal injury and/or death.
WARNING! Always wash hands after handling
ammunition. See the “Ten Commandments of Firearm
Safety,” section of this manual.
PREPARING TO FIRE LOADING A MAGAZINE
WARNING! Always check the cartridge for the correct
designation before loading the firearm. Use of an
incorrect cartridge could result in property damage,
personal injury and/or death.
WARNING! The use of improperly loaded or handloaded ammunition can lead to barrel obstructions,
excessive pressure and/or inadvertent discharge of a
firearm, resulting in personal injury, property damage
and/or death. Use only quality factory ammunition
suitable for your firearm. Examine each Cartridge,
particularly around the primer. Look for dents,
scratches, and other signs of damage. DO NOT LOAD
DAMAGED AMMUNITION!
WARNING: Safe Firearms Handling dictates that you
only load live ammunition into your rifle when you wish
to discharge the firearm. See the “Ten Commandments
of Firearm Safety”, in this manual.
1. Hold the magazine with the front of the magazine
facing forward. See Figure 10.
2. With the primer flush with the rear inside face of the
magazine, position a cartridge of proper caliber on
top of the magazine, between the feed lips.
WARNING! The firearm can be discharged even if
the magazine has been removed. If a cartridge is
chambered, the safety selector is in the “Fire” position
and the magazine is removed from the rifle, depressing
the trigger will cause the rifle to discharge.
FIGURE 10
3. W
ith the cartridge properly positioned, push down on
the cartridge until it is fully seated in the magazine.
Make sure the cartridge is touching the rear inside
face of the magazine.
4. P lace the next cartridge on top of the previously
seated cartridge and push it down between
the feed lips until it becomes seated in the
magazine. The cartridge will sit on the opposite
side of the magazine with respect to the
cartridge that preceded it. The primer end of
each cartridge should be touching the rear
inside face of the magazine.
NOTE: A magazine may be inserted into this firearm
and a round chambered with the Bolt Assembly
starting in the open or closed position.
CHAMBERING A ROUND FROM AN OPEN BOLT
1. Always keep the rifle pointed in a safe direction.
2. Remove the magazine, pull and hold the bolt fully
rearward to inspect the chamber. See Figure
11. Visually and physically verify the Chamber is
completely unloaded. See the section “Clearing/
Unloading Your Rifle”.
FIGURE 11
WARNING: Do not load a hot chamber, a round may
“Cook Off”. “Cooking Off” means that a Round
may Detonate (Fire) unexpectedly just from being
exposed to the heat of the Rifle’s Firing Chamber. An
unintentional or uncontrolled discharge of your firearm
may cause property damage, personal injury and/
or death.
3. With the magazine facing forward, center the
loaded magazine in the firearm’s magazine well
and push the magazine up until magazine catch
engages and holds the magazine. See Figure 12.
4. S lap upwards on magazine bottom to ensure it
is seated fully.
5. Pull down on the magazine bottom to verify it
is securely engaged in the magazine well. If the
magazine releases from the magazine well, repeat
steps two through four.
5. Repeat step four until the magazine is full or the
desired number of rounds have been loaded. Do
not attempt to exceed magazine capacity as it may
damage the magazine and your firearm.
LOADING YOUR RIFLE
WARNING! Never assume your firearm is unloaded
to justify careless handling. Always control the
direction of the muzzle of your firearm, even if you
think it is completely unloaded. Careless handling
of a firearm can lead to property damage, personal
injury and/or death.
WARNING! Always check the cartridge for the
correct designation before loading the firearm. Use
of an incorrect cartridge could result in property
damage, personal injury and/or death.
FIGURE 12
AAC — BLACK RIFLE MANUAL
11
6. W
ith a loaded magazine secured in the magazine
well, depress the upper portion of the bolt release
button. See Figure 13. This will cause bolt to
close and chamber a loaded cartridge. Pulling the
charging handle fully rearward and releasing it will
also cause the bolt to close and chamber a loaded
cartridge. See Figure 15.
7. Tap the forward assist with the heel of your hand
to ensure the bolt is fully forward and closed. See
Figure 14. If the bolt does not fully close, see the
Clearing Your Rifle section of this manual.
FIGURE 13
8. Verify the safety selector is in the “Safe” position.
If it is in the “Fire” position, rotate it fully to the
“Safe” position.
WARNING! The firearm is now fully loaded with the
safety in the “Safe” position. Failure to follow safe
firearm handling practices, as found in the “Ten
Commandments of Firearm Safety” may cause
property damage, personal injury, and or death.
CHAMBERING A ROUND FROM A CLOSED BOLT
1. Always keep the rifle pointed in a safe direction.
2. Remove the magazine, pull and hold the bolt fully
rearward to inspect the chamber. See Figure
11. Visually and physically verify the Chamber is
completely unloaded. See the section “Clearing/
Unloading Your Rifle”.
WARNING: Do not load a hot chamber, a round may
“Cook Off”. “Cooking Off” means that a Round
may Detonate (Fire) unexpectedly just from being
exposed to the heat of the Rifle’s Firing Chamber.
An unintentional or uncontrolled discharge of your
firearm may cause property damage, personal injury
and/or death.
3. With a loaded magazine secured in the magazine
well, depress the upper portion of the bolt release
button. See Figure 13. This will cause bolt to close.
FIGURE 14
4. W
ith the magazine facing forward, center the
loaded magazine in the firearm’s magazine well
and push the magazine up until magazine catch
engages and holds the magazine. See Figure 12.
5. Slap upwards on magazine bottom to ensure it is
seated fully.
6. Pull down on the magazine bottom to verify it
is securely engaged in the magazine well. If the
magazine releases from the magazine well, repeat
steps two through five.
7. With a loaded magazine secured in the magazine
well, pull the charging handle fully rearward and
release it to allow the bolt to close and chamber a
loaded cartridge. See Figure 15.
8. Tap the forward assist with the heel of your hand
to ensure the bolt is fully forward and closed. See
Figure 16. If the bolt does not fully close, see the
Clearing Your Rifle section of this manual.
9. Verify the safety selector is in the “Safe” position.
If it is in the “Fire” position, rotate it fully to the
“Safe” position.
WARNING! The firearm is now fully loaded with the
safety in the “Safe” position. Failure to follow safe
firearm handling practices, as found in the “Ten
Commandments of Firearm Safety” may cause
property damage, personal injury, and or death.
the firearm and check the bore for obstructions. See
“Checking for and Removing a Barrel Obstruction,”
on page 13. Discharging a firearm with an obstruction
can cause property damage, personal injury,
and/or death.
FIRING THE RIFLE
5. Without touching the trigger, fully rotate the safety
selector lever to the “Safe” position.
WARNING! Always wear eye and hearing protection
when discharging your firearm, failure to do so could
result in personal injury. See “The Ten Commandments
of Firearm Safety,” section of this manual.
WARNING! The inside of the barrel must be clean
and free of any obstructions. Discharging the
firearm with a dirty and/or obstructed barrel may
cause property damage, personal injury, and/or
death. See the “Ten Commandments of Firearm
Safety,” section of this manual.
1. Always keep the firearm pointed in a safe direction.
2. Point the muzzle at your intended target.
3. R
otate the safety selector lever fully to the “Fire”
position.
6. P ress the magazine release button and remove the
magazine box. See Figure 2.
7. If the bolt is locked in the open position, the
chamber and magazine well are visible through the
ejection port, proceed to step 10.
8. L ock the bolt open by pulling the charging handle
fully to the rear and pressing the bottom of the bolt
release. While depressing the bottom of the bolt
release, slide the charging handle forward until the
bolt engages the bolt catch. See Figure 3.
9. With the bolt locked open, slide the charging
handle fully forward.
10. Look into the ejection port and visually check
the chamber and magazine well for cartridges,
ensuring the firearm is completely unloaded.
4. W
ith the target acquired and the butt of the firearm
mounted firmly against your shoulder, pull the trigger.
The firearm will discharge and continue to discharge
each time the trigger is pulled, until the magazine and
chamber are empty.
11. M
ake sure the barrel is free of obstructions,
see “Checking for and Removing a Barrel
Obstruction”, on page 13.
NOTE: After the last Round is fired, the Bolt Carrier
will lock in the rear position.
CHECKING FOR AND REMOVING
A BARREL OBSTRUCTION
WARNING! If a cartridge does not discharge when
the trigger is pulled (misfire), keep the firearm
pointed in a safe direction and wait one minute
before opening the bolt or the action. See “Clearing
/ Unloading Your Firearm,” section of this manual.
Failure to wait the allotted time could result in
a delayed and/or uncontrolled discharge of the
cartridge, possibly causing property damage,
personal injury, and/or death.
WARNING! NEVER try to remove an object from the
barrel by loading another cartridge and discharging it
into the obstruction. This may cause property damage,
personal injury and/or death.
WARNING! If the “report” of the discharged cartridge
is noticeably softer or louder or in any way irregular,
keep the firearm pointed in a safe direction; unload
the firearm and check the bore for obstructions. See
“Checking for and Removing a Barrel Obstruction”,
on page 13. Discharging a firearm with an obstruction
can cause property damage, personal injury, and/
or death.
1. Always keep the firearm pointed in a safe direction.
2. Remove the magazine, pull and hold the bolt fully
rearward to inspect the chamber. See Figure
11. Visually and physically verify the Chamber is
completely unloaded. See the section “Clearing/
Unloading Your Rifle”.
WARNING! If the recoil of the firearm during
discharge is harder or softer or any way irregular,
keep the firearm pointed in a safe direction; unload
FIGURE 15
AAC — BLACK RIFLE MANUAL
FIGURE 16
13
DISASSEMBLING YOUR RIFLE
3. P ush the Takedown Pin (a bullet tip may help) as far
as it will go to the shooter’s right. See Figure 17.
4. Pivot the upper receiver away from the lower
receiver. See Figure 18.
5. Carefully pull rearward on the Charging Handle and
Bolt Assembly. See Figure 19.
6. Remove the Bolt Assembly from the upper receiver.
See Figure 20.
FIGURE 17
FIRING PIN
CAM PIN
FIRING PIN
RETAINING PIN
FIGURE 21
2. Remove the magazine, pull and hold the bolt fully
rearward to inspect the chamber. See Figure
11. Visually and physically verify the Chamber is
completely unloaded See the section “Clearing/
Unloading Your Rifle”.
8. If an obstruction exists, insert a correct size cleaning
rod from the chamber end of the barrel until the
obstruction is detected.
FIGURE 18
3. Push the Takedown Pin (a bullet tip may help) as far
as it will go to the shooter’s right. See Figure 17.
FIGURE 22
4. Push the Pivot Pin (a Bullet tip can help) as far as
it will go to the shooter’s right. See Figure 18.
10. Push the rod completely through the barrel until the
rod can be seen at the muzzle.
NOTE: The Pivot Pin and Takedown Pin are captured in
the Lower Receiver, preventing them from falling out and
becoming lost.
11. If an object cannot be easily pushed out of the barrel
with a cleaning rod, return the firearm to the factory
or to an AAC Authorized Repair Center.
WARNING! Before loading the firearm, make sure
the inside of the barrel is free of dirt, oil, or other
obstructions. Discharging the firearm with a dirty and/
or obstructed barrel may cause property damage,
personal injury and/or death.
BOLT
1. A lways keep the firearm pointed in a safe direction.
7. To check for an obstruction by looking through the
receiver and barrel from the chamber end.
9. Lightly tap the cleaning rod against the obstruction to
free the object from the barrel.
WARNING! Before disassembling your firearm, make
sure it is completely unloaded (both the chamber and
the magazine) and engage the safety mechanism by
placing the safety lever in the “S” or “SAFE” position.
Failure to follow these instructions may cause property
damage, personal injury and/or death.
5. Separate Upper Receiver from the Lower Receiver.
FIGURE 19
6. Pull back Charging Handle fully rearward.
See Figure 19.
FIGURE 23
7. Pull the Bolt Assembly fully rearward and remove
it from the Upper Receiver. See Figure 20.
8. Remove the Charging Handle by pulling rearward
and up until the “Ears” clear the cutouts in Upper
Receiver. See Figure 22.
FIGURE 20
9. Remove Firing Pin Retaining Pin. A Bullet tip can help
push it out of the Bolt Carrier. See Figure 23.
FIGURE 24
NOTE: Do not open or close the split end of Firing Pin
Retaining Pin, and do not substitute a common cotter pin
on reassembly.
10. Remove the Firing Pin from the rear of the Bolt
Carrier. See Figure 24.
11. Push the Bolt fully rearward into Bolt Carrier.
See Figure 25.
FIGURE 25
12. Remove the Cam Pin by rotating it 1/4 turn and lifting
it out of the Bolt Carrier. See Figure 26.
13. Pull the Bolt Assembly out of the Bolt Carrier.
See Figure 27.
14. Press the rear of the Extractor to check the Extractor
Spring function. The Extractor should return to its
original position when the pressure is removed.
AAC — BLACK RIFLE MANUAL
FIGURE 26
15
DISASSEMBLE USING STEPS 15 THROUGH 18 ONLY
WHEN PARTS ARE DIRTY OR DAMAGED.
NOTE: The Extractor Spring is under compression and
may be easily lost when the Extractor Pin is removed.
15. Remove the Extractor Pin by pushing it out with a
punch or the tip of a Bullet. See Figure 28.
DON’T LOSE IT!
FIGURE 30
16. Remove the Extractor and Extractor Spring. See
Figure 29.
ith Hammer cocked, depress Buffer Retainer with
17. W
a punch or Bullet tip to release the Buffer and Spring.
See Figure 30.
CAUTION! The Buffer is under compression from
the Action Spring.
NOTE: The Hammer needs to be cocked to allow the
Buffer and Buffer Spring to clear Lower Receiver.
emove the Buffer and Action Spring from the
18. R
Lower Receiver for cleaning. See Figure 31.
AAC DOES NOT RECOMMEND ANY
FURTHER DISASSEMBLY.
FIGURE 27
FIGURE 31
INSPECTION/CLEANING/LUBRICATION
WARNING! Before cleaning your firearm, make sure
it is completely unloaded (both the chamber and the
magazine) and engage the safety mechanism by
placing the safety lever in the “S” or “SAFE” position.
Failure to follow these instructions may cause property
damage, personal injury and/or death.
WARNING! After each use, follow the lubrication and
maintenance directions in this Owner’s Manual. If the
firearm is immersed in water, it must be thoroughly
cleaned and lubricated as soon as possible. In case
of saltwater immersion, first flush all parts with fresh
water, then dry, clean and lubricate the firearm. If the
firearm does not function properly, have it checked and
corrected by an AAC Authorized Repair Center before
further use. Failure to follow these instructions may lead
to firearm malfunctions which could result in property
damage, serious personal injuries and/or death.
After discharging your rifle, clean it as soon as possible
to avoid corrosion. When your firearm has not been
fired, you should clean it at least once or twice a year
if you live in a temperate climate, or as often as once a
week in a tropical climate.
FIGURE 28
FIGURE 29
AAC — BLACK RIFLE MANUAL
If you get your firearm wet, clean it as soon as possible
to avoid the onset of corrosion/rust. Use a high quality
rifle cleaning kit that includes a cleaning rod; swab
holder; cotton flannel bore patches; pipe cleaners; a
small toothbrush; brass wire bristle bore and chamber
brushes and a Cleaner/Lubricant/Preservative (CLP in
Army terminology). Plus, a small brush (old toothbrush)
for cleaning parts and dislodging dirt build-up, and pipe
cleaners or Q-tips for cleaning Gas Key and Gas Tube
and other hard to reach areas.
NOTE: The procedures below describe cleaning your
firearm with a standard military issue multi-piece
rod cleaning kit. Other commercial cleaning kits may
include alternate cleaning instructions which may be
just as effective.
2. R
emove the magazine, pull and hold the bolt fully
rearward to inspect the chamber. See Figure
11. Visually and physically verify the Chamber is
completely unloadedSee the section “Clearing/
Unloading Your Rifle”.
WARNING! Excessive use of a lubricant could adversely
affect the function and safe operation of your firearm.
Failure to properly maintain your firearm can not only
damage your firearm, it can expose you and others to
unnecessary risks of property damage, personal injury
and/or death.
3. D
isassemble the firearm per the instructions in
the “Disassembling Your Firearm,” section of
this manual.
When the firearm is to be stored, it should be
carefully cleaned and thoroughly oiled. Outside
metal surfaces should be wiped with Rem Oil ™
occasionally. When the firearm is to be reused, all
excess lubrication must be removed. The chamber
and bore must be thoroughly wiped dry. For safe and
dependable operation of your firearm, the barrel and
action must be cleaned periodically.
5. Attach the Patch Holder to the Cleaning Rod, but
leave it two turns short of tight.
NOTE: Remington’s Rem Oil ™ is available from your
local dealer. If your dealer is out of stock, ask him to
order Rem Oil™ from his Remington Distributor.
WARNING! The use of non-recommended lubricants
or cleaners could adversely affect the function and
safe operation of your firearm. Do not use congealing
lubricants. The use of non-congealing lubricants such
as Rem Oil™ is strongly recommended. The use of
improper lubricants could cause property damage,
personal injury and/or death
CLEANING THE BORE
WARNING! Unload the firearm before cleaning. Look
into the ejection port and visually check the chamber
and magazine to make sure there are no cartridges in
the firearm. Always wear eye protection when handling,
disassembling and reassembling the firearm. Failure to
follow these instructions may cause property damage,
personal injury and/or death.
The bore of your rifle has Lands and Grooves called
“Rifling”. Rifling makes the bullet spin very fast as it
moves down the Bore and down range. It is difficult
to push a new, stiff Bore Brush through the Bore.
You will find it much easier, and more effective, to
pull your Bore Brush through the Bore. Also, because
the brush will clean better if the bristles follow the
grooves (this is called tracking), you want the Bore
Brush to be allowed to turn as you pull it through.
ALWAYS CLEAN FROM CHAMBER TOWARD THE
MUZZLE. Follow these steps:
1. Always keep the firearm pointed in a safe direction.
4. Attach the three Cleaning Rod Sections together, but
leave each one about two turns short of being tight.
6. Holding only the Upper Receiver in one hand, Point
Muzzle down.
7. Insert the threaded end of the Cleaning Rod into the
Chamber. Guide the Rod carefully through the Bore.
CAUTION: Do not let the Cleaning Rod or its threaded
end scratch the Bore or Chamber. About 2 - 3 inches
of the Rod should protrude out of the Muzzle.
8. A ttach the Handle Section of the Cleaning Rod to the
end of the Rod sticking out of the Muzzle, and swab
out the Bore with a patch moistened with “CLP”.
9. Remove Patch Holder and attach the Bore Brush
(leaving it two turns short of tight).
10. Remove the Handle Section of the Cleaning Rod.
11. Insert the threaded end of the Cleaning Rod into
the Chamber. Guide the Rod carefully through
the Bore.
12. Attach the Handle Section of the Cleaning Rod to
the end of the Rod sticking out of the Muzzle.
13. Pull the Brush through the Bore and out the
Muzzle. You should be able to see the Rod
twisting as you pull it - this is the Brush
“tracking” in the rifling. Never reverse the
direction of the Bore Brush while it is in the Bore.
14. After one pull, take off the Handle Section and
repeat steps 11 - 13 three to four times. If the
three rod sections and the Bore Brush become
screwed tightly together, loosen them two turns.
epeat steps 5 – 14 until the bore is clean.
15. R
16. Push a clean patch saturated with Rem Oil™
through the barrel.
17. Push a clean dry patch through the barrel to
remove excess lubricant.
17
18. A pply a light application of Rem Oil™ to the
outside of the barrel with a soft clean cloth.
WARNING! When checking the bolt, look for cracks or
fractures, especially in the Cam Pin hole area. A bolt
showing cracks or fractures should be replaced. Use
of a cracked or fractured bolt may cause property
damage, personal injury and/or death.
WARNING! After cleaning, make sure the barrel is free
of obstructions, see the “Checking for and Removing a
Barrel Obstruction,” section of this manual. Discharging
the firearm with a dirty and/or obstructed barrel may
cause property damage, personal injury and/or death.
FIGURE 32
CLEANING THE UPPER RECEIVER
WARNING! Unload the firearm before cleaning. Look
into the ejection port and visually check the chamber
and magazine to make sure there are no cartridges in
the firearm. Always wear eye protection when handling,
disassembling and reassembling the firearm. Failure to
follow these instructions may cause property damage,
personal injury and/or death.
WARNING! Check to ensure that there is no looseness
between the Barrel and the Upper Receiver. If you
detect any movement by twisting or pulling the barrel
relative to the receiver, the Barrel Nut must be retorqued. Have the firearm serviced an AAC Authorized
Repair Center before further use. Failure to follow
these instructions may lead to firearm malfunctions
which could result in property damage, serious
personal injuries and/or death.
1. Always keep the firearm pointed in a safe direction.
2. R
emove the magazine, pull and hold the bolt fully
rearward to inspect the chamber. See Figure
11. Visually and physically verify the Chamber is
completely unloaded. See the section “Clearing/
Unloading Your Rifle”.
isassemble the firearm per the instructions in the
3. D
“Disassembling Your Firearm,” section of this manual.
WARNING! When checking the Cam Pin, it should be
replaced if it is cracked or chipped. Use of a damaged
Cam Pin may cause property damage, personal injury
and/or death.
FIGURE 33
CLEANING THE BOLT, BOLT
CARRIER & COMPONENTS
WARNING! Unload the firearm before cleaning. Look
into the ejection port and visually check the chamber
and magazine to make sure there are no cartridges in
the firearm. Always wear eye protection when handling,
disassembling and reassembling the firearm. Failure to
follow these instructions may cause property damage,
personal injury and/or death.
1. Always keep the firearm pointed in a safe direction.
2. Remove the magazine, pull and hold the bolt fully
rearward to inspect the chamber. See Figure
11. Visually and physically verify the Chamber is
completely unloaded. See the section “Clearing/
Unloading Your Rifle”.
sing a “CLP“ type product, clean all areas of
4. U
the Upper Receiver (inside and out) of Powder
Fouling, Corrosion and Dirt. To avoid scratching
and damaging the finish of your Aluminum Upper
Receiver, never use a wire brush or any type of
abrasive cleaner. A Toothbrush works well for
loosening buildup, and will not scratch the Receiver.
3. Disassemble the firearm per the instructions in the
“Disassembling Your Firearm,” section of this manual.
lean the Chamber by dipping the larger Chamber
5. C
Brush in CLP. Use at least 5 plunge strokes and 3 360° clockwise rotations when cleaning the Chamber.
6. With a brush (wet with CLP) clean the Bolt Locking
Lugs, Bolt Rings, Firing Pin and Bolt Cam Pin. See
Figure 21.
6. S wab out the Bore as described previously to remove
contaminated solution or loosened fouling.
7. With a non-abrasive brush (wet with CLP) clean the
extractor spring. See Figure 33.
7. W
ipe all components clean and dry
8. Wipe all components clean and dry.
8. Inspect all components for excessive wear, corrosion
or mechanical damage. Have your AAC Authorized
Repair Center replace any worn or defective parts
before discharging the firearm again.
9. Inspect all components for excessive wear, corrosion
or mechanical damage. Have your AAC Authorized
Repair Center replace any worn or defective parts
before discharging the firearm again.
AAC — BLACK RIFLE MANUAL
WARNING! When checking the Bolt Face, the bolt
should be replaced if any pitting extends into the
firing pin hole. Use of a pitted Bolt Face may cause
property damage, personal injury and/or death.
4. Use the Bore Brush (wet with CLP) to clean carbon
and powder residue from around the Gas Tube. See
Figure 32.
5. Run a Pipe Cleaner through the Gas Tube.
NOTE: When checking the Firing Pin, it should
be replaced if it is bent, cracked, too blunted or
too sharp. Misfires often result from the use of a
damaged Firing Pin.
NOTE: When checking the Firing Pin Retaining Pin,
it should be replaced if it is bent, or badly worn, it
should be replaced. Never use a “Cotter Pin” as a
substitute for a real Firing Pin Retaining Pin. Cotter
pins are not made of heat treated spring steel and
their round head shape may cause damage to the
Upper Receiver.
NOTE: When checking the Extractor and Extractor
Spring, the Extractor should be replaced if it is
chipped or has broken edges in the area of the lip
that engages the cartridge case head. The Extractor
Spring should be replaced if it is cracked or broken.
The Extractor Spring O-Ring should be replaced if it is
crack or broken.
3. D
isassemble the firearm per the instructions in the
“Disassembling Your Firearm,” section of this manual.
4. With the Bolt removed from the Bolt Carrier and the
Extractor installed, place a few drops of CLP around
the Ejector to form a puddle. See Figure 34.
5. Take a fired or dummy cartridge and place it under
the lip of the Extractor.
6. With a rocking motion, press the cartridge down
against the Ejector. The Ejector is spring loaded
and some resistance will be felt.
7. Depress the Ejector with the cartridge until it stops
against the bolt face.
8. A llow the Ejector to fully extend by releasing
pressure from the cartridge.
9. Repeat steps 6 – 8 several time, until the Ejector
moves smoothly. Replace the CLP frequently.
10. Wipe all components clean and dry.
11. Inspect all components for excessive wear, corrosion
or mechanical damage. Have your AAC Authorized
Repair Center replace any worn or defective parts
before discharging the firearm again.
NOTE: When checking the Ejector, the Ejector should
be replaced if it is chipped, cracked, bent, blunted
or has little return force. Have a damaged Ejector
serviced by an AAC Authorized repair center.
CLEANING / LUBRICATING
THE EJECTOR
WARNING! Unload the firearm before cleaning. Look
into the ejection port and visually check the chamber
and magazine to make sure there are no cartridges in
the firearm. Always wear eye protection when handling,
disassembling and reassembling the firearm. Failure to
follow these instructions may cause property damage,
personal injury and/or death.
NOTE: Disassembly of the Ejector is not recommended.
Make sure your firearm ejects empty cases efficiently
by following these steps when cleaning:
1. Always keep the firearm pointed in a safe direction.
2. Remove the magazine, pull and hold the bolt fully
rearward to inspect the chamber. See Figure
11. Visually and physically verify the Chamber is
completely unloaded. See the section “Clearing/
Unloading Your Rifle”.
19
CLEANING THE LOWER RECEIVER
7. Inspect and wipe clean the Bolt Catch Mechanism.
WARNING! Unload the firearm before cleaning. Look
into the ejection port and visually check the chamber
and magazine to make sure there are no cartridges in
the firearm. Always wear eye protection when handling,
disassembling and reassembling the firearm. Failure to
follow these instructions may cause property damage,
personal injury and/or death.
8. Inspect and wipe clean the Receiver’s Takedown
and Pivot Pins.
1. Always keep the firearm pointed in a safe direction.
2. Remove the magazine, pull and hold the bolt fully
rearward to inspect the chamber. See Figure
11. Visually and physically verify the Chamber is
completely unloaded. See the section “Clearing/
Unloading Your Rifle”.
3. Disassemble the firearm per the instructions in the
“Disassembling Your Firearm,” section of this manual.
4. Using a “CLP“ type product, clean all areas of
the Lower Receiver (inside and out) of Powder
Fouling, Corrosion and Dirt. To avoid scratching
and damaging the finish of your Aluminum Lower
Receiver, never use a wire brush or any type of
abrasive cleaner. A toothbrush works well for
loosening buildup and will not scratch the Receiver.
5. Wipe any dirt from the Trigger Mechanism.
6. Carefully clean the Magazine Release Button and
the cavity for the Magazine Catch on the left side
of the Receiver.
9. Wipe clean the Buffer and Action Spring.
10. W
ipe clean the inside of the Lower Receiver
Extension (Buffer Tube). A piece of rag attached to
the Cleaning Rod and Patch Holder can be used to
wipe inside the Buffer Tube.
11. Pull the Telescoping Stock Latch down to slide Stock
rearward from the Lower Receiver Extension.
12. Clean the Lower Receiver Extension Stock Lock Holes.
13. Lightly lube the Lower Receiver Extension
and Latch Mechanism to ensure proper Stock
telescoping action.
14. P ull the Telescoping Stock Latch down and slide
Stock on the Lower Receiver Extension. Ensure the
Stock Latch engages one of the Lower Receiver
Extension Stock Lock Holes.
15. W
ipe all components clean and dry.
16. Inspect all components for excessive wear, corrosion
or mechanical damage. Have your AAC Authorized
Repair Center replace any worn or defective parts
before discharging the firearm again.
LUBRICATION – UPPER &
LOWER RECEIVERS
UPPER RECEIVER
WARNING! Unload the firearm before lubricating. Look
into the ejection port and visually check the chamber
and magazine to make sure there are no cartridges in
the firearm. Always wear eye protection when handling,
disassembling and reassembling the firearm. Failure to
follow these instructions may cause property damage,
personal injury and/or death.
1. Always keep the firearm pointed in a safe direction.
2. Remove the magazine, pull and hold the bolt fully
rearward to inspect the chamber. See Figure
11. Visually and physically verify the Chamber is
completely unloaded See the section “Clearing/
Unloading Your Rifle”.
LOWER RECEIVER
WARNING! Unload the firearm before lubricating. Look
into the ejection port and visually check the chamber
and magazine to make sure there are no cartridges in
the firearm. Always wear eye protection when handling,
disassembling and reassembling the firearm. Failure to
follow these instructions may cause property damage,
personal injury and/or death.
1. Always keep the firearm pointed in a safe direction.
2. Remove the magazine, pull and hold the bolt fully
rearward to inspect the chamber. See Figure
11. Visually and physically verify the Chamber is
completely unloaded See the section “Clearing/
Unloading Your Rifle”.
3. D
isassemble the firearm per the instructions in the
“Disassembling Your Firearm,” section of this manual.
3. Disassemble the firearm per the instructions in the
“Disassembling Your Firearm,” section of this manual.
4. Inspect, clean and lubricate the firearm per the
instructions in the “Inspect/Cleaning/Lubricating,”
section of this manual.
4. Inspect, clean and lubricate the firearm per the
instructions in the “Inspect/Cleaning/Lubricating,”
section of this manual.
5. L ightly lubricate inside the Lower Receiver Extension
(Buffer Tube).
5. Lightly lubricate the inside of Upper Receiver, the Bore
and Chamber (using the cleaning rod and a patch).
6. Lightly lubricate the outer surfaces of the Barrel,
Front Sight and surfaces under the Hand guard.
7. Lubricate in and around all the Locking Lugs.
See figure 34.
8. T he Forward Assist should be lightly lubed inside the
Receiver and checked for function.
6. L ightly lubricate the Buffer and the Action Spring.
7. L ightly lubricate the Telescoping Stock Latch and
exterior of the Receiver Extension.
8. L ubricate all the moving parts inside the lower
receiver, including the Trigger, Hammer, Safety,
Bolt Catch, Magazine Release, and their various
Pins and Detents.
9. L ightly lubricate the Takedown and Pivot Pins and
their Detents. Use an oiled rag to wipe off any
fingerprints on the exterior surfaces (they can start
the corrosion process). A black cloth is best as it
won’t leave visible lint.
FIGURE 34
AAC — BLACK RIFLE MANUAL
21
BOLT ASSEMBLY
1. Always keep the firearm pointed in a safe direction.
WARNING! Unload the firearm before lubricating. Look
into the ejection port and visually check the chamber
and magazine to make sure there are no cartridges in
the firearm. Always wear eye protection when handling,
disassembling and reassembling the firearm. Failure to
follow these instructions may cause property damage,
personal injury and/or death.
2. Remove the magazine, pull and hold the bolt fully
rearward to inspect the chamber. See Figure
11. Visually and physically verify the Chamber is
completely unloadedSee the section “Clearing/
Unloading Your Rifle”.
FIGURE 35
1. Always keep the firearm pointed in a safe direction.
4. Inspect, clean and lubricate the firearm per the
instructions in the “Inspect/Cleaning/Lubricating,”
section of this manual.
2. Remove the magazine, pull and hold the bolt fully
rearward to inspect the chamber. See Figure
11. Visually and physically verify the Chamber is
completely unloaded See the section “Clearing/
Unloading Your Rifle”.
3. Disassemble the firearm per the instructions in the
“Disassembling Your Firearm,” section of this manual.
5. Ensure the Hammer is fully cocked and the safety
lever is in the “Safe” position.
FIGURE 36
NOTE: Extractor Assembly has a Rubber Insert within
the Extractor Spring. If the Extractor Spring comes
loose, put the large end of the Extractor Spring in the
extractor and seat it by pushing down on the Rubber
Insert (a Bullet tip works well). See Figure 35.
5. L ightly lubricate the Firing Pin and the Firing Pin
recess in the Bolt with oil.
7. Lightly lubricate the Charging Handle and its Latch
and Spring.
FIGURE 37
SIDE RAIL AREA
8. Lightly lubricate the inner and outer surfaces of the
Bolt Carrier. Generously lubricate the Cam Pin area
and the “Slide” Rail areas of the Bolt Carrier where
they contact the inside of the Receiver. (Figure 40)
9. T he inside of the Carrier Key on the Bolt Carrier should
be dried with a Q-Tip or Pipe Cleaner - then place one
drop of CLP inside.
9. P ress the rear of the Extractor to check the Extractor
Spring Function. The Extractor should return to its
original position when the pressure is removed.
11. Twist the Bolt to align the Cam Pin Hole in the Bolt
with the Cam Profile in the Bolt carrier.
FIGURE 38
12. Insert the Cam Pin in the Bolt Assembly. See
Figure 36.
NOTE: The Cam Pin can only be installed in Bolt from one
side, if it does not fit, twist the Bolt 180° and try again.
13. Once Cam Pin is fully inserted, twist it 90° (this will
allow insertion of the Firing Pin).
FIGURE 39
WARNING! No components/parts may be left out of
the reassembly of your firearm. Failure to use all the
components/parts and assemble them properly may
cause property damage, personal injury and/or death.
WARNING! The cam pin must be installed in the Bolt
Assembly. Use of a Bolt Assembly without the Cam
Pin may cause property damage, personal injury and/
or death.
16. Reinsert the Firing Pin Retaining Pin. See Figure 38.
NOTE: After reinserting Firing Pin Retaining Pin, the
Firing Pin should not fall out when Bolt Carrier Group is
turned with the bolt facing up.
WARNING! Do not interchange bolts between different
firearms. Using an improper bolt with your firearm may
cause property damage, personal injury and/or death.
17. Insert Charging Handle into Upper Receiver and
lower the “ears” at front end of Handle into cutouts
in Upper Receiver.
18. If the Ejection Port Cover is closed, open it.
19. S lide Charging Handle partially into the
Upper Receiver.
20. Insert the complete Bolt Carrier Assembly into
Upper Receiver. The Gas Key will fit into groove in
the Charging Handle. See Figure 39.
NOTE: If the Bolt is not fully pulled forward of the Bolt
Carrier when the assembly is inserted into the Upper
Receiver, the Cam Pin will hit the receiver, preventing
assembly.
21. Slide the Bolt Carrier Assembly and Charging
Handle fully into the Upper Receiver. The Charging
Handle Latch will lock onto the Upper Receiver.
22. T o join the Upper and Lower Receivers, position the
Pivot Pin Lug of Upper Receiver into slot at front of
Lower Receiver and push Pivot Pin into place. See
Figure 40.
23. P ivot the Upper Receiver onto the Lower receiver
until they are fully mated, push in Takedown Pin.
See Figure 41.
NOTE: Pivot Pin and Takedown Pin are captured in the
Lower Receiver, preventing them from falling out and
becoming lost.
onduct a function check per the steps shown in
24. C
the “Safety Function Check,” section of this manual.
14. Insert the Firing Pin into the Bolt Assembly. See
Figure 24.
FIGURE 40
AAC — BLACK RIFLE MANUAL
8. F irmly push the Extractor into the bolt to compress
the Extractor Spring and reinsert Extractor Pin.
10. Insert Bolt into Bolt Carrier.
REASSEMBLING YOUR RIFLE
WARNING! Before reassembling your firearm, make
sure it is completely unloaded (both the chamber and
the magazine) and engage the safety mechanism by
placing the safety lever in the “S” or "SAFE" position.
Failure to follow these instructions may cause property
damage, personal injury and/or death.
6. Depress the Buffer Retainer and insert the Action
Spring and Buffer.
7. Insert Extractor and Extractor Spring into the Bolt.
4. Inspect, clean and lubricate the firearm per the
instructions in the “Inspect/Cleaning/Lubricating,”
section of this manual.
6. G
enerously lubricate the Bolt, its Cam Pin area and
the Bolt Gas Rings. A lighter application is good on the
Extractor and its Pin.
3. Disassemble the firearm per the instructions in the
“Disassembling Your Firearm,” section of this manual.
15. Pull Bolt fully forward of the Bolt Carrier. See
Figure 37.
FIGURE 41
23
TROUBLESHOOTING
DIRT, CORROSION, OR
CARBON BUILDUP IN BARREL
LOCKING LUGS
Clean Lugs
PROBLEM:
CHECK FOR:
WHAT TO DO:
RIFLE WON’T FIRE
SELECTOR LEVER ON SAFE
Put it on fire
SHORT RECOIL
Loose Carrier Key Screws
Have Gunsmith torque and stake key screws
IMPROPER ASSEMBLY OF FIRING
PIN
Assemble correctly - Retaining pin goes in
back of large shoulder on firing pin
BOLT FAILS TO LOCK
CARBON OR DIRT IN CARRIER KEY
OR ON OUTSIDE OF GAS TUBE
Clean Carrier Key or around Gas Tube
TOO MUCH OIL IN FIRING PIN
RECESS through bolt
Wipe out with pipe cleaner
AFTER LAST ROUND
Clean out if possible or have rifle checked
by gunsmith
DEFECTIVE AMMUNITION
Remove and discard
Q-TIP, PIPE CLEANER PIECES, OR
OTHER DEBRIS STUCK INSIDE
CARRIER KEY
TOO MUCH CARBON ON FIRING PIN
OR IN FIRING PIN RECESS
Clean
SELECTOR LEVER
BINDS
Needs Oil
Lubricate with oil
Dirt or sand under trigger
Clean
BOLT WON’T UNLOCK
DIRTY OR DAMAGED BOLT
Clean, or see your gunsmith
BOLT Carrier
BROKEN EXTRACTOR SPRING
See your gunsmith
DIRTY OR CORRODED AMMO
Remove stuck round with cleaning rod
Round jammed between bolt
and charging handle and /or
double feed
1. Remove magazine.
WON’T EXTRACT
CARBON IN CHAMBER
Clean chamber
FOULING OR CARBON IN
EXTRACTOR RECESS OR LIP
Clean extractor
3. W
hile pulling down on charging Handle, tap
the rifle butt on the ground. Bolt should lock
to the rear.
FROZEN EXTRACTOR
Remove and Clean
4. While bolt is held to the rear, round should fall
through the magazine well.
RESTRICTED BUFFER ASSEMBLY
Remove and Clean
RESTRICTED MOVEMENT OF BOLT
CARRIER GROUP
Remove, clean, and lube (Before putting Bolt
back in, make sure Gas Tube fits into Carrier Key
and that the Carrier moves freely)
DIRTY OR CORRODED AMMO
Remove and discard
DIRTY MAGAZINE
Clean
WON’T FEED
DEFECTIVE MAGAZINE
Replace
TOO MANY ROUNDS IN MAGAZINE
Take out excess
ACTION OF BUFFER ASSEMBLY IS
RESTRICTED
Clean the Buffer an Action Spring
MAGAZINE NOT FULLY SEATED
Adjust Magazine Catch: Press magazine
catch button on right side, then turn catch on
left side. Turn catch clockwise to tighten or
counterclockwise to loosen.
DOUBLE FEED
DEFECTIVE MAGAZINE
Replace
WON’T CHAMBER
DIRTY OR CORRODED AMMO
Remove and discard
WON’T LOCK
DAMAGED AMMO
Remove and discard
CARBON IN CHAMBER OR
ON GAS TUBE
Clean
AAC — BLACK RIFLE MANUAL
2. Push in on the bottom of the bolt latch.
Note: if this procedure fails, use a section of the
cleaning rod to push the bolt fully to the REAR
THROUGH THE EJECTION PORT.
MAINTENANCE IN
EXTREME WEATHER
EXTREME COLD: Clean and lubricate Rifle in a warm
room with Rifle at room temperature. Do not lay a warm
Rifle directly on snow or ice. Moving Rifle from cold into
warmth will cause condensation which could keep Rifle
from functioning.
HOT, WET CLIMATES: Clean and lube Rifle more
frequently in moist climates. Inspect hidden surfaces
of Bolt and Carrier Assembly, Upper Receiver, and
Chamber / Barrel Extension (Locking Lugs), and Lower
Receiver and Receiver Extension Assembly (Buffer
Tube) for rust or corrosion. Also pay close attention to
the Spring Loaded Detents on the rifle. Wipe off any
hand / finger prints on the Rifle as they can accelerate
the onset of rust or corrosion.
RAINS: DO NOT FIRE THE RIFLE IF WATER IS PRESENT
IN THE BARREL. ALWAYS drain any water from Barrel
prior to firing. Dry the Bore with a Swab and Cleaning
Rod if wet.
COMPONENT VARIATIONS
This manual is intended to instruct the AAC Rifle
Operator in all necessary aspects of Maintenance,
Disassembly, Reassembly, Operation and
Troubleshooting of any AR15-style AAC Rifle. Within
the AAC Weapon System family, there can be infinite
variations of Barrel Length, Stock Type, Receiver,
Forend and Sights. The rifle you own, or are using,
may vary in appearance from the photographs
and illustrations in this Manual, but the concepts,
procedures and practices recommended in this Manual
are universal to the AAC AR15-style weapon family.
300 AAC BLACKOUT PDW UPPER
The 300 AAC BLACKOUT (300 BLK) cartridge is highly
efficient and in most cases outperforms 5.56mm with
less powder and resulting blast. The included AAC
BLACKOUT flash suppressor eliminates all secondary
muzzle flash. These properties make it ideal for
personal security.
25
MAGAZINES
ACTION SPRING/BUFFER
AAC 300 BLACKOUT ammo can feed from standard
USGI or Magpul P-Mags. A magazine with the standard
MIL-STD 17-7 stainless spring may be stored fully
loaded with 30 rounds indefinitely. Note that Chrome
Silicon springs will not resist taking a set better than
MIL-STD 17-7 magazine springs regardless of how they
have been marketed.
The 16 inch upper with a carbine length gas system
should use a “C” rated buffer. All other uppers should
use an H2 buffer (160 grams). H3 buffer may be a
good choice if you don’t intend to shoot subsonic
without a sound suppressor or typically shoot
supersonic ammo. Do not use a solid 9mm buffer as
it may cause bolt bounce.
SOUND SUPPRESSORS
EXTRACTOR SPRINGS
The recommended sound suppressor is the AAC
762-SDN-6. This has been tested to provide a good
balance between sound level, weight, accuracy, and
reliable function. Suppressed SPL with AAC subsonic
ammunition is approximately 126 dB both using MILSTD measurements and at the shooter’s ear.
We have 5.56mm test data for the Bushmaster ‘4 coil’
extractor spring with an o-ring. Four uppers completed
a 12,000 round test with no extractor spring related
failures. Two uppers completed an 18,000 round test
with no extractor spring related failures.
AMMUNITION
We do not recommend using
extra-power extractor springs
because they are under higher
stress and will likely break sooner. The included green
o-ring adds the desired extra extractor force without
requiring a spring which would have more force
and hence more stress. Extra-power springs, when
combined with an o-ring, may make the extractor
harder to snap over the case rim and may lead to
function problems. If you do use such a spring, please
don’t use an o-ring and change the spring every 1500
rounds for mission-critical use. The green color of the
o-ring signifies that it meets AAC specifications for
endurance and elasticity at low temperatures.
NOTE: Again per our spring discussion, Chrome Silicon
springs do not resist taking a set better than ASTM
A228 certified music wire when used at temperatures
below 250 degrees F.
There are two special considerations for the AAC
upper - gas port pressure, and reliable feeding
from a magazine. 300 AAC BLACKOUT (300 BLK)
ammo from Advanced Armament Corp. is designed
for reliable function in self-loading firearms. Visit
www.300AACBLACKOUT.com for ammunition
information.
USER MODIFICATIONS
The gas-port diameter was selected after thousands
of rounds of function testing and high-speed video
analysis. We do not recommend you enlarge your gasport to aid subsonic function because then supersonic
ammunition will hyper-cycle the upper which will
reduce the reliability and part life durability of the
system. AAC has developed subsonic and supersonic
ammo that both function reliably (with and without an
AAC 762-SDN-6 sound suppressor) without the need
for an adjustable gas block.
BARREL LIFE
The barrel of the AAC BLACKOUT upper is made from
4150 CMV and specially processed to have
up to 60% more life than a chrome-lined barrel and
without the potential loss in accuracy from uneven
coating. This processing also results in extreme
corrosion resistance.
RECREATIONAL USE
HARD USE / COMPETITION
MISSION-CRITICAL USE
Gas Tube
When fails
10,000 rounds
5,000 rounds
Extractor
When fails
10,000 rounds
5,000 rounds
Gas rings
10,000 rounds
5,000 rounds
5,000 rounds
When fails
10,000 rounds
5,000 rounds
Extractor spring/insert/o-ring
15,000 rounds
5,000 rounds
5,000 rounds
Ejector spring
15,000 rounds
10,000 rounds
5,000 rounds
Barrel
50,000 rounds
35,000 rounds
20,000 rounds
Action spring
15,000 rounds
10,000 rounds
5,000 rounds
PART
Bolt
ALWAYS CHECK HEAD SPACE AFTER CHANGING A BOLT, BARREL, OR BARREL EXTENSION.
REPLACEMENT PART NUMBERS
PARTS REPLACEMENT
The Gas block is press-fit and pinned and may not be
removable or replaceable without a press. Additionally,
set screws are secured with both torque and Rocksett.
If you remove the gas block, reset the set- screws to
30-35 inch/lbs of torque and one drop of Rocksett.
The following recommended replacement schedule for
parts depends on the intensity of use and the intended
use. After any parts replacement, give the firearm a
safety/function check before use.
Firing pin retaining pin, Bushmaster part 8448504
M16 Chromed Steel Firing Pin, Bushmaster part 8448503
Extractor pin, Bushmaster part 8448513
Extractor, Bushmaster part 8448512
Ejector assembly, Bushmaster part A EJECT ASS
Cam pin, Bushmaster part 8448502
Bolt Gas Rings (set of 3), Bushmaster part 8448511K
Charging Handle, Bushmaster part 8448617
LIMITED ONE YEAR WARRANTY
ADVANCED ARMAMENT CORP. (AAC) Firearms and
accessories are warranted to be free from defects in
materials and workmanship. Any such defect of which
AAC is given written notice, as provided below, within
one year and ten days from the date of first purchase by
a customer will be remedied by AAC. This warranty is
granted by ADVANCED ARMAMENT CORP. 2408 Tech
Center Parkway, Suite 150, Lawrenceville, GA 30043,
USA.
To initiate a Warranty claim, call AAC
(1-770-925-9988) to get a “Return Merchandise
Authorization” (RMA) number. Warranty claims should
state (in writing) the model and serial number of the
product concerned, a description of the difficulty
experienced, and the date of purchase. The product
concerned should be shipped (transportation charges
prepaid), to the Warranty Service Department,
ADVANCED ARMAMENT CORP. 2408 Tech Center
Parkway, Suite 150, Lawrenceville, GA 30043, USA.
Shipment should be insured by the owner, as AAC will
accept no responsibility for loss or damage in transit.
Under no circumstances shall ADVANCED ARMAMENT
CORP. be responsible for incidental or consequential
damages with respect to economic loss or injury to
property, whether as a result of express or implied
warranty, negligence or otherwise. Some states do
not allow the exclusion of limitation of incidental or
consequential damages, so the above limitation may
not apply to you. ADVANCED ARMAMENT CORP.
will not be responsible for the results of careless
handling, unauthorized adjustments, defective, low
quality, reloaded, or improper ammunition, corrosion,
neglect, ordinary wear and tear, or unreasonable use.
Furthermore, the liability of ADVANCED ARMAMENT
CORP. under this warranty shall be limited solely to the
obligation to repair or replace the firearm or accessory,
and to pay transportation and insurance charges for
return of the firearm or accessory to owner.
NOTE: Handguns and long guns are classified as
FIREARMS or DANGEROUS WEAPONS. Guns are
surrendered by ADVANCED ARMAMENT CORP. with the
express understanding that it assumes no responsibility
for resale handling under local laws and regulations.
9” PDW UPPER
AAC — BLACK RIFLE MANUAL
27
770-925-9988 (Voice) 770-925-9989 (Fax) CAGE: 3K8N3
www.advanced-armament.com
Specifications subject to change. All content © 2012 ADVANCED ARMAMENT CORP. The contents
of this publication may not be reproduced in any form or by any means in whole or in part
without the prior written permission of the copyright owner.
Rev. 10/12