1
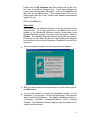
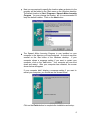
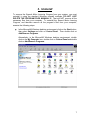
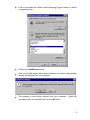
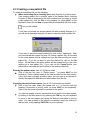
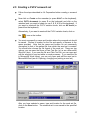
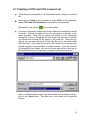
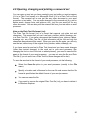
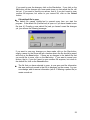
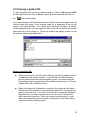
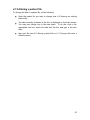
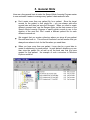
Speech Motor Learning Program
Installation and User Guide
Important note
This manual was devised to help speed up and assist in the usage of the Speech
Motor Learning Approach. Although the text has been created with great care,
the authors shall accept no responsibility for completeness or correctness, for the
contents of the text or for the success of the user‟s actions after following the
information given in this manual. Using the information given in the text is solely
at the user‟s own risk. Furthermore, the text in this guide contains suggestions
and examples only, with no claims made for completeness.
In preparing this guide, the authors assumed that the user has the basic
knowledge of computer usage and the use of Microsoft® Windows as well as
Microsoft® Word. The Speech Motor Learning Software complies with the
standards set by the Microsoft® Windows environment and no efforts were made
in the explanation of standard Windows actions. It is assumed that the user is
familiar with these.
The authors also assumed knowledge of the Speech Motor Learning process as
described in the article on this approach. No principles regarding the Speech
Motor Learning process is explained in this manual and it is assumed that the
user is familiar with the use of the material created by the Speech Motor Learning
software.
The names given in this text are fictitious. Any resemblance to persons alive or
dead is purely coincidental and unintentional.
1. Contents
1.
2.
3.
4.
Contents .......................................................................................................... 2
Installation ........................................................................................................ 3
Uninstall ........................................................................................................... 7
Using the Speech Motor Learning Program ................................................... 10
4.1 Starting the Speech Motor Learning Program .......................................... 10
4.2 The interface ............................................................................................ 11
4.2.1 The main window ............................................................................... 11
4.2.2 The Menubar ..................................................................................... 11
4.2.3 The Toolbar ....................................................................................... 11
4.2.4 Patient name ...................................................................................... 12
4.2.5 Consonants and vowels ..................................................................... 12
4.2.6 Ranges of consonants and vowels .................................................... 13
4.2.7 Reductions ......................................................................................... 13
4.3 Creating a new patient file ........................................................................ 14
4.4 Preparation before creating a word set .................................................... 16
4.5 Creating a CVCV word set ....................................................................... 17
4.6 Creating a CVC word set .......................................................................... 18
4.7 Creating a CVCV and CVC word set ........................................................ 19
4.8 Opening, changing and printing a word set .............................................. 20
4.9 Opening an existing patient file ................................................................ 21
4.10 Saving a patient file ................................................................................ 23
4.11 Saving a patient file under a different name ........................................... 24
4.12 Altering a patient file ............................................................................... 25
5. General Hints ................................................................................................. 26
2
2. Installation
The Speech Motor Learning Program has an automated installer. This installer
handles all the installation procedures. All you need to do is to execute this
installer and follow the onscreen prompts.
To start the installation process, execute the following steps:
Insert the disk you are installing the program from, into the drive.
In the Microsoft® Windows desktop environment (your standard
Windows screen), click on the Start button on the taskbar. Then
click on Run and type the drive name of the drive you are installing
the program from, followed by the file name “Setup.exe” in the field
provided in the window that appears on the screen. Your entry
should be similar to the example below:
A:\Setup.exe
(where A:\ is the drive you are installing the program from).
On most personal computers, the floppy disk drive is drive A:\ and
the CD – Rom is drive D:\. If you are not sure what the name of
your floppy disk drive or CD – Rom is, click on the Browse button
on the screen shown above. A screen similar to the following will
appear:
3
Double click on My Computer and then double-click on the drive
you want to install the program from. If you have selected the
correct drive, two filenames will appear. Click on the Setup file and
then click on the Open button. The original screen will now be
visible again with the correct location and filename automatically
typed in for you.
Click on the OK button.
Alternative:
You could also use Windows Explorer to locate and execute the
Setup.exe file. To do this, right-click on the Start button on the
taskbar in the Microsoft® Windows desktop environment (your
standard Windows screen). A pop-up menu will appear. Click on
Explore. The standard Windows Explorer screen will now appear.
From here you can select the drive you are installing the program
from and then look for the file Setup.exe. Double-click on the file to
execute it.
Once the installer is loaded, the following screen will appear:
After you have carefully read the information on the screen, click on
the Next button.
You are now required to specify the destination directory for the
installation of the program. All the files belonging to the program
will be copied to this directory. The default installation directory is:
C:\Program Files\SM4 Development\Speech Motor Learning
Program. The destination directory appears near the bottom of the
screen, as shown below:
4
It is recommended that you don‟t change this directory, but if you
want to install the program to a different location, click on the
Browse button. The following screen will appear:
Choose the new location to install the program to and click on the
OK button.
After you are satisfied that the installation directory is correct, click
on the Next button.
5
Next you are required to specify the location where a shortcut to the
program will be added in the Start menu on the Windows desktop.
The default location is Start / Programs / Speech Motor Learning
Program. You may change the location, but it is recommended to
keep the default location. Click on the Next button.
The Speech Motor Learning Program is now installed on your
computer in the directory you have selected. A shortcut was also
created on the Start menu of the Windows desktop. If your
computer shows a message asking if you want to restart your
computer, click on the Yes button. Your computer will now shut
down and restart. After your computer has restarted, the screen
shown below will appear.
If your computer didn‟t display a message asking if you want to
restart your computer, you should see the screen below:
Click on the Finish button to complete the installation and setup..
6
3. Uninstall
To remove the Speech Motor Learning Program from your system, you must
uninstall it using the standard Windows uninstall methods. DO NOT JUST
DELETE THE PROGRAM FILES MANUALLY! That will NOT remove all the
necessary files from your computer. To uninstall the Speech Motor Learning
Program, and therefore remove all the program‟s files from your computer,
execute the following steps:
In the Microsoft® Windows desktop environment, click on the Start button,
then select Settings and click on Control Panel. Then double click on
Add/Remove Programs.
Alternatively, in the Microsoft® Windows desktop environment, double
click on the My Computer icon, double click on Control Panel and double
click on Add/Remove Programs.
7
Look for and select the Speech Motor Learning Program option in the list
of programs given.
Click on the Add/Remove button.
Click on the Yes button when asked whether you want to permanently
remove the program from your computer.
The program is now being removed from your computer.
uninstall process is completed, click on the OK button.
When the
8
The Program is now completely removed from your system. The patient files and
word set files that you created and saved with the Speech Motor Learning
Program are still located where you saved them on disk. They were not removed
and should be deleted manually should you wish to do so.
9
4. Using the Speech Motor Learning Program
4.1 Starting the Speech Motor Learning Program
To start the Speech Motor Learning Program, do the following:
In the Microsoft® Windows desktop environment (your standard Windows
screen), click on the Start button on the taskbar, select Programs and
click on Speech Motor Learning Program.
Alternative: If you want to have a shortcut on your Microsoft® Windows
desktop, in addition to the one in the Start menu, do the following:
Click on the Start button on the taskbar of your Microsoft® Windows
desktop and go to Programs. Look for the Speech Motor Learning
Program shortcut and right-click on it. A pop-up menu will appear. Click
on Copy on the pop-up menu. Now click on any place on the desktop
outside the menu to take away the Start-menu. Right-click again on any
open space on your desktop and click on Paste Shortcut on the pop-up
menu that appeared. The shortcut to the program will now appear on your
desktop where you pasted it. If you left-click on the shortcut and hold in
your left mouse button, you can move the shortcut to where you want it to
appear on your desktop. The shortcut will now appear on your desktop
every time you start Microsoft® Windows.
To start the Speech Motor Learning Program in the future, just doubleclick on the shortcut you have created on your desktop.
When you open the Speech Motor Learning Program, the main window will
appear. The application is now ready for use.
10
4.2 The interface
4.2.1 The main window
In the top left corner of the main window of the Speech Motor Learning Program
the name of the file you are currently working on, is displayed. When the
program is opened, there is no open file and the filename is Untitled.
In the top right corner of the main window, you will find the standard Microsoft®
Windows icons to Minimize, Maximize and Close the program.
4.2.2 The Menu bar
At the top of main window you will see the menu bar with the menus File, View,
Create and Help.
The File menu contains the options for creating, saving and opening your files,
for exiting the program, as well as a list of the most recent files you have worked
on.
The View menu contains options to display or hide the toolbar and the status bar.
The Create menu contains the different options for creating CVC and CVCV
word sets.
The Help menu contains information about the program.
4.2.3 The Toolbar
The toolbar contains the shortcuts to the most commonly used tools. All the tools
on the toolbar are available in the menu bar as well, but it is quicker to select one
of these tools from the toolbar than from the menu bar.
The toolbar contains the following icons:
Create a new document
Open an existing file
Save the current file
Create CVCV and CVC word sets
11
Create CVCV word sets
Create CVC word sets
About SML
4.2.4 Patient name
A space is provided where you can supply the name of the person for whom the
nonword set is to be created or any other name by which you can identify the
specific nonword set. This name will be written on the top of the word set and
will serve as identification.
4.2.5 Consonants and vowels
On the main window of the Speech Motor Learning Program you will find spaces
where you are required to specify the consonants and vowels you want to create
a nonword set from. Note that you may use more than one consonant or vowel
to represent a sound, like „sl‟ or „au‟. In this instance, simply type the two letters
as one sound in the desired space.
12
4.2.6 Ranges of consonants and vowels
Before creating a word set, you should specify which of the sounds you have
specified, should be used in the nonword set. You do this by specifying a range
for the vowels and a range for the consonants. All the sounds within those two
respective ranges will then be used in creating the nonword set.
4.2.7 Reductions
The more consonants and vowels you use in creating a nonword set, the bigger
the resulting set will be. It will often be necessary to specify a reduction on the
resultant nonword set. If not, the nonword set may be thousands of pages long!
The Speech Motor Learning Program allows five different types of reductions:
None, Small, Medium, Large, Huge. When choosing a reduction, a certain
number of nonwords will be removed from the set you create, to make it smaller
and more manageable. Note, that the names of the reductions specify the
number of nonwords to be REMOVED and not the number of nonwords that
remain after the reduction. When choosing None, no nonwords will be removed
from the set and the set will thus contain all possible nonwords consisting of the
sounds you chose.
13
4.3 Creating a new patient file
To create a new patient file, do the following:
When an existing file is currently open: (skip this step if no file is open)
If an existing patient file is currently open in the Speech Motor Learning
Program (if data is displayed in the main window) and you want to create
a new patient file, click on File on the menubar (or press Alt+F on the
keyboard), then click on New (or press N on the keyboard) OR click on the
icon on the toolbar.
If you have not saved the current patient file after making changes to it,
you will see a message, asking if you want to save the current patient file.
If you want to save the current patient file, click on the Yes button. After
you have saved the current file (see 4.5 Saving a patient file), all the data
on the main window will be cleared and you can start working on a new
patient file. If you do not want to save the current file, click on the No
button. All the data on the main window will be cleared and you can start
working on a new patient file. If you click on the Cancel button, your
action will be canceled and you‟ll return to the current patient file.
Entering the patient name: (see 4.2.4 Patient name)
Click in the text box next to “Patient name: ” (or press Alt+P on the
keyboard). Enter a patient name in the field provided on the main screen.
If you don‟t want to supply a patient name, you can type in any phrase to
identify the patient file and the word sets created from the file.
Supplying the desired consonants: (see 4.2.5 Consonants and vowels)
Click in the first open space (the space next to 1:) in the box with the
heading Consonants in priority order (or press Alt+S on the keyboard).
Type in the first (most important) consonant in the space.
You can now supply as many consonants as you want in the open spaces,
by clicking in the next space or by pressing the Tab key on your keyboard
to move to the next space and typing the desired consonants in priority
order. You can go back to the previous consonant, simply by clicking in
that text box, or by pressing Shift+Tab on your keyboard.
14
Supplying the desired vowels: (see 4.2.5 Consonants and vowels)
Click in the first open space (the space next to 1:) in the box with the
heading Vowels in priority order (or press Alt+W on the keyboard). Type
in the first vowel in the space.
You can now supply as many vowels as you want in the open spaces, by
clicking in the next space or by pressing the Tab key on your keyboard to
move to the next space and typing the desired vowels in priority order.
You can go back to the previous vowel, simply by clicking in that text box,
or by pressing Shift+Tab on your keyboard.
After following these steps, your screen should look something like this:
Note:
Ignore the values specifying the consonant and vowel ranges and the type of
reduction. These will only be needed later.
You should now save the new patient file (see 4.10 Saving a patient file).
The new patient file is created and ready for future use.
To create a word set from this file, see the next section: 4.4 Preparation
before creating a nonword set.
15
4.4 Preparation before creating a nonword set
Before you create a nonword set, execute the following steps:
Start the Speech Motor Learning Program, if it isn‟t already running.
If you want to create a nonword set from an existing patient file, open the
file (see 4.9 Opening an existing patient file) if it isn‟t already open. The
target consonants and vowels saved in the file will be displayed on the
screen as well as the patient name.
If you want to create a nonword set from a new patient file, you have to
create a patient file first (see 4.3 Creating a new patient file).
In the patient file, specify the ranges for the consonants and vowels to be
included in the nonword set (see 4.2.6 Ranges of consonants and
vowels). To do this, click in the first text box where you would specify the
ranges for the consonants (or press Alt+R on the keyboard) and change
the value. Then click in the second text box where you would change the
ranges for the vowels (or press Alt+R and then press Tab on the
keyboard) and change the value.
Choose a reduction depending on the number of sounds you have chosen
to include in the nonword set (see 4.2.7 Reductions). To do this, click on
the appropriate reduction (or press Alt+D on the keyboard and then use
the arrow keys to select the reduction you want).
After following these steps, your screen should look something like this:
16
4.5 Creating a CVCV nonword set
Follow the steps described in 4.4 Preparation before creating a nonword
set.
Now click on Create on the menubar (or press Alt+C on the keyboard),
select CVCV document (or press C on the keyboard) and click on the
variation level you want to create (or use 1, 2, 3, 4, 5 on the keyboard). If
you want to create all the CVCV variation levels, click on All levels (or
press A on the keyboard).
Alternatively, if you want to create all the CVCV variation levels, click on
the
icon on the toolbar.
You must now specify a name and location where the nonword set should
be saved. Choose a location for the file and specify a filename in the
space provided. Note that the name and location do not necessarily
correspond to that of the patient file from which the word set is created.
You should also choose the file format of the word set. There are two
options: you can save the file as a Plain Text file (.txt) or as a Microsoft®
Word file (.doc). If you save the file as a Plain Text file, you can open and
edit the word set in any text editor or word processor. If you save the file
in Microsoft® Word format, you can only open and edit the word set in
Microsoft® Word (see 4.8 Opening, changing and printing a word set).
After you have selected a name, type and location for the word set file,
click on the Save button. The nonword set is now saved to the specified
location.
17
4.6 Creating a CVC nonword set
Follow the steps described in 4.4 Preparation before creating a nonword
set.
Now click on Create on the menubar (or press Alt+C on the keyboard),
select CVC document (or press V on the keyboard) and click on the
variation level you want to create (or use 1, 2, 3 on the keyboard). If you
want to create all the CVC variation levels, click on All levels (or press A
on the keyboard).
Alternatively, if you want to create all the CVC variation levels, click on
the
icon on the toolbar.
You must now specify a name and location where the nonword set should
be saved. Choose a location for the file and specify a filename in the
space provided. Note that the name and location do not necessarily
correspond to that of the patient file from which the word set is created.
You should also choose the file format of the word set. There are two
options: you can save the file as a Plain Text file (.txt) or as a Microsoft®
Word file (.doc). If you save the file as a Plain Text file, you can open and
edit the word set in any text editor or word processor. If you save the file
in Microsoft® Word format, you can only open and edit the nonword set in
Microsoft® Word (see 4.8 Opening, changing and printing a word set).
After you have selected a name, type and location for the nonword set file,
click on the Save button. The nonword set is now saved to the specified
location.
18
4.7 Creating a CVCV and CVC nonword set
Follow the steps described in 4.4 Preparation before creating a nonword
set.
Now click on Create on the menubar (or press Alt+C on the keyboard),
select CVCV and CVC documents (or press A on the keyboard).
Alternatively, click on the
icon on the toolbar.
You must now specify a name and location where the nonword set should
be saved. Choose a location for the file and specify a filename in the
space provided. Note that the name and location do not necessarily
correspond to that of the patient file from which the word set is created.
You should also choose the file format of the word set. There are two
options: you can save the file as a Plain Text file (.txt) or as a Microsoft®
Word file (.doc). If you save the file as a Plain Text file, you can open and
edit the word set in any text editor or word processor. If you save the file
in Microsoft® Word format, you can only open and edit the word set in
Microsoft® Word (see 4.8 Opening, changing and printing a word set).
After you have selected a name, type and location for the nonword set file,
click on the Save button. The word set is now saved to the specified
location.
19
4.8 Opening, changing and printing a nonword set
You can open a word set you have created in any text editor or word processor
(if it is in Plain Text format) or in Microsoft® Word (if it is in Plain Text or Word
format). The nonword set is now just like any other document in your word
processor or text editor. You can make changes to the nonword set (e.g. add or
delete words, change fonts, add pictures, etc.), just like you would do for any
other document. You can also print the nonword set from your text editor or word
processor.
Note on the Plain Text file format (.txt):
The Plain Text file format (.txt) is a format that supports only plain text and
characters. This means that you can‟t use fonts, pictures, tables, drawings, etc.
in a Plain Text file. If you save a document that contains fonts, pictures, tables,
drawings, etc. as a Plain Text file, all that information will be lost and only the
characters themselves will be saved. When you open the file again, you will only
see the text, without any of the original fonts, pictures, tables, drawings, etc.
If you have saved a word set in Plain Text format and you have made changes
(other than textual changes) to the word set in your word processor (like
changing the font or size of the text or added pictures), you need to save the file
again in the format of your word processor - you can not save the file as a Plain
Text file (If you do save it as a Plain Text file, those changes will be lost).
To save the word set in the format of your word processor, do the following:
Select the Save As option in your word processor (usually in the File
menu).
Specify a location and a filename for the new file and ensure that the file
format is specified as the default format of your word processor.
You can now save the file.
If you want to remove the original Plain Text file (.txt) you have to delete it
in Windows Explorer.
20
4.9 Opening an existing patient file
To open an existing patient file, click on File (or press Alt+F on the keyboard),
then click on Open (or press O on the keyboard) OR click on the
icon on
the toolbar. Select the directory and file you want to open and click on Open.
Note that only files created by the Speech Motor Learning Program can be
opened in the program. These files all end with .sml).
Alternative:
In the File menu on the menubar, the four most recent files you have worked on,
are displayed. If the file you want to open is one of the four most recent files you
have worked on, you can open the file much quicker by clicking on the File menu
and then selecting the file you want to open. If the file does not appear in the
File menu, you have to open the file as described above.
If an existing file is currently open with unsaved changes:
If an existing file is open and there are any unsaved changes in the file, you
will see a message similar to the following:
21
If you want to save the changes, click on the Yes button. If you click on the
No button, all the changes you have made since you last saved the file, will
be lost. If you want to cancel your actions, that is, if you don‟t want to open
another file anymore, but return to your current file, click on the Cancel
button.
If the default file is open:
The default file named Untitled.sml is opened every time you start the
program. If the default file (Untitled.sml) is open or if you have created a new
file (see 4.3 Creating a new patient file) and you haven‟t saved the changes
yet, you will see the following message:
If you want to save any changes you have made, click on the Yes button,
supply a name for the file as well as a location where the file should be saved
and click on the Save button. If there are no changes to the default file that
you would like to save, click on the No button. If you want to cancel your
actions, that is, if you don‟t want to open another file anymore, but return to
the default file, click on the Cancel button.
The file that you have selected to open, is now open and the information
that was previously saved in that file is displayed on the screen. You can
now change, add or remove information (see 4.12 Altering a patient file) or
create a word set.
22
4.10 Saving a patient file
To save the patient file you are currently working on, click on File (or press Alt+F
on the keyboard), then click on Save (or press S on the keyboard) OR click on
the
icon on the toolbar.
If you have already saved the file previously, the file will be saved again under its
current name (the name of the currently open file is displayed at the top left
corner of the main window). If you have never saved the file before, a window
will be displayed where you can supply a name for the file, as well as the location
where the file is to be written to. Choose a location and supply a name for the
file and then click on the Save button.
Notes on saving a file:
When you save a file, the information that was previously saved in the file
is replaced by the new information. If you still want the old information
and you want to save the new information as well, you have to save the
file containing the new information with a different name (see 4.11 Saving
a patient file under a different name).
When you change the information in a patient file, nothing is done about
the word set files created from the mentioned patient file. No changes are
made to the word sets. If you want the word sets to reflect the changes in
the patient file, you have to create new word sets (see 4.4 Preparation
before creating a word set). When you create a new word set, you can
then either replace the old word set(s) or keep the old ones and create a
new word set with a different name.
23
4.11 Saving a patient file under a different name
If you want to save the file you are currently working on under a different name,
click on File (or press Alt+F on the keyboard), then click on Save As (or press A
on the keyboard). You will see a similar screen to the following appear:
You can now supply a new filename and location for the file. After you have
done this, click on the Save button to save the file. Click on the Cancel button to
return to the current file without saving.
Note:
If you save a file under a different name, using Save As, the original file is not
replaced - a new file is created. That means that there are now two files: the
original file, as well as the new file. If you don‟t want the original file anymore,
you have to delete the file in the Windows Explorer.
If you simply want to change the name of a file, without creating a new file, the
best option is to rename the file in Windows Explorer. To do this, right-click on
the Start button on the taskbar of your Windows desktop and then click on
Explore. The Windows Explorer screen will appear. Locate the file you want to
rename and right-click on the file. On the pop-up menu that appears, click on
Rename. Change the filename to the new desired name and press the Enter
key on your keyboard. The file is now renamed.
24
4.12 Altering a patient file
To change the data in a patient file, do the following:
Open the patient file you want to change (see 4.9 Opening an existing
patient file).
The data currently contained in the file, is displayed on the main screen.
You may now change any of the data items. To do this, click in the
appropriate text box, erase the data from the box and type in the new
data.
Save your file (see 4.10 Saving a patient file or 4.11 Saving a file under a
different name).
25
5. General Hints
Here are a few general hints to make the Speech Motor Learning Program easier
to use and make it easier to manage many patient‟s data and word sets.
Don‟t create more than one patient file for a patient. Store the target
sounds for the patient in that single file – you can always add more
sounds later and then just save the file again. When you want to create
different nonword sets, use the Ranges option on the main screen of the
Speech Motor Learning Program to specify which sounds to use in the
creation of the word set. Don‟t create a different patient file for each
different nonword set.
We suggest that you create a directory where you store all your patient
files and word sets in. This will avoid confusion and will ensure that you
always know where to look for the files when you need them.
When you have more than one patient, it may also be a good idea to
create a subdirectory for each patient. In each patient‟s directory you can
then store the patient file, as well as all the word sets that you have
created for that patient. An example of such a structure in Windows
Explorer would be:
26