1
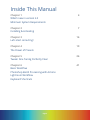
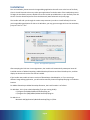
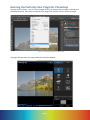
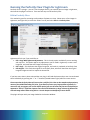
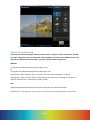
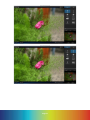
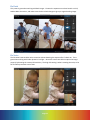
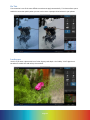
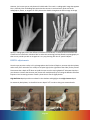
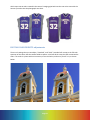
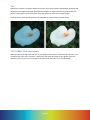
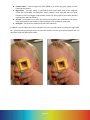
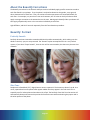
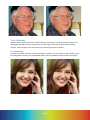
PERFECTLY CLEAR PLUG-IN USER MANUAL
Version 2.0
Per f ec t your p hot os w ith jus t 1 c lic k
a nd s a ve c ountles s hour s of edi ting .
For photos as vibrant as life itself
Congratulations!
You will soon be processing your photos through the World’s fastest
and most advanced automatic image correction science available on
this planet!
Our mission is to save you significant time while producing outstanding
quality. Automatically.
Why Perfectly Clear?
Perfection that’s tested over 30 million times a day – Every day over 30 million
prints are automatically corrected and made amazing by Perfectly Clear,
effortlessly.
Image Correction down to a science – Over 12 years of R&D. 10 patented
processes. 20 unique algorithms. That’s what it takes to develop award-winning
technology. See the Proof
Saving you time - Customers report 85% reduction in editing time and more than 300%
reduction in real time to process images. Ready to start saving?
Page 2
Inside This Manual
Chapter 1
What’s new in version 2.0
Minimum System Requirements
4
Chapter 2
Installing & Activating
7
Chapter 3
Let’s start correcting!
16
Chapter 4
The Power of Presets
19
Chapter 5
Tweak: Fine Tuning Perfectly Clear
26
Chapter 6
Basic Workflow
Photoshop Batch Processing with Actions
Lightroom Workflow
41
Keyboard Shortcuts
Page 3
Chapter 1
What’s new in Version 2.0
System Requirements
Page 4
What’s new in Version 2.0
Version 2.0 provides a major update to all of our core processing technology, and also provides an easier
to use, better looking interface. The major updates include
Faster–re-engineered algorithms deliver at nearly 2x the speed
Our Most Powerful auto correction yet - new algorithms
New Noise engine removes noise even more accurately
Next-generation Beautify gives you 10 ways to look your best
Easier Access to Presets – Import and Export Presets to share your results with friends
Overall Opacity Control – Makes it easy to “fade out” the Perfectly Clear effect to provide even
more correction control
7. Many Workflow and Interface Improvements:
a. Zoom to 100% - accurately judge fine detail when sharpening or removing noise
b. Split View - more ways to visualize your corrections to ensure the best final product
c. More keyboard control – “Z” to toggle zoom; CTRL +/- to zoom in or out, “Space” to
toggle before / after view, “F” to toggle full screen view
d. Import & Export Presets – to make it easy to get the exact same corrections on all the
computers you use
e. Check for Updates – to make sure you’re aware of all future updates and improvements
f. New Presets Panel – to make selecting and applying your favorite Presets fast and easy
1.
2.
3.
4.
5.
6.
Page 5
System Requirements
•
•
•
•
•
•
•
•
•
Mac OSX Mountain Lion (10.8) or newer (including Yosemite)
Intel Processor
PS Plugin: Photoshop CS3, CS4, CS5, CS6 or Creative Cloud (supports both
32 bit and 64 bit). Photoshop Elements 8,9,10,11, 12, 13
LR Plugin: Lightroom 2.7 or newer
4 GB RAM or more
Windows 7, 8, and 10 (32-bit and 64-bit compatible)
PS Plugin: Photoshop CS3, CS4, CS5, CS6 or Creative Cloud (supports both
32 bit and 64 bit). Photoshop Elements 8, 9, 10, 11 12, 13. Corel PaintShop
Pro X5, X6, X7, X8 (Photoshop Plugin)
LR Plugin: Lightroom 2.7 or newer
4 GB RAM or more
Supported Image Formats
Perfectly Clear requires RGB-formatted images in either 8 or 16-bit color depth. Any image file that
Photoshop or Lightroom can convert to this format may be used in Perfectly Clear. Monochrome and
CMYK images must be converted to RGB before using Perfectly Clear. RAW files must be opened
through Adobe Camera RAW and loaded into Photoshop to be accessible to Perfectly Clear.
Page 6
Chapter 2
Installing & Activating
Page 7
Installation
Prior to installation, please ensure the image editing application that will serve as the host of Perfectly
Clear is closed. Please also close any other open applications for the duration of the installation process.
To begin the installation process, double-click on the installer provided either on your Perfectly Clear SD
Card or from the download process from the Athentech (www.athentech.com) web page.
The installer will walk you through the various steps necessary in order to install Perfectly Clear into
your image editing application of choice. On Windows, you may get a message similar to the one below,
just press “Run” or “Yes”.
Figure 1 - Run Application (Windows)
After accepting the End User License Agreement, the installer will automatically attempt to locate all
installed versions of Adobe Photoshop, Adobe Photoshop Elements and Corel PaintShop Pro, and then
display the location where the files will be installed.
If the installer was unable to locate a version of Photoshop or PaintShopPro, or if you are using a
different image editing application, you will need to manually locate the appropriate plug-in installation
location.
For Adobe Photoshop or Adobe Photoshop Elements, the install location is as follows:
For Windows, this is (one or both depending if you are running 64 bit):
C:\Program Files\Adobe\Adobe Photoshop\Plug-Ins
C:\Program Files (x86)\Adobe\Adobe Photoshop\Plug-Ins
For Mac this is:
Macintosh HD\Applications\Adobe Photoshop\Plug- Ins\Filter
Page 8
Running the Perfectly Clear Plugin for Photoshop
Perfectly Clear is a plugin – you can’t run the plugin directly, you need to open an image in PhotoShop or
PhotoShop Elements, then select the Perfectly Clear Plugin from the filter menu to access the plugin.
Figure 2 - Launching the Plugin from PhotoShop
-
The plugin will open with your image loaded in the Preview Window:
Figure 3 - Main Plugin Interface
Page 9
Running the Perfectly Clear Plugin for Lightroom
Perfectly Clear is a plugin – you can’t run the plugin directly; you need to open an image in Lightroom,
then launch the plugin from there. There are two ways to use Perfectly Clear:
Edit in Perfectly Clear
This method is great for correcting small numbers of photos at a time. Select one or a few images in
Lightroom, and right-click (or select the “Photo” menu) and select Edit in > Perfectly Clear.
Figure 4 - Launching Perfectly Clear from 'Edit in..'
Lightroom will ask you if you would like to:
1. Edit a Copy With Lightroom adjustments - This is the only option available if you are working
with raw files. This option applies any adjustments you’ve made in Lightroom, creates a new
image file, and sends that new image to Perfectly Clear
2. Edit a Copy – This duplicates the original image file, and sends it ,unaltered, to Perfectly Clear
3. Edit Original – This sends the original file to Perfectly Clear, which will then alter the original
image and Lightroom will re-import the altered file.
If you have more than 1 photo selected then our plug-in will load all photos and you can view and tweak
them individually by pressing the “<” or “>” buttons (located bottom right) within the same session.
Please note that Perfectly Clear will not work on .psd files (this is due to the complex and proprietary
nature of the Adobe Photoshop file). Also, if you want to process very large volumes of photos (ie –
more than 10), we suggest you use the Export option (you can still view and fine tune each photo) as
opposed to “Edit In”. Lightroom imposes some technical limitations on large volumes of photos with
external image editors when using Edit In. See the chapter on Workflow for more details.
The plugin will open with your image loaded in the Preview Window:
Page 10
Figure 5 - Perfectly Clear main window
“Edit In” Troubleshooting:
If Perfectly Clear does NOT appear when you select “Edit In”, then go to “Edit > Preferences” (for Mac,
it is under “Lightroom” menu) and select the “External Editing” Tab. Then in the middle of your screen
where it says “Additional External Editor”, press the “Choose” button. Navigate to:
Windows
C:\Program files\Athentech\Perfectly Clear Plug-in LR v2
Or
C:\Program files (x86)\Athentech\Perfectly Clear Plug-in LR v2
Select the file called “PCPlugin” (this is a .exe file). You will see the “Application:” now says
“PCPlugin.exe”. Now, under the “preset:” drop down choose “Save Current Settings as New Preset…”
and type “Perfectly Clear” and press the “Create” button.
Mac
/Application/Athentech/PerfectlyClear Plug-in for Lightroom v2/PerfectlyClearLR.app
Then press “ok”, exit Lightroom, and re-launch, and Perfectly Clear should now appear under Edit In.
Page 11
Export to Perfectly Clear
You can automatically batch correct lots of photos by pressing the “Export” button (or File > Export) and
then choosing “Athentech Perfectly Clear” from the “Export To:” drop down menu. Simply follow the
on-screen instructions to choose your export format and where to save it to. Please note that if you
don’t select “Hide Perfectly Clear Window” option, then our plug-in will appear so you can view and
tweak each photo (just like for option 1 above).
Figure 6 - Export to Perfectly Clear
There are several options you can choose when exporting, including:
1. Hide the Perfectly Clear Window – this allows you to batch correct a large number of images
without the plugin waiting for any interaction
2. Export Location – choose where the new files are saved to. There is an option in this section to
automatically add the exported files to your Lightroom catalog.
3. File Naming – choose what the name the new files
4. File Settings – choose the output image format
“Export” Troubleshooting:
If you do not see “Athentech Perfectly Clear” under the “Export To:” drop down menu, then press the
“Plug-in Manager” button on the bottom left, then select “Athentech Perfectly Clear” from the listing
on the left and press the “Add” button. Make sure the status is enabled. If Perfectly Clear does not
appear in the list, then press the “Add” button and navigate to:
Windows (Win 7 or Win 8):
C:\Users\<user name>\AppData\Roaming\Adobe\Lightroom\Modules\ PerfectlyClearv2.lrplugin and
select “ExportFilter.lua”
Page 12
Windows (XP):
C:\Documents and Settings\<user name>\Application Data\Adobe\Lightroom \Modules\
PerfectlyClearv2.lrplugin and select “ExportFilter.lua”
<Note: if the above file path doesn’t exist, then please try “All Users” instead of your “user name”>
Mac:
Users: <user name>: Library: Application Support: Adobe: Lightroom: Modules: PerfectlyClearv2. lrplugin
Page 13
Trial Mode
When you first install and run either of the plugins, you will be in Trial Mode. This is fully functional, but
will only allow you to run the plugin for a limited time. Once your trial expires, you’ll need to purchase a
license to continue to use the plugin. The process for the Photoshop and Lightroom plug-ins is identical,
so only one set of screenshots are shown – for the Photoshop plug-in.
If your trial expires and you still need more time for evaluation, please email us at [email protected]
for assistance.
Online Activation
Online activation is the easiest way to enter a license key that you have received from purchasing
through the Perfectly Clear online store or from one of our retail partners. When you run the plugin,
you will see a screen like the one below:
Simply click ‘Activate’ and copy and paste or carefully type in the license number you have been
provided. When you click ‘Activate’ again, we will validate the license and will unlock your plugin for
continual use.
Online De-activation
De-activation allows you to remove Perfectly Clear from one computer, so you can use it on a different
computer. You can install and use two computers at once, so if you only have two computers that you
use Perfectly Clear on, then you do not need to de-activate.
To de-activate, just open the plugin, click About to show the license screen (below), then click
‘Deactivate’.
Page 14
Offline Activation
If the computer you want Perfectly Clear to run on does not have an active internet connection, then
you can activate offline. This requires a different computer to access the internet and validate the
license code. You can do this yourself, or Athentech Support ([email protected]) can do this for
you. To Activate Offline:
1.
2.
3.
4.
Run the plugin, and click ‘Activate’ just like you were activating online (see above)
Enter your license key in the top field
Click ‘Site Certificate’ to create a unique identifier for this computer and user
Click ‘Copy’ to copy this certificate to the clipboard. Now, do one of the following:
a. Email that site certificate text to [email protected]
b. Visit the following site to enter this site certificate yourself:
http://www.athentech.com/ps-offline-activate
or
http://www.athentech.com/lr-offline-activate
5. Follow the instructions on that page
Offline De-activation
The process to de-activate offline is identical to offline activation, so follow the steps above, but refer to
this page for the form you will need to enter:
http://www.athentech.com/ps-offline-deactivate
or
http://www.athentech.com/lr-offline-deactivate
Page 15
Chapter 3
Let’s Start Correcting!
Page 16
About the Perfectly Clear Interface
Let’s take a look at the plugin interface to understand its key elements.
Figure 7 - Getting to know the Plugin Interface
Let’s take a look at each of the major areas of the plugin interface:
1. View Mode buttons – these control the Preview Window in the plugin. From left to right, the
buttons are: Single Image view, Dual Image View, Split View, Horizontal / Vertical toggle. Single
Image View shows the corrected image in the Preview Window; clicking on the preview will
reveal the original image for comparison. Dual Image View shows both the original and
corrected and images side by side. Split View (shown in the image above) shows a single image
with the corrected image on the right, and the original on the left. Both Dual and Split views can
be toggled between a horizontal and vertical split.
2. Presets & Tweak Tabs – Switch between a simple view of the Presets, and detailed view of each
of the corrections. See the chapter on Fine Tuning for details about the Tweak view.
3. Presets Dropdown and Buttons – The most popular presets are assigned buttons to make them
easy to apply. There are a few more presets that you can access from the dropdown, and you
can create your own presets, too.
4. Getting Help – Three buttons down in the lower left will make sure you’re getting the most from
Perfectly Clear.
5. Zoom Control – when looking at image detail like sharpness or noise, be sure to zoom to 100%
and find a high-detail portion of your image.
Page 17
6. OK & Cancel – Once you’ve got a great looking image, click ‘OK’ to save the corrections and
return to Photoshop. ‘Cancel’ will return you to PhotoShop without applying Perfectly Clear.
The LR plugin also includes this interface element:
7. Image Navigation– Above the zoom control, you’ll also see the image navigation controls. This
shows you the filename of the image you are currently viewing, and allows you to switch to the
first, previous, next, or last image.
If you click About -> Settings, you’ll get this screen:
Figure 8 - Plugin Setting Screen
1. Software Updates – Click ‘Check Now’ to see if we’ve published any updates. Check the ‘Check
automatically’ box to stay up to date without needing to open this settings screen and click
‘Check Now’.
2. Presets – you can export and import Presets. This makes it simple to develop custom Presets on
one computer, then use them on others, or to share your custom Presets with friends. Note:
when exporting Presets, all your custom presets will be exported.
3. LR Only - Ignore non-embedded color profiles – Perfectly Clear is fully color managed, so it will
automatically read and apply embedded color profiles. But, some other photo editors can
create invalid images by writing the image data in sRGB, but leave the image tagged in a
previous color space (most commonly Adobe RGB). This affects a very small number of images,
but this option can help prevent that. (This is the same logic that Adobe Photoshop uses.)
Page 18
Chapter 4
The Power of Presets
Page 19
The Power of Presets
Perfectly Clear provides an amazing amount of automatic
image correction technology – all packaged into a few
different Presets to let you tune how you want your
images to look. To apply these presets to your image,
just click the button in the right panel for the Preset
you’d like to use.
Let’s take a look at the pre-loaded Presets (called
“system presets”).
Details & Vivid
The top two presets are our most popular, and they have both been updated for this version 2 release.
Details and Vivid are very similar, and provide a great starting point for many different kinds of images.
These presets include great starting points automatic exposure, contrast, sharpening, color vibrancy,
and also include a small amount of our new Beautify corrections.
Details – utilizes our new High Definition Contrast which will provide more details in dark shadows,
better details in bright highlights (like faces and wedding dresses), and more pleasing skin tones. Overall
the photo will have less “punch” to it than the Vivid preset.
Vivid – the only difference is our High Contrast is applied (what was in version 1 of our Plug-ins). The
Vivid preset will render a photo with more depth and pop to it.
Page 20
Page 21
Beautify & Beautify +
This preset works wonders on portraits and shots of people. It automatically scans each face in the
photo and determines just how much of each of the Portrait and Eyes corrections to apply to each face.
Beautify is more gentle, with Beautify + applying more corrections and higher values of other
corrections. These also work great on images of newborns.
Page 22
Fix Dark
This preset is great when working with dark images - it boosts the exposure more than Details or Vivid,
enables Noise Correction, and makes several other subtle changes to give you a great looking image.
Fix Noise
The Fix Noise Preset enables noise correction without boosting the exposure like Fix Dark can. This is
great when working with indoor photos in low light – where the camera was able to expose the image
properly by boosting the camera ISO sensitivity. That high ISO setting is what is creating the noise, so let
the Fix Noise preset take care of that.
Page 23
Fix Tint
Tint correction is one of the most difficult corrections to apply automatically. This Preset allows you to
enable tint correction quickly when you see a color cast or improper white balance in your photos.
Landscapes
Use this if you want a photo with lots of color vibrancy and depth. Our Fidelity “Vivid” algorithm is
turned on to enable this and red-eye is turned off.
Page 24
Customizing your Presets
The eight system presets assigned to the preset buttons provide a great starting point for your image
correction work. But you might find that you need a customized set of adjustments for your photos. No
problem – that’s simple to do.
To create your own Preset:
1. Start with one of the System Presets or a custom preset you have imported from someone else
2. On the Tweak tab, make adjustments to any of the correction tools you like. Experiment with
several different images, and see how the various corrections adapt to your image content.
3. When you like what you see, click ‘Create’ at the bottom of the Presets and Adjust panel. You’ll
see this screen:
Figure 9 - New Preset Screen
4. Enter a name and quick description so you can remember what you adjusted.
That’s all there is to it! Now, you’ll see that Preset in the top dropdown menu under the “User Presets”
section.
To Modify a User Preset:
1. Simply select the Preset you’d like to modify
2. Make any adjustments you need to
3. Click ‘Modify’ at the bottom of the Presets panel. You’ll see the same screen as above; edit the
description so you remember what you changed.
Page 25
Chapter 5
Tweak: Fine Tuning Perfectly Clear
Page 26
Tone Controls
Exposure
Perfect Exposure is the most important algorithm and forms the core for all other corrections. Perfect
Exposure optimizes the light exposure in every pixel. This patented approach corrects the image to
emulate what the photographer and subjects saw at the time of taking the photo.
A quick note on overexposed photos: We distinguish between overexposed (which will benefit from the
Perfectly Clear process) and clipped images. The clipped portions of an image are considered to be those
portions that exceed 255 on the RGB spectrum. Portions of the image which meet these criteria have no
data in these areas, and where this occurs Athentech doesn’t hallucinate what might have been there.
PERFECT EXPOSURE: adjustments
By default, when Perfect Exposure is ON, so is Automatic Strength Selection. This means that Perfectly
Clear will independently look at each photo and suggest a specific amount of exposure correction
unique to that photo.
You can adjust how aggressive the Automatic Strength Selection is: Low, Medium, High. In general, a
higher setting means a greater exposure correction per photo.
You can also manually set the exposure by turning Auto Strength off. This allows you to override the
auto correction. Note that saving a Preset with a manual Exposure setting will force that amount of
exposure correction (auto-correction will be turned off).
Depth (Contrast)
This algorithm comes from the signal processing world (medical X-rays, for example). In X-rays, the
challenge is that there are over 4,000 shades of grey in a radiograph.
Page 27
However, the human eye can only detect 50 -100 shades. The result is a radiographic image that appears
blurry. Perfectly Clear for Radiography optimizes the contrast in each and every pixel so that the
radiographer, doctor, or surgeon can easily discern the details throughout the entire image. As image
quality in radiography means the difference between life and death, it’s essential that no artifacts are
created and no information is deleted. We’ve taken this technology and retrofitted it to photography so
that we can provide you with an image that is very eye-pleasing with lots of “punch & depth”
DEPTH: adjustments
Since the eye perceives reality in 3-D, photographers also like lots of depth or contrast with their photos,
and as such you’ll notice that it is usually set as quite high (on the right side of the slider) for the presets.
Please note that a depth of 0% does not yield the same result as turning depth off. Also note that when
you choose to increase the Contrast your photos will usually benefit by increasing the defaults of Perfect
Exposure since increasing contrast creates a photo that is overall slightly darker.
High Definition depth provides more detail in the shadows and highlights than High Contrast depth.
For extremely dark photos, it is beneficial to turn depth “off” in order to bring out extreme details.
Page 28
Skin & Depth Bias
We provide the ability to adjust the skin tone look for your particular audience. In addition, our bias
corrections will cover up many of the flaws created by digital cameras, and allow you to further adjust
how much depth you would like in your photos.
SKIN & DEPTH BIAS: adjustments
There are 2 options to choose from (simply slide the slider bar to the right to increase the strength, and
to the left to decrease):
a) Normal preference - this is our default setting removing red from skin tones, and adding depth
to the background areas.
b) Brighter preference - the same impact as “Normal preference”, but with overall a brighter
image with more details revealed in the shadows.
Page 29
Color Controls
Vibrancy
Perfectly Clear automatically checks and determines whether or not the capture device has captured the
full vibrancy of the colors in the picture. If it hasn’t, then the algorithm will automatically restore the
washed out/faded colors in the photograph while always maintaining the true colors represented in the
original photo. If the camera has properly captured true color, then this function will have no effect on
the image.
COLOR VIBRANCY: adjustments
To enrich color vibrancy simply slide the slider bar to the right. Increasing Color Vibrancy may cause
some clipping at the low end of the RGB spectrum but, it will never cause clipping at the bright end of
the spectrum. Moving the slider to zero will increase the color density less and result in zero chance of
clipping. You will note that on many images there is no increase in color vibrancy. This is because the
camera sensors have already captured true color. There is a difference between a setting of “0” and
turning the algorithm OFF.
Color Fidelity
Digital capture devices are currently incapable of reproducing the full visual spectrum of colors the eye
sees. Point any digital camera at a purple object (Laker’s jersey, FedEx box, blue morning glory flower,
for example) and compare the image on screen with the original purple object in front of you. What do
you see? The purple object will appear blue on the screen! For example, see the two photos below – the
photo on the left is an uncorrected photo directly from the digital camera. The jerseys are actually
purple, but have been captured as blue by the camera. The photo on the right has been corrected with
Digital Color Fidelity and correctly restores the proper purple exactly as seen by the human eyes in the
real world.
Since True Color is fundamental to preserving precious memories perfectly, Athentech has partnered
with Tribeca Labs to provide you with Digital Color Fidelity (“DCF”). DCF is a patent-pending process
Page 30
which maps untrue colors created in the camera’s imaging pipe back into the true colors seen with the
human eye at the time the photograph was taken.
DIGITAL COLOR FIDELITY: adjustments
There are 2 settings that you can adjust: “Standard”, and “Vivid”. Standard will re-map to the full color
spectrum of the colors that the camera failed to capture. Vivid will do the same, but will accentuate the
colors. The result is a photo with more contrast, more vivid colors, and more “punch” to it, as shown
below:
Page 31
Tint
Abnormal tint occurs in situations where the sensors of the camera have inappropriately picked up and
reflected in the image excess green from fluorescent lights, or excess red from the infrared heat of a
person in the image, or excess blue from ultraviolet, or excess yellow from tungsten lights.
Perfectly Clear’s patent pending process will automatically remove these unwanted tints.
TINT CORRECTION: adjustments
When turned ON, this algorithm will look at each image and if there is an abnormal tint, remove it. You
can adjust how much tint is removed – simply move the slider bar further to the right for more tint
removal. If there is no tint, no correction will be performed and it will say “no tint detected”.
Page 32
Clarity Controls
Sharpening
Perfectly Clear’s proprietary sharpening is a series of very powerful and unique algorithms developed to
deliver a crisp looking photo that is artifact free.
SHARPENING: adjustments
Simply select the check-box next to the “sharpen” dialog to activate and move the slider bar to the right
for increased crispness and to the left for less sharpening.
Noise
Our Perfectly Clear Noise engine is the fastest and most effective on the market for removing high and
low ISO noise in photographs, grains in scanned images, JPEG compression artifacts, Moiré pattern
effects and much more.
It is the first photo noise reduction algorithm that allows for fully automatic operation. The algorithm
will first analyze the photo to determine if noise exists, and only then apply the proper amount of noise
removal. Specific algorithms and settings are applied depending on whether the photo was taken with a
digital camera, camera phone, or scanner.
The algorithm includes modules of noise detection, noise analysis and noise filtration which are
statistically trained to provide optimal balance between photo noise reduction and preservation of
image details. Unlike other noise removal algorithms that blur photos after removing noise, our
algorithm is unique in preserving the crisp details.
The noise in digital photos is reduced by 2 - 3 stops, so that the noise level of the photo shot at ISO 1600
is effectively reduced to ISO 200 - 400 levels
NOISE REMOVAL: adjustments
When noise removal is turned ON, there are five presets to choose:
A. Default – a robust, powerful setting for most camera corrections.
Page 33
B. Camera Phone – a special engine has been added in to correct the grainy quality of most
camera phone pictures
C. Night Scene - The night setting is optimized for shots where dark areas of the image are
mixed with illuminated and potentially detail intensive areas. We find that the lower
frequency noise is the biggest (and solvable) concern for these types of shots with potential
noise blotches and color banding.
D. Portrait - The emphasis is to retain the structural and natural color composition but remove
larger noise artifacts and blemishes while avoiding the over-processed, plastic look.
E. Strongest – This forces the maximum amount noise reduction.
In addition, you can adjust the overall strength of the noise removal process by sliding the single slider
bar – greater processing strength occurs the more the slider bar is to the right. Details slider bar can also
adjust the amount of detail preservation.
Page 34
About the Beautify Corrections
The Beautify corrections in the Portrait and Eyes sections individually apply specific corrections tuned to
each face found in your photos. First, the photo is analyzed to determine the gender, race, age and
other characteristics of each face. Then, the various correction parameters are tuned individually for
each face. For example, in a portrait of a man and a woman, the ‘50’ value on the Eye Enhance could
apply a stronger correction to the woman than to the man. Moving each Beautify slider up or down will
then apply proportionally more or less correction individually to each face.
Light Diffusion, and Skin Tone work separately from this face detection procedure.
Beautify: Portrait
Perfectly Smooth
Perfectly Smooth was invented to smooth and diminish wrinkles automatically, while making sure the
details in the hair, eyes, etc are preserved. The “Smooth” option accomplishes this in a very realistic
manner. If you select “Super Smooth”, then the skin will be even smoother, but there may be some loss
of details.
Skin Tone
People emit Infrared Red (“IR”). Digital Camera sensors capture IR. The human eye doesn’t see IR. As a
result, captured and correct photos often appear redder than they appear in the real world. This is
especially true for indoor photos when taken with a flash. The Perfectly Clear Skin Tone Correction will
automatically detect and remove the spurious IR from flesh tones while maintaining the proper reds in
the other portion of the photo.
Page 35
Teeth Whitening
Whitens teeth naturally without the painful need to see the dentist. It automatically finds teeth in the
photograph and applies just the right amount of whitening to make teeth brighter without looking
artificial. See the sample in the next section (Face Slimming) for both corrections.
Face Slimming
For those times when a slimmer, natural looking face is desired. The correction is made naturally, so the
final image does not look overly manipulated and the content and detail around the face is preserved.
Page 36
Blemish Removal
Unlike common approaches that simply employ a blur over the targeted area and have a limited effect
on hot spots, blemishes, or pimples, our solution scans the skin area for these sorts of imperfections and
employs a localized correction that does not affect the surrounding skin areas.
Shine Removal
Removes the bright sheen from flash, light, and oily skin.
Page 37
Light Diffusion
The Light Diffusion setting has been developed for portrait photos, weddings, and close facial shots. It
will smooth the blemishes in the face and create a more diffused, softer picture with less contrast. Skin
tones will often be slightly warmer or red when this algorithm is enabled.
Beautify: Eyes
Auto Red-Eye
Athentech has teamed up with FotoNation (Tessera Technologies) to include their patented technology
as part of the Perfectly Clear image correction suite. Using advanced recognition techniques, the
presence of red-eye is automatically detected and removed. The technology is so sophisticated that it
carefully retains those important glints and sparkles in the subjects’ eyes.
Eye Enhance
Eye Enhancement will brighten and sharpen eyes in your photographs without distorting any other
aspects of the photo.
Page 38
Eye Enlarge
Use this correction to enlarge one’s eyes in a realistic manner. This unique technique is great at
automatically finding and adjusting eyes without distorting any other aspects of the photo.
Dark Circle Removal
Freshens tired eyes. Retouching the dark circles that appear underneath the eyes requires high
precision for distinguishing the actual circles for other natural details present around the eyes. Our
solution handles this task flawlessly, reducing the dark circles but at the same time preserving the fine
details of the eyes.
Page 39
Catchlight
Add sparkle to your eyes, automatically. Technically we’re adding what’s called an “Umbrella” pattern.
Page 40
Chapter 6
Basic Workflow
Photoshop Batch Processing with Actions
& Keyboard Shortcuts
Page 41
Basic Workflow
Perfectly Clear is designed to save you significant time in your editing process. It should be used as a first
step in your image correction workflow to remove the various problems created by digital cameras,
specifically: under-exposure, lack of depth, lack of sharpness, lack of color vibrancy, lack of color fidelity,
abnormal tint, noise, red-eye, and incorrect skin tones.
After you have used Perfectly Clear, you can then apply your creative talent to give your photos an
artistic look, whether that is HDR, Black & White, soft focus, etc.
Thus you should apply the Perfectly Clear Plug-in as a first step to your photos, before using other filters,
plug-ins, or correction tools. If you are using raw files, please perform minimal adjustments in Adobe
Camera Raw or Lightroom, to bring the photo into Perfectly Clear with as much of the original
information as possible.
Step 1
Automatically Correct with Perfectly Clear
Our automatic corrections should get you 80% to
100% of the corrections that you require.
Step 2
Fine Tune with Perfectly Clear
If the automatic correction from Step 1 didn’t get
you 100% there, then re-open the image and try a
different Preset, or switch to Tweak and experiment
with the other corrections.
Step 3
Apply your Creative Talent
With a natural, amazing looking image as your
starting point, you can use other filters or tools
Page 42
Photoshop Batch Processing with Actions
Photoshop is designed to work on images one at a time. But, with the help of Actions, you can quickly
develop a very fast batch processing workflow. An Action in Photoshop is like a script – first your record
the steps you want to automate, then you can “play” those steps on one image or on hundreds.
Here’s the process to record an Action to automatically apply Perfectly Clear:
Step One: Create the Actions
1. Open the Actions Window in Photoshop (Window ->
Actions).
2. Create a new Action Set by clicking the folder icon at
the bottom of the Actions Window. Name it anything
you want, for example ‘Perfectly Clear’.
3. Create a new Action in that Set by clicking the New
Action button, and give it a name, for example ‘Fix HD!’.
4. When the new action is created, it will start recording
automatically. All the steps you do in Photoshop or in
the Perfectly Clear plugin will be recorded, so just open
the Perfectly Clear plugin, apply the Fix HD! Preset, and
click OK to return to Photoshop.
5. Once you are back in Photoshop – remember to stop
recording the Action by clicking the stop icon (far left) in
the Actions window.
That’s all there is to it. You can create separate Actions to apply
different Presets, or you can switch to the Tweak panel and
apply specific corrections that are not part of a Preset. Record
each of these as its own Action.
If you make a mistake, simply stop recording, delete the action (last icon at the bottom of the Actions
Window) and start again from Step 3 above.
Step Two: Batch Process with your new Actions
Once your actions are created, it’s simple to run this action on a large number of photos. You can do
this within Photoshop from the File -> Scripts -> Image Processor tool, or you can do this from Adobe
Bridge.
From Image Processor:
The Image Processor window itself will step you through this process.
1. In the first section, choose the images to work on. Select an entire folder of images, or select
“Use Open Images” to run the Action on all images that are currently open in Photoshop.
2. Next, choose the folder where the corrected images should be saved to.
Page 43
3. Choose the final image format. You can create multiple versions of each file in different formats
if you check multiple rows in this section.
4. Finally, at the bottom, click ‘Run Action”, then select the Action Set you created, and then select
the specific Action you want to apply (Fix HD!).
Click ‘Run’ and Photoshop will open every file that it supports in the folder you selected, apply the
Fix HD! Preset in Perfectly Clear, then will save the images in the format you selected to the folder
you selected.
Figure 10 - Batch Applying Perfectly Clear
From Adobe Bridge:
1. Open Bridge and select the files you’d like to process
2. Select Tools -> Photoshop -> Batch
3. Photoshop will open and the Batch window will be shown:
Page 44
Figure 11 - Batch Window from Adobe Bridge
4. Choose the options in the Batch window to match how you’d like to process your photos:
a. Play: choose Perfectly Clear and the Fix HD! Action
b. Source: the default will be ‘Bridge’ which means the images you had selected in Bridge
will be processed. You can change this to work on files in a specific folder, or process
the images currently open in Photoshop
c. Destination: choose ‘Folder’, then click ‘Choose’ to pick the location to save your images
to. If you choose the ‘None’ option, the images will remain open in Photoshop – so be
careful if you choose this with very many images selected.
d. File Naming: set the filename parameters any way you like.
Click ‘OK’ and the batch processing will start with each image you selected in Bridge.
Page 45
Lightroom: Correcting Single Images
If you have a small number of photos to correct, the simplest way to do this is with the “Edit in..” option
described earlier in this guide. This is limited to about 20 images, though that number might be smaller
in some cases. As such, this method is best used when you have a small number of photos to correct.
The Perfectly Clear interface will open and all of your selected images will be loaded into the Plugin.
Move through your images with the navigation controls in the lower right, and when you are satisfied
with the corrections on all the images, click ‘Save’ to apply Perfectly Clear and save the results.
Lightroom: Batch Processing
Batch processing large volumes of photos is incredibly easy with the Perfectly Clear Lightroom Plugin,
using the Export method described above. Simply select the photos you want to correct in Lightroom,
then File -> Export and select the Perfectly Clear plug in the ‘Export to’ dropdown at the top of the
window that appears.
To automatically apply a single preset to all images, choose that Preset in the ‘Athentech Perfectly Clear’
section of the Export window, and also check the ‘Hide Perfectly Clear’ option. This is the fastest way to
automatically correct your whole shoot. If you also select ‘Add to This Catalog’ in the Export Location
section, then once the Export is complete, you’ll easily be able to find the corrected images in your
Lightroom catalog!
Page 46
Keyboard Shortcuts
Windows
Mac
Command
Z
CTRL+0
CTRL+1
CTRL++
CTRL+-
Z
CMD+0
CMD+1
CMD++
CMD+-
Zoom: toggle Fit / 100%
Zoom Fit
Zoom 100%
Zoom in
Zoom out
Enter
Return
ESC
ESC
Spacebar
Spacebar
F
F
‘OK’ – Apply Perfectly Clear and close the
plugin
‘Cancel’ – Close Perfectly Clear without
applying
Toggle before / after view (in single image
view only)
Maximize / Restore plugin window
Page 47