1
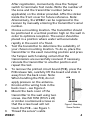
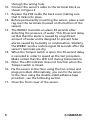
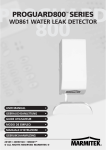
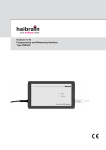
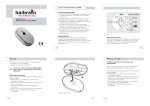
PROGUARD
800
PROGUARD800™ SERIES
WD861 WATER LEAK DETECTOR
USER MANUAL
•
20189 / 20090128 • WD861TM
© ALL RIGHTS RESERVED HAIBRAIN ®
SAFETY WARNINGS
•
•
•
•
•
•
•
To prevent short circuits, this product should only be
used inside and only in normally dry spaces. Do not
expose the transmitter to rain or moisture.
Do not expose the components of your systems to
extremely high temperatures or bright light sources.
In case of improper usage or if you have altered and
repaired the product yourself, all guarantees expire.
Haibrain does not accept responsibility in the case of
improper usage of the product or when the product is
used for purposes other than specified. Haibrain does
not accept responsibility for additional damage other
than covered by the legal product responsibility.
This product is not a toy. Keep out of reach of
children.
The product should only be repaired or serviced by a
qualified repairman.
Keep batteries out of the reach of children. Dispose of
batteries as chemical waste. Never use old and new
batteries or different types of batteries together.
Remove the batteries when you are not using the
system for a longer period of time. Check the polarity
(+/-) of the batteries when inserting them in the
product. Wrong positioning can cause an explosion.
Automatic switching devices provide comfort, but can
also be dangerous. They can surprise people or can
ignite clothing hanging over an electric heat source.
Please be careful and take appropriate measures to
avoid accidents.
WD861
2
INTRODUCTION
The WD861 is an indoor flood sensor and transmitter
designed for use with Haibrain's ProGuard800 supervised
wireless range of receivers. When you wish to know more
about the complete system, its possibilities and its settings,
then you can check out the installation manual or visit
http://www.haibrain.com.
This unit is intended for installation adjacent to water
tanks, piping, radiators and anywhere prone to damage
caused by an undetected water leak. In the event of
flooding or leakage, the WD861 notifies the control panel
30 seconds after detecting the presence of water.
INSTALLATION INSTRUCTIONS
1.
2.
3.
3
To open the transmitter’s housing, insert a small
screwdriver at the bottom of the unit between the
front and back cover and twist the screwdriver to
release the cover.
Remove the divider separating the battery from the
contacts on the battery holder. When you apply
power and the Tamper switch is open, the WD861
enters Test mode during which a transmission is sent
every few seconds. You can terminate Test mode by
closing the Tamper switch. Test mode is automatically
terminated after approximately five minutes.
Note: Due to the occurrence of voltage delay in
lithium batteries that have been in storage, the
batteries may initially appear to be dead. In this
case, leave the unit in Test mode for a few
minutes until the battery voltage level is
stabilized.
While the WD861 is in Test mode, set the receiver to
Registration mode and make sure that the
transmitter’s LED indicator lights up at least twice.
© HAIBRAIN
4.
5.
6.
7.
8.
9.
After registration, momentarily close the Tamper
switch to terminate Test mode. Write the number of
the zone and the transmitter number (where
applicable) on the sticker provided. Affix the sticker
inside the front cover for future reference. Note:
Alternatively, the WD861 can be registered to the
receiver by manually entering the transmitter's serial
number.
Choose a mounting location. The transmitter should
be positioned in a vertical position high on the wall in
order to optimize reception. The sensor should be
placed in a position where water will accumulate
rapidly in the event of a flood.
Test the transmitter to determine the suitability of
your chosen mounting location. To do so, place the
transmitter in the exact mounting position and press
the Tamper switch making certain that the
transmissions are successfully received. If necessary,
relocate the transmitter to a better position and
repeat the test.
To remove the printed circuit board (PCB), press the
PCB release tab, carefully lift the board and slide it
away from the back cover. Note:
PCB
When handling the PCB, do not
apply pressure on the antenna.
Knockout the wiring hole in the
back cover – see Figure 2.
Mount the back cover of the
transmitter to the wall using two
screws. Use ISO 7050 (ST3.5 x 22)
HOUSING
or similar countersunk screws so
that the screw head will not
Figure 1: Mounting
Screw Position
touch the PCB – see Figure 1.
Thread the sensor’s cable
WD861
4
through the wiring hole.
10. Connect the sensor’s cable to the terminal block as
shown in Figure 2
11. Replace the PCB inside the back cover making sure
that it clicks into place.
12. Before permanently mounting the sensor, place a wet
rag over the terminals (located on the bottom of the
sensor).
13. The WD861 transmits an alarm 30 seconds after
detecting the presence of water. This 30-second delay
verifies that the alarm is caused by a significant
amount of water and is designed to prevent false
alarms caused by humidity or condensation. Similarly,
the WD861 sends a restore signal 30 seconds after the
sensor’s terminals are dry.
14. When the Tamper switch is open, the 30-second delay
is canceled in order to speed up the test procedure.
Make certain that the LED is lit during transmissions.
15. Note: The LED indicator does not function when the
Tamper switch is closed.
16. Fix the sensor to the floor using the two screws and
plugs provided. Alternatively, you can fix the sensor
to the floor using the double-sided adhesive tape
provided – see the following section.
17. Close the front cover of the sensor.
5
© HAIBRAIN
1. Antenna
2. Battery Holder
3. LED Indicator
4. Factory Setting Jumper
5. Terminal Block
6. Tamper Switch
7. Location of Wiring Knockout
8. PCB Release Tab
Figure 2: WD861 Transmitter (Cover Off)/
WD861
6
SENSOR INSTALLATION WITH DOUBLESIDED ADHESIVE TAPE
If using double-sided adhesive tape to install the sensor,
perform the following procedure for best results:
1. Clean all surfaces using a low strength solvent such as
isopropyl alcohol to ensure that the surfaces are clean,
dry and grease-free.
2. Peel away the backing from the pieces of adhesive tape
and attach them to the underside of the sensor. Note: Do
not touch the adhesive with your fingers.
3. Peel away the backing from the other side of the adhesive
tape.
4. Fix the sensor to the floor by firmly applying pressure for a
few seconds.
Figure 3: WD861 Typical
1.
Transmitter
2.
Sensor
3.
Control Panel
7
© HAIBRAIN
TECHNICAL DATA
Antenna:
Frequency:
Power:
Current Consumption:
Built-in Internal Whip
868.35MHz FM
3.6V ½ AA Lithium Battery
25mA (transmission), 10μA
(standby)
RFI Immunity:
40V/m
Cable Length:
2.4m
Operating Temperature: 0-60°C
Dimensions:
65 x 30 x 25mm (Transmitter)
Specifications may be modified without prior notice.
Note: The WD861 is supplied with the Factory
Setting jumper in the “F” position. Do not change
the configuration of this jumper.
Environmental Information for Customers in the
European Union
European Directive 2002/96/EC requires that the
equipment bearing this symbol on the product and/or
its packaging must not be disposed of with unsorted
municipal waste. The symbol indicates that this
product should be disposed of separately from regular household
waste streams. It is your responsibility to dispose of this and other
electric and electronic equipment via designated collection facilities
appointed by the government or local authorities. Correct disposal
and recycling will help prevent potential negative consequences to
the environment and human health. For more detailed information
about the disposal of your old equipment, please contact your local
authorities, waste disposal service, or the shop where you
purchased the product.
WD861
8
DECLARATION OF CONFORMITY
Hereby, Haibrain BV, declares that this WD861 is in
compliance with the essential
requirements and other relevant provisions of the
following Directives:
Directive 1999/5/EC of the European Parliament and of the
Council of 9 March 1999 on radio equipment and
telecommunications terminal equipment and the mutual
recognition of their conformity
Council Directive 89/336/EEC of 3 May 1989 on the
approximation of the laws of the Member States relating
to electromagnetic compatibility
HAIBRAIN BV - P.O. BOX 9301 3506 GH
UTRECHT – NETHERLANDS
868.35MHz is not intended for use in BG, GR, PL & SI.
9
© HAIBRAIN
COPYRIGHTS
Every effort has been made to ensure that the information
in this manual is accurate. Haibrain is not responsible for
printing or clerical errors.
Copyright and all other proprietary rights in the content
(including but not limited to model numbers, software,
audio, video, text and photographs) rests with Haibrain
B.V. Any use of the Content, but without limitation,
distribution, reproduction, modification, display or
transmission without the prior written consent of Haibrain
is strictly prohibited. All copyright and other proprietary
notices shall be retained on all reproductions. Other
company and product names mentioned herein may be
trademarks of their respective companies. Mention of
third-party products is for informational purposes only and
constitutes neither an endorsement nor a
recommendation. Haibrain assumes no responsibility with
regard to the performance or use of these products.
HAIBRAIN BV - P.O. BOX 9301
3506 GH UTRECHT THE NETHERLANDS
WD861
10