1
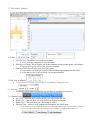
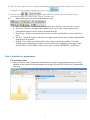
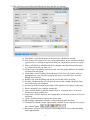
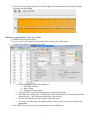
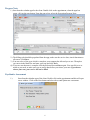
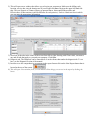
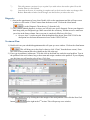
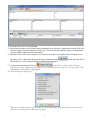
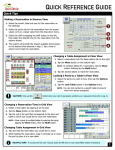
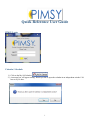
Quick Reference User Guide
PIMSY Login:
Calendar/ Schedule:
1.) Click on the My Sal Calendar.
2.) A message box will appear stating: Would you like to open the calendar in an independent window? It’s
best to say No here.
1
3.) This is the Calendar :
4.) Filters:
a. Filter by User- This allows you to pick any employee
1) To see your own calendar pick your own name
b. Filter by User Group- This will show you all the calendars for the provider group you belong to.
2) If you pick N/A you will see only your own calendar
c. Filter by Client- this will give you a list of you clients
3) If you select one client you will see all the scheduled appointments for that client.
4) If you leave it at N/A you will only see your appointments.
5.) Day Scale in Minutes:
a. It will default to 15 minutes (you can click on any bubble to change the view)
6.) Time Scale:
a. The default will be 8(am) to 5(pm) but you can adjust it according to your hours.
7.) Calendar Views:
a. Day View – This will show you just the day you select on the left side.
b. Week View – This will show you a full week from Sunday to Saturday.
c. Month View – This will show you a full month (4 weeks)
d. Timeline View – Shows a week without time increments, just list all appts.
i. You can select to see weekends or not in the Week & Month view. User Columns, show all
users. If you don’t want the canceled appts to be hidden you will uncheck this box.
2
8.) There is a filter option if you are looking for something particular just click this and put in the items you are
looking for. This is located to the far right of the screen.
9.) Arrow buttons:
Located under the calender views, these make for easy
movement thoughtout the Day, Weekly, Month, Timeline views.
10.)
Button at the upper left corner of the calendar screen:
a. Save – to make sure everything has been saved on your calendar. You can never over save.
b. New Note – If there is no appt on the calendar this is way to enter a note, could be if the
client/patient called in and you want to document that call.
c. New Group – If there is a group meeting and it isn’t on the calendar this is a way to enter that
note.
d. My SAL – Opens to a report to show the user appts, current release status of notes and those that
might need to be released.
e. Refresh – You can never refresh enough. Always click to update the calendar. If you have
multiple people scheduling you always want to refresh before scheduling a new appt to make
sure the slots are still available, make sure you don’t overbook. REFRESH….all the time!
How to Schedule an Appointment:
For an existing Client
1.) Place your cursor in the calendar date and time that you want you appointment to start. Left click
and drag for the duration of the appointment. Then right click and click on the New Sal button that
comes up.
3
2.) This will open a new window that indicates the time and date you selected.
a.) User Name- verify that the name of the user to be scheduled is selected.
b.) User Group- will remain at N/A for a client appointment. If you needed to schedule
a group event i.e. training or supervision than you would choose you service group.
c.) Status- will default to schedule and can be changed when the action is taken place
(i.e. client arrival, late, no show, etc.)
d.) Client Group- If scheduling a group session, select the group and this will schedule
all clients from this group.
e.) Client Name- select from drop down the name of the client you want to make an
appointment for. (you can start typing the last name so you don’t have to scroll
through the whole list)
f.) Billing Code- pick the billing code for the service that will be provided.
g.) Division- Drop down that you will pick the service that is being scheduled. (Only
use if told too by your company)
h.) Location- pick the location of your home office (optional, can change on the note)
i.) Room- optional if your company is using this
j.) Note- click the button to start the progress note or assessment note: see the note
section to see how to add a note.
k.) Group Note- click the button to start a group note: see the note section to see how to
add a note
l.) Client- click this button to open up the clients chart.
m.) MU tracking- optional per company: will provided separate directions
n.) 5 Buttons for Content Central- optional only available if your company has set up to
use Content Central.
o.) Recurrence- will give you a selection of recurring times to select when scheduling
future appointments
4
3.) Click OK, to set the appt, then click Save in the upper left corner and then click Refresh, the appt
will appear on the calendar.
Making an appointment for a new client:
1.) Follows step one & two as above
2.) To put in a new client click the client button. This will open the clients’ charts.
3.)
Click the New button to put in the new client.
a. Fields that MUST be filled out to Save are:
i. First and Last Name
ii. Date of Birth
iii. Therapist seeing the client
b. You should fill out as much information you can gather at this time.
c. Click Save: this will generate a client number in the client number box located in the middle
column top box. This will ensure that the new client is saved.
d. Click the exit button located in the upper right hand corner.
e. This will put you back into the calendar and the client you just set up will be picked on the
appointment
4.) Now follow the rest of how to enter an appointment as described above.
5
Progress Note:
1.) Start from the calendar appt for the client. Double click on the appointment, when the appt box
opens, click on the note button. From the pop up box select the first option Progress Note.
2.) The billing code should be populated from the appt, make sure the service date, time & duration are
all correct. Click Save.
3.) You can select a Note type which is a template your company has allowed you to use. Then place
you cursor in the blank box and enter your note and click Save.
4.) If you are sure that note is complete click the Released box and Save again. You can click save as
much as you need, so make sure you are really done before you release your note. If you do not
release your note, your service will not be billed.
Psychiatric Assessment:
1.)
Start from the calendar appt of the client. Double click on the appointment and this will open
a new window. Click on the Note button and select the second option new assessment.
6
2.) This will open a new window that allows you to begin your assessment. Make sure the billing code,
location, service date, time & duration are all correct and click Save. Begin at the upper left hand side
tabs. They are Purpose of Contact, History of present Illness, Intervention/Observation, and
Effectiveness of Interventions (could be different for each practice). Each is a blank text box in which
you can enter the appropriate information.
3.) Next look at the tabs in the center of the screen from left to right. Starting with Client vitals, can answer
any and all tabs that apply to you and your company. Click Save.
4.) Diagnosis tab. The Diagnosis can be entered here or in the clients chart under the diagnosis tab. To see
how, see the Diagnosis section of the manual.
5.) In order to see the comprehensive assessment in the report format click on the Note Report button that is
located at the top of the screen.
6.) This will open a new window, here you can indicate all the things you can see in the report by clicking the
boxes.
7
7.)
8.)
This will generate a preview for you to print if you wish or have the need to print. Close this
window when you are finished.
Once back at the note, if everything is complete and you don’t need to make any changes click
Release. Remember to make sure all changes are done before you release the note.
Diagnosis:
1.) Start on the appointment of your client. Double click on the appointment and this will open a new
window or click on the “Clients” button from the home screen. Click on the client button.
Go to the Diagnosis Tab at the top (7th from the left).
2.) They column labeled diagnosis, is where you will pick your Axis I diagnosis. Put on your diagnosis
date along with your Diagnosis type. Make sure mark one as Primary. All that are active make sure
you select in the Status column. Once everyone is completely filled out, click Save.
a. On your Axis V you do not pick from the diagnosis drop down. Enter GAF/CGAF in the
description box and enter the numerical score in the GAF/CGAF box.
Treatment Plan:
1.) Double click on your scheduled appointment this will open up a new window. Click on the client button.
This will bring you to the client’s chart (or click “Client” from the home screen). From
here click on the treatment plan tab (eighth from the left at the top)
2.) First, type in problem(s) statements. To do this click in the blank row under the word problem. Type in
the problem in the next column, long or short term and assign a number to the problem. If you company
uses divisions you will need to select it here. Click Save.
3.) Highlight a problem row by clicking the in the margin of the need/problem. Next click the New Goal
button
to the right in the 2nd section. This will open up a new window.
8
4.) Enter the Goal # first, then click Save.
5.) In the first box enter a goal. Do this for the remaining boxes, Objective, Support/Intervention, Who will
Provide Support, Support Frequency. Click Save. (You can have more than one goal per need/problem,
just repeat these steps and increase the goal#)
6.) Optional: (Check with your company to see if these area needs to be completed not all companies use
this area) Click on the Details button in the upper right hand corner.
the box there is a series of questions/boxes that must be completed.
In the left hand side of
7.) To print the treatment plan click on
It will ask if you want to lock the report,
basically if you have a signature pad you will say yes so that your client can sign. If you do not say No. This
is important to read and select approapriatly.
8.) The following box will pop up:
Make sure to include what you want to print on your treatment plan. If you don’t like the way it looks you
can close it out and go back in and open it up again.
9
9.) Once you click OK it will open the treatment plan in a PDF version. You can then print it or save it if you
wish to email via HIPPA secure email. (Again this is how your company tells you to do so.)
10