1
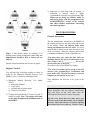
MODEL 86070
USER’S MANUAL
Model 32023
THE MINNESOTA
DEXTERITY TEST
Examiner’s Manual
3700 Sagamore Parkway North
P.O. Box 5729 • Lafayette, IN 47903 USA
Tel: 765.423.1505 • 800.428.7545
Fax: 765.423.4111
E-mail: [email protected]
www.lafayetteinstrument.com
Fax: 765-423-4111 . www.lafayetteinstrument.com . E-mail: [email protected]
THE MINNESOTA MANUAL DEXTERITY
TEST (MMDT) #32023
CONTENTS
PREFACE
Introduction
Theory and Application
ADMINISTRATION
Timing
Test Batteries
Practice
Group Testing
Supplies Needed
TEST PROCEDURES
General Instruction
Placing Test
Turning Test
SCORING AND INTERPRETATION OF DATA
TECHNICAL DATA
REPLACEMENT PARTS AND REORDERING
INFORMATION
Frequency Distributions
Technical Tables
APPENDIX A
Group and Individual Norms Based on
Older Adult Unemployed
Types of Interpretation Scales
Norms
INTERPRETATION CHART
APPENDIX B
Group Placing and Turning Tests Norms
For Young Adults
REFERENCES
3
3
3
3
4
4
4
4
5
5
5
6
7
8
10
10
11
12
13
13
13
13
14
15
15
16
Test Administrator’s
Manual
Revised Edition 1998
Physical and Occupational Therapists use the
MMDT for injury rehabilitation. The MMDT is a
tool used to obtain baseline data on a patient. This
test can also be used to document patient progress
and/or degree of disability.
PREFACE
Introduction
The Minnesota Manual Dexterity Test (MMDT) is a
frequently administered, standardized test for the
evaluation of a subject’s ability to move small
objects various distances. This manual is a guide
demonstrating the proper test procedure for each
test battery. The test administrator must read and
follow the manual completely to insure that standardization has occurred and that the test results are
accurate. Note: Failure to follow the manual may
affect the subject’s test scores, making the test
invalid.
Vocational evaluators use the MMDT to determine
a subject’s ability and aptitude for certain workrelated applications and for recommending job
placement that requires manual dexterity. The
MMDT is also used to develop a specific training
program that will give an individual the skills to
complete a job task that requires manual dexterity.
Human Resource Directors and Temporary Staffing
Agencies use the MMDT as a pre-employment
screening and selection tool. An applicant’s
performance on the MMDT can indicate their
ability to perform in a job/task that requires manual
dexterity. Note: It is strongly recommended that
the testing organization show a correlation
between a subject’s performance on the MMDT
and a subject’s performance in the specific job
task. This may be accomplished by testing subjects
currently working in a specific job task who are
high performers and low performers. Then test the
same subjects using the MMDT. The high
performer should score higher on the MMDT than
the low performers.
Theory and Application
The Minnesota Manual Dexterity Test (MMDT) is
used to measure a subject’s simple but rapid eyehand coordination as well as arm-hand dexterity. In
general, the MMDT measures gross motor skills.
Gross motor skills involve the movement of
large musculature and a goal where the
precision of movement is not as important to
the successful execution of the skill as it is
for fine motor skills. (Magill, 1989, p.11)
Many approaches have been developed to classify
motor skills. Each classification system is based on
the general nature of the motor skills relating to
some specific aspect of the skills. Magill (1989)
considers three systems, in which motor skill
classification is based:
1. the precision of the movement
2. defining the beginning and end points of
the movement
3. the stability of the environment
The MMDT incorporates all three of these systems.
ADMINISTRATION
Before administering the MMDT, the test
administrator is advised to carefully read this
section of the manual. As with any standardized
test, it is important to follow the directions very
closely. If the MMDT is to be used as a basis for
employee selection, the test must be administered to
all applicants according to the standardized test
procedure. If the test is not given identically,
irrelevant factors may affect test scores. In order to
reduce the variability among test administrators,
specific details regarding the arrangement of
materials and the testing procedures are presented
below.
The MMDT can be used for many testing
applications. Physical Therapy, Occupational Therapy, vocational evaluation, and pre-employment
screening are four generalized uses of the MMDT.
Other applications for the MMDT can be found by
doing a bibliography search.
3
The test administrator is advised to practice the
administration of the MMDT before giving it for
selection purposes. The amount of practice needed
in order to become comfortable with the testing
process is dependent upon the test administrator's
previous testing experience. The test administrator
should practice the MMDT until he or she is able to
perform each of the tests at an above-average speed
for demonstration purposes. Note: The test
administrator will be demonstrating to the test
subject what is expected of him or her before
each test.
BOLD Italics and are framed in “quotation
marks”. Make sure to read through the directions to
ensure that they are clearly stated to the test subject.
Remember: Ask the test subject if they have any
questions about the test.
Practice
One trial should always be given for practice. Note:
The test administrator should demonstrate the
test to the subject before starting the practice
trial. Four test trials in addition to the practice trial
are highly recommended. The fewer trials
administered, the less test score reliability. For
individual testing, norms are provided for
interpreting a total score based on two, three or four
test trials. Group testing norms are based on three
and four test trials only.
Timing
When using an ordinary watch or wall clock, it is
recommended that the test administrator say the
word “READY,” pause, and then say “GO” at the
instant that the second hand reaches a landmark
point on the clock. For example, the test
administrator may want to start on one of the fivesecond marks. Make sure to pick a starting point on
the clock that is easy to read. After the test
administrator says, “GO,” immediately write down
the subject’s starting time in minutes and seconds.
As soon as the subject finishes, record the finishing
time above the beginning time and calculate the
difference by subtracting. This calculated number is
the subject’s test score. Note: 2 minutes and 30
seconds = 150 seconds. Scoring is interpreted by
total seconds for any given number of trials.
Group Testing
If the MMDT is to be administered to a group, the
test administrator should demonstrate the test on a
separate board located in front of the subjects as he
or she reads the directions to the group. Figure 1 on
page 3 illustrates one arrangement that permits the
test administrator to oversee the testing of many
subjects during group testing.
Tip: GROUP TESTING promotes competition
among peers, which is good when testing a
subject’s ability to manipulate objects as quickly
as possible. However, an individual CAN do just
as well when tested individually, but he must be
appropriately motivated. Motivation given by
the test administrator is encouraged and
necessary. Without appropriate motivation, the
subject is apt to loaf along and thus not earn a
score that demonstrates the subject’s true
potential. Overall, there is greater reliability in a
group testing situation, even if only two subjects
are in the group.
Test Batteries
The MMDT includes instructions for 2 test
batteries:
1. Placing Test
2. Turning Test
The Placing Test and the Turning Test are commonly administered test batteries.
Each test battery is listed in the next section
separately. The directions are presented in a
step-by-step format. All directions the test
administrator reads to the subject are printed in
4
3) Stopwatch or clock that reads in seconds. A
stopwatch or interval timer is highly
recommended, especially for group testing. Tip:
When you are using an ordinary watch or
wall clock, please read the paragraph in the
ADMINSTRATION section of the manual
that offers further instructions concerning
start and stop times.
TEST PROCEDURES
General Instruction
The test administrator should have the MMDT in
the starting position on the table before the arrival
of the subject. Note: All subjects must stand
during the duration of the test trials. The score
sheet should be placed on the table directly in front
of the test subject. When the subject(s) arrives and
is standing comfortably in front of the table, say:
Figure 1 This picture shows an example of an
optimal group testing arrangement. Note: The test
administrator should be able to observe all test
subjects.
“You must enter your name, the date, and your
dominant hand in the spaces provided on the score
sheet. Today’s date is _____________. Do not fill
out any other part of the form.”
Give an overview of the MMDT by saying:
Special Group Instructions are in a box on page 4.
Supplies Needed
“The series of tests that you are going to take will
measure your eye-hand-finger coordination and
gross motor skills. The tests are timed, so you must
complete each as quickly as you can.”
You will need the following supplies or items in
order for the Minnesota Manual Dexterity Test
(MMDT) to be a consistent, standardized test:
1) Minnesota Manual Dexterity Test
#32023
a. Instruction Manual
b. 1 test board
c. 60 black and red plastic disks
d. Tablet of score sheets.
Now administer the first test to be given in the
series.
model
Special Group Instructions: If the test administrator determines that the subjects should enter
their own times on the score sheet, then the
following directions must be read to the group:
2) Testing table that should be between 28 and 32
inches in height. Note: The subject will stand
at the table throughout the administration of
the MMDT.
“On the score sheet, there are some spaces you
will use to write in the time it takes you to complete
each test. Notice that there are 5 sections and that
the sections have boxes that say “Practice Trial,"
5
“The object of this test is to see how fast you can
put the disks into the holes of the board using
only one hand. You will want to use your
dominant hand.”
'Trial 1,” "Trial 2," "Trial 3,” and “Trial 4.” As
you are finishing each test, I will be counting the
seconds aloud like this: 55, 56, 57, 58, and so on. I
want you to write down the number of seconds that
you hear me say just as you finish each trial. I will
tell you where to write the number before you
begin each trial. Now, put the pencil and score
sheet to one side making sure that it is out of your
way.”
Demonstrate as you read the following instructions.
Note: If you are facing the subject across the
board, remember to demonstrate on your LEFT
because the instructions pertain to the subject’s
RIGHT. Also remember that TOP to the subject
is BOTTOM to you. You should start your
demonstration slowly and increase speed as you
speak.
Tip: As the first subject is near the end of the
practice trial, you should read the number of
seconds aloud as an example to the subjects of what
they should expect to hear. For every trial during
each test, you must show the group where they
should enter their times in seconds onto the score
sheet.
“You must begin on your RIGHT. Pick up the
bottom disk and insert it into the top hole of the
board. Now, you must pick up the next disk in the
column on the right, and so on. You will move
from right to left on this test. Once you complete
one column, repeat the previous sequence in the
second column until you have filled the entire
board.”
Placing Test
Starting Position. Put the board on the table about
10 inches from the edge. Insert the disks into the
holes in the board. Lift the board UP, allowing the
disks to fall through the holes and remain in straight
rows and columns on the table. Now place the
board directly in front of the disks. Note: If the
disks moved out of place, manually realign the
disks. The board should now be about 1 inch from
the edge of the table closest to the subject. This is
the starting position for the placing test. Figure 2
illustrates this position.
Continue demonstrating until two columns have
been filled. Now, remove the eight disks from the
board and put them back into place above the board.
Note: You may have to use a ruler or an object
with a straight edge to align the disks properly.
“You may hold the board with your free hand if
you wish to do so. Do you remember the order in
which you pick up the disks and place them
down?”
If the instructions must be repeated, point to the
disks in the order that they should be picked up and
then point to the disks in the order that they should
be placed into the holes in the board.
“You must make sure that all of the disks are fully
inserted into the holes of the board before the trial
is complete. If you dropped a disk, you must pick it
up and insert it into the proper hole before the
time is stopped. Your score will be the total
number of seconds it takes to complete several
trials. We will record the time for each trial
Figure 2 Starting position for the Placing Test.
Begin by saying and demonstrating:
6
separately. When you finish one trial, we must
rearrange the board and disks into the starting
position before starting another trial. Please do
not touch the disks until you hear further
instruction.”
If you are going to give another test, you should let
your subject know that he or she will be taking a
different test now. At the completion of the Placing
Test, the board and disks should be in the correct
starting position for the Turning Test .
Start the stopwatch or log the time as soon as you
say the word, “GO.” During the practice trial, you
can provide assistance to the subject if necessary.
Turning Test
Starting Position: Put the board on the table about
1 inch from the edge closest to the subject. Insert all
of the disks into the holes in the board with either
the RED or BLACK side facing UP (the color must
be consistent on the whole board). You should now
be in the starting position for the Turning Test,
which is illustrated below in Figure 3.
You will now begin the first trial by saying:
“Put your hand on the first disk. READY, GO!”
When the subject is finished with the trial, log the
time in seconds in the space provided on the score
sheet. Now, you must move the board (now filled
with disks) to the top. Lift the board UP, allowing
the disks to fall through the holes. Now place the
board directly in front of the disks. Remember:
The board should be about on 1 inch from the
edge of the table. The board should now be in the
starting position for the next trial of the Placing
Test. You can begin the next trial by saying:
“Put your hand on the first disk. READY, GO!”
Repeat the above procedure until all of the desired
trials are completed. You should encourage the
subject between every trial by stating the
appropriate sentence:
Figure 3 Starting position and sequence of rows
with directions of travel for the Turning Test.
“Remember, you are being timed, so complete
each trial as quickly as possible.”
“The object of this test is to see how fast you can
pick up the disks with one hand, turn them with
the other hand, and replace the disks back into the
holes on the board.”
Begin by saying:
Or,
“You did a good job, but I believe that you can
complete the next trial faster.”
You should start your demonstration slowly and
increase speed as you speak. Figure 3 illustrates the
sequence of rows and the direction of travel in the
Turning Test. Note: If you are facing the subject
across the board, remember to demonstrate on
your LEFT because the instructions pertain to
the subject’s RIGHT. Also remember that TOP
to the subject is BOTTOM to you. Demonstrate as
you read the following instructions.
And on the last trial,
“This is the last trial and should be your best
time.”
At the end of the last trial, you will say:
“That’s all for this test.”
7
“With your LEFT hand, pick up the block from
the upper right-hand corner. Turn the disk while
passing it to your RIGHT hand and return it into
the original hole in the board with the BOTTOM
side facing UP. You must work to your LEFT
across the board on the top row.”
color on the disks is now exposed. Please do not
touch the disks until you hear further
instructions.”
Start the stopwatch or note the time as soon as you
say the word, “GO.” During the practice trial, you
can provide assistance to the subject if necessary.
You will now begin the first trial by saying:
Continue to demonstrate until you complete the
entire TOP row. As you start to demonstrate the
second row, say:
“Put your LEFT hand on the disk in the top righthand corner of the board. READY, GO!”
“Now with your RIGHT hand, pick up the first
block in the second row. Turn the disk while
passing it to your LEFT hand and return it into
the original hole with the BOTTOM side facing
UP. You will work to your RIGHT until you
complete the entire row.”
When the subject is finished with the trial, log the
time in seconds in the space provided on the score
sheet. Remember: The board should be about 1
inch from the edge of the table. You can begin
the next trial by saying:
The subject always picks UP the blocks with the
hand that LEADS and put them DOWN with the
hand that FOLLOWS. Continue demonstrating the
test in its entirety.
“Put your LEFT hand on the disk in the top righthand corner. READY, GO!”
Repeat the above procedure until all of the desired
trials are completed. You should encourage the
subject between every trial by stating the
appropriate sentence:
“As you work back to the LEFT in the third row,
you will use your LEFT hand to pick up the disk
and your RIGHT hand to return it back to the
original hole. Working back to your RIGHT on
the fourth row, you must use your RIGHT hand to
pick up the disk and your LEFT hand to return
it.”
“Remember, you are being timed, so complete
each trial as quickly as possible.”
Or,
“You did a good job, but I believe that you can
complete the next trial faster.”
You should finish the test at a moderate speed. All
of the disks must be turned so the same color is
facing UP. The board should now be in the original
starting position.
And on the last trial,
“This is the last trial and should be your best
time.”
“You must make sure that all of the disks are fully
inserted into the holes of the board before the trial
is complete. If you dropped a disk, you must pick it
up and insert it into the proper hole before the
time is stopped. Your score will be the total
number of seconds it takes to complete several
trials. We will record the time for each trial
separately. When you finish one trial, the board
and disks should already be in the starting position
for another trial. In other words, the opposite
At the end of the last trial, you will say:
“That’s all for this test.”
You have now completed the last test battery of the
MMDT.
8
SCORING AND INTERPRETATION
OF DATA (AGS, 1969)
Interpretation
The interpretation of MMDT scores is most
appropriately based upon results from prior use of
the test in specific selection applications. As pointed
out in a previous section, Human Resources
Personnel usually wish to classify job applicants
into categories. The question then arises: How high
or how low must a subject score be to place in one
category rather than another? The answer to this
question establishes a critical score. For example,
an employer may decide that he will employ for
certain types of jobs, applicants who score at or
above the 75th percentile point and that he will not
employ applicants who score below this. He has, by
this decision, set the 75th percentile point as the
critical score.
Scoring
The score on any test of the Minnesota Manual
Dexterity Test (MMDT) is the total seconds
required to complete the chosen number of test
trials. Two, three or four test trials may have been
administered. The practice trial time is not included
in the total score.
Composite and comparative scores
When the scores of an individual on two or more
different tests are to be combined into a composite
(sum or average) score, raw scores must first be
given a scale value. This can be done by reference
to one of the scales at the left side of the chart in
Appendix A or B. This must also be done when the
difference in score on two tests is to be interpreted,
i.e., when one wishes to judge whether an examinee
made a better score on one test than on another.
This is a major function of the norm charts, for the
relative value of scale scores shows visually which
are the better and poorer test scores for a subject.
The primary function of the norm chart is to assist
users in dealing graphically with the scores of an
individual as sums, differences and averages. The
charts are not designed to furnish a final basis for
establishing critical scores.
How such a decision was reached is an important
matter, but the norms presented in Appendices A
and B constitute an insufficient basis for such
action. If applicants are plentiful, an employer can,
of course, arrange them in such an order that the
one scoring highest is at the top, the one scoring
lowest is at the bottom and the others range between
these two extremes. He then can fill his vacancies
from the top of such a list--unless it should turn out
that the most successful employees lie somewhere
between two critical scores, or that they possess a
certain pattern of abilities. Such is often the case.
Critical scores can be established systematically and
accurately. A good procedure for doing this is to
test all applicants routinely and then provide for a
follow-up study. From the follow-up study, certain
employees eventually can be classified into two
categories--satisfactory and unsatisfactory, based
upon actual performance on the job. Study of the
test scores made by these two contrasting criterion
groups will indicate which tests may justifiably be
used and what critical scores make possible the
most accurate prediction. Personnel selection then is
established on a sound and practical basis.
Gilbert L. Betts, quoted in 1946 said:
Attention is invited to the point of view
presented in this manual that norms do not
contain critical scores. These scores must be
established by users in accord with their
particular needs; and that the main function
of norms is to equate central tendencies and
measures of dispersion among the several
tests. By their use the score a subject makes
on one test can be compared accurately with
the score he makes on any other test. (AGS,
1969, 4)
9
the Two-Hand Turning and Placing Test. Two trials
were administered for each test.
TECHNICAL DATA (AGS, 1969)
Frequency Distributions
Table 2 presents the correlations between the four
MMDT tests and the success criterion. In addition
to Jurgensen's data, Table 2 includes validity
coefficients corrected for attenuation. Using the
correlation coefficients in Table 2, a multiple R of
0.61 between two of the tests (Turning and
One-Hand Turning and Placing) and the criterion
was obtained.
The nature of the frequency distributions that may
be expected by administering the MMDT to a
cross-sectional population-sample is illustrated by
Figures 4 and 5. These distributions were
accumulated in the period just prior to 1933 by
administering the tests to employed and
unemployed persons. The tests were administered
as group tests. The norms presented in Appendix A
for group testing are derived from these
distributions.
Intercorrelations
The intercorrelations among four of the tests are
reported in Table 3.
Reliability
Correlation with Another Motor Skill Test
Jurgensen (1943) determined reliability on four tests
of the MMDT by correlating time on first and
second trials and correcting with the Spearman-Brown formula. These results are presented in Table
1. Table 1 also includes estimates of the reliability
of two-trial and four-trial tests based on Jurgensen's
data.
Table 4 reports correlations that have been obtained
between two tests of the MMDT and the
Pennsylvania Bi-Manual Worksample (Roberts,
1945).
REPLACEMENT PARTS AND
REORDERING INFORMATION
Validity
A report by Jurgensen (1943) concerns the use of
the MMDT in a corporation that manufactures pulp,
paper and paper specialties. The group tested was
composed of men hired as converting machine
operators in the paper mill. The work required
occasional machine adjustments, but consisted
chiefly in removing a specified number of tissue
paper sheets from the machine, raising the top sheet
to insert advertising material, and placing the
package of sheets on a conveyer. All were
right-handed, high school graduates, aged 18 to 31
years. Three supervisors independently rated each
worker on a scale of 5. Ratings were converted to
T-scores, and the sum of the three T-scores was
used as the criterion of success. The reliability of
the criterion measure, estimated by the Spearman-Brown formula, was 0.75. The four tests
administered were the Placing Test, the Turning
Test, the One-Hand Turning and Placing Test and
We at Lafayette Instrument Company continue our
service after the sale by offering the following
replacement parts for the MMDT:
Disks……………………..# 32031
Board…………………….# 1-04811
Manual…………………...# MAN185
Score Sheets……………...# 32032
We can be contacted from 8:00am -5:00pm Monday
through Friday for pricing and ordering.
3700 Sagamore Parkway North
Lafayette, IN 47904 USA
Phone 765-423-1505, Fax 765-423-4111
USA Toll Free 800-428-7545 ext. 207
e-mail [email protected]
http://www.lafayetteinstrument.com
10
and 55 are equated to percentile points 31 and 69
respectively. These points represent the maximum
and minimum scores made by the middle 38 percent
of the normative population. The difference
between these two scores approximates the standard
deviation (SD) to equal 10, on the standard scale.
Furthermore, a standard score of 60 is a score one
standard deviation above the mean, and a standard
score of 30 is a score two standard deviations below
the mean, if the distribution is normal.
APPENDIX A
Group and Individual Norms Based on
Older Adult Unemployed
The norms and information presented in Appendix
A are taken from the 1946 manual for the
Minnesota Rate of Manipulation. These norms are
based on the distribution of scores obtained from
3,000 cases tested by the Employment Stabilization
Research Institute at the University of Minnesota.
The sample was comprised largely of adult, older,
unemployed people of the Depression era prior to
1946.
The stanine scale is simply the standard scale divided into nine categories. It is useful when punching
data into a card to be processed by an automatic
sorting machine. Each category in the stanine scale,
except the first and the ninth, is bounded by 5-point
intervals on the standard scale.
The unique feature of the norm chart is the use of
several equated scales, so for interpretation purposes, conversion from one to the other is automatic. They are equated on the assumption of a
normal distribution.
The verbal scale is merely a scale of broad categories. Thus, a subject described as having very
high ability would be an individual whose measured
ability score falls above 1½ standard deviation (SD)
from the mean. A high-ability subject’s score will
fall within a range of one SD from the mean. A
subject described as having average ability would
be an individual whose measured ability score falls
within the range of ½ SD above and below the
mean. A low-ability subject would fall within the
range of one SD below the mean. A subject with
very low ability would be an individual whose score
falls under 1½ SD below the mean.
Types of Interpretation Scales
Four scales are aligned on the left of the chart:
1. Percentile scale
2. Standard scale
3. Stanine scale
4. Verbal scale
The percentile scale is used when a score on a test
is interpreted in terms of percent of the normative
population surpassed by a subject making a
particular score. The midpoint 50 on the scale is the
median, representing that the score made by a
subject was better than 50 percent of the normative
population. In other words, percentile point 25
represents that a subject performed better than 25
percent of the normative population. Other
percentile points are interpreted similarly.
Norms
In the MMDT Interpretation Chart, the first two
columns of norms are used to interpret scores made
when the Placing and Turning tests are administered
as group tests, and when an examinee is given four
trials. All other entries constitute norms for tests
administered as individual tests. Separate norms are
given for use when the examinee is administering
four trials, three trials and two trials.
The standard scale is a statistical analysis of a
subject's score. It is derived from the normal
frequency curve. This curve is bell-shaped and not
rectangular like the frequency curve from which the
percentile scale is derived. Standard score 50, representing the mean (arithmetic average), is equated to
percentile point 50. Similarly standard scores 45
Norms were derived from data furnished by: W. A.
Ziegler, Clifford E. Jurgensen, Lindsey R. Harmon
John R. Roberts, and Mary Bauman. (AGS, 1969)
13
REFERENCES
American Guidance Service (1969). Minnesota Rate of Manipulation Test: Examiner’s Manual. Circle Pines, Minn.
Jurgensen, C. E. (1943). Extension of the Minnesota Rate of
Manipulation Test. Journal of Applied Psychology, 27, 164-169.
Magill, R. A. (1989). Motor Learning Concepts and Applications.
Iowa: William C. Brown Publishers.
Roberts, J. R. (1945). Pennsylvania Bi-Manual Worksample:
Examiner’s Manual. Circle Pines, Minnesota: American
Guidance Service.
16
Minnesota Manual Dexterity Test Score Sheet
MODEL #32023
Quick Reference Averages (50 Percentile) in Seconds
Based on Number of Trials
Two Trials*
Three Trials* ^
Four Trials*
Individual
Placing Test
123
183
242
Individual
Turning Test
99
146
192
Group
Placing Test
Not Applicable
155
236
Group
Turning Test
Not Applicable
124
195
* Data taken from the INTERPRETATION CHART
^ Data found in APPENDEX B for Group Testing averages based on three trials.
Subject Record
Name: _____________________________
Dominate Hand:
Right
or
Left
Reason for Administrating: _________________________________________________
________________________________________________________________________
Test Administrator Name: _________________________
Test Setting:
Group
or
Test Date:____ /____/____
Individual
Scoring Grid Based on Number of Seconds
Practice
Trial
Trial
One
Trial
Two
Trial
Three
Trial
Four
Total Score A** Score B**
Seconds
Placing Test
Turning Test
** Refer to the INTERPRETATION CHART and choose from the various SCALES.
You can use the Verbal Scale, Stanine Scale, Standard Scale, or Percentile Scale.
The Verbal Scale and Percentile Scale are the most commonly used.
LAFAYETTE INSTRUMENT ACTIVITY WHEEL COUNTER
LAFAYETTE INSTRUMENT MINNESOTA MANUAL DEXTERITY
Model 32023
Examiner’s Manual
Ordering Information:
All phone orders must be accompanied by a hard copy of
your order. All must include the following information:
1) Complete billing and shipping addresses
2) Name and department of end user
3) Model number and description of desired item(s)
4) Quantity of each item desired
5) Purchase order number or method of payment
6) Telephone number
DOMESTIC TERMS
There is a $50 minimum order. Open accounts can be extended
to most recognized educational institutions, hospitals and government agencies. Net amount due 30 days from the date of
shipment. Enclose payment with the order; charge with VISA,
MasterCard, American Express; or pay COD. We must have a
hard copy of your order by mail or fax. Students, individuals
and private companies may call for a credit application.
INTERNATIONAL PAYMENT INFORMATION
There is a $50 minimum order. Payment must be made in
advance by: draft drawn on a major US bank; wire transfer
to our account; charge with VISA, MasterCard, American
Express; or confirmed irrevocable letter of credit. Proforma
invoices will be provided upon request.
RETURNS
Equipment may not be returned without first receiving a
Return Goods Authorization Number (RGA).
When returning equipment for service, please call Lafayette
Instrument to receive a RGA number. Your RGA number will
be good for 30 days. Address the shipment to: Lafayette Instrument Company, 3700 Sagamore Parkway North, Lafayette, IN
47904, U.S.A. Shipments cannot be received at the PO Box.
The items should be packed well, insured for full value, and
returned along with a cover letter explaining the malfunction.
Please also state the name of the Lafayette Instrument representative authorizing the return. An estimate of repair will be
given prior to completion ONLY if requested in your enclosed
cover letter. We must have a hard copy of your purchase order
by mail or fax, or repair work cannot commence.
WARRANTY
Lafayette Instrument guarantees its equipment against all defects
in materials and workmanship to the ORIGINAL PURCHASER
for a period of one (1) year from the date of shipment, unless
otherwise stated. During this period, Lafayette Instrument
will repair or replace, at its option, any equipment found to
be defective in materials or workmanship. If a problem arises,
please contact our office for prior authorization before returning
the item. This warranty does not extend to damaged equipment
resulting from alteration, misuse, negligence or abuse, normal
wear or accident. In no event shall Lafayette Instrument be liable
for incidental or consequential damages. There are no implied
warranties or merchantability of fitness for a particular use, or
of any other nature. Warranty period for repairs or used equipment purchased from Lafayette Instrument is 90 days.
DAMAGED GOODS
Damaged equipment should not be returned to Lafayette
Instrument prior to thorough inspection.
When a shipment arrives damaged, note damage on delivery
bill and have the driver sign it to acknowledge the damage.
Contact the delivery service, and they will file an insurance
claim. When damage is not detected at the time of delivery,
contact the carrier and request an inspection within 10 days
of the original delivery. Please call the Lafayette Instrument
Customer Service Department for a return authorization for
repair or replacement of the damaged merchandise.
Lafayette Instrument Co. Europe
4 Park Road, Sileby,
3700 Sagamore Parkway North
Loughborough, Leics., LE12 7TJ. UK.
P.O. Box 5729 • Lafayette, IN 47903 USA
Tel: +44 (0)1509 817700
Tel: 765.423.1505 • 800.428.7545
Fax: +44 (0)1509 817701
Fax: 765.423.4111
E-mail: [email protected]
E-mail: [email protected]
www.lafayetteinstrument.com
3700 Sagamore Parkway North . PO Box 5729 . Lafayette, IN 47903 USA . Ph: 765-423-1505