1
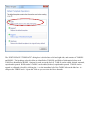
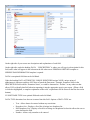
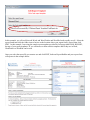
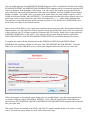
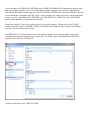
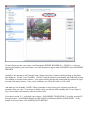
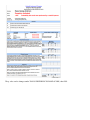
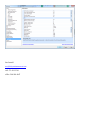
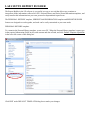
LAFAYETTE REPORT BUILDER The Report Builder in the LX software is a powerful yet easy to use tool that allows any examiner to incorporate all the information collected in a PF’s Personal History and Series/Exam Information templates, and easily transfer this information into your own personal or departmental report forms. The PERSONAL HISTORY template, SERIES/EXAM INFORMATION template and REPORT BUILDER features are designed to work together, and each can be easily customized to your own needs. PERSONAL HISTORY template: To customize the Personal History template, create a new PF. When the Personal History template is open, type in the required information (fields in red) such as name and date of birth, and click Default Template Operations in the lower left corner of this dialog box. Click EDIT at the DEFAULT TEMPLATE dialog box to make your changes. The “EDIT DEFAULT TEMPLATE” dialog box is divided into a left and right side, and consists of TABLES and ROWS. The headings colored in blue are identified as TABLES, and fields of information below each TABLE are identified as ROWS. Options for each are on the far left. TABLEs can be added, deleted, renamed, copied and/or pasted. ROWs under a TABLE can be added, deleted, copied and/or pasted. TABLEs can be opened or collapsed (closed) by clicking the -/+ to the immediate left of the TABLE title on the blue bar. A + collapses the TABLE and a – opens the Table so you can view the Rows beneath. On the right side of your screen are descriptions and explanations of each field. On the right side, under the heading DATA, “DESCRIPTION” is where you will type in a description for this field, and is what will appear in the column on the left when a new PERSONAL HISTORY template or SERIES/EXAM INFORMATION template is opened. DATA is an optional field that can be left blank. Under the heading DATA ATTRIBUTES, UNIQUE IDENTIFIER assigns YOUR unique string of alpha/numeric characters and does NOT have to match the Data name. Example: Examinee Name in the DESCRIPTION field could be “Examinee Name”, or could be shortened to “ ExNme” or any other text that allows YOU to identify that field when incorporating it into the appropriate spot in your report. (When a field is clicked or highlighted, a complete explanation of that cells’ requirements will be shown in the blue box at the bottom.) LX SOFTWARE TYPE is an optional field and can be left blank. DATA TYPE determines how the text is entered into this field. Options of DATA TYPE are: o Text - Allows data to be entered without any restrictions o Dropdown List - Displays a fixed list of strings in a dropdown list o Edit Dropdown List - Displays a fixed list of strings in a dropdown list but also allows the user to enter data into the field o Number - Allows only a number to be entered o o o o o o o o o o Date - Allows a date to be entered Yes/No - Displays the words 'Yes' and 'No' in a dropdown list. Phone Number - Allows a phone number to be entered in format '___-___-____'. Drug Reference - Allows you to choose a drug name from the drug reference. Current Time - The current time will automatically be entered into this field when it is present. Custom - Allows you to create a custom format to restrict how data is entered. Requires a mask to determine what characters are accepted and a mask literal to determine what the user sees Height (# rows) - Determines the height of this item. Set it to the number of rows you need to be displayed in order to fit all the text you want to enter into it. Read-Only - Set to 'True' to prevent the user from entering information in the data field, or set to 'False' to allow the user to enter information. Required - Set to 'True' to require this item to be entered and warn the user if it is not entered. Set to 'False' to not require this item to be entered. (EX: NAME and DOB are currently REQUIRED (set to TRUE) and (will appear in red), to signify this field must be completed) in the default template. You must complete these two fields, unless you change the data attribute to FALSE. STRIP - This setting is applied when sensitive information is removed from the PF. Options are: DO NOT STRIP - The text from this field is left in the PF. WHOLE VALUE - Any match of the entire text from this field will be removed from the PF. SEPARATE WORDS - Matches on any of the value's component words will be removed from the PF. Ideally, each examiner will edit the PERSONAL HISTORY and SERIES/EXAM INFORMATION templates, and add fields for information that are on your report form(s) and delete fields that are of no interest to you. Once you have customized the two templates by adding TABLES or ROWS and deleting un-necessary TABLES or ROWS, click OK at the bottom of the EDIT DEFAULT TEMPLATE dialog box. You are now ready to incorporate your report forms into the LX software. Your newly customized templates for PERSONAL HISTORY and SERIES/EXAM INFORMATION will be available in the next new PF file you create. Lafayette does have only one example report template and is called “FinalReport”. The majority of examiners are very proprietary about their reports and have put much effort and thought into a good report format. Because of this, most do not want to share their report forms with other examiners. If you have report forms that you would like to share, we will be happy to build a “forms library folder” and include these for others to use. And Pat, yours will be the first I ask for (wink). REPORT BUILDER – Getting Started Click FILE>REPORT>EDIT REPORT TEMPLATE. In this example, we will use Microsoft Word, and Word Perfect and WordPad work equally as well. Select the report format and click the folder icon to browse to the location where your report form is stored, then click EDIT. In this example, I am using the sample report template provided by Lafayette titled FINAL REPORT, but any of your report templates, IF you can browse to them on this computer and IF they are in Word, WordPerfect or WordPad can be used. Once you select the report file you want to use and click EDIT, both our Report Builder and your report form will open as in the example below. Now, the fields appearing in the REPORT BUILDER dialog box will be a compilation of all the fields in both EXAMINEE HISTORY and SERIES/EXAM INFORMATION templates that you customized using the EDIT feature as discussed in the beginning of this lesson. You will scroll to the location on your report form for each of the fields, and scroll to that particular field in the Report Builder, and click INSERT from the Report Builder. (Example – for NAME, place your cursor on the report where you want NAME to appear, scroll to NAME in the Report Builder, and click INSERT). The information from that field will be inserted where you placed your cursor on your report form, and will be surrounded with << >>. All the fields, including Start Time and Date, along with Questions Asked and their responses or ALL RELEVANT QUESTIONS can be inserted into your report at your desired location. Once you have all the fields in your report form completed with the insertion of the data for that field from the Report template, save the report form in the Lafayette software by clicking FILE, then SAVE AS, and browse to the location of your LX software (normally, Documents/My LX Software, double-click to open, and scroll to REPORT TEMPLATES. Click SAVE. You can store all your report forms documents in this folder (DOCUMENTS/MY LX SOFTWARE>REPORT TEMPLATES) for accessibility through LX software. To populate the report with the information from the PERSONAL HISTORY and SERIES/EXAM INFORMATION templates, with the new PF open, click FILE, REPORT and NEW REPORT. Using the folder icon, you can now BROWSE to any of your report templates and select the one you want to use. Follow the prompts by choosing the report format (here we used MS Word), select the report template (here we used the Lafayette sample called FINAL REPORT). Click CREATE and all fields of information are taken from the PF’s PERSONAL HISTORY and SERES/EXAM INFORMATION templates and are inserted into your report form. This report will now be included in the PF file, and if the PF copied to another location, the report is copied with it. For each new report format you need, follow these same steps. If you customize your PERSONAL HISTORY and/or SERIES INFORMATION templates and want to share them with a fellow examiner for use, or transfer them to another computer, create a new PF and when the PERSONAL HISTORY template appears, click EDIT DEFAULT TEMPLATE, then click EXPORT. Browse to your thumb drive destination and click SAVE. At the computer you want to copy this to, do the same thing (create a new PF, at the PERSONAL HISTORY click EDIT DEFAULT TEMPLATE, and click IMPORT. Browse to the thumb drive destination and click OK.) I hope this is helpful. Please call, email or text me if you need assistance. Perhaps by the next TALEPI seminar Lafayette will have a REPORT TEMPLATES folder full of different report formats from different examiners, for all to choose from and use. ANOTHER TIP – LX software allows you to take a photo snapshot of your subject while you are video recording and include the snapshot in your report form. To do this, while at the PERSONAL HISTORY template, on the left side, click PHOTO. At the next dialog box, click TAKE PICTURE. To insert the picture into your report, scroll through the REPORT BUILDER for <<PHOTO>> (with your report open) and place your cursor where you want the photo to appear, then click INSERT from the REPORT BUILDER. Normally I ask customer to NOT struggle with a feature more than 5 minutes without picking up the phone and calling me. For this, I say 15 minutes. I did NOT read the detailed, professionally and technically written User Manual we include in the software. I just started clicking and playing around with the software to figure out each of the many features. I have every confidence you will do the same, or CALL ME. And thank you for attending TALEPI! Please remember to always bring your computer and software questions when you come. I am always available to help you anytime with anything, and if I can’t figure it out, I can certainly reach someone who can teach us both. In our latest version 11.3, we include a new feature – ESS REPORT GENERATOR. To use this, open the PF and open a chart. Click SERIES/EXAM>SCORE>SHOW SCORE then SHOW SCORE SHEET. At the bottom of the score sheet, click GENERATE ESS REPORT. The p value can be changes under TOOLS/PREFERENCES/HAND SCORE, then ESS. Sue Luttrell [email protected] cell: 571-263-5310 office: 240-568-4047