1
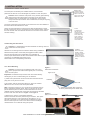
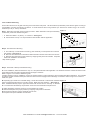
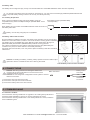
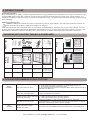
Solar Pack
Ref. 5118727B
EN Installation instructions
www.AVOutlet.com - Email: [email protected] - 1-877-271-5398
Contents
1. Introduction
2. Safety
2.1 Safety and Responsibility
2.2 Specific Safety Advice
3. Installation
3.1 Determine Location of Solar Panel
3.2 Mounting the Solar Panel
3.2.1 Glass Mounting
3.3 Battery State of Charge
3.3.1 Battery Preparation
3.4 Battery Tube Install Location
4. Connections
5. Commissioning
5.1 Activation of Motor
6. Product In Use
6.1 Normal Operation
6.2 Excessive Energy Use
7. Window Application Tables & Guidelines
8. Tips and Recommendations For Use
1. Introduction
The Solar Pack is a group of components that work in unison as a long life energy source for Somfy 12 Volt WireFree™ motors.
This Product is designed for indoor use only.
Contents of the Pack include:
(1) Solar Panel in Bezel
(1) Empty Battery Tube (for 10AA NiMH batteries #9018621
sold separately)
(1) Wire Harness
(1) Glass-Mount Adhesive
(1) Alcohol wipe
(1) Instructions
(1) Solar Panel Mounting Brackets (2” & 4”)
(1) Wall Mount Clips For Battery Tube (set of 2)
(1) Motor cable for connection to motors
referenced (#1001683, #1000494, #1000678)
Note: This product is designed to meet the energy requirements of Somfy 12 Volt WireFree™ Motor applications.This Solar Pack
should be used for «single motor shades», meaning that two (2) or more motors should never be connected to one (1) solar pack
source. Please reference the Solar Pack performance tables for recommended usage.
2. Safety
2.1 Safety and Responsibility
Before installing and using this product, please read the installation guide
carefully.
It is recommended that Solar Pack be installed by a professional motor installer,
for whom these instructions are intended.
Care must be taken for both new and existing installations due to the physical
mounting location of the motorized window covering - likely at the top of an
interior window.
Consequently, pay attention to your personal safety in regards to proper use of
ladders.
Care must also be taken to not drop hand tools or Solar Pack components from
an extended height.
Any usage outside of applications defined by Somfy constitutes noncompliance,
and is therefore not covered by the warranty. In this event, as for all usage not
consistent with the instructions given herein, Somfy accepts no responsibility
for harm or damage.
Never begin installing without first checking the compatibility of this product
with the associated equipment and accessories.
Power Sources for 12 Volt WireFree™ Motors
WireFree™
Motor
Battery
Tube
Solar Pack
Roll Up WireFree
√
√
Cord Lift WireFree
√
√
Tilt WireFree
√
√
Tilt&Lift WireFree
√
√
2.2 Specific Safety Advice
1) Never pierce the solar panel or its bezel frame.
2) Never put anything onto the solar panel (risk of scratching or breakage), especially during installation.
3) Once installed, never subject the wire harness or other components to strain, pinching, or cutting caused by moving objects.
4) Dispose of electronic components and batteries in accordance with local laws. Do not incinerate.
5) Never immerse this product in liquid (s).
6) Avoid Impacts
7) Do not recharge the batteries with any charger other than a Somfy Solar Charger #9018620.
The solar panel is a fragile part. Do not drop it. If Dropped, do not install as damage may not be visibly detectable and reduced
performance may occur.
Refer to the Instruction Manual or Contact your Somfy Representative.
www.AVOutlet.com - Email: [email protected] - 1-877-271-5398
3. Installation
3.1 Determine Location of Solar Panel
Motor side
The solar panel must always be installed indoors, and should be
positioned to allow as much natural light as possible to reach the panel.
Caution! Never install the solar panel on any window glass allowing
less than 65% light transmission (including Low E glass and/or
window tinting), or obstructed by a window pane or bug screen.
Always leave the photovoltaic cells unobstructed, do not put anything
in front of them.
Battery Tube:
Located near the
top of the window
frame and near the
motor side. May be
hidden from view.
The three components which make up the Solar Pack must be installed on
the same side as the WireFree™ motor.
Somfy recommends that all components be fitted systematically in order
that all components may be connected to the wire harness easily, and that
the wire harness does not interfere with the free movement of the interior
window covering.
Panel:
Located near
the top of the
window frame and
near the motor
side. When fully
open, shade or
fascia may help
conceal panel
from inside view.
3.2 Mounting the Solar Panel.
Caution! It is imperative that window hardware or framing does not
collide with the solar panel!
Installed:
When fully open,
shade or fascia
may help conceal
Solar Pack from
inside view. Wire
Harness is tucked
away.
Careful! Do not damage the wire harness cables during installation.
Determined the position of the solar panel (against window, within
reach of wire harness) prior to application of 2-sided tape to
insure proper adhesion the first time. Use brackets when direct-to-glass
mounting is not advisable (see section 3.2.2)
Please refer to the corresponding instructions.
3.2.1 Glass Mounting
Caution! To insure a secure adhesive hold over a long
period, prepare the inside window glass prior to mounting
the solar panel.
Figure 1.
Glass Mount Adhesive
Upper Liner
Important! The adhesive tape should never be touched directly
with fingers (or other contaminates) prior to adhesion.
1) Clean solar panel bezel corners and window area with alcohol
prep pad. Let dry for two minutes.
Adhesive
Master Liner
2) On a table, with the solar panel facing up, apply the 2-sided
adhesive to four corners of the solar panel bezel.
Note: The tape is precut for your convenience in between the top
(facer) and bottom (backer) liners. With your fingers, lift off each
precut adhesive piece so that it remains attached to the “facer”
material and the opposite side of the tape should then be released
from the back liner. See Photo in Figure 1 and Figure 2.
Figure 2.
Apply to all 4 corners
3) Remove the “facers” of the applied adhesive.
Position the bezel with solar panel facing to outdoors , then press
entire panel with firm, even pressure into the glass for 10- 15
seconds. The panel is now supported by the adhesive to glass
bond but will require 24 hours of cure time to allow full strength
characteristics. Do not disturb during this period.
Adhesive must stay with upper liner
when peeled away from master liner
www.AVOutlet.com - Email: [email protected] - 1-877-271-5398
3.2.2 Off Glass Mounting
These instructions are for off-glass mounting of the Solar Pack solar panel. Use the brackets (ref 9015897) when direct-to-glass mounting is
not advisable, including the following conditions : to avoid collisions with moving windows (ex. casement or double-hung) or to mount to
headrails (2» Tilt) or «roll-up cassettes».
Figure 1.
Step 1. Determine best solar panel mounting Location. Attach brackets to solar panel assembly
so that solar panel faces towards the glass.
4”
• A. Offset from Glass = 0” (Flush) – 4” maximum. See Figure 1.
• B. Choose either 2” drop or 4” drop brackets for best location with the application.
4”
3”
3”
2”
2”
1”
1”
0”
0”
Figure 2.
Step 2. Window Frame Mounting:
4”
• A. For inside top of window frame mounting, place assembly in exact position and mark the
hole location. See Figure 2.
• B. Remove Solar Panel from brackets and affix brackets to window frame with wood screws.
• C. Reinsert Solar Panel into proper position by snapping solar panel into brackets. Complete
Solar Pack Installation as instructed.
Skip remaining steps.
3”
2”
1”
0”
Step 3. Head Rail or Roll-Up Cassette Mounting:
A. If new installation, determine whether 2” drop or 4” drop brackets best fit the application. The brackets should be oriented so that the solar
panel will have direct access to daylight without blockage or shadows.
Refer to Figure 1 for maximum offset from glass.
If existing window covering installation, remove the window shade in order to determine which brackets best fit the application. The brackets
should be oriented so that the solar panel will have direct access to daylight without blockage or shadows. Refer to Figure 1for maximum
offset from glass.
B. Depending upon head rail or cassette design, choose the horizontal or vertical hole orientation
which provides best placement for mounting screws. Mark exact hole locations. See Figure 3.
Note: Cassettes will likely require upper hole location with screws driven in vertically. 2” venetian
tilt or cord lift head rails will likely require lower screw hole and horizontal screw placement.
Figure 3.
C. Utilize self-tapping machine screws to mount brackets into position.
D. Reinsert solar panel into proper position by snapping solar panel Into brackets.
E. Mount Interior Window covering assembly into window.
F. Complete Solar pack installation as instructed.
www.AVOutlet.com - Email: [email protected] - 1-877-271-5398
3.3 Battery Tube
The battery tube is shipped empty. Somfy recommends batteries 10 AA NiMH #9018621 which are sold separately.
To maintain user safety and ensure optimum performance, you must use Low Discharge (2000mAh) NiMH batteries that
incorporate safety venting. Failure to do so may void Somfy warranty.
3.3.1 Battery Preparation
Have a service professional fully charge the battery using the
compatible Somfy Solar Pack Rapid Charger (Ref #9018620 - Solar
Pack Charger).
Solar Pack Charger (Ref #9018620)
-sold separately.
Open battery tube and install 10 AA NiMH batteries inside as shown on
the battery tube label.
Battery must be fully charged prior to installation.
3.4 Battery Tube Install Location
SOLAR PACK BATTERY TUBE
MOUNTING CLIPS (OPTIONAL)
Once the batteries installed in the tube, the battery tube assembly can be secured and
hidden from view either behind, inside or next to the window covering product hardware. Shangri La Mount Clips
REF# 9013266
The battery tube is compatible with Somfy Mounting Clips designed for Shangri-La
(REF# 9013266) & Silhouette® (REF#9013264) window covering products.
For outside of headrail mounting, battery tube wall mounting clips (#9013263) are
included in the pack, for either vertical or horizontal positioning.
For blinds with box head rails, room may exist to place the battery inside the rail without
Headrail Mounting
interference.
Silhouette Mounting Clips
REF# 9013264
Headrail Mounting
Caution! If installing the battery vertically, always position it with the cable output
upwards to reduce unrestrained wire from catching the shade.
Vertical Battery Tube connector orientation
4. Connections
Caution! The wiring harness connecting the Solar Pack
Motor Connector
components must be protected from the movement of the
motorized window covering.
Caution! Do not change the configuration of this system to include
different connectors.
1) Connect the wire harness to the motor.
2) Connect the solar panel to the wire harness
3) Connect the battery tube to the wire harness
Battery Tube
Connector
Solar Panel
Connector
5. Commissioning
5.1 Activation of Motor
If the Solar Pack is being installed as an upgrade to an existing Somfy WireFree™
motorized shade installation, there is no need to reprogram the motor.
If the Solar Pack is being installed with a new Somfy WireFree™ motor, follow the
motor installation guide.
Standard Installation Plan of Roll-Up Shade.
www.AVOutlet.com - Email: [email protected] - 1-877-271-5398
6. Product in Use
6.1 Normal Operation
After commissioning, the battery is trickle-charged by electrical energy generated by the solar panel. The energy is stored in the high
capacity NiMH battery (acting like a reservoir) and the system provides uninterrupted service through many climatic seasons. It is
normal for the battery to gain more energy in summer as compared to winter – the Solar Panel converts the intensity of light to energy
upon availability.
6.2 Excessive Energy Use
Caution! If daily motor activations exceed recommended cycles per day as stated in the Solar Pack Performance Chart, the
solar panel will not be able to “replenish” the battery as designed.
If the motorized shade does not operate due to an excessively diminished battery, the battery may require a full recharge. This may
be done with a Somfy Solar Pack Charger (#9018620). If the battery no longer provides adequate power to operate your motor, new
NiMH batteries should be installed in the battery tube. There should be no need to replace any other Solar Pack components.
Avoid
SINGLE OR
DOUBLE PANE OK
LIGHT
TRANSMISSION
65% OR GREATER
WINDOW TINTING
INSIDE WINDOW
ONLY
FIXED WINDOW
DOUBLE HUNG
SLIDING
CASEMENT
Concern
Suggestions
AWNINGS OR DEEP WINDOW DIVIDERS
ROOF EVES
OVERLAPPING
SOLAR PANEL
Avoid
Moving
Window
Window Type
7 Window Application Tables & Guidelines
Clean Install
VEGETATION
BLOCKING LIGHT
BUG SCREENS
Caution:
Caution:
Caution:
Avoid Panel Collision Avoid Panel Collision Panel Movement Will
tug or tear Harness
Limit Screw in track
Limit Screw in Track Cable tie near corner
8 Tips and recommendations for use
During
Installation
The motor does not work
1. Verify wires have secure connection, and that wires are not cut.
2. Verify battery has been charged to 100%.
3. See Troubleshooting Section of Specific Motor (Roll-Up,Cord-Lift, Tilt or
Tilt &Lift User Manual).
Solar Panel does not adhere to
glass after initial application.
1. Remove panel and adhesive. Clean glass with glass prep pad. Dry.
Apply new adhesive as directed.
Sliding window collides with solar 1. Install a window bumper to prevent collision.
panel after mounting.
2. Install optional solar panel mounting bracket.
Solar Pack loses charge
BEFORE 3-5 years of use.
After
Installation
Solar Pack loses charge
AFTER 3-5 years.
1. Recharge battery to 100% with Solar Pack Charger #9018620.
2. Review Section 7.0 Window Application Tables & Guidelines or request
Solar Pack Performance Chart to service provider.
Purchase new 10AA NiMH batteries and install them in the battery tube.
www.AVOutlet.com - Email: [email protected] - 1-877-271-5398